[edit]
First Steps[edit]
To get started with MiWorkplace is really simple:
- Download MiWorkplace
- Extract the content of the zip file
- Start MiWorkplace
- Create a server connection
- Done, congratulations ... now you can start browsing and editing your source code.
You don't need to install anything on the server. Just make sure that the needed TCP servers are started, see Requirements.
Connections[edit]
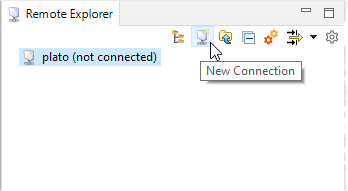
Connections are the starting point for working with the IBM i server. Connections can be created via the context menu (right-click in the Remote Explorer view) or the main menu (Main Menu ⇒ New ⇒ Connection). A name for the connection and the server name or IP address must be entered to create a connection. The username is optional.
Adding a Connection[edit]
Select "New Connection" (![]() ) from the context menu. A wizard will open.
) from the context menu. A wizard will open.
Basic Connection information[edit]
Enter the system descriptio, the ip-address and an option user.
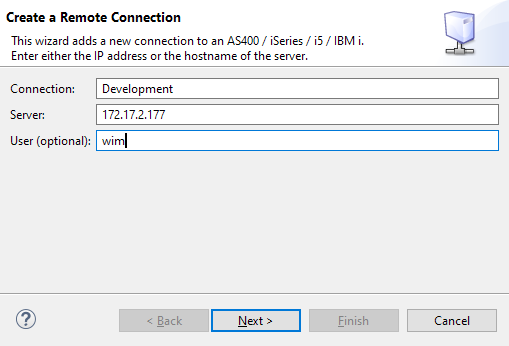
Press "Next >"
Which Libraries to show in the Remote Explorer[edit]
The next screen determines which libraries should be listed in the remote explorer.
The Remote Explorer will only list libraries that were explicitly added by you.
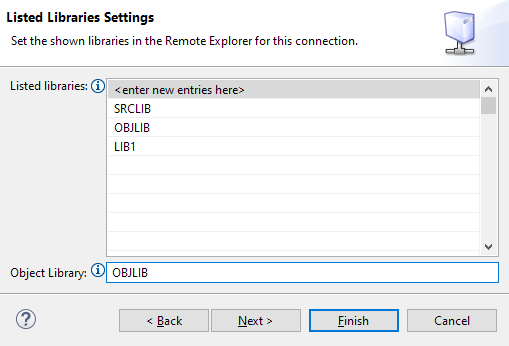
- Listed Libraries
Enter the libraries one by one. To delete a library from the list, just select the cell and make it empty.
- Object Library
When you enter the object library, it can be used as a variable substitution ${object_library} in Compiles and Actions.
Press "Next >"
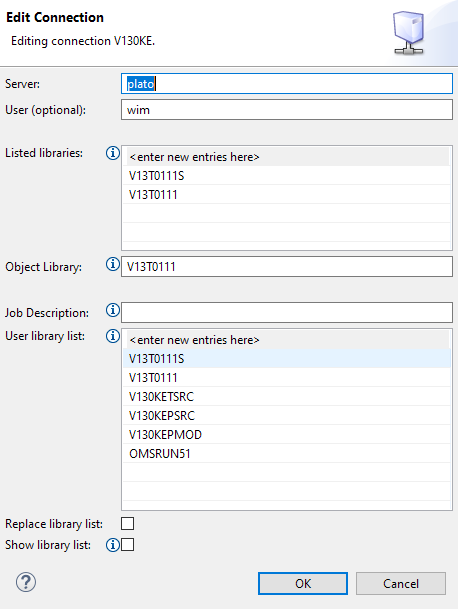
Library List Settings[edit]
The last page determines the library list of your connection.
Libraries can be repositioned by using drag and drop
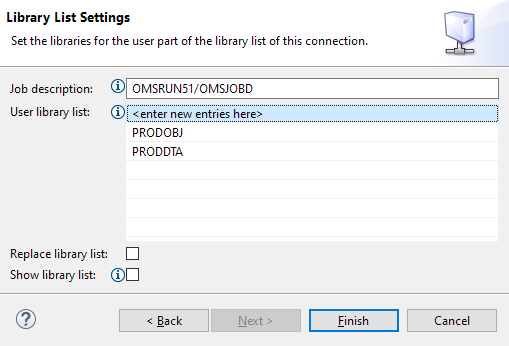
- Job Description
The initial library list entries of the job description will be added to the end of the user library list. Enter the job description name or library/name.
- User Library list
Specify the library list. You can change or remove entries by clicking on the cell. You can move the order of the library by drag and drop.
- Replace Library list
Tick this if you want the library list of the job replaced or extended.
- Show library list
Tick this if you also want to see the libraries in the library list in addition to the libraries you list in the "Listed Libraries" table.
Connection properties can be changed if the connection is closed(see Connection Context Menu ⇒ Edit).
Press "Finish" to create the connection
Changing the Connection[edit]
If the connection is disconnected, you can use the "Edit" menu option to change all the attributes of the connection.
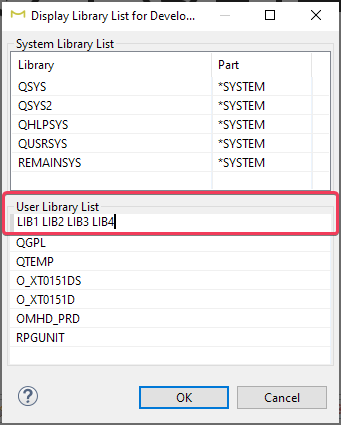
Library List[edit]
The library list is defined in the connection, but it can be changed on the fly by using the context menu on the remote explorer connection.
The library dialog shows the system and the user part of the library list. You can change the user part of the library list by:
- drag and drop to reorganize to sequence
- by adding a new library in the top cell of the user library list.
- replace an entry by typing over its name
- removing an entry by blanking its name (start from the bottom)
Press OK to update the initial library list in the connection and set the job's library list.
A list of comma- or space-separated libraries can be entered into the entry field of the library list editor.
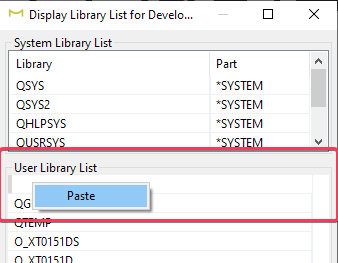
You may also copy the library list from the green screen and paste it into the field. However, since the copying from the green screen contains special characters, you need to use the "Paste" context menu as shown below.
Key Bindings[edit]
Key bindings provide a quick way to execute an action. Using your keyboard over your mouse has various health advantages.
Remote Explorer Key Bindings[edit]
| CTRL + C | Copy selection |
| CTRL + V | Paste selection |
| CTRL + SHIFT + C | Compile |
| CTRL + O | Open source member (directly) |
| DEL | Delete selection |
| F2 | Rename object / source member |
| F5 | Refresh selection |
Editor Key Bindings[edit]
| F4 | Prompt (CL and CMD) |
| ALT + ARROW UP | Move line(s) |
| ALT + ARROW DOWN | Move line(s) down |
| ALT + J | Join lines |
| CTRL + + | Increase Font (Zoom in) |
| CTRL + - | Decrease Font (Zoom out) |
| CTRL + Space | Content assist |
| CTRL + A | Select all |
| CTRL + C | Copy |
| CTRL + D | Delete line |
| CTRL + E | Execute Script (from Script Editor) |
| CTRL + ENTER | Split a comment line. |
| CTRL + F | Open Find / Replace Dialog |
| CTRL + K | Find Next |
| CTRL + L | Go to line |
| CTRL + P | |
| CTRL + S | Save |
| CTRL + V | Paste |
| CTRL + X | Cut |
| CTRL + Y | Redo |
| CTRL + Z | Undo |
| CTRL + SHIFT + C | Compile |
| CTRL + SHIFT + D | Duplicate line |
| CTRL + SHIFT + K | Find Previous |
| CTRL + SHIFT + / | Toggle Comment |
| DEL | Delete character |
| SHIFT + ENTER | Add new line at the end of the line |
| SHIFT + TAB | Shift left |
| TAB | Shift right |
Remote Explorer[edit]
The Remote Explorer is the heart and starting point of the application. In the Remote Explorer, the connections to the IBM i servers are managed and the QSYS and root file system in the IFS can be browsed. The libraries, source, and stream files can be managed. Actions like create, delete, rename, copy, paste, etc. are supported.
Toolbar Actions[edit]
You can hover over the toolbar actions ![]() to find the explanation for each icon:
to find the explanation for each icon:
 Filesystem
- Toggle between IFS () and Library (
 ) file system view
  Create a New Connection
 Go Up
Go Up- Use this in combination with "Go Into" on the context menu of the tree items
 Collapse all
- Collapse all items in the tree
 Open the License Editor
 Press the button to open the filter editor.
- (Press the drop-down (
 ) to activate and de-activate filters)
  Preferences
- Opens MiWorkplace specific preferences
Connections[edit]
Connections are the starting point for working with the IBM i server. Connections can be created via the context menu (right-click in the Remote Explorer view) or the main menu (Main Menu ⇒ New ⇒ Connection). A name for the connection and the server name or IP address must be entered to create a connection. The username is optional.
The password is not stored in the connection properties and must be entered on every connection attempt.
Connection properties can be changed if the connection is closed(see Connection Context Menu ⇒ Edit).
Remote Explorer Key Bindings[edit]
| CTRL + C | Copy selection |
| CTRL + V | Paste selection |
| CTRL + SHIFT + C | Compile |
| CTRL + O | Open source member (directly) |
| DEL | Delete selection |
| F2 | Rename object / source member |
| F5 | Refresh selection |
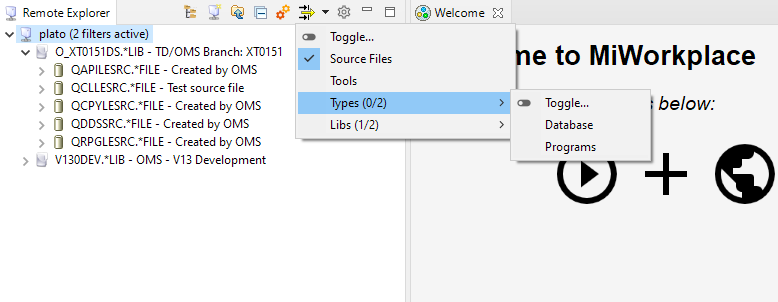
Select a Filter[edit]
Filters can be activated and de-activated by selecting them in the filter drop-down menu.
- Using the Toggle... function will switch all filters in the menu on or off in one go.
- The number of filters and active filters is visible behind the group name. Libs(1/2) means that 1 out of 2 available filters are active in that submenu.
Filters[edit]
Filters are used to restrict the number of visible items in the remote explorer.
Once a filter is created, it can be activated and de-activated from the drop-down menu.
- If no filters are active
- All items (libraries, objects, directories and files) will be visible.
- If filters are active
- All items that are selected by the filter are visible
You can stack multiple filters to quickly hide or show a set of items.
Filter Configuration[edit]
The Filter Configuration Dialog can be reached by pressing the Filter icon (![]() ) on the Remote Explorer toolbar.
) on the Remote Explorer toolbar.
Use the combo box to select a filter.
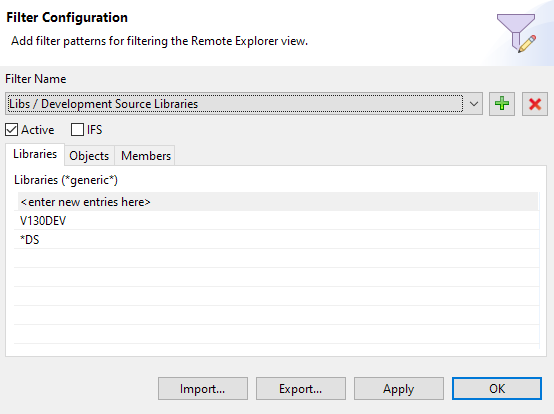
- Import...
- Imports filters that were previously exported.
- Export...
- Exports your filters to a file.
- Apply...
- Saves the filters without leaving the dialog. Use this before you select another filter from the combo box.
- OK
- Saves the filters and closes the dialog.
 Adds a new filter.
- It will copy a filter if one was selected from the combo box.
 Deletes a filter
- Active
- This toggles the activation of the filter. A filter is active when the box is checked.
- IFS
- This filter is applicable when the IFS view is shown. Check the box to make the filter available for IFS items.
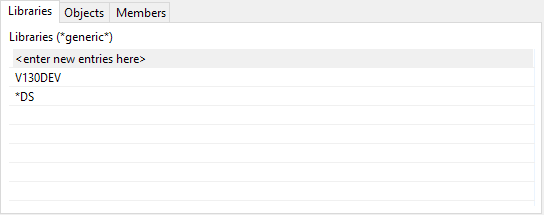
- Libraries
- Use this tab to add library names that you want to be visible. If you don't specify anything here, then all libraries will be shown. However, other filters can restrict the number of visible libraries.
- Libraries(*generic*): Specify zero or more qualified object names or masks like *DS to filter all libraries ending with DS.
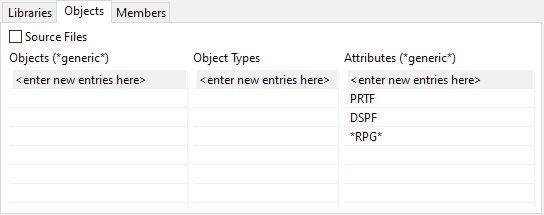
- Objects
- Use this tab to filter objects on the name, type, and object attribute (not source attribute). If you don't specify anything here, then all objects will be shown. However, other active filters can restrict the number of visible objects.
- Source Files : This is a shorthand selection to select source files.
- Objects (*generic*): Specify zero or more qualified object names or masks like PG* to filter all objects starting with PG
- Object types: Specify the object types to show like *PGM, *FILE, etc...
- Attributes (*generic): Specify the object attributes to show. These can be generic like RPG* which would select objects with RPG, RPGLE, etc...
- Members
- Use this tab to filter source members on name and source attribute. If you don't specify anything here, then all objects will be shown. However, other active filters can restrict the number of visible objects.
- Members (*generic*): Specify zero or more qualified member names or masks like PG* to filter all members starting with PG
- Member Attributes (*generic): Specify the member attributes to show. This can be generic like *RPG* which would select RPG, RPGLE, SQLRPG, SQLRPGLE, etc...

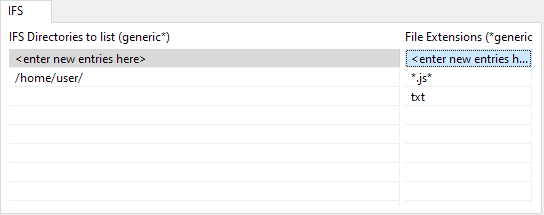
- IFS
- Use this tab to filter IFS directories and files. If you don't specify anything here, then all will be shown. However, other active filters can restrict the number of visible objects.
- IFS Directories to list (*generic*): Specify zero or more qualified directories like /home/user/* to show everything starting from this directory in the following format:
- /home/user -> Shows only this directory but no directory contents. Use other filters to reveal additional content.
- /home/user/ -> Shows this directory and all subdirectories. Use other filters to reveal files.
- /home/user/* -> Shows this directory with all its content. No other filters are required.
- File Extensions (*generic): Specify the file extensions that you want to show. This can be generic like *RPG* which would select RPG, RPGLE, SQLRPG, SQLRPGLE, etc...
- Using * shows all files
Adding Filters[edit]
You can create a new filter by pressing the add icon (![]() ) on the filter configuration dialog.
) on the filter configuration dialog.
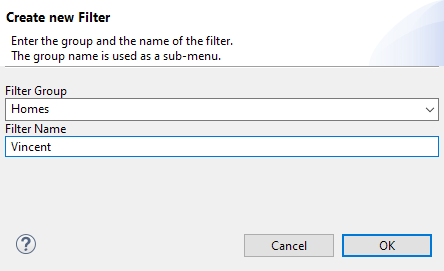
- Filter Group
- If you use a filter group, the filter will be visible in a submenu. If you leave the group blank, the filter will appear in the top level menu.
- Filter Name
- This is the name of the filter.
Press OK to add the filter or Cancel to close the dialog without creating a new filter.
Select a Filter[edit]
Filters can be activated and de-activated by selecting them in the filter drop-down menu.
- Using the Toggle... function will switch all filters in the menu on or off in one go.
- The number of filters and active filters is visible behind the group name. Libs(1/2) means that 1 out of 2 available filters are active in that submenu.
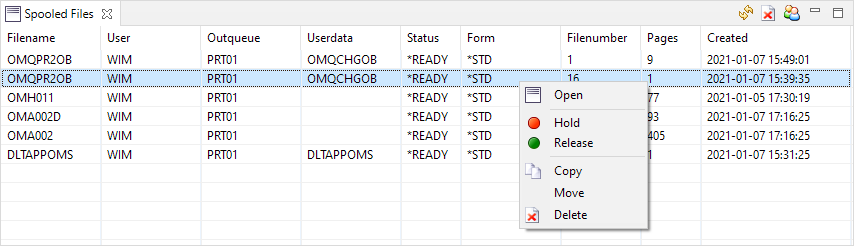
Spooled Files[edit]
The application can manage and show spooled files. The view Spooled Files lists the spooled files of the connection associated with the current selection in the Remote Explorer view.
Initially, the view will only show your spooled files.
 The list of spooled files can be refreshed by clicking on the button Refresh in the toolbar of the view.
 Delete All deletes all listed spooled files. Spooled files not listed the view are not deleted.
 and
and  will toggle between showing all or only your spooled files. Showing all spooled files can take a very long time to complete.
- Actions
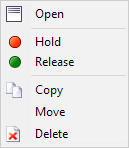
The spooled file entries in the view have a context menu (right click on entry) to work with the spooled file. You can also select multiple entries with CTRL+CLICK or select a range by using SHIFT+CLICK. Press CTRL+A to select all entries in the list.
The available actions are
- Open spooled file in an extra view (read only)
- Hold (do not print) the spooled file
- Release after Hold (make ready for printing)
- Copy to another output queue
- Move to another output queue
- Delete
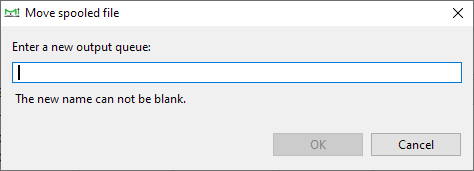
- Move or Copy a Spooled file
After selection of the move or copy action, a dialog box appears where you can enter the name of the target output queue.
Jobs[edit]
Jobs on IBM i are an essential part of the development lifecycle. This part of developing applications is integrated into MiWorkplace.
It enables you to:
- Make one or more filters to list specific jobs
- Interact with the job
- Show the job log messages in a way aimed at quick troubleshooting
- Show the spooled files of the job
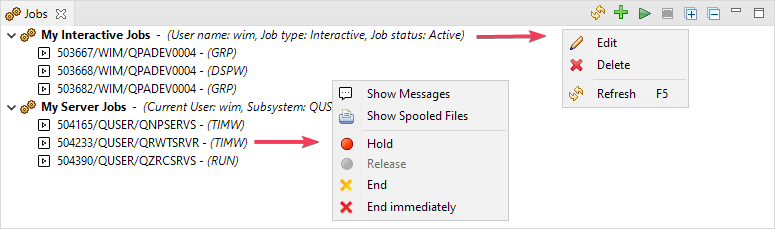
The Jobs view with a context menu for Jobs and Job filters.
Job Filter[edit]
The Jobs view lists various jobs that can be selected and grouped via job filters. So first, a job filter must be created. A new job filter can be created via the context menu of the view or via the button 'New Job Filter' (![]() ) in the toolbar of the view.
) in the toolbar of the view.
Jobs View[edit]
Once a connection is active and at least one job filter has been created, the Jobs view is populated with job entries from the IBM i server. The job entries can either be retrieved automatically every x seconds or manually (using the global or local "Refresh" (![]() ) action via the toolbar or the context menu of a job filter). The interval can be configured in the MiWorkplace preferences. An extra job for retrieving the job entries can be started (
) action via the toolbar or the context menu of a job filter). The interval can be configured in the MiWorkplace preferences. An extra job for retrieving the job entries can be started (![]() ) and halted (
) and halted (![]() ) from the toolbar of the Jobs view. The job's current state is displayed on the right side of the status line at the bottom of the application window.
) from the toolbar of the Jobs view. The job's current state is displayed on the right side of the status line at the bottom of the application window.
 is displayed when the job entries retrieving thread is running and is just actively retrieving a set of job entries.
 indicates that the thread is running but currently sleeping. No job entries are currently retrieved from the IBM i server.
 means that the thread for retrieving job entries has been stopped or was never started.
The context menu of a job entry in the Jobs view allows to hold, release or end a job.
Job Filter[edit]
The Jobs view lists various jobs that can be selected and grouped via job filters. So first, a job filter must be created. A new job filter can be created via the context menu of the view or via the button 'New Job Filter' (![]() ) in the toolbar of the view.
) in the toolbar of the view.
The following dialog appears:
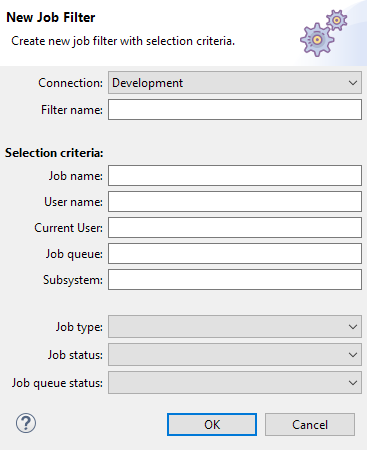
For a job to be displayed in the Jobs view, it must match every job filter criterion.
The job filter is only created for one connection. You can create several job filters per connection.
Messages[edit]
Using the context menu of a job, the job messages can be viewed in an extra view.
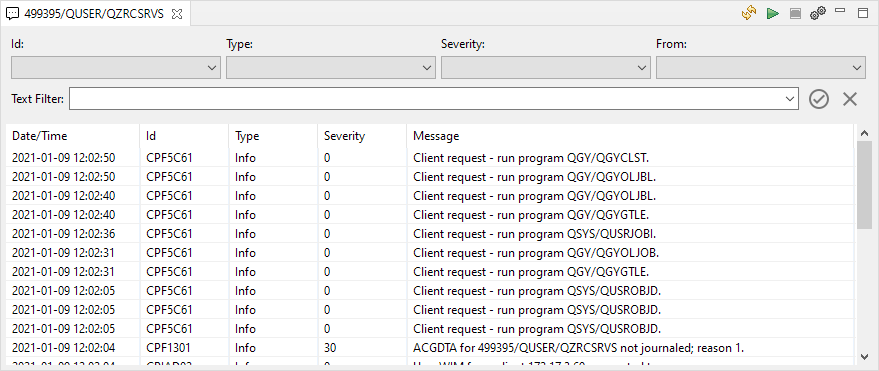
At the top of the view is a filter section that can be used to filter the messages. The message can be automatically retrieved from the IBM i server by using the start (![]() ) and stop (
) and stop (![]() ) buttons. The toolbar of the view has a refresh button (
) buttons. The toolbar of the view has a refresh button (![]() ) which retrieves new messages when you press it.
) which retrieves new messages when you press it.
The drop-down boxes in the filter section only contain entries that are part of the list. This enables you to scan the log quickly.
The input box enables you to enter a search term. The search terms will be remembered for this session.
The view can be sorted by column by clicking on the column of your choice.
 - Applies the filters to the list
 - Resets all the filters
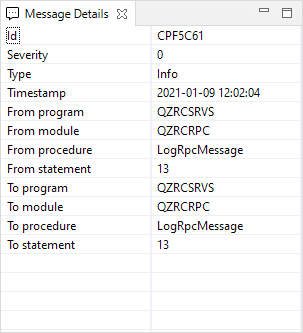
Message Details[edit]
A Message Details view can be displayed via the Show View menu in the main menu. It displays the message details by selecting the message in the Messages view.
Remote Search[edit]
MiWorkplace provides a dialog and a search result view for searching libraries, source files, source members, or directories on the server. The functionality is similar to the FNDSTRPDM (Find String Using PDM) IBM i command. In fact, the search can use FNDSTRPDM as a search engine or QSHELL's GREP command.
The search dialog can be accessed via the main menu Search ⇒ ![]() Remote Search (MiWorkplace).
Remote Search (MiWorkplace).
Search Dialog[edit]
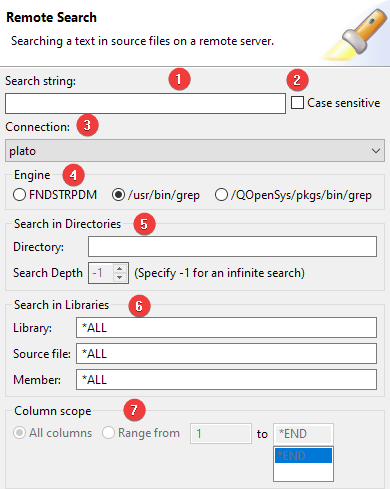
Use the search dialog to enter your search criteria:
- (1) Search string
- Enter the search string. When using the GREP engine you are able to supply a regular expression that is allowed by the grep command. You can find the syntax on the internet.
- (2) Case sensitive
- Check this box if you want the search to be case sensitive.
- (3) Connection
- The connection to be used of the search. This will be filled in automatically based on what you have selected in the remote explorer or based on the previous search.
- (4) Engine
- The search engine to use. You can choose between FNDSTRPDM and GREP. With FNDSTRPDM you can only search source files. With GREP you can also search the IFS. Please read the manuals on /usr/bin/grep and /qopensys/pkgs/bin/grep on how to specify the search field.
- (5) Search in Directories
- Specify the Directory to search. If you enter something here, the library fields will be disabled. Clear the directory to enable the library fields. You can use the Search Depth field to determine how many levels deep the search must go. Specify -1 to search all sub-directories. Please note that a deep search can be slow to complete.
- (6) Search in Libraries
- Specify the Library name or *ALL for all libraries defined in the connection. Specify the Source file or *ALL for all source files. Specify the Member or *ALL for all members.
- (7) Column scope
- When using FNDSTRPDM you can limit the search between two columns.
Search Result[edit]
After the search finished, the result of the remote search is automatically displayed in the Search Result view.
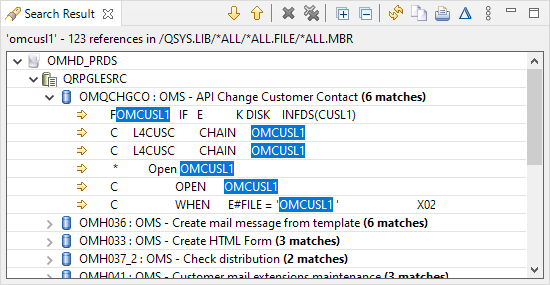
The search string is highlighted in the search result entries.
Double-clicking on the search result entry will open the source member and go to the corresponding line selecting the search string in the line. If the entry does not appear the first time, please double-click the same entry again, after the file has opened.
By using ![]() Show Previous Match and
Show Previous Match and ![]() Show Next Match you can navigate through the search result entries in the opened source member.
Show Next Match you can navigate through the search result entries in the opened source member.
The search can be executed again by pressing the ![]() Refresh button.
Refresh button.
The search result of previously executed searches are cached and can be selected by the view menu of the view toolbar.
The search result can also be ![]() copied to the clipboard or
copied to the clipboard or ![]() printed.
printed.
Pressing the ![]() icon will fetch the member descriptions.
icon will fetch the member descriptions.
Previous Searches[edit]
All searches in this session are saved in the "kebab" menu ![]() .
.
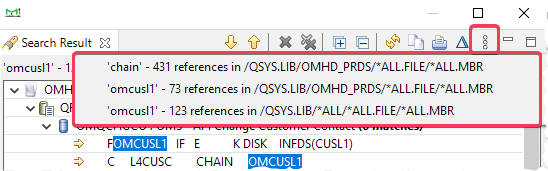
Selecting a saved search will run the search again.
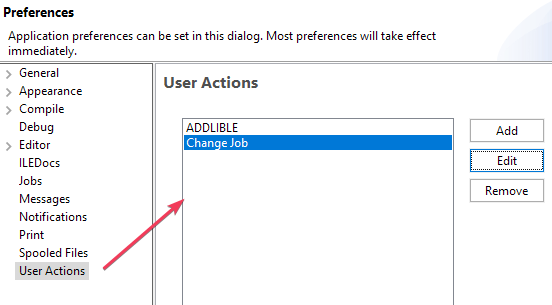
User Actions[edit]
Commands can be started from the Remote Explorer by defining user actions and selecting them from the context menu of the Remote Explorer.
User actions can be managed in the preferences.
Main Menu ⇒ Window ⇒ MiW Preferences ⇒ User Actions
A user action is one command. It does not support multiple commands. You can create a CL with multiple commands, which can be executed as a user action.
Adding a User Action[edit]
User actions contain functionality that will enhance your workflow.
- Promptable User Actions: User actions are now promptable, allowing you to execute actions with a simple click instead of typing them manually.
- Command Prompting on Addition: When adding a user action, you can now prompt the command, making setting up and modifying actions on the go easier.
- Improved Variable Insertion: Enjoy better support for variable insertion, making it more convenient to integrate and automate actions with variables.
- Execute on Multiple Entries: Save time by executing user actions on multiple entries simultaneously. Perform actions across a batch of items efficiently.
- Type-Specific Selection: Customize your user actions by selecting them for specific entry types. Tailor your workflow to match your needs.
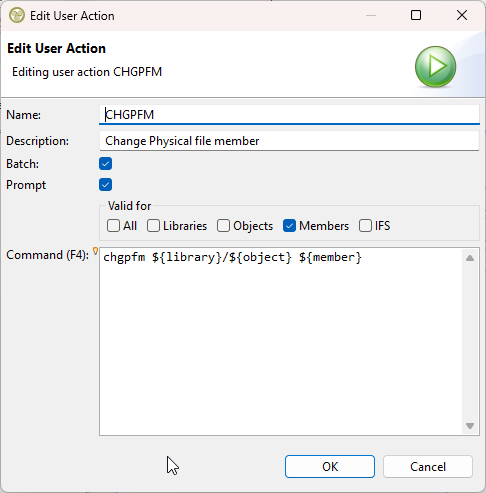
Placeholders[edit]
Placeholders are supported so that you can pass the name of the current selection in the Remote Explorer to the user action command. The placeholder names are case sensitive.
- ${connection} — selected connection name
- ${library} — selected library name
- ${object} — selected object name
- ${member} — selected member name
- ${path} — see ifsPath
- ${ifspath} — IFS path of the selected resource
- ${type} — type of the selected object or member
- ${attribute} — attribute of the selected object
- ${user} — name of logged in user
- ${streamfile} — selected stream file name
- ${basename} — base name of the selected stream file (example.rpgle => example)
Execution[edit]
All defined user actions are available from the context menu in the Remote Explorer.

Batch[edit]
As a default, all user actions are executed interactively which blocks the UI until the user action is finished.
User actions can be defined to be executed in "Batch". This means an extra thread is started on the PC which executes the user action command which does not block the UI.
Note: In "Batch" mode no job will be submitted with SBMJOB on the IBM i server. The batch handling is done on the PC. A new thread is started which executes the command.
Console[edit]
The console is a generic output window. It may contain the output of a script or any other function that wants to display a result.