Introduction[edit]
Remain API Test is an API client that makes it easy for developers to test OpenApi requests. This is done by allowing users to create and save simple and complex HTTP/s requests, as well as reading and validating their responses.
Remain API Test is integrated with Remain API Studio to make it easy to test the oas3 files. The tests can be saved and replayed. Tests can also put in test cases. This makes API testing more efficient and less tedious.
Requests are the core functionality of the Remain API Test. We can create a new request by right-clicking on requests to open the request editor. We can then select the HTTP method to use, specify the URL for the request and configure parameters, headers, and body of requests.
Creating Request[edit]
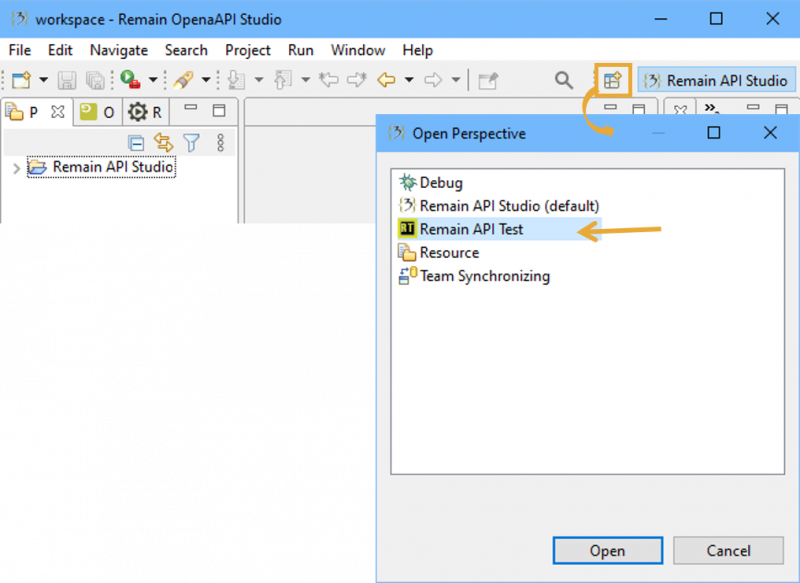
Open the Remain API Test perspective.
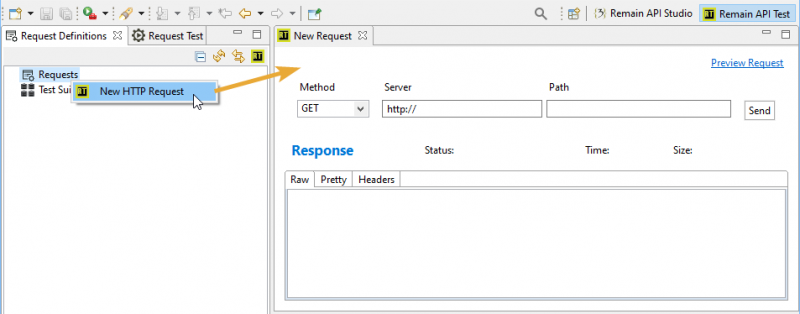
Go to the Request Definitions view and select the node Requests > mouse right-click and click on New HTTP Reequest.
The request editor can be also directly opened from the top toolbar button ![]() of the view.
of the view.
Simple Request[edit]
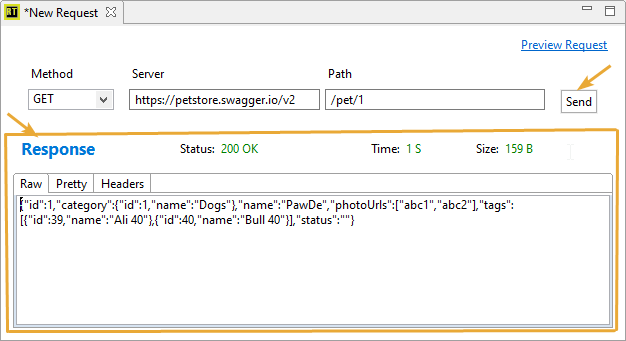
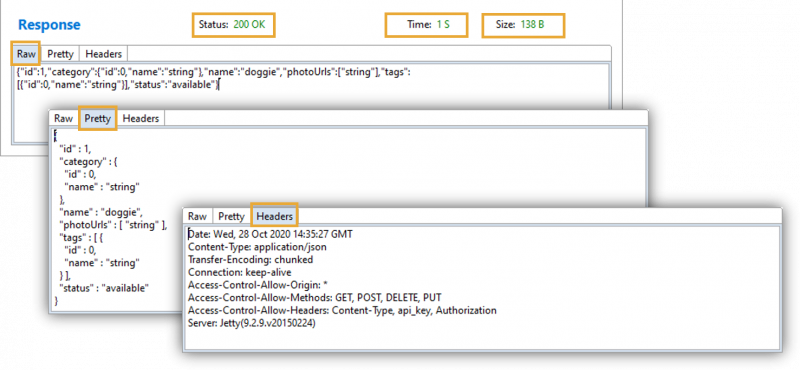
A simple request contains a method, server, and a path. Click on the Send button to test the request. The retrieved response will be displayed as shown in the following figure:
Save Request[edit]
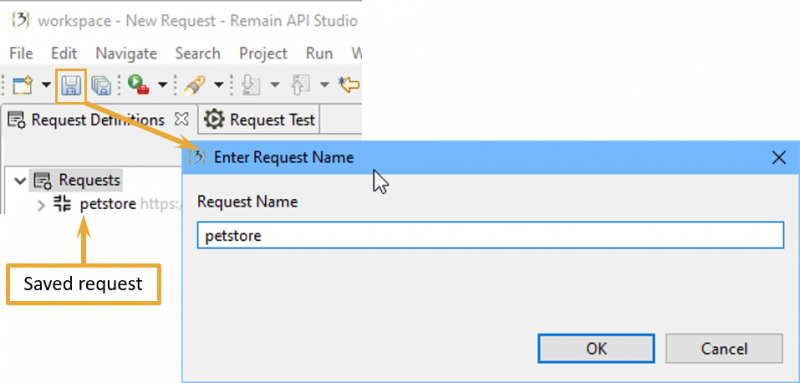
Click on the Save toolbar button to save the request. Specify the request name en click on OK. The saved request will be displayed as a child of the Requests item.
Advanced Request[edit]
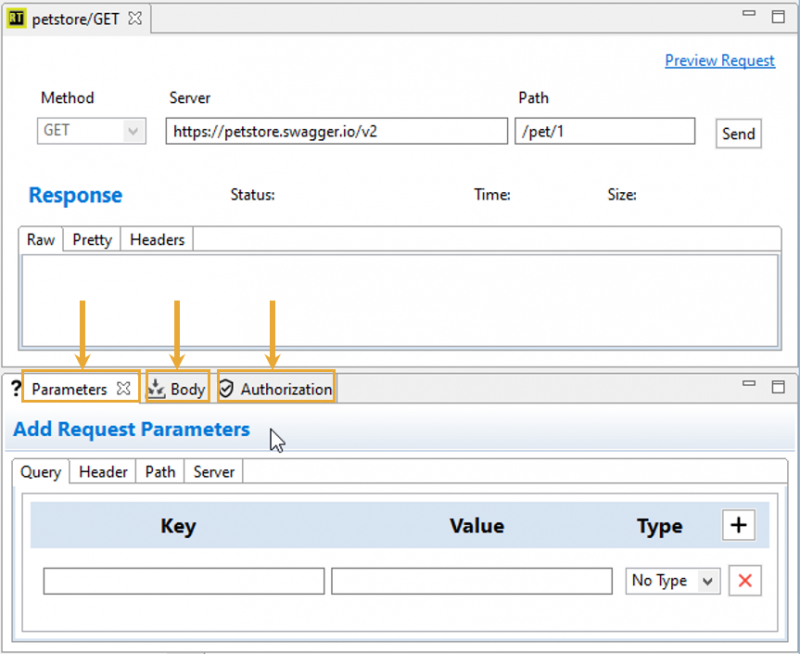
An advanced request contains besides the above basic elements the parameters, body, and authorization. These elements are represented as views.
Request Editor[edit]
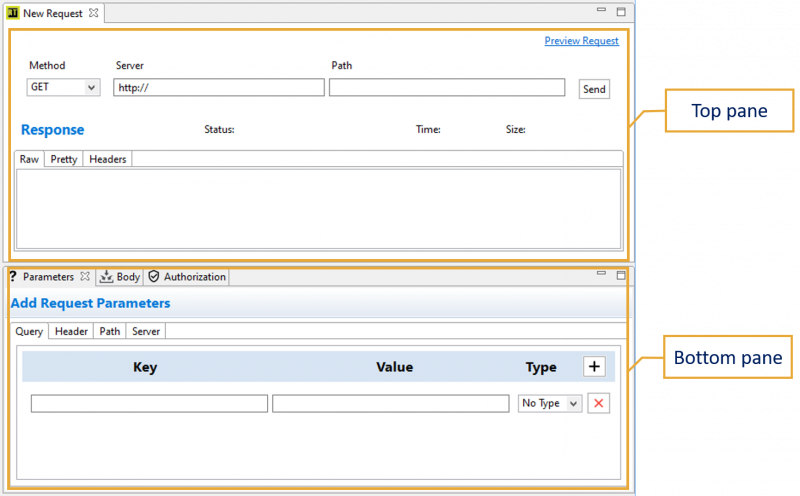
The Request Editor is designed to provide a simple way to create, execute, and store information about HTTP requests.
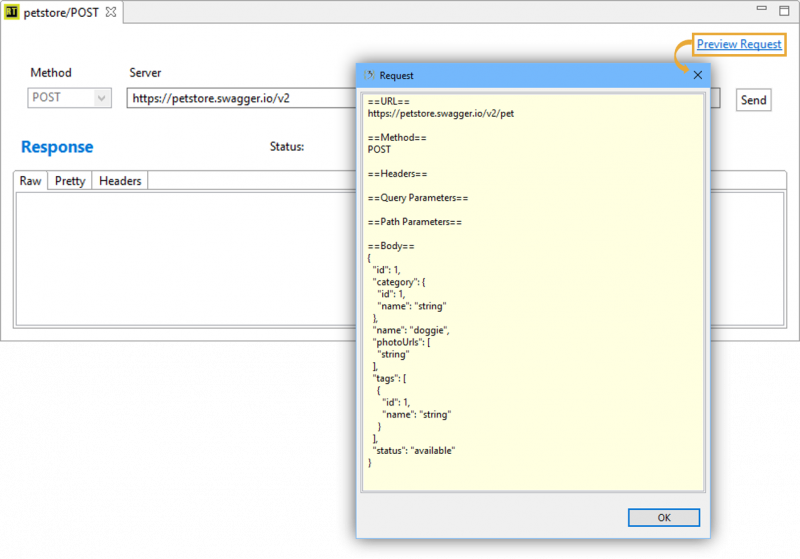
The top pane in the Request Editor is where you can provide HTTP method, Server and Path, execute the request and explore the data received from the server. The Preview Request button is added to the top of the pane to display all used request elements at once in a simple view.
The bottom pane displays the request parameters, body, and authorization.
The following request methods are supported:
- GET
- POST
- PUT
- DELETE
- PATCH
- HEAD
- OPTIONS
- TRACE
- CONNECT
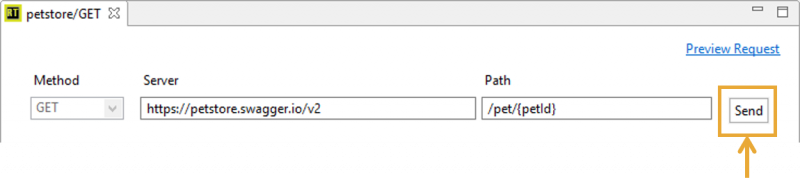
To execute the Request click the Send button.
Analyzing Request Responses[edit]
After the request is sent to the server, the server sends the response to the client. The server response is shown in the tabs Row, Headers, and in the labels Status, Time, and Size.
- Row tab displays the server response body.
- Headers tab displays the server response headers.
- Pretty tab displays the pretty printing of the server response body(JSON,HTML).
- Status label displays the server response status code followed by status text.
- Time label displays the server response time.
- Size label displays the size of the server response body.
Request Parameters[edit]
Request parameters are used for avoiding unnecessary data duplication in requests or for providing an easy way of switching between the development and production environments. They can be used inside request query, path, and server. Each request parameter is represented by a case-sensitive identifier surrounded by curly braces.
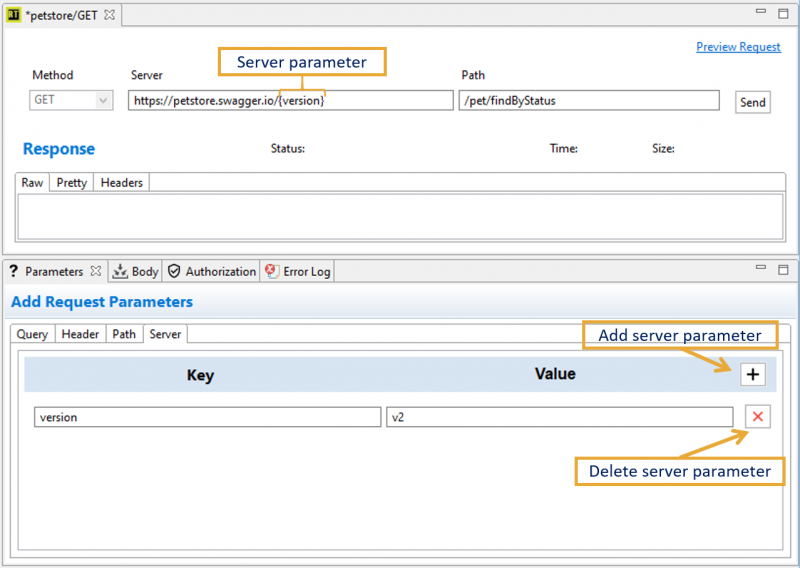
Server Parameters[edit]
You can add server parameters to a request using the Request Editor and Server tab from the Parameters view. From the Request Editor add the parameter {version} to the server URL, and from Server tab add the parameter key and value. Click on the save button to save the request changes.
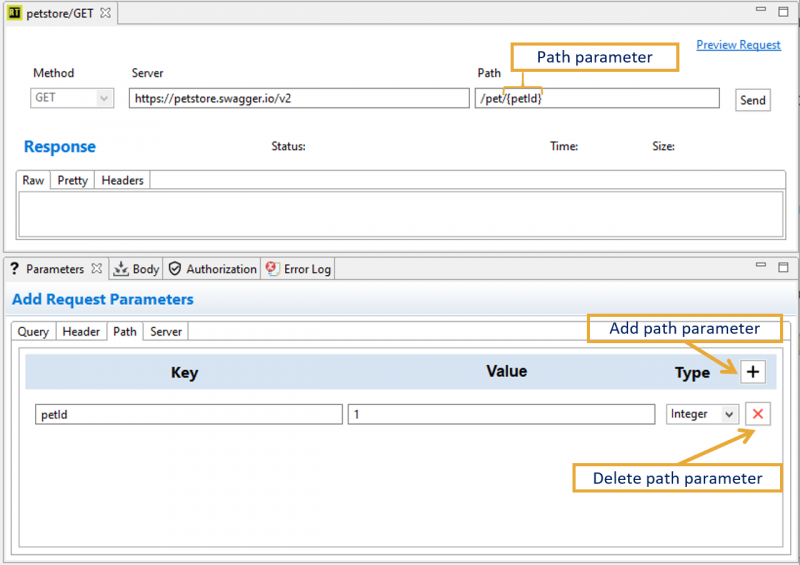
Path Parameters[edit]
You can add path parameters to a request using the Request Editor and Server tab from the Parameters view. From the Request Editor add the parameter {petId} to the server URL, and from Server tab add the parameter key and value. Click on the save button to save the request changes.
Header Parameters[edit]
You can add header parameters to a request using the Header tab from the Parameters view. After adding the header parameters click on the save button to save the request changes.

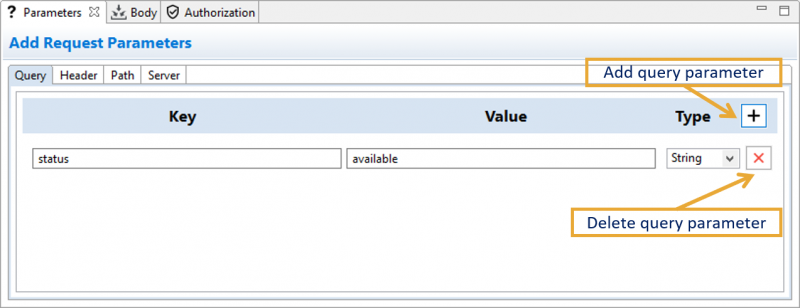
Query Parameters[edit]
You can add query parameters to a request using the Query tab from the Parameters view. After adding the query parameters click on the save button to save the request changes.
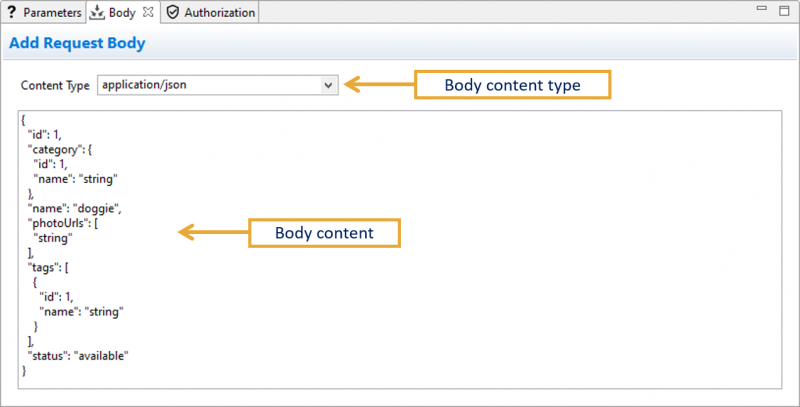
Request Body[edit]
You can add a request body using the Body view. Select the content type > add the body content > click on the save button to save the request changes.
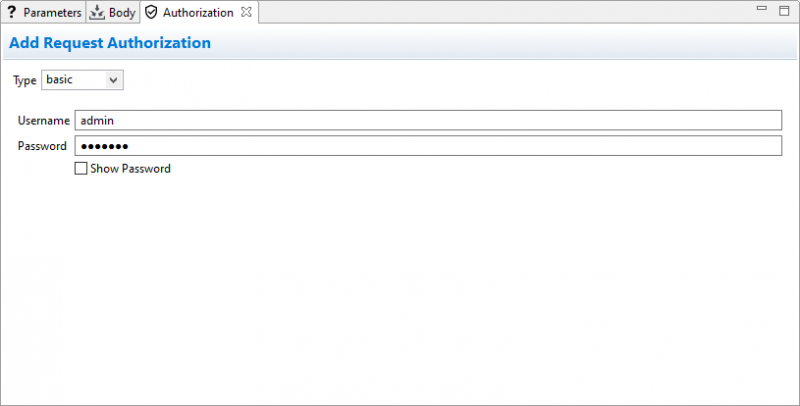
Request Authorization[edit]
You can add request authorization using the Authorization view. Select the authorization type > add the authorization information > click on the save button to save the request changes.
Request Details Viewer[edit]
To see all request details at once open the request editor > press the Preview Request button.
Managing Requests[edit]
This section explains how to manage existing requests:
Delete Request[edit]
Select the request to be deleted, right mouse click and click on Delete.
[[Image:deltet_request.png|border|600px]|border]
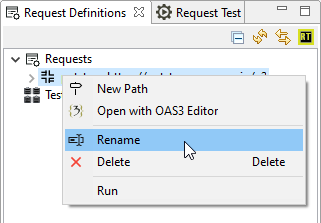
Rename Request[edit]
Select the request to be renamed, right mouse click and click on Rename.
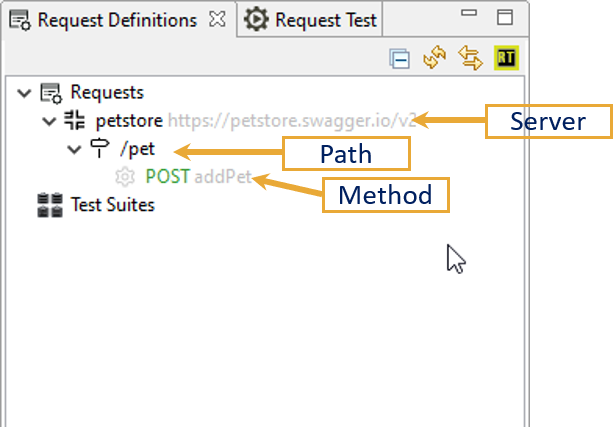
Request Structure[edit]
The basic elements of the request are represented as tree items.
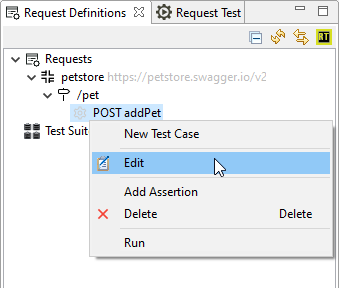
Edit Request Method[edit]
Select the method to be edited, mouse right-click > click on Edit.
Delete Request Mehtod[edit]
Select the method to be deleted, mouse right-click > click on Delete.
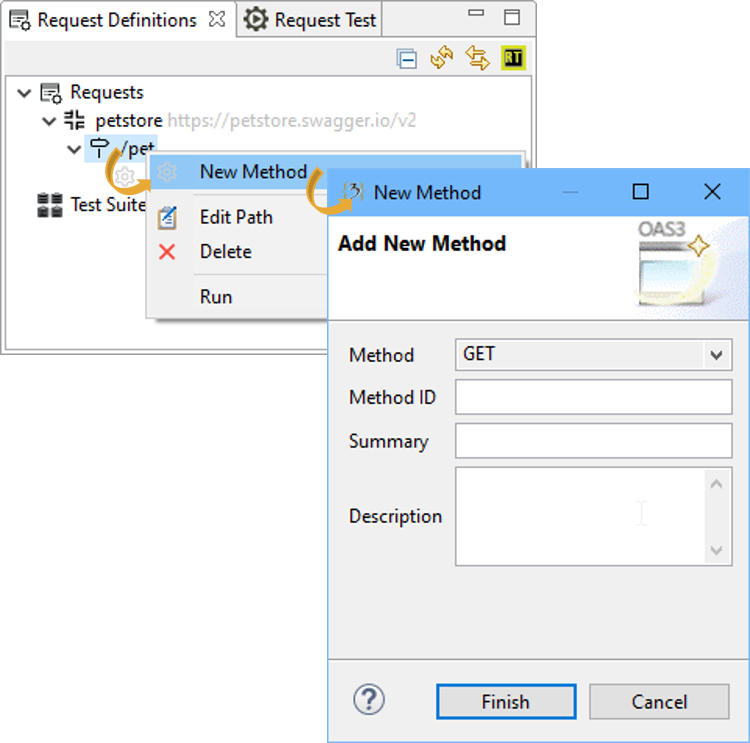
Add Request Method[edit]
Select a request path > mouse right-click > click on New Method > Select the new method from the displayed dialog and eventually the extra method information > click on Finish. The created method will be displayed as a child of the path node.
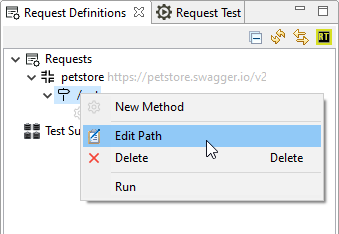
Edit Request Path[edit]
Select the path to be edited, mouse right-click > click on Edit Path.
Delete Request Path[edit]
Select the path to be deleted, mouse right-click > click on Delete.
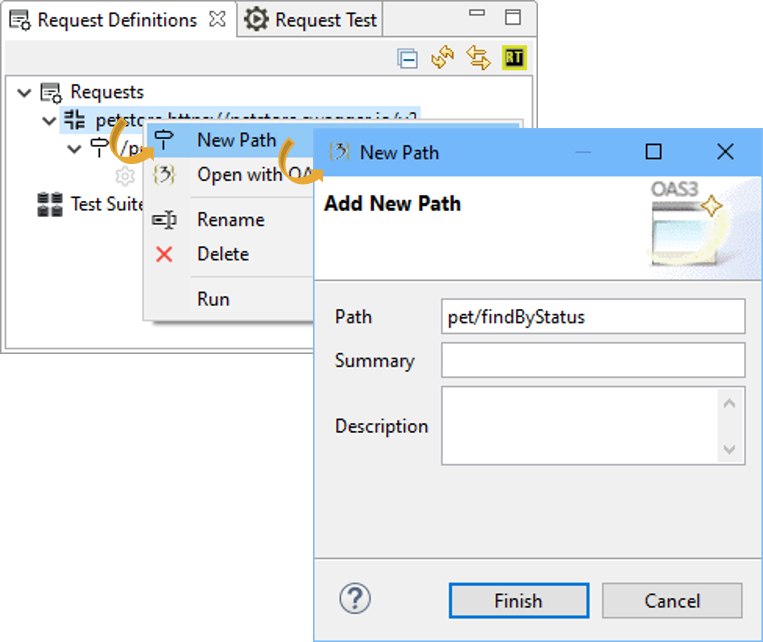
Add Request Path[edit]
Select a request node > mouse right-click > click on New Path > enter the pathname on the displayed dialog and eventually the extra path information > click on Finish. The created path will be displayed as a child of the request node.
Import and Export Request[edit]
To import a request select requests folder, mouse right-click > click on Import.
To export a request select the request to be exported, mouse right-click > click on Export.
Testing Request Mehtods[edit]
The chapter create request illustrates how to test a method from the request editor. In the following, we are going to show you how to test one method, path methods, and request methods from the definitions view.
Test One Request Method[edit]
Select the method to be tested > right mouse-click and click on Run.
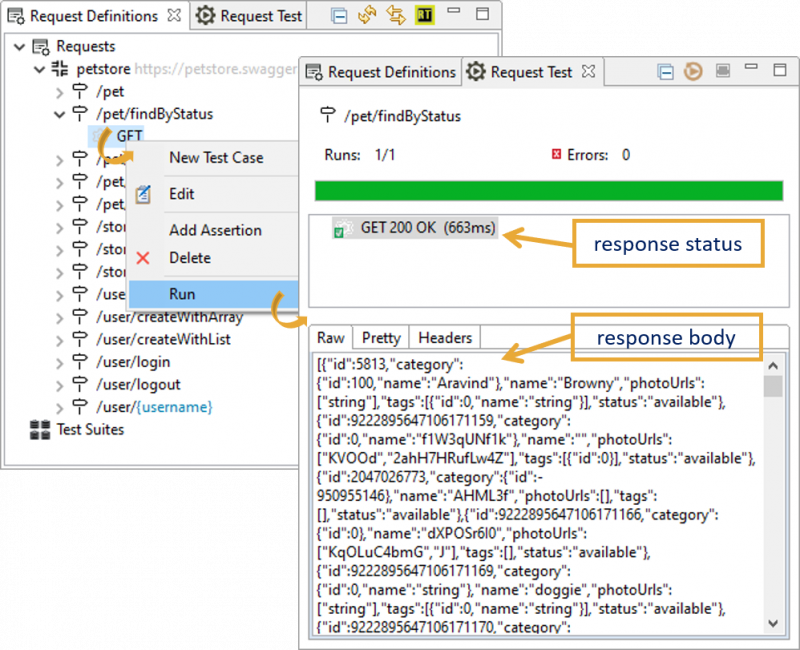
Test Request Path Methods[edit]
To test all related methods to a path select a request path > right-mouse-click and click on Run.

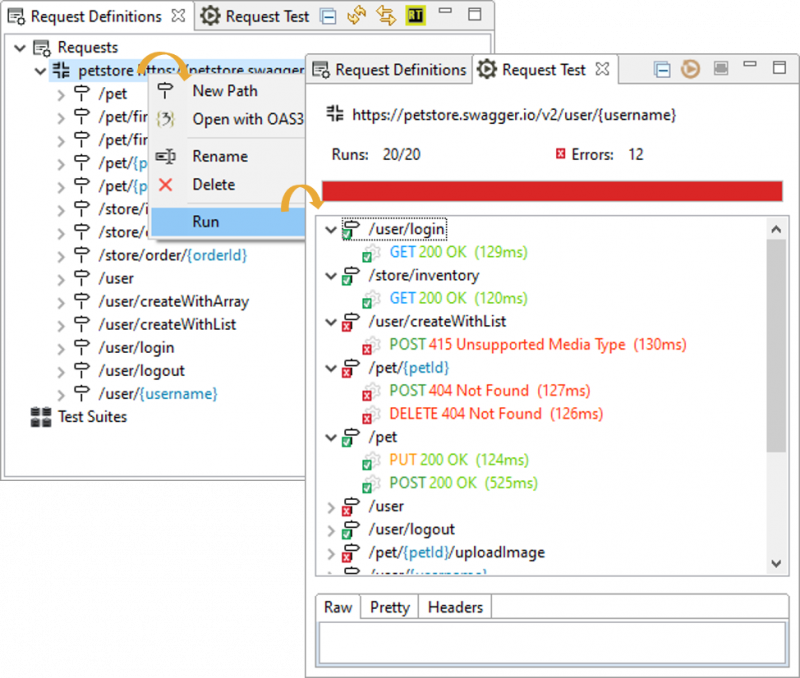
Test All Request Methods[edit]
To test all request methods select a request > right mouse-click and click on Run.
Managing Tests[edit]
Test Structure[edit]
OpenAPI Test structures functional tests into three levels; TestSuites, TestCases, and Assertions.
- TestSuite is a collection of TestCases that can be used for grouping functional tests into logical units.
- TestCase is a request method that can contain a collection of Assertions. You can add any number of TestCases to a containing TestSuite.
- Assertions are pre-defined variables with values that can be asserted on the request-response to ensure that a request is working as expected.
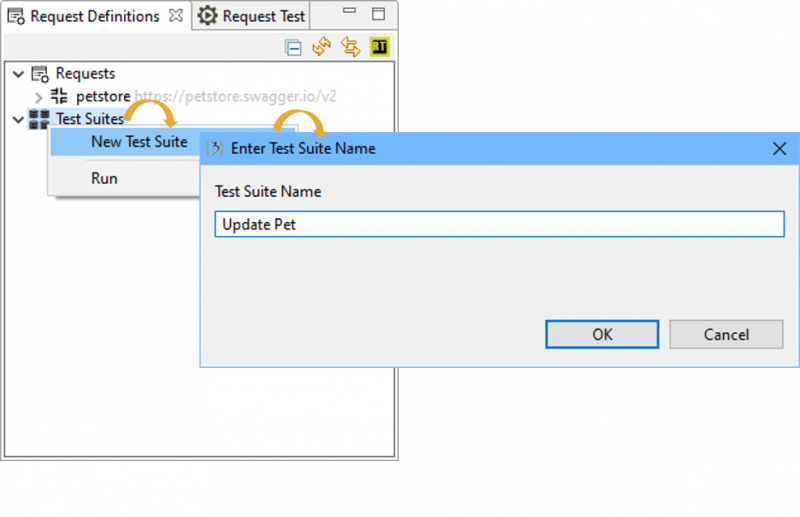
Create TestSuite[edit]
Select Test Suites node from the definitions view > right mouse-click and click on New Test Suite > enter the test suite name on the displayed dialog and click on OK. The created test suite will be displayed as a child of the test suites node.
Rename TestSuite[edit]
Select a test suite > right mouse-click and click on Rename > enter the name of the test suite and click on Ok.
Delete TestSuite[edit]
Select a test suite > right mouse-click and click on Delete > Klick on Ok.
Create TestCase[edit]
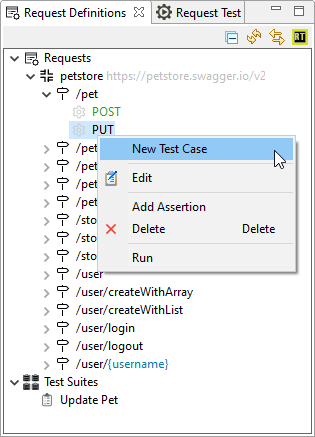
Select a method from a request node > right-mouse-click and click on New Test Case > new test case dialog will be displayed.
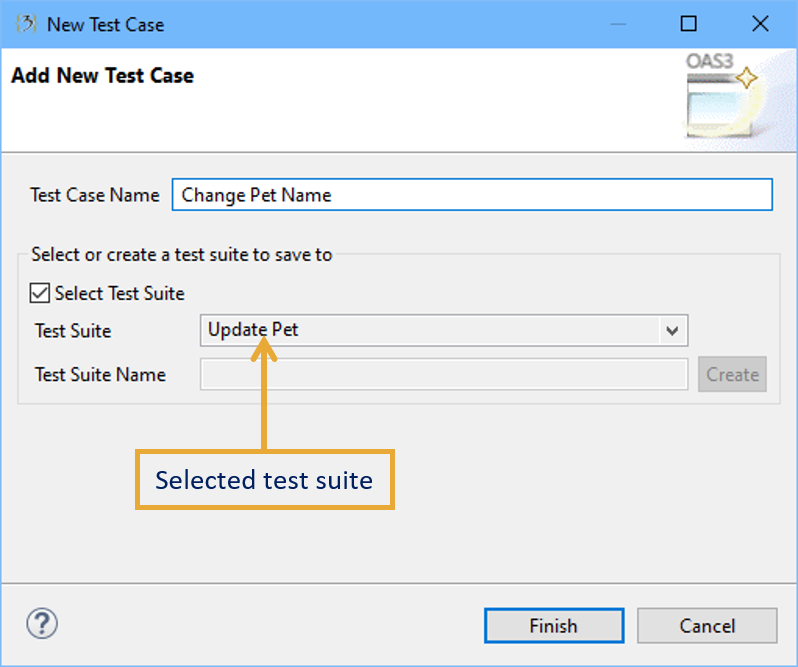
The following test case dialog will create and add the test case to the selected test suite.
Enter the name of the test case and select an existing test suite > click on Finish. The created test case will be displayed as a child of the test suite.
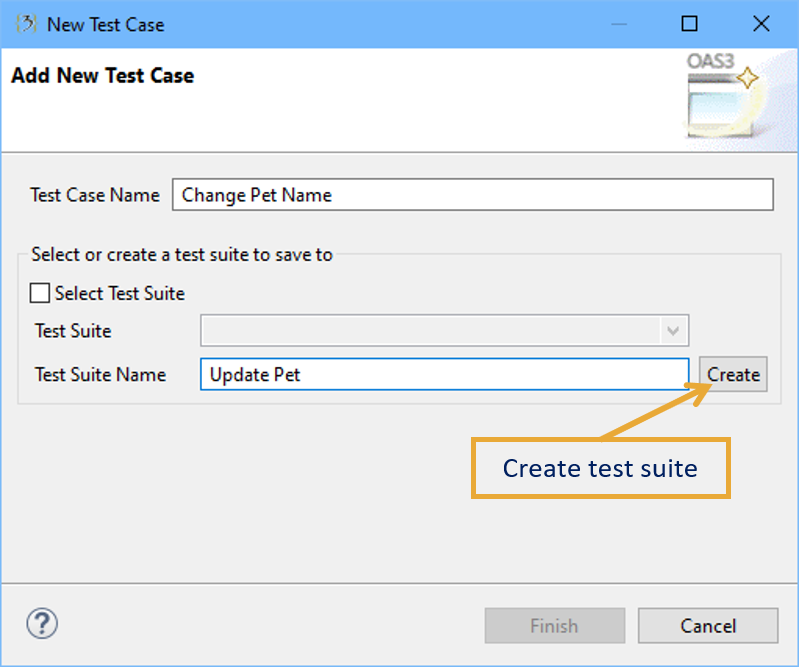
The following test case dialog will create a test case and a test suite. To create a test suite enter the name of the test suite, then click on Create button. Enter the name of the test case and click on Finish, the test case will be created and added to the test suite.
Rename TestCase[edit]
Select a test case > right mouse-click and click on Rename > enter the name of the test case and click on Ok.
Delete TestCase[edit]
Select a test case> right mouse-click and click on Delete > Klick on Ok.
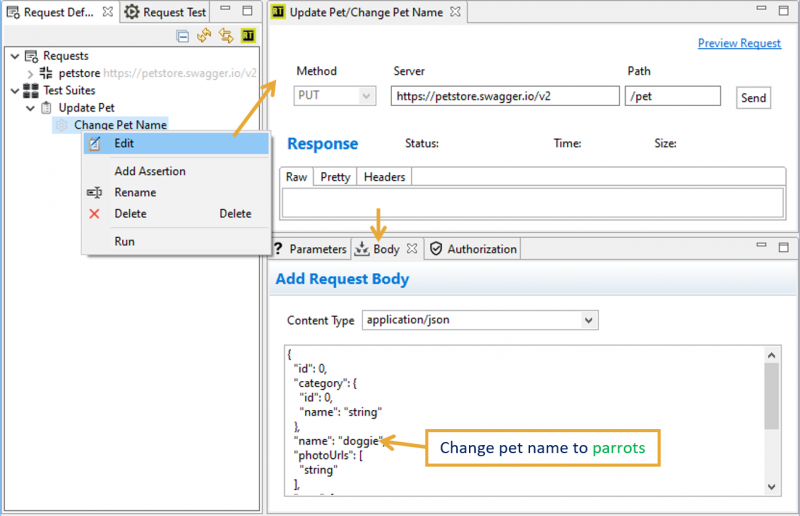
Edit TestCase[edit]
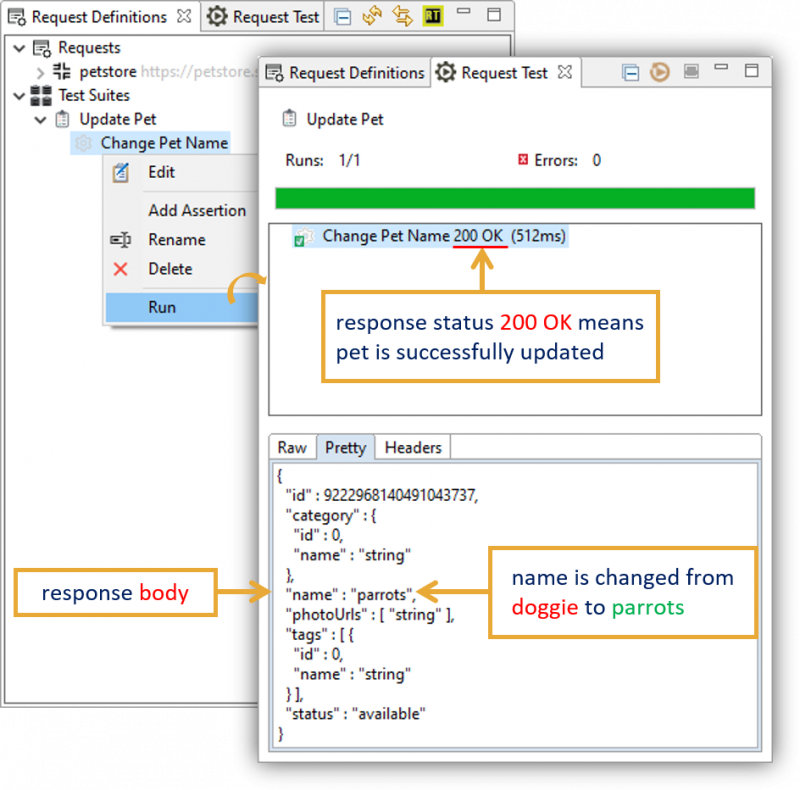
Select a test case > right mouse-click > click on Edit > the editor will be opened on the right site. In our example, we want to change the pet name, to do that you have to select the body view and change the name of the pet e.g to parrots and save the changes.
Run TestCase[edit]
Select a test case > right mouse-click > click on Run > The output will be displayed in the Request Test view.
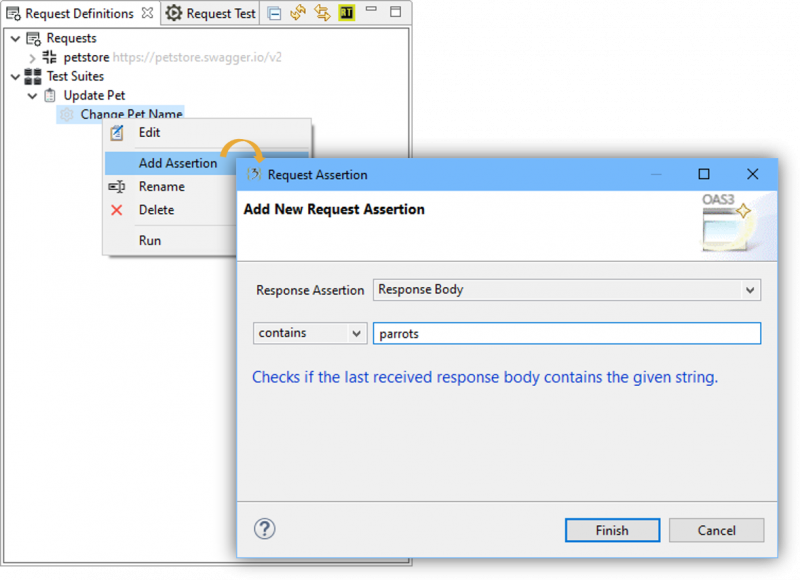
Add Assertion to TestCase[edit]
Select a test case > right mouse-click > click on Add Assertion > The assertion wizard will be displayed > select the response assertion > enter the assertion condition and value > click on Finish. The added assertion will be displayed as a child of the test case.
As you can see in the wizard the following assertion types can be added:
- Response body
- Response headers
- Response status code
- Response status text
- Response time
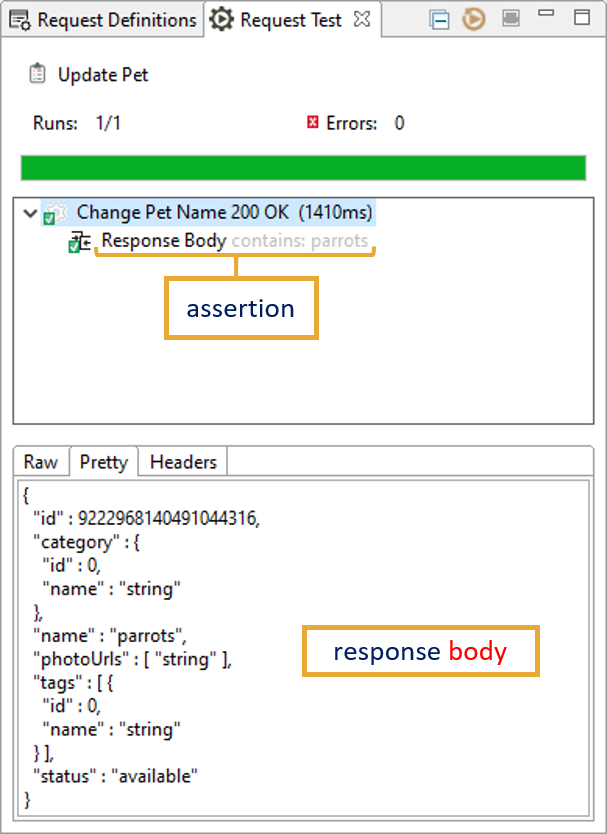
Run TestCase with Assertion[edit]
This test checks the response body of the request. If the response body contains the string parrots, the test will pass, otherwise, it will fail. Run the test case again > the following output will be displayed:
Delete Assertion[edit]
Select an assertion > right mouse-click and click on Delete > Klick on Ok.
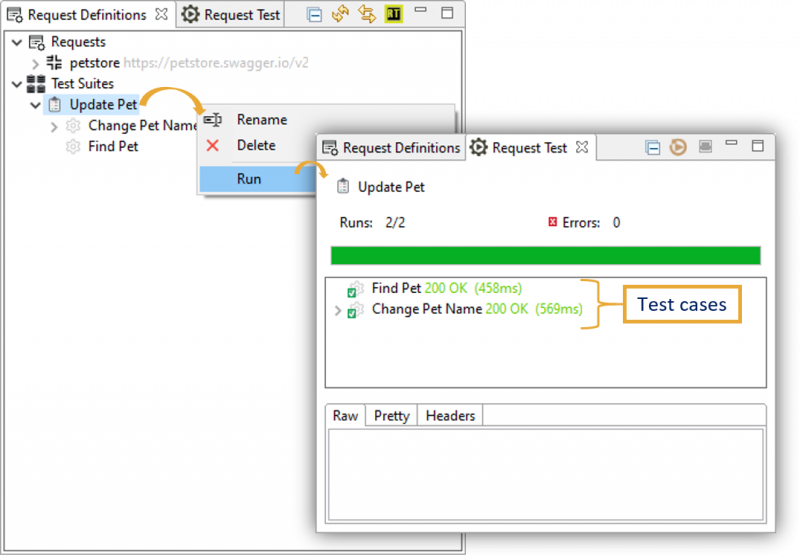
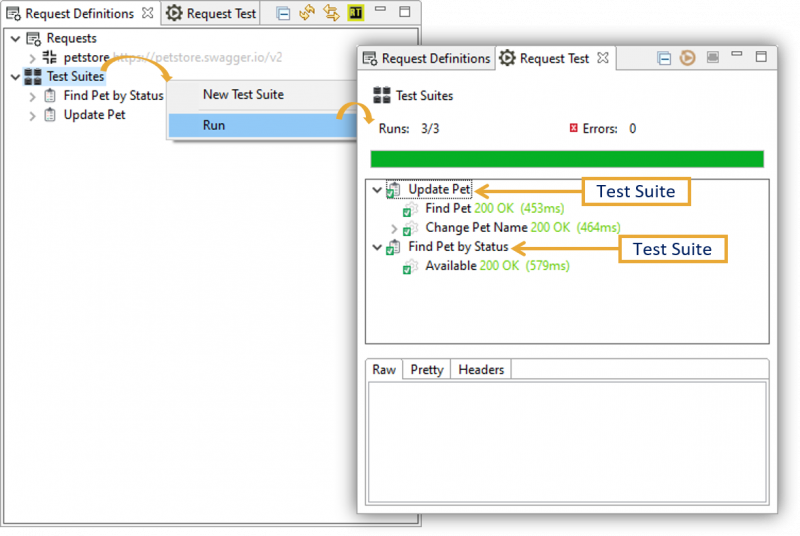
Run Collected TestCases on TestSuite[edit]
Select a test suite that contains test cases > right mouse-click and click on Run.
Run all Test Cases from Test Suites Node[edit]
Select Test Suites node > right mouse-click and click on Run.
Using OAS3 Editor[edit]
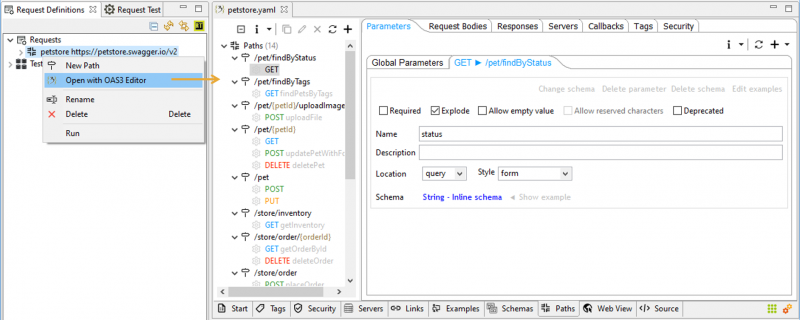
Open Request with OAS3 Editor[edit]
For an advanced request, you have to use the OAS3 editor.
Select a request from the definitions view > right mouse-click and click on Open with OAS3 Editor.
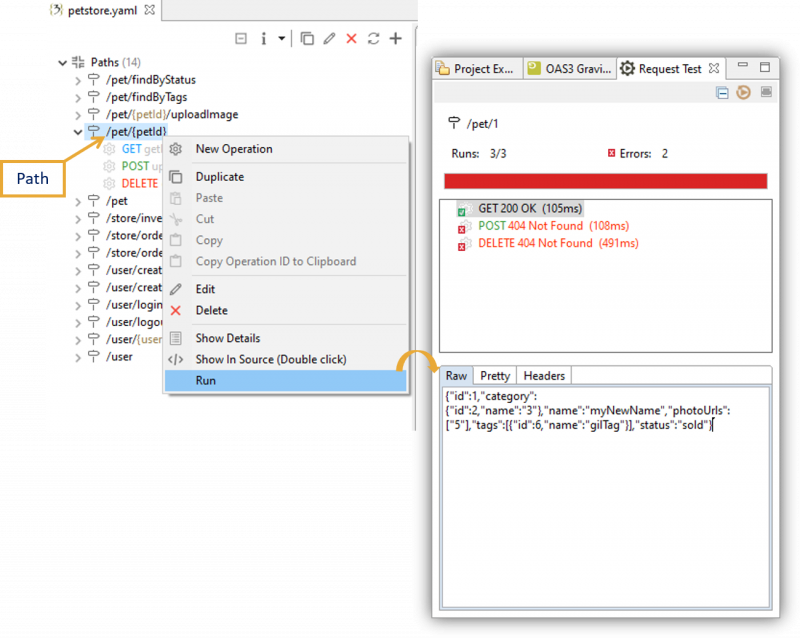
Test OpenAPI File Methods[edit]
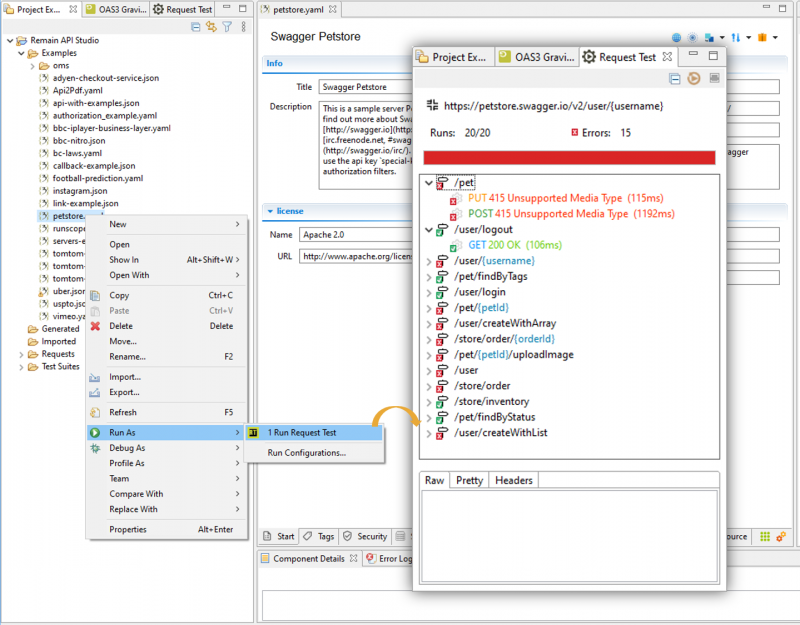
To test the OpenAPI file methods you have to open the Remain API Studio> open an OpenApi file with OAS3 editor > select Paths tab > select a method > mouse right-click > click on Run. The test output will be displayed on the Request Test view.

Test Path Methods
To test the path methods use the same steps as above, instead of selecting the method select the path.
Test All OpenAPI File Methods
To test all OpenAPI file methods select the file > mouse right-click > click on Run As > click on Run Request Test. The test output will be displayed on the Request Test view.