OCTO:Getting Started
YouTube Playlist
Installing the VSCode TD/OMS Extension
Installing the VSCode plugins is easy, but remember that communication goes through the Octo server and your VPN. So you first need to setup a local Octo server, or create an organization at https://octo.remainsoftware.com.
Install from Marketplace
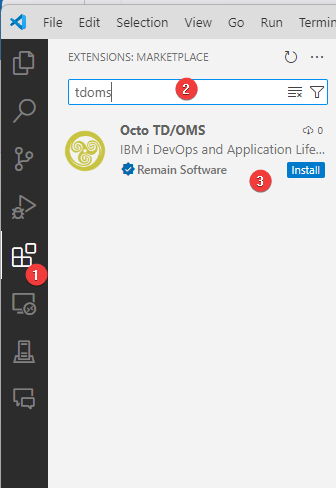
The easiest way to install the plugins is through the VSCode marketplace.
- Select the Extensions
- Filter for TD/OMS
- Press the install button
Continue with Configure the Extension.
Download the vsix file
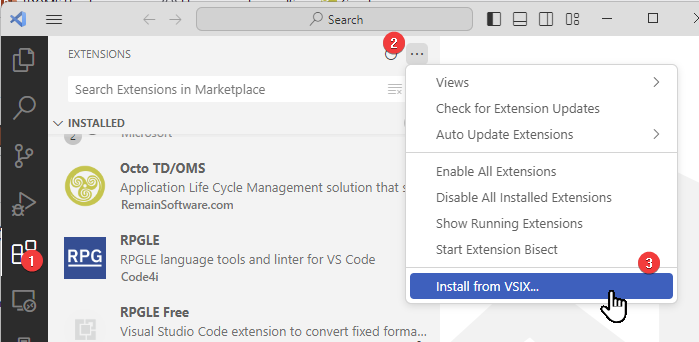
Alternatively, you can download the extension manually. For example if you want to run the latest version. Log in to the Remain Software website and download the latest vsix file from the Octo Download section.
After downloading the file, open VSCode and click on the Extensions Icon (1). Then open the ellipsis menu (2) and select 'Install from VSIX...' (3)
Then navigate to your TD/OMS Octo Download location and select the downloaded vsix file.
Configure the Extension
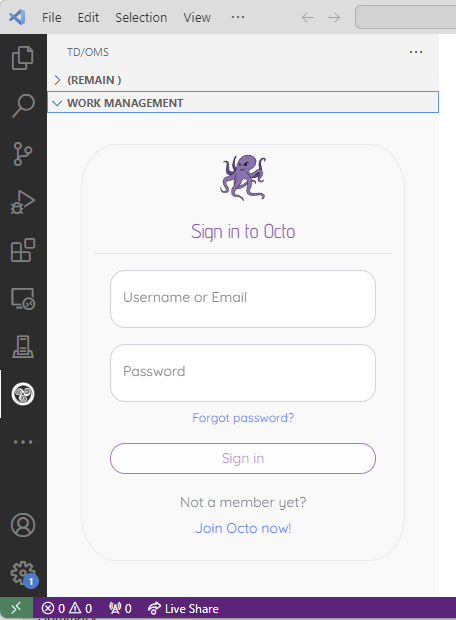
After the extension is installed you will find the Remain Software logo in the Icon bar. Click on it to activate the extension.
Then add your Octo Server
Make sure to use your own organization
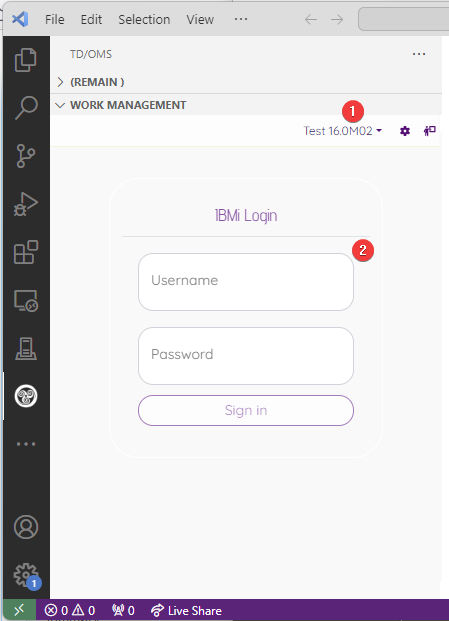
Login to Octo
Then login twice. The first time to login to Octo and the second time to login to the IBM i
Use the UI
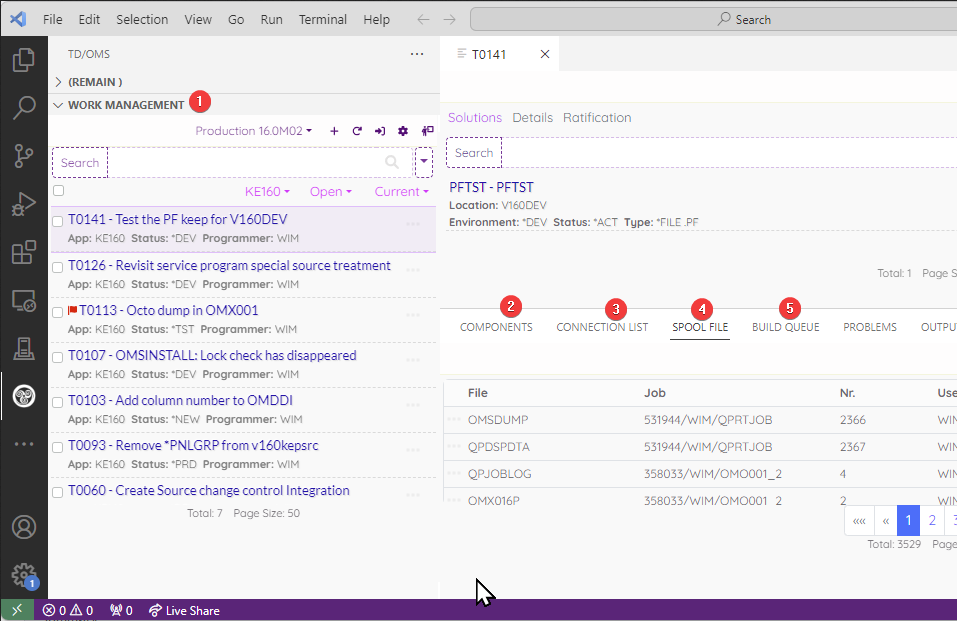
Below you see an example of the UI. The following views are available:
- (1) Work Management
- To work with your tasks, create new tasks and do task actions like "Checkout and Promote, Add to build queue, etc..". Click on your task to work with the attached objects.
- (2) Components
- Find, view and connect objects.
- (3) Connection List
- Connect Objects and resolve connection issues.
- (4) Spool files
- Find, and open your spool files.
- (5) Build Queue
- View build queue entries and release the queue.
The organization of these views is up to you. They can be dragged and dropped to your liking to any suitable location.
Installing the Docker image on a Linux system
The most efficient and effective way to run Octo is by using the Octo-server Docker image in a containerized environment, such as Docker Compose, Docker Swarm, or Kubernetes. Running Octo in a container removes much of the complexity associated with managing a self-installed Node.js and MongoDB setup. At Remain, we primarily run and test Octo using Docker Compose, as it provides the simplest way to get Octo up and running and to perform automated tests. Although it is not our primary test environment, we also maintain a Kubernetes setup (using Minikube) to regularly test the Octo container in a Kubernetes environment.
The Octo-server Docker image targets the AMD64 architecture and is intended for use on compatible systems. The base of the Octo-server Docker image is Ubuntu, along with Node.js, MongoDB and the Octo-server application. Within the Docker container, several application directories are mapped to host locations or set up as Docker volumes. The mapping to host ensures that data requiring persistence—such as Octo and MongoDB data—remains intact after an Octo-server image update or container restart.
Prerequisites: For disk, memory and cpu requirements the Octo Docker container will initially need 1-2 CPU cores, 512-1024mb of memory and 512-1024mb of disk space, of course more is better. These are conservative estimates that might need to be updated to reflect the growing needs of the Octo container. The usage of memory, disk and CPU by Octo does not include the runtime required to run the Octo container. If you are setting up a new (virtual) machine to run an Octo container then you will also need to include the requirements of the OS and Docker runtime. The requirements can vary depending on the choice of OS. For example you could run Octo on a virtual machine running Ubuntu 22.04 that is configured with 2vCpus, 2gb memory and 50gb of disk space (at the time of writing, at Remain we are running the Octo container using Docker Engine version 26.1.3 and Docker Compose version 2.29.2).
Note that it is also possible to run an Octo container in Windows (10+) using Docker Desktop, which includes a Linux VM (via WSL2 or Hyper-V) to run Linux containers. As of Windows Server 2022, Microsoft also has full support for Docker and Docker Compose. On Windows the requirements for the Octo container would be the same as described above.
Setting up a Docker runtime environment can be complex and is beyond the scope of this installation manual.
The section below shows an example of how to start an Octo container using Docker Compose. Note that the image for Docker Compose is the same image to be used for Kubernetes and Docker Swarm.
Note that in the example scripts we use the 'docker-compose' command available through the docker-compose plugin, change this to 'docker compose' command if you have a Docker client with the V2 Docker Compose integrated (which will be the case for Docker Desktop).
Octo-server image for Kubernetes or Docker Swarm/Compose
The Docker image to be used for Kubernetes and Docker Swarm/Compose is the image with the name 'octoserverk'. For security reasons the image does not run under root, it defines 'octousr' as the user responsible for running application processes. The image is available from our software download site and from the Remain Docker repository (Harbor). For Kubernetes and docker-compose we have example deployment yaml files that can be used for the setup and run of the Octo container for your specific environment. The yaml files are located in the zip file starting with the name 'octoserver_docker_kube-yaml-?version?_date?.zip' and can be downloaded from the same location as the Octo-server file, octoserver_docker_kube-?version?_date?.zip for the image. The 2 example deployment files available in the zip are octo-deployment.yaml and docker-compose.yaml. The docker-compose.yaml requires a docker-compose version 2.x to be installed. The Octo docker-compose was developed using using docker-compose v2.29.2.
Volume setup in Kubernetes
The Octo container requires a number of volumes to be created before the Octo app can run. This is all configured in the deployment yaml and under ideal circumstances the Octo pod and services will run out of the box. But no two Kubernetes environments are created equally and there can be an issue concerning the creation of the volumes through the persistent volume claim (PVC). Notably there can be an issue where files and directories in the volume are not owned by the Docker defined octousr, but by root. If this is the case then the Octo app will most likely fail to start. To fix the problem one or more of the following securityContext properties might need to be added to the deployment yaml:
     containers:
     - name: octo
       image: octoserverk_1.3.2:latest
       securityContext:
         runAsUser: 1000      # UID of 'octousr'
         runAsGroup: 1000     # GID of 'octousr'
         fsGroup: 1000        # ensures group ownership of mounted volumes
Explanation of the SecurityContext Parameters
runAsUser: Sets the user ID (UID) for the main container process. 1000 coincides with the UID of octousr as defined in the Docker image.
runAsGroup: Sets the group ID (GID) for the main container process. 1000 coincides with the GID of octousr.
fsGroup: This might be of importance for some storage clusters. It ensures that the group ownership of all mounted volumes is set to the specified group, in the example above GID 1000 is used.
It might also be necessary to apply extra configuration in the storage cluster to correctly mount the PVCs with octousr as the owner.
Getting the image from the Remain Software download site
The octoserverk image can be downloaded from the release, milestone and nightly download directory (https://remainsoftware.com/extranet/software-downloads/octo). The image is provided as a zip file, for example octoserver_docker_kube-lin64-?version?_?date?, which when unpacked contains the octoserverk image as a tar file. The image tar file can be loaded into the local Docker repository with the command docker load -i octoserverk.tar.
Pulling an octoserverk image from the Remain Docker repository
The remain Docker registry is hosted by a Harbor implementation located at 'https://harbor.remainsoftware.com:443'. Before you can access the Remain Docker registry you have to register yourself in Harbor and (for now) email us that you have registered and would like to access the Octo-server images. To register go to the above mentioned site and click on 'Sign up for an account', enter the required fields and press 'Sign Up'. Once you have signed up you can email us at helpdesk@remainsoftware.com, we will add you to the appropriate Octo-server projects from which you can view (from the web-site) and pull images using the docker pull command.
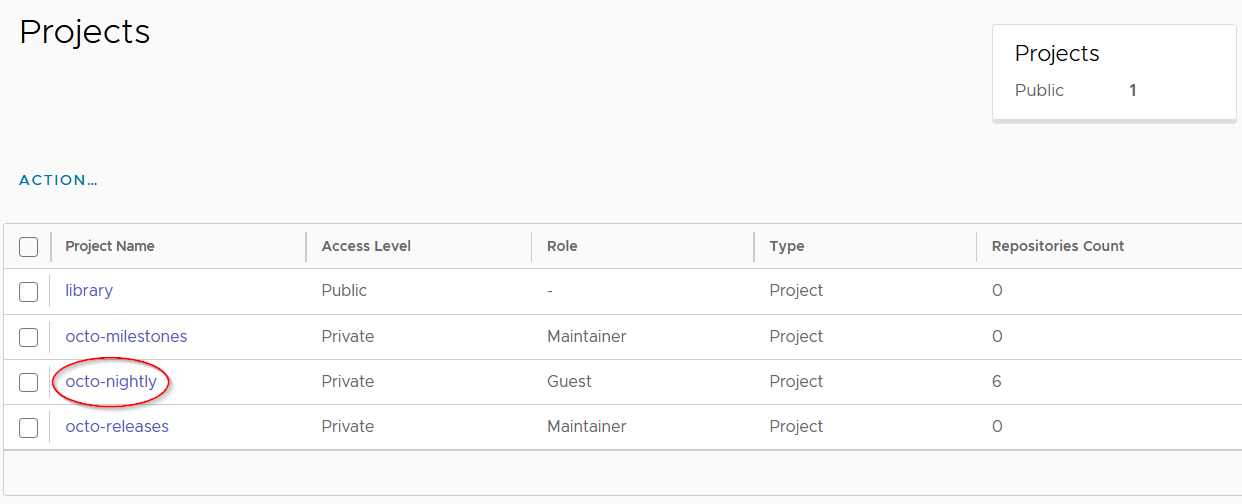
For Octo-server we have the projects octo-releases and octo-nightly. Once you have logged into the Remain Docker registry, you can view and list these projects.
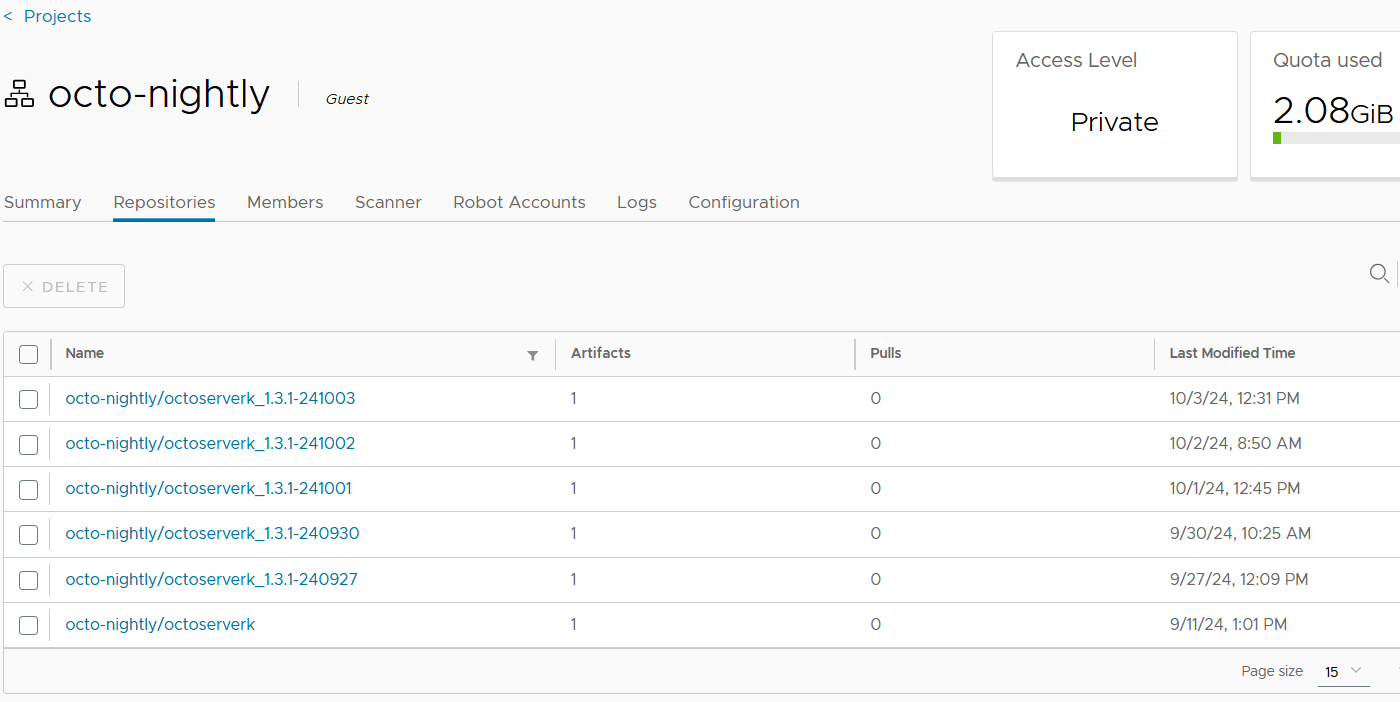
To view the octo-nightly images press the highlighted octo-nightly entry which will give you a screen similar to the one below. For Octo-server the last 5 builds will have a date in the name and there is also the 'octoserverk'image without a date, this is always the last built Octo-server image.
An octoserverk image can be pulled from the Remain Docker registry by first logging into the registry and then pulling the required image, for example:
docker login -u ?harbor-user-name? -p ?harbor-password? 'https://harbor.remainsoftware.com:443'.
To get a specific version, use for example the command:
docker pull harbor.remainsoftware.com:443/octo-nightly/octoserverk_1.3.1-241003 (this will pull the octoserverk image built on 3 oct. 2024)
or to get the latest available:
docker pull harbor.remainsoftware.com:443/octo-nightly/octoserverk (this will pull the last successfully built Octo-server)
Running the Octo container
For HTTPS access we use Nginx as a separate container to run as the front-end reverse proxy. This setup allows Octo to deliver a default out of the box Nginx setup but also allows you to use an alternative solution for handling HTTPS requests. More on how to setup HTTPS for Octo in the section 'Octo-server HTTP/HTTPS setup'.
As an example we will use docker-compose to manage the container and pull the octoserverk image from the local repository. Once the Octo image is available and a directory has been setup with the docker-compose.yaml file in it, for example:
services:
  octo-service:
    # image: harbor.remainsoftware.com:443/octo-releases/octoserverk_1.3.1  # change version number, use to pull remote image
    image: octoserverk  # use octoserverk if image was loaded with docker load
    pull_policy: never # pull locally, set to 'always' when pulling image from remote
    container_name: octo
    restart: always
    environment:
      TZ: Europe/Amsterdam  # update to reflect required Time zone
      ENABLE_BACKUPS: true
      MAX_BACKUPS: 7
      BACKUP_HOUR: 0
      MAX_ARCHIVED_LOGS: 7
      NGINX_SUPPORT: enable  # defaults to managed if not set (Octo is not to provide the Nginx configuration)
      ENABLE_HTTP: true  # defaults to true if not set and NGINX_SUPPORT is enable
      ENABLE_HTTPS: true  # defaults to true if not set and NGINX_SUPPORT is enable, see CERT_HOSTNAME
      ENABLE_HTTPS_ONLY: false  # defaults to true if not set and NGINX_SUPPORT is enable, see CERT_HOSTNAME
      HTTPS_ONLY_PORT: 8443  # defaults to 443 else assign to the nginx configured amd exposed https port
      CERT_HOSTNAME: octoserver  # if already providing certificates leave empty else set host name for a self signed certificate
    logging:
      driver: "json-file" # manage container stdout logging
      options:
        max-size: "15m"
        max-file: "5"
    volumes:
      - "db-data:/var/lib/mongodb"
      - "octo-nginx:/opt/remain/octo-server/nginx"
      - "server-config:/opt/remain/octo-server/config"
      - "server-db-backups:/opt/remain/octo-server/db-backups"
      - "server-log:/opt/remain/octo-server/log"
      - "server-public-media:/opt/remain/octo-server/public/media"
    expose:
      - "47007"  # internal app port 47007
    networks:
      - backend
  octo-nginx-service:
    image: nginx:mainline-alpine
    container_name: octo-nginx
    restart: unless-stopped
    logging:
      driver: "json-file"
      options:
        max-size: "15m"
        max-file: "5"
    ports:
      - "8080:80"
      - "8443:443"
    volumes:
      - "octo-nginx:/etc/nginx/conf.d"  # in this setup a shared Octo volume for conf files and certificates
    depends_on:
      - octo-service  # Octo service starts before Nginx
    networks:
      - backend
networks:
  backend:
  driver: bridge
volumes:
  db-data: {}
  octo-nginx: {}
  server-config: {}
  server-db-backups: {}
  server-log: {}
  server-public-media: {}
As previously mentioned, the latest example Docker Compose and Kubernetes yaml file is availabe from our download site.
With the image available and yaml in place, start the Octo server with:
docker-compose up -d
After waiting for about 5 seconds you can check if Octo has started by looking at the Octo container log:
docker-compose logs
Output similar to below will be shown if Octo was started successfully:
octo  | 2024-12-20 11:08:48 INFO: initiating Octo app startup, user: octousr, current-dir: /opt/remain/octo-server
octo  | 2024-12-20 11:08:48 INFO: using existing server_conf.json in /opt/remain/octo-server/config
octo  | 2024-12-20 11:08:48 INFO: using existing db_conf.json in /opt/remain/octo-server/config:
octo  | 2024-12-20 11:08:48 INFO: using existing access_token.js in /opt/remain/octo-server/config
octo  | 2024-12-20 11:08:48 INFO: NGINX_SUPPORT: enable
octo  | 2024-12-20 11:08:48 INFO: ENABLE_HTTP: false
octo  | 2024-12-20 11:08:48 INFO: ENABLE_HTTPS: false
octo  | 2024-12-20 11:08:48 INFO: ENABLE_HTTPS_ONLY: true
octo  | 2024-12-20 11:08:48 INFO: HTTPS_ONLY_PORT: 9443
octo  | 2024-12-20 11:08:48 INFO: skip setup of certificate, found tls.crt and tls.key
octo  | 2024-12-20 11:08:48 INFO: for ENABLE_HTTPS_ONLY using existing Nginx HTTPS configuration: nginx_https.conf
octo  | 2024-12-20 11:08:48 INFO: updating file permission of Nginx configurations
octo  | 2024-12-20 11:08:48 INFO: start MongoDB on port 27017, log-file: /opt/remain/octo-server/log/mongodb.log
octo  | 2024-12-20 11:08:48 INFO: MongoDB started on PID: 57
octo  | {"t":{"$date":"2024-12-20T10:08:49.961Z"},"s":"I",  "c":"CONTROL",  "id":20697,   "ctx":"-","msg":"Renamed existing log file","attr":{"oldLogPath":"/opt/remain/octo-server/log/mongodb.log","newLogPath":"/opt/remain/octo-server/log/mongodb.log.2024-12-20T10-08-49"}}
octo-nginx  | /docker-entrypoint.sh: /docker-entrypoint.d/ is not empty, will attempt to perform configuration
octo-nginx  | /docker-entrypoint.sh: Looking for shell scripts in /docker-entrypoint.d/
octo-nginx  | /docker-entrypoint.sh: Launching /docker-entrypoint.d/10-listen-on-ipv6-by-default.sh
octo-nginx  | 10-listen-on-ipv6-by-default.sh: info: /etc/nginx/conf.d/default.conf is not a file or does not exist
octo-nginx  | /docker-entrypoint.sh: Sourcing /docker-entrypoint.d/15-local-resolvers.envsh
octo-nginx  | /docker-entrypoint.sh: Launching /docker-entrypoint.d/20-envsubst-on-templates.sh
octo-nginx  | /docker-entrypoint.sh: Launching /docker-entrypoint.d/30-tune-worker-processes.sh
octo-nginx  | /docker-entrypoint.sh: Configuration complete; ready for start up
octo-nginx  | 2024/12/20 10:08:49 [notice] 1#1: using the "epoll" event method
octo-nginx  | 2024/12/20 10:08:49 [notice] 1#1: nginx/1.27.3
octo-nginx  | 2024/12/20 10:08:49 [notice] 1#1: built by gcc 13.2.1 20240309 (Alpine 13.2.1_git20240309)
octo-nginx  | 2024/12/20 10:08:49 [notice] 1#1: OS: Linux 5.4.0-193-generic
octo-nginx  | 2024/12/20 10:08:49 [notice] 1#1: getrlimit(RLIMIT_NOFILE): 1048576:1048576
octo-nginx  | 2024/12/20 10:08:49 [notice] 1#1: start worker processes
octo-nginx  | 2024/12/20 10:08:49 [notice] 1#1: start worker process 20
octo-nginx  | 2024/12/20 10:08:49 [notice] 1#1: start worker process 21
octo-nginx  | 2024/12/20 10:08:49 [notice] 1#1: start worker process 22
octo-nginx  | 2024/12/20 10:08:49 [notice] 1#1: start worker process 23
...
The Octo UI can be accessed by using the host name on which the container is running and, in this case, the host HTTP port as configured in the octo-nginx service of the yaml configuration file, for example: http://docker:8080 or http://docker:8443
You can stop the Octo container with the command:
docker-compose down
Do not use the -v option on the docker-compose down unless you intentionally want to remove all Octo data to run a fresh image. Also be careful when running docker prune commands, like system prune or volume prune; you may unintentionally delete an Octo volume if the Octo container is not running.
Octo server logging
By default the Octo app and Nginx logging is output to file and the console (stdout terminal). There are separate log files for Octo, Nginx, MongoDb and the Backup_logs job. When on the system running the Octo container the output of Octo and Nginx can be viewed with ' docker-compose logs' (run from the directory containing the docker-compose.yaml). Primary location for viewing logs is in the Octo UI, Octo Admin -> Server -> Server Logs, accessible for the Octo Admin (essentially anybody using the Admin token as password when logging in). If there are problems starting the server then use docker-compose or Kubernetes log commands to view the output of the Octo container, for example docker-compose logs or kubectl logs <pod-name>.
Getting the Admin token
The very first time the Octo-server is started an Admin token will be created. Octo does not have a dedicated administrative user, but rather uses a token that gives a user administrative authorities. The command to get this token from the Docker container is shown below. This token can be used for the so called 'Octo Admin' Sign-In. Before you can 'Sign In' into Octo using the Admin token as password, an Octo user must first be registered. In the Sign-In dialog you must select Join Octo now! and complete the user registration to create a new user. Note that when registering an Octo user with no mail-server configuration set in Octo Admin, then email verification of the new user will not be possible. You will not be able to Sign-In with the new user until it has been verified through email. You will although, be able to do a Sign-In with the new user name and the Admin token as the password (paste the Admin token in the password field). You are now setup to perform administrative tasks, such as configuring the mail server, or install the Admin and other plugins.
The basic command to get the admin token when using Docker Compose is:
docker-compose exec <octo-service-name> sh -c "grep 'exports.ADMIN_ACCESS_TOKEN =' /opt/remain/octo-server/config/access_token.js | sed 's/.*\"\(.*\)\".*/\1/'"
If the default docker-compose.yaml is used then the default service name is 'octo-service'.
For a Kubernetes environment the command is:
kubectl exec -it <pod-name> -- sh -c "grep 'exports.ADMIN_ACCESS_TOKEN =' /opt/remain/octo-server/config/access_token.js | sed 's/.*\"\(.*\)\".*/\1/'"
Here you will need to first lookup the Octo <pod-name> with 'kubectl get pods'.
Scripted versions of the above commands are made available in the same zip file that contains the yaml examples. For docker-compose the script is dc_admintoken.sh for Kubernetes it is kube_admintoken.sh. The dc_admintoken.sh assumes that the Octo service-name is the same as set in the docker-compose.yaml, for the kube_admintoken.sh it is assumed that the selector is 'app=octo' and that the Octo service namespace is 'remain-octo'. Update the scripts accordingly if any of the mentioned settings have been changed. The result of running the script will be that the admin token is output to the console and that the 'admin.token' file will have been created in the current working directory.
Be careful when exposing the Admin token as any registered Octo user can use the token to access the Admin plugin.
Octo-server HTTP/HTTPS setup
Running Octo in HTTPS mode will run out of the box if you set the option ENABLE_HTTPS to true and provide a value for the CERT_HOSTNAME. With this configuration a self signed certificate will be created and used for HTTPS communication. Drawback to this out of the box setup is that the server certificate for the host will be a self-signed certificate and may be rejected by a browser unless explicitly accepted. Consider this setup as a temporary solution until a certificate can be provided that has been signed by a Certificate Authority (CA).
Setup of Nginx with Octo in Kubernetes
Setup of Nginx with Octo in Kubernetes diverts somewhat for the docker-compose version. From the outset Octo in the docker-compose variant controls the configuration files made available to Nginx, both Octo and Nginx share a volume for this integration. This is not the case with Kubernetes, here Octo does not inject configuration files or the ssl certificate nor is there a shared volume. In the Kubernetes Nginx setup, Nginx has its own configuration made available through a ConfigMap and the certificate for HTTPS communication is made available by way of a configured TLS secret. One thing that requires attention in the configuration of the HTTP to HTTPS redirect is the setting of the port used in the redirect line. By default, redirect is to HTTPS port 443, but this will not work when running under Kubernetes, here the HTTPS node port needs to be used as the port in the redirect line of the https.conf:
return 301 https://$host:443$request_uri; # redirect all HTTP requests to HTTPS
HTTP/HTTPS options and settings
Below are the available HTTP/HTTPS settings to be set in the yaml file:
NGINX_SUPPORT: enable
ENABLE_HTTP: false
ENABLE_HTTPS: false
ENABLE_HTTPS_ONLY: true
HTTPS_ONLY_PORT: 9443
CERT_HOSTNAME: <octo-server-hostname>
Applicable Nginx HTTP/HTTPS Settings if NGINX_SUPPORT is set to enable. This will be the case of a Docker compose setup. For Kubernetes the NGINX_SUPPORT will bet set to 'managed' indicating that the Nginx configuration will not be controlled by Octo but by way of Kubernetes deployment configuration.
- Nginx Support (NGINX_SUPPORT)
- Values: managed, enable, reset, clear
- Default: managed (if the option NGINX_SUPPORT is not provided or has an invalid value)
- Description: Determines how Nginx is setup, coupled or decoupled from Octo.
- managed: to decouple from the Octo instance, Octo has no influence on the Nginx configuration. User provides his own configuration or solution.
- enable: to couple Octo with Nginx, Octo provides the Nginx HTTP and HTTPS configuration.
- reset: same as enable but deletes any existing Nginx HTTP/HTTPS or SSL files and reloads according to what is set.
- clear: deletes any existing Nginx HTTP/HTTPS or SSL certificate files and assumes the 'managed' state.
Docker compose only settings:
- Enable HTTP (ENABLE_HTTP)
- Values: true, false
- Default: false
- will be overridden if the option ENABLE_HTTPS_ONLY is true.
- Description: Enable this option if you want a separate HTTP configuration, optionally combined with ENABLE_HTTPS is true.
- Enable HTTPS (ENABLE_HTTPS)
- Values: true, false
- Default: false
- will be overridden if the option ENABLE_HTTPS_ONLY is true.
- when set to true then this option requires the availability of an SSL certificate and key.
- Description: Enable this option if you want to handle HTTPS requests.
- Enable HTTPS only (ENABLE_HTTPS_ONLY)
- Values: true, false
- Default: true
- if set to true then this option will override the ENABLE_HTTP and ENABLE_HTTPS settings.
- when set to true then this option requires the availability of an SSL certificate and key.
- Description: Enable this option if you want to handle HTTPS and HTTP requests but HTTP requests being redirected to HTTPS.
- Set HTTPS port for ENABLE_HTTPS_ONLY (HTTPS_ONLY_PORT)
- Values: port number 1-65535
- Default: 443
- Note that this setting is only applicable if ENABLE_HTTPS_ONLY is set tot true.
- If set then this option will apply the port number for HTTPS traffic on the HTTP redirect Nginx configuration.
- Description: Set this option to override the default configured HTTPS redirect port, 443, for the HTTP redirect. The actual port to be set here will be the HTTPS port defined in the octo-nginx-service section of the docker-compose.yaml.
- Certificate host name (CERT_HOSTNAME)
- Values: empty or valid host name
- Default: empty
- if not set or empty and HTTPS is enabled then HTTPS requests will fail due to the failure of Nginx to resolve the certificate files.
- Description: Set the host name when Octo is to create a self-signed certificate using the provided host name. If a certificate already exists then no certificate will be created.
For a Docker Ccompose setup, repending on what is available, and as a temporary solution, it might be useful to start with the Octo internal self signed certificate (requires the CERT_HOSTNAME to be set). This way you can have HTTPS working out of the box, afterwards you can replace the internally created certificate with your company certificate. Alternatively if you already have a company certificate then the procedure can also be to start with only HTTP enabled and then using the dc_prepnginx.sh (see Adding/Updating SSL certificate files) to get the certificate in place and then restart with HTTP disabled and HTTPS or HTTPS-only enabled.
Adding/Updating SSL certificate files
Adding or updating a server certificate is not applicable to the Kubernetes environment only the docker-compose environment. To add/update the Octo-server's certificate and key, you can use the dc_prepnginx.sh in the yaml and scripts zip (octoserver_docker_kube_yaml..), available from the Octo download site. The script needs to be copied to the same location as the docker-compose.yaml file (i.e. the location where the docker-compose up -d is run). The script assumes that in the directory from which the script will run there is a sub-directory named 'ssl', containing the SSL certificate as file name 'tls.crt' and the certificate key as file name 'tls.key', for example:
ssl
  tls.crt
  tls.key
dc_admintoken.sh
dc_prepnginx.sh
docker-compose.yaml
When the script is run, it will copy the certificate files to the appropriate location in the Octo-Nginx volume and have the Nginx container reload its configuration, after which the new certificates will become active.
Octo-server backup and log settings
On container initialization a backup script (backups_logs.sh) is enabled that will take care of routinely running backup and maintenance jobs.
The backup script will run the backup of the MongoDB and the backup of essential Octo-server resources. The Octo resources are the Octo-server configuration files and data not stored in the MongoDB. The script will also do maintenance on all Octo-server related log files (including MongoDB). Logs will be rotated (or archived for another word) when they reach the size of about 150kb, for MongoDB the log is rotated daily or on container startup. The maximum number of archived log files to keep is determined by the property MAX_ARCHIVED_LOGS, which is initially 7.
The backup script will by default start daily at 0:00 AM. Output of the backup script will go to the backups.log file, which can be found in the directory ‘/opt/remain/octo-server/log’ and can be viewed through the Octo Admin UI.
The settings of the backup and log maintenance are stored in the configuration file ‘backup.env’. This file is located in the directory ‘/opt/remain/octo-server/config’. The backup.env file will be created on first time startup of the Octo-server container/pod. The settings involved in the backup and log maintenance can be manually updated or be updated by the Admin through the Octo UI.
Below are the available backup and log settings with there default setting:
ENABLE_BACKUPS=true
MAX_BACKUPS=7
BACKUP_HOUR=0
MAX_ARCHIVED_LOGS=7
Backup and Log Settings
- Enable Backups (ENABLE_BACKUPS)
- Default: true
- Description: Determines whether backups are enabled.
- Set to true to enable backups (default setting).
- Set to false to disable backups.
- Note: Disabling this setting does not affect log rotation or cleanup processes.
- Maximum Backups (MAX_BACKUPS)
- Allowed Range: 7–50
- Default:
- 7 if the value is less than 7.
- 50 if the value is greater than 50.
- Description: Specifies the maximum number of backups to retain.
- Backup Hour (BACKUP_HOUR)
- Allowed Range: 0–23
- Default: 0 (12:00 AM daily)
- Description: Sets the hour of the day when backups will run.
- Values outside the range are adjusted to the default.
Log Settings
- Maximum Archived Logs (MAX_ARCHIVED_LOGS)
- Allowed Range: 7–50
- Default:
- 7 if the value is less than 7.
- 50 if the value is greater than 50.
- Description: Specifies the maximum number of archived logs to retain.
Container security
We have taken significant measures to ensure the security of the Octo Docker container:
- Secure Build Process:
- All packages and applications required for Octo-server to function are installed during the image build process.
- No additional software is installed at runtime.
- Any software necessary for building the Octo-server image but not required for the Octo-server runtime is removed during the image build phase.
- Non-root User mode:
- The Octo-server application and container is configured to run as a non-root user. This greatly reduces the risk of a potential attack on the host system by making container breaches significantly more difficult.
- Vulnerability Scanning:
- The Octo-server Docker image is regularly scanned for vulnerabilities using Scout and Grype.
- Any high or critical vulnerabilities are addressed as soon as possible. If a fix is unavailable (e.g., due to third-party dependencies like npm packages), it is prioritized for resolution.
Web and REST API security
- General:
- Regarding the Octo server and the APIs running on Apache on the IBMi, there is no direct connection; all APIs are accessed exclusively from the web frontend (Octo client). The Octo server does not interact with any TD/OMS-related APIs. However, the Octo server does make connections to public sites, primarily for JavaScript bootstrap purposes (e.g., retrieving fonts from Google) and user geolocation (to determine and confirm login locations). We are exploring options to localize the bootstrap-related calls for local processing and to disable geolocation calls if necessary.
- Secure REST APIs
- An X.509 certificate needs to be applied to the IBMi application running the APIs (Apache) to secure the connection (allow HTTPS) between the web frontend (running the Octo client) and the backend IBMi REST server. On the level of API request, Octo’s interaction with the backend is not vulnerable to unauthorized manipulation, where an unauthenticated request might inject a malicious payload. In Octo, every backend call is authenticated using a token in the request, ensuring that unauthenticated requests will not be processed. Additionally, all Octo requests are backed by a REST API that fully sanitizes input data, preventing any manipulation of the request to execute unauthorized actions or exploit security vulnerabilities.
- Securing Web Frontend
- Between Octo server and the Octo web frontend we have no native solution for using HTTPS. If you are running Kubernetes, then the recommended approach is to use the Ingress controller. Alternatively, for Docker, an Nginx container can be configured (as a reverse proxy) to handle and route HTTPS requests to the Octo container.
- Securing TD/OMS extension in VScode
- Regarding the TD/OMS work-management extension in VSCode, using secure connections would be valid if the Octo server and IBMi REST backend have been configured for secure connections, as discussed in points 2 and 3
Known Octo image vulnerabilities
The result of the image scan with Docker Scout and Grype is as follows: 0 critical, 1 relevant high and 1 false positive high (with several mediums and lows). Most medium and low vulnerabilities refer to the Ubuntu 20.04 installation on which the Octo-server Docker image is based. These medium and low vulnerabilities all refer to the exploit of packages or functionality that is not used by or accessible from Octo.
Vulnerabilities with status high indication
ip 1.1.9 (false positive)
GHSA-2p57-rm9w-gvfp
- Summary
- This affects all versions of the package up to and including 1.1.8. In Node.js this might allow an SSRF because some IP addresses (such as 127.1, 01200034567, 012.1.2.3, 000:0:0000::01, and ::fFFf:127.0.0.1) are improperly categorized as globally routable via isPublic. NOTE: this issue exists because of an incomplete fix for CVE-2023-42282.
Version 1.1.9 of ip used in the Octo does not have the vulnerability. For further information see https://nvd.nist.gov/vuln/detail/CVE-2023-42282#match-13115760.
Dicer 0.3.1
- CVE-2022-24434
- Summary
- This affects all versions of package dicer. A malicious attacker can send a modified form to the server and crash the nodejs service. A complete denial of service can be achieved by sending the malicious form in a loop.
- There is no fix available for this issue. We are working on replacing dicer.
- A word on sending modified data and prototype pollution vulnerability, as can be possible with the javascript __proto__ key.
- Octo’s interaction with the backend is not vulnerable to prototype pollution, where an unauthenticated request can have an injected __proto__ key in the request payload. In Octo, every backend call is authenticated using a token in the request, meaning unauthenticated requests will not be processed. Furthermore, all Octo requests are backed by a REST API that fully sanitizes input data, preventing any manipulation of the request to execute unauthorized actions or exploit security vulnerabilities.
Running Octo in Docker-Desktop
The requirement for this setup is as follows:
- Docker-Desktop installed and running with WSL 2 enabled (see https://docs.docker.com/desktop/features/wsl)
- From Octo Downloads (Milestones or Nightly, depending on which version is needed), download the zipped tar and zipped scripts. As of writing the latest were octoserver_docker_kube-lin64-1.3.4_2025-06-30_17-40-31.zip (tar) and octoserver_docker_kube-yaml-1.3.4_2025-06-30_17-40-31.zip (scripts).
Octoserverk Image location
To use the Octo docker-compose.yaml in Docker-Desktop you need to setup a project directory from where the docker-compose for Octo will be started, for example c:/work/docker-desktop/octo-server. At this point you also should probably switch to this directory.
Unpack the zip files to the project directory (for example with the File Explorer or 7Zip).
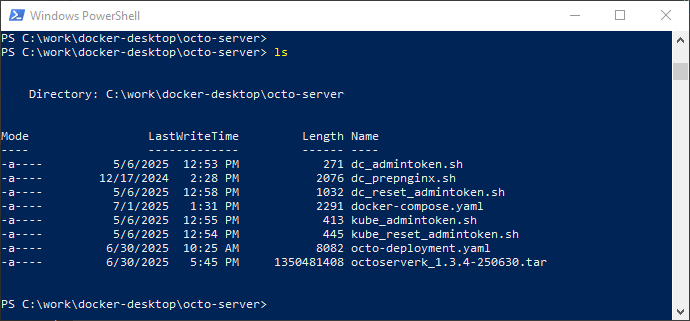
From here on docker commands are run from a Windows powershell terminal in the project directory setup for the octo-server. The project directory should look something like this:
Before running the docker-compose command the octoserverk image must be available in the local docker repository. This can be done by using the octoserverk image (tar) or by pulling the image from the Harbor docker repository, which requires an enabled Harbor user.
Image load from remote location (pull from Harbor)
From the project directory do a docker login to the Harbor docker repository with:
docker login -u ?username? harbor.remainsoftware.com
After a successful login you can pull the latest octo image with the command
docker pull harbor.remainsoftware.com/octo-nightly/octoserverk:latest
After a successful pull the octoserverk image will be available in the local docker repository. To be able to use this image you will need to change the image definition used in the docker-compose.yaml to:
image: harbor.remainsoftware.com/octo-nightly/octoserverk:latest
Image load from local location
If you are not going to pull the Octo image from the Harbor docker repository then you do not need to change the image name in the docker-compose.yaml. But you do need to manually load the octoserverk image into the local docker repository. The docker command to do this is, is for example:
docker load -i octoserverk_1.3.4-250630.tar
Octo HTTP/HTTPS configuration
The HTTP/HTTP configuration might need to be updated if you want to test Octo locally using the HTTP protocol. By default, the HTTP/HTTPS setting is set to https-only, which will not allow the http protocol to be used with Octo. For local testing the docker-compose configuration for HTTP/HTTPS can be set to the following (see changes in bold):
ENABLE_HTTP: true # defaults to true if not set and NGINX_SUPPORT is enable
ENABLE_HTTPS: true # defaults to true if not set and NGINX_SUPPORT is enable...
ENABLE_HTTPS_ONLY: false # defaults to true if not set and NGINX_SUPPORT is enable...
HTTPS_ONLY_PORT: 8443 # defaults to 443 else assign to the nginx configured https port
CERT_HOSTNAME: localhost # for HTTPS leave empty if already providing certificates...
The above HTTP/HTTPS configuration will allow the use of HTTP and HTTPS, albeit HTTPS support (with a self-signed certificate) will not be available in all browsers even if the Octo server public certificate has been imported. Most browsers will allow you to continue use HTTPS but by adding an exception for the site. If you need the certificate then you can copy it to the local directory with the command: “docker-compose cp octo-service:/opt/remain/octo-server/nginx/ssl/tls.crt .”. Even with a certificate, experience is that chromium-based browsers are a problem. Firefox and Opera allow you to continue by setting a site exception.
Running the Octo-server container
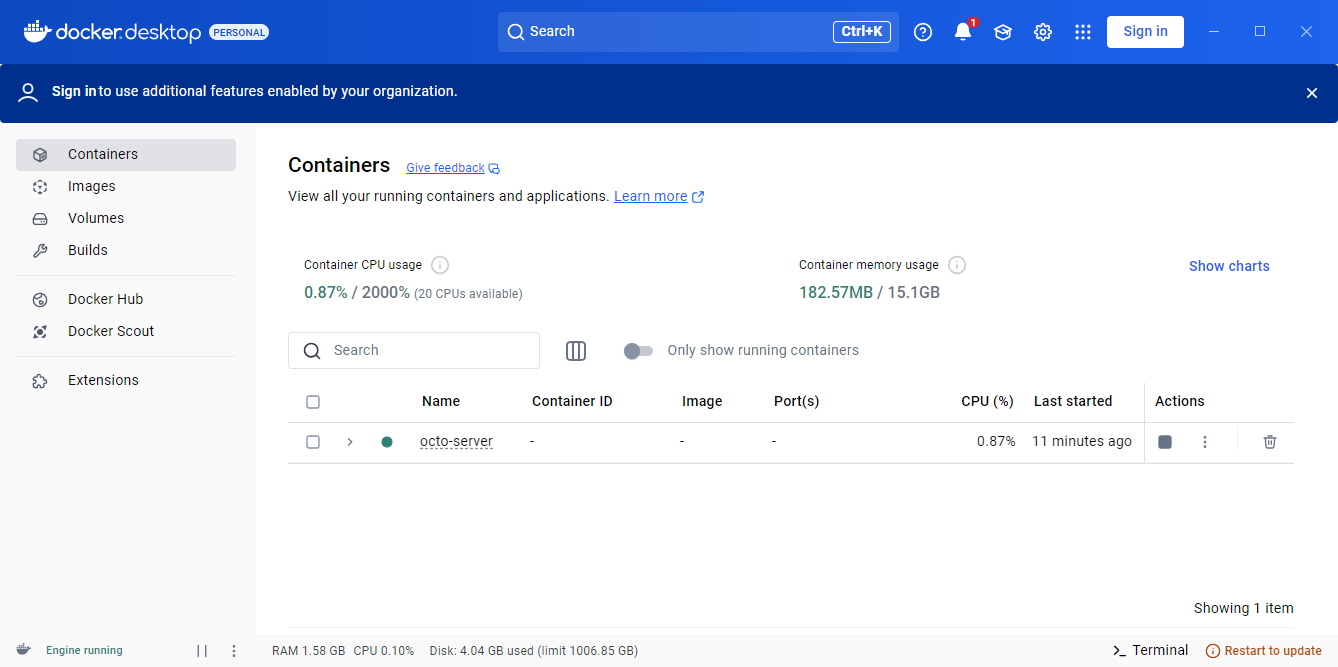
When the image is available in the local docker repo and the correct image name is defined in the docker-compose.yaml, then the Octo container can be started with the command “docker-compose up -d”. With the command “docker-compose logs” you can check if the startup was successful (the container console output can also be viewed from the Docker-Desktop UI). The output will look something like this:
octo-nginx | /docker-entrypoint.sh: /docker-entrypoint.d/ is not empty, will attempt to perform configuration
octo-nginx | /docker-entrypoint.sh: Looking for shell scripts in /docker-entrypoint.d/
octo-nginx | /docker-entrypoint.sh: Launching /docker-entrypoint.d/10-listen-on-ipv6-by-default.sh
octo-nginx | 10-listen-on-ipv6-by-default.sh: info: /etc/nginx/conf.d/default.conf is not a file or does not exist
octo-nginx | /docker-entrypoint.sh: Sourcing /docker-entrypoint.d/15-local-resolvers.envsh
octo | 2025-06-30 10:40:06 INFO: initiating Octo app startup, user: octousr, current-dir: /opt/remain/octo-serverocto-nginx | /docker-entrypoint.sh: Launching /docker-entrypoint.d/20-envsubst-on-templates.sh
octo-nginx | /docker-entrypoint.sh: Launching /docker-entrypoint.d30-tune-worker-processes.sh
octo-nginx | /docker-entrypoint.sh: Configuration complete; ready for start up
octo-nginx | 2025/06/30 08:40:06 [notice] 1#1: using the "epoll" event method
octo-nginx | 2025/06/30 08:40:06 [notice] 1#1: nginx/1.29.0
octo-nginx | 2025/06/30 08:40:06 [notice] 1#1: built by gcc 14.2.0 (Alpine 14.2.0)
octo-nginx | 2025/06/30 08:40:06 [notice] 1#1: OS: Linux 5.15.167.4-microsoft-standard-WSL2
octo-nginx | 2025/06/30 08:40:06 [notice] 1#1: getrlimit(RLIMIT_NOFILE): 1048576:1048576
octo-nginx | 2025/06/30 08:40:06 [notice] 1#1: start worker processes
octo-nginx | 2025/06/30 08:40:06 [notice] 1#1: start worker process 20
octo-nginx | 2025/06/30 08:40:06 [notice] 1#1: start worker process 21
octo-nginx | 2025/06/30 08:40:06 [notice] 1#1: start worker process 22
octo-nginx | 2025/06/30 08:40:06 [notice] 1#1: start worker process 23
octo-nginx | 2025/06/30 08:40:06 [notice] 1#1: start worker process 24
octo-nginx | 2025/06/30 08:40:06 [notice] 1#1: start worker process 25
octo-nginx | 2025/06/30 08:40:06 [notice] 1#1: start worker process 26
octo-nginx | 2025/06/30 08:40:06 [notice] 1#1: start worker process 27
octo-nginx | 2025/06/30 08:40:06 [notice] 1#1: start worker process 28
octo-nginx | 2025/06/30 08:40:06 [notice] 1#1: start worker process 29
octo | 2025-06-30 10:40:06 INFO: creating server_conf.json in /opt/remain/octo-server/config
octo-nginx | 2025/06/30 08:40:06 [notice] 1#1: start worker process 30
octo | 2025-06-30 10:40:06 INFO: creating db_conf.json in /opt/remain/octo-server/config
octo | 2025-06-30 10:40:06 INFO: creating access_token.js in /opt/remain/octo-server/config
octo | 2025-06-30 10:40:06 INFO: NGINX_SUPPORT: enable
octo | 2025-06-30 10:40:06 INFO: ENABLE_HTTP: false
octo | 2025-06-30 10:40:06 INFO: ENABLE_HTTPS: false
octo | 2025-06-30 10:40:06 INFO: ENABLE_HTTPS_ONLY: true
octo | 2025-06-30 10:40:06 INFO: HTTPS_ONLY_PORT: 8443
octo-nginx | 2025/06/30 08:40:06 [notice] 1#1: start worker process 31
octo-nginx | 2025/06/30 08:40:06 [notice] 1#1: start worker process 32
octo-nginx | 2025/06/30 08:40:06 [notice] 1#1: start worker process 33
octo-nginx | 2025/06/30 08:40:06 [notice] 1#1: start worker process 34
octo-nginx | 2025/06/30 08:40:06 [notice] 1#1: start worker process 35
octo-nginx | 2025/06/30 08:40:06 [notice] 1#1: start worker process 36
octo-nginx | 2025/06/30 08:40:06 [notice] 1#1: start worker process 37
octo-nginx | 2025/06/30 08:40:06 [notice] 1#1: start worker process 38
octo-nginx | 2025/06/30 08:40:06 [notice] 1#1: start worker process 39
octo | 2025-06-30 10:40:06 INFO: creating tls certificate and key for host: 'devkube' in directory: /opt/remain/octo-server/nginx/ssl
octo | Generating a RSA private key
octo | .....+++++
octo | .....+++++
octo | writing new private key to '/opt/remain/octo-server/nginx/ssl/tls.key'
octo | -----
octo | 2025-06-30 10:40:06 INFO: installing default Octo-Nginx HTTPS configuration
octo | 2025-06-30 10:40:06 INFO: installing default Octo-Nginx HTTP to HTTPS redirect configuration
octo | 2025-06-30 10:40:06 INFO: update HTTPS port number on HTTP redirect, port: 8443
octo | 2025-06-30 10:40:06 INFO: updating file permission of Nginx configurations
octo | 2025-06-30 10:40:06 INFO: start MongoDB on port 27017, log-file: /opt/remain/octo-server/log/mongodb.log
octo | 2025-06-30 10:40:06 INFO: MongoDB started on PID: 68
octo | 2025-06-30 10:40:11 INFO: check availability of MongoDB...
octo | 2025-06-30 10:40:12 INFO: MongoDB is available
octo | 2025-06-30 10:40:12 INFO: starting cron for background job processing
octo | 2025-06-30 10:40:12 INFO: creating backup.env in /opt/remain/octo-server/config/env
octo | 2025-06-30 10:40:12 INFO: starting node server.js in: /opt/remain/octo-server/server
octo | 2025-06-30T10:40:12.303 [INFO] [default] log4js setup completed, log file: /opt/remain/octo-server/log/octo.log
octo | 2025-06-30T10:40:12.981 [INFO] [Store Service] Octo Admin DB trying to connect...
octo | 2025-06-30T10:40:12.982 [INFO] [Store Service] Octo Admin Database name: octo
octo | 2025-06-30T10:40:13.361 [INFO] [Octo Server] Octo Server started
octo | 2025-06-30T10:40:13.362 [INFO] [Octo Server] Octo Server available on http://172.18.0.2:47007
octo | 2025-06-30T10:40:13.370 [INFO] [Store Service] Octo Admin DB connected successfully!
octo | 2025-06-30T10:40:13.370 [INFO] [Store Service] MongoDB Driver Version: 6.10.0
octo | 2025-06-30T10:40:13.370 [INFO] [Store Service] Mongoose Version: 6.13.8
octo | 2025-06-30T10:40:13.378 [INFO] [Store Service] MongoDB Server Version: 6.0.9
octo | 2025-06-30T10:40:13.386 [INFO] [Store Service] MongoDB Server Compatibility Version: 6.0
octo | 2025-06-30T10:40:13.387 [WARN] [Store Service] MongoDB Server Compatibility Version (6.0) does not match the MongoDB Server Version (6.0.9)
octo | 2025-06-30T10:40:13.389 [INFO] [Session Log Service] Checking sign-in logs to purge...
octo | 2025-06-30T10:40:13.393 [WARN] [Configuration Service] checkProductConfig() Failed to initialize the host name because the product configuration doesn't exist! This warning should not appear once you configure and save the email SMTP server settings using Octo Admin > Email.
octo | 2025-06-30T10:40:13.395 [INFO] [Tenant Service] Initializing tenants...
octo | 2025-06-30T10:40:13.395 [INFO] [Tenant Service] Initializing tenants... Found: 0 organizations
octo | 2025-06-30T10:40:13.395 [INFO] [Tenant Service] Initializing tenants... Done!
octo | 2025-06-30T10:40:13.396 [INFO] [Session Log Service] Checking sign-in logs to purge... No configurations found! Reverting to default settings.
octo | 2025-06-30T10:40:13.396 [INFO] [Session Log Service] Purging 'failed' sign-ins logs older than 365 days...
octo | 2025-06-30T10:40:13.397 [INFO] [Session Log Service] Purging 'successful' sign-ins logs older than 365 days...
octo | 2025-06-30T10:40:13.399 [INFO] [Session Log Service] Purged 0 'successful' sign-in logs.
octo | 2025-06-30T10:40:13.399 [INFO] [Session Log Service] Purging 'successful' sign-in logs to purge... Done
octo | 2025-06-30T10:40:13.399 [INFO] [Session Log Service] Purged 0 'failed' sign-in logs.
octo | 2025-06-30T10:40:13.399 [INFO] [Session Log Service] Purging 'failed' sign-in logs to purge... Done
Docker-Desktop will show the following:
First task in the Octo-server setup is the configuration of the email data. To be able to do this a user has to be registered, followed by a login with the registered username using the Octo server admin token as the password.
Get the Octo admin token
The admin token can be retrieved using the script dc_admintoken.sh (in the same zip file as the docker-compose.yaml). Once the script is run with: ‘./ dc_admintoken.sh’, the file admin.token will be created in the project directory, the created file will contain the password (token) that can be used for an admin login. If you do not have the dc_admintoken.sh script readily available, you can use the command:
docker-compose exec octo-service grep "exports.ADMIN_ACCESS_TOKEN =" /opt/remain/octo-server/config/access_token.js
The output of this command will be similar to the text below:
exports.ADMIN_ACCESS_TOKEN = "fa4dbe12-a826-49d8-9377-649a2b518c32";
The admin token will be the quoted id but without the quotes.
For here on Octo is available from a web browser, either as http://localhost:8080 or https:/localhost:8443 (using Firefox or Opera).
Vulnerabilities with status high
Qs 6.5.3 CVE-2022-24999
+-- express@4.18.2 | +-- body-parser@1.20.1 | | `-- qs@6.11.0 deduped | `-- qs@6.11.0 `-- request@2.88.2 `-- qs@6.5.3
Summary qs before 6.10.3 allows attackers to cause a Node process hang because an __ proto__ key can be used. In many typical web framework use cases, an unauthenticated remote attacker can place the attack payload in the query string of the URL that is used to visit the application, such as a[__proto__]=b&a[__proto__]&a[length]=100000000. The fix was backported to qs 6.9.7, 6.8.3, 6.7.3, 6.6.1, 6.5.3, 6.4.1, 6.3.3, and 6.2.4.
Note that the vulnerability has been fixed and back ported to qs version 6.5.3 (and others, see https://github.com/ljharb/qs/pull/428), the back ported and safe version is being used in Octoserver as a dependency of request 2.88.2.
Dicer 0.3.1 CVE-2022-24434
+-- dicer@0.3.1
Summary This affects all versions of package dicer. A malicious attacker can send a modified form to server, and crash the nodejs service. A complete denial of service can be achieved by sending the malicious form in a loop.
There is no fix available for this issue. We are working on replacing dicer.
A word on sending modified data and prototype pollution vulnerability as is possible with the javascript __proto__ key.
The way Octoserver interacts with the back-end is not sensitive to how prototype pollution can be applied i.e. an unauthenticated request in which a javascript __proto___ key is injected into the request payload. With Octoserver every back-end call is authenticated by a token in the supplied request, unauthenticated requests will not be processed, furthermore all Octoserver requests are backed by a REST API which fully sanitize input requests and make it impossible to manipulate the request data to have the API execute unauthorized actions or exploit security vulnerabilities.
