PRINT:HOWTO:How To Guide
Welcome to the index of the TD/OMS How-To Guide. Please select the link of your interest.
Users and Security
Grant Access
To grant or to revoke access to an application, you may use the STRUAM command or select the User Authority Maintenance function from the Application Management menu (STROMS, option 2, option 1). In case you have a named user setup, you must also add or remove the user from the System User Maintenance function (STRSUM).
To change the owners of an environment you may use the STREM command or select the Environment Maintenance function from the Application Management Menu (STROMS, option 2, option 4) and then select option 8.
We advise to always use a named user in the TD/OMS user tables but in User Authority Maintenance (STRUAM). However, we also support the usage of groups and user classes.
- User Groups
- Instead of a user profile, also any of the user profile groups may be used. You can for instance make a group DEVS and then assign people to this group. The group DEVS can be used in TD/OMS instead of the individual user profiles.
- User Class
- Instead of a user profileor user group, also the user class can be used. For example, in STRUAM you can grant programmer rights to the *PGMR user class.
See:
Add a Developer Environment
To add a new developer to an application you must follow the following workflow:
- Add a new subenvironment for this developer (STREM, option 12, (then F6 or option 3=Copy))
- Use option 13=Transfer Path to assign the user profile of the developer to the new subenvironment.
Make sure to update the target libraries and the compilation library list.
TD/OMS also supports branching. This can be used to create an isolated development environment for every change.
See:
Housekeeping
Housekeeping Considerations
In general, it is only needed to keep an eye on the fallback history. The fallback library may grow quickly, especially on the production machines. It should be cleared on a regular basis with the CLRFBSOMS command.
Other parts of TD/OMS will grow as well but they will not be in your way.
Cleanup after a failed transfer
TD/OMS may not remove transfer artifacts to aid issue resolution. After you have resolved the remote or local issue you have to cleanup any artifacts from the transfer run.
The libraries that TD/OMS uses are all using the following pattern: CCnnnnnn. E.g., OM012345. Please make sure that the following libraries are removed:
Local System
- OMnnnnnn - This is the library where the old objects are moved to during a run
- ONnnnnnn - This is the library where the new objects are moved to during a rollback
- ODnnnnnn - This is the temporary distribution library on the sending machine
- /OMnnnnnn - The transfer directory in the root of the file system
Remote System
- OMnnnnnn - This is the library where the old objects are moved to during a run
- ONnnnnnn - This is the library where the new objects are moved to during a rollback
- ORnnnnnn - This is the temporary distribution library on the receiving machine
- /OMnnnnnn - The transfer directory in the root of the file system
Removing Fallback History
The Clear Fall Back Save library (CLRFBSOMS) command is used to remove all or some entries from the Fall Back Save libraries file and remove the corresponding savefiles from the Fall Back Save library. You should schedule it on a regular basis to avoid a large size of the fallback save library.
The fallback save library is defined per application in the application definition function (STRAD).
You may also selectively purge saved fallback entries. The function name is Fallback Library Maintenance and it is started from the recovery menu or through the STRFBLM command.
See:
Command Clear Fall Back Save library
Fallback Library Maintenance
Removing Log Entries
If you want you may remove log entries with the CLRLOGOMS command. It is recommended to keep at least 7 years of history.
Removing archived sources
You may remove archived sources but we also recommend to keep a long history. They do not take a lot of space and you never know who comes asking. In case you want to remove the sources you can use the Dumped Sources Maintenance (STRDSM) function to purge them with F14.
Requests and Tasks
How To Create a Request
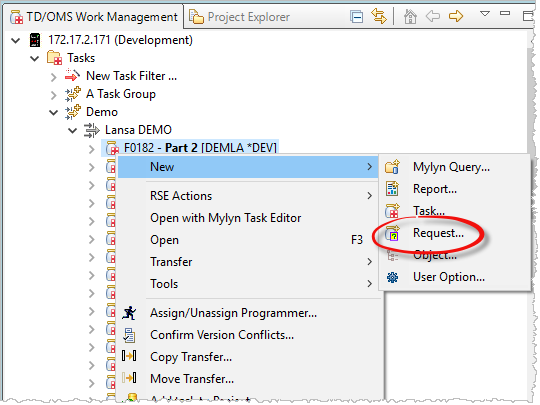
You can start creating a new request by choosing New->Request from the context-menu in any TD/OMS view or by pressing the New Change Request ![]() button in the toolbar. This will start the New Change Request wizard.
button in the toolbar. This will start the New Change Request wizard.
For more information see:
How To Create a Task
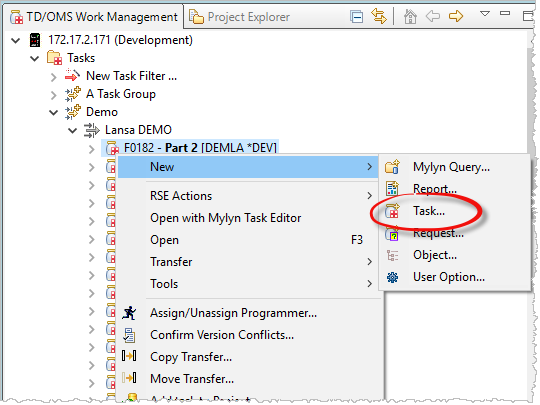
You can start creating a new task by choosing New->Task from the context-menu in any TD/OMS view or by pressing the New Task ![]() button in the toolbar. This will start the New Task wizard.
button in the toolbar. This will start the New Task wizard.
For more information see:
How To Connect an Object
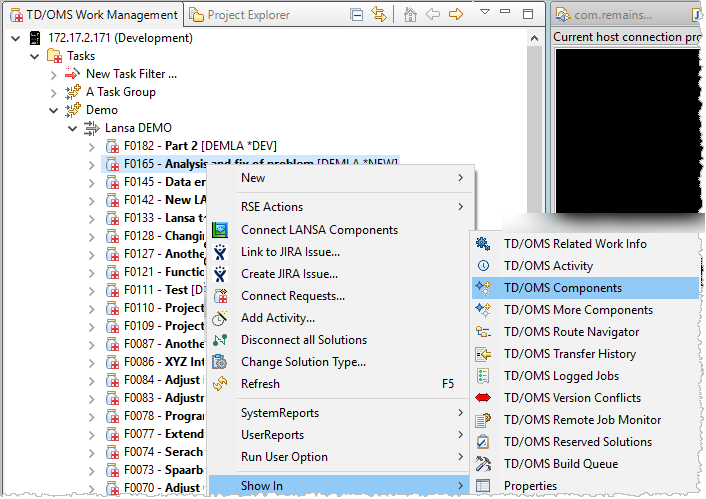
- Select a Task in the Work Management View
- From the Context Menu select Show in/TD/OMS Components
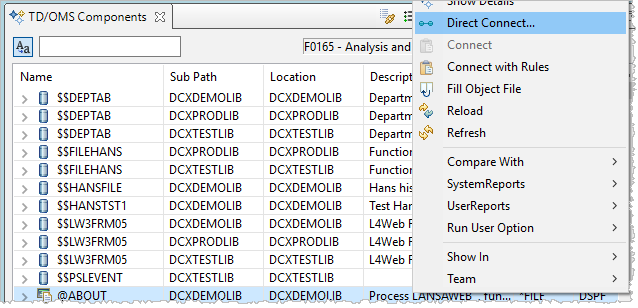
- Find your component in the components view
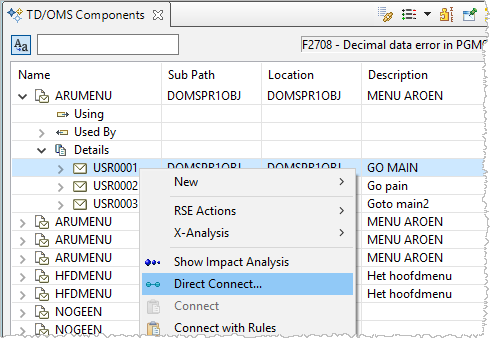
- Right click and select Direct Connect
Further reading:
- TD/OMS Work Management view
- Connecting an Object
- Object Concepts
- Object Version Concepts
- Conflicts when connecting to solutions
How To Connect a Message
- Select a Task in the Work Management View
- From the Context Menu select Show in/TD/OMS Components
- Find your message file in the components view
- Expand the object
- Expand 'Details
- Find your message
- Right click and select Direct Connect
Further reading:
- TD/OMS Work Management view
- Connecting an Object
- Object Concepts
- Object Version Concepts
- Conflicts when connecting to solutions
How To Connect a Source Member
 Note: You cannot connect sources that is the source of an object like an RPGLE program or module source.
       You can only connect free sources like copy members, SQL instructions and so on.
- Select a Task in the Work Management View
- From the Context Menu select Show in/TD/OMS Components
- Find your sourcefile in the components view
- Expand the object
- Expand 'Details
- Find your source member
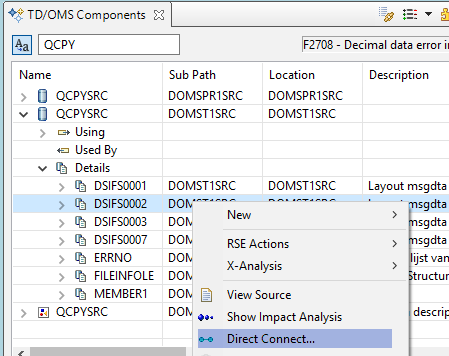
- Right click and select Direct Connect
If you cannot find your member like this. Right click the object (e.g. QCPYSRC) and choose "Show in / TD/OMS Details". This will open a separate view where you can search for your member.
You can also rebuild the list of members by reloading it from the context menu.
Further reading:
- TD/OMS Work Management view
- Connecting an Object
- Object Concepts
- Object Version Concepts
- Conflicts when connecting to solutions
<translate>
How To Create a new Object
There are two different procedures to create a new object.
GUI
- Within TD/OMS (1)
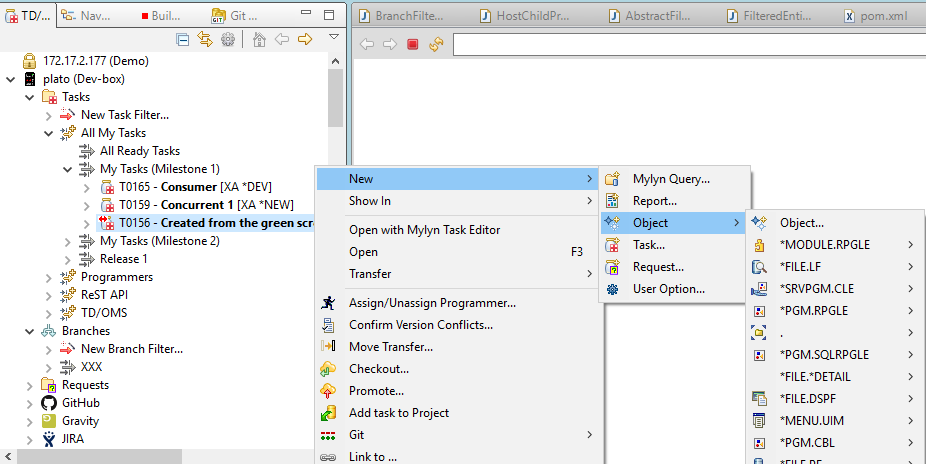
- Select a Task in the work management view and select New/Object... Then enter the information to create a new stub object with an attached source. After the source was created, compile the source to get the object. The object is automatically loaded in the TD/OMS Object registration.
- Within TD/OMS (2)
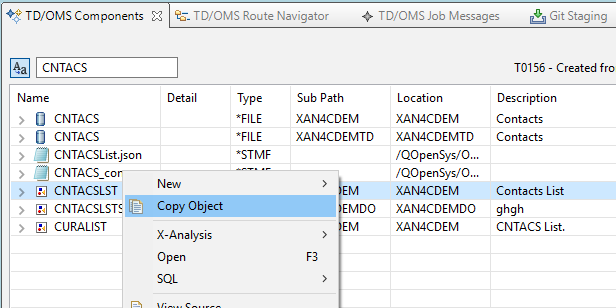
- Select a Task to make it active and find a component you want to use as a base. Then open the context menu and select Copy Object... Depending on the type of object you are presented with one or more templates. Select the one that you want to use and press next. Then continue with the new object wizard.
See Also
Green Screen
- Within TD/OMS
- to create a new object with TD/OMS, open the Fix Maintenance function, create a new Fix or select and existing one to work with the attached components (option 12). Then press F18 and enter the information to create your new object or create a new object by copying an existing object.
- Manually
- First create you object manually through PDM. After you created the source and/or the object you can use one of the following methods to load it in the TD/OMS object registration.
- Fill Object File with the STRFOF command or use the menu in Application Management;
- Use the Change Object API command OMQCHGOB see using API commands ;
- Use the Object Maintenance menu in Work Management and start adding an object with function key F6;
- Start the smart Object Linker menu option in Work Management and fill the input requirements. You can load one or more objects in one run;
- Use command LNKOBJOMS or the menu option in Work Management and enter the exact key values of your object.
See Also
</translate>
How To Checkout an Object or a Detail
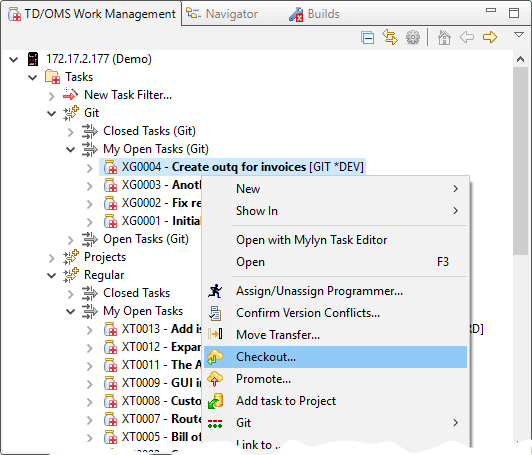
- Right Click the Task in the Work Management View
- Select Checkout or Promote (for the complete wizard use "Move Transfer")
- Follow the wizard
How To Delete an Object everywhere (*TERMINATE)
When you transfer a *TERMINATE solution through the workflow. We will archive the latest version and delete the object in every environment. Also on the remote machines.
To change a solution from *CHANGE to *TERMINATE, follow the following procedure.
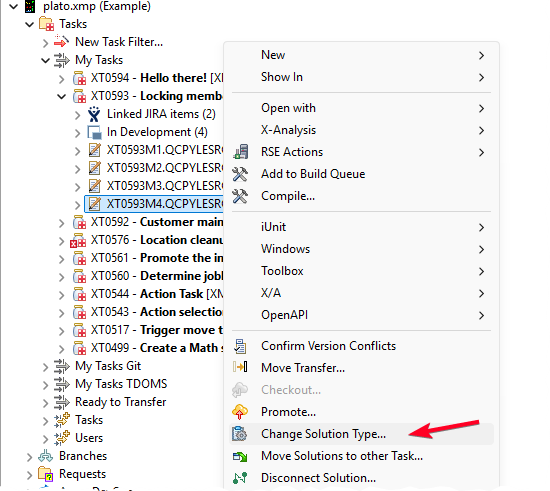
- Right Click the object or member in the Task in the Work Management View
- Select Change Solution Type...
- Follow the wizard to change the type into *TERMINATE
API (CLI)
How to create a Task with API
The command OMQCHGFI is your interface to the Task API. You can use the API for the following functions:
- *ADD
- Use this action code to add a new Task to the TD/OMS database.
- *CHANGE
- Use this action code to change one or more Task attributes.
- *CLOSE
- Use this action code to close the Task database and to perform last record processing. This option enables you to keep the interface to
the Task database open until you explicitly close it. This will make the interface faster.
- *COMPLETE
- Use this action code to complete a Task which has not yet been processed. This action cannot be used if objects are connected to the Task or if the Task has a status other then *NEW. You can use this option to complete obsolete Tasks.
- *CONNECT
- Use this action code to connect a Task to a Request. The Task/Request relationship enables you to group Tasks under one logical Request. A Task can be connected to more than one request in more than one application.
- *COPY
- Use this action code to copy the attributes of a Task to a new Task. The extended description of the Task is also copied, but not the associated word processing document (if any). The connected objects are also not copied.
- *DELETE
- Use this action code to remove a Task from the database (deprecated, use *CLOSE instead).
- *DISCONNECT
- Use this action code to disconnect a Task from a Request.
- *RATIFY
- Use this action code to ratify the Task (or not). This action code is used in combination with the ratification group and the ratification code. Together they determine whether or not the connected objects are able to go to the next environment. Consult the Ratification Group Maintenance function for more information.
- *STATUS
- Use this action code to recalculate and set the status of a Task. The Task status is determined when the object transfer function is ended in a controlled manner so normally this action will not be used. However, when the status of the Task is not updated correctly, you can use this action code to determine the status.
How to create a Request with API
You can use the OMQCHGRE command as an interface to the Request API.
OMQCHGRE ACTC(*ADD) APPL(DEMO) REQ(*GEN) SHRD(DESCRIPTION)
Press F4 to specify other options than the defaults.
Specify the action to be performed with the Request. The possible values are:
- *ADD
- Use this action code to add a new Request to the TD/OMS database.
- *CHANGE
- Use this action code to change one or more of the Request attributes.
- *CLOSE
- Use this action code to close the Request database and to perform last record processing. This option enables you to keep the connection to the database open until you explicitly close it. This will make the interface considerably faster.
- *COMPLETE
- Use this action code to complete a Request that has not yet been processed. This action cannot be used if Taskes are connected to the Request. You can use this option to complete obsolete Requests, hence removing them from the active Request list.
- *CONNECT
- Use this action code to connect a Request to a Task. The Request/Task relationship enables you to group Taskes under one logical Request. A Task can be connected to more that one Request in more than one application.
- *COPY
- Use this action code to copy the attributes of a Request. The extended description is also copied, but not the associated word processing document (if any).
- *DELETE
- Use this action code to remove a Request from the database and to remove all relationships to connected Tasks.
- *DISCONNECT
- Use this action code to disconnect a Task from a Request.
- *RENAME
- Use this action code to rename a Request.
- *RATIFY
- Use this action code to ratify the Task (or not). This action code is used in combination with the ratification group and the ratification code. Together they determine whether or not the connected objects are able to go to the next environment. Consult the Ratification Group Maintenance function for more information.
- *STATUS
- Use this action code to determine the status of a Request. The Request status is determined when the object transfer function is ended in a controlled manner; so normally you should not have to use this action. However, you can use this action code to rebuild the status when it is not updated correctly.
Branching HOWTO
What is Branching
With the Branching function, you are able to create a separate flow inside your application where you can do development that is completely isolated from the other development efforts in the same application.
- Branches can be created on the fly.
- Branches can be long- or short-lived.
- Multiple developers can work on the same branch
- You can have a branch per task or a branch for multiple tasks
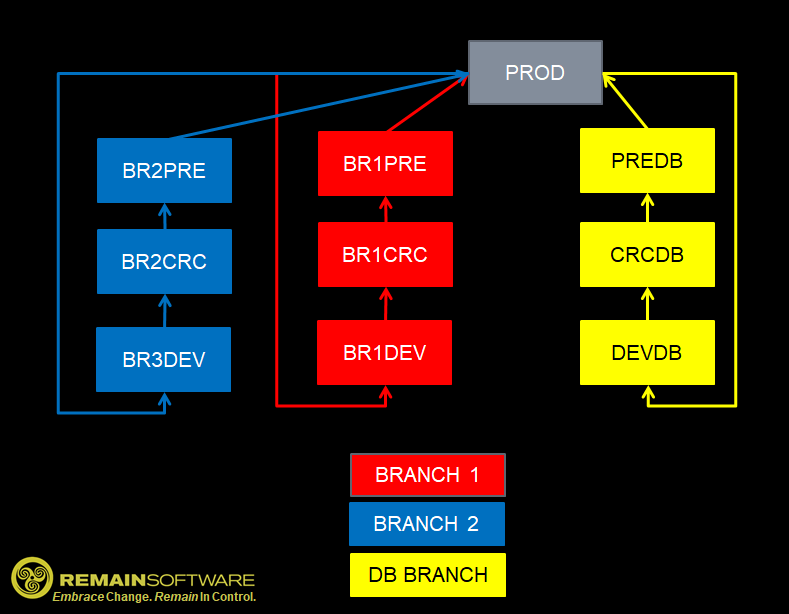
This diagram shows an example application definition with three active branches with four environments.
The yellow branch in this picture is the database branch. It is a long-lived branch and it is used only to do database changes in isolation. If you want to change a file, you can attach all related objects to a task, quickly make the change and then promote the change back into production.
Then there are two feature branches (a new feature is a new function or bug fix, it's modern lingo).
The two branches are red and blue in this picture. In reality, branches don't have colors. What you notice is that each environment (*DEV, *CERTIFICATION and *PRE-PRODUCTION) have cryptic names. These are the actual library names which can only be 10 positions in the IBM i.
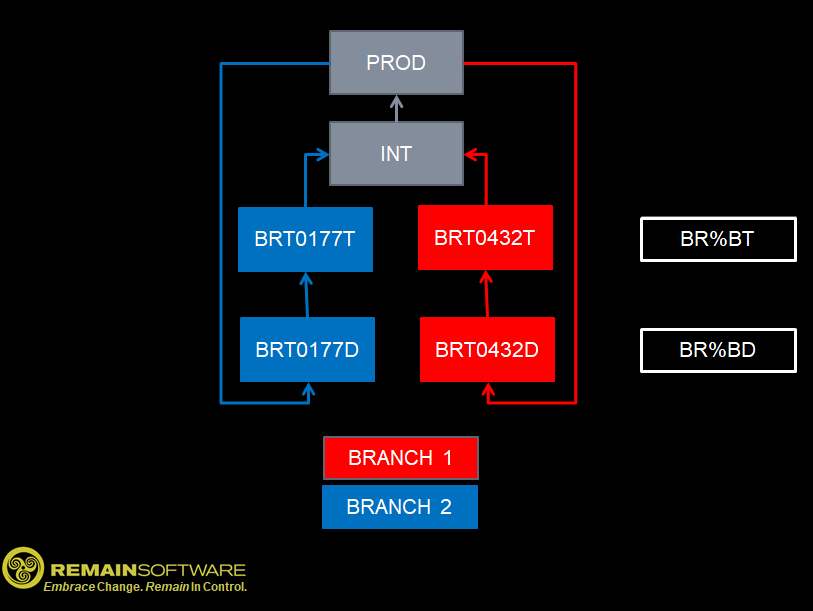
The diagram below shows a different branching strategy with currently two active branches.
Then two feature branches have a separated development and test environment but merge together in the integration environment.
You can also see the template name that has been used to generate unique library names: BR%BD for the development libraries and BR%BT for the test libraries, resulting in the library names you see in the example.
Library and Directory Name Template
In the environment maintenance function, you are able to create a TEMPLATE sub-environment with a compilation LIBL, directories and libraries to receive objects and sources. In addition to the normal library rules, you are also able to specify a template in case you are defining a template library list for branch creation.
The following special values may be used to compile a library name during the creation of a branch:
- %B
- The Branch code is used to compile the name of the library during the creation of the branch. Keep the Branch number to a reasonable width (e.g. 5 or 6) in order to be able to use additional decorations in the name.
- %U
- The first 3 positions of the current user name are used to compile the name of the library during the creation of the branch.
- %S
- A sequence number is used to compile the name of the library during creation of the branch. The sequence number is 6 long and will return to zero after 999999 branches have been created.
Examples for library generation
%S: 000016
%U: PATRICIA
%B: B01233

+---------------------------------+
¦ Base value      Generated value ¦
+---------------------------------+
¦  %U%SD          PAT000017D      ¦
¦  DM%BD          DMB01233D       ¦
¦  %B%S%U         B012336PAT      ¦
+---------------------------------+
%S: 312882
%U: PATRICIA
%B: B1233

+---------------------------------+
¦ Base value      Generated value ¦
+---------------------------------+
¦  %U%SD          PAT312883D      ¦
¦  DM%BD          DMT01233D       ¦
¦  %B%S%U         B123382PAT      ¦
+---------------------------------+
Branching Setup
To use Branching, you have to create special template library lists in the environment maintenance function. After the templates are created, developers are able to create branches from the GUI.
Create Branch
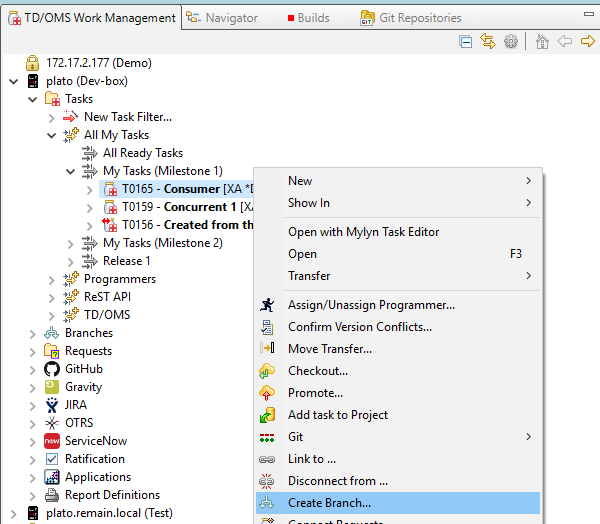
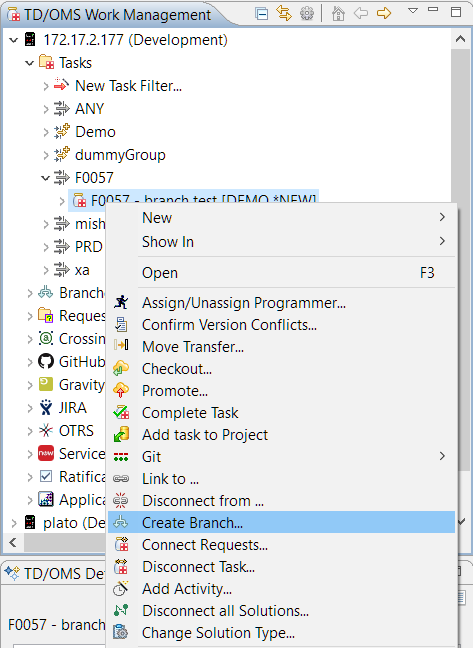
To create a branch, you must right-click on a task (or many) and select the "Create Branch" action.
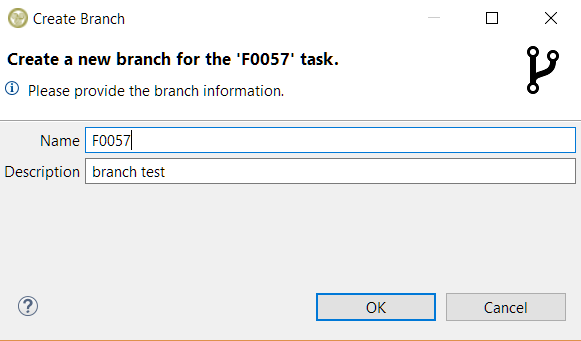
This will open the respective dialog that allows you to choose the name and the description of the branch. For convenience, these values will be automatically filled for you from the task itself. If many tasks are selected then they will be filled in from the first task in your selection. Both fields are mandatory for a branch to be created.
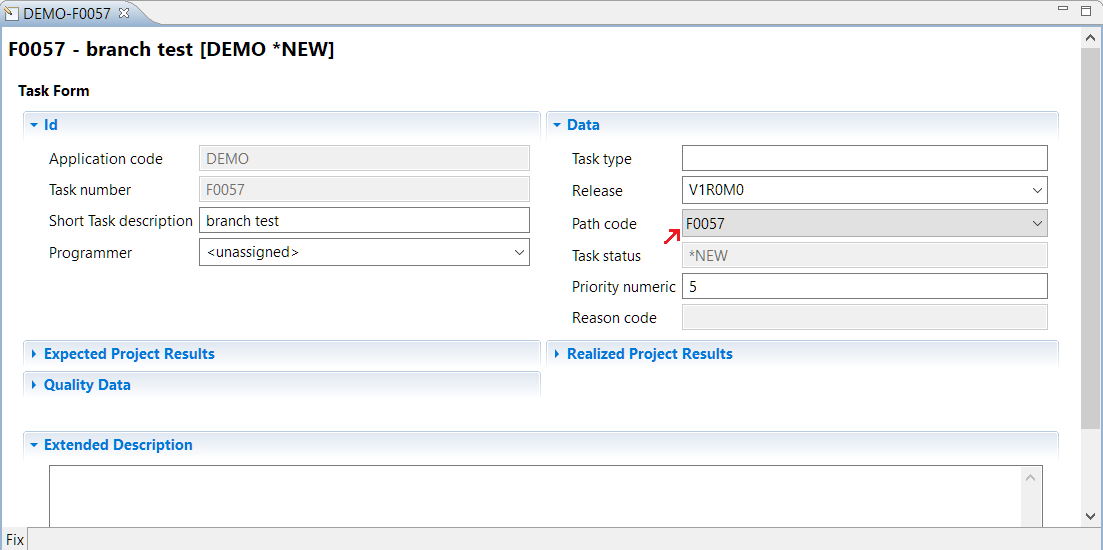
When OK is pressed then the newly created branch will also be assigned to the tasks that you selected to create it.
Delete Branch
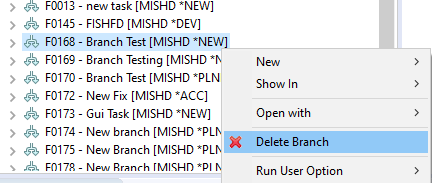
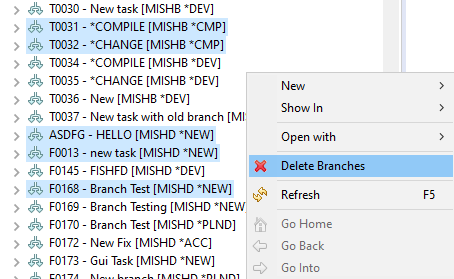
To delete a branch, right click on it and select the Delete Branch option. A branch can be deleted only if all the tasks that are assigned to it are completed meaning that it must have either *NEW or *CMP status.
If many branches need to be deleted then they all need to have the *NEW or *CMP status or the option won't be available. They can also be from different applications but not from a different host.
Another option is to right click a single branch filter.
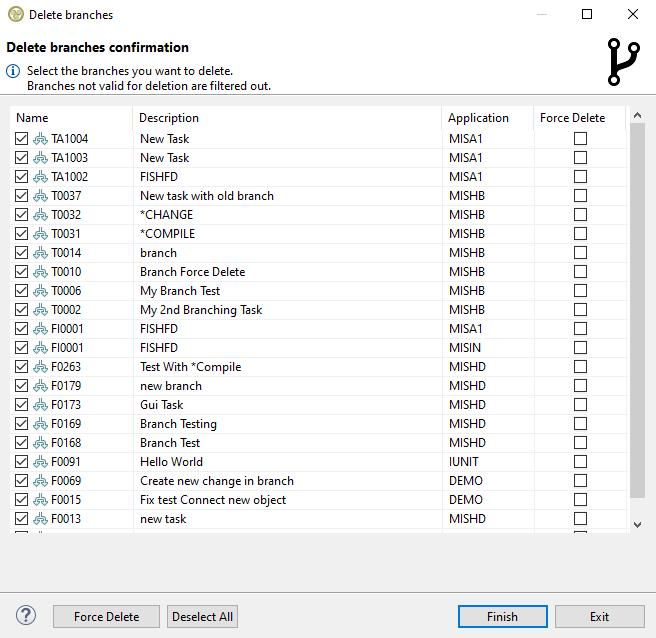
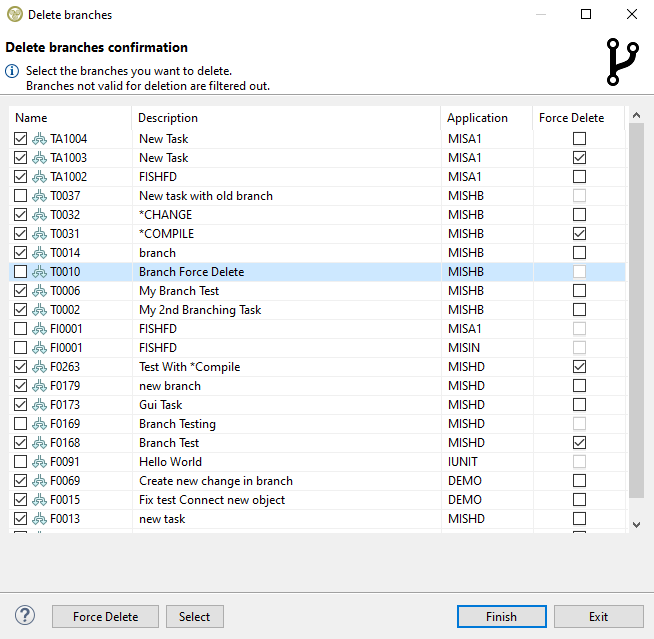
The delete branch wizard has a table with the branches and a checkbox for each one defining if it should be force deleted. Force delete is useful if a branch can't be deleted normally because its libraries or routes still contain objects. In case a branch filter was selected, any branches that don't have the *NEW or *CMP status will be automatically filtered out and won't show in the table. When the wizard opens all branches will be preselected for deletion.
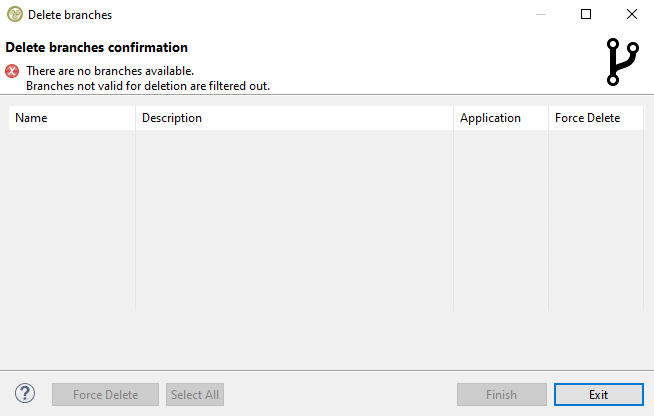
If a branch filter doesn't have a single branch with the *NEW or *CMP status then no branches are valid for deletion and the wizard will show the error with the table will being empty without any possible actions.
Wizard Content and Actions
The table itself has four resizable columns with the branch name, description, application and a checkbox to select if a branch must be force deleted. The table can be ordered by clicking on the columns to sort the branches based on their name, description or application. On the bottom left there are shortcut buttons that allow you to force delete (or don't force delete) all selected branches and a button to select/deselect all available branches or select only the ones that are selected on the table.
When you have made your choices press finish to start the process.
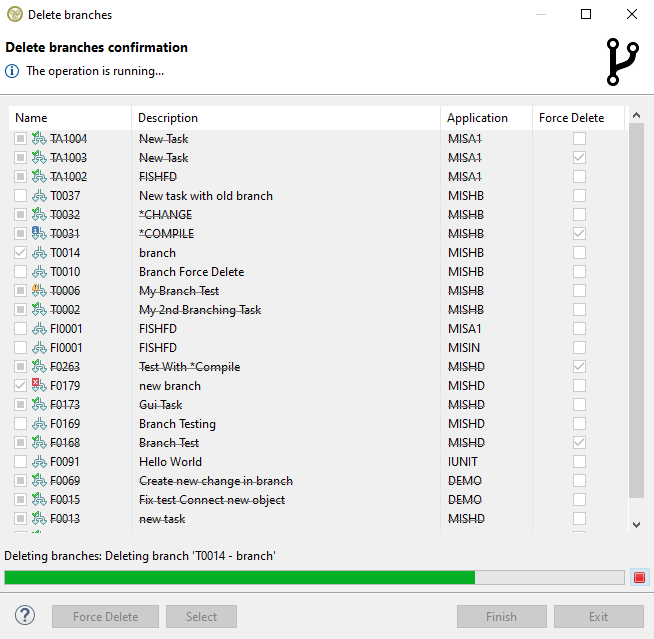
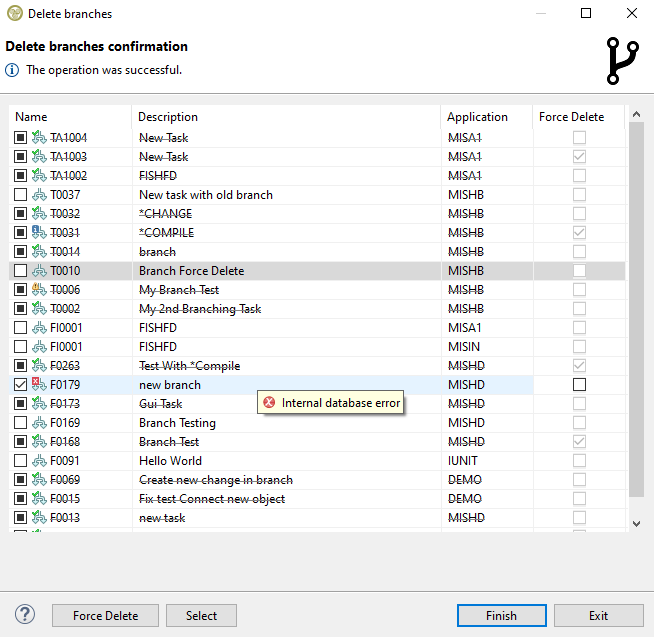
A progress bar will appear showing which branch is processed at the moment. As the progress continues the table will update the branches based on the returned status of each one: Deleted, Deleted with an informational or warning message, or Not Deleted with an error. If the branch is deleted it will have a strike-through line in the middle of its text and if there is no extra information to display then it will have a green check on the top left of its icon. If there is extra information to display it can be viewed when hovering over a branch row with an extra icon.
The operation can be cancelled by pressing the red box at the right of the progress bar and the table will show the status of the branches that have been processed already. Any deleted branches will be gray-checked and won't be available for selection anymore and they will be excluded from any actions in the wizard.
If all available branches on the table are deleted without any extra messages to show then the wizard will close automatically when the process is finished. Any affected objects that are visible in a tree in all open views will be refreshed and all affected open editors will be refreshed or closed accordingly.
HOWTO:Delete a Branch Automatically/en

Components
How To Create a new Object
There are two different procedures to create a new object.
GUI
- Within TD/OMS (1)
- Select a Task in the work management view and select New/Object... Then enter the information to create a new stub object with an attached source. After the source was created, compile the source to get the object. The object is automatically loaded in the TD/OMS Object registration.
- Within TD/OMS (2)
- Select a Task to make it active and find a component you want to use as a base. Then open the context menu and select Copy Object... Depending on the type of object you are presented with one or more templates. Select the one that you want to use and press next. Then continue with the new object wizard.
See Also
Green Screen
- Within TD/OMS
- to create a new object with TD/OMS, open the Fix Maintenance function, create a new Fix or select and existing one to work with the attached components (option 12). Then press F18 and enter the information to create your new object or create a new object by copying an existing object.
- Manually
- First create you object manually through PDM. After you created the source and/or the object you can use one of the following methods to load it in the TD/OMS object registration.
- Fill Object File with the STRFOF command or use the menu in Application Management;
- Use the Change Object API command OMQCHGOB see using API commands ;
- Use the Object Maintenance menu in Work Management and start adding an object with function key F6;
- Start the smart Object Linker menu option in Work Management and fill the input requirements. You can load one or more objects in one run;
- Use command LNKOBJOMS or the menu option in Work Management and enter the exact key values of your object.
See Also
Create a new logical, view or index without the table
In general, these kinds of objects need their parent tables or else they cannot compile. However, creating a new logical/view/index is possible because TD/OMS will create a stub object. In order to compile the logical/view/index, the correct library list is required, OR a correct RUNSQLSTM execution.
During the transfer (check-in/check-out), also the target environment must contain the correct structure to be able to compile or duplicate the logical/view/index correctly.
Deploying logicals/views/indexes
More information can be found here.
How To create & connect a new Menu
There are two different types of Menu definitions: the UIM panel Menu and the DSPF type Menu based on a display file definition and message descriptions in a message file. The special type of source attribute which you need for creating both Menu types, is not a critical obstacle for a correct definition procedure of the Menu objects.
The UIM type Menu procedure
The UIM panel Menu can only be created by compiling a source based on the UIM tag code and with the attribute type MENU. After editing and saving your source code in a source file member with type MENU, you can create the Menu object using the common command CTRMNU. Next you can use one of the common methods to load the new menu object together with its related source member at one time in the TD/OMS object registration.
The DSPF type Menu procedure
Creating a DSPF type menu needs definition of a display file based on a source with attribute type MNUCMD and definition of message descriptions in a message file. Generally you will use the SDA development tool for building and creating this type of Menu. Working in that way your major concern may be to load the set of matching definitions in the TD/OMS registration.
Start the procedure using the New Object function and define objects without source and of type *MENU, *MSGF and display file. The New Object function allows object specification in TD/OMS, while the object does not really exist on your system. Next build and create using for example the SDA tool, the DSPF menu on the system, and be sure that the resulting objects have been created in your development environment (library). Finally return to the menu-related object definitions in TD/OMS, and start for any object an refilling job (STRFOF or Object API). Now The objects will really exist, and their related source and their mutual relations will be loaded in TD/OMS.
Loading Existing Objects
Loading an existing object into the TD/OMS database is done through the OMQCHGOB API. This API can be called from the command line using command OMQCHGOB or by using the Fill Object File function. From the GUI or the Green screen, objects can be added and reloaded in the Components View (GUI) or the Object Maintenance function (Green Screen).
- API OMQCHGOB
- Fill Object File
- TD/OMS Components view
- Use command STROM in the green screen and press F1 for help.
SQL User Defined Functions
SQL user defined functions (UDF) are internal SQL objects.
Manage the UDF through the generated service program
When the UDF creates an external object, it is in the form of a service program. We can use this concept inside TD/OMS to manage the UDF.
The steps to follow are:
- Create a new object template for a SQL UDF with a label
- Create a special compile instruction for this service program
We will take the following scalar function as an example:
 1 Create or Replace FUNCTION PriorityDate(indate DATE) RETURNS CHAR(7)
 2 LANGUAGE SQL
 3 PROGRAM NAME UDFPTYDATE
 4 BEGIN
 5 RETURN(
 6       CASE   WHEN indate>CURRENT DATE-3 DAYS THEN 'HIGH'
 7         WHEN indate>CURRENT DATE-7 DAYS THEN 'MEDIUM'
 8         ELSE 'LOW'
 9      END
10      );
11 END
- Note the program name UDFPTYDATE on line 3. This will create a service program with this name
Creating the Object Template
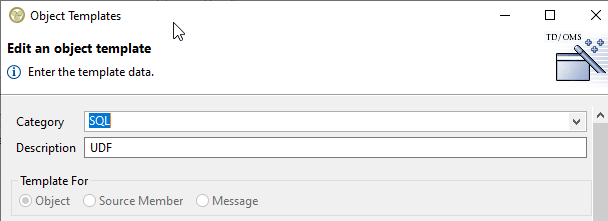
Inside the GUI, create this new object template:
With the following attributes:
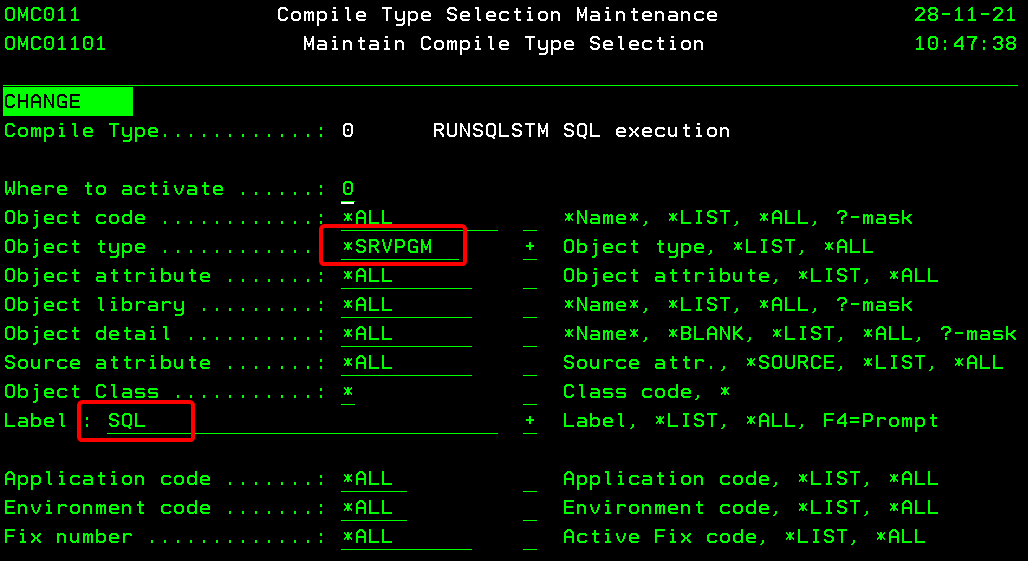
Please note the label SQL because with this, we can control the object to behave exactly how we want.
Creating the Compile Instruction
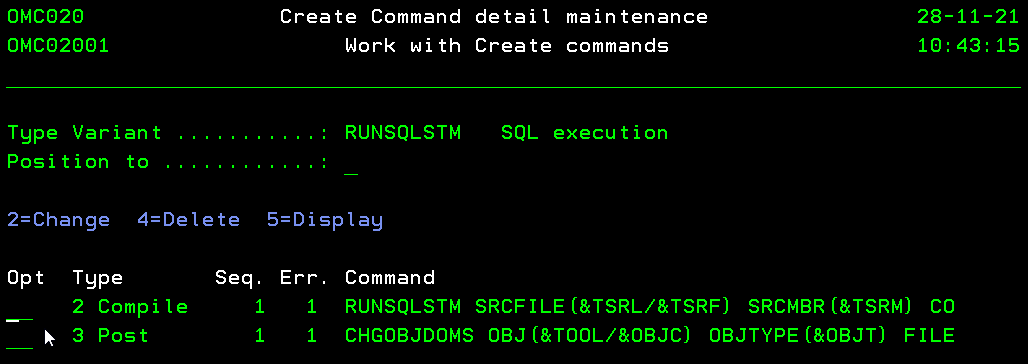
When a *SRVPGM with this label is processed, we want to use RUNSQLSTM to create it. As part of the create, we also want to stamp the object with source information so that TD/OMS can find the source and associate it with the *SRVPGM.
- Compile Command
RUNSQLSTM SRCFILE(&TSRL/&TSRF)
          SRCMBR(&TSRM)
          COMMIT(*NONE)
          DFTRDBCOL(&TOOL)
- Stamp the source into the object
CHGOBJDOMS OBJ(&TOOL/&OBJC)
           OBJTYPE(&OBJT)
           FILE(&SRCL/&SRCF)
           MEMBER(&SRCM)
Creating the Compile Selection
This compile instruction is fired when a service program with this label is processed.
Manage the UDF through a virtual object
In case you do not want to manage the service program but just execute the SQL statement, you can perform the same steps as above, but in this case, create a virtual object. Then use the virtual object as a carrier to execute your SQL statements.
The POST compile step to stamp the source must not be specified in this case.
Manage the UDF through a source only
In case you do not want to manage the service program but just execute the SQL statement, you can create a source member or an IFS file. Also add a label so that you can control how the object is compiled.
Please note that in case of a source member or IFS object, you also have to create a PRE compile command to copy the member or IFS file before running the RUNSQLSTM command. The copy command must not be executed when you are compiling in place.

SQL
SQL User Defined Functions
SQL user defined functions (UDF) are internal SQL objects.
Manage the UDF through the generated service program
When the UDF creates an external object, it is in the form of a service program. We can use this concept inside TD/OMS to manage the UDF.
The steps to follow are:
- Create a new object template for a SQL UDF with a label
- Create a special compile instruction for this service program
We will take the following scalar function as an example:
 1 Create or Replace FUNCTION PriorityDate(indate DATE) RETURNS CHAR(7)
 2 LANGUAGE SQL
 3 PROGRAM NAME UDFPTYDATE
 4 BEGIN
 5 RETURN(
 6       CASE   WHEN indate>CURRENT DATE-3 DAYS THEN 'HIGH'
 7         WHEN indate>CURRENT DATE-7 DAYS THEN 'MEDIUM'
 8         ELSE 'LOW'
 9      END
10      );
11 END
- Note the program name UDFPTYDATE on line 3. This will create a service program with this name
Creating the Object Template
Inside the GUI, create this new object template:
With the following attributes:
Please note the label SQL because with this, we can control the object to behave exactly how we want.
Creating the Compile Instruction
When a *SRVPGM with this label is processed, we want to use RUNSQLSTM to create it. As part of the create, we also want to stamp the object with source information so that TD/OMS can find the source and associate it with the *SRVPGM.
- Compile Command
RUNSQLSTM SRCFILE(&TSRL/&TSRF)
          SRCMBR(&TSRM)
          COMMIT(*NONE)
          DFTRDBCOL(&TOOL)
- Stamp the source into the object
CHGOBJDOMS OBJ(&TOOL/&OBJC)
           OBJTYPE(&OBJT)
           FILE(&SRCL/&SRCF)
           MEMBER(&SRCM)
Creating the Compile Selection
This compile instruction is fired when a service program with this label is processed.
Manage the UDF through a virtual object
In case you do not want to manage the service program but just execute the SQL statement, you can perform the same steps as above, but in this case, create a virtual object. Then use the virtual object as a carrier to execute your SQL statements.
The POST compile step to stamp the source must not be specified in this case.
Manage the UDF through a source only
In case you do not want to manage the service program but just execute the SQL statement, you can create a source member or an IFS file. Also add a label so that you can control how the object is compiled.
Please note that in case of a source member or IFS object, you also have to create a PRE compile command to copy the member or IFS file before running the RUNSQLSTM command. The copy command must not be executed when you are compiling in place.
How to prevent rerouting of SQL objects when renaming or moving
IBM has implemented a rerouting mechanism to make sure SQL schema references do not break when renaming or moving objects.
When a procedure or function is created, the routine information is stored within the *PGM or *SRVPGM. Previously, when librarian commands were used to copy/move/rename the object, the QSYS2/SYSROUTINE, SYSPARMS and SYSRTNDEP catalogs were left unchanged. The following commands (and their API counterparts) are changed to keep the catalogs in sync with the executable object for procedures and functions:
- Create Duplicate Object (CRTDUPOBJ) - the routine catalog information is duplicated and the SYSROUTINE EXTERNAL_NAME column points to the newly duplicated executable object
- Copy Library (CPYLIB) - the routine catalog information is duplicated and the SYSROUTINE EXTERNAL_NAME column points to the newly duplicated executable object
- Rename Object (RNMOBJ) - the routine catalog information is modified with the SYSROUTINE EXTERNAL_NAME column pointing to the renamed executable object
- Move Object (MOVOBJ) - the routine catalog information is modified with the SYSROUTINE EXTERNAL_NAME column pointing to the moved executable object
TD/OMS moves and renames SQL implementation objects before they are replaced with new versions. This causes the side effects mentioned above which are unwanted.
To prevent the re-routing, an environment variable must be set at the job or system level.
ADDENVVAR ENVVAR(QIBM_SQL_NO_CATALOG_UPDATE) LEVEL(*JOB/*SYS)
Create an action that gets executed at UEP 1 with the "Suppress Subsequent" flag set to '1' to avoid setting it multiple times
HOWTO:Relationships & References/en

Compiling - How to Compile
How to define a Compile Type
You can create a compile type by entering the Type Maintenance function. You can change the Type Variant in the top of the display to '0' which should already be the default.
You can use option 3 to copy a Type or press F6 to add a new Type.
Defining Compile Commands
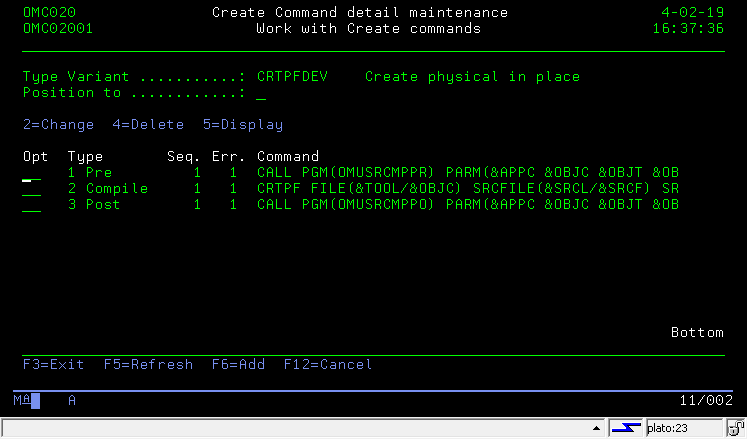
After the type is added you can use option 12 to work with the Type Details. This will bring you to screen OMC02001 where you can add compile commands and commands that need to be executed at the end (post) or at the beginning (pre) of the compile command. You may have many pre- and post commands but only on compile command.
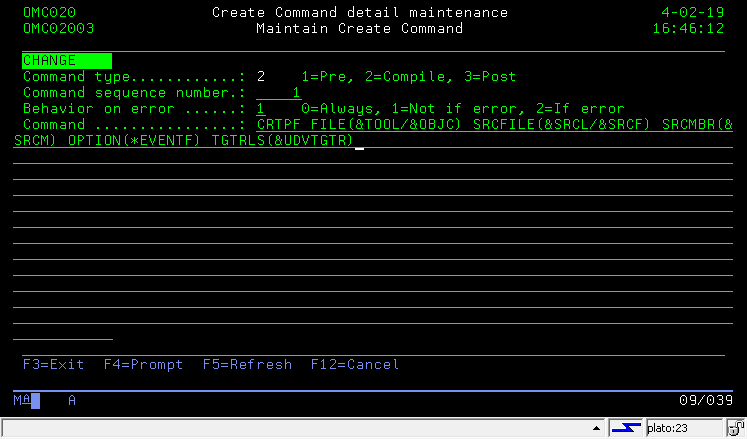
Press F6 to add or option 2 to change a pre-, compile- or post command.
- Command Type
- Specify the execution moment of the command.
- '1' or *PRE
This command type must be used for the Pre-create object commands.
- '2' or *COMPILE
This command type must be used for the create object commands.
- '3' or *POST
This command type must be used for the Post create object commands.
- Sequence
- This field determines the order of execution in case you have multiple pre- or post commands.
- Behavior on error
- '0' Always
This command will be executed regardless of the result of any previously executed commands.
- '1' Not if Error
This command will be executed only if the previous commands were successfully executed.
- '2' If Error
This command will be executed if any of the previous commands ended in error.
- Command
- Specify the command to be executed. The command may contain substitution variables and/or user-defined variables.
Specify pre and post compile commands
Pre- and Post compile commands are part of the compile type.
If pre- and post commands are needed depends on the type of command. Pre- and Post commands that are associated with the managing of the objects are done by TD/OMS. This means that you do not have to worry about removing indexes and logicals from a table before compilation.
Compilation Library List
The compilation library list is set in the Environment Maintenance function. You can set the compilation libraries in many different and easy ways. Please read the following topic.
How to Compile during Transfer
Setup the Compile Instructions with Type Maintenance
Use the Type Maintenance (STRTCM) function to create Compile instructions and attach these to a selection (i.e. when should this compile be executed)
Define a Compile Action
The Action "Compile using types" is already shipped with TD/OMS. If this is not the case follow these instructions on how to create the compile action
Define a Compile Action Group
The Action Group is already shipped with TD/OMS. If this is not the case follow these instructions on how to create the compile group. Then add the action to the action group
Define an Action Selection
Attach one or more Action Selections to the group to determine when the Compile Group should be executed. An example can be found here.
Create SQL with RUNSQLSTM
If you want to create your database with SQL instead of DDS then the "compile" command is RUNSQLSTM.
Caveats
How to use the library list with RUNSQLSTM
RUNSQLSTM assumes that all your tables and indexes are in your target schema. This is often not the way we work in IBM i. Our community is happy to create a logical in DEV over a physical in TST. The RUNSQLSTM command is not designed to handle this and most other databases do not even support this feature.
You can use the Default Collection (DFTRDBCOL) parameter to point to a specific schema but this will not take the library list into consideration. Using the DFTRDBCOL parameter will create your SQL object in this library but it also assumes that all references are also in this library.
It so happens that if you leave the DFTRDBCOL set to *NONE then the library list will be used to create the SQL object. However, your object will be created in the same library as the reference object so this is not a complete solution.
In order to take advantage of the library list (DFTRDBCOL is set to *NONE) we need to qualify the target element in the SQL source. We can use a TD/OMS variable for this:
CREATE INDEX &TOOL/MYINDEX ON MYTABLE
When you pre-process the source before compile with the SBSVAROMS command, it will replace &TOOL with the correct target library:
SBSVAROMS SRCF(&SRCL/&SRCF) SRCM(&SRCM) TSRF(QTEMP/&SRCF) TSRM(&SRCM) BUF(&BUF)
PLEASE NOTE: We now use QTEMP as the source location because that is where the source is converted to
SBSVAROMS and QTEMP source member
In the example above we described how to use QTEMP as an intermediate source library. In some cases this can conflict with the SQL preprocessor when creating a Function and possible other SQL artifacts.
Assume a DB2 function entirely in SQL:
Pre-Compile:
SBSVAROMS to QTEMP/QSQLSRC(EXAMPLE)
Compile:
RUNSQLSTM from QTEMP/QSQLSRC(EXAMPLE)
Source Code:
CREATE FUNCTION &TOOL.EXAMPLE( "ORDER" DECIMAL(8, 0),
                                    ITEM VARCHAR(35),
                                    QTYPROD DECIMAL(11, 3) )
      LANGUAGE SQL
This fails. This is because the DB2 function actually creates a CLE *SRVPGM called EXAMPLE. To do this, it takes the SQL member, precompiles it to C code, and then compiles the *SRVPGM using the C compiler. The precompiled C code is stored in QTEMP/QSQLSRC(EXAMPLE) as well as QTEMP/QSQLT00000(EXAMPLE). When the SBSOMSVAR command is used to QTEMP, the precompiler cannot overwrite the member in QTEMP/QSQLSRC(EXAMPLE) because it is in use.
In order to get around this change the SBSVAROMS destination source file to use QTEMP/&SRCFX (this will lead to use a source file appended with 'X', e.g. 'QSQLSRCX') and then the RUNSQLSTM to match:
Pre-Compile:
SBSVAROMS to QTEMP/&SRCFX(EXAMPLE)
Compile:
RUNSQLSTM from QTEMP/&SRCFX(EXAMPLE)
This completes successfully.
Create SQL with RUNSQLSTM from IFS
The RUNSQLSTM can also process sources from the IFS.
How to use the library list with RUNSQLSTM
RUNSQLSTM assumes that all your tables and indexes are in your target schema.
You can use the Default Collection (DFTRDBCOL) parameter to point to a specific schema. Using the DFTRDBCOL parameter will create your SQL object in this library but it also assumes that all references are also in this library.
Substitution variable &TIOL (To IFS Object Library)
To be able to run the DFTRDBCOL parameter in the RUNSQLSTM substitution variable &TIOL is available in the compile commands.
How is the “To IFS Object Library (&TIOL)” determined.
The “To IFS Object Library” is retrieved from the Environment definitions.
The library list sequence of the IFS file (Route) is retrieved and used to determine the corresponding target library (&TIOL):
- The sub-environment is searched with the “Location type” for the IFS file.
- If no target found then a search is done for object type “*STMF”.
- If still no target is found the *ALL library will be used.
How to use the Source Attribute in selections
The source attribute is filled with the extension of the IFS file, e.g. for *STMF “Customer.PFSQL” the source attribute is “PFSQL”. This source attribute can then be used as selection criteria in:
Parallel Compile
The TD/OMS parallel compile option enables you to define a job queue for objects that can be compiled in parallel, like programs. Suppose you have a task with 5 files and 50 programs. After the files are compiled one by one, the programs can be compiled in parallel.
In order to activate parallel compiles, you have to create a job queue that will release multiple jobs at a time. How many depends on you. You can use the job queue OMSJOBQ that is created in the TD/OMS subsystem or you can create one yourself.
After the job queue is created you have to add the single and parallel queues to the system registry.
Since
This function is available since V11.0M01
HOWTO:Compiling/Get a compile listing in RDi/en
How to Override the Default Compile Command
In the green screen you may go to the fix maintenance function (STRFM) use option 12 to work with solutions and then use option 12 to override the compile commands for this specific object.
Using the GUI
The TD/OMS Compile View enables you to overrides creation commands for the selected component. You will see in this section that sometimes we talk about Create and sometimes about Compile, we mean the same thing (strictly speaking, the compilation is just one way to create something). Compile overrides are create commands that differ from the normal commands for this specific type. Suppose you want to create all physical files with MAXMBRS(1) except for some special files. We are going to take this example in the following explanation.
TD/OMS Compile View
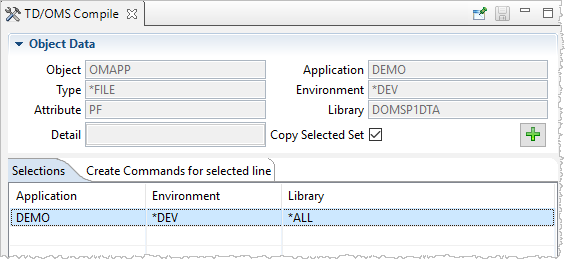
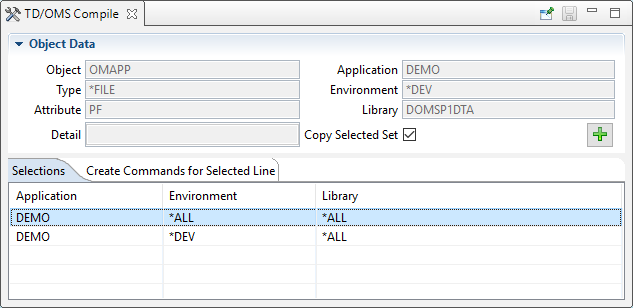
Open the Compile View by using the "Show in" context menu on a solution or component. In our case, we have selected file OMAPP. The following view is opened:
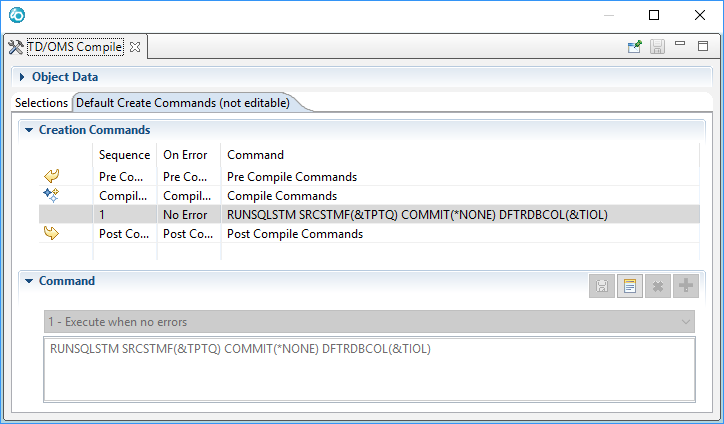
The view shows overrides on the selection tab. In this case, there is already an override for this file when it is created in environment *DEV in application DEMO. If you click on this line then its create commands are loaded on the tab "Create Commands for Selected Line". Click on this tab to see the create commands for this selected line. If you want to see the default create commands for this object then press CTRL and click on the line again. The will be "unselected" and the second tab will change the contents to "Default Create Commands (not editable)". The default create commands for this component can then be viewed.
Creating a new Override
Press the big green ![]() button to create a new override selection. The "Copy Selected Set" tickbox determines if you want to copy the creation commands for the selected line into the new override. If you untick this box, the default create commands will be copied for this new override.
button to create a new override selection. The "Copy Selected Set" tickbox determines if you want to copy the creation commands for the selected line into the new override. If you untick this box, the default create commands will be copied for this new override.
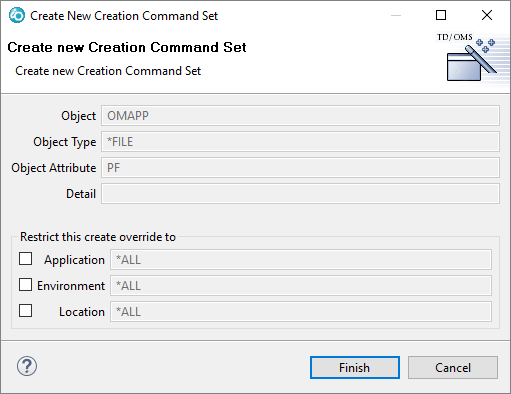
The tick boxes indicate the selection for which this override is active. If you leave all the tick boxes unselected as shown in the previous picture then this override will be active for all occurrences of this file. You can restrict when the override is active by selecting one or more selection boxes.
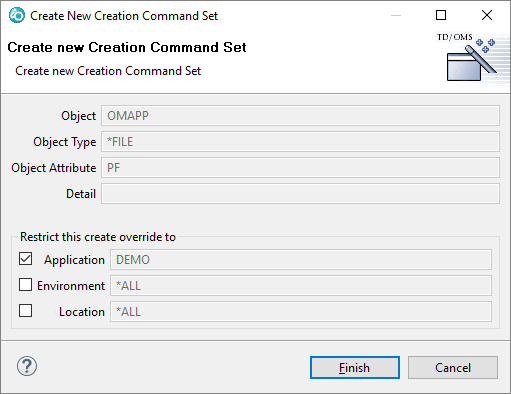
In this case we want to make one additional override to compile the file always with the MAXMBRS(*NOMAX) setting anywhere in the DEMO application. Tick the Application box as indicated in the above picture. Press the "Finish" button to create the override.
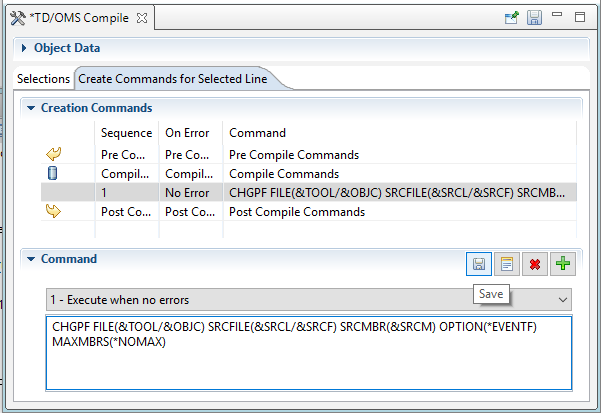
Changing the creation commands
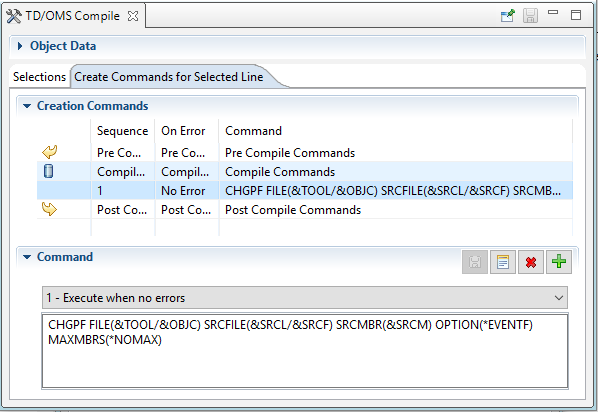
The "Selections" tab will be loaded with our new entry and it will be automatically selected. Selecting a line in the "Selections" tab will load the create commands in the "Create Commands for Selected Line" tab. Click on the tab to reveal the commands. Please note that the "Object Data" section will be collapsed to make more room for the create commands. If you wish, you can expand it manually.
As you can see from the image, there are already compile commands created for this new entry. If you want to remove one of the default commands you can select it and press ![]() to remove it.
to remove it.
To create a new compile command, select the middle line that says "Compile Commands" and then press the ![]() button.
button.
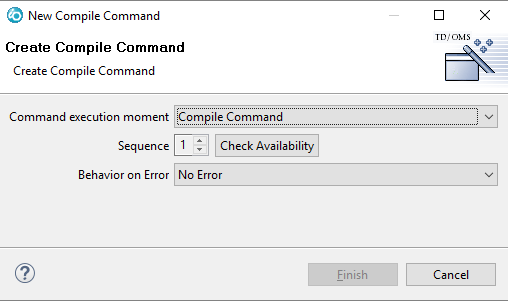
a new wizard will pop up that enables you to create a new command. The command can be created in the "Pre" ,"Compile" or "Post" section. Since our view is already filled correctly, we just press "Finish". If you get a warning telling you that the sequence is already taken or the Finish button is not enabled, then press the "Check Availability" button to tell you if the sequence is available. Change the sequence if needed. There can only be one compile command, but many pre and post commands.
Also, specify the Behavior on Error field to indicate if you want this command to be executed:
- No Error
- Execute this command if no errors were found in any of the preceding commands.
- Error
- Execute this command if errors were found in any of the preceding commands. You can use this field to send a message or do error recovery.
- Always
- Always execute the command no matter how the previous commands ended.
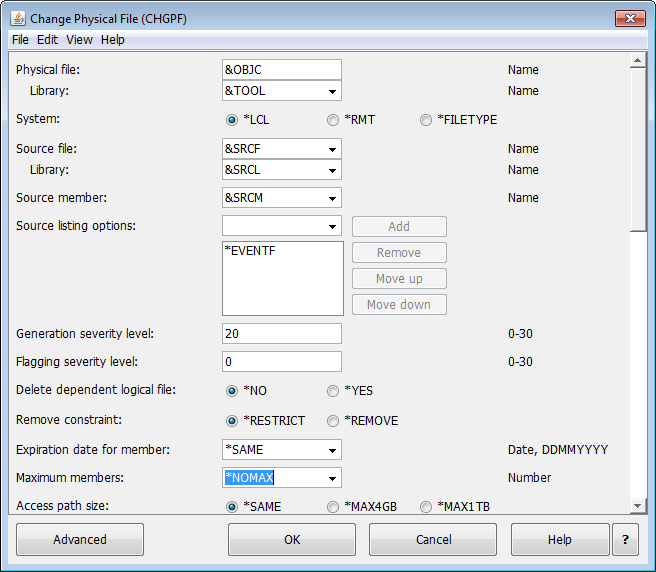
When we return to the Compile view we see that the compile command is copied from the default compile command. All we have to do is to alter our command and we can do that by pressing the "Prompt" (![]() ) button.
) button.
In the prompt dialog we can change the values that we want and press "Finish" Please note that you can use Substitution variables that will be filled in by TD/OMS.
Finally, press the "Save" button to save your work.
If you select a solution for Compile, you will see that the new compile command is active.
Compilation command execution hook
The execution of the compilation instructions has been moved to the user program OMC022EXC. The source of this program can be found in the QUSRSRC file. See the program source for additional instructions. HOWTO:GUI/en
User Exits
How to Check the Objects in a Transfer
Before or during the transfer you want to do some checking and based on the outcome you want to stop the transfer or remove the object.
Before a Transfer
If you want to check the objects before a transfer you have to use the Exception Mechanism and create an Exception program that does the checking. Then based on the result you can send an escape message that will cancel the transfer. You can also blank the target locations of the object so that it does not get included in the transfer.
Steps:
- Create and compile an Exception Program by copying QUSRSRC(OME__03C)
- Create an Exception that uses the program (STRXFM)
- Create an Exception Selection (STRXSM) that activates the selection on UEP-3 with When to Activate set to 4=Pre-Processing
During a Transfer
If you want to check the objects during a transfer you can use the Action mechanism. If the Action must be critical then place it in an Action Group first. Create an Exception procedure to do the checking. Then create an Action that invokes the Exception procedure by using the STRPRCOMS command. Then based on the result you can set the return status to *TERM to cancel the transfer and start rollback for any object already processed. You can also blank the target locations of the object so that it gets kicked from the transfer.
Further reading
- What are exception selections
- What are exception functions
- OMS Exception Management
- Execute an Exception Procedure
- Actions Users Guide
Example of an Exception Procedure
/* ---------------------------------------------------------------- */
/* Program prevents *QRYDFN obejcts to be processed                 */
/* they will be removed from the transfer                           */
/* This is an example exception procedure.                          */
/* ---------------------------------------------------------------- */

         /* ------------------------------------------------------- */
         /* Program start                                           */
         /* ------------------------------------------------------- */
            PGM        PARM(&XFUC &XUEP &CRII &FREE &BUF &STAT)

         /* ------------------------------------------------------- */
         /* Declare parameters                                      */
         /* ------------------------------------------------------- */
            DCL        VAR(&XFUC) TYPE(*CHAR) LEN(10)
            DCL        VAR(&XUEP) TYPE(*CHAR) LEN(1)
            DCL        VAR(&CRII) TYPE(*CHAR) LEN(1)
            DCL        VAR(&FREE) TYPE(*CHAR) LEN(256)
            DCL        VAR(&BUF)  TYPE(*CHAR) LEN(1024)
            DCL        VAR(&STAT) TYPE(*CHAR) LEN(5)

         /* ------------------------------------------------------- */
         /* Initialize the return status with *NORM                 */
         /* ------------------------------------------------------- */
            CHGVAR     VAR(&STAT) VALUE('*NORM')

/* ---------------------------------------------------------------- */
/* Processing starts here.                                          */
/* This is an example exception procedure.                          */
/* ---------------------------------------------------------------- */

         /* ------------------------------------------------------- */
         /* Pull values from the buffer.                            */
         /* ------------------------------------------------------- */
            PULLVAROMS BUF(&BUF) INTL(*V5R1M0) APPL(&APPL) +
                         OBJC(&OBJC) OBJT(&OBJT) FROL(&FROL)

         /* ------------------------------------------------------- */
         /* Test the object code                                    */
         /* ------------------------------------------------------- */
            IF         COND(&OBJT *EQ '*QRYDFN') THEN(DO)

            /* This is how to remove this object from the transfer */

            PUSHVAROMS TOOL()
            PUSHVAROMS TSRL()
            PUSHVAROMS TSRF()
            PUSHVAROMS TSRM()
            CHGVAR     VAR(&STAT) VALUE('*TERM')

            ENDDO
            ENDPGM
How To remove an object from the transfer at runtime
You can remove a component from the transfer at runtime by blanking the target fields in an exception procedure:
Example of an Exception Procedure
/* ---------------------------------------------------------------- */
/* Program prevents *QRYDFN obejcts to be processed                 */
/* they will be removed from the transfer                           */
/* This is an example exception procedure.                          */
/* ---------------------------------------------------------------- */

         /* ------------------------------------------------------- */
         /* Program start                                           */
         /* ------------------------------------------------------- */
            PGM        PARM(&XFUC &XUEP &CRII &FREE &BUF &STAT)

         /* ------------------------------------------------------- */
         /* Declare parameters                                      */
         /* ------------------------------------------------------- */
            DCL        VAR(&XFUC) TYPE(*CHAR) LEN(10)
            DCL        VAR(&XUEP) TYPE(*CHAR) LEN(1)
            DCL        VAR(&CRII) TYPE(*CHAR) LEN(1)
            DCL        VAR(&FREE) TYPE(*CHAR) LEN(256)
            DCL        VAR(&BUF)  TYPE(*CHAR) LEN(1024)
            DCL        VAR(&STAT) TYPE(*CHAR) LEN(5)

         /* ------------------------------------------------------- */
         /* Initialize the return status with *NORM                 */
         /* ------------------------------------------------------- */
            CHGVAR     VAR(&STAT) VALUE('*NORM')

/* ---------------------------------------------------------------- */
/* Processing starts here.                                          */
/* This is an example exception procedure.                          */
/* ---------------------------------------------------------------- */

         /* ------------------------------------------------------- */
         /* Pull values from the buffer.                            */
         /* ------------------------------------------------------- */
            PULLVAROMS BUF(&BUF) INTL(*V5R1M0) APPL(&APPL) +
                         OBJC(&OBJC) OBJT(&OBJT) FROL(&FROL)

         /* ------------------------------------------------------- */
         /* Test the object code                                    */
         /* ------------------------------------------------------- */
            IF         COND(&OBJT *EQ '*QRYDFN') THEN(DO)

            /* This is how to remove this object from the transfer */

            PUSHVAROMS TOOL()
            PUSHVAROMS TSRL()
            PUSHVAROMS TSRF()
            PUSHVAROMS TSRM()
            CHGVAR     VAR(&STAT) VALUE('*TERM')

            ENDDO
            ENDPGM
How To Change the Target Location of an Object at Runtime
You can change the target location at runtime by using an Action or Exception command CHGVAROMS. You can also create an Exception Procedure that will change the target variables in a program.
Change the Target Location at Runtime
/* ---------------------------------------------------------------- */
/* Program moves *QRYDFN objects to another library                 */                           */
/* This is an example exception procedure.                          */
/* ---------------------------------------------------------------- */

         /* ------------------------------------------------------- */
         /* Program start                                           */
         /* ------------------------------------------------------- */
            PGM        PARM(&XFUC &XUEP &CRII &FREE &BUF &STAT)

         /* ------------------------------------------------------- */
         /* Declare parameters                                      */
         /* ------------------------------------------------------- */
            DCL        VAR(&XFUC) TYPE(*CHAR) LEN(10)
            DCL        VAR(&XUEP) TYPE(*CHAR) LEN(1)
            DCL        VAR(&CRII) TYPE(*CHAR) LEN(1)
            DCL        VAR(&FREE) TYPE(*CHAR) LEN(256)
            DCL        VAR(&BUF)  TYPE(*CHAR) LEN(1024)
            DCL        VAR(&STAT) TYPE(*CHAR) LEN(5)

         /* ------------------------------------------------------- */
         /* Initialize the return status with *NORM                 */
         /* ------------------------------------------------------- */
            CHGVAR     VAR(&STAT) VALUE('*NORM')

/* ---------------------------------------------------------------- */
/* Processing starts here.                                          */
/* This is an example exception procedure.                          */
/* ---------------------------------------------------------------- */

         /* ------------------------------------------------------- */
         /* Pull values from the buffer.                            */
         /* ------------------------------------------------------- */
            PULLVAROMS BUF(&BUF) INTL(*V5R1M0) APPL(&APPL) +
                         OBJC(&OBJC) OBJT(&OBJT) FROL(&FROL)

         /* ------------------------------------------------------- */
         /* Test the object code                                    */
         /* ------------------------------------------------------- */
            IF         COND(&OBJT *EQ '*QRYDFN') THEN(DO)

           /* This is how to change the target library */

           PUSHVAROMS TOOL('NEWLIB')

           ENDDO
           ENDPGM
How To Change source file record length for new objects
When a new object is created and the source file does not yet exist in the library the source file is created, the record length is determined as follows:
- First check the source file length in the dump library
- If it does not exist use 132 length
- if program omo008c2u exists then call it (see source file "QUSRSRC" in the TD/OMS library for an example)
- Does that program fail or does not exist then we create it with the found length
New object create source file
/* ---------------------------------------------------------------- */
/* Description                                                      */
/* ---------------------------------------------------------------- */
/*                                                                  */
/* Program ....: OMO008C2U                                          */
/* Function ...: Creates a source file in the "New Object"          */
/*               process                                            */
/* Parameters .: &NSRF - New Source file                            */
/*               &NSRL - New Source library                         */
/*               &RECL - Proposed record lenght                     */
/*               &STAT - Return status                              */
/*                       *NORM - Source was created normally        */
/*                       *TERM - Sourcefile could not be created    */
/*                                                                  */
/* Compile this program if you want to override the source file     */
/* creation in the 'new object' process of the GUI.                 */
/*                                                                  */
/* ---------------------------------------------------------------- */

            pgm        parm(&NSRF &NSRL &RECL &STAT)

            DCL        VAR(&NSRL) TYPE(*CHAR) LEN(10)
            DCL        VAR(&NSRF) TYPE(*CHAR) LEN(10)
            DCL        VAR(&recl) TYPE(*dec)  LEN(15 6)
            DCL        VAR(&STAT) TYPE(*CHAR) LEN(5)

            MONMSG     MSGID(CPF0000) EXEC(GOTO CMDLBL(ERROR))

            chgvar     &stat '*NORM'
            CRTSRCPF   FILE(&NSRL/&NSRF) RCDLEN(&RECL) TEXT('Created by +
                         TD/OMS') CCSID(*HEX)
            MONMSG     MSGID(CPF5113 CPF7313)
            RETURN

error:
            chgvar     &stat '*TERM'
            monmsg     (cpf0000 mch0000)
            dmpclpgm
            MONMSG     MSGID(CPF0000)
            ENDPGM
Add Log entries to the TD/OMS Log
TD/OMS has a log that can be viewed with DSPLOGOMS (in the green screen) or through the various "transfer history" actions in the GUI. You can add your own log entries to the TD/OMS log file. The log file name is OMLOG. Adding entries can be done in two ways.
1. Log the last entries from the job log
Suppose you monitor a message and you want to log this message. The construct would be something like this:
  CALL XYZ
  MONMSG CPF0000 exec(do)
    CALL OMX928C
  ENDDO
Calling OMX928C like this will log the last message in the program message queue and put it in the TD/OMS log file.
You may also log your own messages like this:
SNDPGMMSG MSGID(CPF9898) +
         MSGF(QCPFMSG)  +
         MSGDTA('Hello World!') +
         TOPGMQ(*SAME)
CALL OMX928C
PRE V13.0.1
If you are before TD/OMS version V13.0.1, the message will be added to the TD/OMS log file and removed from the joblog.
V13.0.1 and Higher
If you are on TD/OMS version V13.0.1 or higher, the message will NOT be removed from the joblog. In addition, when you log an ESCAPE message, also all diagnostic messages that precede the escape message will be copied into the TD/OMS log file.
2. Add your own trace and debug messages to the TD/OMS Log
Starting from version 11.1 you can put TD/OMS in debug mode using the STRSD command in the green screen. Service program OMLOGGER contains a number of procedures that enable you to add your debug and trace messages.
You can find examples on how to use the logging facility in member QUSRSRC/LOGTEST.CLLE.
HOWTO:Distribution/en

License
Request TD/OMS License Codes
To generate license codes we need to have the following information:
- Serial Number
- Use the command DSPSRVAGT TYPE(*SRVREGINF) to get the serial number.
- LPAR Number (logical partition number)
- Use the command DSPSRVAGT TYPE(*SRVREGINF) to get the LPAR number.
- Processor Feature code
- Use the command DSPSYSVAL SYSVAL(QPRCFEAT)
- Use command SYSINFOMS to retrieve the above mentioned information when TD/OMS version V11.0M02 or higher is installed.
Send that information to us together with the information if it concerns a development or a deployment partition.
How To Transfer a License
If you want to transfer a license from one machine to another you have to make an official request by filling out one of the forms on the following page.
https://remainsoftware.com/extranet/software-licenses
How To Get a Temporary License
You can get a temporary license at no costs for testing and other purposes. Please fill out the appropriate form on the following page:
https://remainsoftware.com/extranet/software-licenses
How To Request for a Permanent Sleeping License
If you want to have a permanent license for a roll-over machine you can get one for a special price. Contact sales at sales@remainsoftware.com and send them the filled out form from the following page:
https://remainsoftware.com/extranet/software-licenses
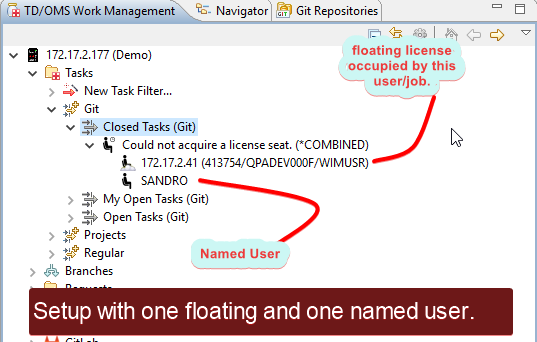
How does a Floating License Work
A floating license enables a user to acquire a license for a short period of time. After the user ends the job, the license is released and someone else can consume the license.
Assume we have a system with one named user assigned to user Bob and one floating license.
- Bob starts the GUI
- Bob may always start TD/OMS because Bob is a named user. Bob is the main developer and Bob requires constant access to TD/OMS.
- Alice logs on to the green screen
- If Alice does not start TD/OMS then a license is not acquired.
- Carl logs on to the green screen and starts Request Maintenance
- Carl is granted access and thereby takes the floating license seat.
- Carl starts the GUI
- Carls starts the GUI and has access to TD/OMS. From the same IP address, Carl can open as many sessions as he likes in TD/OMS using this one floating license.
- Alice starts Request Maintenance
- Alice is not granted access because Carl has occupied the license seat.
- Alice starts the GUI
- The GUI telss Alice in a friendly way that there is not license available. The GUI will try to acquire the license every three minutes.
- Carl want to solve a problem on another user's computer. He starts a 5250 session and opens Request Maintenance
- Carl is blocked because Carls already takes the license session from another computer.
- Carl logs off from his first session and walks back to the user and tries to start Request Maintenance
- If Carl walked too slowly then the GUI that Alice started may have acquired the license.
Troubleshooting
How to get the Bundle States
Open the OSGi console and type:
osgi> ss remain
Copy the resulting list and attach it to the helpdesk item.
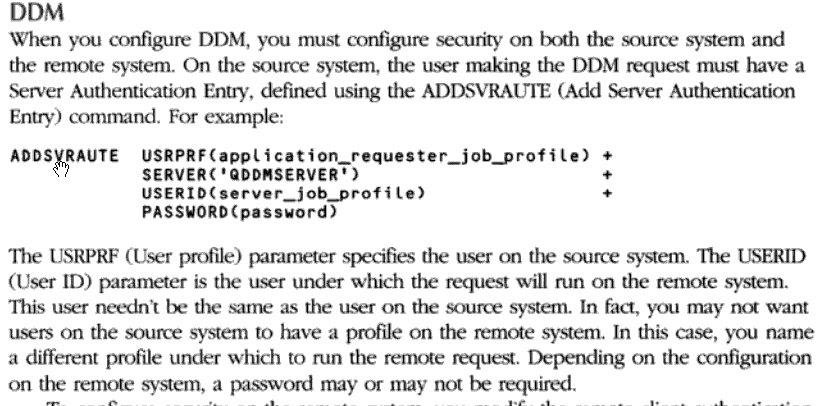
How to set-up DDM to view TD/OMS log on remote machines
When you use command DSPLOGOMS to view a log from a remote machine, TD/OMS creates a DDM file to so. If this fails you must do some additional set-up to make this work.
Check if DDM server is running
The TCP server for DDM must be running. Use command STRTCPSVR SERVER(*DDM) to start the server.
Check the DDM TCP/IP attributes
Use command CHGDDMTCPA to check what the DDM TCP/IP attributes settings are. When "Lowest authentication method" is set to "*USRIDPWD" or higher value then it is required to have a Server Authentication Entry for each user who has to have access to the remote address. Use command DSPSVRAUTE to display the existing authentication entries.
Add server entry for user
To add an Authentication entry use command:
More info about TCP/IP DDM set-up
Check the TD/OMS log file values
You can only view a log from a remote machine when the log file (OMLOG) on both systems have:
- The same record id (Use DSPFD to check this)
- The same CCSID (Use DSPFFD and make sure that the first field has CCSID 37)
How to gather TD/OMS logging information
TD/OMS logging information can be gathered through the DSPLOGOMS command. More information on how to use the command can be found in:
How to set the GUI logging level
If you want to investigate some TD/OMS behavior you are able to increase the logging level in the GUI. You can find the logging level in the preferences.
How to access the GUI log
If you want to investigate some TD/OMS behavior you can take a look at the GUI console log.
In addition, you can find GUI logs in the Error Log View.
How to set the server logging level
Problems may also occur on the IBM i. You can use the DSPLOGOMS function nut also the job logs of the server jobs. To force additional logging you may set the logging level of the IBM i with the STRSD command.
If you set the logging level to 1=Trace, every call from the GUI to the server will generate a joblog. The joblog appears under the user that calls the GUI jobs.
