DFG:System Management
TD/OMS System Management
TD/OMS System Management Introduction
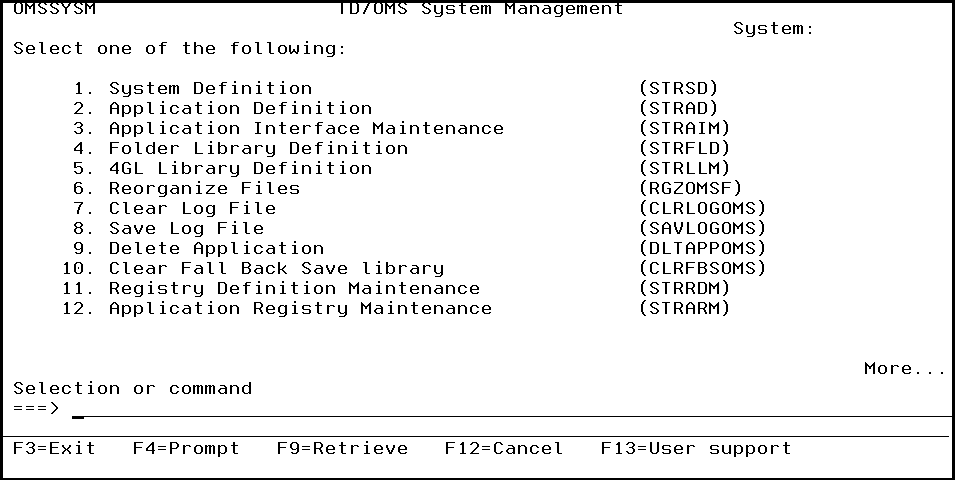
The TD/OMS System Management menu enables you to perform initial definitions and TD/OMS maintenance activities.
System Definition (STRSD)
This menu command starts the system definition function. Refer to the description of the function System Definition for more detail information. This command has no parameters.
Application Definition (STRAD)
This menu command starts the application definition function. Refer to the description of the function Application Definition for more detail information. This command has no parameters.
Application Interface Maintenance (STRAIM)
This menu command starts the application interface maintenance function. Refer to the description of the function Application Interface Maintenance for more detail information. This command has no parameters.
Folder Library Definition (STRFLD)
This menu command starts the folder library definition function. Refer to the description of the function Folder Library Definition for more detail information. This command has no parameters.
4GL Library Definition (STRLLM)
This menu command starts the 4GL library definition function. Refer to the description of the function 4GL Library Definition for more detail information. This command has no parameters.
Registry Definition Maintenance (STRRDM)
A registry definition describes how a system registry entry can be added to the system registry table. A registry definition describes in which context(s) the registry entry can be specified and explains the usage of the entry. See more details in Registry Definition Maintenance
Application Registry Maintenance (STRARM)
An Application registry activates a specific registry keyword. This is done by the specification of 1 or more context values and the keyword value. The registry definition describes in which context(s) the registry keyword can be specified and the allowed keyword values (if any). See more details in Application Registry Maintenance
Pre Transfer Check Maintenance (STRPTCM)
This menu command starts the Pre Transfer Check Maintenance function. Refer to the description of the function Pre Transfer Check Maintenance for more detailed information. This command has no parameters.
Job Description Maintenance (STRJDM)
This menu command starts the Job Description Maintenance function. Refer to the description of the function Job Description Maintenance for more detailed information. This command has no parameters.
Reorganize TD/OMS Files (RGZOMSF)
The reorganize TD/OMS files command is used to start the function reorganizing TD/OMS files. Refer to the description of the function Reorganize TD/OMS Files for more detail information.
Clear TD/OMS Log (CLRLOGOMS)
The Clear TD/OMS Log command is used to remove all or selected entries from the TD/OMS log file. Use it on a regular base to prevent the log file from growing beyond limits or extend the size of the TD/OMS physical file OMLOG. The OMLOG file should have a limit exceeding ten times the default value. See more details in Command Clear TD/OMS Log
Save TD/OMS log (SAVLOGOMS)
The Save TD/OMS Log Files command is used to save various TD/OMS log files. These files are saved in a history library you may specify. The records are saved until the date you have specified. At least the last three log entries of an object are preserved. See more details in Command Save TD/OMS Log Files
Delete Application (DLTAPPOMS)
The Delete TD/OMS Application command is used to remove all, or a selection of entries from an existing TD/OMS application. See more details in Command Delete TD/OMS Application
Clear Fall-back Save library (CLRFBSOMS)
The Clear Fall-back Save library command is used to remove all, or a selection of save files in an archive library. These save files contain the fall-back library of an TD/OMS transfer job. You have to specify an application and an end date that filter the save files to be removed. See more details in Command Clear Fall Back Save library
System Definition
The System Definition function enables you to enter new values for the TD/OMS system values. These values will be in effect for all applications. Users belonging to the group *SECOFR or *SECADM and the TD/OMS manager are allowed to use this function.
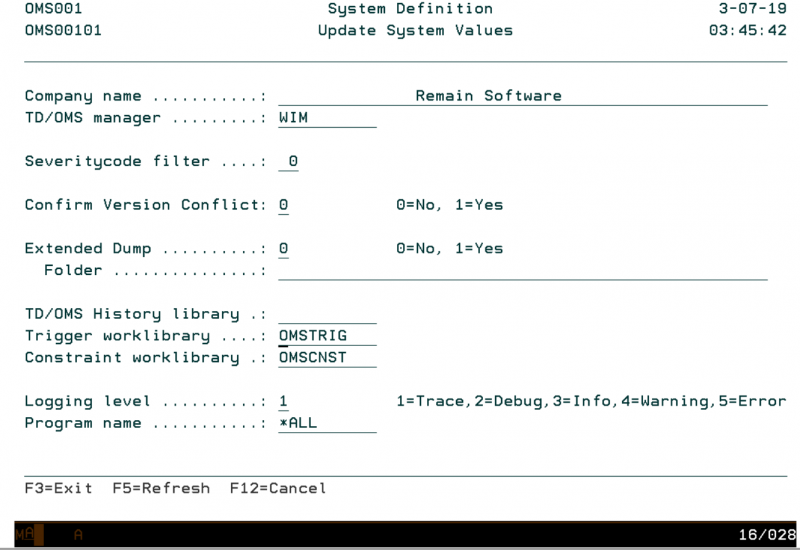
Update System Values
The Update System Values display shows the currently used system values and enables you to change these values. The values can be changed at any time during use of TD/OMS, but the old values stay in effect for active users. When you press ENTER the new or changed values are stored in the TD system file.
Company name
The Company Name is meant to contain a description of your company in combination with the TD/OMS environment you are working with. The company name should be self explanatory if TD/OMS is implemented several times on one IBM i or on several IBM i's. A blank value is not allowed.
The Company Name is printed on reports.
TD/OMS Manager
The TD/OMS Manager is the user or group profile who is allowed to use the other functions of System Management (i.e. Application Definition and Reorganization of files). These functions can be used by members of the group *SECOFR or *SECADM and by the TD/OMS Manager. A blank value is not allowed.
Severity Code Filter
The Severity Code Filter is used to indicate which TD/OMS messages are logged into the TD/OMS log file during interactive display processing. A value 0 indicates that all TD/OMS messages and warnings are logged.
Another value indicates that only TD/OMS messages with a severity higher or equal to this value are logged. The value 0 is recommended. The TD/OMS messages are stored in the OMSMSG message file in the TD/OMS library. OS/400 messages, selected by TD/OMS to store in the TD/OMS log file, are not influenced by this filter.
Confirm Version Conflicts
TD/OMS keeps track of all possible Version Conflicts and informs the application managers by sending a message when an object is copied to development while another application contains a different version of this object.
If Confirm Version Conflicts is activated, TD/OMS will also send these messages, but it also does extra checks, for example:
If different versions of the same object are maintained at the same time, TD/OMS requests a confirmation when the second (or higher) version of the object is moved to production.
Specify one of the following values:
0 - Deactivate Confirm Version Conflicts
1 - Activate Confirm Version Conflicts
Note: A changed value takes effect immediately. When Confirm Version Conflicts is deactivated, TD/OMS will not delete any of the confirmation data, but it will not request any confirmation until it is activated again.
Extended Dump
When TD/OMS encounters an internal problem, the TD/OMS Error Report is always generated. When the Extended Dump is activated, TD/OMS collects a lot of information about the job that encountered the error and redirects this information to a document in the folder specified in the Extended Dump Folder. The name of this document is in the format OMyymmdd.nnn, where yymmdd is the date and nnn a number starting at 001.
Specify one of the following values:
0 - Deactivate Extended Dump.
1 - Activate Extended Dump.
Note: A changed value takes effect immediately. The collection of the dump information can take several minutes.
TD/OMS History Library
The TD/OMS History Library contains the name of the library where TD/OMS history objects reside. You can created history with the command SAVOMSLOG.
Trigger Worklibrary
Specify this library to indicate the name of the library where the trigger processing workfiles should be stored. Normally this is library QTEMP but if the information is required to do some analysis another library can be specified to prevent the files from deletion after the job has ended.
Constraints Worklibrary
Specify this library to indicate the name of the library where the constraint processing workfiles should be stored. Normally this is library QTEMP but if the information is required to do some analysis another library can be specified to prevent the files from deletion after the job has ended.
Logging level
Some TD/OMS programs can log additional information about the program flow. Specify which type of messages must be written to the TD/OMS log.
The possible values are:
- 1=Trace
All additional messages are logged. - 2=Debug
All additional messages, except "Trace" messages are logged. - 3=Info
All additional messages, except "Trace" and "Debug" messages are logged. - 4=Warning
All additional "Warning" and "Error" messages are logged. - 5=Error
Only additional "Error" messages are logged.
Program name
The possible values are:
- Program name
When the Log level is "Trace"or "Debug" then only the specified program will log additional messages.
- *ALL
When the Log level is "Trace"or "Debug" then all programs will log additional messages.
Command Start System Definition (STRSD)
This menu command starts the system definition function. Refer to the description of the function System Definition for a detailed description.
STRSD
This command has no parameters.
Application Definition
The Application Definition function enables you to maintain the initial application definition. The application code must be known to TD/OMS before any function can be executed for a specific application.
Application definitions can be added, changed, deleted or copied from another application. The definition contains parameters at application level.
Users belonging to the group *SECOFR or *SECADM, and the TD/OMS manager are allowed to start this function.
Note: The function User Authority Maintenance must be executed once to declare the authorized users for that specific application, after entering an initial definition for an application.
Work with Application Definitions
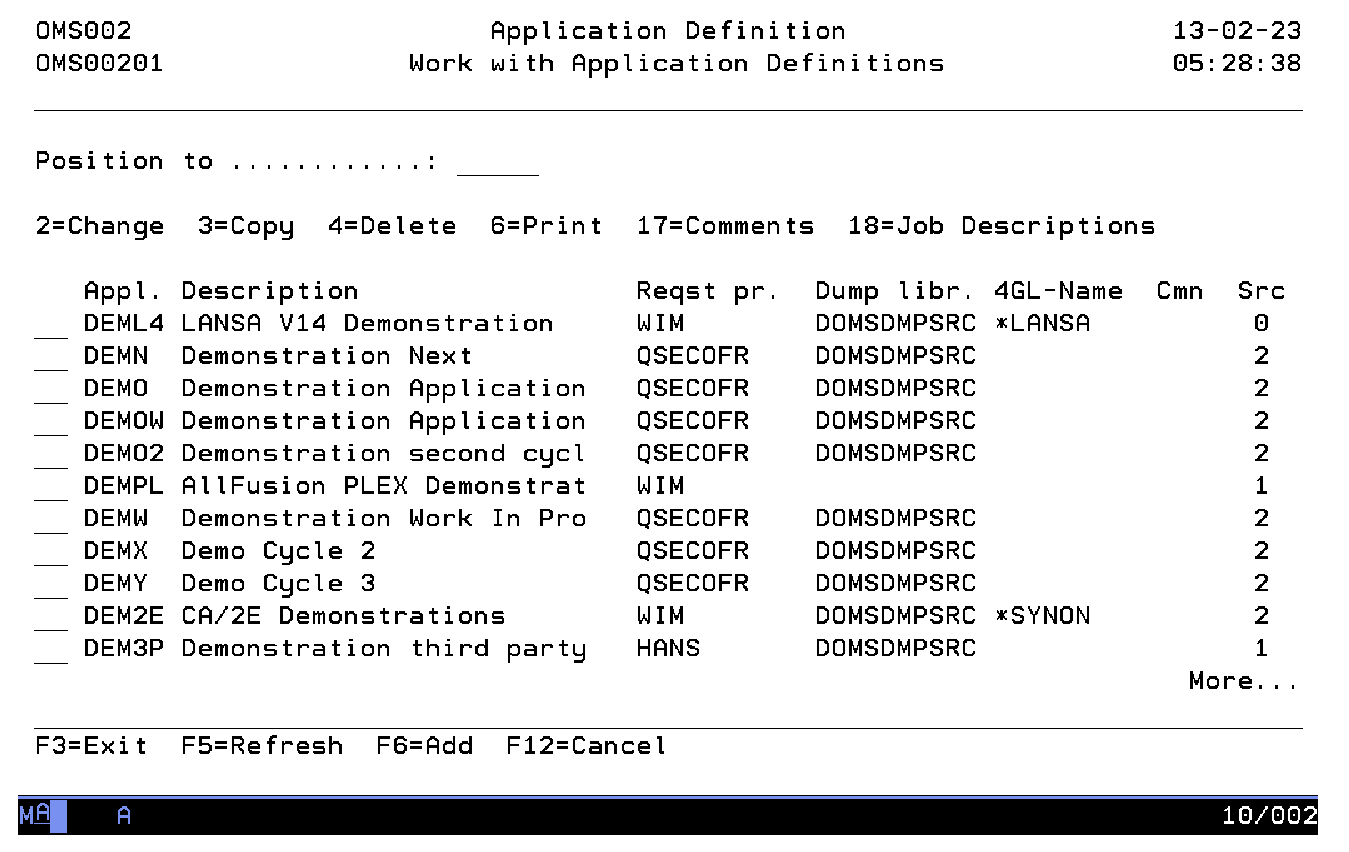
The Work with Application Definitions display shows the currently defined applications, including their main parameters. To select an option, type the option number in the option field area and press Enter. For more information about an option move the cursor to the option column and press Help. For more information about a function key, move the cursor to the function key area and press Help.
Position to
Use this prompt to go to a particular application in the list.
Option
Use this column to perform different operations on individual entries. Type the option number next to an entry and press Enter.
- 2=Change
Change the contents or certain attributes of an application.
- 3=Copy
Add a new application definition and at the same time copy one or more parts of the extended definition of an existing application.
- 4=Delete
Delete the definition of an application.
- 6=Print
Print the application definition.
- 17=Comments
Work with the comments and replies associated with the application.
- 18=Job Descriptions
Work with the job descriptions.
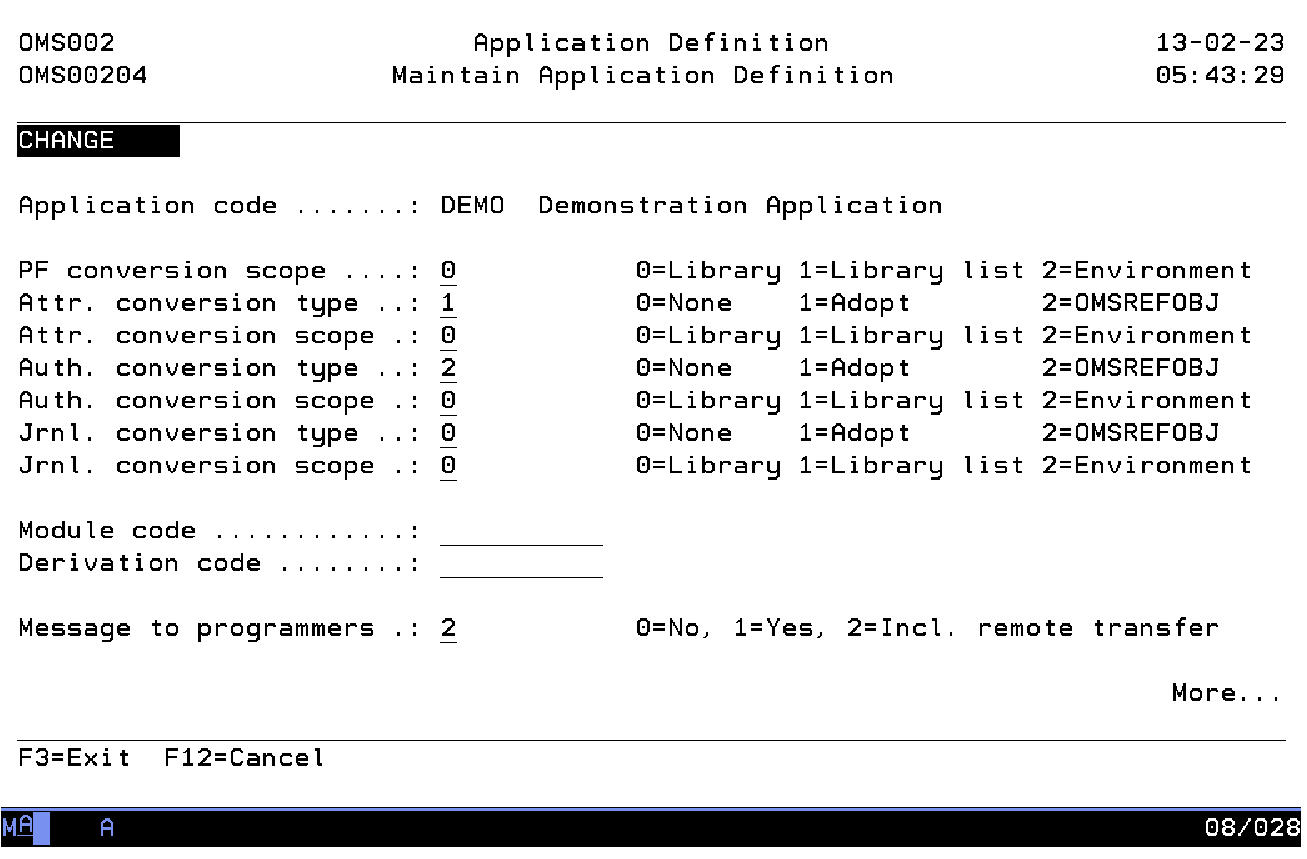
Maintain Application Definition
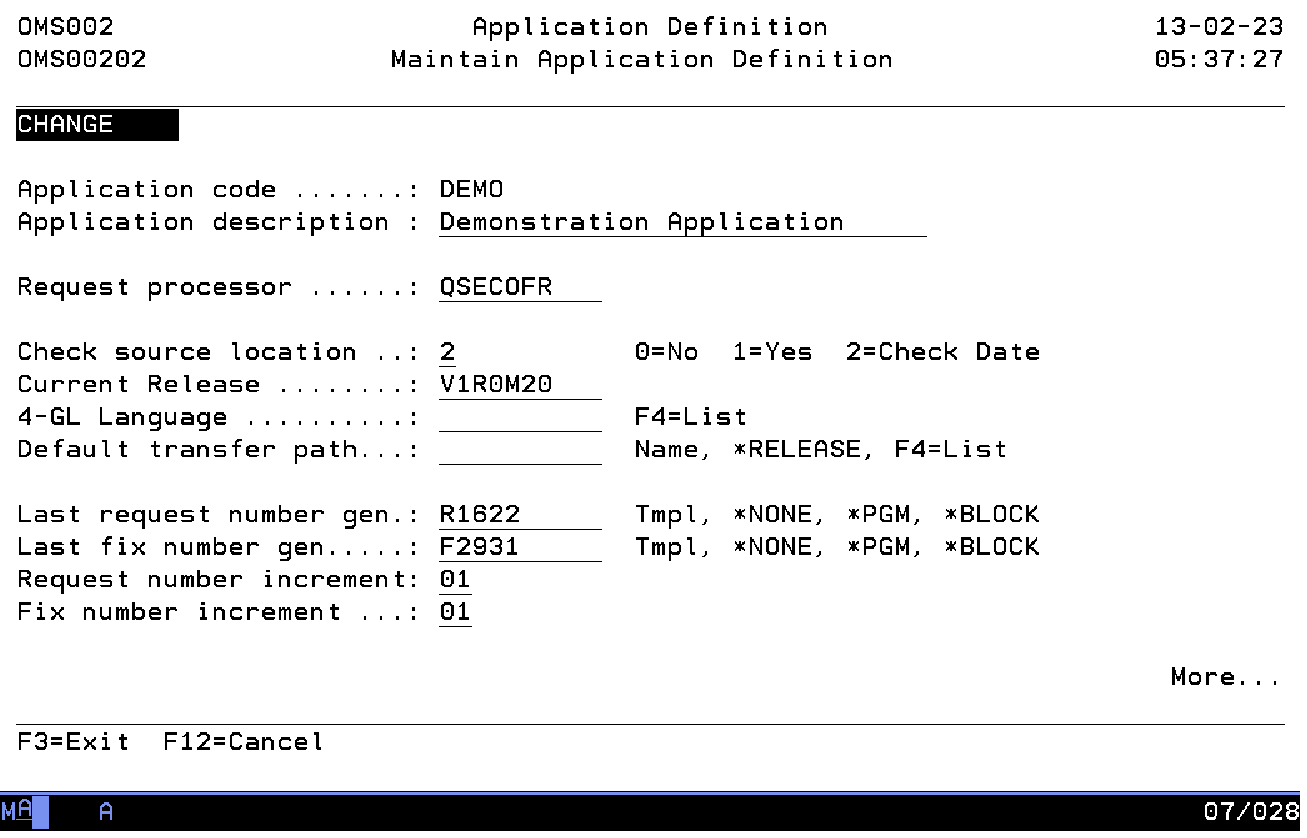
The Maintain Application Definition display shows information and allows actions depending on the option chosen on the previous display. The chosen action on the previous display is shown on line three. The following modes can be activated:
- Add
You can add a new application definition. The application code and all attributes must be entered.
- Change
You can change the attributes of an existing application definition. The current values are shown. All attributes can be changed at any time during the life cycle of an application.
- Delete
The current contents of all attributes is shown including a confirmation message. Deletion of application definitions is only allowed if no related information is stored in the TD database.
Note: For more information about a specific attribute move the cursor to the attribute area and press Help.
Application code
The application code is a unique identification of the application. Once the code has been added it cannot be changed. To change the application code you have to delete the old application code and add a new one. A blank value is not allowed. Almost all data defined in TD/OMS is related to an application. In general an application groups information about:
- Security
Security Rights and privileges assigned to users for a specific application.
- Environment
The definition of phases in the maintenance cycle for a specific application.
- Objects
The definition of objects pertaining to a specific application.
- Requests
The history of user requests concerning the specific application.
- Fixes
The description of a unit of work, both completed and in process.
- Exceptions
The definition of exception functions and exception selections.
Application description
The application description contains a description of the application code. A blank value is not allowed.
Request processor
The request processor is one of the persons who is in charge of the request handling and who will receive an informational message if another user has entered a new request. He is allowed to maintain all requests and fixes belonging to this application. The name of the request processor is mandatory and must be known to OS/400 as a user profile object.
Note: that the request processor must also have an authorization code assigned to him in order to enable him to work with requests and/or fixes.
Check source location
The Check source location indicator instructs TD/OMS how to handle source members related to an object. The possible values are:
- 0=No
The value "0" indicates that in general the objects do not have a related source in this particular system. No errors will occur if no source can be found if a new object is registered in the TD database. Use this value for instance for applications in remote systems where no sources reside, or if you wish to register some objects from the QSYS library.
- 1=Yes
The value "1" indicates that objects do have related sources in this system. The environment definition determines the way TD/OMS searches for the right source member. Information about source change date of object and source is stored in TD, but a mis-match does not cause an error.
- 2=Check Date
The value "2" is equal to value "1". Mis-match of source change date between object and source will result in an error. This value is recommended if objects have sources in this system.
Release
A release identification can be used to bundle fixes and will commonly be formatted as VnRnMnn, where V stands for Version, R for Release and M for Modification level. Any other format is allowed, including a blank value. The current release indicates the default value for release whenever a new fix is added.
Another way of working with releases can be achieved by defining each release as an application. Refer to the concepts guide for more detailed information.
4GL name
The 4GL name can be defined in Application Definition, indicating that the specified 4GL or Case tool is used, possibly in combination with 3GL compilers. Defining a 4GL name will enable you, in general, to register 4GL objects in TD/OMS and handle them like OS/400 objects. Specific information about the functions per 4GL / Case tool are described in the relevant interface manual.
You will also need to specify 4GL logical library names in the 4GL Library Definition function in order to work with the 4GL objects.
Use F4=List to get a list of the available 4GL interfaces.
Note: You will need the TD interface module in order to work with the 4GL objects.
Default Transfer Path
A default transfer path indicates the default value for the transfer path whenever a new fix is added.
Use F4=List to get a list of the available transfer paths. When the list is empty, you can use STREM (Environment Maintenance) to add transfer paths to your environment.
The special value *RELEASE applies to the value given in the previously mentioned Release. When you are using the value *RELEASE you need to be sure that there is a transfer path defined with the same name as the release.
Last request number
The last request number is used by TD/OMS as a base for generating request numbers. TD/OMS will generate the request number if the default request number "*GEN" has been used during the addition of a Request. The generated Request number is stored in this attribute. The last Request number is shown and can be maintained in the Application Definition function.
The following rules apply to generation of numbers:
- If the string ends with an alphabetic character TD/OMS will extend the string with "0000".
- If the string ends with a numeric character TD/OMS will use all ending numeric characters as a base.
Examples: (Assume increment value is 1)
Base Value   Generated value
R            R0001
R1           R2
R9           R10
ABCDEFGHI    ABCDEF0001
R00000000    R00000001
Last fix number
The Last fix number is used by TD/OMS as a base for generating fix numbers. During addition of a fix, TD/OMS will generate the fix number if the default fix number "*GEN" has been used. The generated fix number is stored in this attribute. The Last fix number is shown and can be maintained in the Application Definition function.
The following rules apply to generation of numbers:
- If the string ends with an alphabetic character TD/OMS will extend the string with "0000".
- If the string ends with a numeric character TD/OMS will use all ending numeric characters as a base.
Examples: (Assume increment value is 1)
Base Value Generated value
F          F0001
F1         F2
F9         F10
ABCDEFGHI  ABCDEF0001
F00000000  F00000001
Request number increment
The request number increment value is used by TD/OMS for generating request numbers. Before generating a request number the "Last request number gen." is incremented with this value. This value is shown and can be maintained in the Application Definition function.
Fix number increment
The fix number increment value is used by TD/OMS for generating fix numbers. The "Last fix number gen." is incremented with this value before generating a fix number. The value is shown and can be maintained in the Application Definition function.
Data conversion scope
The data conversion scope is used to indicate where to search for a reference object if the data of a physical file has to be converted during Object Transfer. The default value is '0'. The possible values are:
- 0=Library
The data is only converted if the reference object exists in the library where the new object has to be created.
- 1=Library list
The data is only converted if the reference object exists in the library list where the new object has to be created. The libraries are searched in order of definition.
Note: The library list mentioned here is the TD library list as defined in the environment definitions.
- 2=Environment
The data is only converted if the reference object exists in the environment where the new object has to be created. The library lists are searched in order of definition.
Attribute conversion type
The attribute conversion type instructs Object Transfer what to do with the object attributes of an OS/400 object. Copying of the object attributes is only applicable for OS/400 objects with a prompt override program specified in the CHG.... command. The possible values are:
- 0=None
No additional copying of attributes is done, except for logical files, because objects are by default copied and thus the object attributes will also be copied.
The object attributes of the logical file in the source environment are copied to the newly created logical after compilation. This is because logicals are compiled instead of duplicated.
If the object is created by an exception at user exit point 5 the exception must also copy the object attributes.
- 1=Adopt
The attributes are copied from a reference object with same object code and object type in the target library, target library list or target environment, depending on the attribute conversion scope. The reference object 'OMSREFOBJ' will be used as if value '2' has been used if no equally named reference object can be found.
- 2=OMSREFOBJ
The attributes are copied from a reference object 'OMSREFOBJ' with same object type in the target library, target library list or target environment, depending on the attribute conversion scope.
No further processing is done for the attributes if object OMSREFOBJ cannot be found.
Attribute conversion scope
The attribute conversion scope is used to indicate where to search for a reference object if the attributes of an OS/400 object have to be changed during Object Transfer. The possible values are:
- 0=Library
The object attributes are only copied if the reference object exists in the library where the new object has to be created.
- 1=Library list
Attributes are copied if the reference object exists in the library list where the new object has to be created. The library lists are searched in order of definition.
Note: The library list mentioned here is the TD library list as defined in the environment definitions.
- 2=Environment
Attributes are copied if the reference object exists in the environment where the new object has to be created. The library lists are searched in order of definition.
Authority conversion type
The authority conversion type instructs Object Transfer what to do with the object owner and authority of an OS/400 object. Copying of the object owner and authorities is only applicable for OS/400 objects. The default value is '0'. The possible values are:
- 0=None
No additional copying of authority is done.
- 1=Adopt
The owner and authorities are copied from a reference object with same object code and object type in the target library, target library list or target environment, depending on the authority conversion scope.
The reference object 'OMSREFOBJ' will be used if no equally named object can be found. This is the same as code '2'.
- 2=OMSREFOBJ
The owner and authorities are copied from a reference object 'OMSREFOBJ' with type *DTAARA in the target library, target library list or target environment, depending on the authority conversion scope.
This data area 'OMSREFOBJ' can be created with TYPE(*CHAR) and LEN(1) and without contents.
No further processing is done for ownership and authorities if data area OMSREFOBJ cannot be found.
Authority conversion scope
The authority conversion scope is used to indicate where to search for a reference object if the owner and authorities of an OS/400 object has to be changed during Object Transfer. The default value is '0'. The possible values are:
- 0=Library
The authority is only copied if the reference object exists in the library where the new object has to be created.
- 1=Library list
The authority is copied if the reference object exists in the library list where the new object has to be created. The library lists are searched in order of definition.
Note: The library list mentioned here is the TD library list as defined in the environment definitions.
- 2=Environment
The authority is copied if the reference object exists in the environment where the new object has to be created. The library lists are searched in order of definition.
Journal conversion type
The journal conversion type instructs Object Transfer what to do about journaling of an OS/400 physical file. The default value is '0'. The possible values are:
- 0=None
Physical files will not be journalled automatically.
- 1=Adopt
The physical file will be journalled in the same way as a reference physical file in the target library, target library list or target environment, depending on the journal conversion scope.
A reference physical file 'OMSREFOBJ' will be used if no equally named reference object can be found as if value '2' has been used.
- 2=OMSREFOBJ
The physical file will be journalled in the same way as a reference physical file with the name 'OMSREFOBJ' in the target library, target library list or target environment, depending on the journal conversion scope.
The physical file will not be journalled automatically if no 'OMSREFOBJ' object can be found.
Journal conversion scope
The journal conversion scope is used to indicate where to search for a reference object if a physical file has to be checked for journalling during Object Transfer. The default value is '0'. The possible values are:
- 0=Library
Journalling of the physical file is only done if the reference object exists in the library where the new object has to be created.
- 1=Library list
Journalling of the physical file is done if the reference object exists in the library list where the new object has to be created. The library lists are searched in order of definition.
Note: The library list mentioned here is the TD library list as defined in the environment definitions.if the reference object.
- 2=Environment
Journalling of the physical file is done if the reference object exists in the environment where the new object has to be created. The library lists are searched in order of definition.
Module code
The module code is not applicable at this time.
Derivation code
The derivation code is not applicable at this time.
Message to programmer
The message to programmer specifies if a programmer has to be informed if a fix, which has been assigned to her/him, is changed by another user. The default value is '0'. The possible values are:
- 0=No
No messages will be sent to the programmer.
- 1=Yes
The programmer will receive a message if another user adds a new Fix with his name specified as programmer, or if another user starts Object Transfer for a Fix, with his or her name specified, to or from the development environment.
- 2=Incl. remote transfer
The programmer will additionally receive a message when a transfer to production is performed on a remote system.
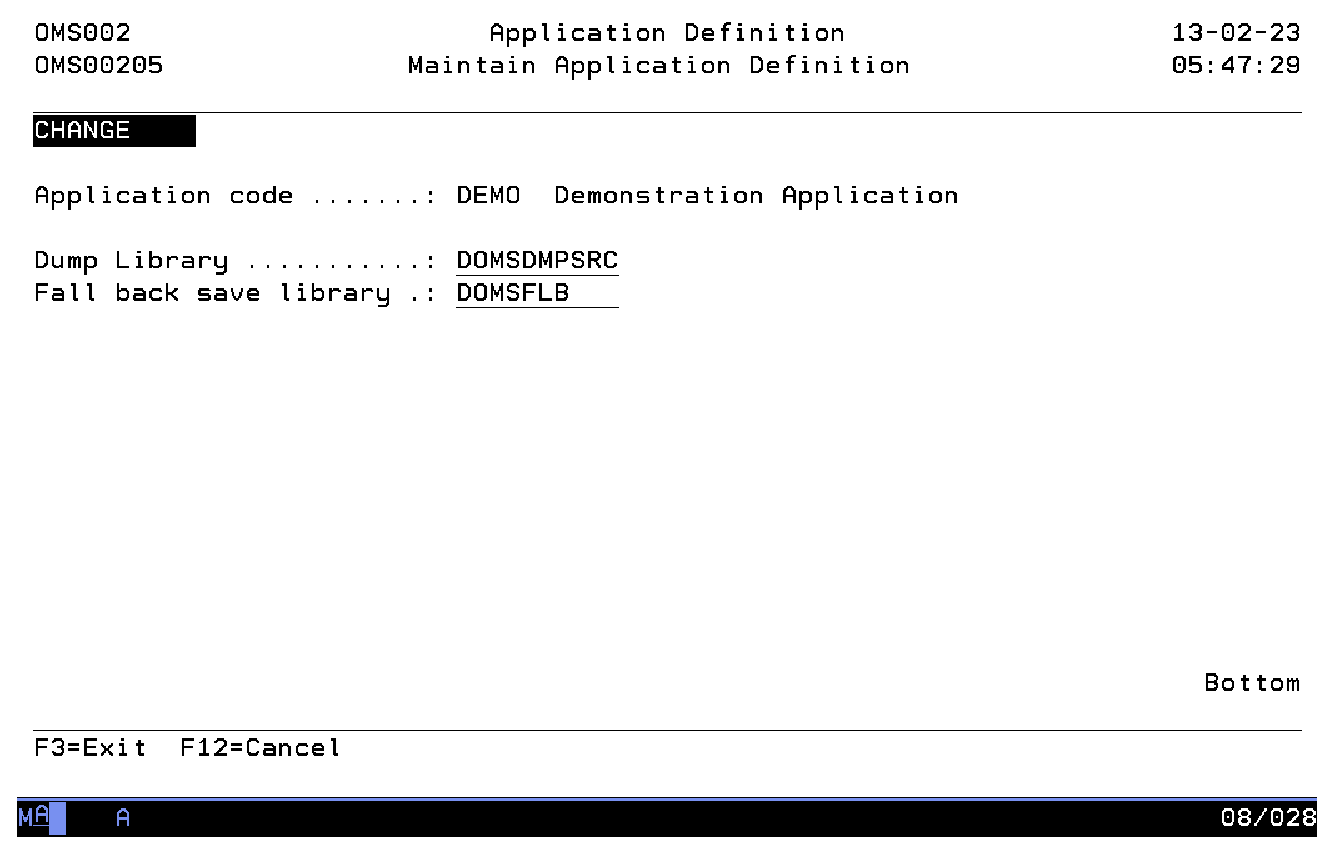
Dump library
The source archive library is a valid OS/400 library name in which TD/OMS saves the old source if an object or source member is moved or copied from the production environment. Old sources will not be saved if the name of this library is blank. The necessary source files are automatically created by TD/OMS and a unique member name is generated. The saved information is logged and can be accessed by using the Dumped Sources Maintenance function.
Fall back save library
The fall back save library is a valid OS/400 library name and is defined in the Application definition function. Leave this field blank if you do not wish to use fall back options.
If a valid library name is entered TD/OMS will use this library to store the savefiles with the replaced objects. The library list definitions determine if replaced objects are to be saved.
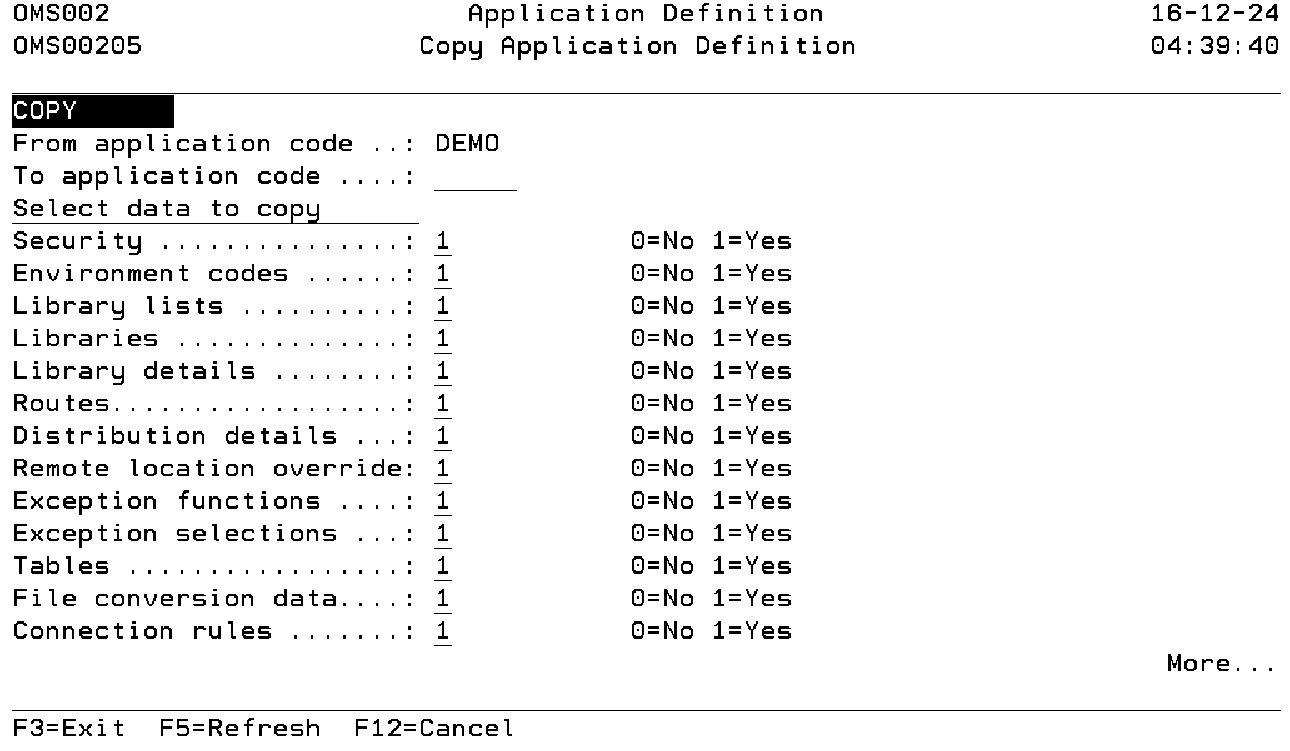
Copy Application Definition
The Copy Application definition function enables you to add an application definition using an existing application as a base for copying. The application attributes of the base application are always copied to the new application. Other descriptions can be selected to copy.
Copying of applications is useful if the extended descriptions of the new application has a lot in common with the application used as a base. You can also create a template application which will be used as a base for other applications.
Note: Don't forget to change the newly created application once it is copied.
Target application code
Use this prompt to enter the application code to be created. Refer to the description of Application code for a detailed description.
Security
Use this field to indicate that the user authority definitions have to be copied. Select value '1' to include these definitions. Select value '0' to exclude them.
Environment codes.
Use this field to indicate that the environment definitions have to be copied. Select value '1' to include these definitions. Select value '0' to exclude them.
Note: Copying of environments also include the security definitions per environment.
Library lists
Use this field to indicate that the library list definitions have to be copied. Select value '1' to include these definitions. Select value '0' to exclude them.
Libraries
Use this field to indicate that the library definitions have to be copied. Select value '1' to include these definitions. Select value '0' to exclude them.
Library details
Use this field to indicate that the library detail definitions have to be copied. Select value '1' to include these definitions. Select value '0' to exclude them.
Routes
Use this field to indicate that the Route definitions have to be copied. Select value '1' to include these definitions. Select value '0' to exclude them.
Distribution details
Use this field to indicate that the distribution list definitions have to be copied. Select value '1' to include these definitions. Select value '0' to exclude them.
Remote location override
Use this field to indicate that the remote location override definitions have to be copied. Select value '1' to include these definitions. Select value '0' to exclude them.
Exception functions
Use this field to indicate that the exception function definitions have to be copied. Select value '1' to include these definitions. Select value '0' to exclude them.
Exception selections
Use this field to indicate that the exception selection definitions have to be copied. Select value '1' to include these definitions. Select value '0' to exclude them.
Tables
Use this field to indicate that the table definitions have to be copied. Select value '1' to include these definitions. Select value '0' to exclude them.
File conversion data
Use this field to indicate that the file conversion definitions have to be copied. Select value '1' to include these definitions. Select value '0' to exclude them.
Connection rules
Use this field to indicate that the application specific Connection rule definitions have to be copied. Select value '1' to include these definitions. Select value '0' to exclude them.
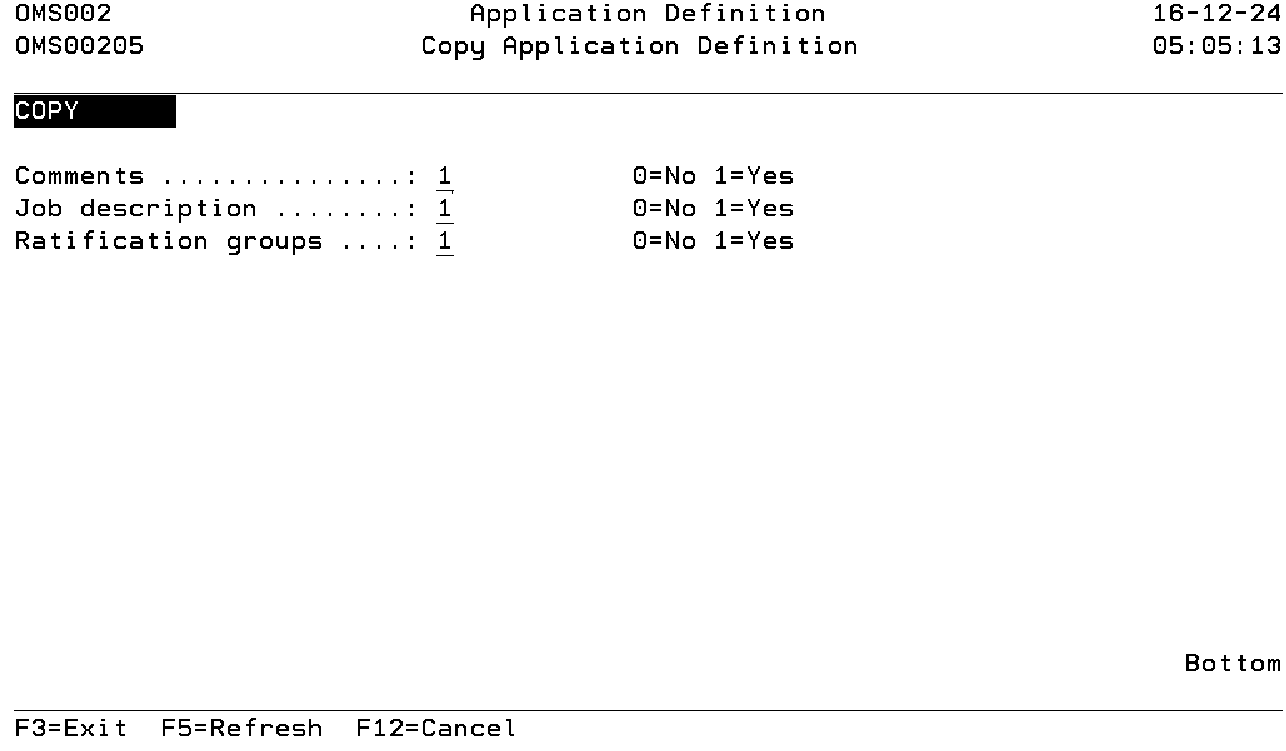
Comments
Use this field to indicate that the application specific comments have to be copied. Select value '1' to include these. Select value '0' to exclude them.
Job description
Use this field to indicate if the job descriptions have to be copied. Select value '1' to include these definitions. Select value '0' to exclude them.
Ratification groups
Use this field to indicate if ratification groups have to be copied. Select value '1' to include these definitions. Select value '0' to exclude them.
Command Start Application Definition (STRAD)
This menu command starts the application definition function. Refer to the description of the function Application Definition for a detailed description.
STRAD
This command has no parameters.
Application Interface Maintenance (STRAIM)
The Application Interface Maintenance function enables you to define a more complex application structure. Examples of these complex structures are given at the end of this section.
In a simple application definition you can define a maintenance cycle and an optional emergency environment. With the definition of these application links however you can:
- Define a second cycle
- Define derived versions per country
- Define a new version or release as an application
Do not use this function if objects of one application are using objects of another application. These kind of interfaces do not require a complex application structure.
Users belonging to the group *SECOFR or *SECADM and the TD/OMS manager are allowed to use this function.
The definition of one entry between two applications will influence the following functions:
- Object Maintenance
In Object Maintenance you can change your subset in order to include objects of applications from which you are allowed to import, in a collapsed or expanded view.
- Solution Maintenance
In Solution Maintenance you can change your subset in order to include objects of applications from which you are allowed to import, in a collapsed or expanded view.
The TD/OMS locking mechanism of objects, to prevent dual maintenance, is only in effect within one application. A derived application is able to connect an object to a fix if the same object is connected to another fix on the other application. The managing of possible conflict of changes is done at Object Transfer level.
- Object Transfer
If an object is transferred to a development environment, all application managers of each derived application will receive a message indicating that the based-on object is to be changed.
If an object is moved to the highest (production) environment the based-on version number is checked against the current based-on version number of the object to be replaced. If these version numbers do not match, a confirmation window is shown in order to accept the version conflicts.
If an object is moved to the highest (production) environment, again all application managers of each derived application will receive a message indicating that a based-on object has been changed.
In the following paragraph you will find an example for each kind of application structure.
Define a second cycle or a branch
Two separate application definitions are used for describing a cycle. The links between these application are registered using this Function. Once the link has been established the two applications are logically merged at the linked environments. The environments DEV1, TEST1 and PROD are defined in one application in the figure below. The environments DEV2, TEST2 and again PROD are defined in another application. The two applications can be managed as one logical application by defining a bi-directional link between the two applications at the production level. This definition tells TD/OMS that these two environments are to be seen as one logical environment.
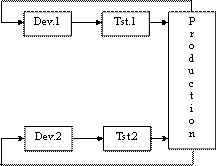
The definition of this example is as follows:
Import Application    Export Application
APP1 *PROD            APP2 *PROD LIB1
APP1 *PROD            APP2 *PROD LIB2
APP2 *PROD            APP1 *PROD LIB1
APP2 *PROD            APP1 *PROD LIB2
In this example you specify that the production libraries LIB1 and LIB2 belong to both the application APP1 and APP2.
Define a new version or PTF cycle or a Fork
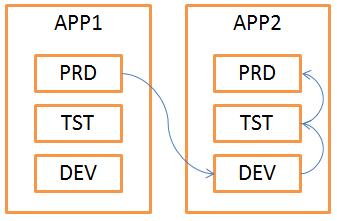
Two or more separate application definitions are linked together to form a downstream import. Once the link has been established the old version application is linked as an upstream application and the new version application is linked as a downstream application. The environments DEV, TEST and PROD are defined in both applications but we only link production. This definition tells TD/OMS that objects from application APP1 can be imported in application APP2. If an object is already imported in APP2 but is changed in APP1, APP2 can be notified of this change. We have several advanced functions available in the GUI which we call Application Crossing.
The definition of this example is as follows:
Import Application    Export Application
APP1 *PROD            APP2 *PROD LIB1
APP1 *PROD            APP2 *PROD LIB2
In this example you specify that the production libraries LIB1 "belong" to both the application APP1 and APP2.
Define derived versions per country
The original objects and derived versions are stored in separate applications. The derived application is allowed to import objects from the original application if changes for a specific country or department have to be made.
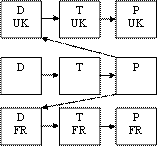
The environments D, T and P are defined in one application, containing all standard objects in the figure below. The environments DUK, TUK and PUK are defined in a separate application, containing only changed objects for the UK customers. Application UK is allowed to import objects from the general application. The same goes for a French version of the same application.
The definition of this example is as follows:
Import Application    Export Application
APUK *PROD            APPL *PROD LIB1
APUK *PROD            APPL *PROD LIB2
APFR *PROD            APPL *PROD LIB1
APFR *PROD            APPL *PROD LIB2
In this example you specify that the production libraries LIB1 and LIB2 belong to the applications APPL (the core application), APUK and APFR (the British and French alterations). The country specific changes are stored in separate production libraries. These are not defined here.
Define a new version or release as an application
You can define each release as an application and register the newest release as a derived version of the previous release. This is useful if you start working on a new release but you must also be able to maintain the old release.
The definition of this example is as follows:
Import Application    Export Application
V4R0 *PROD            V3R0 *PROD LIB3
V3R0 *PROD            V2R0 *PROD LIB2
V2R0 *PROD            V1R0 *PROD LIB1
This example shows four versions of the same application. These applications are named V1R0 to V4R0. Application V1R0 has library LIB1 as the production library, V2R0 has LIB2 and V3R0 has LIB3. These specifications describe that application V2R0 is able to import objects from V1R0. The production library LIB1 is added to the production environment of application V2R0. V2R0 can only import from this library. It can not place objects into it. The same is true for the other import applications.
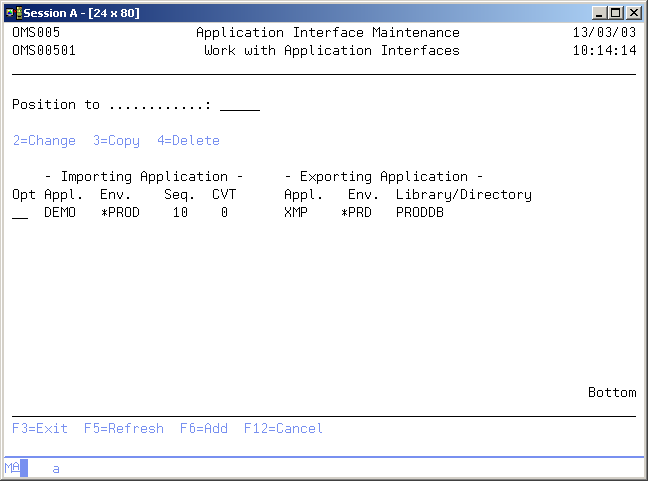
Work with Application Interfaces
The Work with Application Interfaces display shows the currently defined application interfaces for the application you are working in. You can add an application interface to the list, remove an application interface from the list and change the attributes of an existing application interface.
Position to
Use this prompt to go to a particular application area in the list.
Option
Use this column to perform different operations on individual entries. The possible values are:
- 2=Change
Change the attributes of the application interface. - 3=Copy
Enter ADD mode with the attributes of the selected interface record. - 4=Delete
Delete the entry from the list. - F6=Add
Specify a new application interface.
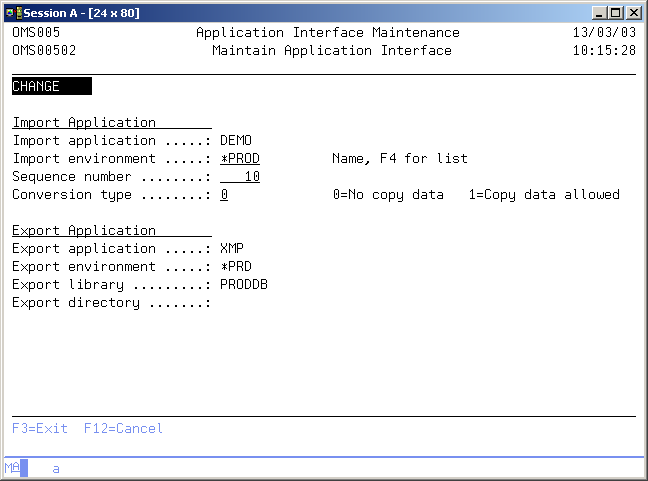
Maintain Application Interface
The Maintain Application Interface display shows information and enables actions depending on the option chosen on the previous display. The chosen action on the previous display is shown on line four. The following actions can be activated;
- Add
You can add a new entry definition. The import application and the export application must be entered. - Change
You can change the attributes of an existing entry definition. The current attributes are shown. The target environment code, the sequence number and the conversion type can be changed. - Delete
The current entry and its attributes is shown, including a delete confirmation message.
For online information about a specific attribute move the cursor to the attribute area and press Help.
Import Application
The import application element is used in the function Application Interface Maintenance to register the application code which is able to import objects from another application code. The import application must be an existing application code.
Use F4=List to get a list of the available application codes.
Import Environment
The Import Environment is the environment code of the Import Application which is linked to the Export Environment of the Export Application. The Import Environment must be an existing environment in the Import Application.
Use F4=List to get a list of the valid environment codes.
Interface Sequence number
The Interface Sequence number is registered in the function Application Interface Maintenance and is used in the function Object Maintenance to influence the order of appearance of the objects. Objects with the lowest sequence number are shown first, objects with the highest sequence number are shown last.
- *NEXT
Use this value to allocate the next sequence number. It will increment by 10 or round off to the nearest multiple of 10.
Conversion Type
The conversion type in the function Application Interface Maintenance is used to indicate if physical files can be imported with or without their data. The possible values are:
- 0=No copy Data
Use "0" if you do not allow copying of data from any data files from the export application into the import application. - 1=Copy data allowed
Use "1" if you allow copying of data from any data files from the export application to the import application.
Export Application
The export application element is used in the function Application Interface Maintenance to register the application code from which objects can be exported to other applications. The export application must be an existing application code.
Use F4=List to get a list of the valid application codes.
Export Environment
The Export Environment is the environment code of the Export Application which is linked to the Import Environment of the Import Application. The Export Environment must be an existing environment in the Export Application.
Use F4=List to get a list of the valid environment codes.
Exporting Library
The Exporting Library is a valid library name which is part of the export environment in the export application. Only objects in libraries defined as an export library can be imported by other applications.
Use F4=List to get a list of the valid libraries.
Exporting Directory
The Exporting Directory is a valid directory name which is part of the export environment in the export application. Only objects in directories defined as an export directory can be imported by other applications.
Use F4=List to get a list of the valid directories.
Note: You cannot specify an exporting directory together with an exporting library.
Command Start Application Interface Maintenance (STRAIM)
This menu command starts the application interface maintenance function. Refer to the description of the function Application Interface Maintenance for a detailed description.
STRAIM
This command has no parameters.
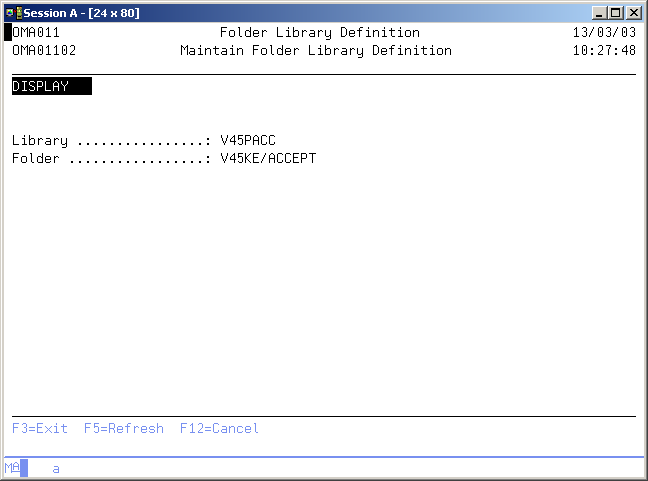
Folder Library Definition
The Folder Library Definition function is used to define a logical library name for an OS/400 folder. TD/OMS uses the logical library name instead of the real folder name because folders can have large path names (like FOLD1/FOLD3/FOLD4).
In order to store documents in TD/OMS you first have to define these Folder Libraries, each representing an OS/400 folder. Once the Folder Library is defined, it can be used in all TD functions as if it were a normal OS/400 library.
Note: Do not use OS/400 library names as folder libraries to avoid conflicts.
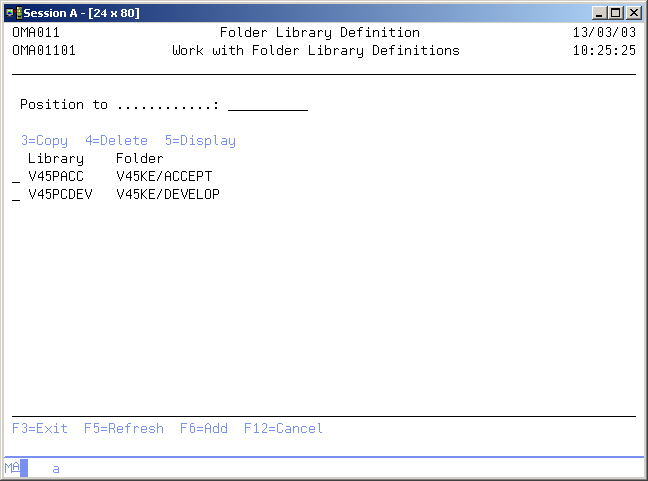
Work with Folder Libraries
The Work with Folder Library Definitions display shows the currently defined folder libraries and their related folder. To select an option, type the option number in the option field area and press Enter.
Position to
Use this prompt to go to a particular logical library in the list.
Option
Use this column to perform different operations on individual entries. The possible values are:
- 3=Copy
Copy to add a new folder library definition using an existing definition as a base. - 4=Delete
Remove an existing folder library definition. Deletion of a folder library is only allowed when the folder library is not being used in the function environment maintenance. - 5=Display
Get more detailed information about the folder library. - F6=Add
Add a new occurrence of the entity.
Maintain Folder Library
The Maintain Folder Library Definition display shows information and enables actions depending on the option chosen on the previous display. The chosen action on the previous display is shown on line three. The following modes can be activated:
- Add
You can add a new folder library definition. The logical library and folder name must be entered. Both fields are pre-filled with the values of the selected item if the copy action has been used. - Delete
The current logical library is shown, including a confirmation message. Deletion of logical library definitions is only allowed if no related information is stored in the TD database. - Display
The current logical library and its attributes are shown.
Note: For online information about a specific attribute move the cursor to the attribute area and press Help.
Library
Enter a name which logically describes the folder to use.
Folder code
The folder code is defined in the function Folder library Definition, and contains the OS/400 folder name. The folder must exist.
Command Start Folder Library Definition (STRFLD)
This menu command starts the folder library definition function. Refer to the description of the function Folder Library Definition for a detailed description.
STRFLD
This command has no parameters.
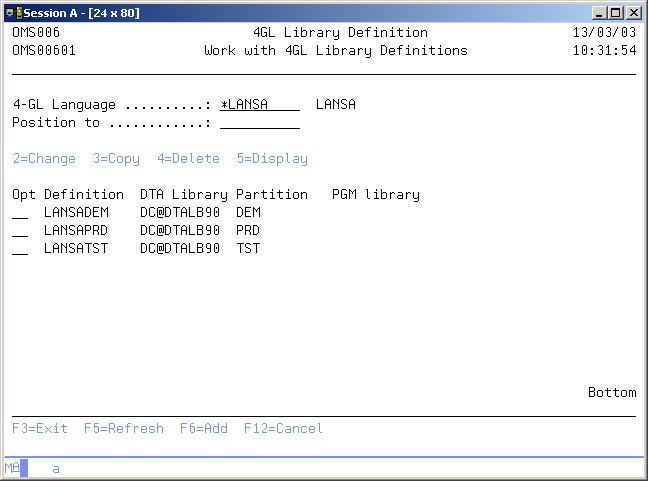
4GL Library Definition
The 4GL Library Definition function is used to define a logical library name for 4GL objects. In order to store 4GL objects in TD/OMS you first have to define these Logical Libraries, each representing the location where the 4GL objects can be found. Once the Logical Library is defined, it can be used in all TD functions as if it were a normal OS/400 library.
Note: Do not use OS/400 library names as logical libraries.
Work with 4GL Library Definitions
The Work with 4GL Library Definitions display shows the currently defined 4GL libraries and their related elements. To select an option, type the option number in the option field area and press Enter.
4GL name
The 4GL name can be defined in Application Definition, indicating that the specified 4GL or Case tool is used, possibly in combination with 3GL compilers. Defining a 4GL name enables you, in general, to register 4GL objects in TD/OMS and handle them like OS/400 objects. Specific information about the functions per 4GL / Case tool are described in the relevant interface manual.
Note: You will need the TD interface module in order to work with the 4GL objects.
Use F4=List to get a list of the available 4GL interfaces.
Position to
Use this prompt to go to a particular logical library in the list.
Option
Use this column to perform different operations on individual entries. The possible values are:
- 2=Change
Change the contents or certain attributes of a 4GL library. - 3=Copy
Add a new 4GL library and at the same time copy one or more parts of the extended definition of a 4GL library. - 4=Delete
Delete the 4GL library definition. - 5=Display
Display the 4GL library definition. - F6=Add
Add a new occurrence of the entity.
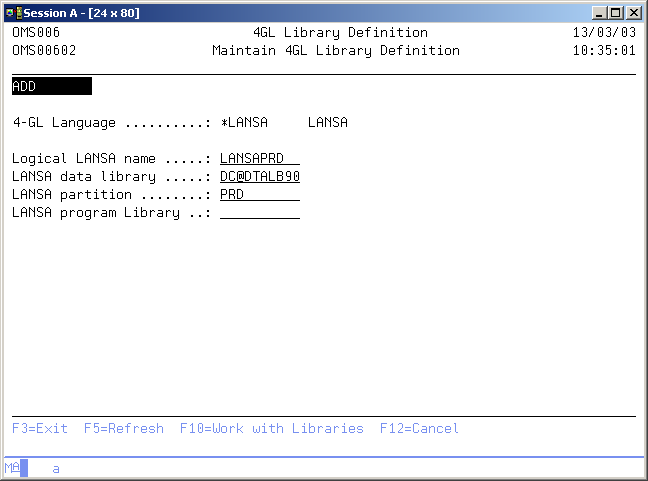
Maintain 4GL Library Definition
The Maintain 4GL Library Definition display shows information and enables actions depending on the option chosen on the previous display. The chosen action is shown on line three. The following modes can be activated:
- Add
You can add a new 4GL library definition. The logical library and its specifications must be entered. ll fields are prefilled with the values of the selected item if the copy action has been used. - Delete
The current logical library is shown including a confirmation message. Deletion of logical library definitions is only allowed if no related information is stored in the TD database. - Display
The current logical library and its attributes are shown.
Note: For online information about a specific attribute move the cursor to the attribute area and press Help.
4GL Model code
The 4GL Model code is a logical name. It is to be used in the TD definitions and represents several identifying elements of the selected 4GL or Case tool. Each 4GL or Case tool has its information stored in a different manner. For OS/400 objects each object can be identified by the object code, object type and object library. In order to achieve the same unique identification of model objects the 4GL Model code represents information of a model object which identifies its physical location. The display will show the necessary elements for specification depending on the selected 4GL. Refer to your TD 4GL Interface manual for more detailed information about the specifics of each 4GL.
4GL definitions
The description and contents of this element depends on the selected 4GL / Case tool. This element is defined in the 4GL Library Definition function. Refer to your TD 4GL Interface manual for more detailed information about the specifics of each element per 4GL.
Command Start 4GL Library Definition (STRLLM)
This menu command starts the 4GL library definition function. Refer to the description of the function 4GL Library Definition for a detailed description.
STRLLM
This command has no parameters.
Registry Definition Maintenance
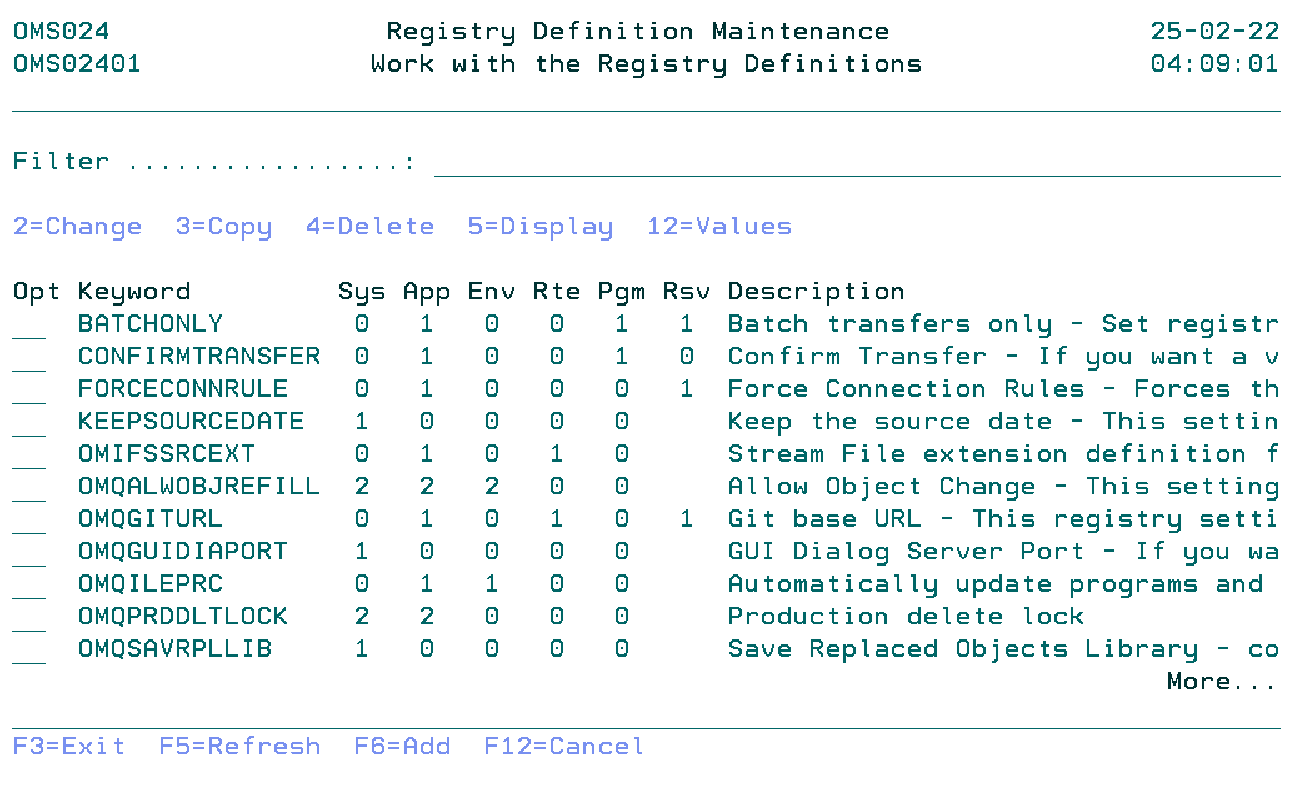
The Registry Definition function (STRRDM) enables you to work with the registry definitions.
Registry definitions can be added, copied, changed, deleted or viewed.
Users belonging to the user class *SECOFR, *SECADM or the TD/OMS manager (group) are allowed to use this function.
Work with the Registry Definitions
The Work with Registry Definitions display shows the currently defined registry keywords, including their main parameters. To select an option, type the option number in the option field area and press Enter. For more information about an option move the cursor to the option column and press Help. For more information about a function key, move the cursor to the function key area and press Help.
Filter
The Filter prompt allows for quick filtering of the list.
Option
Use this column to perform different operations on individual entries.
- 2=Change
- Change the registry definition keyword.
- 3=Copy
- Copy the registry definition keyword.
- 4=Delete
- Remove registry definition keyword.
- 5=Display
- Display the information of the registry definition keyword.
- 12=Values
- Work with registry definition keyword values.
- F6=Add
- Add a new registry definition keyword.
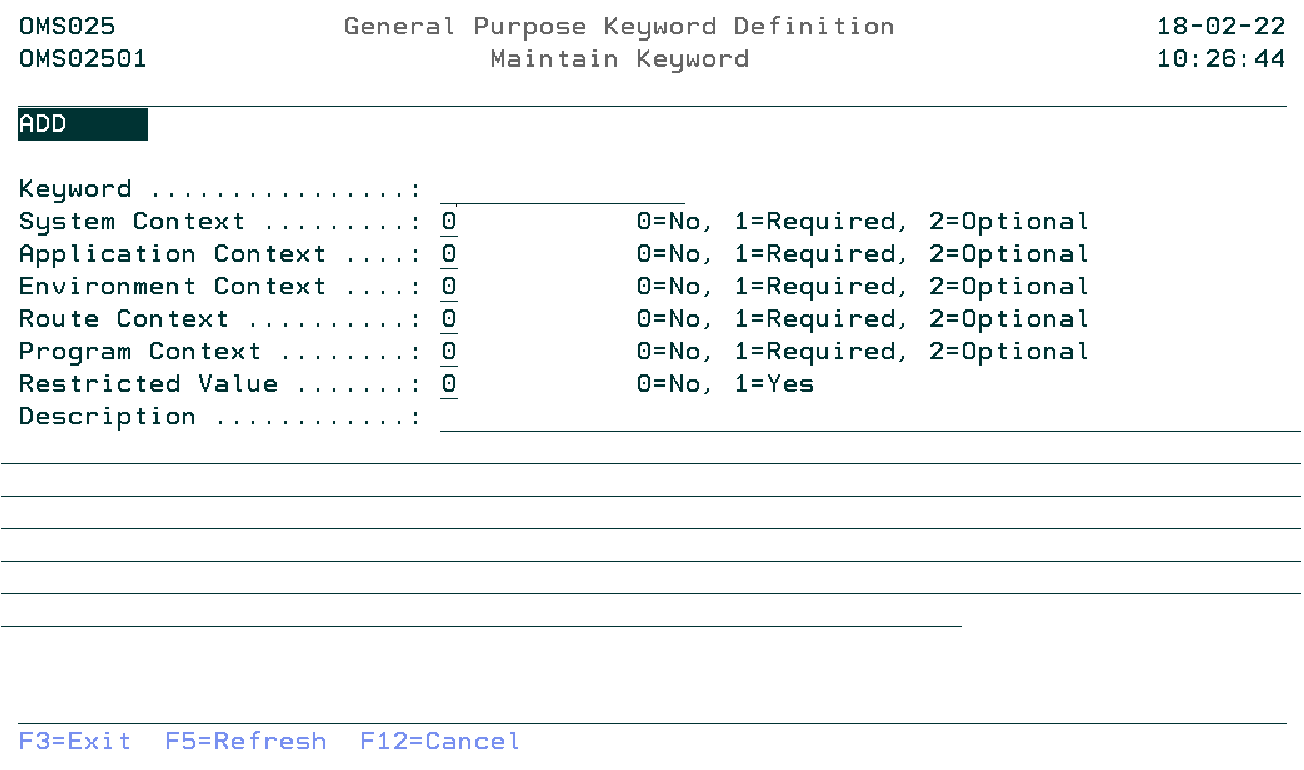
Maintain Keyword
The Maintain Keyword display shows information and allows actions depending on the option chosen on the previous display. The chosen action on the previous display is shown on line three. The following modes can be activated:
- *Add
- A new registry definition keyword is being added.
- *Change
- Change the attributes of an existing keyword.
- *Copy
- Copy the attributes of an existing keyword to a new keyword. The current values are shown.
- *Delete
- You are about to delete an existing keyword. The current values are shown.
- *Display
- Shows the attributes of an existing keyword.
Keyword
Specify the registry definition keyword. The blank value or a already existing keyword is not allowed.
System Context Indicator
Determines if context values can be specified (2=Optional), must be specified (0=Not required) or can not be specified (1=Required) when adding a registry keyword. Entering a 1 for the System context means that all other context related indicators must be 0.
Application Context Indicator
Determines if context values can be specified (2=Optional), must be specified (1=Required) or can not be specified (0=Not required) when adding a registry keyword.
Environment Context Indicator
Determines if context values can be specified (2=Optional), must be specified (1=Required) or can not be specified (0=Not required) when adding a registry keyword.
Route Context Indicator
Determines if context values can be specified (2=Optional), must be specified (1=Required) or can not be specified (0=Not required) when adding a registry keyword.
Program Context Indicator
Determines if context values can be specified (2=Optional), must be specified (1=Required) or can not be specified (0=Not required) when adding a registry keyword.
Restricted Value Indicator
Specifying a 0 means that any combination of characters is allowed when adding a registry keyword. The description may contain instructions on the required format (eg comma separated). The value entered must match with a pre-defined value in case of a 1.
Description
Explanation of the purpose of this keyword. Examples and dependancies on other keywords will be described here.
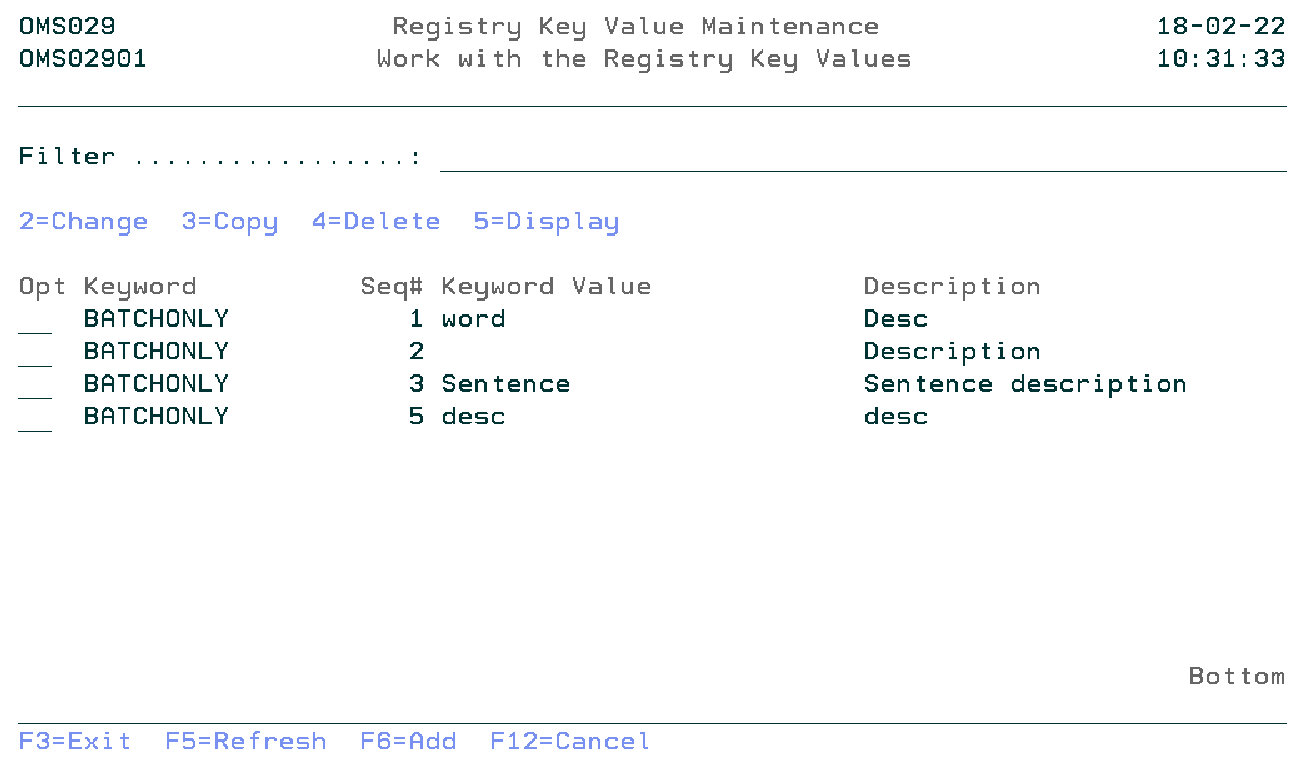
Work with the Registry Definition Key Values
The Work with the Registry Key Values display shows the list of values of the selected Registry Definition keyword (option 12 on the previous display). Entries can be Added, Copied, Changed, Deleted, and Viewed.
Filter
The Filter prompt allows for quick filtering of the list.
Option
Use this column to perform different operations on individual entries. Type the option number next to an entry and press Enter.
- 2=Change
- Change the registry keyword value.
- 3=Copy
- Copy the registry keyword value.
- 4=Delete
- Remove registry keyword value.
- 5=Display
- Display the information of the registry keyword value.
- F6=Add
- Add a new registry keyword value.
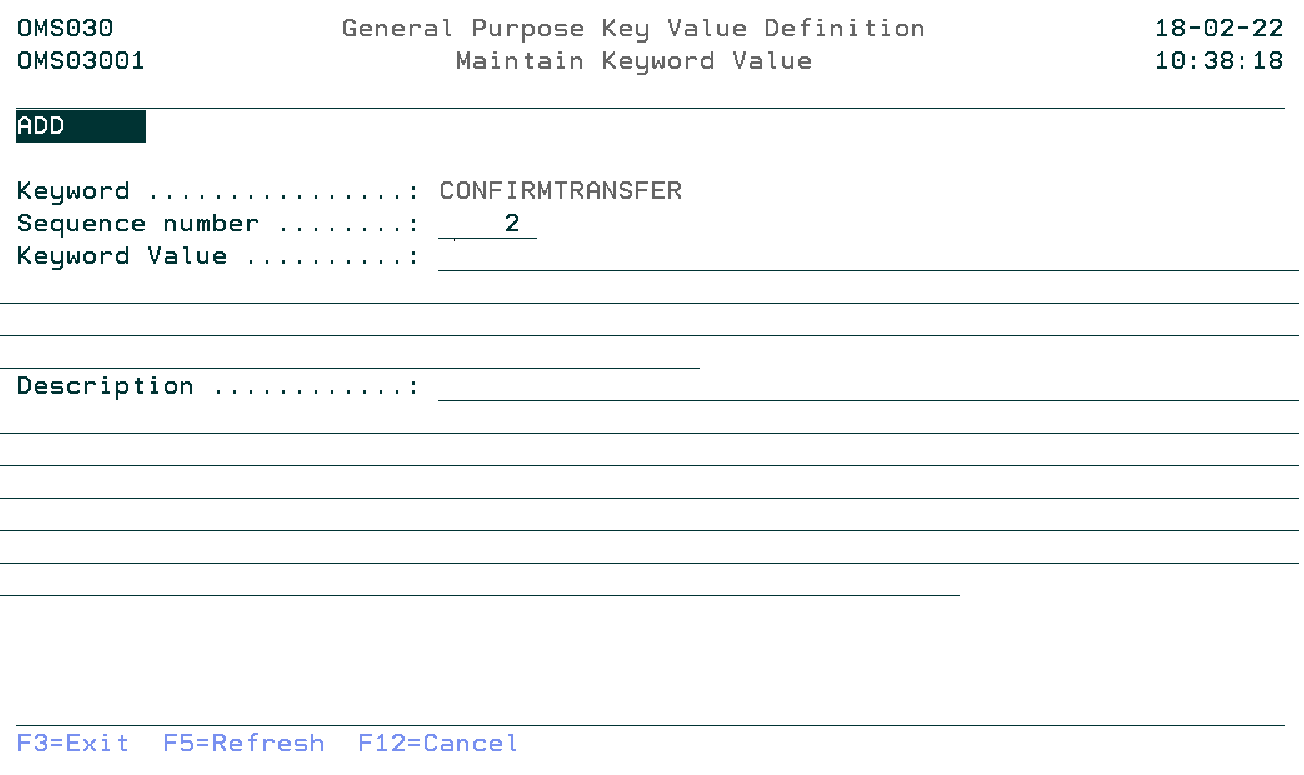
Maintain Keyword Value
The Maintain Keyword Value display shows information and allows actions depending on the option chosen on the previous display. The chosen action on the previous display is shown on line three. The following modes can be seen:
- Add
- Adding a registry keyword Value.
- Change
- Change the attributes of an existing keyword value. The current values are shown.
- Copy
- The attributes of an existing keyword value are being copied to a new value. The current values are shown.
- Delete
- Delete the attributes of an existing keyword value. The current values are shown.
- Display
- The attributes of an existing keyword value are shown.
Keyword
The keyword for the value. Display only
Sequence number
The sequence number controls the display of the values in the list. A value from 99999- until 99999 is allowed
Keyword Value
The registry definition keyword value.
Description
The clarification of the meaning of the registry definition keyword value.
Command Start Registry Definition Maintenance (STRRDM)
This menu command starts the registry definition maintenance function. Refer to the description of the function Registry Definition maintenance for a detailed description.
STRRDM
This command has no parameters.
Application Registry Maintenance
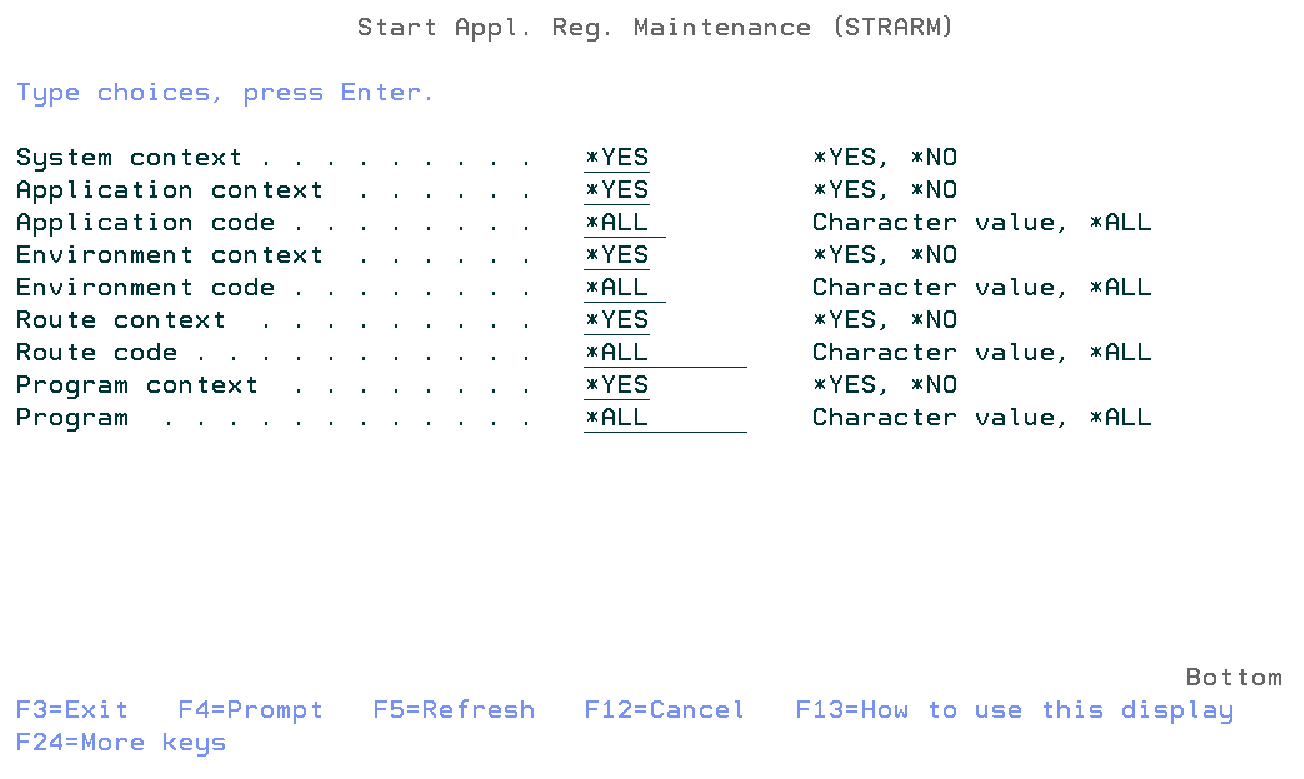
The Application Registry Maintenance function (STRARM) shows all the entries in a list that is based on the filters. Users belonging to the user profile class *SECOFR, *SECADM or the TD/OMS manager group are allowed to use this function.
System Context Indicator
Specify *YES to display keywords with a required or optional System context indicator or specify *NO to display keywords for which this context is not allowed.
Application Context Indicator
Specify *YES to display keywords with a required or optional Application Context Indicator or specify *NO to display keywords for which this context is not allowed.
Application Code
Specify the application code filter. Possible values are:
- *All
- Select all application codes.
- Application-Code
- Specify the application code.
Environment Context Indicator
Specify *YES to display keywords with a required or optional Environment Context Indicator or specify *NO to display keywords for which this context is not allowed.
Environment Code
Specify the environment code filter. Possible values are:
- *All
- Select all environment codes.
- Environment-Code
- Specify the environment code.
Route Context Indicator
Specify *YES to display keywords with a required or optional Route Context Indicator or specify *NO to display keywords for which this context is not allowed.
Route Code
Specify the route code filter. Possible values are:
- *All
- Select all route codes.
- Route-Code
- Specify the route code.
Program Context Indicator
Specify *YES to display keywords with a required or optional Program Context Indicator or specify *NO to display keywords for which this context is not allowed.
Program Name
Specify the program name filter. Possible values are:
- *All
- Select all program names.
- Program-name
- Specify the program name.
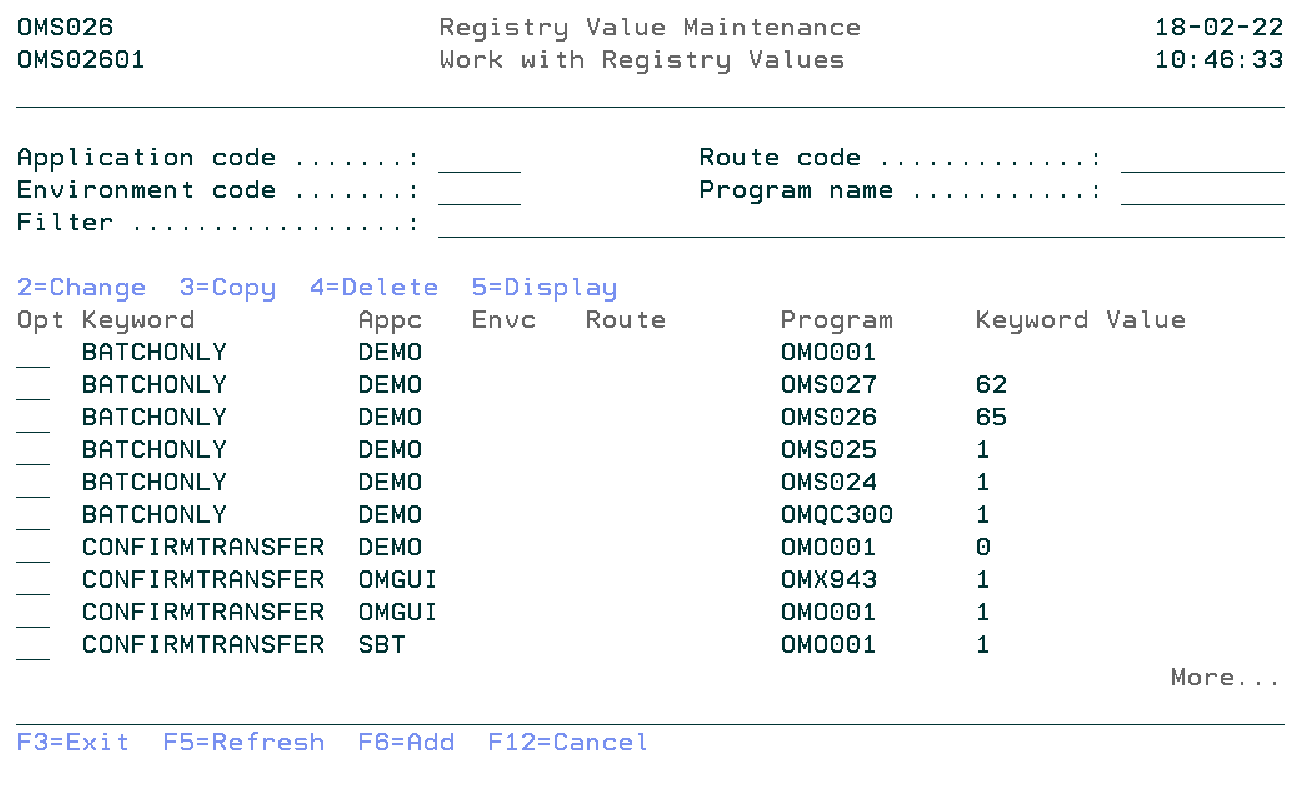
Work with Registry Values
The Work with Registry Values shows all the entries in a list from the application general-purpose file that is linked to the general-purpose definition file. Entries can be Viewed, Copied, Changed, Deleted, and Added. This screen will be shown according to the parameter of the previous display.
Application Code
You can specify the application code which you want to filter.
Environment Code
You can specify the environment code which you want to filter.
Route Code
You can specify the route code which you want to filter.
Program Name
You can specify the program name which you want to filter.
Filter
The Filter prompt can be used for quick filtering of the list.
Option
Use this column to perform different operations on individual entries. Type the option number next to an entry and press Enter.
- 2=Change
- Change the value of a registry keyword.
- 3=Copy
- Copy the registry keyword from the database.
- 4=Delete
- Remove the registry keyword from the database.
- 5=Display
- Display the information about the registry keyword.
- F6=Add
- Add a new registry keyword.
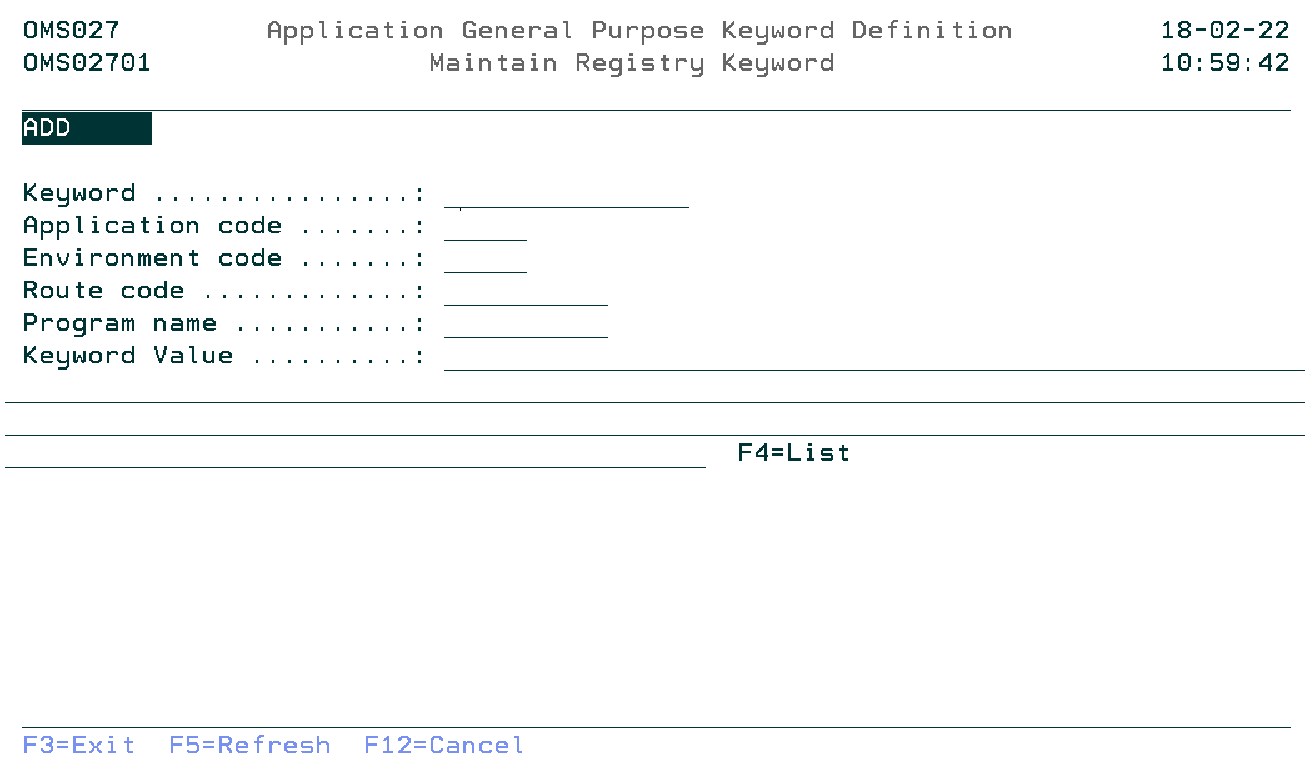
Maintain Registry Keyword
The Maintain Registry Keyword display shows information and allows actions depending on the option chosen on the previous display. The chosen action on the previous display is shown on line three. The following modes can be activated:
- Add
- Add a new registry keyword.
- Change
- Change the attributes of an existing registry keyword. The current values are shown.
- Copy
- Copy the attributes of an existing registry keyword. The current values are shown.
- Delete
- Delete the attributes of an existing registry keyword. The current values are shown.
- Display
- Show the attributes of an existing registry keyword. The current values are shown.
Keyword
You can specify the registry keyword.
Application Code
You can specify the application code of the application to which the registry key must be added.
Environment Code
You can specify the environment code for which this registry key is valid.
Route Code
You can specify the route code for which this registry key is valid.
Program Name
You can specify the program name for which this registry key is valid.
Keyword Value
You can specify the registry keyword value.
Use F4=List to get a list of the available keyword values.
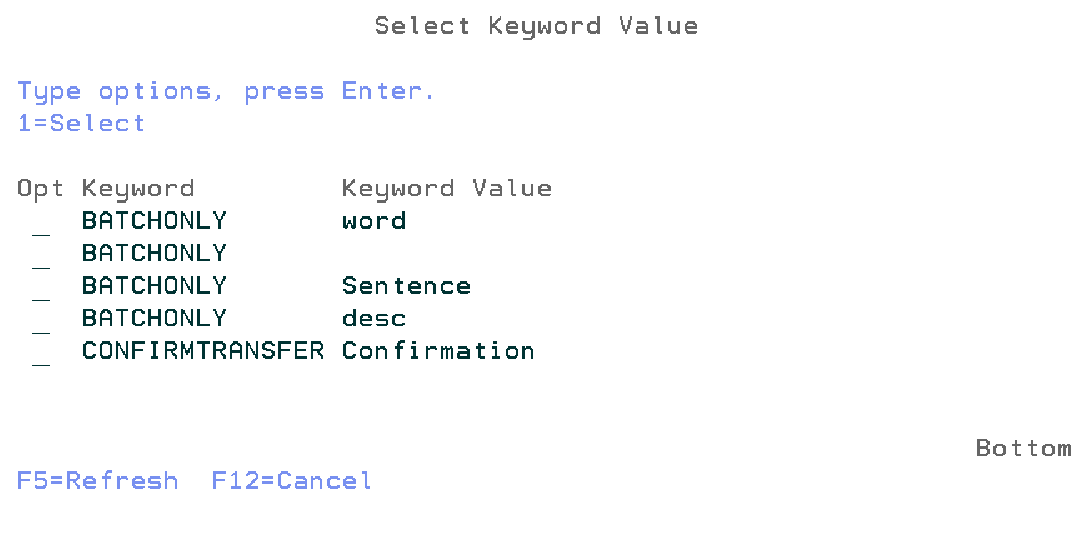
Select Keyword Value
The Select Keyword Value window shows all the keyword values in a list from the general-purpose value file. This display will be shown when you press F4 on the keyword value field in the previous screen.
Option
Use this column to select the keyword value.
- 1=Select
- Select keyword value.
Command Start Application Registry Maintenance (STRARM)
This menu command starts the application registry maintenance function. Refer to the description of the function application registry maintenance for a detailed description.
STRARM SYSI(*YES)
       APPI(*YES)
       APPC(*ALL)
       PDLI(*YES)
       PDLC(*ALL)
       ROTI(*YES)
       ROTC(*ALL)
       PGMI(*YES)
       PGMN(*ALL)
This command has nine parameters.
Pre Transfer Check
The pre-transfer check mechanism is used to check if an object can safely be transported to the next environment. The pre-transfer check will check a couple of actions, e.g.
- Level Checks for files,
- Signature Level Check for service programs,
- Etc...
A pre-transfer check defines how a check entry can be added to the pre-transfer check table OMPTC. It defines in which contexts the check entry can be added and describes the usage of the check.
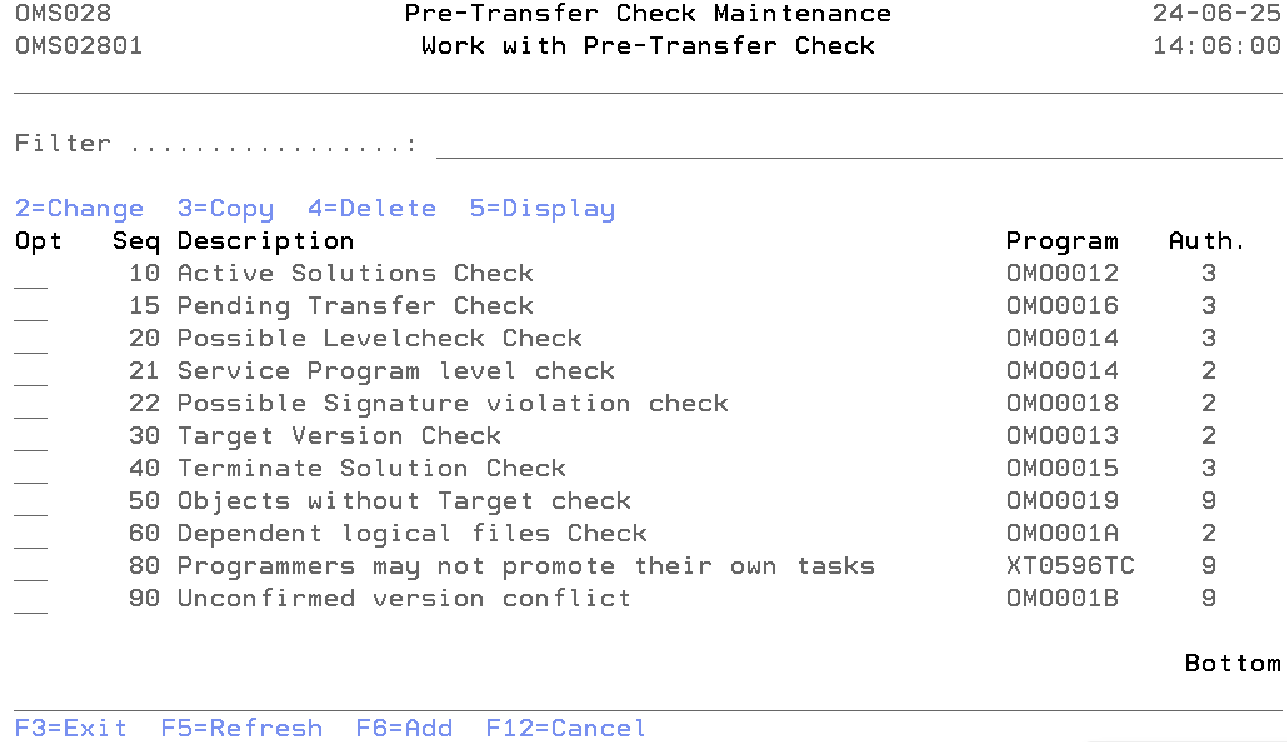
Work with Pre Transfer Check
The Work with Pre transfer check display shows the currently defined checks, including their main parameters. To select an option, type the option number in the option field area and press Enter. For more information about an option move the cursor to the option column and press Help. For more information about a function key, move the cursor to the function key area and press Help.
The system indicator, the description of the function, a critical indicator, a local/remote indicator and the function owner are shown in addition to the functions. Refer to the Exception Concepts for more detailed information.
You can add a new check to the list, delete a check from the list, change the attribute of a check, or display the attribute of a check.
Filter
The Filter prompt can be used for a quick filtering of the list. Type the code or partial code of the below fields you wish to show in the list.
- Sequence Number
- Description
- Program Name
Option
Use this column to perform different operations on individual entries. The possible values are:
- 2=Change
Type 2 to change the value of a check. - 3=Copy
Type 3 to copy the check from the database. - 4=Delete
Type 4 to remove a check from the database. TDOMS supplied checks can not be deleted. - 5=Display
Type 5 to display the information about the check.
- F6=Add
Add a new occurrence of the entity you are working with.
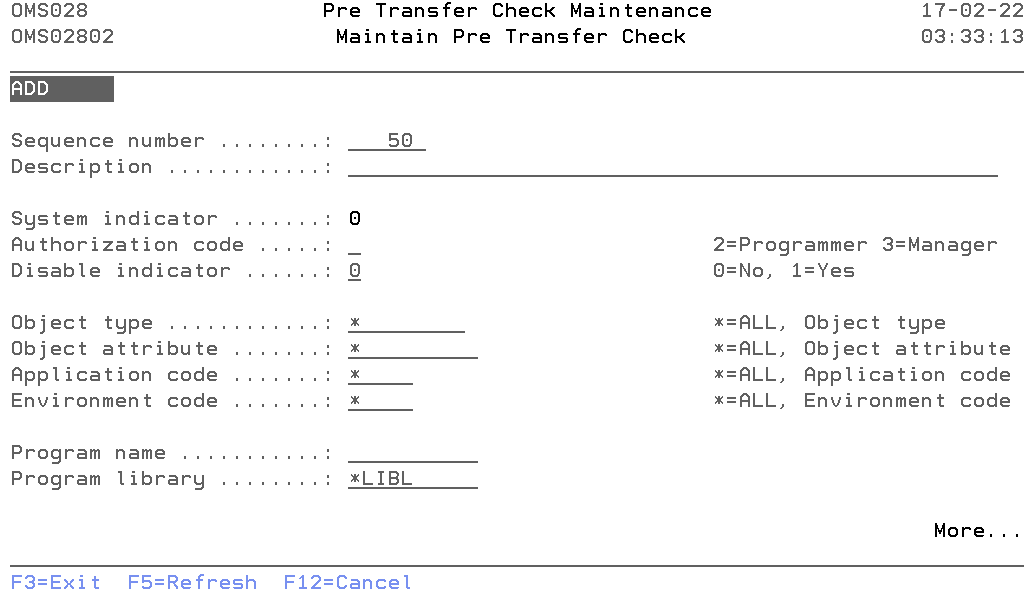
Maintain Pre Transfer Check
The Maintain Pre Transfer Check display shows information and allows actions depending on the option chosen on the previous display. The chosen action on the previous display is shown on line three. The following modes can be activated:
- Add
You can add a new check. The sequence number, description, Authorization code and all other mandatory fields must be entered. - Change
Change the attributes of an existing check. - Copy
Copy the check from the database. - Delete
The current pre-transfer check attributes are shown, including a confirmation message. The check is deleted from the list after pressing Enter. - Display
Show the attributes of a check. The current values are shown.
Sequence Number
The Sequence Number is the order in which the check is being executed.
You can change the system-generated sequence number but it must be unique per check. A blank value is not allowed.
Description
The pre-transfer description contains a description of the pre-transfer check entry. A blank value is not allowed.
System indicator
The System Indicator indicates whether the check is supplied by TD/OMS or by the user. Value '1' indicates that the check is a TD/OMS supplied. Value '0' indicates check is created by user.
Only authorization code and disabled indicator value can be changed for TD/OMS supplied check.
Authorization code
Specify the authentication code that can confirm the errors or warnings coming from the pre-transfer check. The possible values are:
- 2=Programmer
Programmers can not confirm error or warning. - 3=Application manager
Programmers can confirm error or warning. - 9=Block
No one can confirm the issue. The issue has to be resolved before processing can continue.
Disable indicator
The disabled indicator is defined per pre-transfer check. It indicates if this check should execute or not. The possible values are:
- 0=No
The check will run. - 1=Yes
The check will not run.
Object type
Specify the Object Type for which this check should be executed. Enter a valid object type or '*' for all object types.
Object attribute
Specify the Object Attribute for which this check should be executed. Enter a valid object attribute or '*' for all object attributes.
Application code
Specify the Application Code for which this check should be executed. Enter a valid application code or '*' if this check should be executed for all applications.
Environment code
Specify the Environment Code for which this check should be executed. Enter a valid environment code or '*' if this check should be executed for all environments.
Program name
The program name contains the name of a program which is called by TD/OMS during checkout.
Program library
The program library contains the OS/400 library where the exception program can be found.
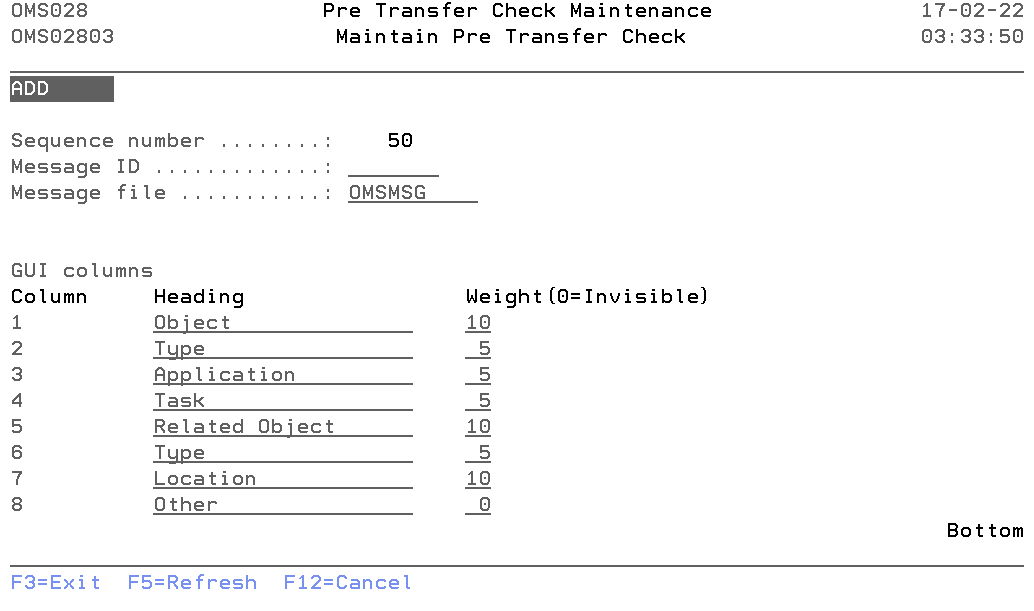
Message id
The message id contains the name of the message-id of the pre-transfer check description text.
Message file
The name of the message file from which message-id is referred. By default "OMSMSG" message file is supplied, the user can change this value.
Gui Columns
It is now possible to configure which columns are visible and the header of these columns during the pre-transfer check. This is only possible for your own pre-transfer check definitions. Not for the system-supplied definitions. Please refer to the below description for more details.
- Column
The numbers match the column number. - Heading
The columns for this particular check can be changed by entering the values in this field. - Weight
The weight is the relative size of the column in the table. Value 0 will hide the column.
Command Start Pre Transfer Check Maintenance(STRPTCM)
This menu command starts the pre-transfer check function. Refer to the description of the function Pre Transfer Check for a detailed description.
This command has no parameters.
Pre Transfer Check details
Below are the detailed functions of each pre-transfer check.
- Active Solutions Check
- If you see this message, it means that you are going to replace an object that is currently attached to another task. This does not mean it is a version conflict. It just means that the object will, from this point on, be attached to your task and the other task as a *MERGE solution.
- Unconfirmed Active Solutions Check
- If version conflict confirmation is embedded in your organization then it means that you are going to replace an object that is currently attached to another task for which we could not find a confirmation record. This does not mean it is a version conflict. It just means that the object will, from this point on, be attached to your task and the other task as a *MERGE solution.
- Object Without Target Check
- If the configuration is not correct, you may see this error. It means that TD/OMS cannot find a suitable library or directory for the indicated objects in the target environment. This is sometimes related to location types and labels.
- Possible Level check Check
- You are processing a file that has dependencies that are not part of your transfer. This could mean that a level check could occur. The list will show which objects are depending on the object that you plan to process.
- Target Version Check
- You are going to overwrite an object version that is not a direct parent of your version. Note the objects and use the version conflicts view to resolve the issues.
- Terminate Solution Check
- All objects in the target environment which use the object will be checked. If they are not part of this transfer, then this message will be shown. You should probably not terminate an object which is in use by other objects.
- Pending Transfer Check
- There are still transfers pending completion on this or other systems. To close pending remote transfers, start the remote job monitor function.
- Service Program Level Check
- This check is done when not all dependent objects of a service program are processed. If you use a signature strategy, you may disable this check in the pre transfer check maintenance program.
- Possible Signature violation check
- Checks if the program to service program signatures match.
- Check dependent logicals
- It checks if there is an abnormal dependency. This occurs when either a dependent logical file exists but is not known to TD/OMS, or the dependent logical file exists in a different library than the physical file and its source does not exist.
- Unconfirmed version conflict
- It checks if there is a target higher environment that has a higher version of the solution.
- User Defined
- It is also possible to insert your own checking program. An example source is available in QUSRSRC. File a question in the helpdesk if you require support for this.
DFG:Job Description Maintenance/en
Reorganize Files
The "Reorganize files" function must be activated on a regular basis in order to remove deleted records physically. Only users having a *SECOFR or *SECADM class profile, and the TD/OMS-manager are allowed to use this function.
The files can only be reorganized, if no job has a lock of any kind on the files to be reorganized. All batch and interactive jobs using the files, must be ended and closed. If a file can not be exclusively allocated, the file(s) will not be reorganized.
Note: As part of the reorganizing activity you should make a back-up of your (TD/OMS) database, and then start the reorganize function. The files are reorganized using the RGZPFM system command.
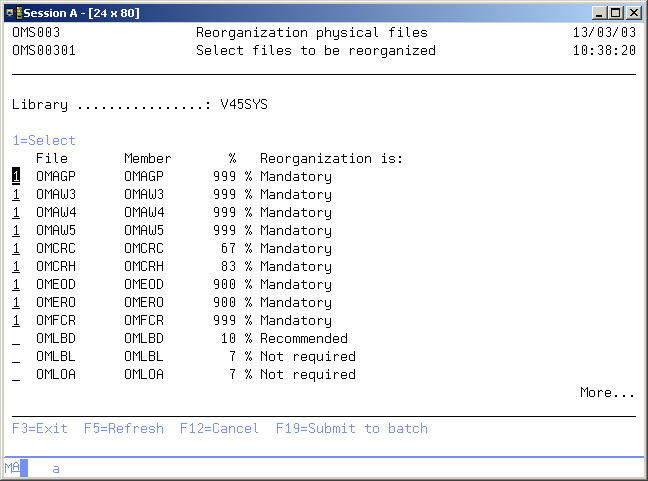
Select Files to be Reorganized
The display shows all physical files with the file members, and per member a percentage and a recommendation. The selection indicator is pre-set with "1", when reorganization is strongly recommended or mandatory. The percentage is based on the number of deleted records in relation to the number of actual records. A percentage of 999 is shown, when the number of deleted records exceeds multiple times the number of currently active records.
The possible recommendations are "Not required", "Recommended", "Strongly recommended" and "Mandatory".
When you press Enter the selected physical file members are reorganized interactively. You will be confirmed online about the status of each reorganization. If the status of the organization is "File allocation error.." the file could not be allocated by the RGZPFM command and it is not reorganized.
Option
Use this column to select different operations on individual file entries. The possible values are:
- 1=Select
Select the physical file member for reorganization.
Use F19 to submit the selected reorganization tasks to the batch environment. The job will use job description OMSJOBD.
Command Reorganize TD/OMS Files (RGZOMSF)
The reorganize TD/OMS files command is used to start reorganizing TD/OMS files. Refer to the description of the function Reorganize TD/OMS Files for more detailed information.
RGZOMSF LIB(*OMSLIB)
Library (LIB)
Use this parameter to select the library, where the files to be reorganized are located. You can use the parameter to enter your own specific library. The possible values are:
- *OMSLIB
The command processing program will locate the TD/OMS product library containing the files. - Name
Type the name of the library containing the files to be reorganized.
Command Clear TD/OMS Log data(CLRLOGOMS)
The Clear TD/OMS Log command is used to remove all or some entries from the TD/OMS log file. Use it on a regular base to prevent the TD/OMS log file from growing beyond limits or extend the size of the TD/OMS physical file OMLOG, so it is able to contain a large number of records.
CLRLOGOMS TODATE(date)
Clear until Date - (TODATE)
Specify the date up to which you wish to delete the log entries. The possible values are:
- Date
Enter the date up to which you wish to clear the log file. - *ALL
Use this value, if you wish to clear all the entries from the log file.
Command Save OMS Log Files (SAVLOGOMS)
WARNING: This command will remove data from the current TD/OMS files, and requires exclusive access to all files. If you have some doubts, please contact TD/OMS consultancy before executing this command.
The Save OMS Log Files command is used to REMOVE data from various TD/OMS files. The command is intended to move older data to separated history files. The removal concerns data which you no longer need in the actual files. We advice NEVER using this command, unless you are very sure about which data you want to split off. The data that are removed, will be saved in identical, parallel TD/OMS history files. These files are stored in the target library you must specify. The number of data records removed and separately saved, depends on the calendar date you specify.
SAVLOGOMS          DATE(date)
                   APPL(appl)
                   LIB(lib)
Save until Date - (DATE)
Specify the date up to which the history must be removed/saved.
Date Enter the date up to which you wish to save the log file.
Application - (APPL)
Specify the application for which you want to save the history. The possible values are:
- *ALL
Select all application codes. - application-code
Specify the application code.
Library - (LIB)
Specify the library where the saved history data must be stored. The library will be created, if it doesn’t exists. When the library exists and there are already history files in that library, then the history records are added to these files.
Command Delete OMS Application (DLTAPPOMS)
This command is used to remove an application or parts of an application from the TD/OMS database.
The following elements can be selected for deletion:
- Application as a whole
- Application definitions
- Application tables
- Application security
- Requests
- Fixes and solutions
- Exceptions
- Distribution overrides
- Dumped sources
- Fall-back objects
- Object data
- Ratification data
- Action data
The command checks the consistency of the deletion request. For example, it is not possible to delete the application without deleting all of the other elements.
Furthermore, there might be conditions that prohibit the deletion of specific elements. For example, a solution might be leading solutions that are part of other applications. In that case, it is not allowed to delete the solution. These situations are signaled by the command processing program, and a report is printed to signal the error condition.
You can also run this command in a 'Check only' mode. In this case, the program checks if there are conditions that would prohibit the deletion of the application. No actual deletion will take place.
This command does not remove data which is not directly related to the specified application.
Because of the destructive nature of this command, only the *SECOFR and *SECADM users are allowed to use the command.
DLTAPPOMS           CHECK(*YES|*NO)
                    APPL(application)
                    RMVAPPL(*YES|*NO)
                    RMVDFN(*YES|*NO)
                    RMVTBL(*YES|*NO)
                    RMVSEC(*YES|*NO)
                    RMVREQ(*YES|*NO)
                    RMVFIX(*YES|*NO)
                    RMVEXC(*YES|*NO)
                    TFRAPPL(*ANY|application)
                    RMVDST(*YES|*NO)
                    RMVDMPSRC(*YES|*NO|*DATA)
                    RMVFLBCNT(*YES|*NO|*DATA)
                    RMVOBJD(*YES|*NO)
                    RMVRATI(*YES|*NO)
                    RMVACTN(*YES|*NO)
                    PRTM(*BASIC|*FULL|*NONE)
Check only CHECK()
Specify if the command should be run in Check only mode. The possible values are:
*YES
Specifies that the command should be run in Check only mode. In this mode, no actual deletion will take place. You will be informed whether or not the deletion is allowed.*NO
Specifies that the selected elements should actually be deleted.
Application (APPL)
Specify the application for which elements should be deleted.
Remove application (RMVAPPL)
Specify if the application must be removed altogether. The possible values are:
*YES
Specifies that the application must be removed. If the application must be removed, then all other application related elements should also be removed.*NO
Specifies that only specific elements should be removed from the application. The application will not be removed altogether.
Remove definition (RMVDFN)
Specify if the application definitions must be removed. The application definitions consists of library definitions, library list definitions, distribution entries, environment security and environment definitions. The application definitions are created with the environment maintenance function. The possible values are:
*YES
Specifies that the application definitions should be removed.*NO
Specifies that the application definitions should not be removed.
Remove tables (RMVTAB)
Specify if the application tables must be removed. The application tables define the request and fix types, the priority and the reason codes. The possible values are:
*YES
Specifies that the table definitions should be removed.*NO
Specifies that the table definitions should not be removed.
Remove security (RMVSEC)
Specify if the application security must be removed. The possible values are:
*YES
Specifies that the application security should be removed. Keep in mind that the application is not accessible if there are no security definitions.*NO
Specifies that the application security should not be removed.
Remove requests (RMVREQ)
Specify if the application's request database must be removed.
*YES
Specifies that the request database should be removed along with the associated fix/request relationships.
If you remove the request database but keep the application definitions, then the request numbering continues from where it has left off. You must manually set the last generated request number in the application definition if you want to (re)start numbering from 1.*NO
Specifies that the request database should not be removed.
Remove fixes (RMVFIX)
Specify if the application's fix database must be removed.
*YES
Specifies that the fix database should be removed along with the associated solutions, solution details and fix/request relationships.
If you remove the fix database but keep the application definitions, then the fix numbering continues from where it has left off. You must manually set the last generated fix number in the application definition if you want to (re)start numbering from 1.*NO
Specifies that the fix database should not be removed.
Remove exceptions (RMVEXC)
Specify if the application's exception definitions be removed. The possible values are:
*YES
Specifies that the exception definitions should be removed from the application. This includes exception functions and exception selections. System exception functions are moved to another application or removed if they are no longer in use. This is controlled by the TFRAPPL keyword.*NO
Specifies that the exception definitions should not be removed.
Transfer system exceptions to (TFRAPPL)
Specify the application to which system exceptions must be moved. The possible values are:
*ANY
If the application to be deleted contains a system exception function and the function is in use by exception selections of other applications, then it is moved to one of the applications using it. The application that is to be the new owner can be any of the applications using the system function. If the system exception is not in use by other applications, then it is removed altogether.- Application
Specifies the application which must own the system exception functions defined in the application to be deleted. The system exception functions are always moved to the specified application, even if they are not in use by that application or any other application.
Remove distribution overrides (RMVDST)
Specify if the remove location overrides must be removed from the application. The remote location overrides are specific to an application and they are defined using the STRRLO command. The possible values are:
*YES
Specifies that the remote location overrides should be removed.*NO
Specifies that the remote location overrides should not be removed.
Remove dumped sources (RMVDMPSRC)
Specify if the dumped sources data must be removed from the application. The possible values are:
*YES
Specifies that the dumped sources data should be removed from the application. However, the actual dumped sources should not be removed from the dumped sources library.*NO
Specifies that the dumped sources data should not be cleared.*DATA
Specifies that the dumped sources data should be removed from the application, and that the actual dumped sources should be removed from the dumped sources library.
Remove fall-back contents (RMVFLBCNT)
Specify if the fall-back data must be removed from the application. The possible values are:
*YES
Specifies that the fall-back data should be removed from the application. However, the actual dumped objects should not be removed from the fall-back save library.*NO
Specifies that the fall-back data should not be cleared.*DATA
Specifies that the fall-back data should be removed from the application, and that the actual dumped objects should be removed from the fall-back save library.
Remove object descriptions (RMVOBJD)
Specify if the object descriptions must be removed from TD/OMS. The internal TD/OMS database is cleared for the indicated application.
*YES
Specifies that the object descriptions should be removed from the application. This includes objects, object relations, details and detail relations.*NO
Specifies that the object descriptions should not be removed.
Remove ratification data (RMVRATI)
Specify if the ratification data should be removed from the application. The possible values are:
*YES
Specifies that the ratification data should be removed. This includes the ratification groups, the ratification group members and the ratification groups per environment.*NO
Specifies that the ratification data should not be removed.
Remove action data (RMVACTN)
Specify if the action data should be removed from the application. The only elements that are deleted are the action selections containing the name of the application. If an action group detail selection refers to the application, then the field Application is set to *ALL, but the selection is also set to Disabled. The possible values are:
*YES
Specifies that the action data should be removed. This includes only the action selections.*NO
Specifies that the action data should not be removed.
Print mode (PRTM)
Specify the amount of data that should appear on the deletion report. The possible values are:
*FULL
Specifies that a complete logging of all the deletion actions should be written on the report.*BASIC
Specifies that only a basic logging of the deletion actions should be written on the report.*NONE
Specifies that no report should be written at all.
Clear Fall Back Save library (CLRFBSOMS)
The Clear Fall Back Save library command is used to remove all or some entries from the Fall Back Save libraries file and remove the corresponding savefiles from the Fall Back Save library. Only members of the OMS Manager group are allowed to run this command (STRSD).
CLRFBSOMS APPL(DEMO) TODATE(01012010)
- Application - (APPL)
Specify the application for which the Fall Back Save library entries and corresponding savefiles must be removed.
- Code
- Enter an existing application code.
- *ALL
- The fallback entries are removed for all applications.
- Clearing range end date - (TODATE)
Specify the end date up to which you wish to delete the Fall Back Save library entries and corresponding savefiles. The possible values are:
- Date
- Enter a correct date according to the date format of
your current JOB or the format of the JOB that will execute the command. The input is an END date for which the Fall Back Save library file will be cleared (the end date is included).
- *ALL
- Use this value if you wish to clear all the entries from the Fall Back Save library entries and corresponding savefiles.
- *1-WEEK
- Use this value if you wish to clear the entries except of last one Week from the Fall Back Save library entries and corresponding savefiles.
- *2-WEEK
- Use this value if you wish to clear the entries except of last two Weeks from the Fall Back Save library entries and corresponding savefiles.
- *1-MONTH
- Use this value if you wish to clear the entries except of last one Month from the Fall Back Save library entries and corresponding savefiles.
- *3-MONTH
- Use this value if you wish to clear the entries except of last three Months from the Fall Back Save library entries and corresponding savefiles.

