EWM:Checkout and Promote
Checkout and Promote
The Transfer process
There are four ways of performing a transfer in the context-menu for a task, one or more solutions or solution folders.
- Move Transfer
Starts the transfer wizard if you want to select the target environment yourself (e.g. Emergency). Objects will be moved but you can change this to copy in the wizard.
- Checkout
A 'Copy Transfer' to development. The wizard tries to gather all the required information and shows a final confirmation page. Any required user actions will open on the spot that requires the attention.
- Promote
A 'Move Transfer' when you want to move to the next environment. The wizard tries to gather all the required information and shows a final confirmation page. Any required user actions will open on the spot that requires the attention
The process of transfer consists of the following actions:
- Determining the sequence of processing (e.g. tables before indexes, modules before programs)
- Update the object version number (when leaving development)
- Create the object (and source) in the new environment
- Distribute to remote systems (in case of a remote sub environment)
- Update status of the solution
- Conditionally remove sources and objects from the previous environment (e.g. if 'move').
- Update task status
- Update object dependencies
Also, keep the following in mind:
- During this process one or more actions and/or exceptions may be executed at the predefined exits. Each action/exception can contain one or more user-defined programs. The actions/exceptions and the relation to the user-defined programs are registered with the TD/OMS configuration functions and can not be influenced from within the client or during the transfer.
- Creation of an object is usually done by using the CRTDUPOBJ command. Logical files are always compiled. Users who like to handle the creation of objects themselves and not use the defaults are enabled to do so by specifying Actions and/or Exceptions.
- Data conversion of physical files during transfer is supported by TD/OMS. The standard TD/OMS data conversion applies the copy file command with *MAP and *DROP specified for the relevant parameters. The TD/OMS configuration functions must be used to specify one of the other TD/OMS data conversion methods (copy from a different file name, execute conversion program or copy with data) before the transfer is executed.
- A special transfer is the so-called horizontal transfer. In this case, a task is transferred within an environment, from one sub environment to another. The most important reasons for using a horizontal transfer are:
-
- To transfer a task from one programmer to another in a development environment where every programmer has his/her own sub environment.
- To distribute a task to a remote machine again when the processing on a remote machine has failed for whatever reason.
- To implement a task in a (remote) sub environment at a later moment than the local production environment.
Copy Transfer / Move Transfer
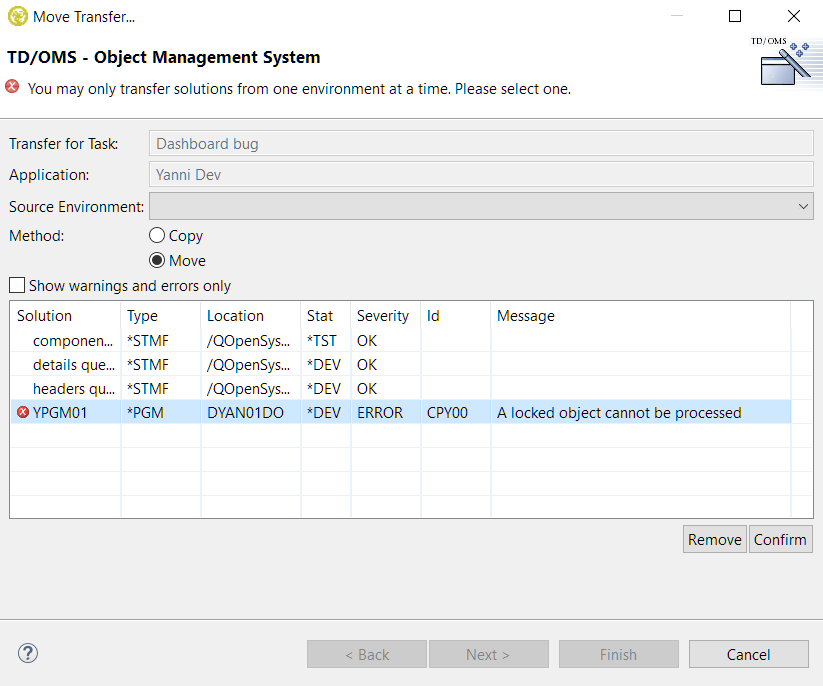
After selecting the Copy Transfer or Move Transfer action the transfer process will collect the required information, perform the pre-processing validation and display the result.
You can limit the display to the solutions with a warning or error by ticking the checkbox. Depending on the error you may “solve” the problem by selecting a specific Source environment, a different Method or by pressing the Remove/Confirm button after selecting a line. Some errors may force you to cancel the transfer process and resolve the problem before you can continue. The Next button can only be pressed after resolving all errors.
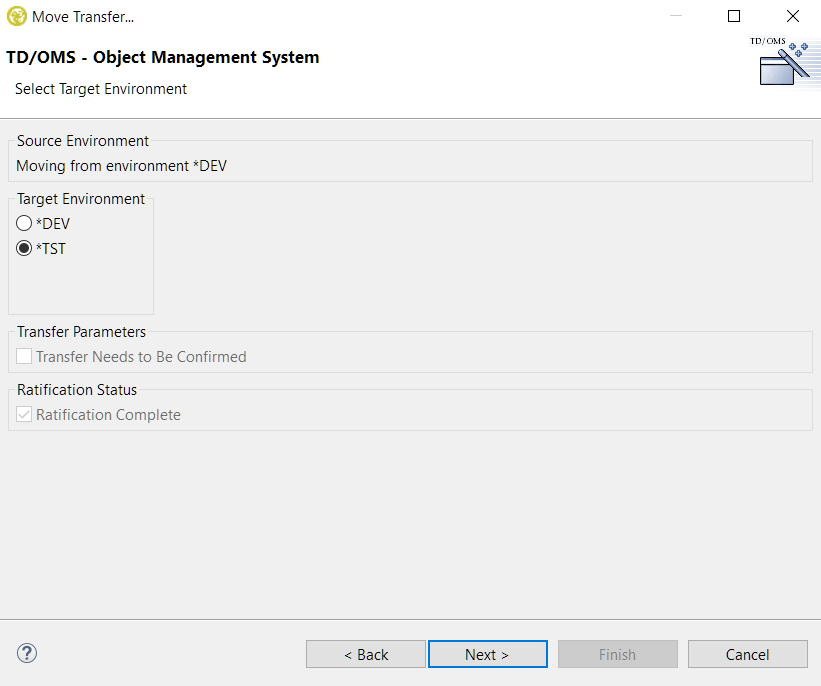
Select Target Environment
The second screen allows the selection of the target environment. The target environment is automatically selected among the options based on the source environment and if its a copy or a move transfer.
This screen also supplies information regarding the transfer confirmation and ratification status. You will not be able to continue with the transfer when one or more ratifications have not been given or have been rejected.
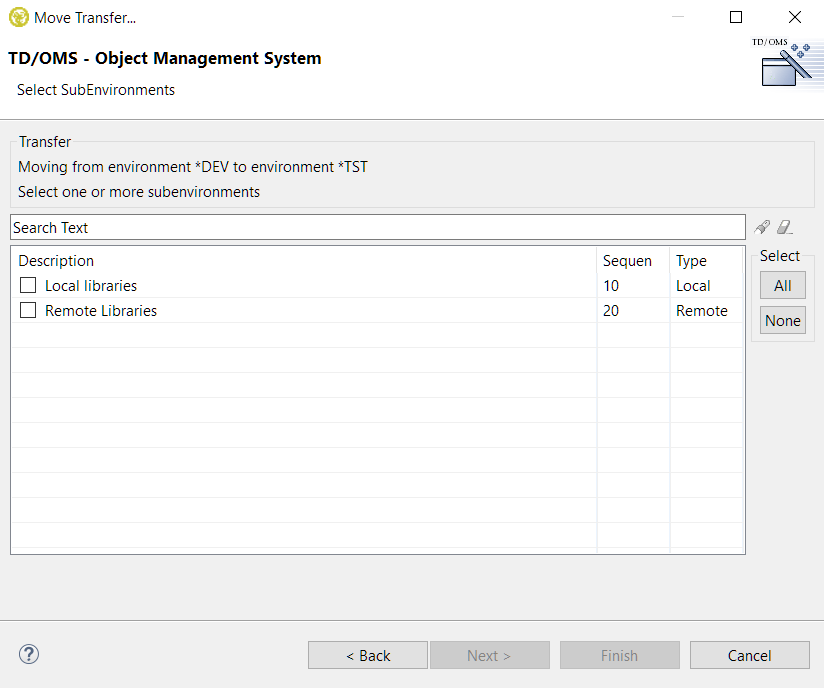
Select Subenvironment
Pressing the Next button may result in the display of the sub-environment selection screen. Depending on the environment configuration, you are enabled to select 1 or more sub-environments or sub-environments that are automatically selected for you and this screen will not be displayed.
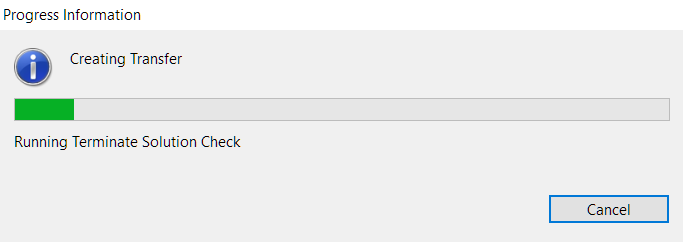
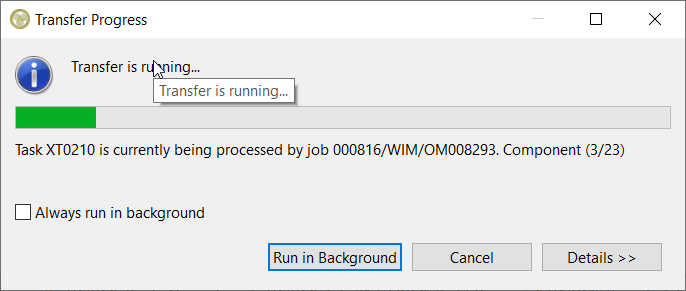
The selection of sub-environments is the final selection step. When the next button is pressed the transfer process will execute several steps (e.g. execution of the pre-processing exceptions, version check, etc.) to generate the transfer processing data. Depending on the number of components involved some time may pass before this is finished. A screen is displayed informing you about the progress and the step being executed.
Resolve Conflicts
During the process, several checks are done to ensure that there will be no issues in the target environment. The following system checks are done:
- Active Solutions Check
- If you see this message, it means that you are going to replace an object that is currently attached to another task. This does not mean it is a version conflict. It just means that the object will, from this point on, be attached to your task and the other task as a *MERGE solution.
- Unconfirmed Active Solutions Check
- If version conflict confirmation is embedded in your organization then it means that you are going to replace an object that is currently attached to another task for which we could not find a confirmation record. This does not mean it is a version conflict. It just means that the object will, from this point on, be attached to your task and the other task as a *MERGE solution.
- Object Without Target Check
- If the configuration is not correct, you may see this warning. It means that TD/OMS cannot find a suitable library or directory for the indicated objects in the target environment. This is sometimes related to location types and labels.
- Possible Levelcheck Check
- You are processing a file that has dependencies that are not part of your task. This could mean that a level check could occur. The list will show which objects are depending on the file that you plan to process.
- Target Version Check
- You are going to overwrite an object version that is not a direct parent of your version. Note the objects and use the version conflicts view to resolve the issues.
- Terminate Solution Check
- All objects in the target environment which use the object will be checked. If they are not part of this transfer, then this message will be shown. You should probably not terminate an object which is in use by other objects.
- Pending Transfer Check
- There are still transfers pending completion on this or other systems. To close pending remote transfers, start the remote job monitor function.
- Service Program Level Check
- This check is done when not all dependent objects of a service program are processed. If you use a signature strategy, you may disable this check in file OMPTC.
- Possible Signature violation check
- Checks if the program to service program signatures match.
- User Defined
- It is also possible to insert your own checking program into OMPTC. An example source is available in QUSRSRC. File a question in the helpdesk if you require support for this.
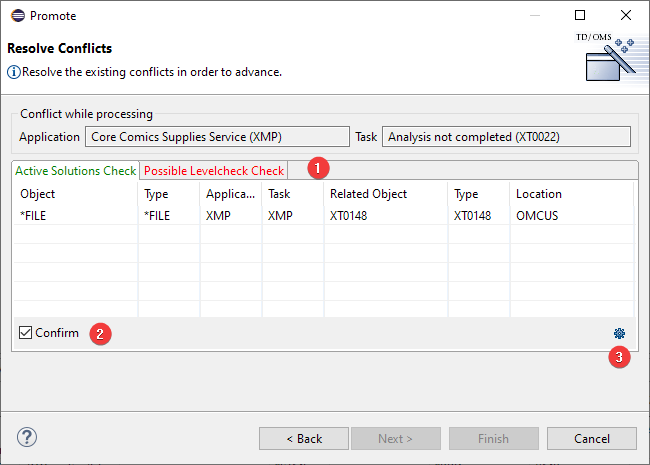
The Resolve Conflicts dialog will show you the conflicts. In case you are authorized, you can click the "Confirm" checkbox. This confirmation will be logged in the TD/OMS audit log.
- 1 Checks
- Every tab is a separate check that needs to be confirmed. A red text color shows that the item has not been confirmed. A green color means that this conflict has been confirmed.
- 2 Confirm
- If the checkbox is enabled, then you are authorized to confirm the conflict.
- 3 Configure Columns
- In case you are authorized, you may configure the columns for your user check program. If you are not authorized then there is no button.
Transfer overview
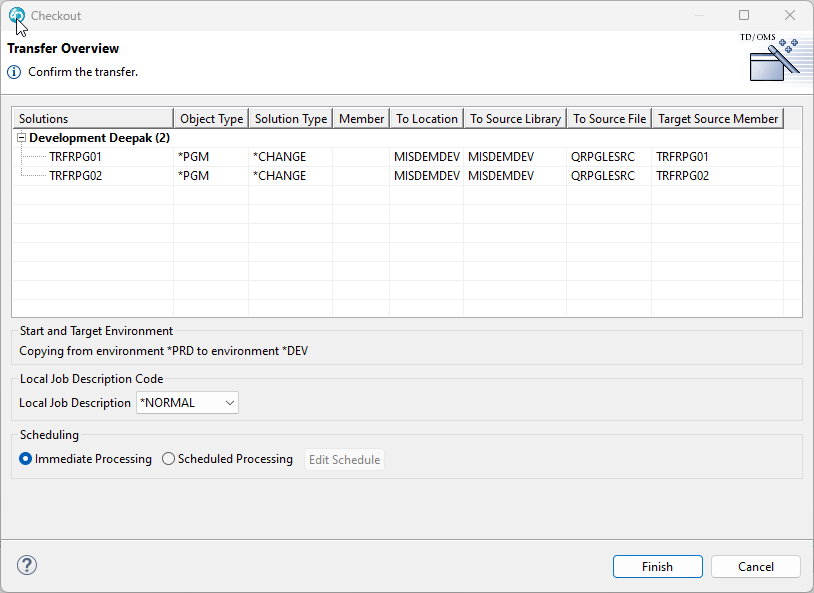
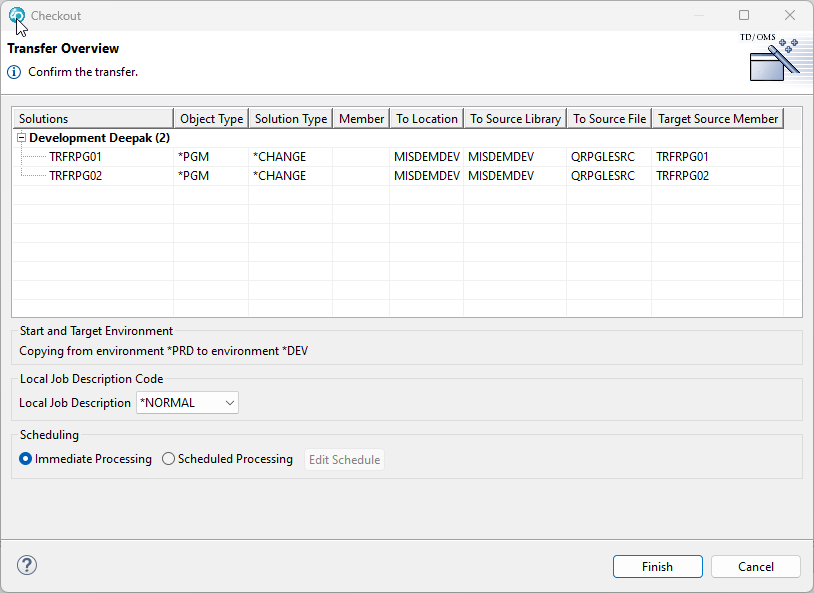
In the final confirmation screen, the solutions to be transferred are displayed grouped under the sub-environment that they are going to be transferred to. Each sub-environment row can be expanded to display the solutions that are going to be transferred to that sub-environment. The number in the parenthesis shows the number of solutions it contains. The source and target environments are also displayed underneath along with the optional feature to schedule the transfer at a later date.
Schedule a Transfer
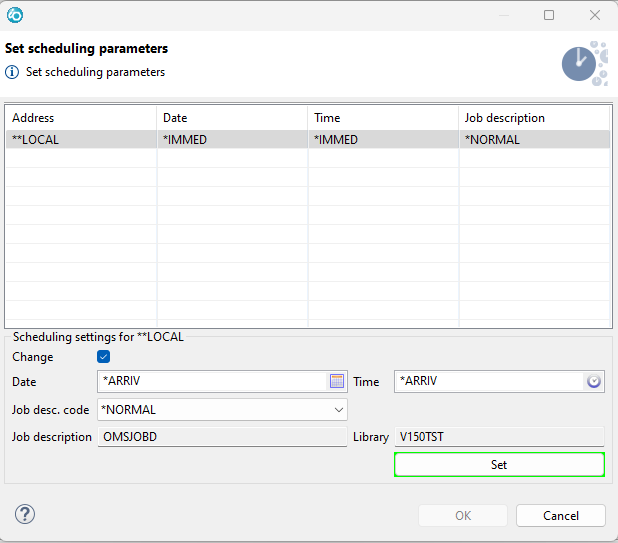
After selecting the Scheduled Processing radio button you may press the Edit schedule button to display the scheduler settings. Press the Calendar button to select a different date and/or enter a time that will be in the future when you start the actual transfer. TD/OMS has two pre-defined Job description codes (*NORMAL and *FAST) to process transfer requests with different (priority) settings. The actual behavior is determined by the job description attributes which are set by the TD/OMS or system administrator.
Changes made to the scheduling parameters are activated when the Set button is pressed. Pressing the OK button without pressing the Set button will result in the loss of any changes made after the last time the Set button was pressed.
Pressing the Finish button will start the actual transfer. You can press the Run in Background button to minimize the screen.
Checkout / Promote
These two actions perform an automatic transfer by choosing the target environment and sub-environments automatically. A checkout is always a copy transfer to the development environment while a promote is always a move transfer to the next environment. The sub-environments are selected automatically based on the configured settings.
If it was not possible to gather all the required information and user intervention is required or an error occurred, then the normal transfer wizard will open on the appropriate page for the user to continue, skipping the previous pages. If all the information was gathered successfully, then the wizard will open only on the last confirmation page.
TD/OMS Version Conflicts view
You might want to read up on Object Version Concepts.
The TD/OMS Version Conflicts view shows solutions with a (possible) version conflict for the selected Component, Solution, Task, Request or Application
The view shows version conflicts for objects in the selected application AND for objects in the related application(s) as shown in the next example:
By default the view only shows the conflicts that must be confirmed. Press the Show All button (‘checked’-icon) in the upper right corner of the view to include conflicts that are confirmed (Confirmed by is filled in) and the potential version conflicts.
TD/OMS recognizes three types of version conflicts:
- Conflicts that MUST be confirmed (red arrow)
- Potential version conflicts (yellow arrow)
- Version conflicts in another application (blue arrow)
Potential version conflicts occur when a solution is connected to more than 1 task but the component in the production environment has the highest version number. This will be the case when you connect a component to multiple tasks without performing a copy transfer for (all of) these solutions.
Depending on the actions taken a possible version conflict may turn into a real conflict that must be confirmed. Possible conflicts that do NOT turn into a real conflict will be automatically confirmed. These conflicts show *SYSTEM in Confirmed by.
