EWM:Edit and Compile
Edit and Compile
Two Minute Overview Videos
TD/OMS Build Queue View
The TD/OMS Build Queue view enables to you build/compile one or more components in a Task.
You can open the Build Queue view by:
- Selecting a task or Solution and using the Show in .. context menu
- Using the quick-access box in the toolbar and typing build queue
If it is empty, select a Task in the Work Management view. The view will be populated with the all components that are in the Build Queue for the selected Task. If there are no entries in the queue yet, click the ![]() toolbar item to add all entries from the Task to the build queue. If you want to add one or more Solutions instead of all components from the Task, simply select the Solutions that you want to add and click the
toolbar item to add all entries from the Task to the build queue. If you want to add one or more Solutions instead of all components from the Task, simply select the Solutions that you want to add and click the ![]() toolbar item to add them to the queue.
toolbar item to add them to the queue.
Toolbar Items
Use the toolbar (1) to execute action that operate on the queue or entries in the queue.
 Preferences
- Open the Preferences Page to change Build Queue preferences.
 Pin to the Current Selection
- Click this icon to lock the view for further selection changes. When you select another Task, the view will not repopulate.
 Toggle owner
- Click this icon to toggle between showing your compiles (default) and compiles from other users.
 Show all entries
- Click this icon to toggle between showing only the latest compiles (default) or all compiles.
 Release Selected / Release Queue
- Click this icon to release all locked items in the queue or to release only the selected items. Please note that it is possible to re-release a failed compile by selecting the failed compile entry and pressing this icon.
 Add all Development Solutions from Selected Task
- When you select a Task in the Work Management view and then click this icon, all Solutions from the selected Task will be added to the queue. Hoover over the icon to read the tooltip. The tooltip will tell you what will happen if you press the icon.
 Add Selected Solutions
- When you select one or more Solutions that are either in the development environment or in the emergency environment, these will be added to the Build Queue. Hoover over the icon to read the tooltip. The tooltip will tell you what will happen if you press the icon.
 Refresh
- Refresh the Build Queue List.
 Delete Selected Build Queue Entries
- All selected entries in the Build Queue will be removed from the Build Queue. This toolbar entry will only appear if a line is selected in the Build Queue list. Hoover over the icon to read the tooltip. The tooltip will tell you what will happen if you press the icon.
The meaning of the line icons
The icon in front of the line (2) will tell you what the state of this entry is. Pressing the refresh ![]() icon will rebuild the list to show you the latest state of the Build Queue. The meaning of the icons are:
icon will rebuild the list to show you the latest state of the Build Queue. The meaning of the icons are:
 Held
Held- The entry is currently held. Select this line and press the Release
 icon to release this entry for compilation. The icon will change to
  to indicate that the entry is waiting to be executed.
  Waiting
- The entry is release from the queue and it waits for its turn to be processed. This icon will be shown if there are other entries preceding it which are also released.
 Running
- This entry is currently being processed.
 Success
- This entry was built successfully.
 Fail
Fail- The build of this entry failed.
Other Features
- Change the Build Order (3)
- You can click the "Order" cell to change the sequence.
- Copy the Job Name (4)
- You can click the "Job" cell to select the job number. The job number can then be used in the WRKJOB command.
- Sorting (5)
- You can click the "Order", "Object" and "Date" column to sort the list on these entries.
- Open the Error List (6)
- If you compiled with the event file then the error list is shown here.
- Open Spool file (7)
- Here you can find the spooled files of the compile.
Preferences
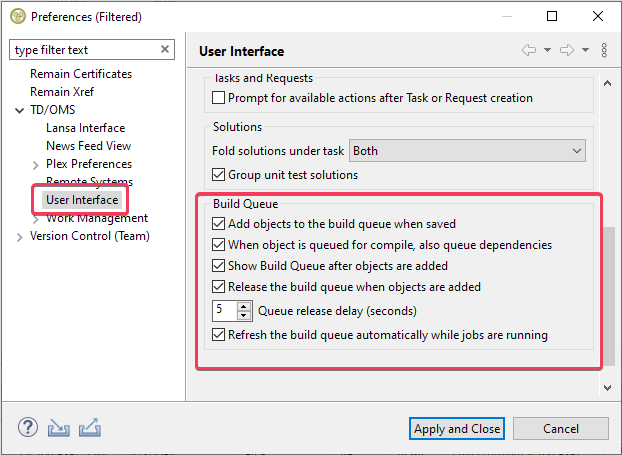
In the TD/OMS Preferences, you can control additional behavior of the Build Queue.
- Add objects to the build queue when saved
- When you press save in the editor, the object is automatically added to the build queue.
- When an object is queued for compile, also queue dependencies
- For example, when you queue a physical file, also queue any logical and related programs in the same task.
- Show the build queue after objects are added
- Puts the build queue view in the foreground when you have added an object.
- Release the build queue when objects are added
- Tick this if you want to release the build queue when new objects are added.
- Queue release delay (seconds)
- When working remotely, the compile may be finished before the source is uploaded. You may delay the release of the build queue by specifying a value between 1 and 30 seconds.
- Refresh the build queue automatically when jobs are running
- When the build queue is running, it will automatically refresh for you until all results are in.
Change and save the view layout
The columns within the view can be resized and the column order can be changed by dragging the columns into the preferred sequence. You can save this information by pressing the Save the current column ordering ![]() button.
The TD/OMS Compile View enables you to overrides creation commands for the selected component. You will see in this section that sometimes we talk about Create and sometimes about Compile, we mean the same thing (strictly speaking, the compilation is just one way to create something). Compile overrides are create commands that differ from the normal commands for this specific type. Suppose you want to create all physical files with MAXMBRS(1) except for some special files. We are going to take this example in the following explanation.
button.
The TD/OMS Compile View enables you to overrides creation commands for the selected component. You will see in this section that sometimes we talk about Create and sometimes about Compile, we mean the same thing (strictly speaking, the compilation is just one way to create something). Compile overrides are create commands that differ from the normal commands for this specific type. Suppose you want to create all physical files with MAXMBRS(1) except for some special files. We are going to take this example in the following explanation.
TD/OMS Compile View
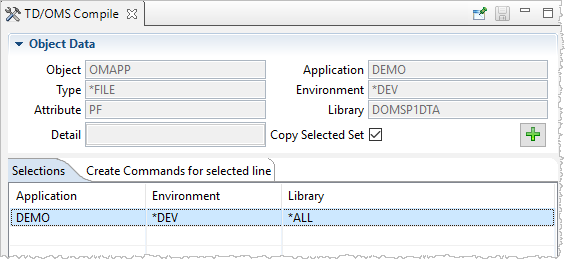
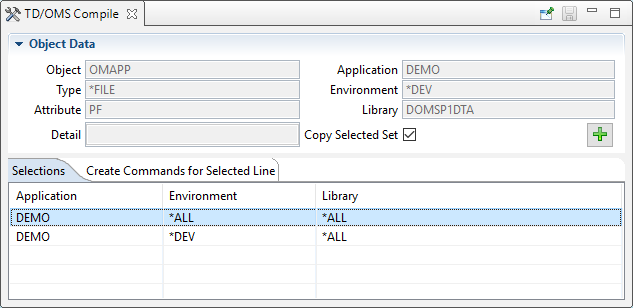
Open the Compile View by using the "Show in" context menu on a solution or component. In our case, we have selected file OMAPP. The following view is opened:
The view shows overrides on the selection tab. In this case, there is already an override for this file when it is created in environment *DEV in application DEMO. If you click on this line then its create commands are loaded on the tab "Create Commands for Selected Line". Click on this tab to see the create commands for this selected line. If you want to see the default create commands for this object then press CTRL and click on the line again. The will be "unselected" and the second tab will change the contents to "Default Create Commands (not editable)". The default create commands for this component can then be viewed.
Creating a new Override
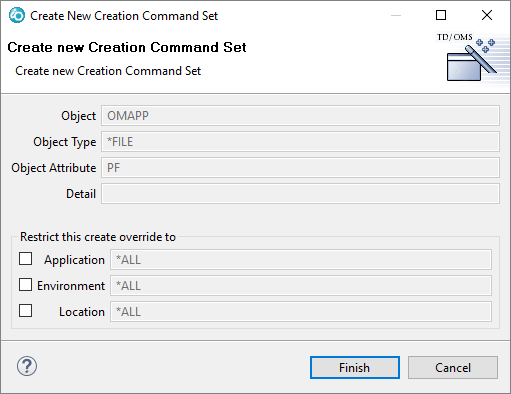
Press the big green ![]() button to create a new override selection. The "Copy Selected Set" tickbox determines if you want to copy the creation commands for the selected line into the new override. If you untick this box, the default create commands will be copied for this new override.
button to create a new override selection. The "Copy Selected Set" tickbox determines if you want to copy the creation commands for the selected line into the new override. If you untick this box, the default create commands will be copied for this new override.
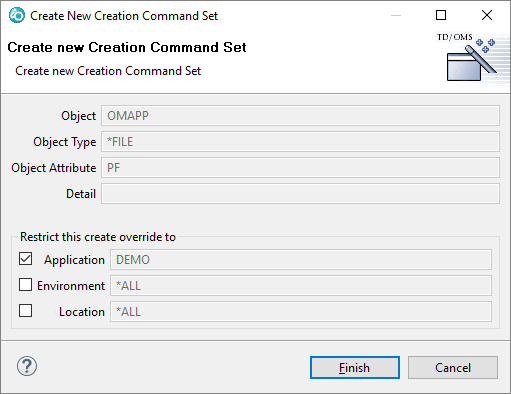
The tick boxes indicate the selection for which this override is active. If you leave all the tick boxes unselected as shown in the previous picture then this override will be active for all occurrences of this file. You can restrict when the override is active by selecting one or more selection boxes.
In this case we want to make one additional override to compile the file always with the MAXMBRS(*NOMAX) setting anywhere in the DEMO application. Tick the Application box as indicated in the above picture. Press the "Finish" button to create the override.
Changing the creation commands
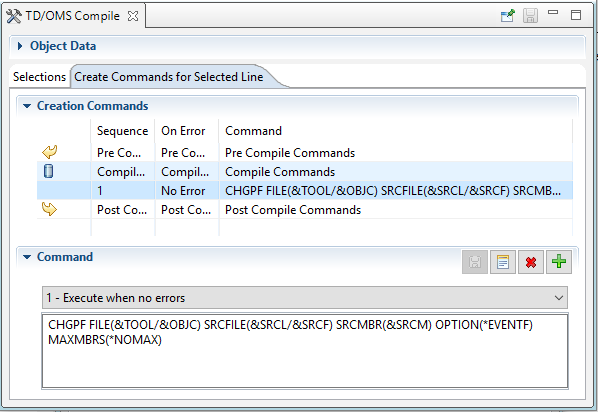
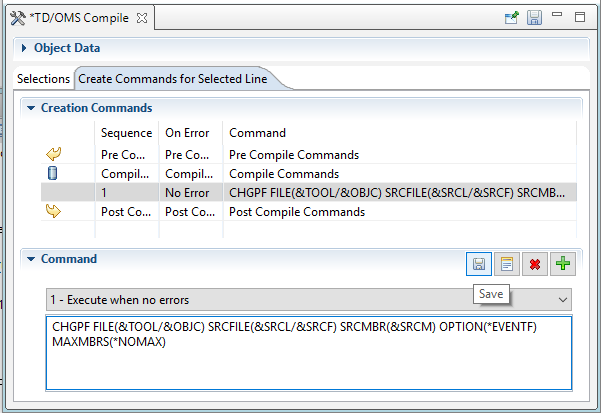
The "Selections" tab will be loaded with our new entry and it will be automatically selected. Selecting a line in the "Selections" tab will load the create commands in the "Create Commands for Selected Line" tab. Click on the tab to reveal the commands. Please note that the "Object Data" section will be collapsed to make more room for the create commands. If you wish, you can expand it manually.
As you can see from the image, there are already compile commands created for this new entry. If you want to remove one of the default commands you can select it and press ![]() to remove it.
to remove it.
To create a new compile command, select the middle line that says "Compile Commands" and then press the ![]() button.
button.
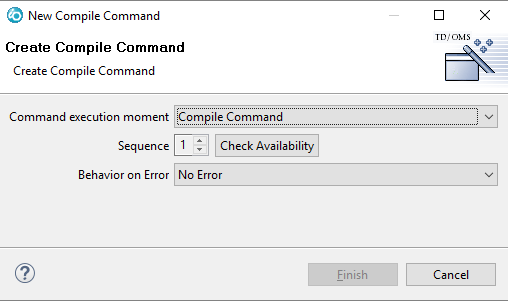
a new wizard will pop up that enables you to create a new command. The command can be created in the "Pre" ,"Compile" or "Post" section. Since our view is already filled correctly, we just press "Finish". If you get a warning telling you that the sequence is already taken or the Finish button is not enabled, then press the "Check Availability" button to tell you if the sequence is available. Change the sequence if needed. There can only be one compile command, but many pre and post commands.
Also, specify the Behavior on Error field to indicate if you want this command to be executed:
- No Error
- Execute this command if no errors were found in any of the preceding commands.
- Error
- Execute this command if errors were found in any of the preceding commands. You can use this field to send a message or do error recovery.
- Always
- Always execute the command no matter how the previous commands ended.
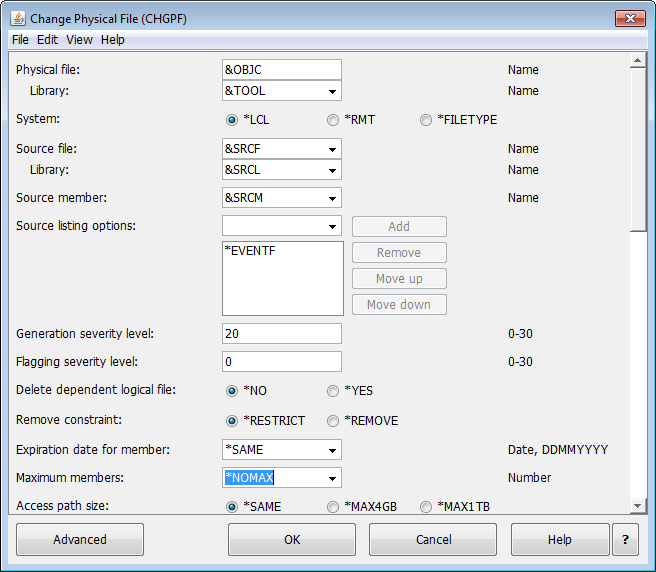
When we return to the Compile view we see that the compile command is copied from the default compile command. All we have to do is to alter our command and we can do that by pressing the "Prompt" (![]() ) button.
) button.
In the prompt dialog we can change the values that we want and press "Finish" Please note that you can use Substitution variables that will be filled in by TD/OMS.
Finally, press the "Save" button to save your work.
If you select a solution for Compile, you will see that the new compile command is active.
TD/OMS Spooled File View
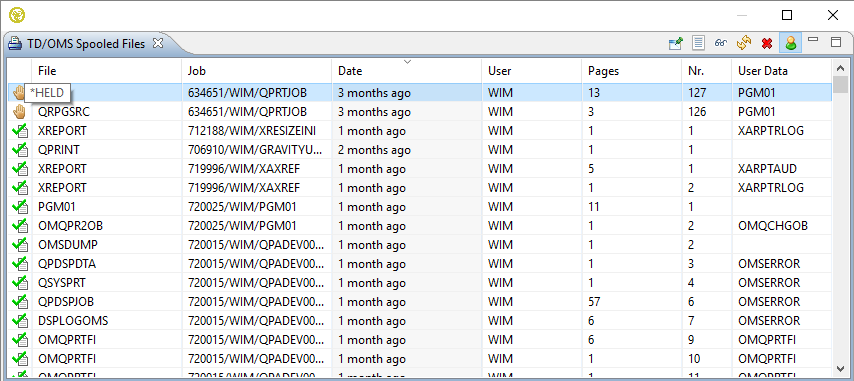
The TD/OMS Spooled File view enables to you quickly view the generated reports on the IBM i that are related to the current selection.
You can open the Spooled File view by:
- Selecting a Task, History record, Transfer record or job message and using the Show in .. context menu
- Using the quick-access box in the toolbar and typing spooled file
If it is empty, select a Task in the Work Management view. The view will be populated with all your spooled files for the selected system.
You can also select a line from the Logged Jobs view, the Build Queue, the Log, the Object and the Task Transfer History views. If you do then the spooled files will be restricted to the ones associated with that specific job (if any).
Toolbar Items
Use the toolbar (1) to execute action that operate on the queue or entries in the queue.
 Pin to the Current Selection
- Click this icon to lock the view for further selection changes. When you select another line, the view will not repopulate.
 Refresh
- Refresh the Spooled File List.
 Save the current column ordering
- If you have moved the columns around by using drag and drop, you can use this button to save the ordering for the next time.
 Delete Selected Spooled Files
- All selected entries in the list will be removed from the system. This toolbar entry will only appear if a line is selected.
 Display the Spooled File
- Select one entry from the list and press the Display icon. This will show the contents of the spooled file. You can also double-click the line instead of selecting this icon.
 Toggle between your files and all files
- This action toggles between showing only your files and showing all spooled files in the selection. The default is to only show your files. Please note that the list can become quite long if you select all users in combination with a general selection (like a Task or a Request)
The meaning of the line icons
The icon in front of the line (2) will tell you what the state of this entry is. Pressing the refresh ![]() icon will rebuild the list to show you the latest state of the spooled file queue. Hoover over the icons to get the associates status.
icon will rebuild the list to show you the latest state of the spooled file queue. Hoover over the icons to get the associates status.
Other Features
- Sorting
- You can click the columns to sort the list on these entries.
Change and save the view layout
The columns within the view can be resized and the column order can be changed by dragging the columns into the preferred sequence. You can save this information by pressing the Save the current column ordering ![]() button.
button.

