FRI:Working with an Issue Tracker
Working with an Issue Tracker
In this chapter we are going to explain the features of an interface. For demonstration purposes we are going to use the JIRA interface (all the rest work in a similar fashion).
Filters
Items from the connected external systems can be found by creating search filters or by using the system filters that you have on that system.
Search Filters
Search filters are custom filters created through the 'New Search Filter' wizard. They are filters that are created with your criteria in TD/OMS and they serve only for viewing purposes. This gives you the possibility to find specific items on the spot without going to the connected system's application at all.
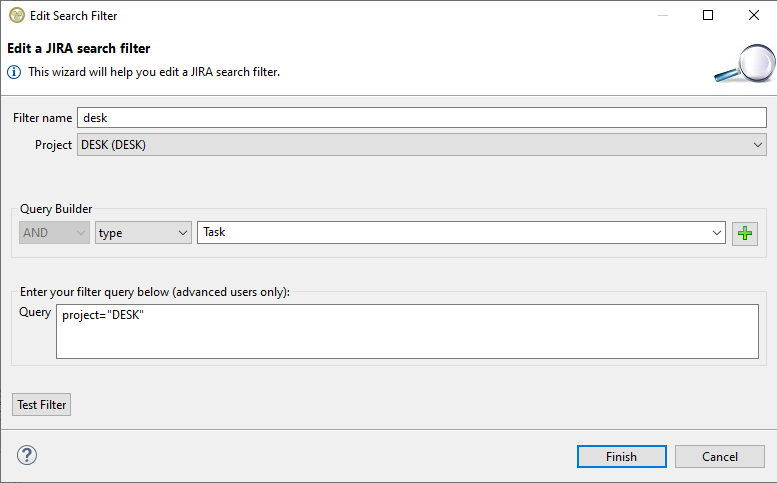
In order to create one the 'New Search Filter' wizard must be opened:
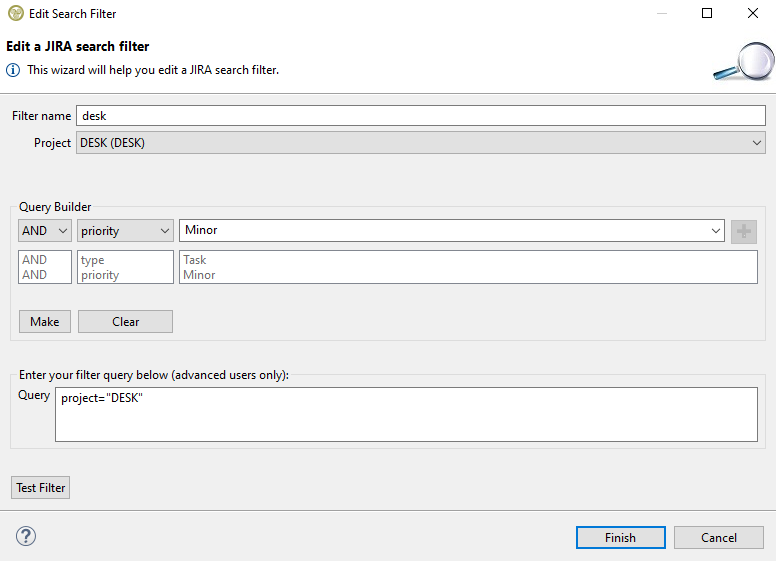
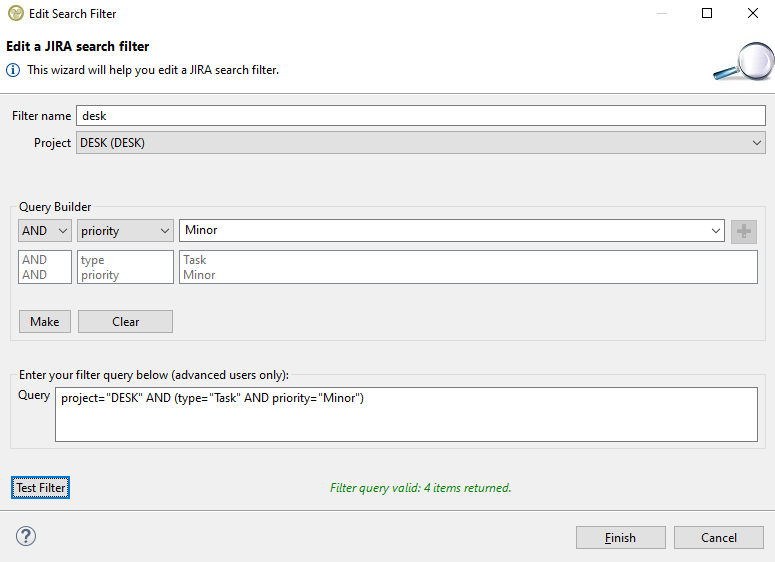
First a filter name must be specified. For JIRA the scope must also be specified by selecting one of the available projects of your account. A project title is comprised of its name and its key in the parenthesis (the project key is unique its name not). Then you can use the query builder to add any kind of condition that JIRA offers just like you would do on the its website (a full explanation of the filter criteria follows at a later section). In this occasion we want to search for items that have the type 'Task' and priority 'Minor'. We select the type criteria in the combo box, we select or type the 'Task' value and then press the green + button to add it to the query. We do the same for the 'Minor' priority.
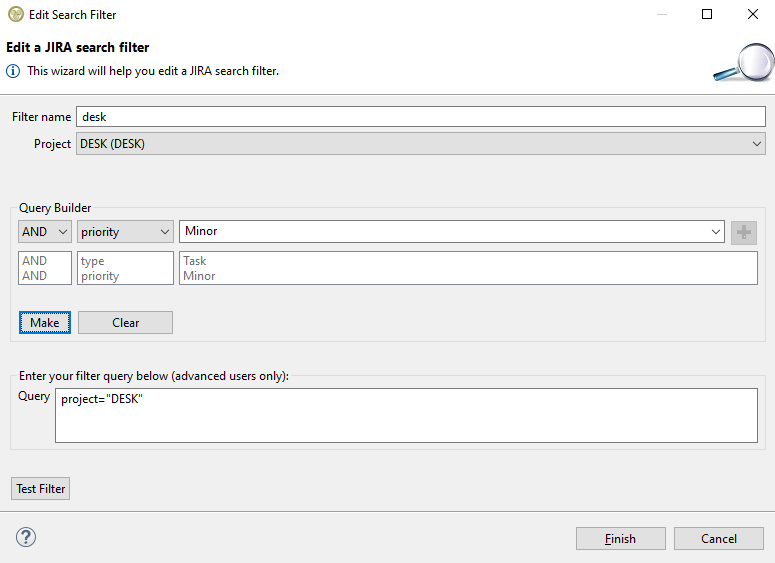
Then we need to press the make button in order to make the query:
With this way we can construct any kind of query that we want. Experienced users that are familiar with the SQL that the external system uses can also write a query on their own in the query box.
When we are finished with the query construction we have the optional choice of testing the query to see if it is valid or if it actually returns any items back. To do that we press the 'Test Filter' button:
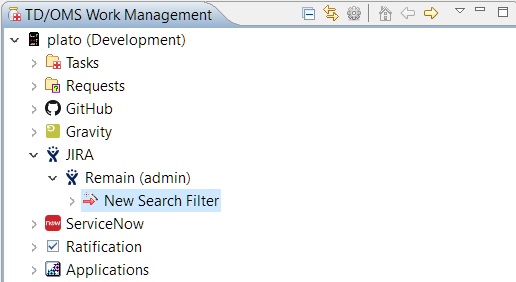
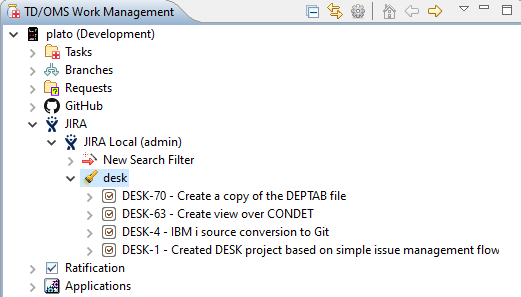
When we are done and press finish the tree will be refreshed containing the new search filter:
Criteria Explanation
Each system has its own criteria for its filters. In this section there is an explanation for each one.
Gravity
Here is the explanation of the Gravity filter criteria:
- Search for text: Search for items that contain the specified text in their name, subject or description.
- Application: Search for items that belong to an application.
- Assigned to: Search for items that are assigned to a specific user.
- Connection: Search for items that are connected to other items with one of the default connection types or even with a user defined one.
- Creation date: Search for items that are created after the specified date (including).
- Creator: Search for items based on which user created them.
- Expected completion date: Search for items that have their expected completion date after the specified date (including).
- Expected end date: Search for items that have their expected end date after the specified date (including).
- Expected hours: Search for items that have a specific number of expected hours assigned to them.
- Expected start date: Search for items that have their expected start date after the specified date (including).
- Has: Search for items that have attachments, children or parents.
- Has attachments: Search for items that have attachments or not.
- Has item parents: Search for items that have other items as parents or not.
- Has source dependencies: Search for items that source dependencies or not.
- Has sub items: Search for items that have other items as children or not.
- Has target dependencies: Search for items that have target dependencies or not.
- Is: Search for items based on their status (e.g. open).
- Item id: Search for items based on their ID's.
- Modified date: Search for items that the date where they were last modified is after the specified date (including).
- Name generated: Search for items that have their name automatically generated or not.
- Priority: Search for items that have the specified priority.
- Realized completion date: Search for items that have their realized completion date after the specified date (including).
- Realized end date: Search for items that have their realized end date after the specified date (including).
- Realized hours: Search for items that have a specific number of realized hours assigned to them.
- Realized start date: Search for items that have their realized start date after the specified date (including).
- Reported by: Search for items based on the user reported them.
- Severity: Search for items based on their severity.
- Stage: Search for items based on their stage.
- Type: Search for items based on their type e.g. Task.
- Workflow: Search for items with a specific workflow.
JIRA
For JIRA the filter scope must be specified first by selecting one of the available projects you have on your account.
Here is the explanation of the JIRA filter criteria:
- Assignee: Search for issues that are assigned to a particular user.
- Category: Search for issues that belong to projects in a particular category.
- Comment: Search for issues that have a comment that contains particular text.
- Component: Search for issues that belong to a particular component(s) of a project.
- Created: Search for issues that were created after the selected date (including).
- Creator: Search for issues that were created by a particular user.
- Description: Search for issues where the description contains particular text.
- Due: Search for issues that were due after the selected date (including).
- Environment: Search for issues where the environment contains particular text.
- IssueKey: Search for issues with a particular issue key or issue ID (e.g. the number that JIRA automatically allocates to an issue).
- Labels: Search for issues tagged with a label.
- Priority: Search for issues with a particular priority.
- Reporter: Search for issues that were reported by a particular user. This may be the same as the creator, but can be distinct.
- Resolution: Search for issues that have a particular resolution.
- Resolved: Search for issues that were resolved after the selected date (including).
- Status: Search for issues that have a particular status.
- Summary: Search for issues where the summary contains particular text.
- Text: This is a "master-field" that allows you to search in the Summary, Description, Environment and Comments fields.
- Type: Search for issues that have a particular issue type.
GitHub
For GitHub you must specify what type of items you want to search first: Issues, Pull Requests or both.
Here is the explanation of the GitHub filter criteria:
- Assignee: Finds issues or pull requests that are assigned to a certain user.
- Author: Finds issues or pull requests created by a certain user.
- Closed: Filters issues or pull requests based on the date when they were closed.
- Commenter: Finds issues or pull requests that a certain user commented on.
- Comments: Filters issues or pull requests based on the quantity of comments.
- Created or updated: Filters issues or pull requests based on date of creation, or when they were last updated.
- Description: Searches issues or pull requests that contain the text provided.
- Head or base: Filters pull requests based on the branch that they came from or that they are modifying.
- In: Qualifies which fields of the item are searched. With this qualifier you can restrict the search to just the title, body, comments, or all of these.
- Involves: Finds issues or pull requests that were either created by a certain user, assigned to that user, mention that user, or were commented on by that user.
- Is: Filter issues or pull requests based on whether they're open or closed.
- Labels: Filters issues or pull requests based on their labels.
- Language: Searches for issues or pull requests within repositories that match a certain language.
- Mentions: Finds issues or pull requests that mention a certain user.
- Merged: Filters pull requests based on the date when they were merged.
- No: Filters items missing certain metadata, such as label, milestone, or assignee.
- Project: Limits searches to a specific project board in a repository or organization.
- Status: Filters pull requests based on the commit status.
- Team: For organizations you're a member of, finds issues or pull requests that mention a team within the organization.
- User: Limits searches to a specific user.
GitLab
For GitLab you must specify what type of items you want to search first: Issues or Merge Requests.
Here is the explanation of the GitLab filter criteria:
- Issue Filter Attributes
- assignee_username: Return issues assigned to the given username.
- author_username: Return issues created by the given username.
- created_after: Return issues created on or after the given time.
- created_before: Return issues created on or before the given time.
- in: Modify the scope of the search attribute. title, description, or a string joining them with comma.
- labels: Comma-separated list of label names, issues must have all labels to be returned. None lists all issues with no labels. Any lists all issues with at least one label.
- milestone: The milestone title. None lists all issues with no milestone. Any lists all issues that have an assigned milestone.
- order_by: Return issues ordered by created_at, updated_at, priority, due_date, relative_position, label_priority, milestone_due, popularity, weight fields. Default is created_at.
- scope: Return issues for the given scope: created_by_me, assigned_to_me or all. Defaults to created_by_me.
- search: Search issues against their title and description.
- sort: Return issues sorted in asc or desc order. Default is desc.
- state: Return all issues or just those that are opened or closed.
- updated_after: Return issues updated on or after the given time.
- updated_before: Return issues updated on or before the given time.
- weight: Return issues with the specified weight. None returns issues with no weight assigned. Any returns issues with a weight assigned.
- Merge Requests Filter Attributes
- assignee_id: Returns merge requests assigned to the given user id. None returns unassigned merge requests. Any returns merge requests with an assignee.
- author_id: Returns merge requests created by the given user id. Combine with scope=all or scope=assigned_to_me.
- created_after: Return merge requests created on or after the given time.
- created_before: Return merge requests created on or before the given time.
- in: Modify the scope of the search attribute. title, description, or a string joining them with comma. Default is title,description.
- labels: Return merge requests matching a comma separated list of labels. None lists all merge requests with no labels. Any lists all merge requests with at least one label.
- milestone: Return merge requests for a specific milestone. None returns merge requests with no milestone. Any returns merge requests that have an assigned milestone.
- order_by: Return requests ordered by created_at or updated_at fields. Default is created_at.
- scope: Return merge requests for the given scope: created_by_me, assigned_to_me or all.
- search: Search merge requests against their title and description.
- sort: Return requests sorted in asc or desc order. Default is desc.
- source_branch: Return merge requests with the given source branch.
- state: Return all merge requests or just those that are opened, closed, locked, or merged.
- target_branch:Return merge requests with the given target branch.
- updated_after: Return merge requests updated on or after the given time.
- updated_before: Return merge requests updated on or before the given time.
- wip: Filter merge requests against their wip status. yes to return only WIP merge requests, no to return non WIP merge requests.
Bitbucket
For Bitbucket you must specify what type of items you want to search first: Issues or Pull Requests.
Here is the explanation of the Bitbucket filter criteria:
- Issue Filter Attributes
- assignee: Return issues assigned to the given nickname or account_id.
- id: Return issues to the given id.
- kind: Return issues for the given kind: bug, task, enhancement or proposal.
- priority: Return issues for the given priority: trivial, minor, major, critical or blocker.
- reporter: Return issues reported with the given nickname or account_id.
- state: Return issues for the given state:new, open, resolved, on hold, invalid, duplicate, wontfix or closed.
- title:Return issues for the given title.
- created_on: Return issues created on the given time.('<' means created before and '>' means created after).
- updated_on: Return issues updated on the given time.('<' means updated before and '>' means updated after).
- Pull Request Filter Attributes
- author: Return Pull Requests authorized to the given nickname or account_id.
- id: Return Pull Requests to the given id.
- state: Return Pull Requests for the given state:MERGED, SUPERSEDED, OPEN OR DECLINED.
- created_on: Return Pull Requests created on the given time.('<' means created before and '>' means created after)
- updated_on: Return Pull Requests updated on the given time.('<' means updated before and '>' means updated after)
ServiceNow
When searches and filter tests fail in ServiceNow, it is due to the user not having sufficient authority. A good role to add to the user is the itil role but other roles may be needed for other types of tasks.
In order to use the search API you also have to create a read ACL rule for the Task table. A good role to use is the itil role. To be able to link, a user should have the admin role and the authorization to write to the 'label_entry.table_key' table. The steps to do that are the following:
1) Log in as system administrator.
2) Click on the system administrator button on the top right and select 'Elevate Roles'.
3) Check the checkbox that refers to giving rights to change the database access rules. Note that these extra rights are only active for your current session for security reasons.
4) Search for the ACL tab on the left and select it.
5) Search for the table with the name 'label_entry' and select the one called 'label_entry.table_key' with the 'write' operation.
6) On the bottom where the roles are shown click on 'insert row' to add a role and add the admin one. Press update to save.
Finally, in order to see linked items one role that a user must have is the 'tags_admin'.
Here is the explanation of the ServiceNow filter criteria:
- Search for text: Search for items that contain the specified text.
- Active: Search for items that are active or not.
- Impact: Search for items based on their impact.
- Number: Search for items based on their number.
- Priority: Search for items based on their priority.
- State: Search for items based on their state.
- Type: Search for items based on their type.
- Urgency: Search for items based on their urgency.
OTRS
Here is the explanation of the OTRS filter criteria:
- Created or Last_changed: Search for tickets that were created or last changed after the specified time.
- Customer: Search for tickets that belong to a customer. Please note that the customer ID must be used in this condition.
- Customer_user: Search for tickets that belong to a customer user. Please note that the username of the customer user must be used in this condition.
- Lock: Search for tickets that are locked or unlocked.
- Number: Search for tickets based on their number.
- Priority: Search for tickets based on their priority.
- Queue: Search for tickets based on their queue or a subqueue. In the case of a subqueue the full name must be entered, for example Raw::subqueue.
- State: Search for tickets based on their state.
- Title: Search for tickets based on their title.
- Type: Search for items based on their type.
Notes:
1) The + character is equal to a space character.
2) If 2 or more of the same conditions are added then the last one is always considered and the rest are ignored. For example, if a query is to search for tickets that belong to the 'Raw' and 'Misc' queues and they belong to a customer as well, then only the 'Misc' queue and the customer criteria will be considered and the 'Raw' queue will be ignored.
3) The 'like' character is the % character. If its used please note the following behaviors:
- a) It can only be used in the title, number, customer and customer_user.
- b) In the number condition it can be used only at the end, for example 2018%.
Azure DevOps
In Azure it is possible to query for work items or pull requests. When you create a new filter you will be given the choice of which type of filter you want to create.
Work Items
- In order to query for work items in Azure a Team must be defined first because all items must belong under a team. A default team always exists in Azure and when a project is created you will be asked to create a team as well. More than one teams can be created under a project but work items must always be queried under one. You can select which team you want in the 'Team' selection menu on the top of the filter under the filter name.
- For a full explanation of all the available work item criteria in Azure please refer to the official documentation.
- Azure DevOps queries for work items using WIQL (Work Item Query Language). Every time you make a query in a filter a WIQL query is generated based on your criteria. It is strongly advised that you don't change this query manually unless you are experienced in WIQL. The official documentation for WIQL is here.
Pull Requests
- A maximum number of pull requests must be defined because pull requests can be hundreds. The default is the maximum allowed 200.
- It is also possible to select a target repository or branch of the pull requests and the same for the source. These criteria are optional.
- For a full explanation of all the available pull request criteria in Azure please refer to the official documentation.
SonarQube
- For SonarQube you must first specify a project before you start working on the issue filters.
If you plan to work with rules as part of your filter then you can opt to press <Load Project Rules> to prefill the rules criteria values (by default there are no values for rules). Loading the project rules can take some time (it depends on the number of rules assigned to any project issue) so do this only if you know you want to use rules in your filter query. Note that issue rules will be loaded only once per session, this means that you do not have to load project rules a second time when you create a new filter. Consequence of this strategy is that new project rules will not be picked up from the SonarQube server if they were added during a running session.
Project Rules
When project rules have been loaded they will show up in the rules selection box where a rule is displayed in the following format: 'rule-key (number of issues with this rule) short rule description', for example 'common-java:DuplicatedBlocks (6) Source files should not have any duplicated blocks'.
Below are the editable SonarQube filter criteria:
- Issue Filter Attributes
- assignees: Return issues assigned for the given user login name.
- author: Return issues for the given author (requires SonarQube SCM integration).
- branch: Return issues for the given SCM branch (requires SonarQube SCM integration).
- components: Return the issues associated to the provided source file component (this is the full relative path to the source file).
- createdAfter: Return issues created after the given date. The date must be in the format yyyy-MM-dd.
- languages: Return issues for the given language, e.g. java or cs ... (a complete list is provided to select from).
- resolutions:Return issues for the given resolution, e.g. FIXED ... (a complete list is provided to select from).
- rules: Return issues for the given rule, e.g. squid:s00100 ... (a complete list is provided to select from if Load From Projects was run).
- severities: Return issues for the given severity, e.g. CRITICAL ... (a complete list is provided to select from).
- statuses: Return issues for the given status, e.g. OPEN ... (a complete list is provided to select from).
- tags: Return issues for the given tag, e.g. 'unused' (the tag 'oms.linked' will be set an issue linked to a TD/OMS task).
- types: Return issues for the given type, e.g. BUG ... (a complete list is provided to select from).
- Notes on adding filter attributes
- When 'rules' is selected to be a part of the query then it is not possible to include either severities or types, combining a rule with either attribute is not supported by SonarQube.
- Except for branch, components and createdAfter multiple entries of a filter attribute are allowed. For example you can add multiple statuses such as CLOSED and RESOLVED.
- Adding a components value requires you to know the full relative path of a source file. In an a Eclipse Java project the source relative path will be src/?package name?/?sourecFileName.ext?, for example 'src/com/remainsoftware/omx/server/command/SshCommand.java'.
- To be able to successfully use the query attributes author and branch the SonarQube project needs to be setup with SonarQube branch analyzes enabled. This requires the SonarQube project to be handled through the project's defined source repository (for example BitBucket or GitHub).
Testing a Filter
Once you have created a filter query then it is advised to test the query before you press Finish as the result of a query can be many hundreds of SonarQube issues. The query test is very efficient and does not fetch or load any issues it just calculates the number of issues involved. General goal is to find a manageable set of issues that you can comfortably work with and not end up with an unwieldy set of issues in the filter.
Add a Filter to a Task
A SonarQube filter can be added to a task provided the SonarQube project was created with a specific project name. The layout of the project name must be TDOMS::?APPCD?:?ENV?:?SOURCE_LIBRARY?, for example TDOMS::XMP:PRD:OMHD_PRDS. The separated fields in the project name ensure that a filter can be correctly matched to a selected application task. Once the filter is added to the task it is possible to connect an issue source file to the task as a solution. Additionally when TD/OMS branching is enabled for the application, a branch related SonarQube filter will be created under the task. This will happen if a matching SonarQube project is found, in this case the project name will have the layout TDOMST::?APPCD?:?ENVCD?:?TASKNR? for example TDOMST::XMP:DEV:XT0262. The contents of this filter will match the filter criteria of an already connected SonarQube filter set on a task. The SonarQube task projects need to be created through TD/OMS. A branch project will be created automatically if configured as such. When a SonarQube filter is removed from a task then the related branch filter will also be removed.
Service Desk Plus
- In Service Desk Plus projects, requests or tasks can be queried. You can select the type of your search in the Type field in the filter wizard. Based on your selection the available filter criteria will change below because every entity has different criteria.
- The maximum number of items returned can also be adjusted in the Max field.
- For a full explanation of all the available filter criteria in Service Desk Plus please refer to the official documentation.
- Service Desk Plus queries are in JSON format. Every time you make a query in a filter a JSON query is generated based on your criteria. It is strongly advised that you don't change this query manually unless you are experienced in JSON, the keys and formats that Service Desk Plus uses. The official documentation for the Service Desk Plus REST API is here.
Connect Wise
- In Connect Wise service tickets can be queried. All service tickets belong to a location, department and service board thus these three criteria are mandatory before you proceed choosing any other secondary criteria in the query builder. Every time a location is selected then the departments for that location are loaded and subsequently every time a department is selected then the service boards for that department are loaded.
- The maximum number of tickets returned can also be adjusted in the Max field.
- For a full explanation of all the available filter criteria in Connect Wise please refer to the official documentation.
System Filters
Gravity
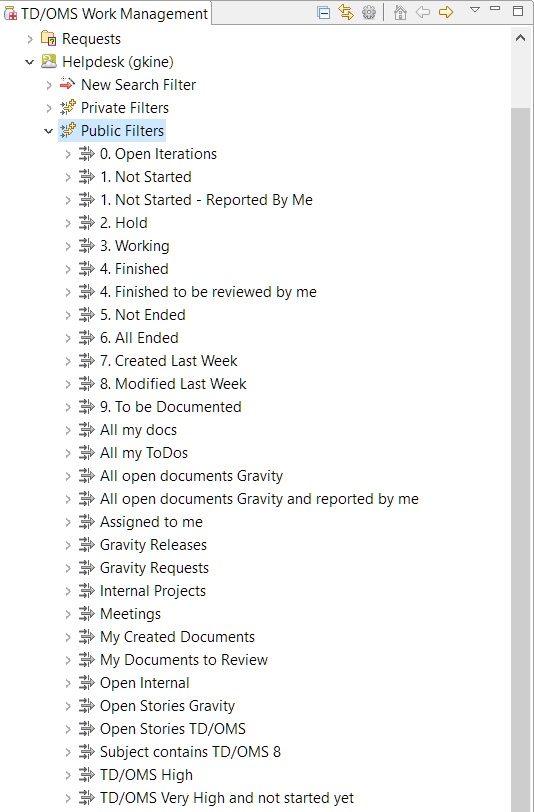
The Gravity interface also offers the possibility to view your Gravity filters. These are the ones loaded from gravity and are divided into private and public filters. Private are the ones that you have created from Gravity and public are the default Gravity filters.
Link an Item to a TD/OMS Task
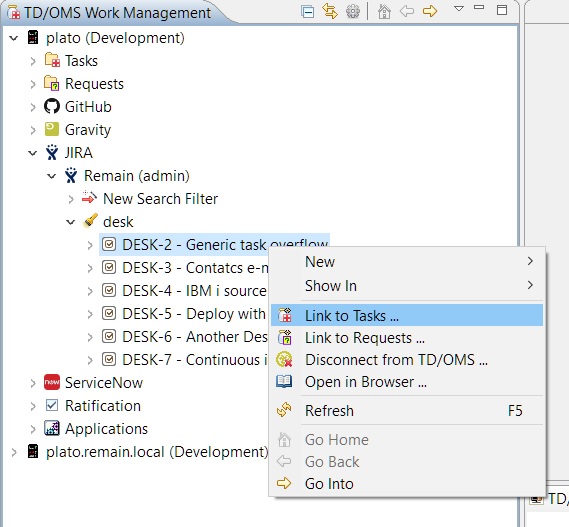
One or more items can be linked to TD/OMS tasks by right-clicking them and selecting the 'Link to Tasks' option.
If possible, a back-link will be created in the issue tracker. You can configure the back-link URL by using the OMQLINKPREFIX registry setting.
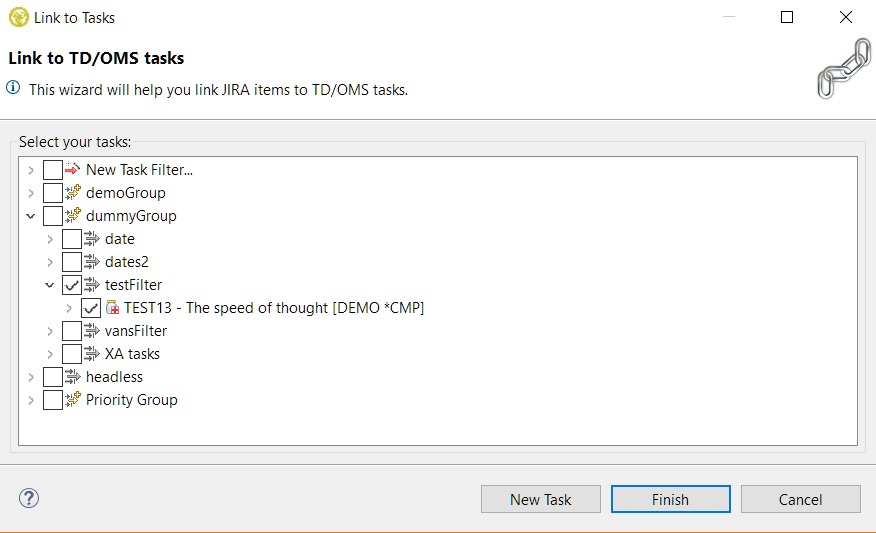
Here you can select the tasks that you want to link through the task filters. If the present ones are not enough, you can create a new one inside the wizard and it will be automatically updated when the new task filter is created.
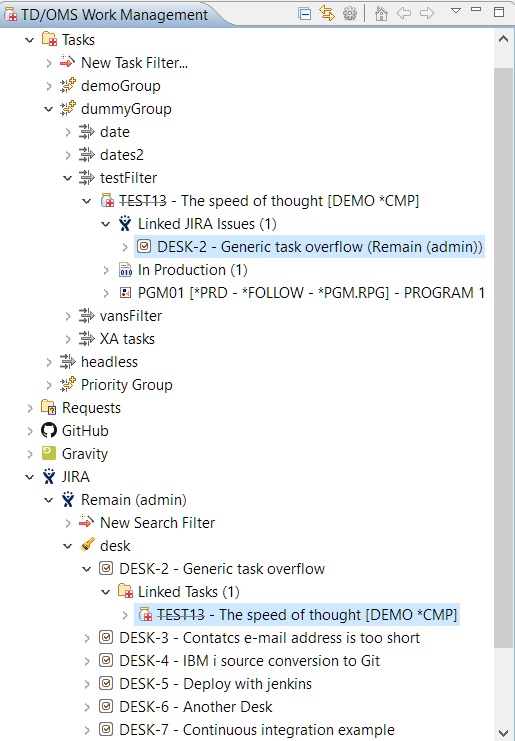
By pressing the finish button the selected items are now linked and the relevant TD/OMS and external system nodes will be updated with the new information in the tree.
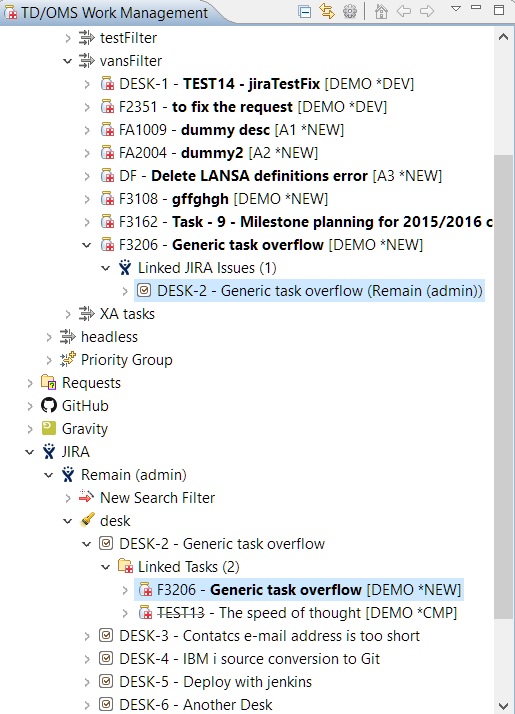
You can view the linked tasks of an item in the 'Linked Tasks' folder under an item.
Here you can view the linked items of a task under the 'Linked JIRA Issues' folder under a task. The folder will have the relevant name of the system that the items it holds belong to.
Link an Item to a TD/OMS Request
One or many items can be linked to TD/OMS requests by right clicking them and selecting the 'Link to Requests' option. Then a similar wizard opens as that of the Link an Item to a TD/OMS Task, with the difference of course is that this time its about requests.
If possible, a back-link will be created in the issue tracker. You can configure the back-link URL by using the OMQLINKPREFIX registry setting.
Create a Task from an Item
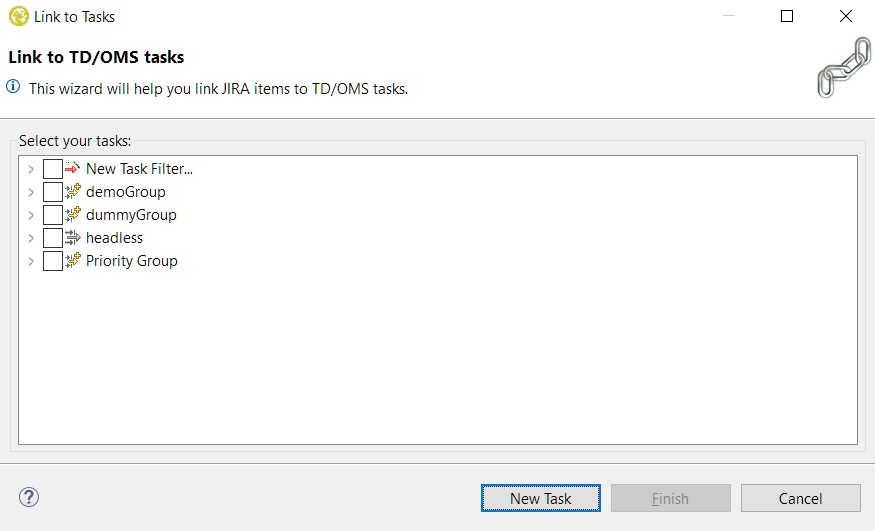
If when trying to link an item to a TD/OMS task and a suitable task isn't present yet, it can also be created through the 'Link to Tasks' wizard. First, we have to right-click the item that we want to create a new task from, right-click and select the 'Link to Tasks ...' option:
If possible, a back-link will be created in the issue tracker. You can configure the back-link URL by using the OMQLINKPREFIX registry setting.
Then press the 'New Task' button:
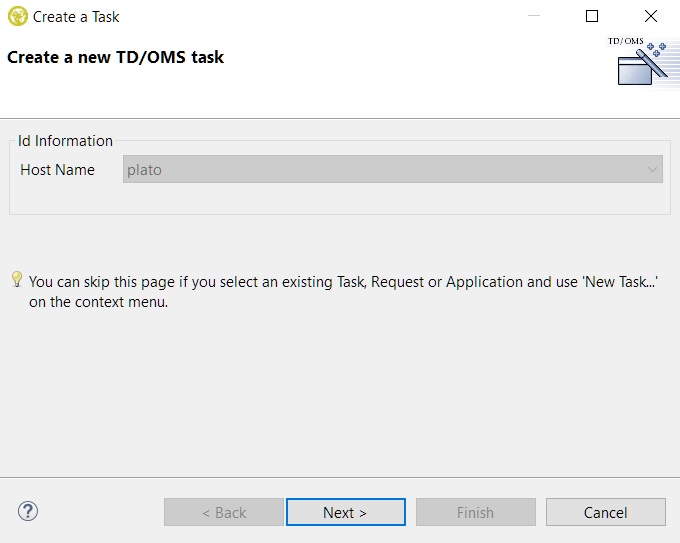
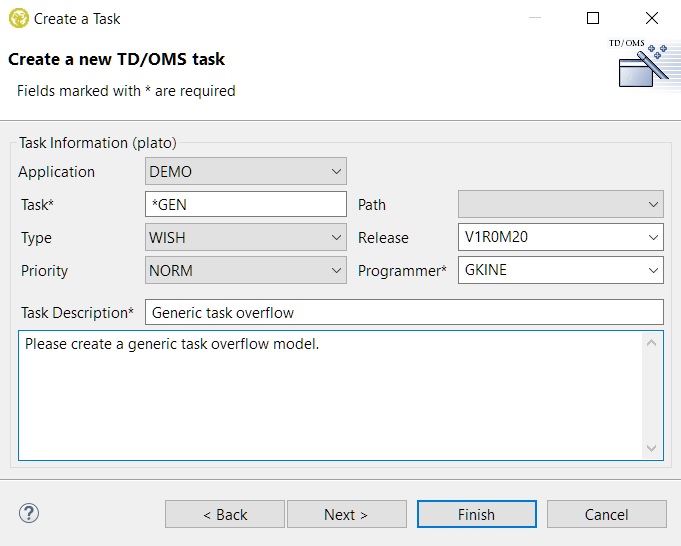
And then the standard new task wizard will open:
After selecting an application (the host will be detected automatically) you can go to the second page to fill in the task's information. For ease of use, the short and long descriptions are prefilled from the items' information. If the registry setting OMQAUTOTSKREQNR is also configured to have value '1', then the task number will be prefilled as well from the item's ID.
When Finish is pressed the new task will be created and automatically linked to the selected item it was created from.
Note: A faster way to create a task or a request from an item is to right click the item and select New Task... or New Request.... That way the new task/request will automatically be linked to the item and have its fields prefilled from the item as well just like the previous example.
Create a Request from an Item
If when trying to link an item to a TD/OMS request and a suitable request isn't present yet, it can also be created through the 'Link to Requests' wizard. The operation is similar with the Create a Task from an Item only this time a new request will be created and linked instead.
Disconnect a Task or Request from an Item
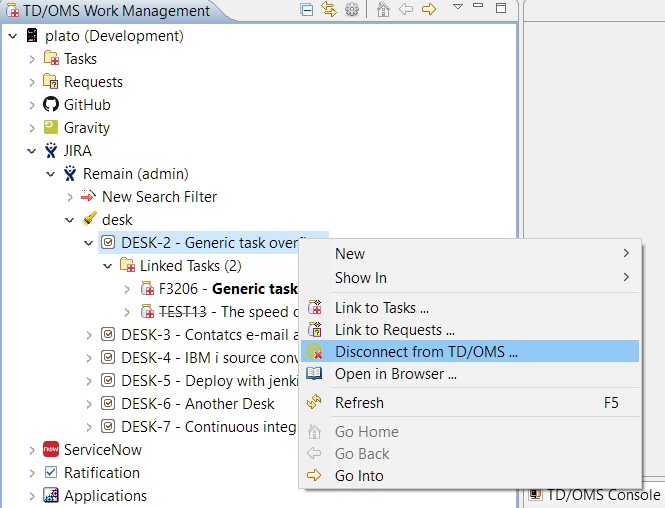
By right clicking an item and selecting the 'Disconnect from TD/OMS ...' option you will be able to disconnect TD/OMS tasks or requests from a that item.
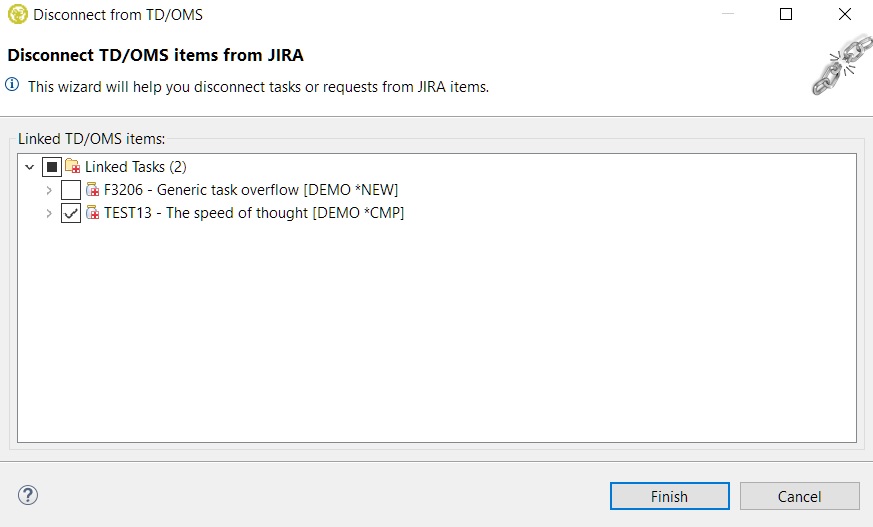
A disconnect wizard will open automatically showing you the linked TD/OMS items of the item:
After pressing finish all relevant TD/OMS and external system nodes will be automatically refreshed in the tree.
Link a Task or Request to an Item
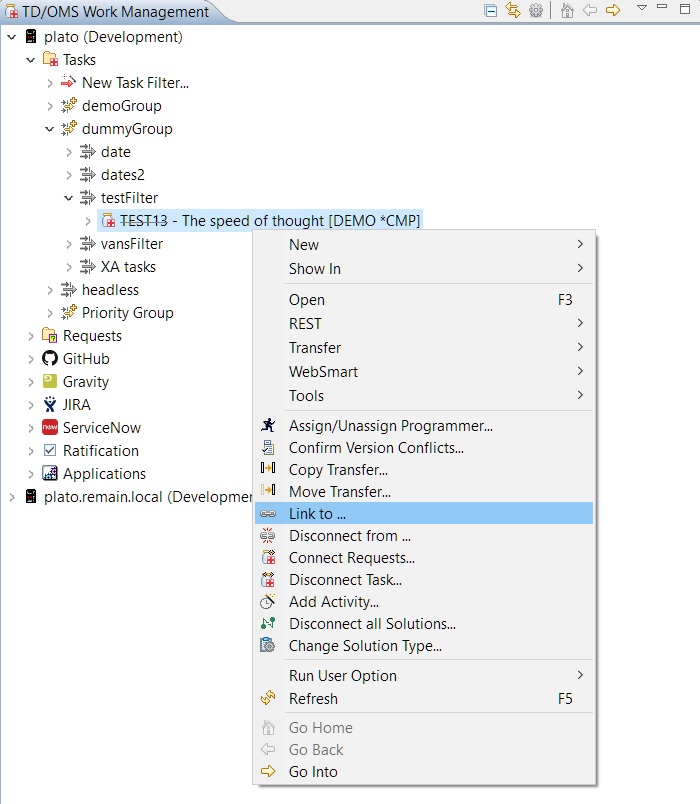
One or many TD/OMS tasks/requests can be linked to an item by right-clicking them and selecting the 'Link to ...' option.
If possible, a back-link will be created in the issue tracker. You can configure the back-link URL by using the OMQLINKPREFIX registry setting.
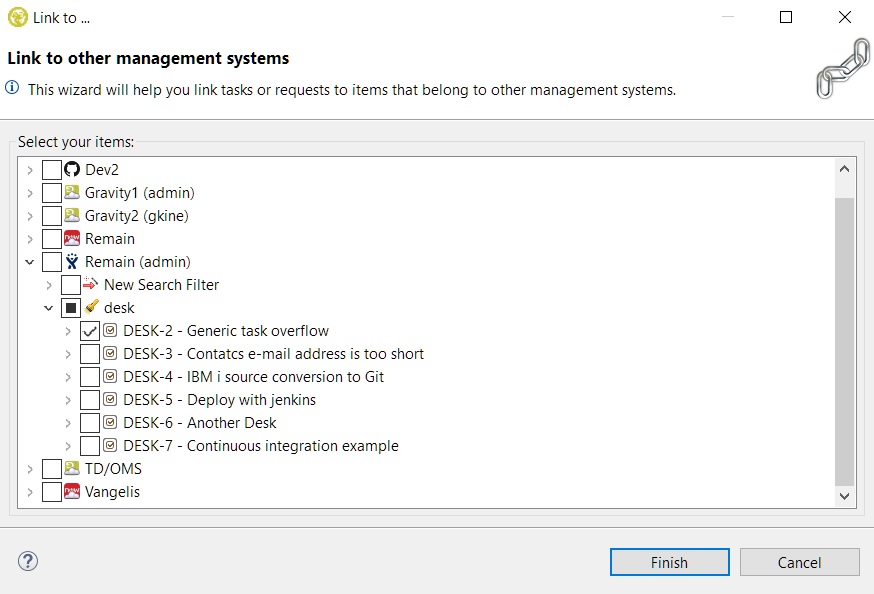
Then the following wizard opens where you can select which items you want to link to your selected TD/OMS items. First, you must select a server from the previously added ones and then find the desired items through the server filters. If the present filters are not enough then you can create a new search filter by selecting 'New Search Filter' inside the wizard. The wizard will then be updated automatically with the new filter once it's been created. Please see Finding Items for more information on filters.
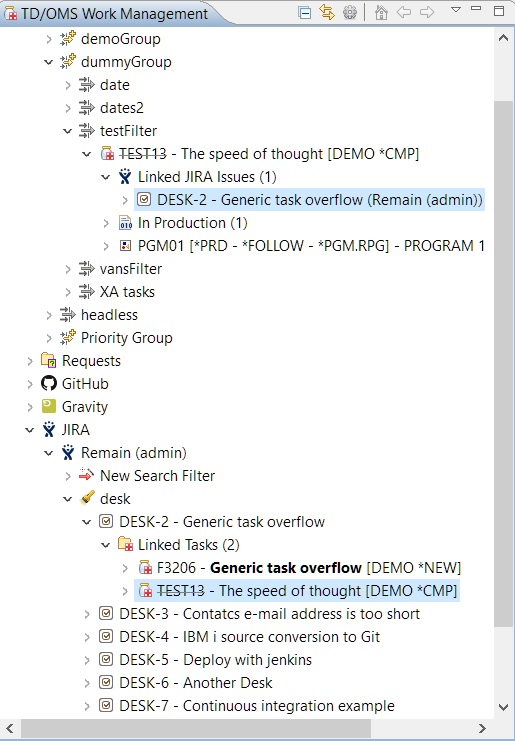
When finish is pressed the items are linked and the relevant TD/OMS and external system nodes will be refreshed automatically in the tree. In our example under the selected tasks, you can find the linked JIRA items under the 'Linked JIRA Issues' folder. The same applies if we had linked requests. Note that the server that they belong to is displayed on the right of each item. Also under the JIRA items, you can see the linked tasks under the 'Linked Tasks' folder. Linked requests can be found in the 'Linked Requests' folder (it will appear only if we have any).
Disconnect an Item from a Task or Request
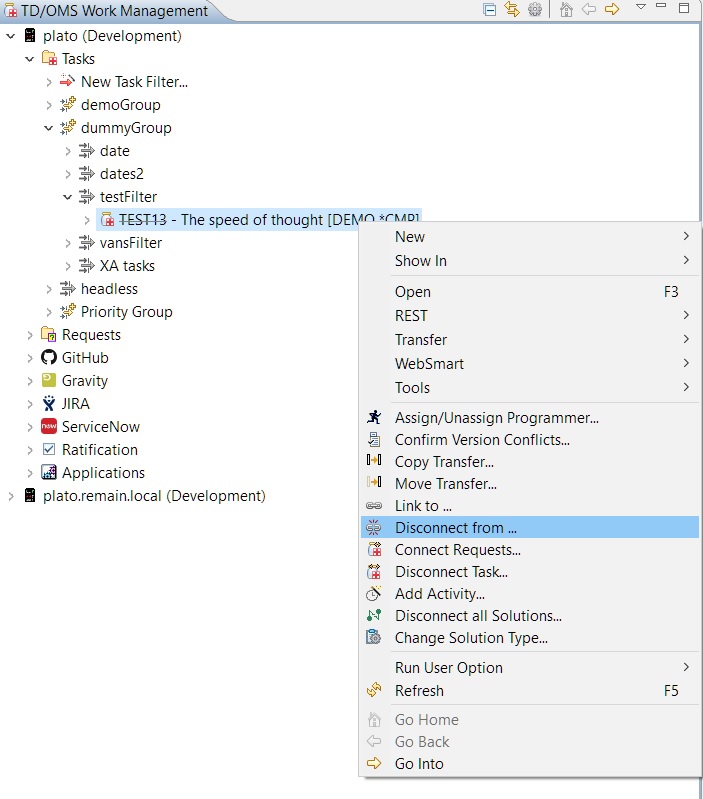
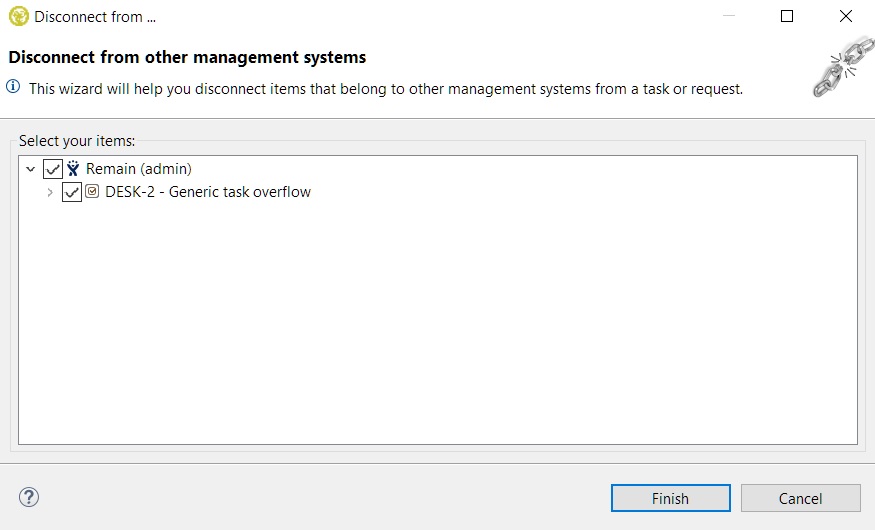
By right clicking a TD/OMS task or request and selecting the 'Disconnect from ...' option you can disconnect linked items from the selected TD/OMS item.
A disconnect wizard will open that will automatically show you the linked items for your selection grouping them based on the server they belong to:
After pressing finish all the relevant TD/OMS and external system nodes will be refreshed in the tree.
Open an Item in a Browser
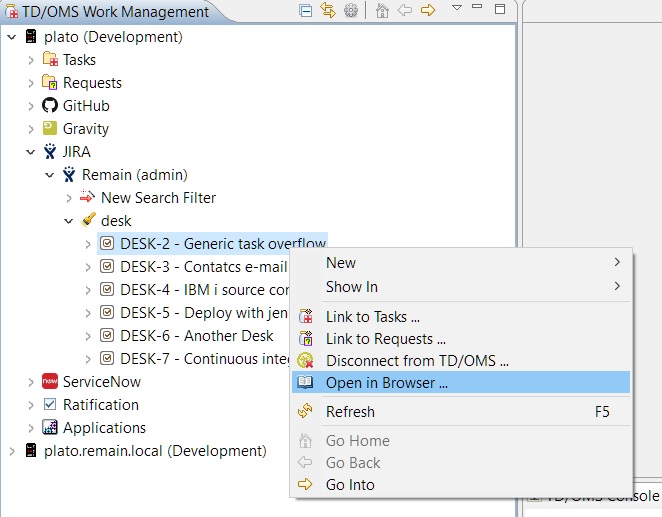
In order to open an item of an external system to view its information in its own website you can press right click on the desired item and press the 'Open in Browser ...' option.
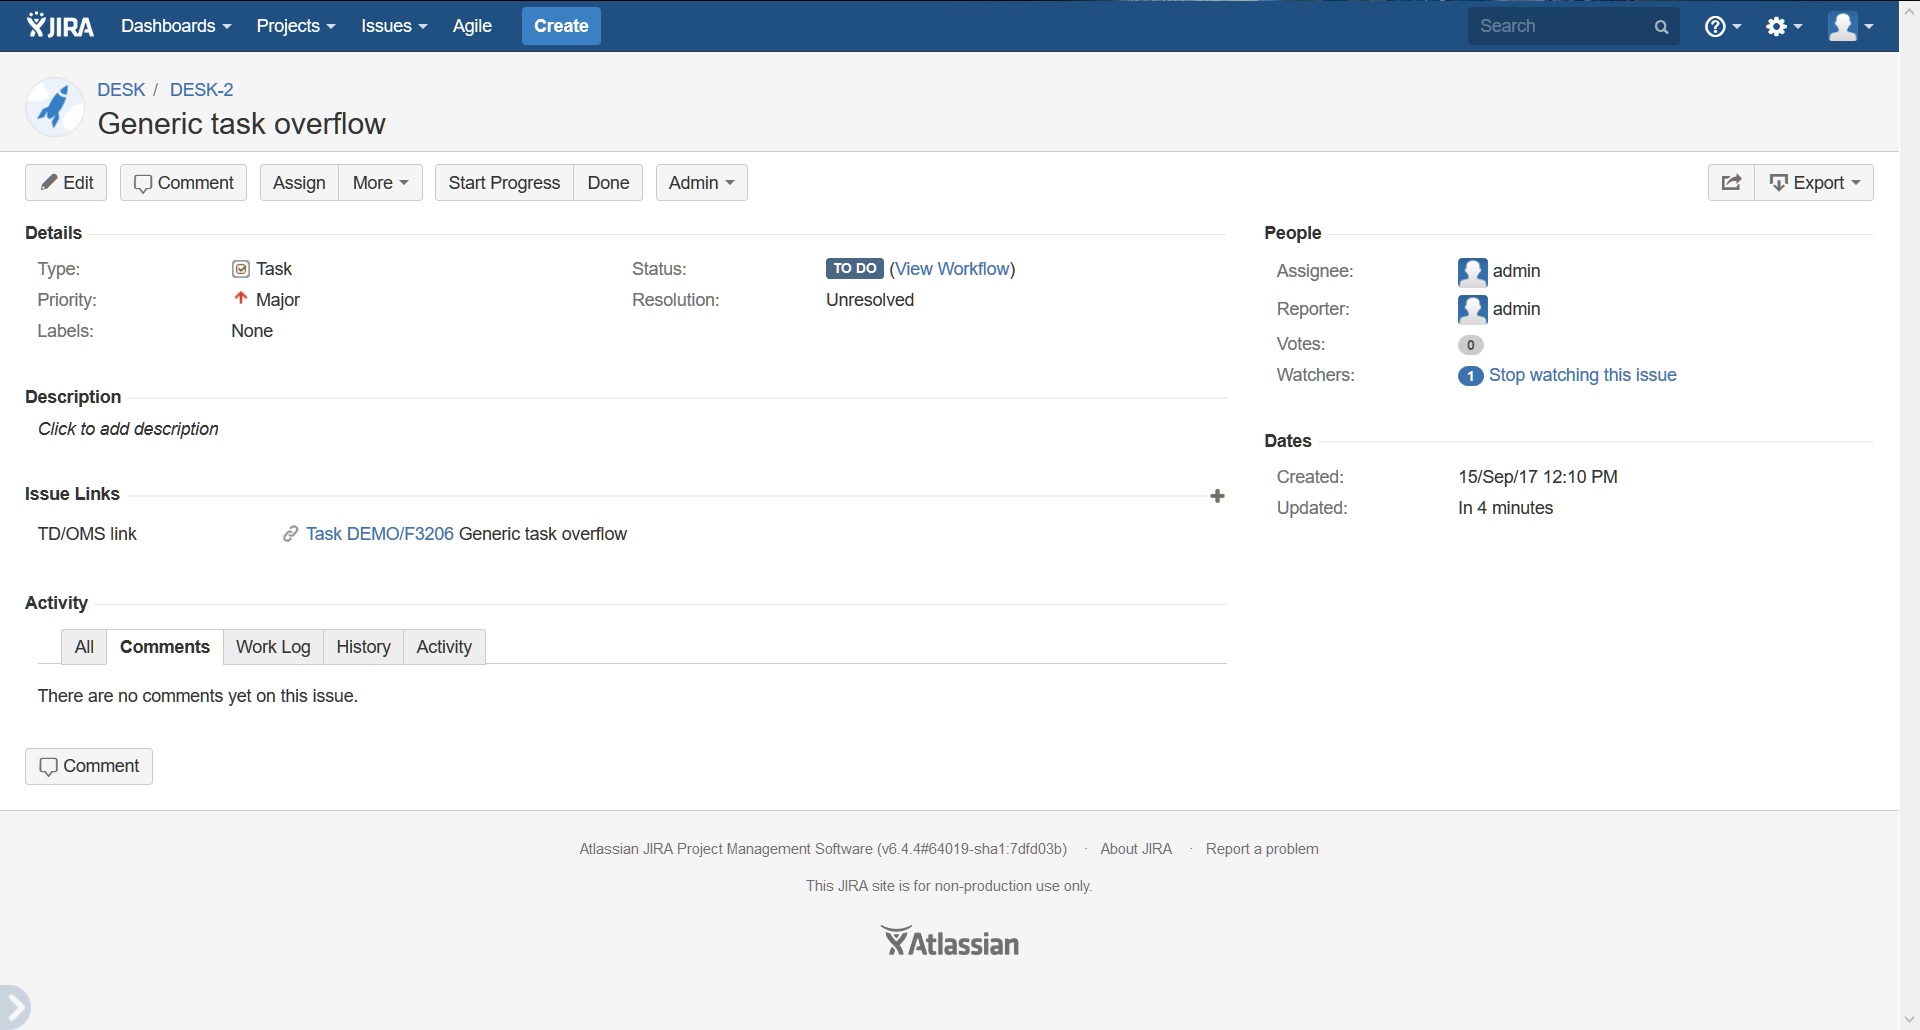
Because we have chosen a JIRA item it will redirect us to the JIRA website for that item using your default web browser:
Note: With the Gravity interface it is also possible to select multiple items for this action.
