GIT:Working with the TD/OMS Git view
Working with the TD/OMS Git view
Clone Repository and Import Projects
With the Setup complete its time we start working with the TD/OMS Git view.
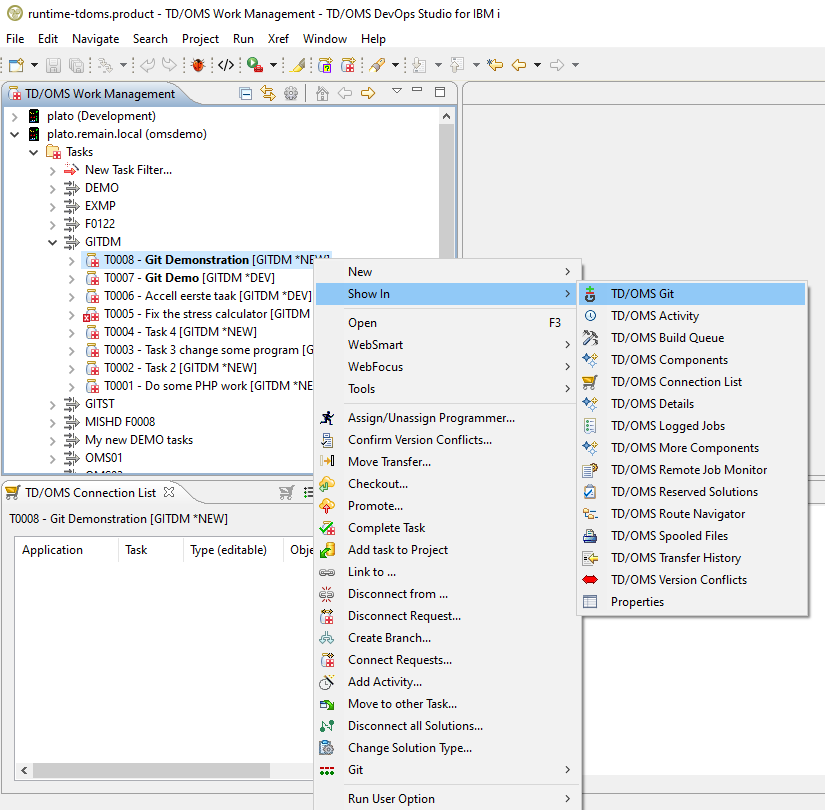
In the TD/OMS client, make a filter for Tasks in the GITDM application and create a new Task. Then, right click on that task and select Show in -> TD/OMS Git. This will open the task in the TD/OMS Git view.
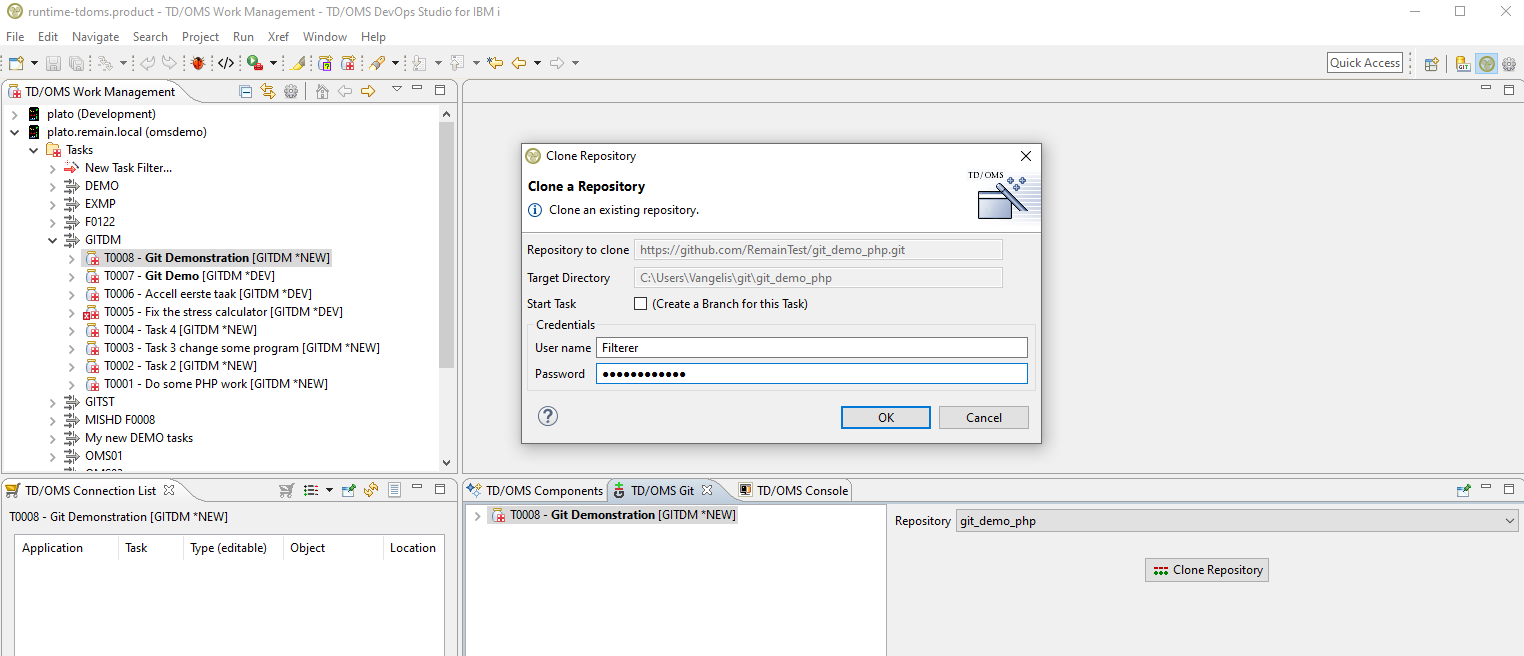
Select the "git_demo_php" repository and select "Clone Repository". Provide your account credentials on the host that the repository resides (GitHub in this case).
You can also check the "Start Task" box in order for the wizard to guide you to create a branch for this task but this part is explained in the next chapter.
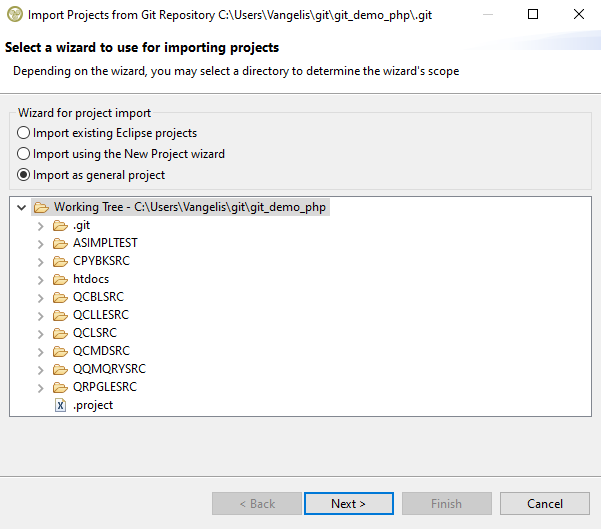
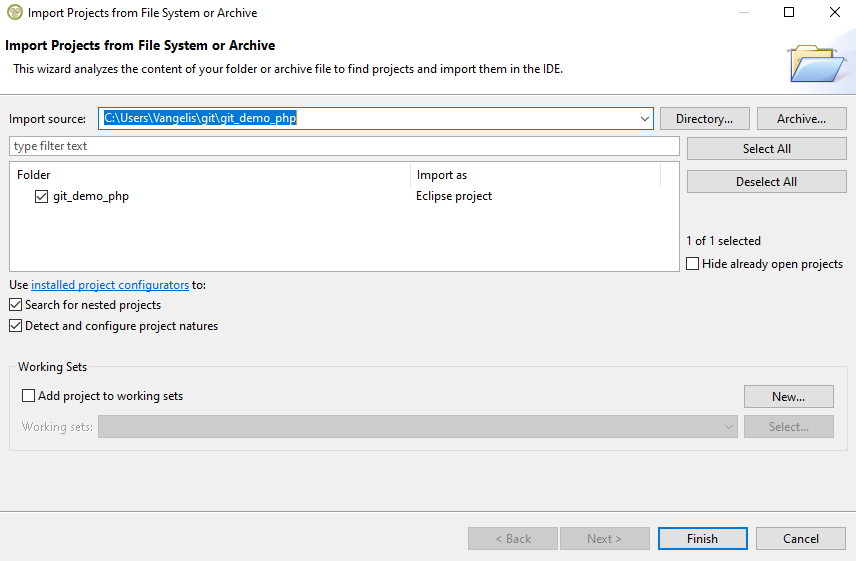
Afterwards you will be prompted to import the projects of the repository. Select "Import as general project". In this case we import everything as a single project so select the working directory folder.
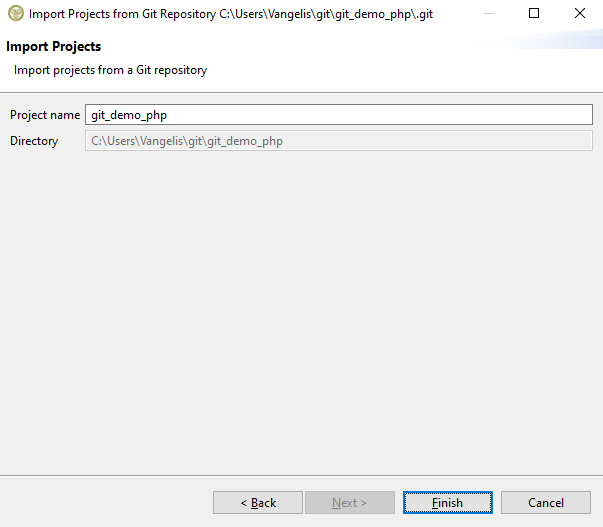
Type the name of the project.
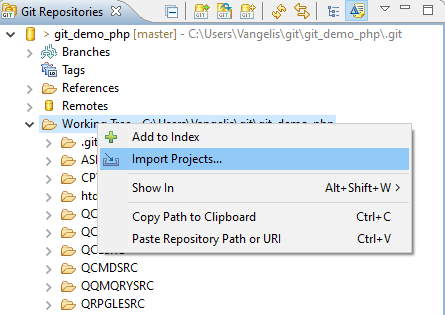
If you pressed cancel on the wizard after the cloning you can also import the repository's projects manually from the Git Repositories view by right clicking on a folder that contains projects and selecting "Import Projects".
After the project is imported it can be seen in the project explorer.
Start Task
Good Git practice dictates that all work for a single task should be done in a separate branch. A branch can be viewed as a temporary copy of the repository and all work done here will not harm the master branch where the latest production-ready version of the application is. Every developer works in a branch for the task at hand and then later merges the changes back into the master branch.
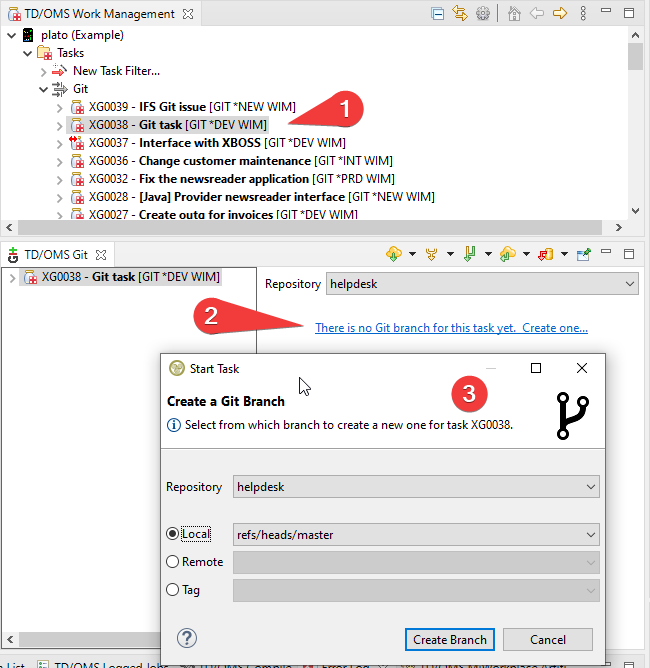
TD/OMS will prevent changes in the master branch by not allowing a task to work there. A branch for the task can be created by clicking the link to create one on the right side of the view. This link will appear every time a task doesn't have a branch in the current repository. If you checked the "Start Task" box on the clone dialog then the branch creation dialog will open automatically. The dialog that opens will preselect the current repository and its local master branch as the starting point to "branch off" but you can select another local, remote branch, or a tag as the starting point. Being able to select another branch enables you to continue work on a branch where you worked on earlier or on top of the work of one of your colleagues but usually, the master branch is where we want to start. Even another repository can be selected (if it's already cloned and configured for that application).
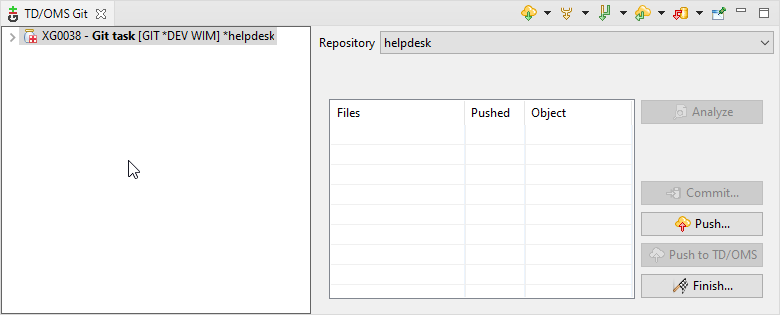
By pressing (2) "Create Branch" the branch will be created with its name being the name of the task. Now all the options of the Git view will become visible.
In addition, the Task will be decorated with the name of the repository with an asterisk in front (e.g. *helpdesk) so that you can see which task is currently active.
Committing changes
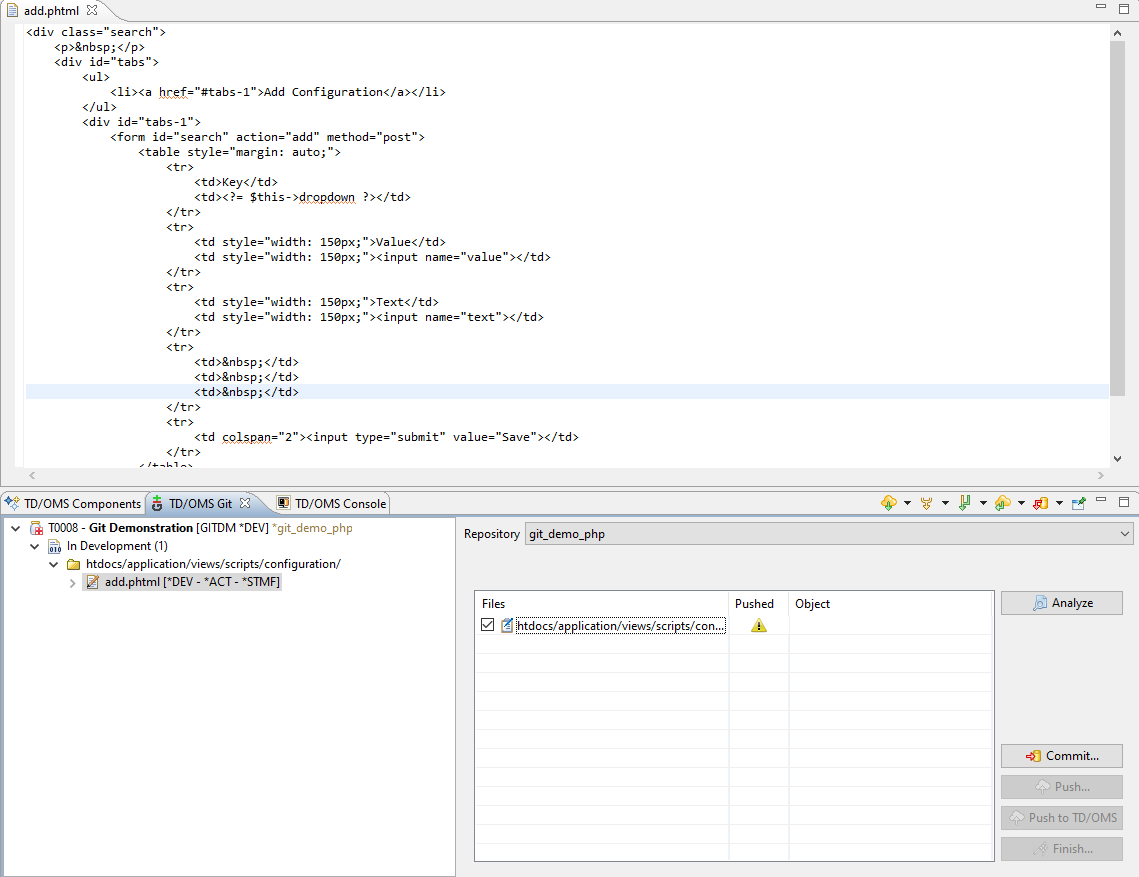
From now on you can start working and any changed files will be shown in the view. For ease of use all the available actions by right clicking a task and all usual content that appears if a task is expanded is also in this view just like in work management. This way all work for a task can be done entirely in the TD/OMS Git view without switching to the work management. In this example we have opened a file from the task and changed it. In order to check if files are pushed and if they have an object in the database (native repositories only) the analyze button must be pressed.
The table shows the files changed and it has three columns.
- The Files column displays the names of the changed files. Here you can select which files you want to push to TD/OMS. Each file also has an icon. If its a new file it will have the new file
 icon, if its an existing file that has been edited then it will have the modified file
  icon and if its a deleted file it will have the deleted file
  icon.
icon.
- The Pushed column displays if the files have already been pushed to TD/OMS. Any file that is already pushed to TD/OMS will have a green check
 icon on this column and if not there will be no icon there. If the file has not been locally committed to the task branch in Git first (like in this case) then a warning
  icon will appear (no analyze is needed for this check).
- The Object column displays the name of the object that the file represents in TD/OMS but this applies only on a repository that has native IBMi objects so in this case its empty. The guide on how to work with a native repository is here.
Note: The table will always display all the files changed since the creation of the task. The purpose of this is to be able to see all the changes that the task is going to make since you started working on it thus all the icons displayed on the files column are calculated compared to the branch that your task has branched off (usually the master branch). For example if a new file has been created and pushed to Git and to TD/OMS, it will still be displayed as a new file because the master branch doesn't have it yet (unless the master has merged with your task branch).
Local Commit
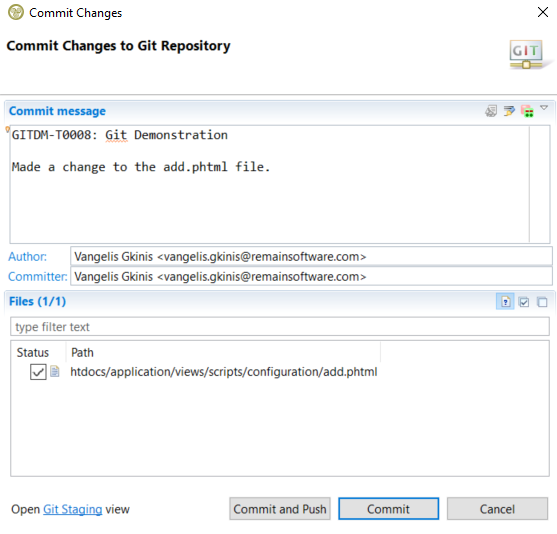
In order to solve the warning we need to commit the files locally to Git so a "Commit" is required first. By choosing "Commit" the default commit dialog of Git appears. Here you can type a commit message and select which files you want to commit and then press commit.
Recomendation: It is strongly recommended that all files are locally committed to the task branch in Git first before pushing to TD/OMS. The reason is that TD/OMS works in union with Git so both must be synchronized in order to better detect changed files and any pushing to TD/OMS without a local commit to Git first might result in displaying wrong information on the pushed column in the TD/OMS Git view concerning when a file is pushed or not (TD/OMS will be in front of Git in changes while the valid workflow is that Git should be ahead before being at the same state). Regardless, we allow pushing to TD/OMS without a local commit first in the case where many commits need to be made without having to do an extra local commit on each one of them.
Remote Push
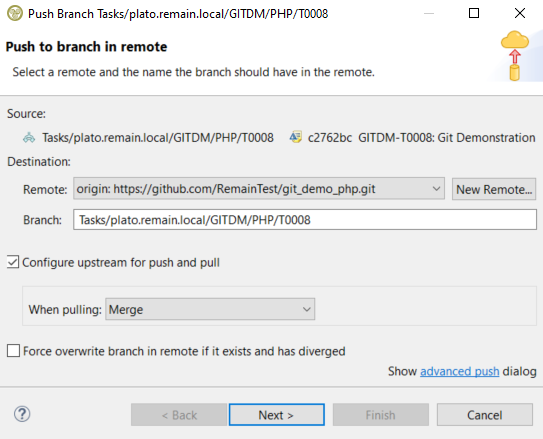
An optional step is to push the same changes to the remote branch of your current task branch in Git. By pressing the push button a dialog will open that will allow you push to the remote branch of the task (if there is no remote branch it will create one). This is an optional step so if you don't want to create a remote branch for your task and push the changes also there then ignore this section and proceed with the next step.
If you tried to push before locally commiting then a warning dialog will open prompting you to do that first because it is only logical to commit locally first and then remotely.
The push dialog displays the source branch which is the branch where its going to take the changes for pushing (our local branch in this case). In the destination section it displays the remote which is the target repository and the branch is the remote branch that will try to push the changes to. If that branch doesn't exist on the remote side it will create it with that name. The "Configure upstream for push and pull" checkbox allows you to choose the strategy that changes will be fetched and incorporated to your branch when you pull from the remote branch and the opposite when you push. There are four options (merge and three different ways to rebase) with the default being the merge. More on the differences between merge and rebase can be found here.
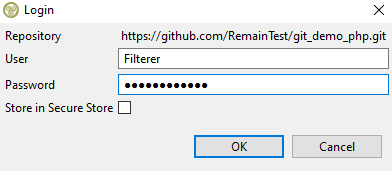
After pressing next the GitHub credentials will be required (or wherever the repository resides).
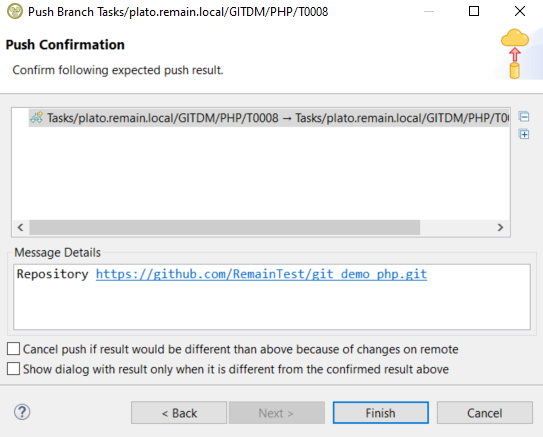
Then the confirmation dialog appears.
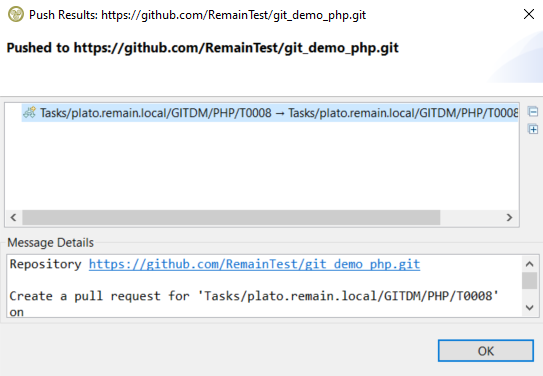
Lastly this dialog appers with the results after the push.
Native Repository
A repository that has IBMi objects is a native repository. Everything is the same while working with such a repository but there are some extra additions.
There can be only one native repository per application. More information about how to setup a native repository can be found here.
The Object column on the table represents the name of the native object that the file is representing in TD/OMS. By pressing analyze, a check is done for each file if it has an object or not. If it does then its name will be displayed and if not then a create button will appear in order to be able to create one.
In our example we have three files changed. One that is a new one, one that already existed and is edited and one that is deleted.
None of them is pushed to TD/OMS but they are pushed locally to the task branch (they don't have the warning icon neither the green check in the pushed column). Notice that even though they are pushed locally the GENFILES5.RPG file is still marked as a new file and the TESTWIMX.CLLE is still marked as deleted. This is because the changes are compared to the branch that our task branch started so this means that these changes are not yet merged to that branch (usually all branches start from the master branch).
By pressing the create button we can create an object for that file.
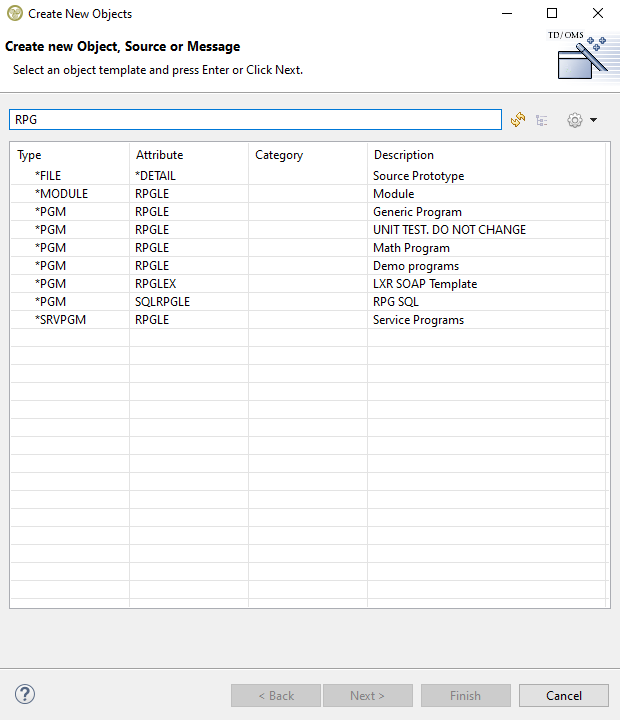
We can choose to create an object, a member or cancel with the add later button. If we choose the first or second option then the create object wizard will appear prompting to select a template for the object as usual.
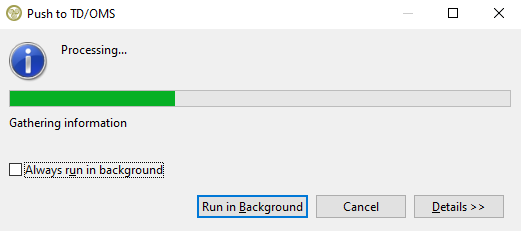
In this case we choose not to create this object and continue by pushing the other two files to TD/OMS. Notice that if you select a file that its object is not created yet then the push to TD/OMS button becomes unavailable. Press the "Push to TD/OMS" ![]() button in order to push the changes to TD/OMS. A progress bar will appear showing the progress and aftewards a green check will be displayed on all the files that have been pushed successfully. The already pushed files will also have their names on a gray color instead of black and they will not be automatically selected anymore after an analyze.
button in order to push the changes to TD/OMS. A progress bar will appear showing the progress and aftewards a green check will be displayed on all the files that have been pushed successfully. The already pushed files will also have their names on a gray color instead of black and they will not be automatically selected anymore after an analyze.
If the files pushed are solutions on the development or emergency environment and they are of type *CHANGE then they will also be automatically added to the build queue view to be compiled.
Controlling the view
The TD/OMS Git view is sensitive to task and application selections from the work management view.
Task Selection
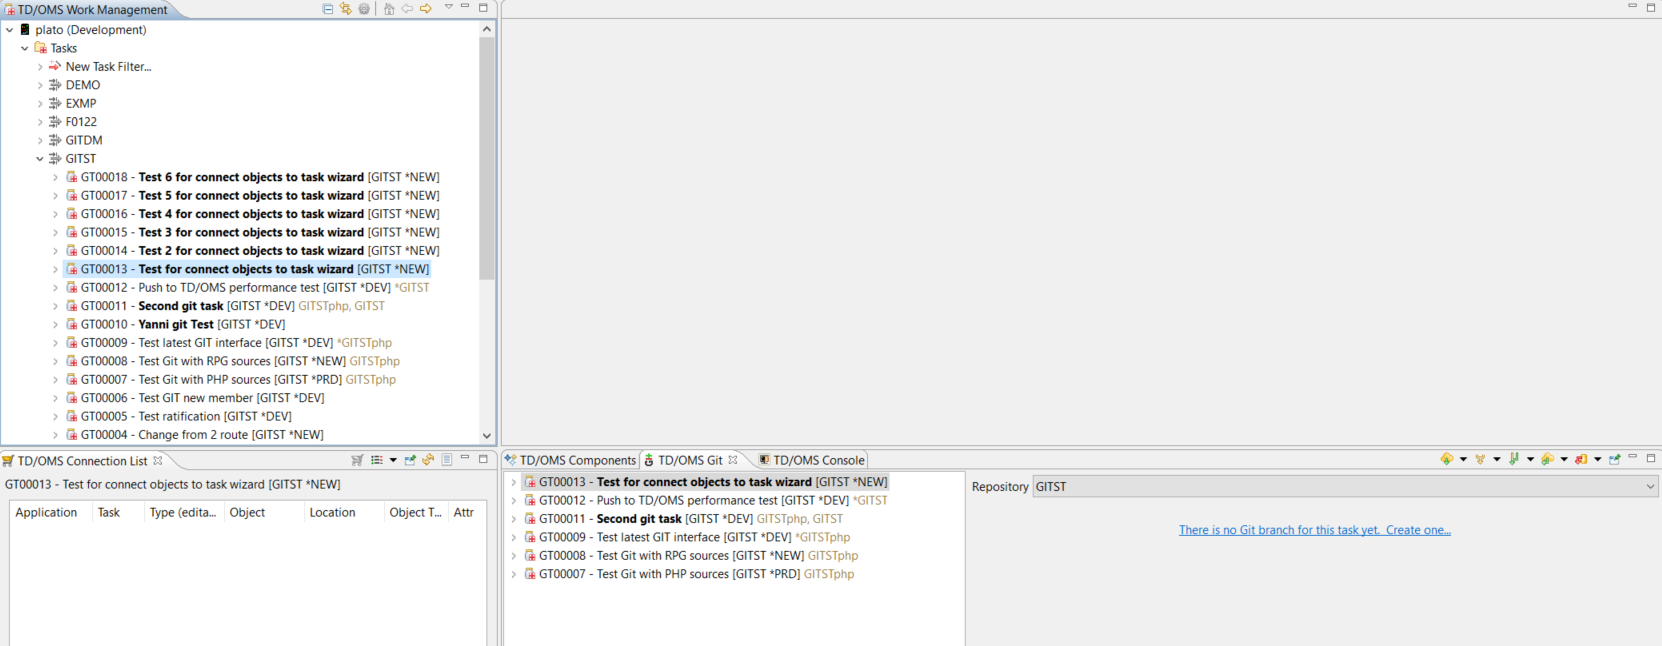
When a task is selected from the work management view the TD/OMS Git view will display it first in its own tree on the left side and on the right side it will try to select the repository that it has a branch to it. The repositories that will be searched and are available in the repository field, are the ones that are setup for the application of the task. If it can't find a branch for the task selected then it will select a repository that it is already cloned with the choice to start the task for this repository. If no repository is cloned either then it will not change the repository selection with the option to clone the repository that was lastly selected.
Under the selected task there will be also the tasks that have a branch in any of the available repositories for that application and every time another task is selected from inside the view the same rules will apply.
In this example we select the task 4 and automatically it selects a cloned repository and it informs us that the task doesn't have a branch for this repository yet.
Application Selection
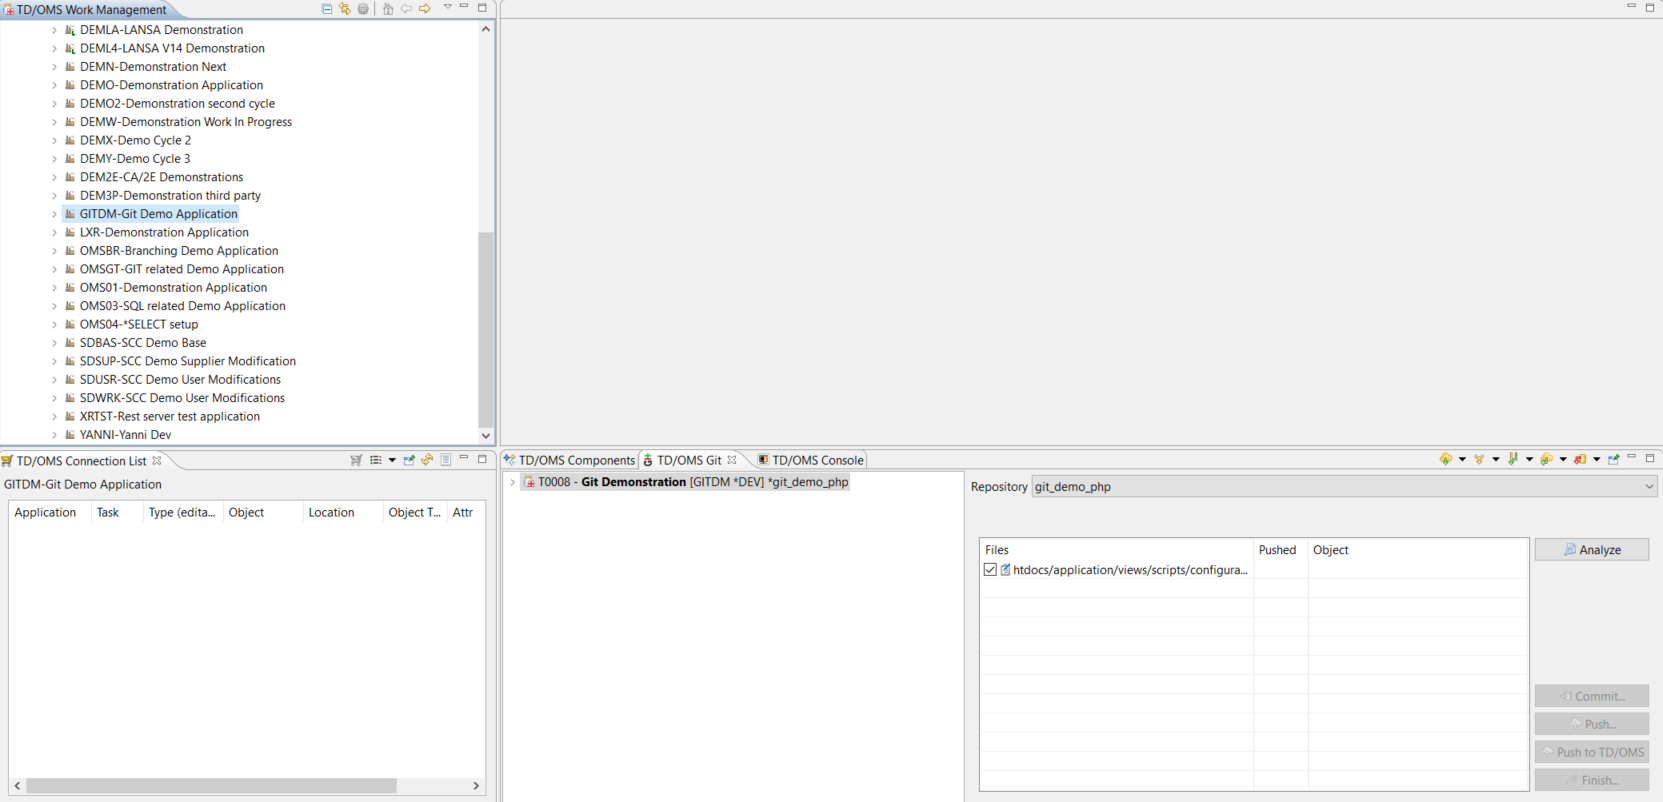
When an application is selected from the work management view the TD/OMS Git view will display all the tasks for that application that have a branch in any of the available repositories and it will select the first from those repositories. If no task has a branch on any of the repositories then it will display no tasks but select the first repository it finds that has been cloned for that application. If no repository is cloned either then it will select the first repository available with the option to clone it.
In this case we select the GITDM application so it shows the Git Demo task that has a branch for the git_demo_php repository so it selects that repository and switches to that branch as well. Only that task is displayed because no other task on this application has a branch on any of the available repositories.
Available actions
Clone Repository
When a repository is selected that is not cloned yet to your local workspace in TD/OMS you will have the option to clone it.
The full guide on this topic is here.
Start Task
When a task is selected that it doesn't have a branch yet in a cloned repository then you have the option to start the task by creating a branch for it.
The full guide on this topic is here.
Switch and Abandon Task
When task is selected and its branch exists but is not the active one at the selected repository then the option to switch to it (checkout in Git terminology) becomes available. It is also possible to abandon the task that will delete its branch (not the task itself) but any uncommitted work to it or work that is committed to it but not pushed to master or to its remote branch will be lost. Any changes that are already pushed to TD/OMS will not be lost. Its remote branch will not be deleted either (if it has one).
Fetch
Fetching is the operation where the reference (a copy) of a remote branch that exists in the local workspace is updated from the actual remote branch that resides in remotely in the server where the repository is. Most of the times a fetch must be done before a rebase or a merge can make sense. This can be done from the fetch ![]() button.
button.
Manual Fetch
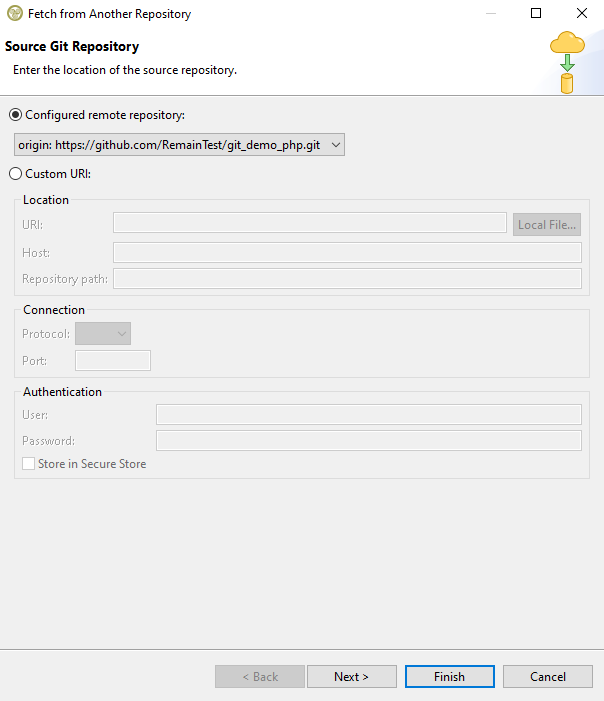
If you want to have all the options for a fetch then you can press the fetch button and a wizard will open where the only mandatory selection among all the options is to select which branch you want to fetch changes for. After pressing finish the remote branch you have selected will be updated.
Automatic Fetch
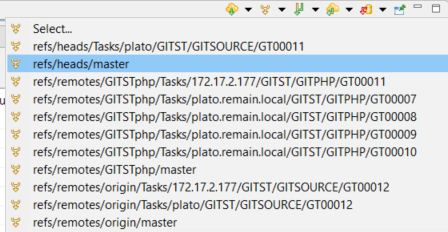
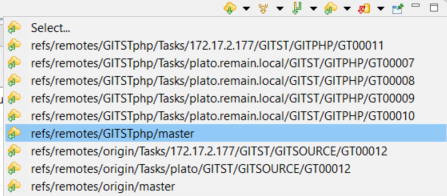
In order to save time the arrow next to the fetch button can also be pressed to reveal all your remote branches for your selection. By default the "origin" option refers to the remote master branch referrence in your workspace and the "Select..." option will open the wizard for the manual fetch.
Merge
Merge is the operation where a local branch is updated from another branch. This can be done from the merge ![]() button.
button.
Manual Merge
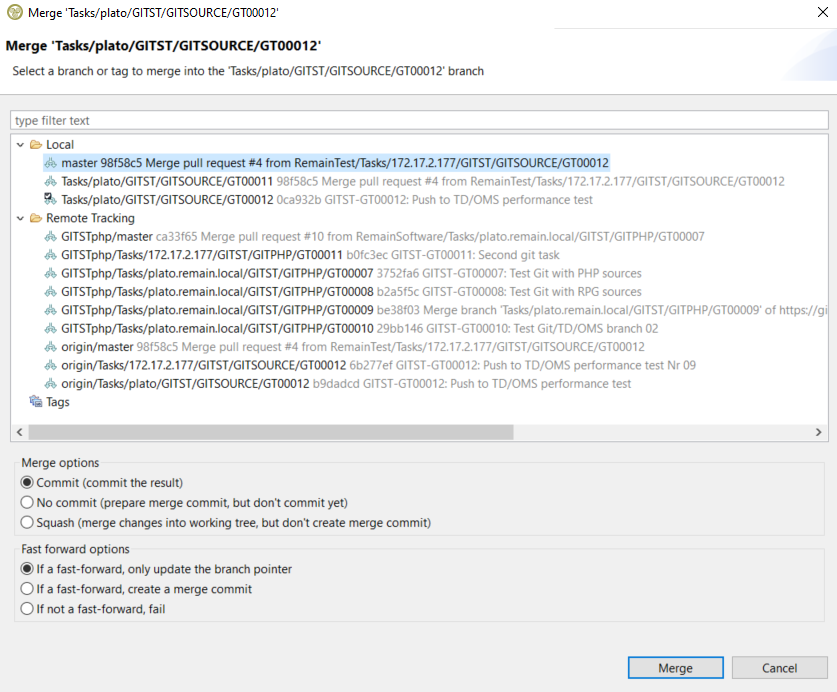
If you want to have all the options for a merge then you can press the merge button and a wizard will open where the only mandatory selection among all the options is to select which branch you want to merge its changes from towards your current task branch. After pressing finish the branch you have selected will be updated.
Automatic Merge
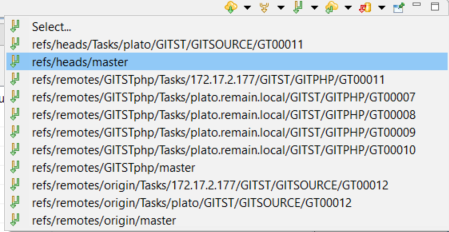
Similar with the fetch, the arrow next to the merge button can also be pressed to reveal all your branches (local and remote references) for your selection. The "Select..." option will open the wizard for the manual merge.
Rebase
Similar with merge, rebase is the operation where a local branch is updated from another branch. This can be done from the rebase ![]() button.
button.
Manual Rebase
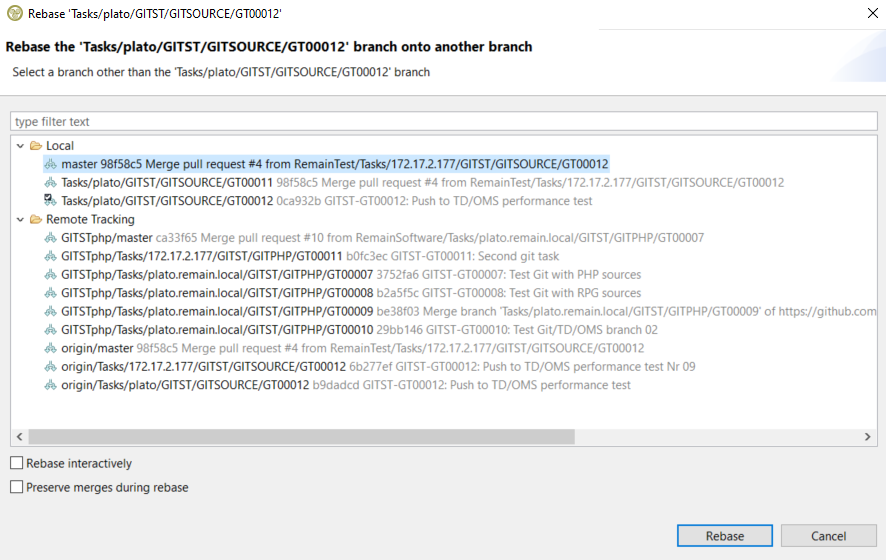
If you want to have all the options for a rebase then you can press the rebase button and a wizard will open where the only mandatory selection among all the options is to select which branch you want to rebase (build-on) your current task branch upon. The other two options concern the rebase strategy (more information about rebase here. After pressing finish the branch you have selected will be updated.
Automatic Rebase
Similar with the merge, the arrow next to the rebase button can also be pressed to reveal all your branches (local and remote references) for your selection. The "Select..." option will open the wizard for the manual rebase.
Merge vs Rebase
There are many debates on the internet on when to use merge or rebase.
Merging changes will result in a commit with two parents. In the picture below the changes will be merged into a new commit ![]() which points to two parents.
which points to two parents.
Merge
There is a Git History view available to see the history of changes of a branch in a tree representation.
One advantage of merge is that merge will make clear in the history of a branch which changes are from the branch itself and which ones are from another branch (even though it will make the history tree more complex to read). One downside is if there are version conflicts its not possible to cancel so the conflicts have to be resolved manually in order to continue.
Rebasing your changes will force the branch to treat the foreign changes from another branch as its own changes thus creating a linear commit history in the history view. The commits from the foreign branch are
committed back on top of your current branch by creating two "new" ![]() commits (with exactly the same content).
commits (with exactly the same content).
Rebase
One advantage of rebase is that you can cancel it if there are version conflicts avoiding to resolving them yourself when its too late (unlike merge) but one downside is that it makes it more difficult to find out which changes are from the branch itself and which ones are from other branches. This disadvantage though can be avoided if you choose the option to "preserve merge commits" in the rebase dialog. This will display the merge commits in the branch history allowing you to see where changes from another branch were inserted into your branch.
If you want more information on this topic you can see this discussion on merge vs rebase.
Pull
The pull button ![]() performs two operations at once: fetch the changes from a remote branch of your current or another repository and merges them to your current local one.
performs two operations at once: fetch the changes from a remote branch of your current or another repository and merges them to your current local one.
Manual Pull
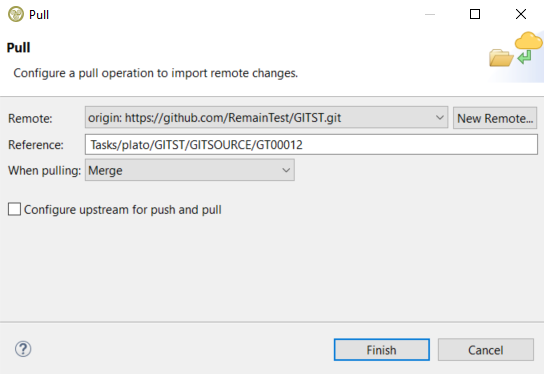
If you want to have all the options for a pull then you can press the pull button and a wizard will open where you can select which remote branch you want to pull changes from. After pressing finish the changes from the selected remote branch will be fetched and merged/rebased on your current branch. A pull can also be configured in the dialog to perform a rebase instead of a merge.
Automatic Pull
Similar with the fetch, merge and rebase, the arrow next to the pull button can also be pressed to reveal all your remote branches for your selection. The "Select..." option will open the wizard for the manual pull.
Update Master
While you are working it is more than likely that others have committed changes to the master branch as well. In order to check if you are outdated you need to click the ![]() "Update Master" button. That button serves as a shortcut that will update your local master branch while you stay on your task branch. What it actually does is a pull for the master branch.
"Update Master" button. That button serves as a shortcut that will update your local master branch while you stay on your task branch. What it actually does is a pull for the master branch.
If you get the "Not updated with master" warning after the update, then you must merge or rebase the changes from master to your task branch.
Update Master and Current Branch
By pressing the arrow next to the update master button it will reveal both options and the second one is to update master and your current branch. This action does exactly what the first one does with the addition that it updates also your current branch with the recently updated master so that with one button you can be updated without the need of doing something else.
Analyze
In order to check which files have been pushed to TD/OMS or if they have an object created in the database the analyze ![]() button has to be pressed. No push or push to TD/OMS is available if an analyze is not done first.
button has to be pressed. No push or push to TD/OMS is available if an analyze is not done first.
The files that are pushed to TD/OMS will have a green check in the pushed column and no icon if they are not. If a file has not been locally committed to Git first then a warning icon will appear (no analyze is needed for this check). On the object column, the name of the object will be displayed if the file has an object in the TD/OMS database otherwise a create button will appear in order to create one. Since a file can have an object only if a repository is representing native IBMi objects, this column will not display anything for non-native repositories.
Commit
Commit ![]() is the operation to commit your changes to your current local task branch.
is the operation to commit your changes to your current local task branch.
The guide on a local commit is here.
Push
Push ![]() is the operation to commit your local changes to the equivalent remote branch of your task. If there is no remote branch for your task then it will create one. If your changes are not committed to your local branch yet then you will be prompted to do that first.
is the operation to commit your local changes to the equivalent remote branch of your task. If there is no remote branch for your task then it will create one. If your changes are not committed to your local branch yet then you will be prompted to do that first.
The guide on a remote push is here.
Push to TD/OMS
The push to TD/OMS ![]() button will push the changes to the TD/OMS.
button will push the changes to the TD/OMS.
You guide for pushing to TD/OMS is here.
Finish
When all the work for a task has been completed then the task can be finished. The finish ![]() button will be available only when all the changed files have been pushed to TD/OMS first (every file must have the green check icon). Pressing the buttion will open the finish dialog.
button will be available only when all the changed files have been pushed to TD/OMS first (every file must have the green check icon). Pressing the buttion will open the finish dialog.
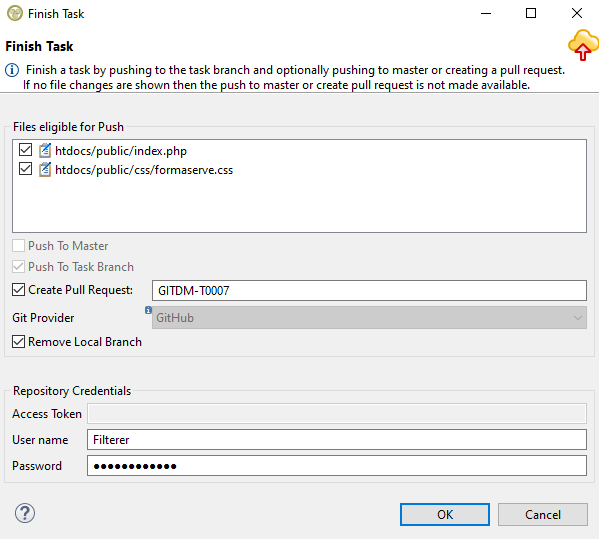
On the top of the dialog all the files that have been changed from the beginning of the task will be displayed. What the finish task will do is that it will merge the changes of your task branch to the local master branch. An option is available to delete the local task branch (not its remote) if its not needed anymore. Your repository credentials are also required at the bottom of the dialog.
Pull Request
When a task is finished there is also the option to create a pull request. This means to create a request on your remote task branch that it wants to merge its changes into the remote master branch. In order to do that the repository must be hosted in a Git provider that supports pull requests (like GitHub, GitLab etc). In the finish dialog, the correct Git provider will be automatically selected based on the URL of your current repository but if its not then the choice to select one will be made available. The name of the pull request will also be automatically filled with the format "application-task number" but it can also be changed.
The pull request then has to be accepted on the website that the repository resides in order for the remote master (and thus the repository) to be updated with your changes. Until a pull request is accepted it will have the open status and when its accepted it will be marked as closed. It is also possible to view all the pull requests (open or closed) of a repository in TD/OMS if you have installed the appropriate feature for your repository provider, for example if its a GitHub repository you can see the issues and pull requests for that repository if you have installed the GitHub feature upon TD/OMS installation.
The guide on how to install and work with a framework interface like GitHub is here.
Lock View
The lock view ![]() button will lock the view making it not changing its content anymore when a task is selected outside from the TD/OMS Git view. Pressing it will set the lock on and pressing it again will set it off. Please note that the view will still be sensitive to task selections from inside the view itself.
button will lock the view making it not changing its content anymore when a task is selected outside from the TD/OMS Git view. Pressing it will set the lock on and pressing it again will set it off. Please note that the view will still be sensitive to task selections from inside the view itself.
