GR:Gravity/Definitions/Work Flow
Workflow
Work Items define a certain amount of work to be done. In order to get from start to finish you can define a Workflow that these documents must follow. A Workflow consists of a number of steps before a Work Item can be completed.
Workflow stages
Before you start designing a workflow it is important to understand the various types of elements that make up the workflow.
There are so called Landing Stages. This is a place in the workflow where the item actually is. Then there are Activity stages. These stages are "executed" when an Item moves from one "Landing stage" to another. Let's take a look at the following example:
The Landing Stages In the picture starts with [1]. This is a special "Landing Stage" which we call "Start". Every workflow must start with this specific stage. There is also a corresponding "End" stage [7] which closes every workflow. In between "Start" and "End" there can be many normal "Stage" stages [2] taking many different paths. Not just linear as you see here. If you want to divide the "Stage" into smaller chunks this can be done with the "Status" stage [3]. An Item has a field for the "Stage" and the "Status".
The Activity or Pass Through stages are in between Landing stages. Whenever an Item moves from one Landing Stage to another, the Activity stages in between perform their specific action. The available Activity stages are "Activity" [4] which is a multi-purpose stage. It can do anything from sending and e-mail to calling a program. The other two Activity stages are "Event" [5] which will send out an event for others to process and the "Change Attribute" [6] which enables you to change all attributes of the Item when it passes through. Please note that all other stages are also "Change Attribute" stages but sometimes you want to use one separately.
Creating a Work Flow
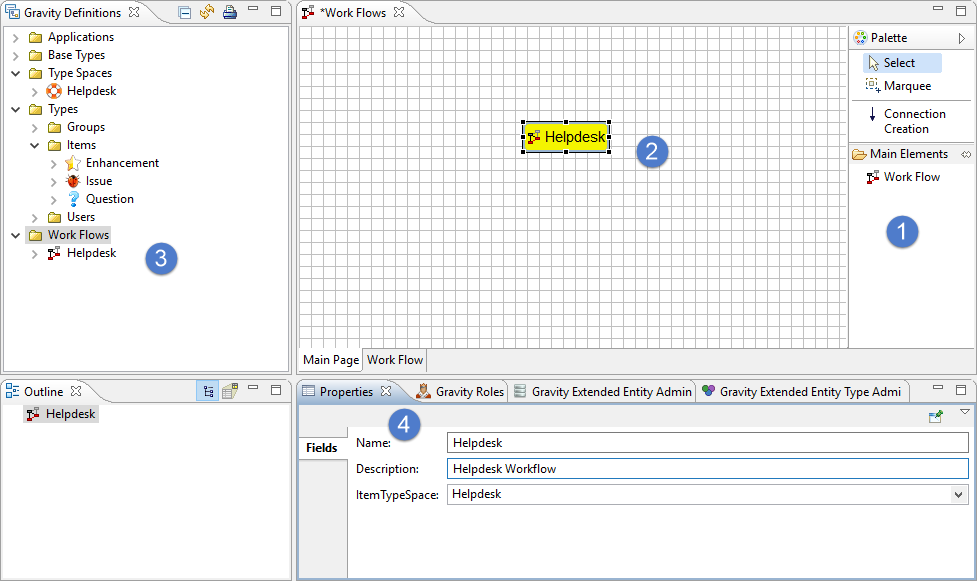
To create a new Work Flow, click on the "Work Flow" tool in the "Main Elements" section of the Palette [1]. Then click again on an empty spot in the canvas [2]. This will create a new Work Flow (note: Click and Click. Not Drag and Drop.)
If you click on the just created Work Flow, its properties will appear in the Properties View [4]. If you do not see the view, you can reset the perspective or open the view through the Gravity or Window top-level menus. You can also open the context menu of the canvas and select "Show in.../Properties".
In the properties view you can change various attributes. One particular important one is the Type Space (field ItemTypeSpace). Select the "Helpdesk" Type Space that we have created earlier.
To save the Workflow press CTRL+S or press the Save icon in the main toolbar. The Workflow will appear in the Definitions View.
Defining the Work Flow
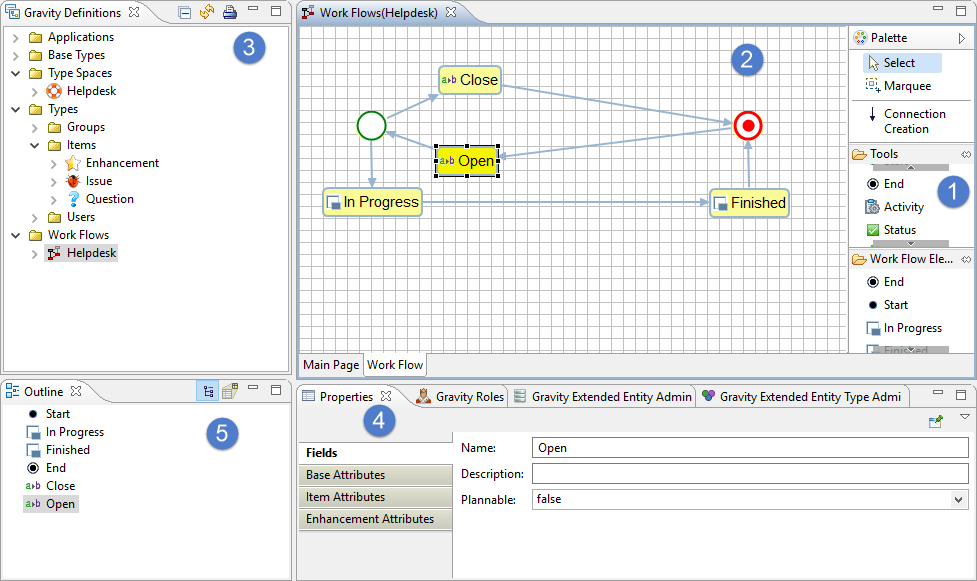
To define the Work Flow, you have to double-click it. This will open the Work Flow details where you can define the actual flow [2]. To go back, just click on the tab "Main Page" in the bottom left of the canvas [2].
The various tools that can be used from the Palette are explained in the next section.
To define a flow , start by
- click on the "Start" tool in the Palette [1]. After this is done, click anywhere on the canvas [2].
- click on the "End" tool in the Palette.
- Next, click on the "Stage" tool and then click on the canvas.
- Click on the "Stage" that was just created on the canvas and change the name into "In Progress" in the properties view.
- Next, click on the "Stage" tool and then click on the canvas.
- Click on the "Stage" that was just created on the canvas and change the name into "Finished" in the properties view.
- Next, click on the "Change Attribute" tool and then click on the canvas.
- Click on the "Change Attribute" that was just created on the canvas and change the name into "Close" in the properties view.
- Next, click on the "Change Attribute" tool and then click on the canvas.
- Click on the "Change Attribute" that was just created on the canvas and change the name into "Open" in the properties view.
If you feel confident, add additional elements until you are satisfied with the result. If your workflow becomes to big, you can see the overview in the Outline view [5]. You can toggle between tree and graphical view by using the buttons on the Outline view toolbar.
Connecting the Elements
To create an actual flow, we need to connect the various elements. To do this, click on the "Connection Creation" tool and click on the first element and then click on the next element. Do not "drag" (click-hold). Arrange the elements together as indicated in the picture above.
Tools
We create a workflow with the tools in the Gravity Workflow editor.
Start
This is the start of the Work Flow and is the required first element of any Work Flow.
End
This is the end of the Work Flow and is the required last element of any Work Flow.
Activity
The Activity tool denotes some manual work that needs to be done before the process can continue. The Role that is assigned to the Activity must perform the work that is associated with the Activity.
It is also possible to assign an automated task to a Activity. The Activity may execute a script or program. The Activity can also call a service on the web through a URL. Finally, the special Gravity Activities can be attached to the Activity.
Status
A Status is field associated with the Activity or the Stage that defines its progress. An Activity of "Create Documentation" may be connected to several Statuses that define the current status of that Activity or Stage.
Event
An Event is a step in the Work Flow that can send an Event through the Gravity Event System. The Event System will then deliver the event to the interested parties.
Stage
A Stage is a physical step in the Work Flow that in the Application will point to a physical location to store binary or source software Artifacts.
Re-Use of Elements
Be sure to re-use elements instead of creating a new element every time. You can re-use elements by not clicking a tool in the "Tools" section of the Palette but by selecting an already defined item of the "Work Flow Elements" of the Palette.


