GR:Gravity/Setup/Tutorial
Concepts
Applications
Applications are containers where the Gravity Item Types are created. You can create multiple Applications in Gravity so that you can separate different business functions. You might want to create one application to manage your first level support for your website. You can create another application to manage your internal projects. Maybe you want to manage defect reports in your factory and this can be managed in another application. Tasks, Projects, Issues, Defects are all examples or Items.
By using Applications you can use one system to manage multiple independent parts of your business. Every Application uses on or more workflows that controls how your Items flow from start to end.
Workflows
A Workflow is a predefined path from Start to End. It is a predefined path and it defines the Workflow for the Applications that you want to manage. A Workflow contains steps which enforces that all Items are handled in a way that is defined by your business. Examples are approval of changes, code review, starting of secondary processes or sending e-mails. By following a Workflow your team is able to collaborate more efficiently. It may also contains steps that take care of certain aspects of your development cycle,
Gravity comes with a Graphical Workflow editor that is used to visually layout the shape of the Workflow. The Workflow is then used in an application where application specfic attributes can be added like Priority, Assignee, Status and other attributes of the Item.
The parts of the Workflow are:
- Stages and Substages
- Stages and Substages define a "landing place" in the Workflow. Examples of Stages are Working, Test and Validation
- Events
- Enables the Workflow to send Events which can be received by secondary processes.
- Activity
- An Activity is a call of a user defined function while Items are transferred through the Workflow.
An Item that traverses the Workflow will "land" on Stages and Substages and execute intermediate stages like Activities and Events.
Base Types
Gravity enables you to create your own sub types from the following Base Types:
- Base Group
- A Group groups User types. Examples of Group Types are "Group" (default), "Customers", "Departments", "Roles" and so on.
- Base User
- A User represents your different types of users. Examples of User Types are "User" (default), "Contact", "IBM i Profile" and so on.
- Base Item
- An Item represents the things that can travel through the Workflow. Examples of Items are "Issue", "Project", "Time", "Order" and so on.
Items and Item Types
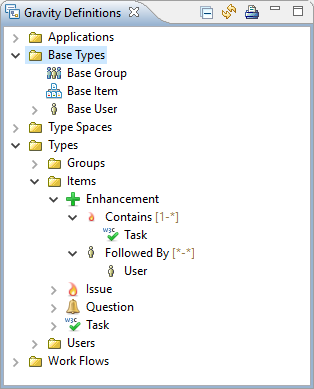
Items are the things that can be created in Gravity to form the base of your administration. An Item is an abstraction of everything you deal with and can manifest in a Change Request, a Task or a Project. It can also be a Release Document or a User Story. When you start with Gravity, you have to define your different types of Items. After this is done, the Items can be arranged in an hierarchical structure. For example, a Project can contain Tasks.
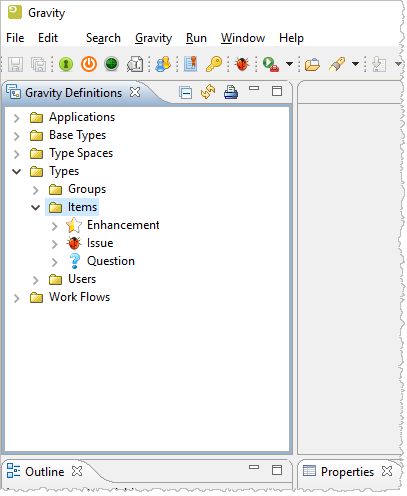
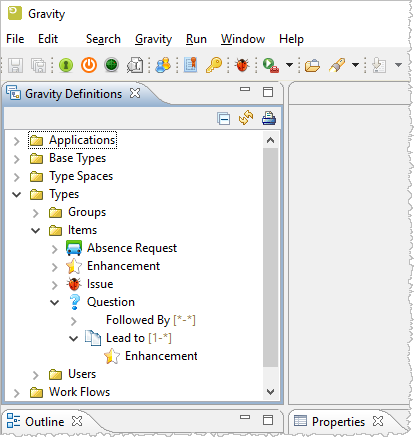
In the picture above you see the four defined types "Enhancement", "Issue", "Question" and "Task". In addition you see some dependencies which are discussed next.
Dependency Types
A Dependency Type determines the kind of relationship that is available between a Source and a Target. For example, a "Project" may contain "Tasks" with a "cardinality of 1 to *" which means a Project can contain many Tasks but a Task can only be connected to one project.
A Dependency Type can be re-used if it is generic. For example, if you define a "Parent/Child" Dependency then it can be re-used to connect Items/Groups/Users to other Items/Groups/User. Other dependencies can be more specialized like "Employer/Employee" which suggests a Group to User or a User to User dependency.
You can create a dependency type by finding a type you want to create a dependency with and then select "Connect". Base types can also be connected. This means that every sub type will inherit that relationship.
Type Space
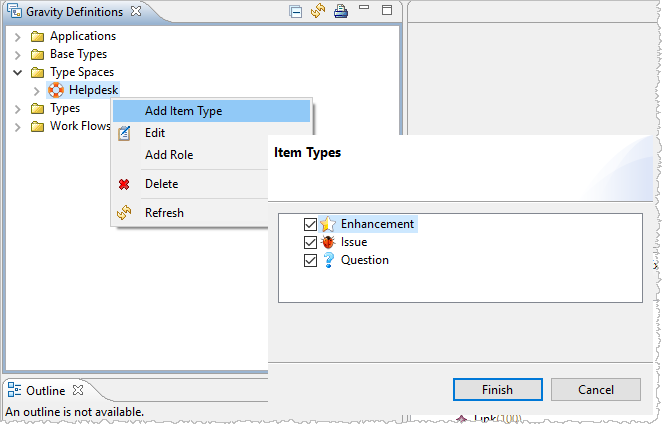
A set of Item Types can be arranged in a Type Space. In the example to the right there is a Type Space called Helpdesk which contains the Issue and Project. If this Type Space is attached to an Application's Workflow then you can only create these types in that Workflow. This enables you to create many Types for different kinds of Business Processes but still only allow a subset of those Types in a specific Workflow.
Depending on your organization, you can create many of these Type Spaces. You are therefore not confined to one business process but you can create as many as you need. However, each Workflow can only use one Type Space. In one application, you can have multiple workflows so it is possible to use more than one Type Space per application.
Suppose we have the following Item Types:
- Release
- Story
- Iteration
- Task
- Issue
- Question
- Enhancement
- Time Sheet
- Prescription
- Order
- Absence Registration
In addition we have the following Workflows:
- Development
- Helpdesk
- Business
This could lead to the following Type Spaces:
- Helpdesk
- Contains Item Types Question, Issue and Enhancement
- Agile
- Contains Item Types Release, Story, Iteration, Task, Time Sheet and Issue (used twice)
- Business
- Contains Item Types Order, Absence Registration, Prescription and Time Sheet (also used in Agile)
Definitions
The definitions system of Gravity takes care of all the definitions that together form an application.
Creating a Definition
This section describes how to setup Gravity with the concepts described above. All concepts are going to be explained in depth in the following sections. You can use this information to create your own Item Types, Dependencies and how to group them in a Type Space. We will show you how to create a Work Flow with various stages. Then we will create some types and assign them a Type Space. Finally we will create an Application that uses the Workflow and the Type Space.
When this is done, you are able to start creating Items.
During this tutorial we will create a Helpdesk. The Helpdesk contains basic types like Issue, Enhancement and Question. The sequence of events are:
- Create the Types
- Create an Extended Field for a Type
- Create a dependency
- Create a Workflow
- Create an Application
- Test
Before you begin
The easiest way to learn how to define Gravity is to install a copy of the server on your own windows machine. This tutorial assumes that you have done this.
When you install the Windows Server. Make sure that you do NOT use the shipped database but start working on an empty Gravity from scratch.
Installing the server is described here.
Installing the administration client is described here
Opening the Definitions Perspective
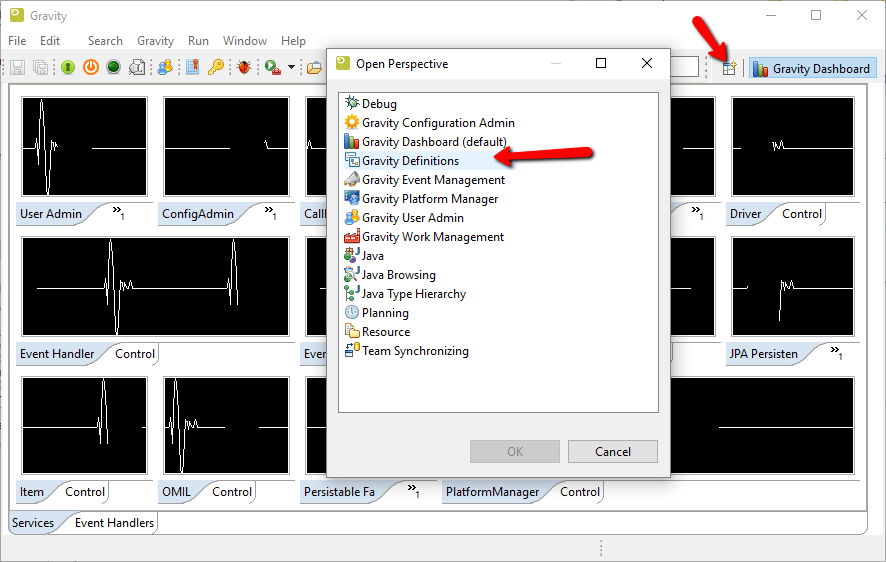
Entering the Definitions must be done in the Gravity Administration Client. Once the client is installed and you are logged in as "admin" you can open the Definitions perspective.
Item Types
Item Types define the Items that you can create in Gravity. In case of our Helpdesk example, the Item Types are are Issue, Question and Enhancement. Item Types are created in the Definitions view which becomes visible if you open the Definitions perspective.
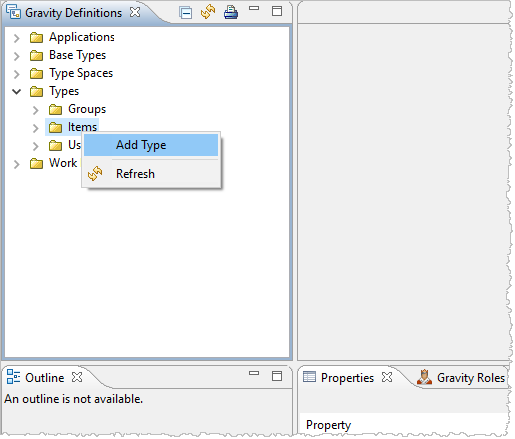
Open the "Types" tree item and click on Items. Then right click for the context menu and select "Add Type". This will popup the Type wizard.
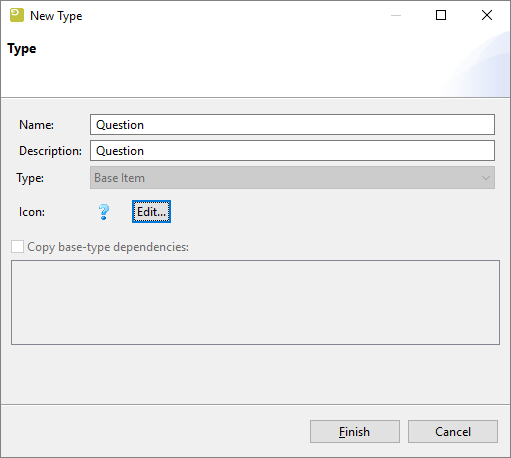
Enter the Name and the Description of the Item Type and select an icon by pressing the "Edit..." button. This enables you to add icons to the Gravity database which can be re-used for this and other purposes.
Go ahead and create the three Item Types that are part of this tutorial:
- Question
- Enhancement
- Issue
The final result must look like the picture below:
When we are done with this tutorial we can create Items of the types that we have created here. These Items will then traverse our Workflow. Item Types are attached to a Workflow through a Type Space.
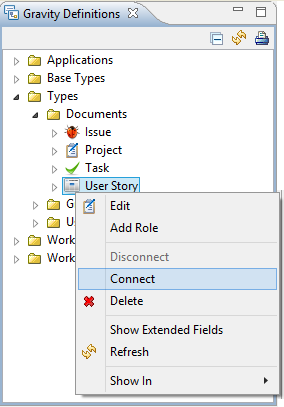
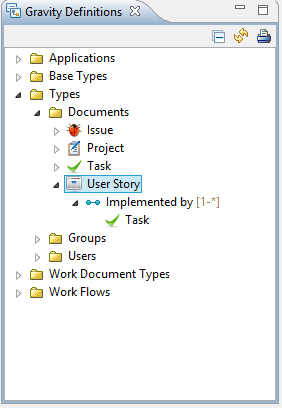
Now that we have two Document Types, we can connect them to each other. We are going to define that the User Story can contain many Tasks. To do this, we expand Documents, select the User Story and open the context menu.
From the context menu we can select "Connect..." to connect another Document Type to the User Story.
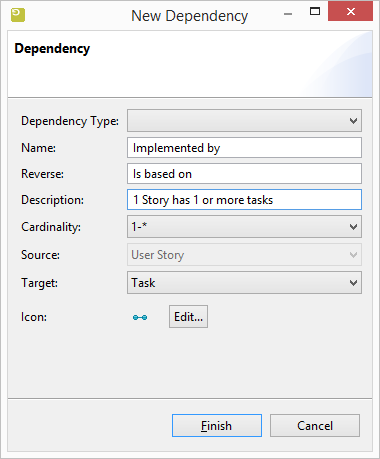
This will open the Connect dialog. The Dependency Type box can be used to base your definition on a existing one. Use the blank line to define a new one. Enter a Name, Reverse and a Description. Please make sure that you use terminology that is well known within your organisation. Select one of the available Document Types. In our case we have a Document Type called "Task" which we can select. Finally select an icon by pressing the "Edit..." button. This enables you to add icons to the Gravity database which can be re-used for this and other purposes.
A good place to find icons is the icons directory of the "plugins/com.remainsoftware.gravity.icons" directory in your Gravity installation.
We can also specify the Cardinality. This indicates how many Tasks can be connected to the User Story. Select "One to Many" to indicate that more than one Task can be connected to a User Story and that a Task can be connected to only one User Story.
The final result will look like this.
Base Types
Base Types are used to define fields and dependencies that are common to all Types of that Base Type. Currently there are three Base Types. You cannot add more Base Types.
Base Type Dependency
Let's create a Contributor connection from the Base Type to the User Type.
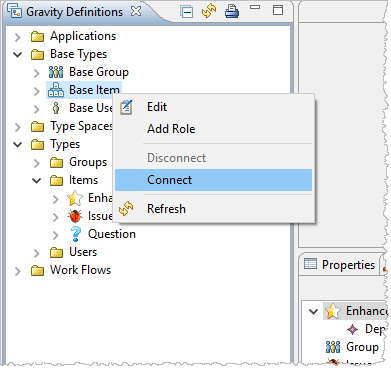
First we open the context menu on the Base Item type and then we select Connect. This will open a Dialog in which you can create a connection.
The details of the Dependency Types are discussed in this chapter.
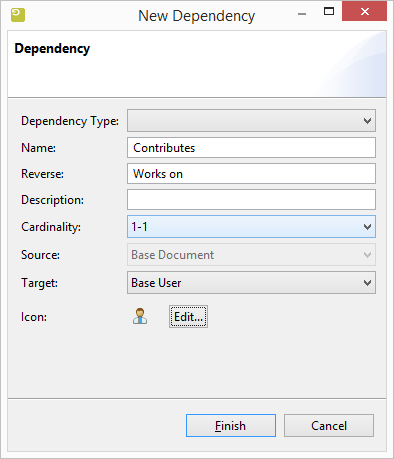
Then we can define the connection.
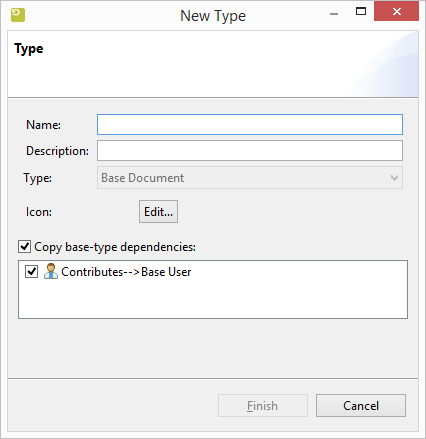
The Base Item Dependencies will show up when creating an Item Type.
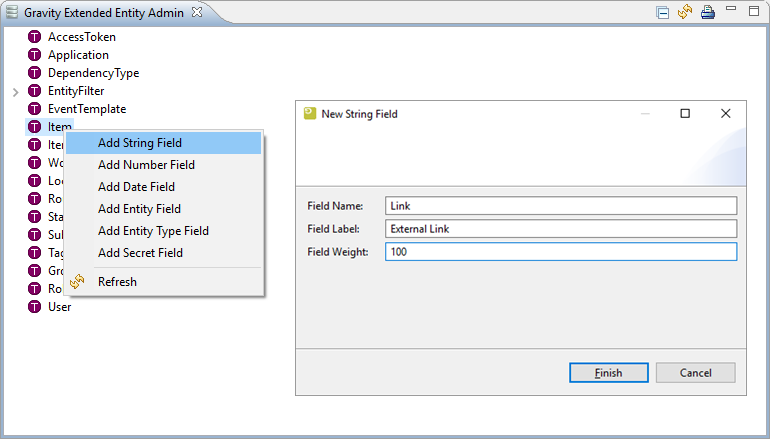
Base Type Extended Fields
The Gravity Extended Entity Admin view enables you to create fields for all Gravity entities that are Extendable. This means that you can add your own user fields to these entities.
As an example we are going to add an "External Link" to the Item type. This means that every Item you create, regardless of the Type, will inherit this Link field.
More information about Extended Fields can be found here
Extending Types
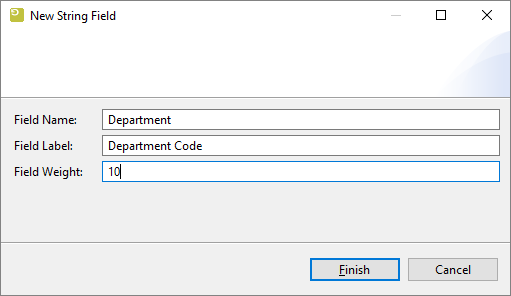
You are able to extend types with your own fields. You might want to add a Department code to the Enhancement Item Type. In this part of the tutorial we will show you how to do this.
You can extend all Types but also all Base Types. Every Type will inherit the Extended Fields of the Base Type.
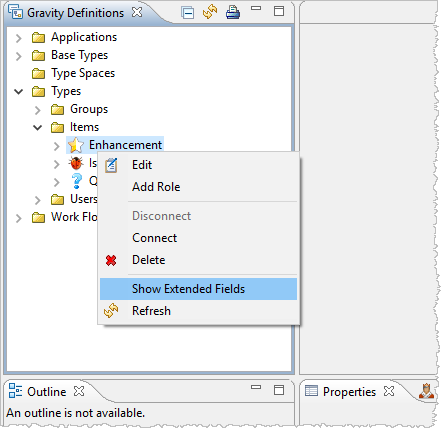
Open the Definitions view again, expand the Types and expand Items. Then open the context menu on Enhancement and select Show Extended Fields.
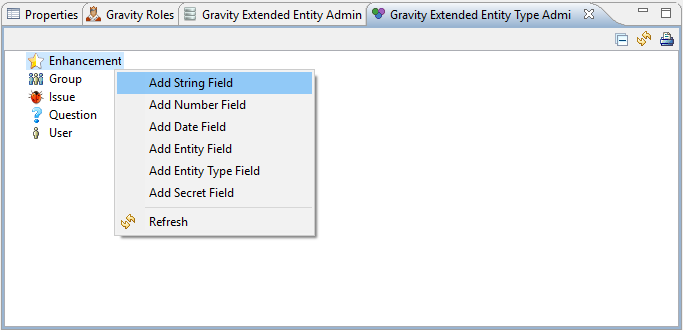
The Gravity Extended Entity Type Admin view will open. In this view you can open the context menu on any of the Types to add a field of a specific type.
- String Field
- Choose this if you want to add a free or bounded character value. The field becomes bounded (i.e. the user can only select a value) if you have added values to field after it is defined.
- Number Field
- Enables the user to add a number or select from a range of numbers.
- Date Field
- Enables the user to select a date.
- Entity Field
- Enables the user to select a value from the Gravity database. For example, select an Application, Workflow, User or an Item.
- Entity Type Field
- Enables the user to select a value from the Gravity database from any of the defined Types. For example, select an Enhancement, or Question.
- Secret Field
- A field that does not show its value when typed. It is stored encrypted in the database but it can be decrypted to the original value.
Right click on the Enhancement type and select New String Field. In the dialog that appears enter the following attributes.
- Field Name
- The name of the field
- Field Label
- The label that is presented to the user
- Field Weight
- If you add more fields to the Type then the Field Weight governs the position in the form. The higher the weight the more it will be in the bottom of the form.
Adding Values
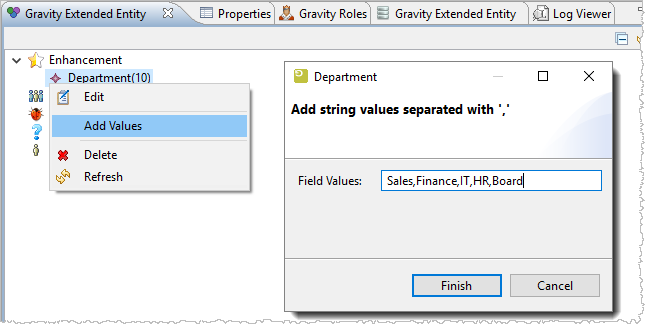
Right click the field to open the context menu and choose 'Add Values'. This will open a simple dialog which enables you to add a comma separated list of values.
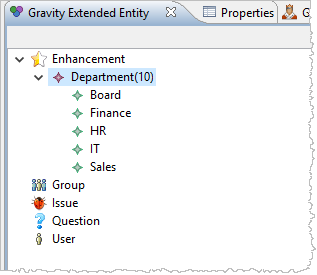
The final result looks like this:
Final Results
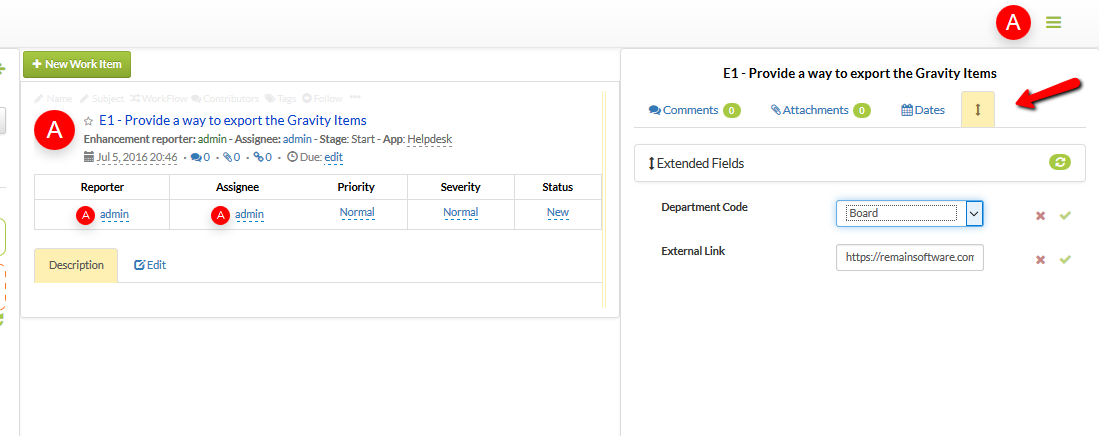
In the image below you see how the final result looks in the Web Client. Extended fields are of course also available in the rich client.
Dependency Types
A Dependency Type determines the kind of relationship that is available between a Source and a Target. For example, if someone opens a "Question" in our Helpdesk which leads to an "Enhancement" then you probably want to link that Question to the new Enhancement. In order to do this we need to define a Dependency between "Question" and "Enhancement".
Let's take an example.
Q: Is it possible to export Items from Gravity
A: No this is not possible
This might prompt the person that asked the question to create an enhancement request. It would then be nice to be able to link the two together.
Connecting an Enhancement to a Question
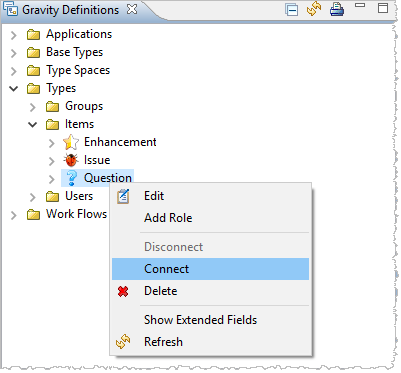
Right click the Question Type and select Connect from the context menu:
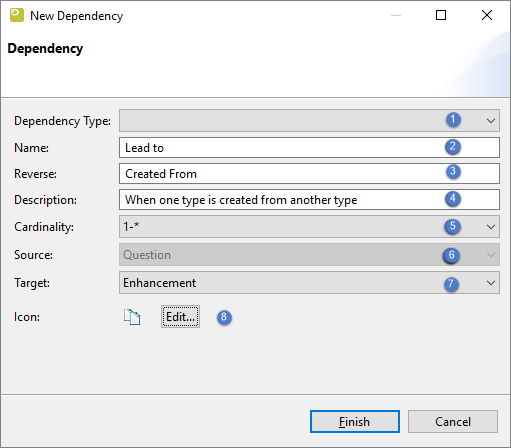
This will open a wizard that enables you to either re-use and existing type, or create a new type. In the example below we want to make a dependency that connects Questions to Enhancements.
- (1) Dependency Type
- If you want to re-use an existing dependency type you can do so by selecting one from the drop down box. Doing so will disable all input fields except (7), the Target.
- (2) Name
- Defines the "Source to Target" name for the dependency. In our example, the Question led to the Enhancement so a good choice is Led to. However, this is very specific. An alternative could be See Also.
- (3) Reverse
- Defines the "Target to Source" name for the dependency. The Enhancement was created from the Question therefore this would make a good "Reverse".
- (4) Description
- A short description of the dependency if at all needed.
- (5) Cardinality
- Defines the how many to how many relationship. For example, a project can contain many tasks but a task can only be assigned to one project. This is the one to many or 1-* cardinality. In our case, many Issues can be connected to many issues so this could be a many to many cardinality *-*.
- (6) Source
- This is the type that acts as the source or parent of the relationship. It cannot be changed.
- (7) Target
- Select a type that is the target of this connection. In our case this is the Enhancement.
- (8) Icon
- Choose an icon to represent this connection in the GUI.
After you press Finish your users are enabled to connect items of the type Enhancement to items of the type Question.
Type Spaces
A Type Space is an arrangement of Item Types. A Type Space is connected to a Workflow so that is why we create it now. The Item Types that can be created in a specific Workflow are restricted by the Types in the Type Space.
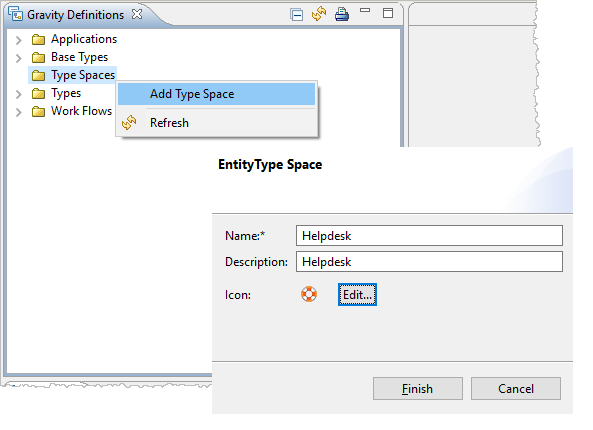
Open the Definitions view and right click on the "Type Spaces" tree item and select "Add Type Space". This will popup the Type Space wizard. Enter the Name and the Description of the Type Space and select an icon by pressing the "Edit..." button. This enables you to add icons to the Gravity database which can be re-used for this and other purposes.
In this example we are creating a Type Space called Helpdesk. We have selected an appropriate icon and specified the Name and the Description of this Type Space.
A Type Space will be used in a Workflow. All Items that are created for a specific Workflow must be of one of the types in the attached Type Space.
Please see the section on Item Types for more information about Item Types.
Workflow
Work Items define a certain amount of work to be done. In order to get from start to finish you can define a Workflow that these documents must follow. A Workflow consists of a number of steps before a Work Item can be completed.
Workflow stages
Before you start designing a workflow it is important to understand the various types of elements that make up the workflow.
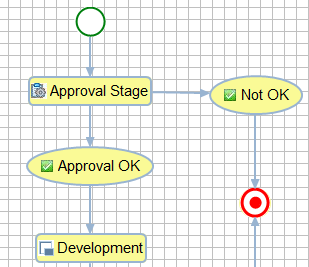
There are so called Landing Stages. This is a place in the workflow where the item actually is. Then there are Activity stages. These stages are "executed" when an Item moves from one "Landing stage" to another. Let's take a look at the following example:
The Landing Stages In the picture starts with [1]. This is a special "Landing Stage" which we call "Start". Every workflow must start with this specific stage. There is also a corresponding "End" stage [7] which closes every workflow. In between "Start" and "End" there can be many normal "Stage" stages [2] taking many different paths. Not just linear as you see here. If you want to divide the "Stage" into smaller chunks this can be done with the "Status" stage [3]. An Item has a field for the "Stage" and the "Status".
The Activity or Pass Through stages are in between Landing stages. Whenever an Item moves from one Landing Stage to another, the Activity stages in between perform their specific action. The available Activity stages are "Activity" [4] which is a multi-purpose stage. It can do anything from sending and e-mail to calling a program. The other two Activity stages are "Event" [5] which will send out an event for others to process and the "Change Attribute" [6] which enables you to change all attributes of the Item when it passes through. Please note that all other stages are also "Change Attribute" stages but sometimes you want to use one separately.
Creating a Work Flow
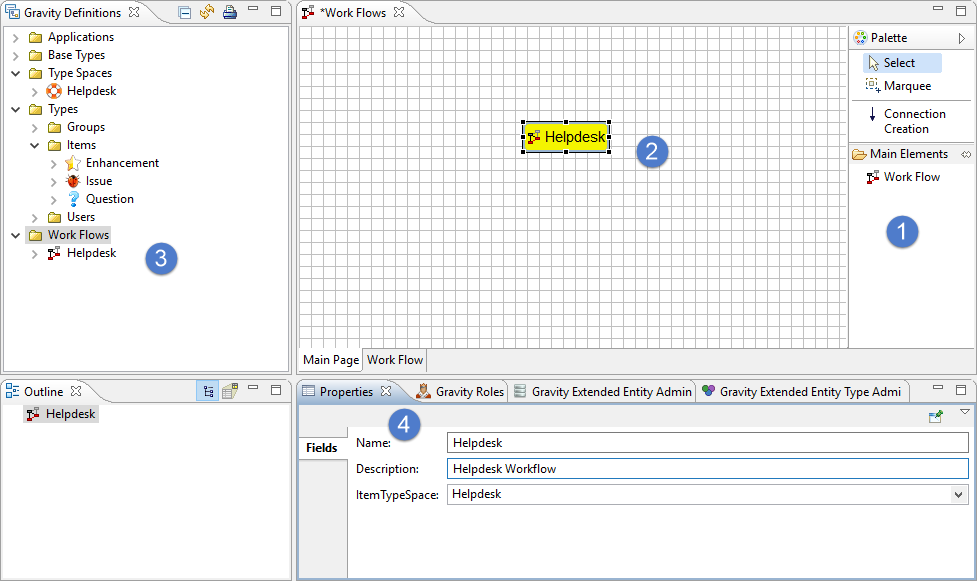
To create a new Work Flow, click on the "Work Flow" tool in the "Main Elements" section of the Palette [1]. Then click again on an empty spot in the canvas [2]. This will create a new Work Flow (note: Click and Click. Not Drag and Drop.)
If you click on the just created Work Flow, its properties will appear in the Properties View [4]. If you do not see the view, you can reset the perspective or open the view through the Gravity or Window top-level menus. You can also open the context menu of the canvas and select "Show in.../Properties".
In the properties view you can change various attributes. One particular important one is the Type Space (field ItemTypeSpace). Select the "Helpdesk" Type Space that we have created earlier.
To save the Workflow press CTRL+S or press the Save icon in the main toolbar. The Workflow will appear in the Definitions View.
Defining the Work Flow
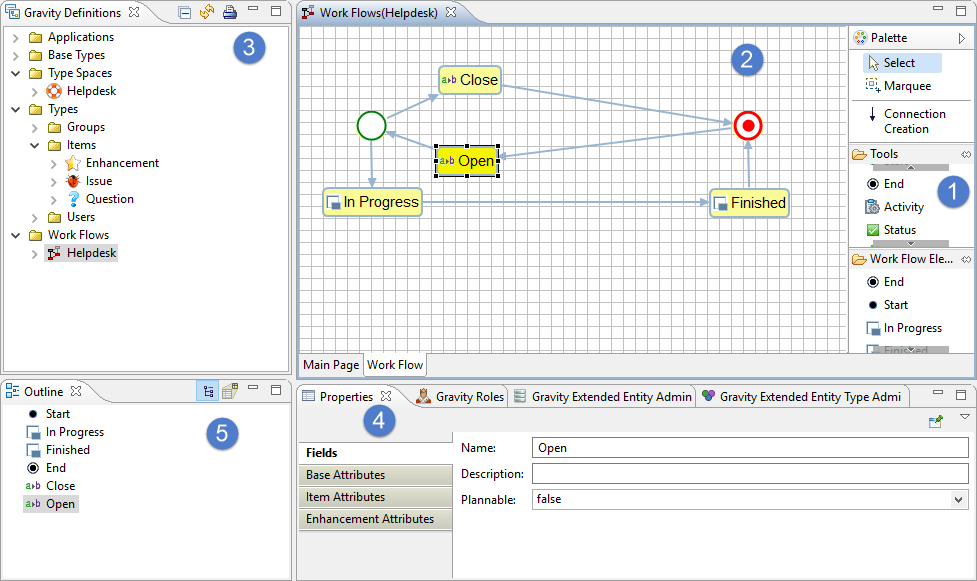
To define the Work Flow, you have to double-click it. This will open the Work Flow details where you can define the actual flow [2]. To go back, just click on the tab "Main Page" in the bottom left of the canvas [2].
The various tools that can be used from the Palette are explained in the next section.
To define a flow , start by
- click on the "Start" tool in the Palette [1]. After this is done, click anywhere on the canvas [2].
- click on the "End" tool in the Palette.
- Next, click on the "Stage" tool and then click on the canvas.
- Click on the "Stage" that was just created on the canvas and change the name into "In Progress" in the properties view.
- Next, click on the "Stage" tool and then click on the canvas.
- Click on the "Stage" that was just created on the canvas and change the name into "Finished" in the properties view.
- Next, click on the "Change Attribute" tool and then click on the canvas.
- Click on the "Change Attribute" that was just created on the canvas and change the name into "Close" in the properties view.
- Next, click on the "Change Attribute" tool and then click on the canvas.
- Click on the "Change Attribute" that was just created on the canvas and change the name into "Open" in the properties view.
If you feel confident, add additional elements until you are satisfied with the result. If your workflow becomes to big, you can see the overview in the Outline view [5]. You can toggle between tree and graphical view by using the buttons on the Outline view toolbar.
Connecting the Elements
To create an actual flow, we need to connect the various elements. To do this, click on the "Connection Creation" tool and click on the first element and then click on the next element. Do not "drag" (click-hold). Arrange the elements together as indicated in the picture above.
Tools
We create a workflow with the tools in the Gravity Workflow editor.
Start
This is the start of the Work Flow and is the required first element of any Work Flow.
End
This is the end of the Work Flow and is the required last element of any Work Flow.
Activity
The Activity tool denotes some manual work that needs to be done before the process can continue. The Role that is assigned to the Activity must perform the work that is associated with the Activity.
It is also possible to assign an automated task to a Activity. The Activity may execute a script or program. The Activity can also call a service on the web through a URL. Finally, the special Gravity Activities can be attached to the Activity.
Status
A Status is field associated with the Activity or the Stage that defines its progress. An Activity of "Create Documentation" may be connected to several Statuses that define the current status of that Activity or Stage.
Event
An Event is a step in the Work Flow that can send an Event through the Gravity Event System. The Event System will then deliver the event to the interested parties.
Stage
A Stage is a physical step in the Work Flow that in the Application will point to a physical location to store binary or source software Artifacts.
Re-Use of Elements
Be sure to re-use elements instead of creating a new element every time. You can re-use elements by not clicking a tool in the "Tools" section of the Palette but by selecting an already defined item of the "Work Flow Elements" of the Palette.
Applications
Work Flows define the logical steps in a business process along with some general attributes. It is in the Application where this Work Flow is used and where the i's are dotted. An Application can be configured to use one or more Work Flows.
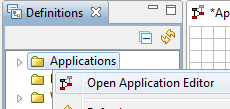
To open the Application editor you can open the context menu on the "Applications" tree item. Select the "Open Application Editor" menu item. This will open the editor.
Creating an Application
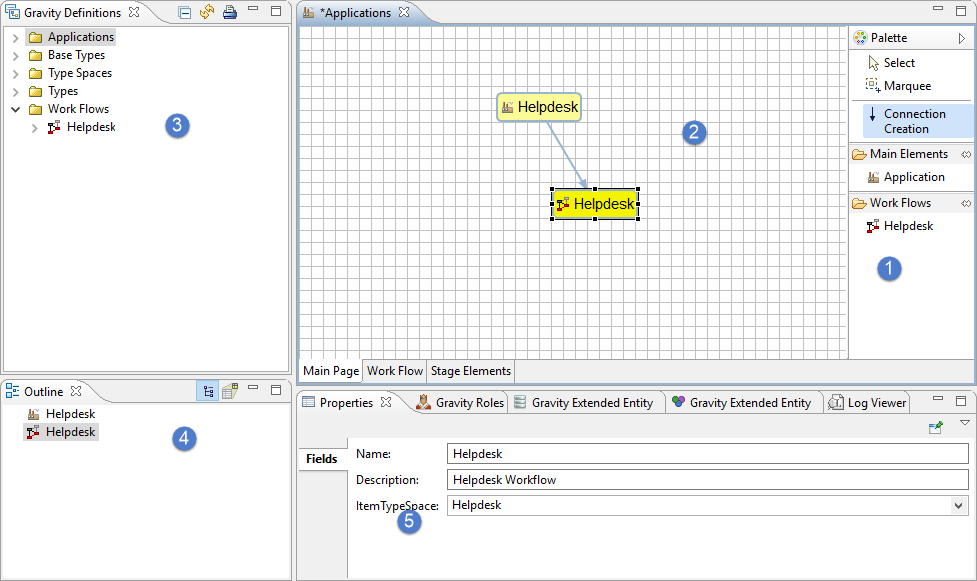
To create a new Application, click on the "Application" tool in the "Main Elements" section of the Palette [1]. Then click again on an empty spot in the canvas [2] (do not drag). This will create a new Application.
If you click on the just created Application, its properties will appear in the Properties View [4]. If you do not see the view, you can reset the perspective or open the view through the Gravity or Window top level menus. You can also open the context menu of the canvas and select "Show in.../Properties".
In the properties view you can change various attributes.
Assigning a Work Flow
To assign a Work Flow, you click on the desired Work Flow in the "Work Flows" section of the Palette. Then click on an empty section of the canvas.
After this has been done, select the "Connection Creation" tool from the Palette and click on the Application and then on the Work Flow element.
Press Ctrl+S or close the editor and select yes to save the changes and create the new application.
Assigning Item Types to the Application
Our Item Types have been assigned to our Helpdesk "Type Spaces". A "Type Space" is assigned to a "Work Flow" and only these Item Types the user can create in this workflow. Since our Work Flow is now connected to our "Application", this results in our Item Types being created in the our "Application". To finalize how Items of these types are created within the "Application" we need to define how you want the names (numbers) of the Items to be generated.
Open the Definitions View to maintain Document Types.
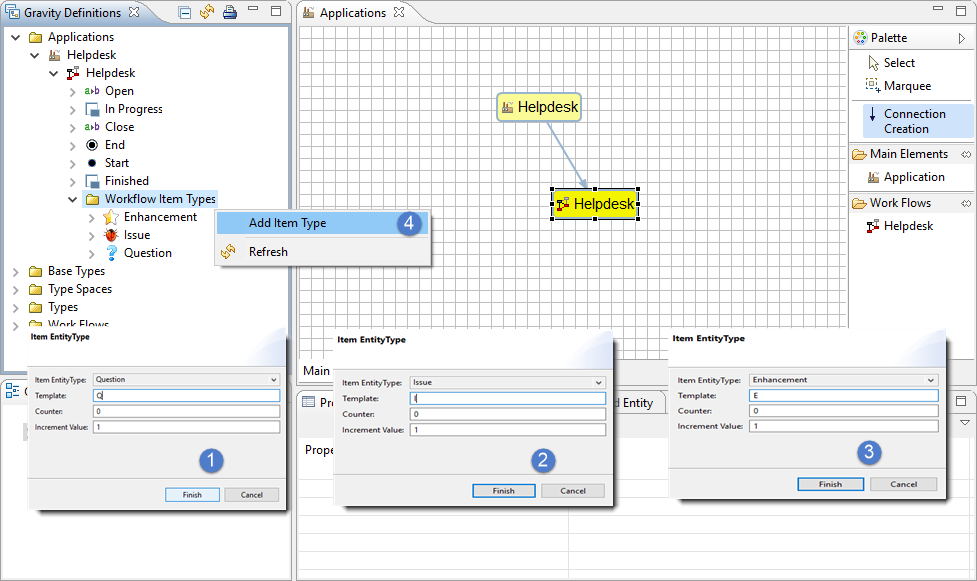
Open the "Applications" tree item, open the Helpdesk Application tree item and open the Helpdesk WorkFlow tree item. Click on the Item Types folder. Then right click for the context menu and select "Add Item Type" [4]. This will popup the Item Type wizard.
The Item Type selection box will only contain Item Types for which no definition has been created yet within the Application. The Template can be used to define the starting characters of each Item that is created for this Item Type like 'I', 'QUE' or 'ENH'. The counter and Increment value are used to determine the sequence number when a Item is added. The default values will result in the first Item being created with sequence 1. A Counter of 999 and a Increment Value of 1 will result in the first Item of this type being created with sequence 1000.
In our example we have defined
- a Question Item Type which will start with Q. The code assigned to the thousands Item of this Item Type will be Q1000.
- an Issue Item Type which will start with I. The code assigned to the first Item of this Item Type will be I1.
- an Enhancement Item Type which will start with E. The code assigned to the 21st Item of this Item Type will be E21.
You are now ready to start creating Items and take them through the Workflow. If you open your browser and login as admin/admin you can start creating Items immediately. You may also use the ![]() perspective to see the effect of your definition changes. In the Work Management view you are also able to create public and private filters which are also used in the web client..
perspective to see the effect of your definition changes. In the Work Management view you are also able to create public and private filters which are also used in the web client..

