PRINT:CDM:Client Deployment Manual
 Welcome to the index of the Client Deployment Manual v1.1. Please select the link of your interest.
Introduction
The Client Deployment module is used to distribute objects, which are under control of TD/OMS, to clients. These clients currently may be running the Microsoft operating systems Windows 98SE, NT 4.0, 2000 and XP. A multi-platform version (in general suitable for each platform with a Java runtime environment) is under construction and will be available in the near future.

Prerequisites
The following is necessary before installing Client Deployment:
- IBM OS/400 V5R1 or later installed on your iSeries
- TD/OMS 5.0 M00 or later installed on your iSeries
- TD/OMS GUI Server software installed on your iSeries
- A PC with Windows 98 SE, NT4.0, 2000, XP Home or XP Professional installed. Windows 98 and NT4.0 however are not preferred, because they are not supported anymore by Microsoft.
The latest servicepacks for these operating systems should be installed as well to ensure problem-free results. The PC must have a working TCP/IP connection to your iSeries, with at least 2 TCP/IP ports free to use (the default ports Client Administration uses are 45029 and 45030, but in general you are free to choose different ports).
Installation
The installation is done by running the OMCDE.exe installation program from the TD/OMS Product CD.
The installation procedure should be self-explanatory. Below you will find an description of the steps to be performed.
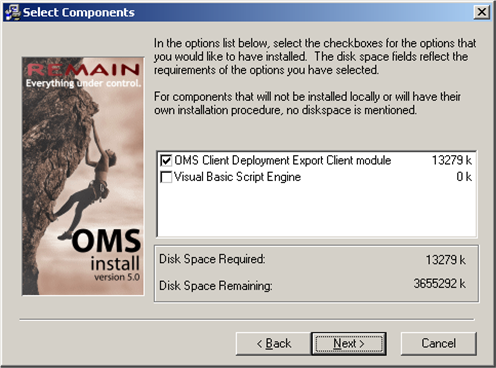
After starting OMCDE.exe, you will be presented with some general introduction screens. Clicking "next" a couple of times will get you to the first screen with choices on it, where the modules to be installed have to be selected:
The first selection is one you would always want to choose, being the main application.
The second one, "Visual Basic Script Engine" may be necessary if for some reason Internet Explorer is not installed.
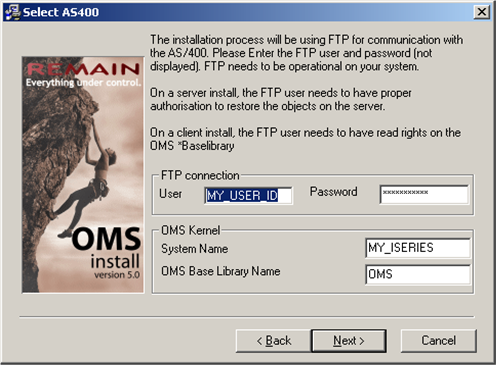
Click next. The following screen will appear:
A FTP connection is used to retrieve some general installation information from your iSeries, for instance where your TD/OMS kernel resides. Enter the appropriate information and click next.
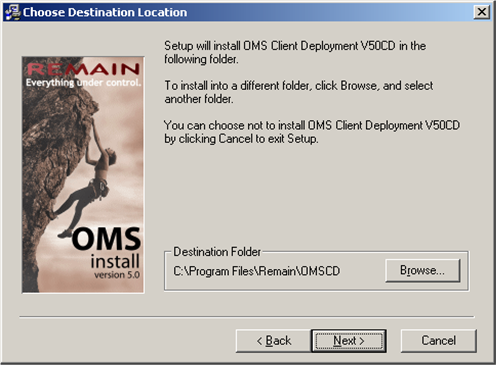
The following screen will appear:
This is to define the installation directory of the application on your PC. Click next.
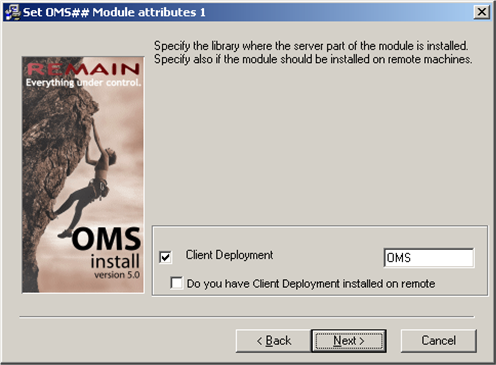
The following screen is used to indicate the library where the Client Deployment server module is installed.
Normally, this should be your TD/OMS installation library. Click next. The following screen appears:
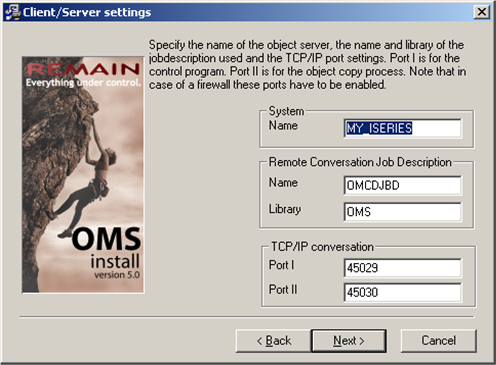
This is the screen where the information for the TCP/IP connection is entered. This includes the remote server name, the information for the job description to be used and the ports for the connection. These two ports should be the same as you defined before when installing the server part of Client Deployment.
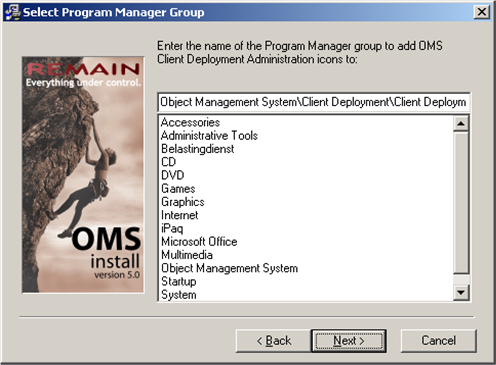
Click next, which will make the next screen visible. This is to define the place of the Start menu icons.
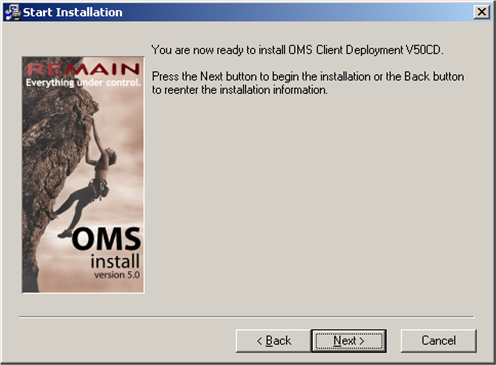
Clicking next will get you to the final installation screen:
You are now one click away from installing Client Deployment. Using the cancel button will abort the installation.
CDM:Running Client Deployment

How the Client Deployment process works
When Client Deployment is started it will first check if there are objects to be processed. If this is the case, a list with objects is created, after which these objects are transferred to a temporary directory on the client.
When all objects are in the temporary directory they are copied to the final location. Finally, a list is sent to the server with the statuses of all object transfers. If an error occurs during the copying process, a message is shown (as displayed before) that there was a lock and the pc should be restarted to process the remaining objects. This process will be started automatically after rebooting, showing a message that it is active (the message, once again, was displayed before).
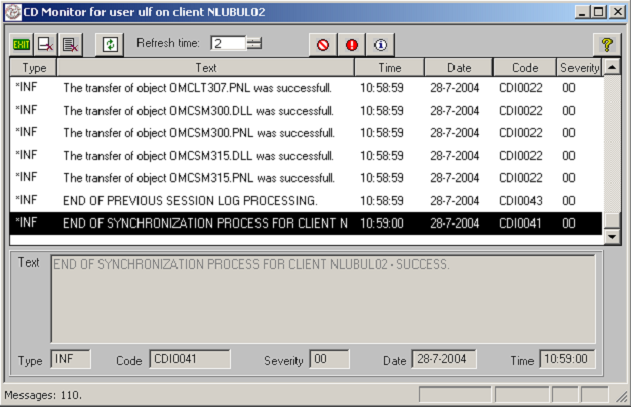
During the object transfer processes messages are written to a file which may be used to keep track of which transfers fail, etc. These messages may be viewed by starting the Client Monitor program. Doing this will display the window shown below.
The buttons should be self-explanatory by viewing the hint text. The Refresh time is set to 5 seconds by default, but can be modified. In that case, the time is remembered the next time you open the window.
These messages may help in solving problems when calling the Remain helpdesk. It is therefor advised only to remove messages which you are sure of that they are not needed anymore, for instance after a successfull transfer.

Additional settings in the INI file OMCDE301.INI
There are some special settings, which may be entered in the INI file for the Client Deployment process. These are explained below.
[Program Options]
This is the segment in which the settings are placed.
Debug={Yes,No}
Shows a message at the beginning of the process. This is for debugging purposes. It also shows a message at the end of the process, to be able to view the job log.
IdOverride={Yes, NO_PRE,NO_POST}
Yes overrides the ClientId by the value specified in IdAddition (see below)
NO_PRE appends the value to the begin of the ClientId
NO_POST appends the value to the end of the ClientId.
If no value is specified, no IdAddition is used.
IdAddition={…}
Additional string for the ClientId

Additional settings in the system registry of a client
Some settings may be stored in the system’s registry.
Automatic client registration
This makes it possible to automatically register a client that logs on for the first time, by creating its account based on a "template" client:
HKEY_LOCAL_MACHINE\SOFTWARE\Remain\BasedOnClient = Template ClientId
This defines the ClientId on which a new client should be based and at the same time enables automatic client registration for this client.
Symbolic path names
Symbolic path names may be used to define an abstract path for a client, which may be converted to a physical path by overriding the abstract path (defined in the Client Administration module) by the physical counterpart (which is stored in the client’s registry). Symbolic path names are enclosed by "%" characters when they are entered in the Client Administration module; e.g.: converting %DRIVE%\%PATH%\ to D:\TEMPORARY would require the following settings in the client’s registry:
HKEY_LOCAL_MACHINE\SOFTWARE\Remain\SymbolicPathNames\DRIVE = D:
and
HKEY_LOCAL_MACHINE\SOFTWARE\Remain\SymbolicPathNames\PATH= TEMPORARYDIR
Of course, it is also possible to use a single Symbolic path for drive and path:
HKEY_LOCAL_MACHINE\SOFTWARE\Remain\SymbolicPathNames\DRIVEPATH= D:\TEMPORARYDIR
will point %DRIVEPATH% to D:\TEMPORARYDIR
So, the abstract path in the Client Administration module will be converted by the client to a physical path. This may for instance be useful when a path is different on many pc’s but you do not want (or are not able to) to define these differences on the server. An example may be the installation of an application on various pc’s, where the user has the possibility to choose where the application is installed. In the installation routine, the only thing that has to be done is to write the registry setting for the path with a symbolic path name and to use the symbolic path name in the Client Administration module.

Start and End processing exits
The is a possibility to run operating system commands or SQL scripts on a client before or after a transfer. These are called respectively Start processing exits (with extension SP$) and End processing exits (with extension EP$).
They merely consist of textfiles with the above mentioned extensions, which are transferred to a client, like normal objects. Client Deployment will recognize them as being exits and perform the requested actions. Like normal objects, the exits are executed only once, being when they are new or when they have changed.
An example of the commands which may be used is shown below.
SQL Exit
"SQL";"SELECT * FROM "KOPEHDTA"."COL06P""
The token "SQL" identifies this as an SQL Exit. After the semi-colon, the statement within quotation marks is defined. This will be executed. The database is defined for the library list-client directory combination in the Client Administration module.
Operating system command
"OSCMD";"C:\Program Files\Internet Explorer\iexplore.exe"
The token "OSCMD" defines this as an Operating System Exit. After the semi-colon, the statement to be executed is defined within quotation marks. This may be a program to be called (as shown above), a general command (e.g. "chkdsk") or a document of a known type, which will be automatically be opened with the corresponding program, like a web page (e.g. http://www.remain/nl will start Internet Explorer or its equivalent with the web page of Remain). Note that Symbolic Pathnames may be used as well, which makes it possible to start programs which are located on different locations on different clients.

Final words
This document should provide the necessary information to use Client Deployment. For more information, for instance about the configuration of Client Deployment, it is advised to read the Client Deployment Concepts Guide and the Client Deployment Administration module manual, as this may contain valuable information, especially for system administrators and helpdesk personell.
For more information on TD/OMS or Client Deployment you may visit our website (http://remainsoftware.com) or contact our helpdesk by mail (helpdesk@remain.nl) or telephone (+31-30-6005017).
