PRINT:DFG:Definitions & Recovery Guide
TD/OMS Main Menu
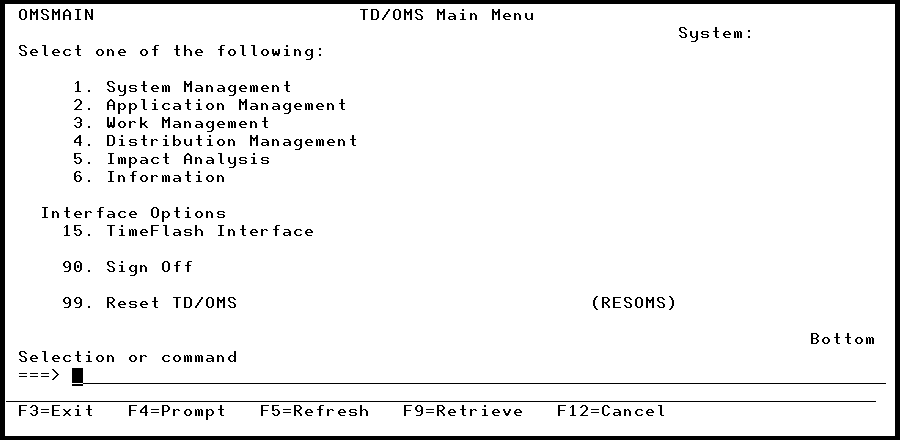
TD/OMS Main Menu Introduction
To start the TD/OMS functions, you enter a menu option using the TD/OMS menus. This menu is the main menu from which you can display all available sub-menus. A sub-menu is available per module. The following sub-menus are discussed in this manual.
System Management
The System Management menu enables you to start functions, that offer administration tasks at the highest system level. You can define the TD/OMS system, add or delete applications and reorganize files. The menu for TD/OMS internal functions is also available via the System Management menu.
In general you will need *SECOFR or *SECADM authorities or you should be defined as the TD/OMS manager to enter these functions.
TD/OMS Internal
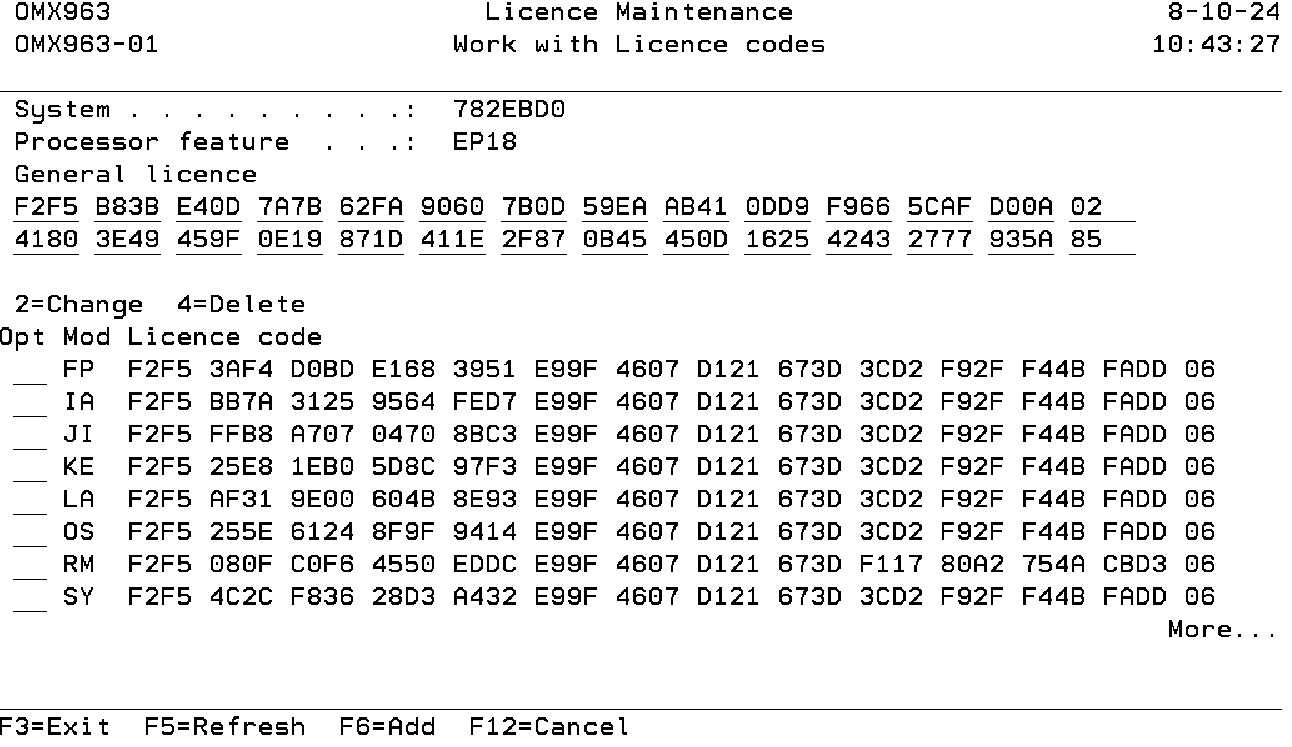
The TD/OMS TD/OMS Internal menu enables you to use functions related to TD/OMS itself. You are able to install and display the license codes, change the way the TD/OMS objects are authorized, start authorizing TD/OMS objects, change the fix processing sequence and other functions.
NOTE: This menu option is only shown for category *SECOFR users.
Application Management
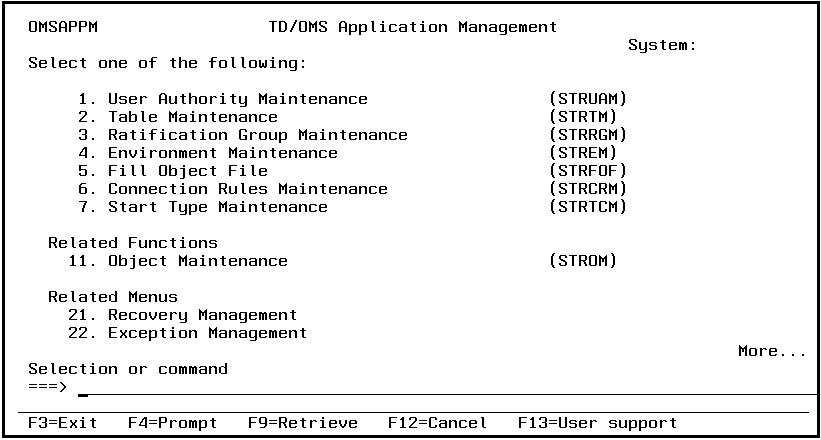
The Application Management menu enables you to start functions for definitions, recovery and initial loading of objects, all related to a specific application. You can authorize your users for a specific application, define the maintenance cycle in an application, fill the various tables, do the initial loading of objects and start the exception and recovery menus.
Recovery Management
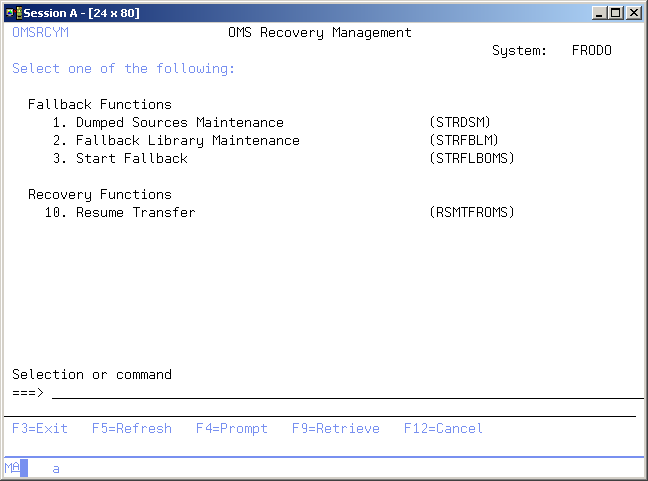
The Recovery Management menu contains functions concerning Fall-back and Recovery. This includes the Dumped Source Maintenance, the Fall-back Library Maintenance, the Start Fall-back and the Resume Transfer functions.
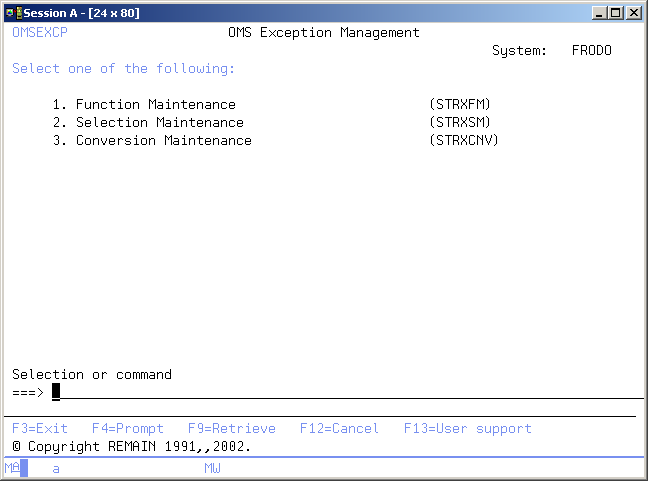
Exception Management
The Exception Management menu contains functions concerning Exceptions. This includes the Exception Functions Maintenance, the Exception Selection Maintenance and the Conversion Maintenance functions.
TD/OMS System Management
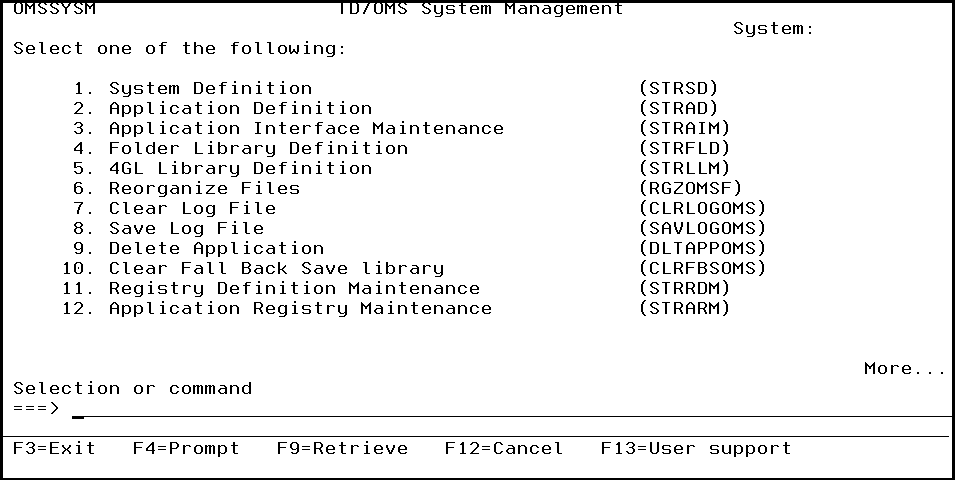
TD/OMS System Management Introduction
The TD/OMS System Management menu enables you to perform initial definitions and TD/OMS maintenance activities.
System Definition (STRSD)
This menu command starts the system definition function. Refer to the description of the function System Definition for more detail information. This command has no parameters.
Application Definition (STRAD)
This menu command starts the application definition function. Refer to the description of the function Application Definition for more detail information. This command has no parameters.
Application Interface Maintenance (STRAIM)
This menu command starts the application interface maintenance function. Refer to the description of the function Application Interface Maintenance for more detail information. This command has no parameters.
Folder Library Definition (STRFLD)
This menu command starts the folder library definition function. Refer to the description of the function Folder Library Definition for more detail information. This command has no parameters.
4GL Library Definition (STRLLM)
This menu command starts the 4GL library definition function. Refer to the description of the function 4GL Library Definition for more detail information. This command has no parameters.
Registry Definition Maintenance (STRRDM)
A registry definition describes how a system registry entry can be added to the system registry table. A registry definition describes in which context(s) the registry entry can be specified and explains the usage of the entry. See more details in Registry Definition Maintenance
Application Registry Maintenance (STRARM)
An Application registry activates a specific registry keyword. This is done by the specification of 1 or more context values and the keyword value. The registry definition describes in which context(s) the registry keyword can be specified and the allowed keyword values (if any). See more details in Application Registry Maintenance
Pre Transfer Check Maintenance (STRPTCM)
This menu command starts the Pre Transfer Check Maintenance function. Refer to the description of the function Pre Transfer Check Maintenance for more detailed information. This command has no parameters.
Job Description Maintenance (STRJDM)
This menu command starts the Job Description Maintenance function. Refer to the description of the function Job Description Maintenance for more detailed information. This command has no parameters.
Reorganize TD/OMS Files (RGZOMSF)
The reorganize TD/OMS files command is used to start the function reorganizing TD/OMS files. Refer to the description of the function Reorganize TD/OMS Files for more detail information.
Clear TD/OMS Log (CLRLOGOMS)
The Clear TD/OMS Log command is used to remove all or selected entries from the TD/OMS log file. Use it on a regular base to prevent the log file from growing beyond limits or extend the size of the TD/OMS physical file OMLOG. The OMLOG file should have a limit exceeding ten times the default value. See more details in Command Clear TD/OMS Log
Save TD/OMS log (SAVLOGOMS)
The Save TD/OMS Log Files command is used to save various TD/OMS log files. These files are saved in a history library you may specify. The records are saved until the date you have specified. At least the last three log entries of an object are preserved. See more details in Command Save TD/OMS Log Files
Delete Application (DLTAPPOMS)
The Delete TD/OMS Application command is used to remove all, or a selection of entries from an existing TD/OMS application. See more details in Command Delete TD/OMS Application
Clear Fall-back Save library (CLRFBSOMS)
The Clear Fall-back Save library command is used to remove all, or a selection of save files in an archive library. These save files contain the fall-back library of an TD/OMS transfer job. You have to specify an application and an end date that filter the save files to be removed. See more details in Command Clear Fall Back Save library
System Definition
The System Definition function enables you to enter new values for the TD/OMS system values. These values will be in effect for all applications. Users belonging to the group *SECOFR or *SECADM and the TD/OMS manager are allowed to use this function.
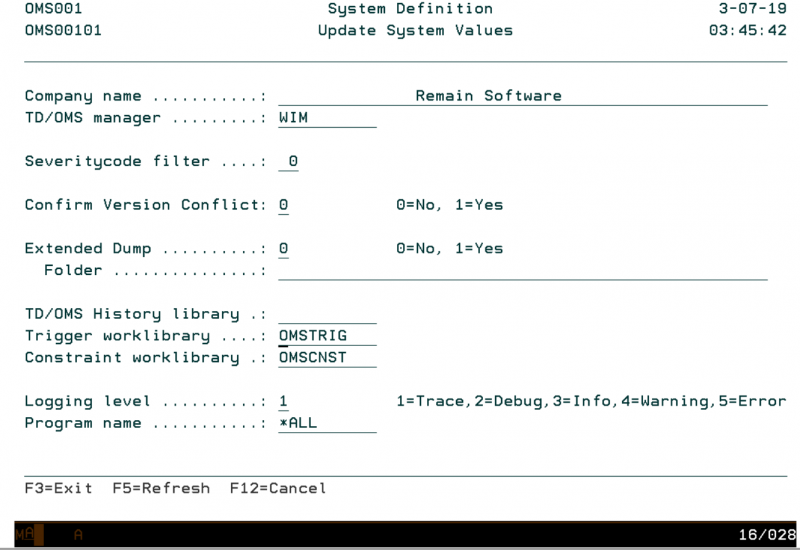
Update System Values
The Update System Values display shows the currently used system values and enables you to change these values. The values can be changed at any time during use of TD/OMS, but the old values stay in effect for active users. When you press ENTER the new or changed values are stored in the TD system file.
Company name
The Company Name is meant to contain a description of your company in combination with the TD/OMS environment you are working with. The company name should be self explanatory if TD/OMS is implemented several times on one IBM i or on several IBM i's. A blank value is not allowed.
The Company Name is printed on reports.
TD/OMS Manager
The TD/OMS Manager is the user or group profile who is allowed to use the other functions of System Management (i.e. Application Definition and Reorganization of files). These functions can be used by members of the group *SECOFR or *SECADM and by the TD/OMS Manager. A blank value is not allowed.
Severity Code Filter
The Severity Code Filter is used to indicate which TD/OMS messages are logged into the TD/OMS log file during interactive display processing. A value 0 indicates that all TD/OMS messages and warnings are logged.
Another value indicates that only TD/OMS messages with a severity higher or equal to this value are logged. The value 0 is recommended. The TD/OMS messages are stored in the OMSMSG message file in the TD/OMS library. OS/400 messages, selected by TD/OMS to store in the TD/OMS log file, are not influenced by this filter.
Confirm Version Conflicts
TD/OMS keeps track of all possible Version Conflicts and informs the application managers by sending a message when an object is copied to development while another application contains a different version of this object.
If Confirm Version Conflicts is activated, TD/OMS will also send these messages, but it also does extra checks, for example:
If different versions of the same object are maintained at the same time, TD/OMS requests a confirmation when the second (or higher) version of the object is moved to production.
Specify one of the following values:
0 - Deactivate Confirm Version Conflicts
1 - Activate Confirm Version Conflicts
Note: A changed value takes effect immediately. When Confirm Version Conflicts is deactivated, TD/OMS will not delete any of the confirmation data, but it will not request any confirmation until it is activated again.
Extended Dump
When TD/OMS encounters an internal problem, the TD/OMS Error Report is always generated. When the Extended Dump is activated, TD/OMS collects a lot of information about the job that encountered the error and redirects this information to a document in the folder specified in the Extended Dump Folder. The name of this document is in the format OMyymmdd.nnn, where yymmdd is the date and nnn a number starting at 001.
Specify one of the following values:
0 - Deactivate Extended Dump.
1 - Activate Extended Dump.
Note: A changed value takes effect immediately. The collection of the dump information can take several minutes.
TD/OMS History Library
The TD/OMS History Library contains the name of the library where TD/OMS history objects reside. You can created history with the command SAVOMSLOG.
Trigger Worklibrary
Specify this library to indicate the name of the library where the trigger processing workfiles should be stored. Normally this is library QTEMP but if the information is required to do some analysis another library can be specified to prevent the files from deletion after the job has ended.
Constraints Worklibrary
Specify this library to indicate the name of the library where the constraint processing workfiles should be stored. Normally this is library QTEMP but if the information is required to do some analysis another library can be specified to prevent the files from deletion after the job has ended.
Logging level
Some TD/OMS programs can log additional information about the program flow. Specify which type of messages must be written to the TD/OMS log.
The possible values are:
- 1=Trace
All additional messages are logged. - 2=Debug
All additional messages, except "Trace" messages are logged. - 3=Info
All additional messages, except "Trace" and "Debug" messages are logged. - 4=Warning
All additional "Warning" and "Error" messages are logged. - 5=Error
Only additional "Error" messages are logged.
Program name
The possible values are:
- Program name
When the Log level is "Trace"or "Debug" then only the specified program will log additional messages.
- *ALL
When the Log level is "Trace"or "Debug" then all programs will log additional messages.
Command Start System Definition (STRSD)
This menu command starts the system definition function. Refer to the description of the function System Definition for a detailed description.
STRSD
This command has no parameters.
Application Definition
The Application Definition function enables you to maintain the initial application definition. The application code must be known to TD/OMS before any function can be executed for a specific application.
Application definitions can be added, changed, deleted or copied from another application. The definition contains parameters at application level.
Users belonging to the group *SECOFR or *SECADM, and the TD/OMS manager are allowed to start this function.
Note: The function User Authority Maintenance must be executed once to declare the authorized users for that specific application, after entering an initial definition for an application.
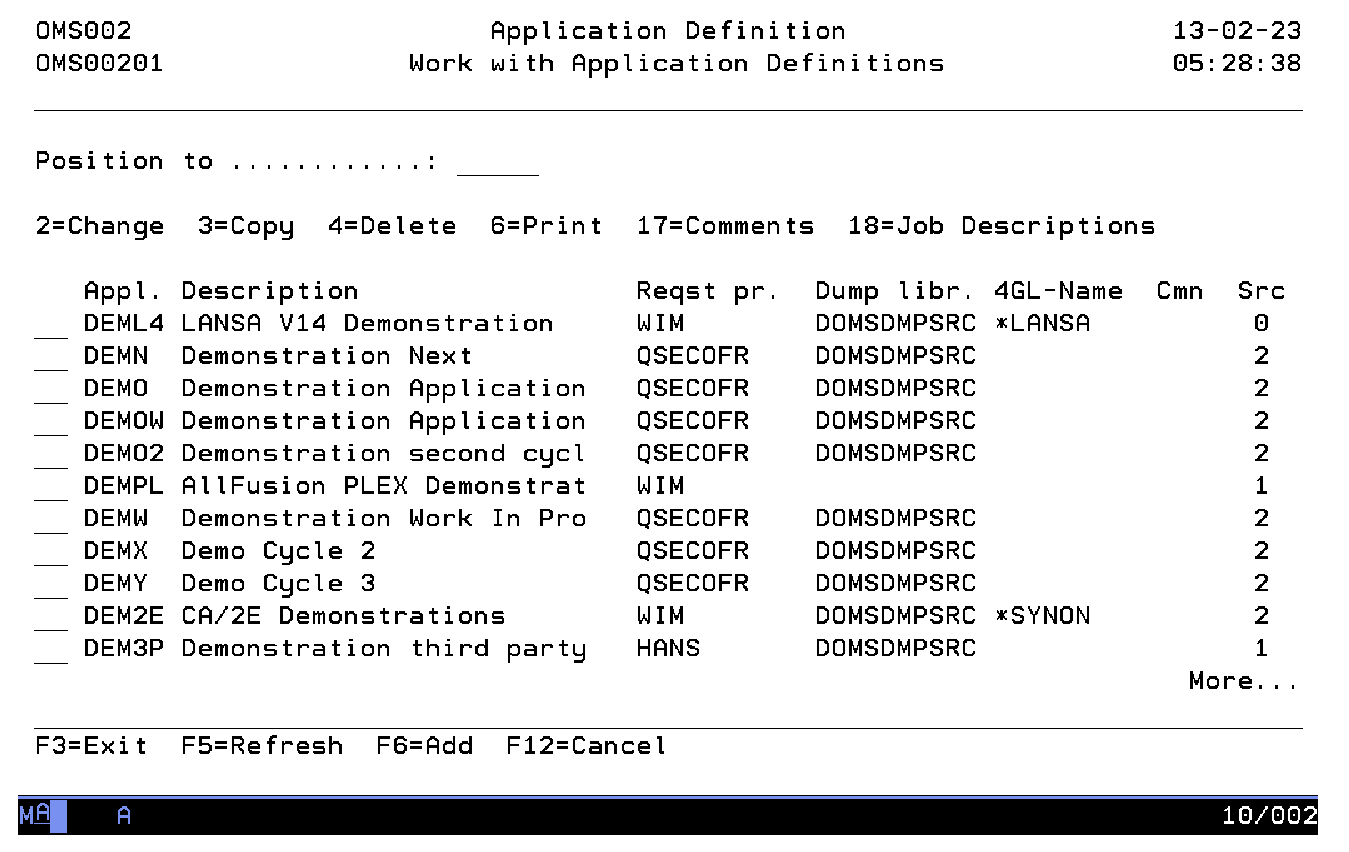
Work with Application Definitions
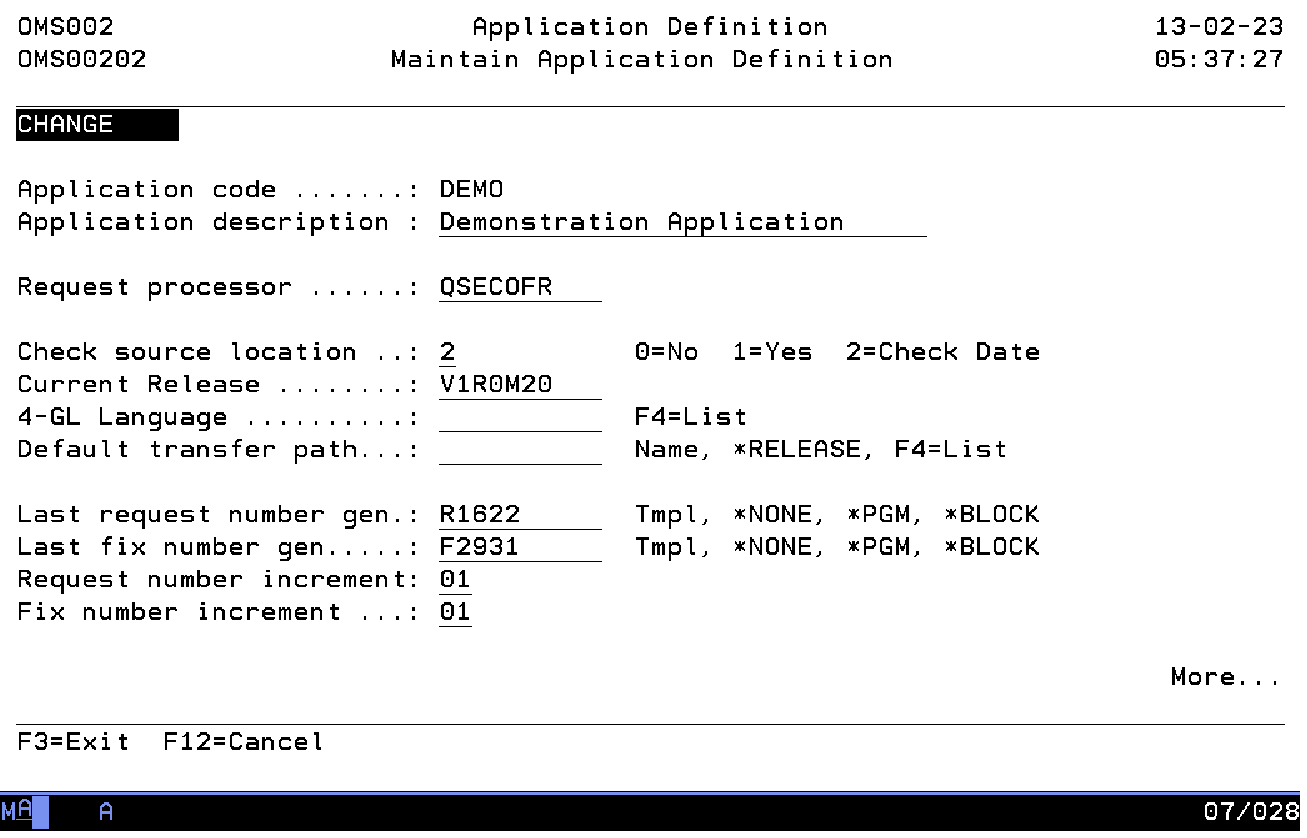
The Work with Application Definitions display shows the currently defined applications, including their main parameters. To select an option, type the option number in the option field area and press Enter. For more information about an option move the cursor to the option column and press Help. For more information about a function key, move the cursor to the function key area and press Help.
Position to
Use this prompt to go to a particular application in the list.
Option
Use this column to perform different operations on individual entries. Type the option number next to an entry and press Enter.
- 2=Change
Change the contents or certain attributes of an application.
- 3=Copy
Add a new application definition and at the same time copy one or more parts of the extended definition of an existing application.
- 4=Delete
Delete the definition of an application.
- 6=Print
Print the application definition.
- 17=Comments
Work with the comments and replies associated with the application.
- 18=Job Descriptions
Work with the job descriptions.
Maintain Application Definition
The Maintain Application Definition display shows information and allows actions depending on the option chosen on the previous display. The chosen action on the previous display is shown on line three. The following modes can be activated:
- Add
You can add a new application definition. The application code and all attributes must be entered.
- Change
You can change the attributes of an existing application definition. The current values are shown. All attributes can be changed at any time during the life cycle of an application.
- Delete
The current contents of all attributes is shown including a confirmation message. Deletion of application definitions is only allowed if no related information is stored in the TD database.
Note: For more information about a specific attribute move the cursor to the attribute area and press Help.
Application code
The application code is a unique identification of the application. Once the code has been added it cannot be changed. To change the application code you have to delete the old application code and add a new one. A blank value is not allowed. Almost all data defined in TD/OMS is related to an application. In general an application groups information about:
- Security
Security Rights and privileges assigned to users for a specific application.
- Environment
The definition of phases in the maintenance cycle for a specific application.
- Objects
The definition of objects pertaining to a specific application.
- Requests
The history of user requests concerning the specific application.
- Fixes
The description of a unit of work, both completed and in process.
- Exceptions
The definition of exception functions and exception selections.
Application description
The application description contains a description of the application code. A blank value is not allowed.
Request processor
The request processor is one of the persons who is in charge of the request handling and who will receive an informational message if another user has entered a new request. He is allowed to maintain all requests and fixes belonging to this application. The name of the request processor is mandatory and must be known to OS/400 as a user profile object.
Note: that the request processor must also have an authorization code assigned to him in order to enable him to work with requests and/or fixes.
Check source location
The Check source location indicator instructs TD/OMS how to handle source members related to an object. The possible values are:
- 0=No
The value "0" indicates that in general the objects do not have a related source in this particular system. No errors will occur if no source can be found if a new object is registered in the TD database. Use this value for instance for applications in remote systems where no sources reside, or if you wish to register some objects from the QSYS library.
- 1=Yes
The value "1" indicates that objects do have related sources in this system. The environment definition determines the way TD/OMS searches for the right source member. Information about source change date of object and source is stored in TD, but a mis-match does not cause an error.
- 2=Check Date
The value "2" is equal to value "1". Mis-match of source change date between object and source will result in an error. This value is recommended if objects have sources in this system.
Release
A release identification can be used to bundle fixes and will commonly be formatted as VnRnMnn, where V stands for Version, R for Release and M for Modification level. Any other format is allowed, including a blank value. The current release indicates the default value for release whenever a new fix is added.
Another way of working with releases can be achieved by defining each release as an application. Refer to the concepts guide for more detailed information.
4GL name
The 4GL name can be defined in Application Definition, indicating that the specified 4GL or Case tool is used, possibly in combination with 3GL compilers. Defining a 4GL name will enable you, in general, to register 4GL objects in TD/OMS and handle them like OS/400 objects. Specific information about the functions per 4GL / Case tool are described in the relevant interface manual.
You will also need to specify 4GL logical library names in the 4GL Library Definition function in order to work with the 4GL objects.
Use F4=List to get a list of the available 4GL interfaces.
Note: You will need the TD interface module in order to work with the 4GL objects.
Default Transfer Path
A default transfer path indicates the default value for the transfer path whenever a new fix is added.
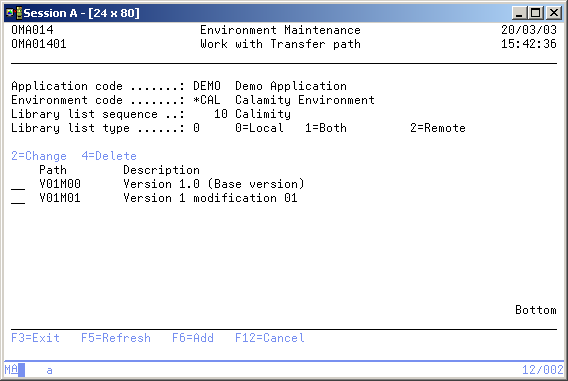
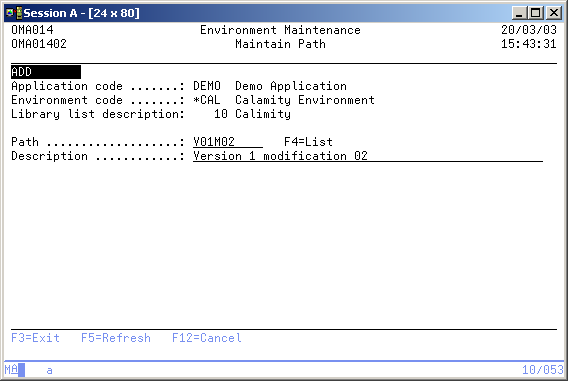
Use F4=List to get a list of the available transfer paths. When the list is empty, you can use STREM (Environment Maintenance) to add transfer paths to your environment.
The special value *RELEASE applies to the value given in the previously mentioned Release. When you are using the value *RELEASE you need to be sure that there is a transfer path defined with the same name as the release.
Last request number
The last request number is used by TD/OMS as a base for generating request numbers. TD/OMS will generate the request number if the default request number "*GEN" has been used during the addition of a Request. The generated Request number is stored in this attribute. The last Request number is shown and can be maintained in the Application Definition function.
The following rules apply to generation of numbers:
- If the string ends with an alphabetic character TD/OMS will extend the string with "0000".
- If the string ends with a numeric character TD/OMS will use all ending numeric characters as a base.
Examples: (Assume increment value is 1)
Base Value   Generated value
R            R0001
R1           R2
R9           R10
ABCDEFGHI    ABCDEF0001
R00000000    R00000001
Last fix number
The Last fix number is used by TD/OMS as a base for generating fix numbers. During addition of a fix, TD/OMS will generate the fix number if the default fix number "*GEN" has been used. The generated fix number is stored in this attribute. The Last fix number is shown and can be maintained in the Application Definition function.
The following rules apply to generation of numbers:
- If the string ends with an alphabetic character TD/OMS will extend the string with "0000".
- If the string ends with a numeric character TD/OMS will use all ending numeric characters as a base.
Examples: (Assume increment value is 1)
Base Value Generated value
F          F0001
F1         F2
F9         F10
ABCDEFGHI  ABCDEF0001
F00000000  F00000001
Request number increment
The request number increment value is used by TD/OMS for generating request numbers. Before generating a request number the "Last request number gen." is incremented with this value. This value is shown and can be maintained in the Application Definition function.
Fix number increment
The fix number increment value is used by TD/OMS for generating fix numbers. The "Last fix number gen." is incremented with this value before generating a fix number. The value is shown and can be maintained in the Application Definition function.
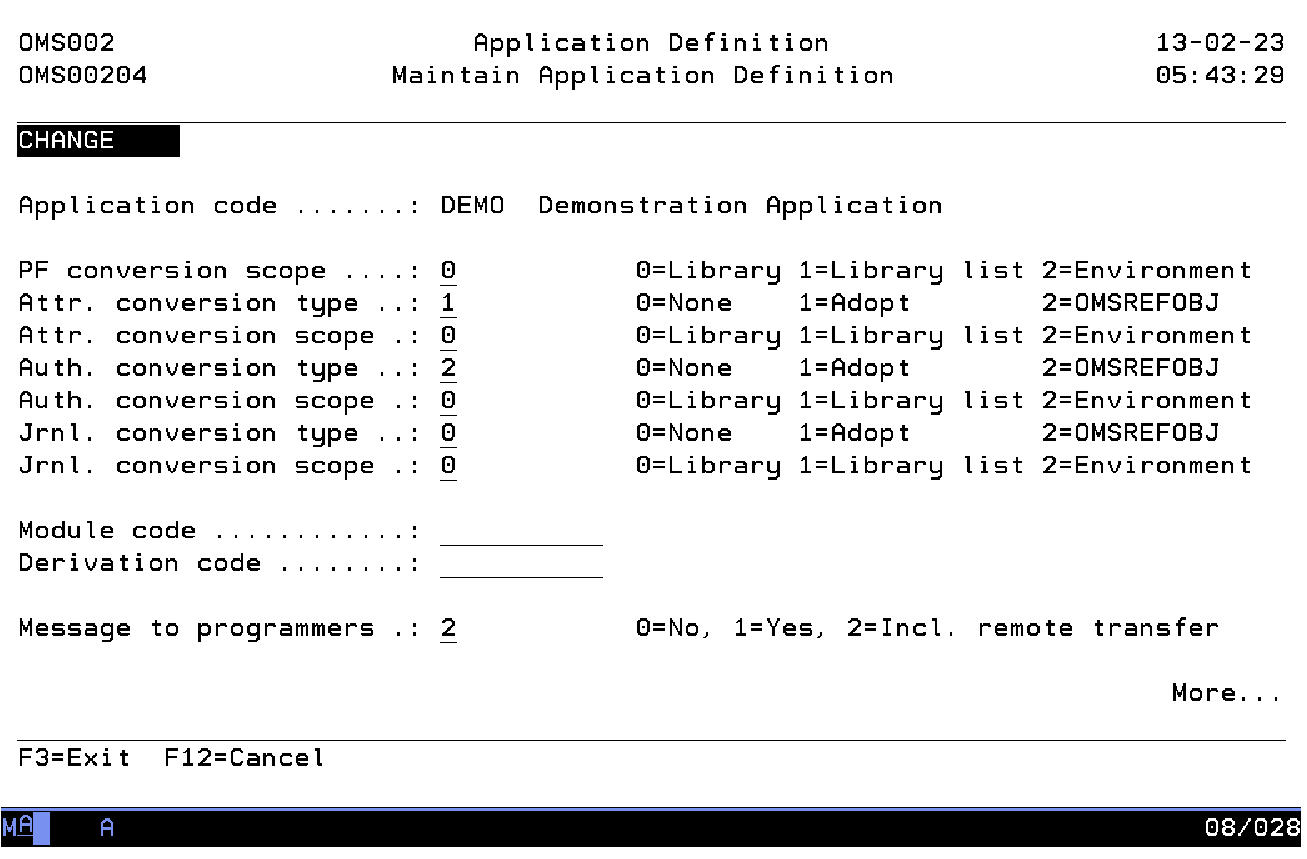
Data conversion scope
The data conversion scope is used to indicate where to search for a reference object if the data of a physical file has to be converted during Object Transfer. The default value is '0'. The possible values are:
- 0=Library
The data is only converted if the reference object exists in the library where the new object has to be created.
- 1=Library list
The data is only converted if the reference object exists in the library list where the new object has to be created. The libraries are searched in order of definition.
Note: The library list mentioned here is the TD library list as defined in the environment definitions.
- 2=Environment
The data is only converted if the reference object exists in the environment where the new object has to be created. The library lists are searched in order of definition.
Attribute conversion type
The attribute conversion type instructs Object Transfer what to do with the object attributes of an OS/400 object. Copying of the object attributes is only applicable for OS/400 objects with a prompt override program specified in the CHG.... command. The possible values are:
- 0=None
No additional copying of attributes is done, except for logical files, because objects are by default copied and thus the object attributes will also be copied.
The object attributes of the logical file in the source environment are copied to the newly created logical after compilation. This is because logicals are compiled instead of duplicated.
If the object is created by an exception at user exit point 5 the exception must also copy the object attributes.
- 1=Adopt
The attributes are copied from a reference object with same object code and object type in the target library, target library list or target environment, depending on the attribute conversion scope. The reference object 'OMSREFOBJ' will be used as if value '2' has been used if no equally named reference object can be found.
- 2=OMSREFOBJ
The attributes are copied from a reference object 'OMSREFOBJ' with same object type in the target library, target library list or target environment, depending on the attribute conversion scope.
No further processing is done for the attributes if object OMSREFOBJ cannot be found.
Attribute conversion scope
The attribute conversion scope is used to indicate where to search for a reference object if the attributes of an OS/400 object have to be changed during Object Transfer. The possible values are:
- 0=Library
The object attributes are only copied if the reference object exists in the library where the new object has to be created.
- 1=Library list
Attributes are copied if the reference object exists in the library list where the new object has to be created. The library lists are searched in order of definition.
Note: The library list mentioned here is the TD library list as defined in the environment definitions.
- 2=Environment
Attributes are copied if the reference object exists in the environment where the new object has to be created. The library lists are searched in order of definition.
Authority conversion type
The authority conversion type instructs Object Transfer what to do with the object owner and authority of an OS/400 object. Copying of the object owner and authorities is only applicable for OS/400 objects. The default value is '0'. The possible values are:
- 0=None
No additional copying of authority is done.
- 1=Adopt
The owner and authorities are copied from a reference object with same object code and object type in the target library, target library list or target environment, depending on the authority conversion scope.
The reference object 'OMSREFOBJ' will be used if no equally named object can be found. This is the same as code '2'.
- 2=OMSREFOBJ
The owner and authorities are copied from a reference object 'OMSREFOBJ' with type *DTAARA in the target library, target library list or target environment, depending on the authority conversion scope.
This data area 'OMSREFOBJ' can be created with TYPE(*CHAR) and LEN(1) and without contents.
No further processing is done for ownership and authorities if data area OMSREFOBJ cannot be found.
Authority conversion scope
The authority conversion scope is used to indicate where to search for a reference object if the owner and authorities of an OS/400 object has to be changed during Object Transfer. The default value is '0'. The possible values are:
- 0=Library
The authority is only copied if the reference object exists in the library where the new object has to be created.
- 1=Library list
The authority is copied if the reference object exists in the library list where the new object has to be created. The library lists are searched in order of definition.
Note: The library list mentioned here is the TD library list as defined in the environment definitions.
- 2=Environment
The authority is copied if the reference object exists in the environment where the new object has to be created. The library lists are searched in order of definition.
Journal conversion type
The journal conversion type instructs Object Transfer what to do about journaling of an OS/400 physical file. The default value is '0'. The possible values are:
- 0=None
Physical files will not be journalled automatically.
- 1=Adopt
The physical file will be journalled in the same way as a reference physical file in the target library, target library list or target environment, depending on the journal conversion scope.
A reference physical file 'OMSREFOBJ' will be used if no equally named reference object can be found as if value '2' has been used.
- 2=OMSREFOBJ
The physical file will be journalled in the same way as a reference physical file with the name 'OMSREFOBJ' in the target library, target library list or target environment, depending on the journal conversion scope.
The physical file will not be journalled automatically if no 'OMSREFOBJ' object can be found.
Journal conversion scope
The journal conversion scope is used to indicate where to search for a reference object if a physical file has to be checked for journalling during Object Transfer. The default value is '0'. The possible values are:
- 0=Library
Journalling of the physical file is only done if the reference object exists in the library where the new object has to be created.
- 1=Library list
Journalling of the physical file is done if the reference object exists in the library list where the new object has to be created. The library lists are searched in order of definition.
Note: The library list mentioned here is the TD library list as defined in the environment definitions.if the reference object.
- 2=Environment
Journalling of the physical file is done if the reference object exists in the environment where the new object has to be created. The library lists are searched in order of definition.
Module code
The module code is not applicable at this time.
Derivation code
The derivation code is not applicable at this time.
Message to programmer
The message to programmer specifies if a programmer has to be informed if a fix, which has been assigned to her/him, is changed by another user. The default value is '0'. The possible values are:
- 0=No
No messages will be sent to the programmer.
- 1=Yes
The programmer will receive a message if another user adds a new Fix with his name specified as programmer, or if another user starts Object Transfer for a Fix, with his or her name specified, to or from the development environment.
- 2=Incl. remote transfer
The programmer will additionally receive a message when a transfer to production is performed on a remote system.
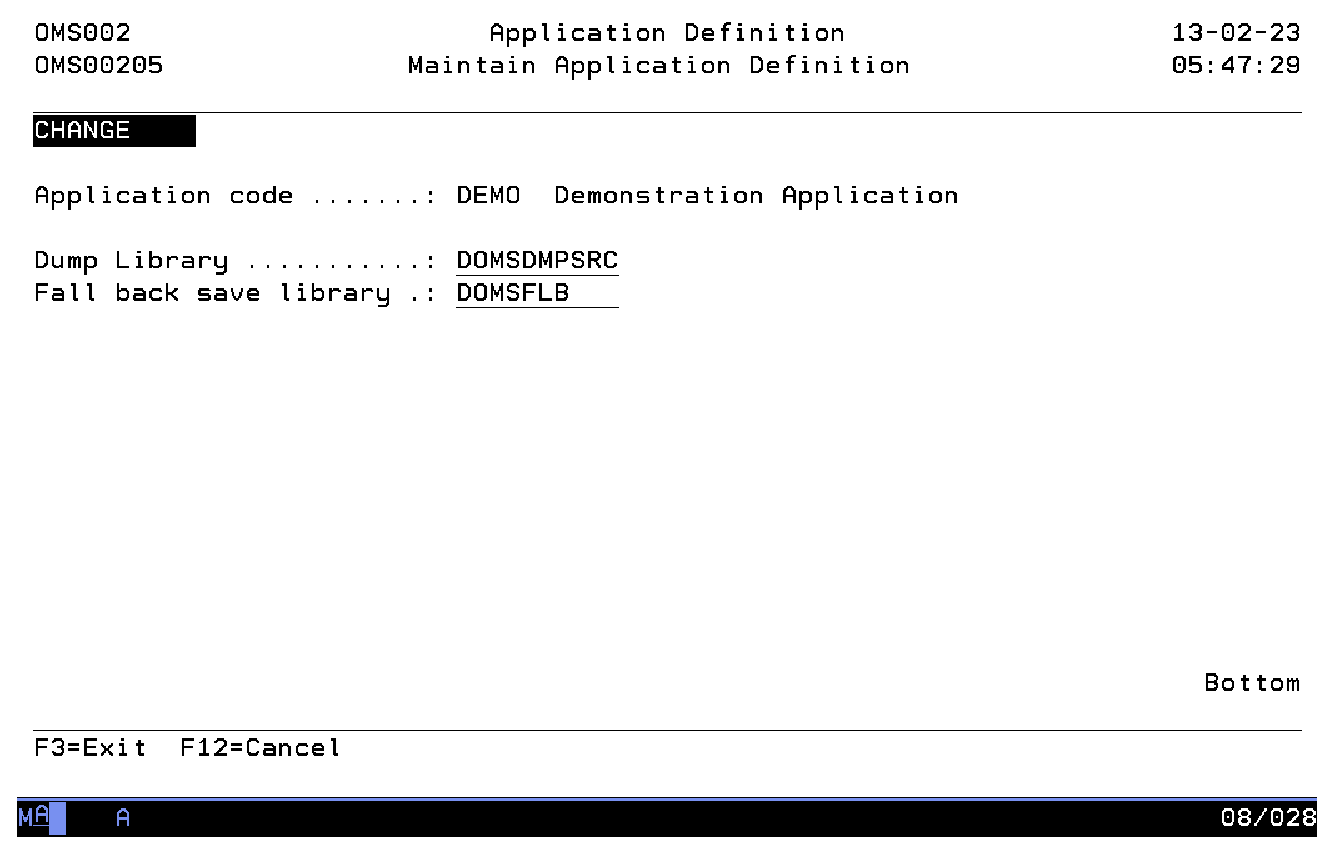
Dump library
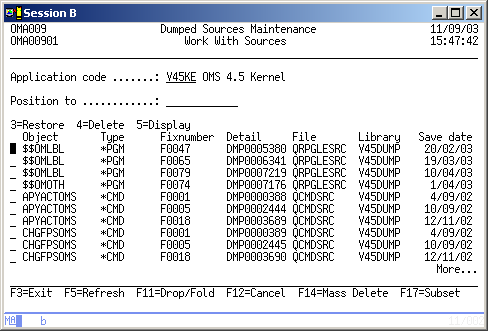
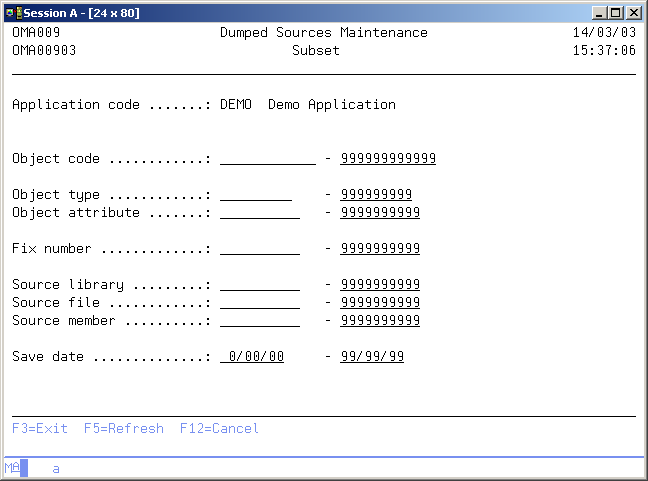
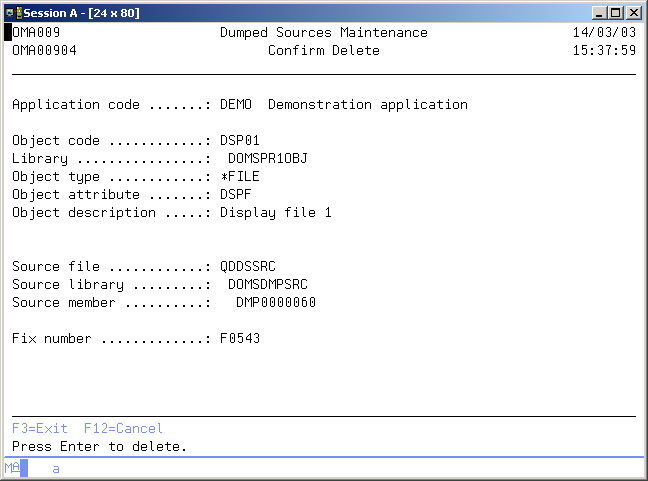
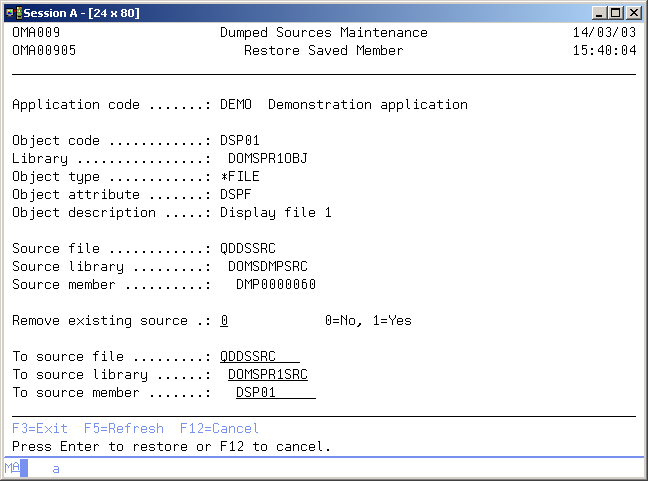
The source archive library is a valid OS/400 library name in which TD/OMS saves the old source if an object or source member is moved or copied from the production environment. Old sources will not be saved if the name of this library is blank. The necessary source files are automatically created by TD/OMS and a unique member name is generated. The saved information is logged and can be accessed by using the Dumped Sources Maintenance function.
Fall back save library
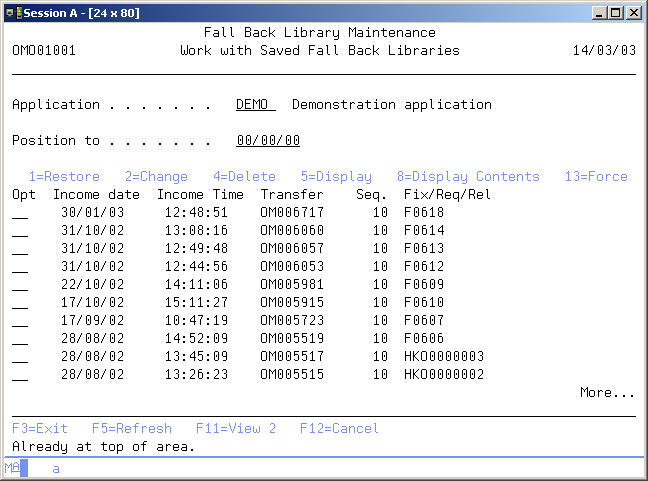
The fall back save library is a valid OS/400 library name and is defined in the Application definition function. Leave this field blank if you do not wish to use fall back options.
If a valid library name is entered TD/OMS will use this library to store the savefiles with the replaced objects. The library list definitions determine if replaced objects are to be saved.
Copy Application Definition
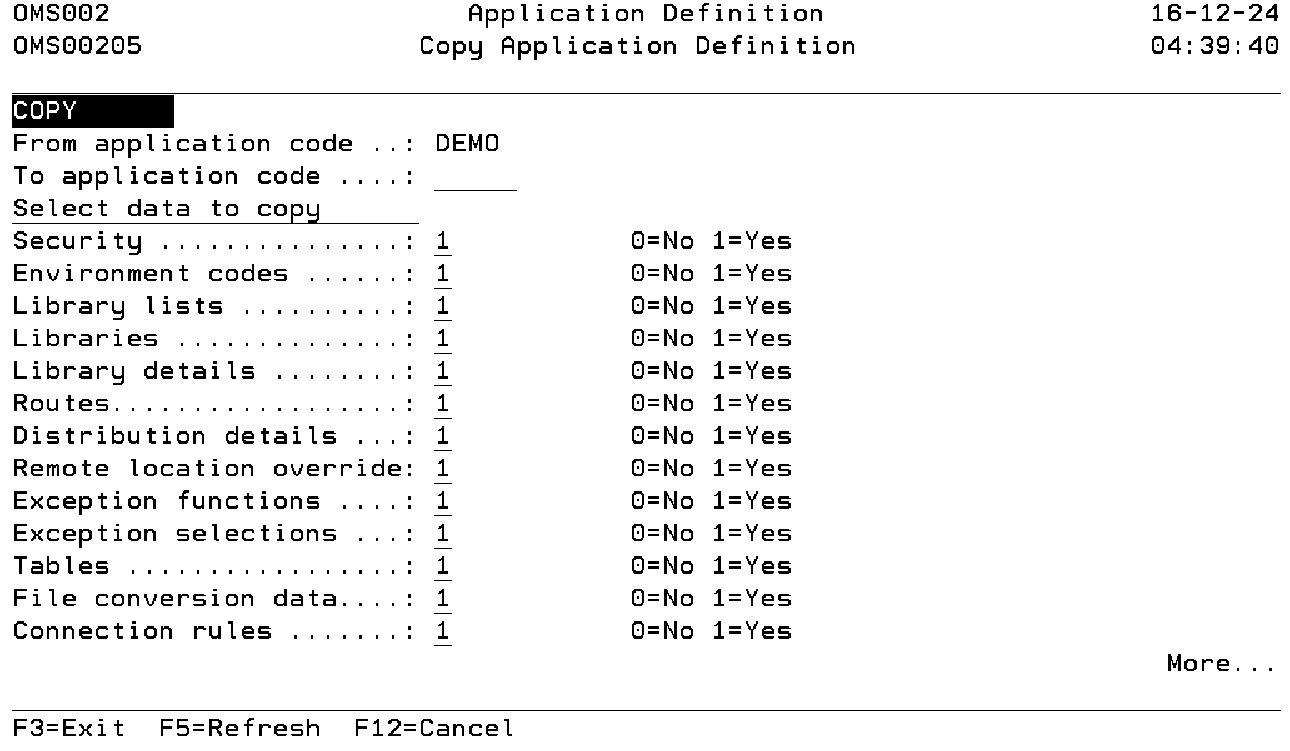
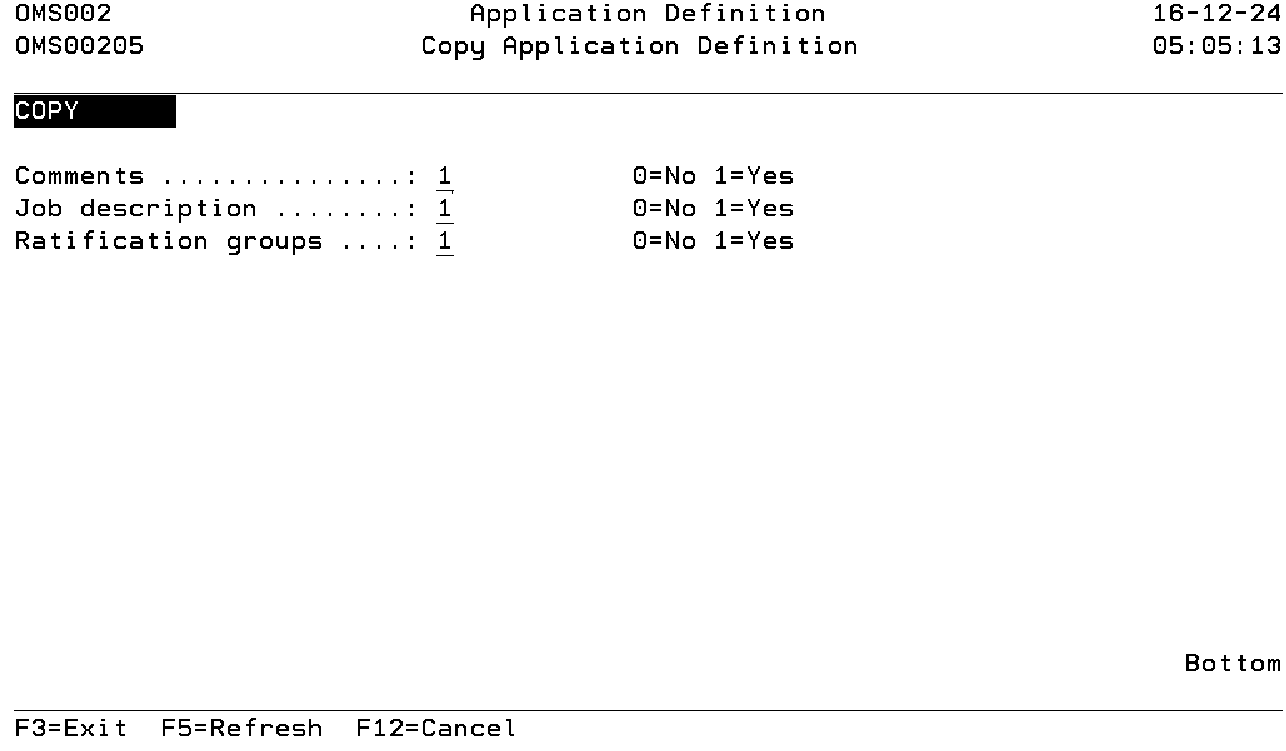
The Copy Application definition function enables you to add an application definition using an existing application as a base for copying. The application attributes of the base application are always copied to the new application. Other descriptions can be selected to copy.
Copying of applications is useful if the extended descriptions of the new application has a lot in common with the application used as a base. You can also create a template application which will be used as a base for other applications.
Note: Don't forget to change the newly created application once it is copied.
Target application code
Use this prompt to enter the application code to be created. Refer to the description of Application code for a detailed description.
Security
Use this field to indicate that the user authority definitions have to be copied. Select value '1' to include these definitions. Select value '0' to exclude them.
Environment codes.
Use this field to indicate that the environment definitions have to be copied. Select value '1' to include these definitions. Select value '0' to exclude them.
Note: Copying of environments also include the security definitions per environment.
Library lists
Use this field to indicate that the library list definitions have to be copied. Select value '1' to include these definitions. Select value '0' to exclude them.
Libraries
Use this field to indicate that the library definitions have to be copied. Select value '1' to include these definitions. Select value '0' to exclude them.
Library details
Use this field to indicate that the library detail definitions have to be copied. Select value '1' to include these definitions. Select value '0' to exclude them.
Routes
Use this field to indicate that the Route definitions have to be copied. Select value '1' to include these definitions. Select value '0' to exclude them.
Distribution details
Use this field to indicate that the distribution list definitions have to be copied. Select value '1' to include these definitions. Select value '0' to exclude them.
Remote location override
Use this field to indicate that the remote location override definitions have to be copied. Select value '1' to include these definitions. Select value '0' to exclude them.
Exception functions
Use this field to indicate that the exception function definitions have to be copied. Select value '1' to include these definitions. Select value '0' to exclude them.
Exception selections
Use this field to indicate that the exception selection definitions have to be copied. Select value '1' to include these definitions. Select value '0' to exclude them.
Tables
Use this field to indicate that the table definitions have to be copied. Select value '1' to include these definitions. Select value '0' to exclude them.
File conversion data
Use this field to indicate that the file conversion definitions have to be copied. Select value '1' to include these definitions. Select value '0' to exclude them.
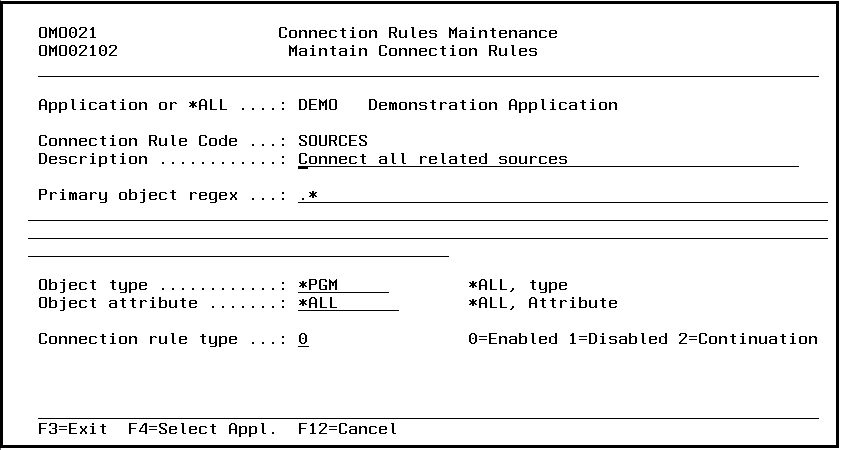
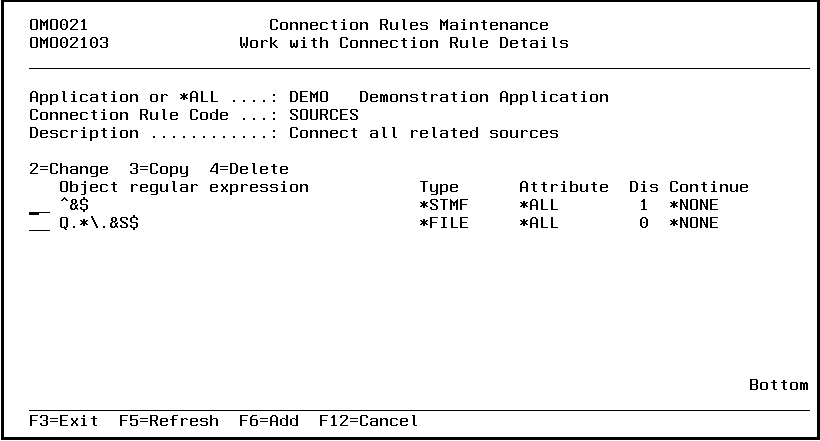
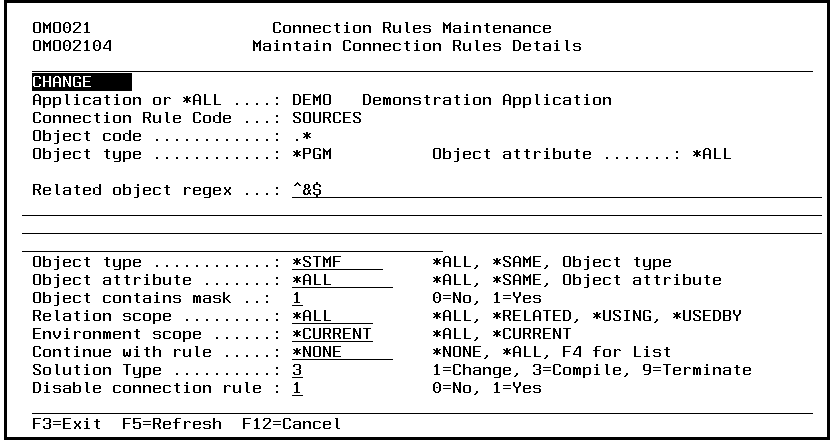
Connection rules
Use this field to indicate that the application specific Connection rule definitions have to be copied. Select value '1' to include these definitions. Select value '0' to exclude them.
Comments
Use this field to indicate that the application specific comments have to be copied. Select value '1' to include these. Select value '0' to exclude them.
Job description
Use this field to indicate if the job descriptions have to be copied. Select value '1' to include these definitions. Select value '0' to exclude them.
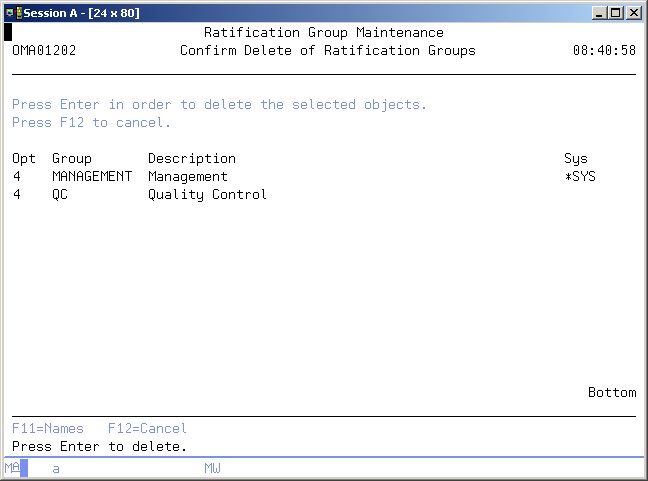
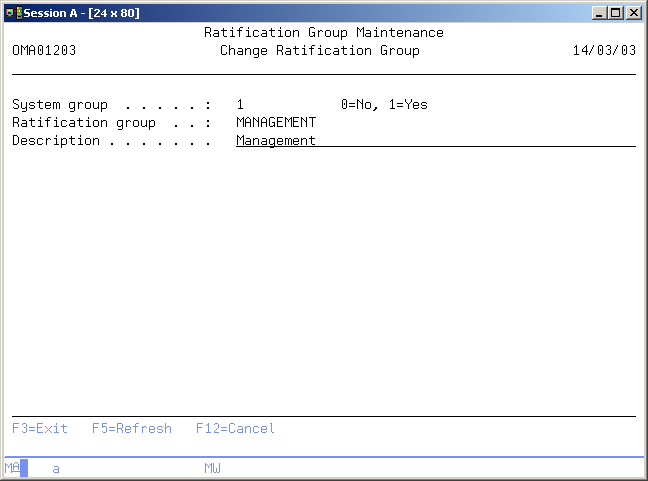
Ratification groups
Use this field to indicate if ratification groups have to be copied. Select value '1' to include these definitions. Select value '0' to exclude them.
Command Start Application Definition (STRAD)
This menu command starts the application definition function. Refer to the description of the function Application Definition for a detailed description.
STRAD
This command has no parameters.
Application Interface Maintenance (STRAIM)
The Application Interface Maintenance function enables you to define a more complex application structure. Examples of these complex structures are given at the end of this section.
In a simple application definition you can define a maintenance cycle and an optional emergency environment. With the definition of these application links however you can:
- Define a second cycle
- Define derived versions per country
- Define a new version or release as an application
Do not use this function if objects of one application are using objects of another application. These kind of interfaces do not require a complex application structure.
Users belonging to the group *SECOFR or *SECADM and the TD/OMS manager are allowed to use this function.
The definition of one entry between two applications will influence the following functions:
- Object Maintenance
In Object Maintenance you can change your subset in order to include objects of applications from which you are allowed to import, in a collapsed or expanded view.
- Solution Maintenance
In Solution Maintenance you can change your subset in order to include objects of applications from which you are allowed to import, in a collapsed or expanded view.
The TD/OMS locking mechanism of objects, to prevent dual maintenance, is only in effect within one application. A derived application is able to connect an object to a fix if the same object is connected to another fix on the other application. The managing of possible conflict of changes is done at Object Transfer level.
- Object Transfer
If an object is transferred to a development environment, all application managers of each derived application will receive a message indicating that the based-on object is to be changed.
If an object is moved to the highest (production) environment the based-on version number is checked against the current based-on version number of the object to be replaced. If these version numbers do not match, a confirmation window is shown in order to accept the version conflicts.
If an object is moved to the highest (production) environment, again all application managers of each derived application will receive a message indicating that a based-on object has been changed.
In the following paragraph you will find an example for each kind of application structure.
Define a second cycle or a branch
Two separate application definitions are used for describing a cycle. The links between these application are registered using this Function. Once the link has been established the two applications are logically merged at the linked environments. The environments DEV1, TEST1 and PROD are defined in one application in the figure below. The environments DEV2, TEST2 and again PROD are defined in another application. The two applications can be managed as one logical application by defining a bi-directional link between the two applications at the production level. This definition tells TD/OMS that these two environments are to be seen as one logical environment.
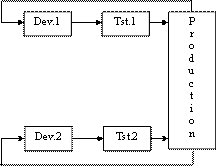
The definition of this example is as follows:
Import Application    Export Application
APP1 *PROD            APP2 *PROD LIB1
APP1 *PROD            APP2 *PROD LIB2
APP2 *PROD            APP1 *PROD LIB1
APP2 *PROD            APP1 *PROD LIB2
In this example you specify that the production libraries LIB1 and LIB2 belong to both the application APP1 and APP2.
Define a new version or PTF cycle or a Fork
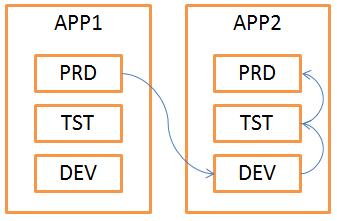
Two or more separate application definitions are linked together to form a downstream import. Once the link has been established the old version application is linked as an upstream application and the new version application is linked as a downstream application. The environments DEV, TEST and PROD are defined in both applications but we only link production. This definition tells TD/OMS that objects from application APP1 can be imported in application APP2. If an object is already imported in APP2 but is changed in APP1, APP2 can be notified of this change. We have several advanced functions available in the GUI which we call Application Crossing.
The definition of this example is as follows:
Import Application    Export Application
APP1 *PROD            APP2 *PROD LIB1
APP1 *PROD            APP2 *PROD LIB2
In this example you specify that the production libraries LIB1 "belong" to both the application APP1 and APP2.
Define derived versions per country
The original objects and derived versions are stored in separate applications. The derived application is allowed to import objects from the original application if changes for a specific country or department have to be made.
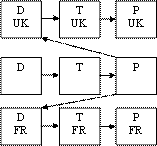
The environments D, T and P are defined in one application, containing all standard objects in the figure below. The environments DUK, TUK and PUK are defined in a separate application, containing only changed objects for the UK customers. Application UK is allowed to import objects from the general application. The same goes for a French version of the same application.
The definition of this example is as follows:
Import Application    Export Application
APUK *PROD            APPL *PROD LIB1
APUK *PROD            APPL *PROD LIB2
APFR *PROD            APPL *PROD LIB1
APFR *PROD            APPL *PROD LIB2
In this example you specify that the production libraries LIB1 and LIB2 belong to the applications APPL (the core application), APUK and APFR (the British and French alterations). The country specific changes are stored in separate production libraries. These are not defined here.
Define a new version or release as an application
You can define each release as an application and register the newest release as a derived version of the previous release. This is useful if you start working on a new release but you must also be able to maintain the old release.
The definition of this example is as follows:
Import Application    Export Application
V4R0 *PROD            V3R0 *PROD LIB3
V3R0 *PROD            V2R0 *PROD LIB2
V2R0 *PROD            V1R0 *PROD LIB1
This example shows four versions of the same application. These applications are named V1R0 to V4R0. Application V1R0 has library LIB1 as the production library, V2R0 has LIB2 and V3R0 has LIB3. These specifications describe that application V2R0 is able to import objects from V1R0. The production library LIB1 is added to the production environment of application V2R0. V2R0 can only import from this library. It can not place objects into it. The same is true for the other import applications.
Work with Application Interfaces
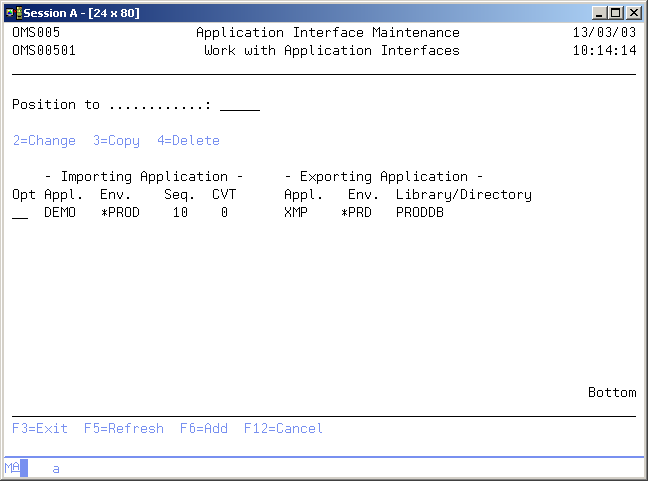
The Work with Application Interfaces display shows the currently defined application interfaces for the application you are working in. You can add an application interface to the list, remove an application interface from the list and change the attributes of an existing application interface.
Position to
Use this prompt to go to a particular application area in the list.
Option
Use this column to perform different operations on individual entries. The possible values are:
- 2=Change
Change the attributes of the application interface. - 3=Copy
Enter ADD mode with the attributes of the selected interface record. - 4=Delete
Delete the entry from the list. - F6=Add
Specify a new application interface.
Maintain Application Interface
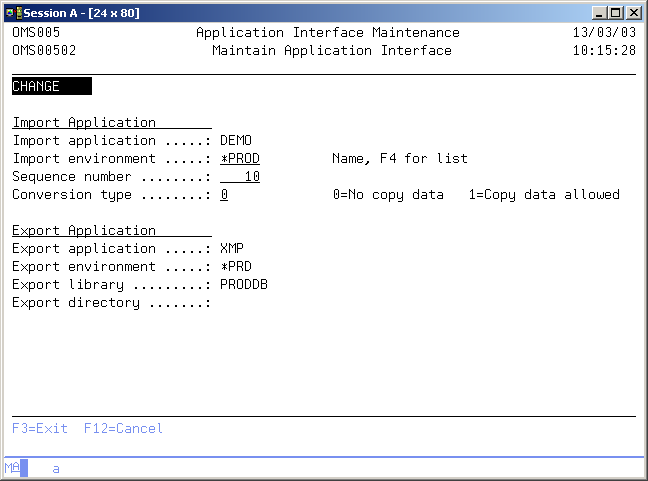
The Maintain Application Interface display shows information and enables actions depending on the option chosen on the previous display. The chosen action on the previous display is shown on line four. The following actions can be activated;
- Add
You can add a new entry definition. The import application and the export application must be entered. - Change
You can change the attributes of an existing entry definition. The current attributes are shown. The target environment code, the sequence number and the conversion type can be changed. - Delete
The current entry and its attributes is shown, including a delete confirmation message.
For online information about a specific attribute move the cursor to the attribute area and press Help.
Import Application
The import application element is used in the function Application Interface Maintenance to register the application code which is able to import objects from another application code. The import application must be an existing application code.
Use F4=List to get a list of the available application codes.
Import Environment
The Import Environment is the environment code of the Import Application which is linked to the Export Environment of the Export Application. The Import Environment must be an existing environment in the Import Application.
Use F4=List to get a list of the valid environment codes.
Interface Sequence number
The Interface Sequence number is registered in the function Application Interface Maintenance and is used in the function Object Maintenance to influence the order of appearance of the objects. Objects with the lowest sequence number are shown first, objects with the highest sequence number are shown last.
- *NEXT
Use this value to allocate the next sequence number. It will increment by 10 or round off to the nearest multiple of 10.
Conversion Type
The conversion type in the function Application Interface Maintenance is used to indicate if physical files can be imported with or without their data. The possible values are:
- 0=No copy Data
Use "0" if you do not allow copying of data from any data files from the export application into the import application. - 1=Copy data allowed
Use "1" if you allow copying of data from any data files from the export application to the import application.
Export Application
The export application element is used in the function Application Interface Maintenance to register the application code from which objects can be exported to other applications. The export application must be an existing application code.
Use F4=List to get a list of the valid application codes.
Export Environment
The Export Environment is the environment code of the Export Application which is linked to the Import Environment of the Import Application. The Export Environment must be an existing environment in the Export Application.
Use F4=List to get a list of the valid environment codes.
Exporting Library
The Exporting Library is a valid library name which is part of the export environment in the export application. Only objects in libraries defined as an export library can be imported by other applications.
Use F4=List to get a list of the valid libraries.
Exporting Directory
The Exporting Directory is a valid directory name which is part of the export environment in the export application. Only objects in directories defined as an export directory can be imported by other applications.
Use F4=List to get a list of the valid directories.
Note: You cannot specify an exporting directory together with an exporting library.
Command Start Application Interface Maintenance (STRAIM)
This menu command starts the application interface maintenance function. Refer to the description of the function Application Interface Maintenance for a detailed description.
STRAIM
This command has no parameters.
Folder Library Definition
The Folder Library Definition function is used to define a logical library name for an OS/400 folder. TD/OMS uses the logical library name instead of the real folder name because folders can have large path names (like FOLD1/FOLD3/FOLD4).
In order to store documents in TD/OMS you first have to define these Folder Libraries, each representing an OS/400 folder. Once the Folder Library is defined, it can be used in all TD functions as if it were a normal OS/400 library.
Note: Do not use OS/400 library names as folder libraries to avoid conflicts.
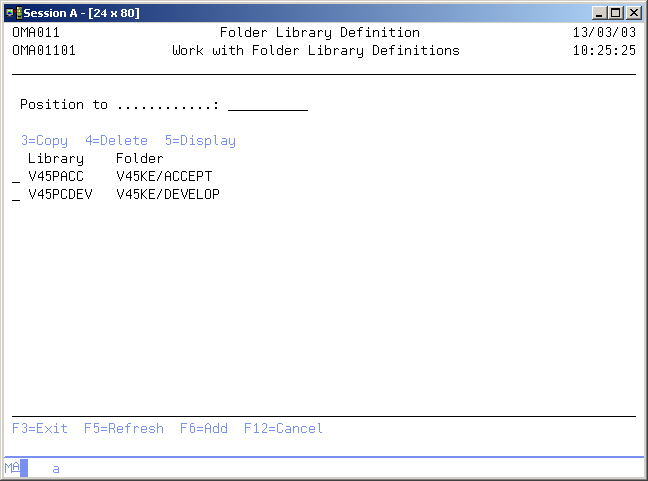
Work with Folder Libraries
The Work with Folder Library Definitions display shows the currently defined folder libraries and their related folder. To select an option, type the option number in the option field area and press Enter.
Position to
Use this prompt to go to a particular logical library in the list.
Option
Use this column to perform different operations on individual entries. The possible values are:
- 3=Copy
Copy to add a new folder library definition using an existing definition as a base. - 4=Delete
Remove an existing folder library definition. Deletion of a folder library is only allowed when the folder library is not being used in the function environment maintenance. - 5=Display
Get more detailed information about the folder library. - F6=Add
Add a new occurrence of the entity.
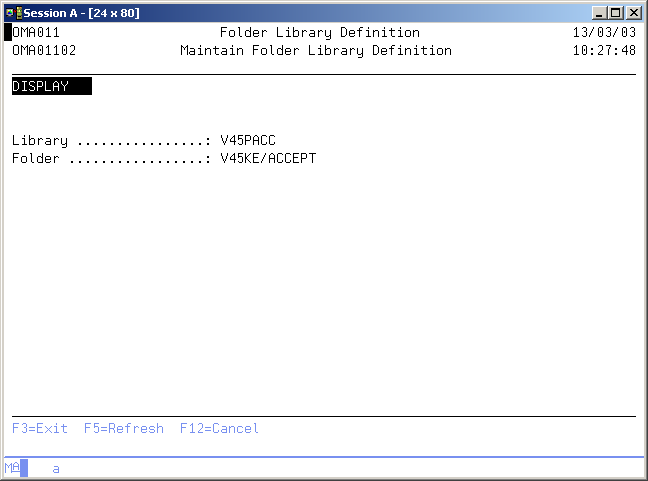
Maintain Folder Library
The Maintain Folder Library Definition display shows information and enables actions depending on the option chosen on the previous display. The chosen action on the previous display is shown on line three. The following modes can be activated:
- Add
You can add a new folder library definition. The logical library and folder name must be entered. Both fields are pre-filled with the values of the selected item if the copy action has been used. - Delete
The current logical library is shown, including a confirmation message. Deletion of logical library definitions is only allowed if no related information is stored in the TD database. - Display
The current logical library and its attributes are shown.
Note: For online information about a specific attribute move the cursor to the attribute area and press Help.
Library
Enter a name which logically describes the folder to use.
Folder code
The folder code is defined in the function Folder library Definition, and contains the OS/400 folder name. The folder must exist.
Command Start Folder Library Definition (STRFLD)
This menu command starts the folder library definition function. Refer to the description of the function Folder Library Definition for a detailed description.
STRFLD
This command has no parameters.
4GL Library Definition
The 4GL Library Definition function is used to define a logical library name for 4GL objects. In order to store 4GL objects in TD/OMS you first have to define these Logical Libraries, each representing the location where the 4GL objects can be found. Once the Logical Library is defined, it can be used in all TD functions as if it were a normal OS/400 library.
Note: Do not use OS/400 library names as logical libraries.
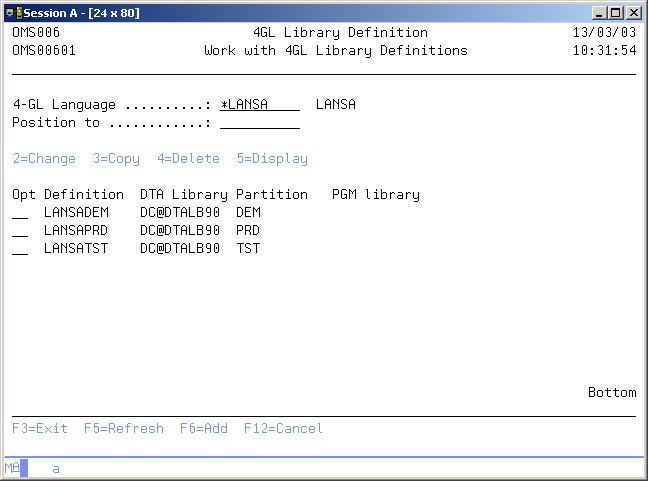
Work with 4GL Library Definitions
The Work with 4GL Library Definitions display shows the currently defined 4GL libraries and their related elements. To select an option, type the option number in the option field area and press Enter.
4GL name
The 4GL name can be defined in Application Definition, indicating that the specified 4GL or Case tool is used, possibly in combination with 3GL compilers. Defining a 4GL name enables you, in general, to register 4GL objects in TD/OMS and handle them like OS/400 objects. Specific information about the functions per 4GL / Case tool are described in the relevant interface manual.
Note: You will need the TD interface module in order to work with the 4GL objects.
Use F4=List to get a list of the available 4GL interfaces.
Position to
Use this prompt to go to a particular logical library in the list.
Option
Use this column to perform different operations on individual entries. The possible values are:
- 2=Change
Change the contents or certain attributes of a 4GL library. - 3=Copy
Add a new 4GL library and at the same time copy one or more parts of the extended definition of a 4GL library. - 4=Delete
Delete the 4GL library definition. - 5=Display
Display the 4GL library definition. - F6=Add
Add a new occurrence of the entity.
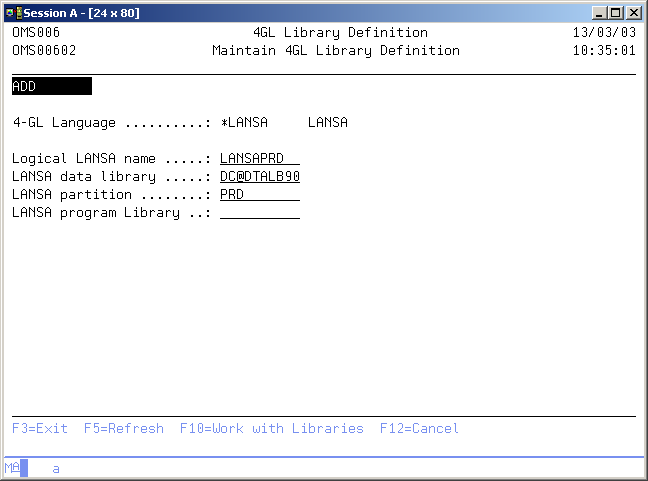
Maintain 4GL Library Definition
The Maintain 4GL Library Definition display shows information and enables actions depending on the option chosen on the previous display. The chosen action is shown on line three. The following modes can be activated:
- Add
You can add a new 4GL library definition. The logical library and its specifications must be entered. ll fields are prefilled with the values of the selected item if the copy action has been used. - Delete
The current logical library is shown including a confirmation message. Deletion of logical library definitions is only allowed if no related information is stored in the TD database. - Display
The current logical library and its attributes are shown.
Note: For online information about a specific attribute move the cursor to the attribute area and press Help.
4GL Model code
The 4GL Model code is a logical name. It is to be used in the TD definitions and represents several identifying elements of the selected 4GL or Case tool. Each 4GL or Case tool has its information stored in a different manner. For OS/400 objects each object can be identified by the object code, object type and object library. In order to achieve the same unique identification of model objects the 4GL Model code represents information of a model object which identifies its physical location. The display will show the necessary elements for specification depending on the selected 4GL. Refer to your TD 4GL Interface manual for more detailed information about the specifics of each 4GL.
4GL definitions
The description and contents of this element depends on the selected 4GL / Case tool. This element is defined in the 4GL Library Definition function. Refer to your TD 4GL Interface manual for more detailed information about the specifics of each element per 4GL.
Command Start 4GL Library Definition (STRLLM)
This menu command starts the 4GL library definition function. Refer to the description of the function 4GL Library Definition for a detailed description.
STRLLM
This command has no parameters.
Registry Definition Maintenance
The Registry Definition function (STRRDM) enables you to work with the registry definitions.
Registry definitions can be added, copied, changed, deleted or viewed.
Users belonging to the user class *SECOFR, *SECADM or the TD/OMS manager (group) are allowed to use this function.
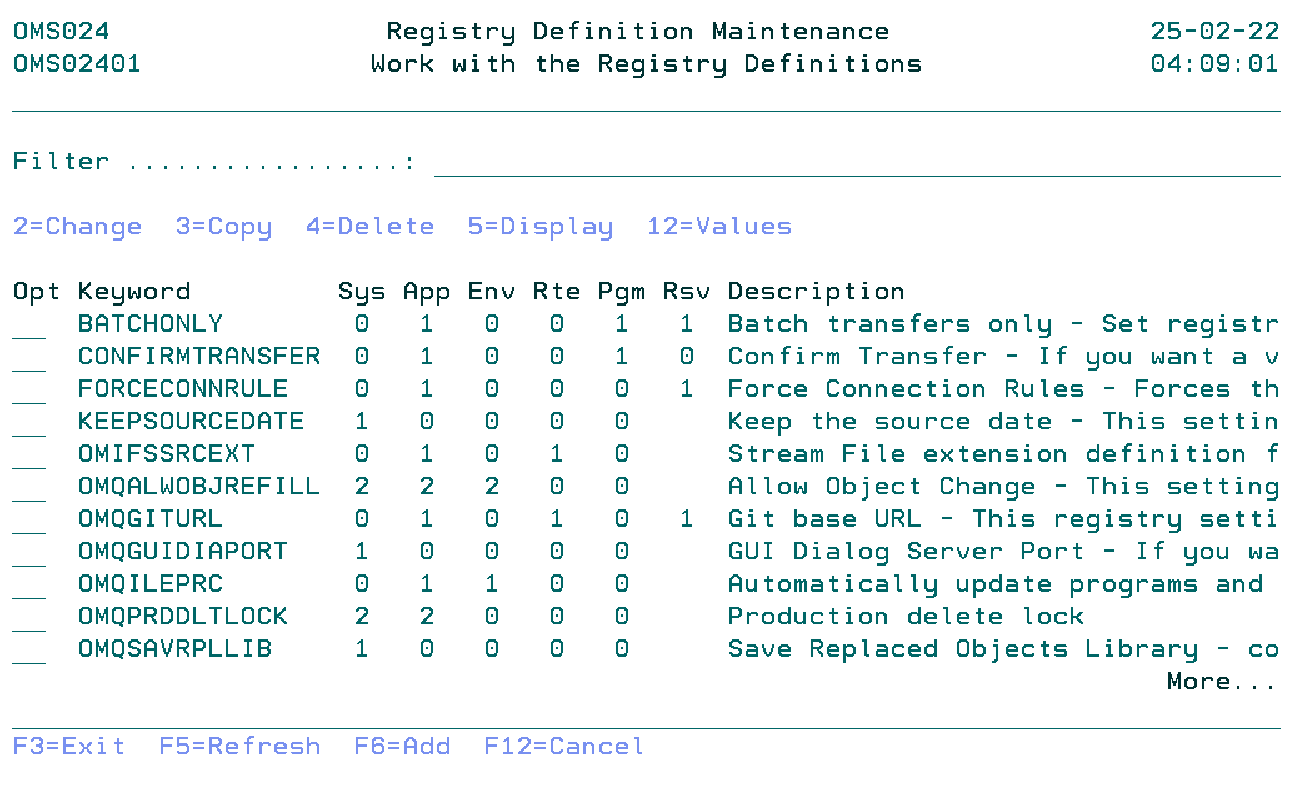
Work with the Registry Definitions
The Work with Registry Definitions display shows the currently defined registry keywords, including their main parameters. To select an option, type the option number in the option field area and press Enter. For more information about an option move the cursor to the option column and press Help. For more information about a function key, move the cursor to the function key area and press Help.
Filter
The Filter prompt allows for quick filtering of the list.
Option
Use this column to perform different operations on individual entries.
- 2=Change
- Change the registry definition keyword.
- 3=Copy
- Copy the registry definition keyword.
- 4=Delete
- Remove registry definition keyword.
- 5=Display
- Display the information of the registry definition keyword.
- 12=Values
- Work with registry definition keyword values.
- F6=Add
- Add a new registry definition keyword.
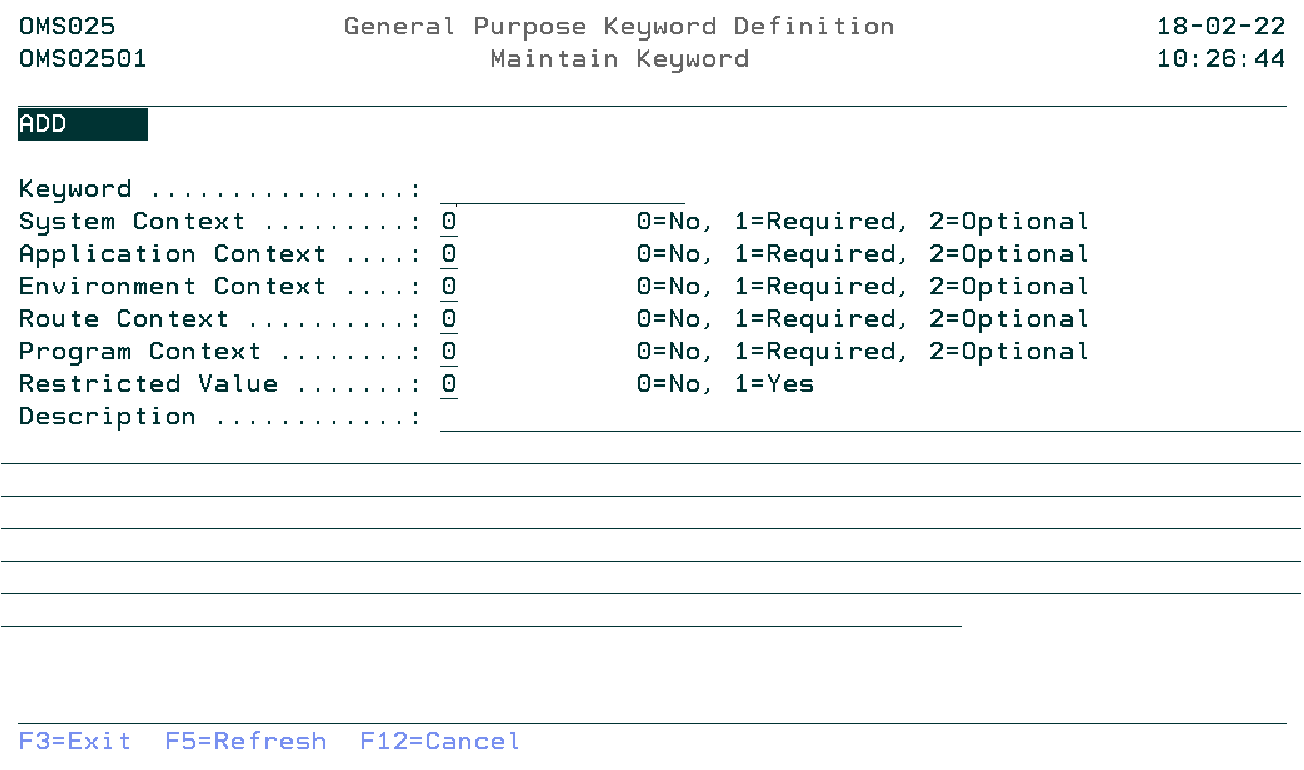
Maintain Keyword
The Maintain Keyword display shows information and allows actions depending on the option chosen on the previous display. The chosen action on the previous display is shown on line three. The following modes can be activated:
- *Add
- A new registry definition keyword is being added.
- *Change
- Change the attributes of an existing keyword.
- *Copy
- Copy the attributes of an existing keyword to a new keyword. The current values are shown.
- *Delete
- You are about to delete an existing keyword. The current values are shown.
- *Display
- Shows the attributes of an existing keyword.
Keyword
Specify the registry definition keyword. The blank value or a already existing keyword is not allowed.
System Context Indicator
Determines if context values can be specified (2=Optional), must be specified (0=Not required) or can not be specified (1=Required) when adding a registry keyword. Entering a 1 for the System context means that all other context related indicators must be 0.
Application Context Indicator
Determines if context values can be specified (2=Optional), must be specified (1=Required) or can not be specified (0=Not required) when adding a registry keyword.
Environment Context Indicator
Determines if context values can be specified (2=Optional), must be specified (1=Required) or can not be specified (0=Not required) when adding a registry keyword.
Route Context Indicator
Determines if context values can be specified (2=Optional), must be specified (1=Required) or can not be specified (0=Not required) when adding a registry keyword.
Program Context Indicator
Determines if context values can be specified (2=Optional), must be specified (1=Required) or can not be specified (0=Not required) when adding a registry keyword.
Restricted Value Indicator
Specifying a 0 means that any combination of characters is allowed when adding a registry keyword. The description may contain instructions on the required format (eg comma separated). The value entered must match with a pre-defined value in case of a 1.
Description
Explanation of the purpose of this keyword. Examples and dependancies on other keywords will be described here.
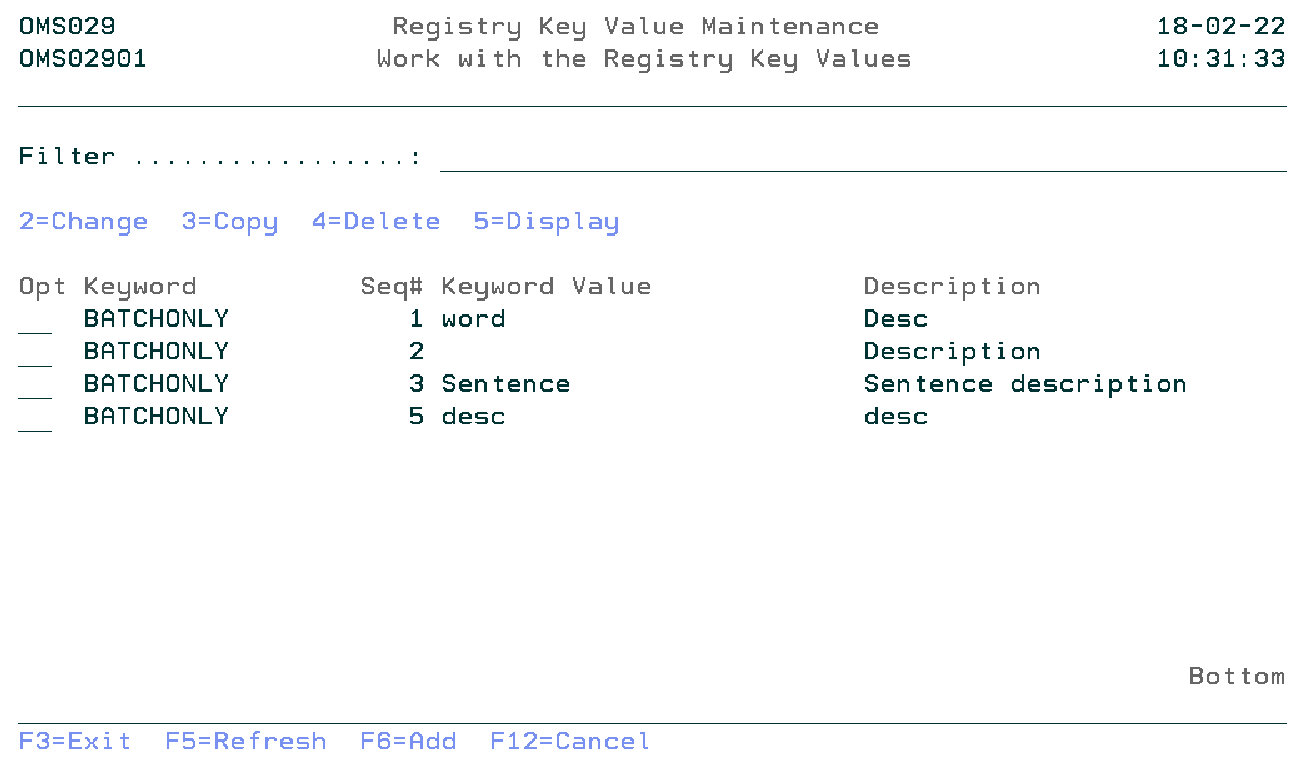
Work with the Registry Definition Key Values
The Work with the Registry Key Values display shows the list of values of the selected Registry Definition keyword (option 12 on the previous display). Entries can be Added, Copied, Changed, Deleted, and Viewed.
Filter
The Filter prompt allows for quick filtering of the list.
Option
Use this column to perform different operations on individual entries. Type the option number next to an entry and press Enter.
- 2=Change
- Change the registry keyword value.
- 3=Copy
- Copy the registry keyword value.
- 4=Delete
- Remove registry keyword value.
- 5=Display
- Display the information of the registry keyword value.
- F6=Add
- Add a new registry keyword value.
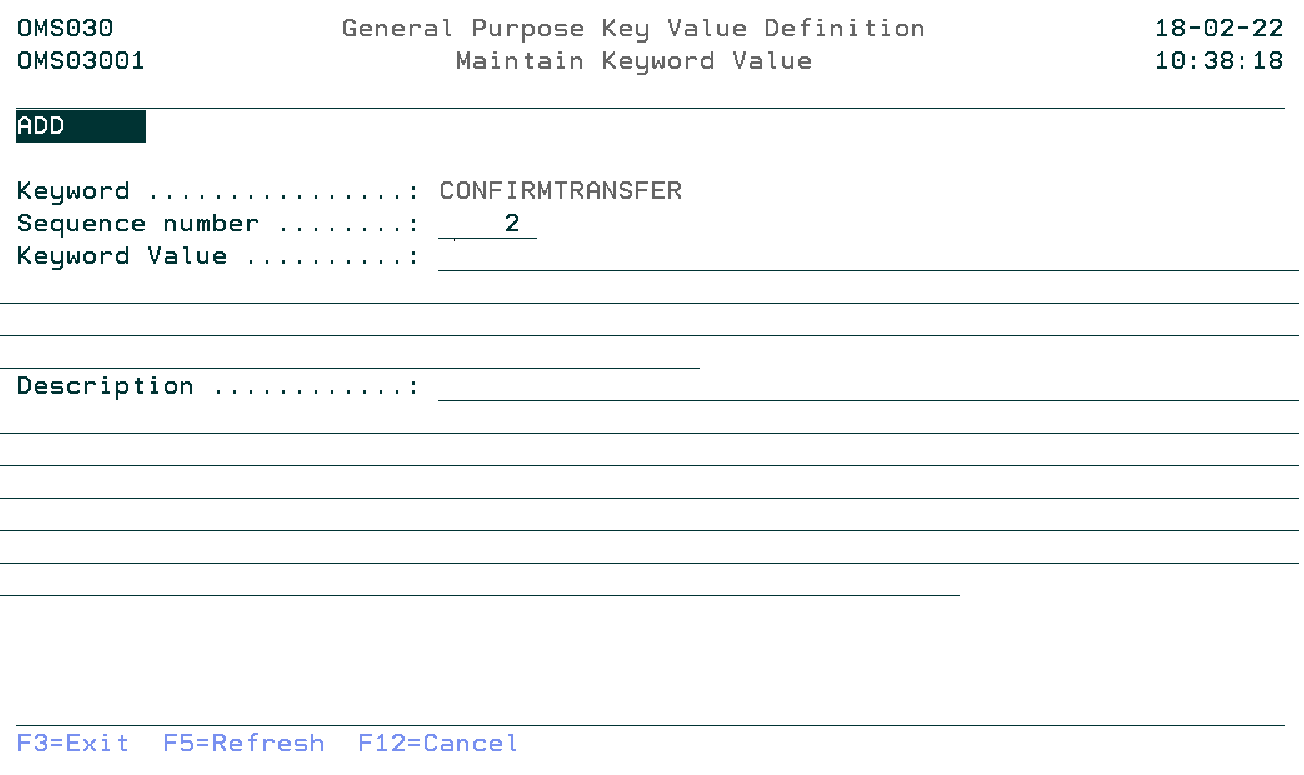
Maintain Keyword Value
The Maintain Keyword Value display shows information and allows actions depending on the option chosen on the previous display. The chosen action on the previous display is shown on line three. The following modes can be seen:
- Add
- Adding a registry keyword Value.
- Change
- Change the attributes of an existing keyword value. The current values are shown.
- Copy
- The attributes of an existing keyword value are being copied to a new value. The current values are shown.
- Delete
- Delete the attributes of an existing keyword value. The current values are shown.
- Display
- The attributes of an existing keyword value are shown.
Keyword
The keyword for the value. Display only
Sequence number
The sequence number controls the display of the values in the list. A value from 99999- until 99999 is allowed
Keyword Value
The registry definition keyword value.
Description
The clarification of the meaning of the registry definition keyword value.
Command Start Registry Definition Maintenance (STRRDM)
This menu command starts the registry definition maintenance function. Refer to the description of the function Registry Definition maintenance for a detailed description.
STRRDM
This command has no parameters.
Application Registry Maintenance
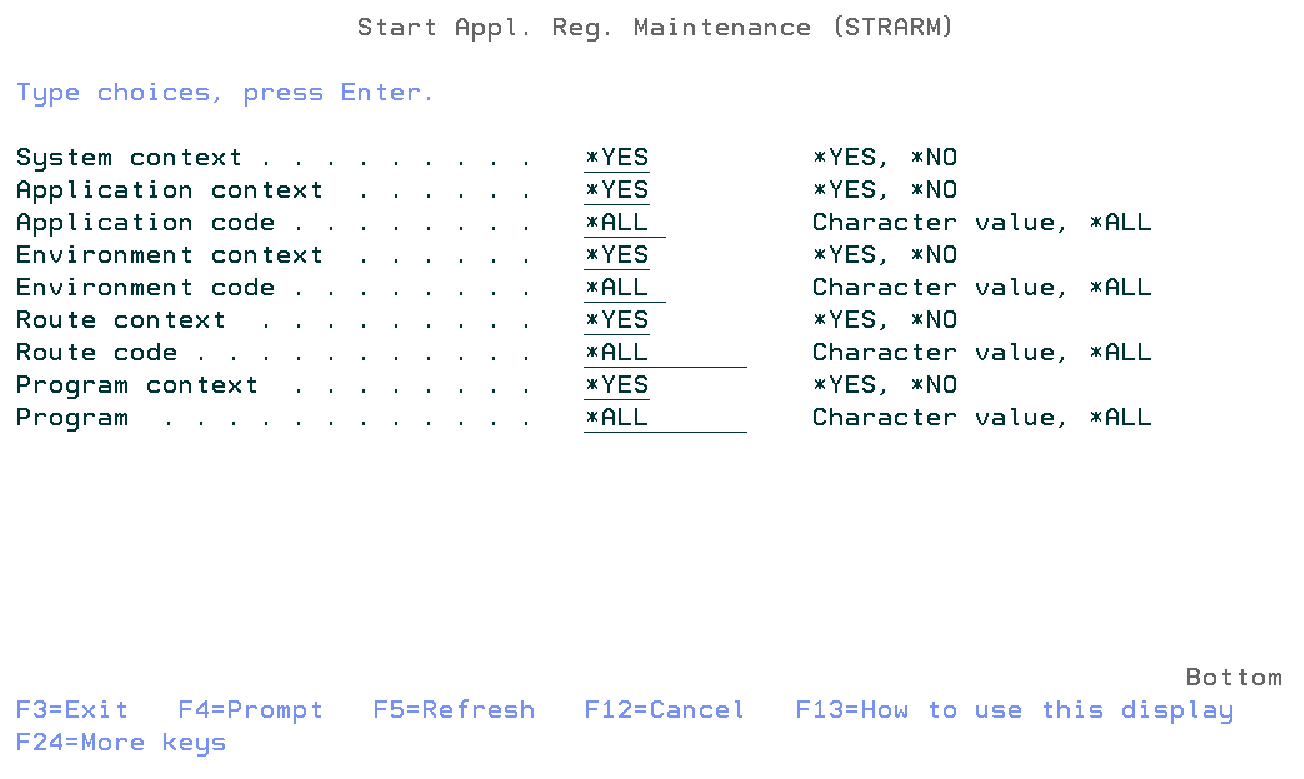
The Application Registry Maintenance function (STRARM) shows all the entries in a list that is based on the filters. Users belonging to the user profile class *SECOFR, *SECADM or the TD/OMS manager group are allowed to use this function.
System Context Indicator
Specify *YES to display keywords with a required or optional System context indicator or specify *NO to display keywords for which this context is not allowed.
Application Context Indicator
Specify *YES to display keywords with a required or optional Application Context Indicator or specify *NO to display keywords for which this context is not allowed.
Application Code
Specify the application code filter. Possible values are:
- *All
- Select all application codes.
- Application-Code
- Specify the application code.
Environment Context Indicator
Specify *YES to display keywords with a required or optional Environment Context Indicator or specify *NO to display keywords for which this context is not allowed.
Environment Code
Specify the environment code filter. Possible values are:
- *All
- Select all environment codes.
- Environment-Code
- Specify the environment code.
Route Context Indicator
Specify *YES to display keywords with a required or optional Route Context Indicator or specify *NO to display keywords for which this context is not allowed.
Route Code
Specify the route code filter. Possible values are:
- *All
- Select all route codes.
- Route-Code
- Specify the route code.
Program Context Indicator
Specify *YES to display keywords with a required or optional Program Context Indicator or specify *NO to display keywords for which this context is not allowed.
Program Name
Specify the program name filter. Possible values are:
- *All
- Select all program names.
- Program-name
- Specify the program name.
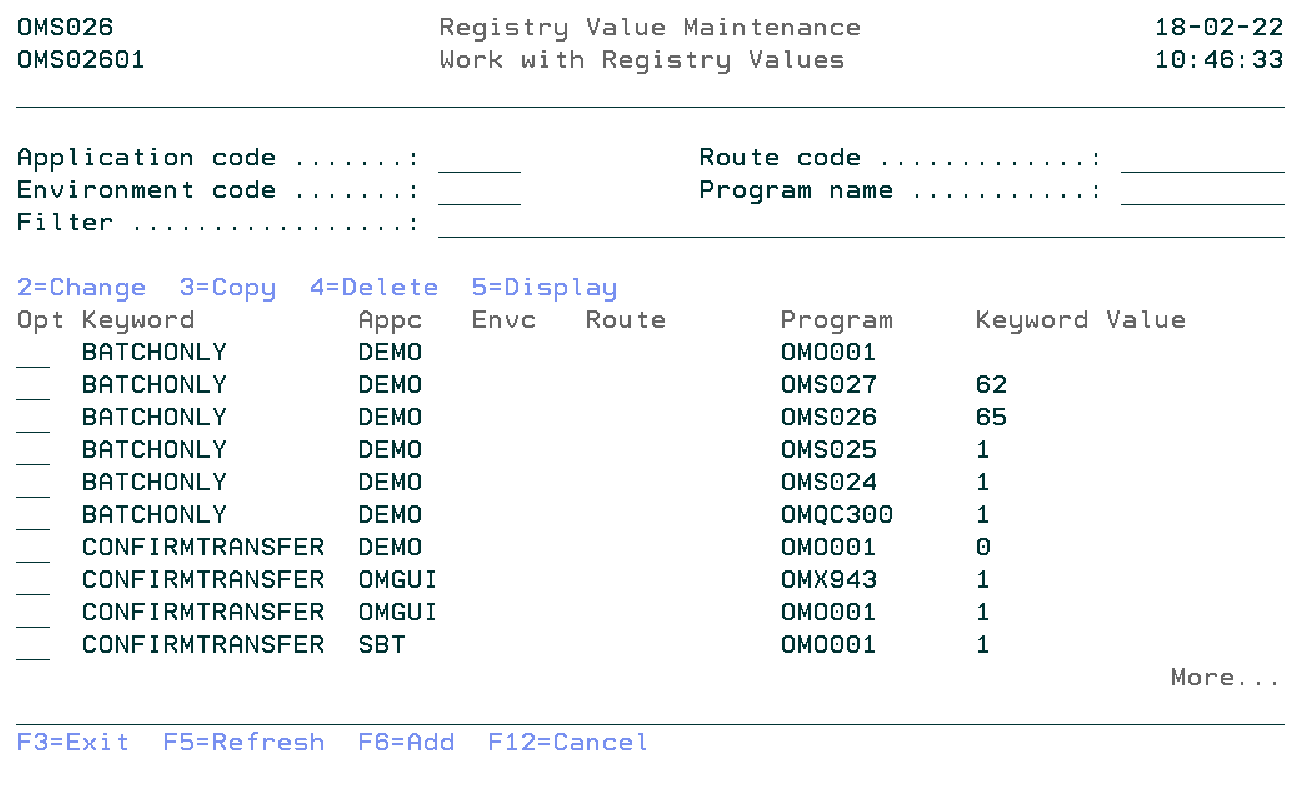
Work with Registry Values
The Work with Registry Values shows all the entries in a list from the application general-purpose file that is linked to the general-purpose definition file. Entries can be Viewed, Copied, Changed, Deleted, and Added. This screen will be shown according to the parameter of the previous display.
Application Code
You can specify the application code which you want to filter.
Environment Code
You can specify the environment code which you want to filter.
Route Code
You can specify the route code which you want to filter.
Program Name
You can specify the program name which you want to filter.
Filter
The Filter prompt can be used for quick filtering of the list.
Option
Use this column to perform different operations on individual entries. Type the option number next to an entry and press Enter.
- 2=Change
- Change the value of a registry keyword.
- 3=Copy
- Copy the registry keyword from the database.
- 4=Delete
- Remove the registry keyword from the database.
- 5=Display
- Display the information about the registry keyword.
- F6=Add
- Add a new registry keyword.
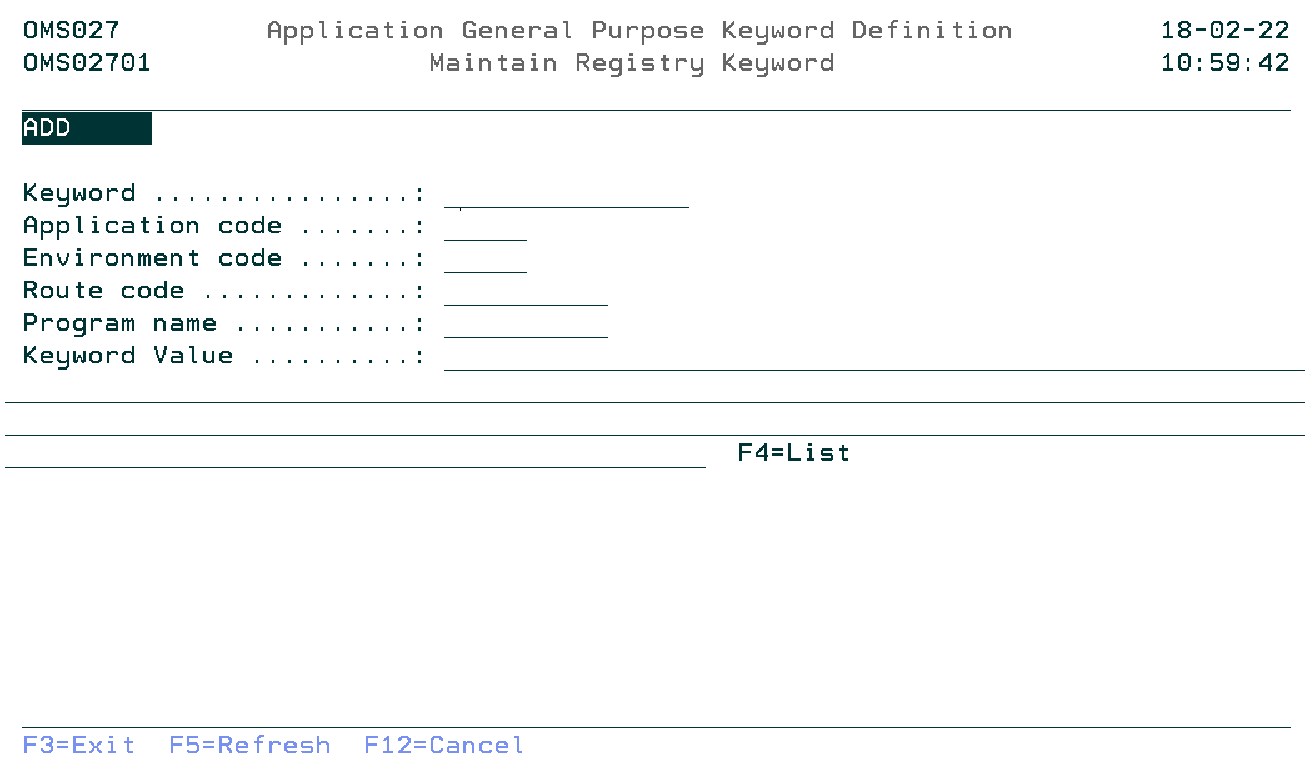
Maintain Registry Keyword
The Maintain Registry Keyword display shows information and allows actions depending on the option chosen on the previous display. The chosen action on the previous display is shown on line three. The following modes can be activated:
- Add
- Add a new registry keyword.
- Change
- Change the attributes of an existing registry keyword. The current values are shown.
- Copy
- Copy the attributes of an existing registry keyword. The current values are shown.
- Delete
- Delete the attributes of an existing registry keyword. The current values are shown.
- Display
- Show the attributes of an existing registry keyword. The current values are shown.
Keyword
You can specify the registry keyword.
Application Code
You can specify the application code of the application to which the registry key must be added.
Environment Code
You can specify the environment code for which this registry key is valid.
Route Code
You can specify the route code for which this registry key is valid.
Program Name
You can specify the program name for which this registry key is valid.
Keyword Value
You can specify the registry keyword value.
Use F4=List to get a list of the available keyword values.
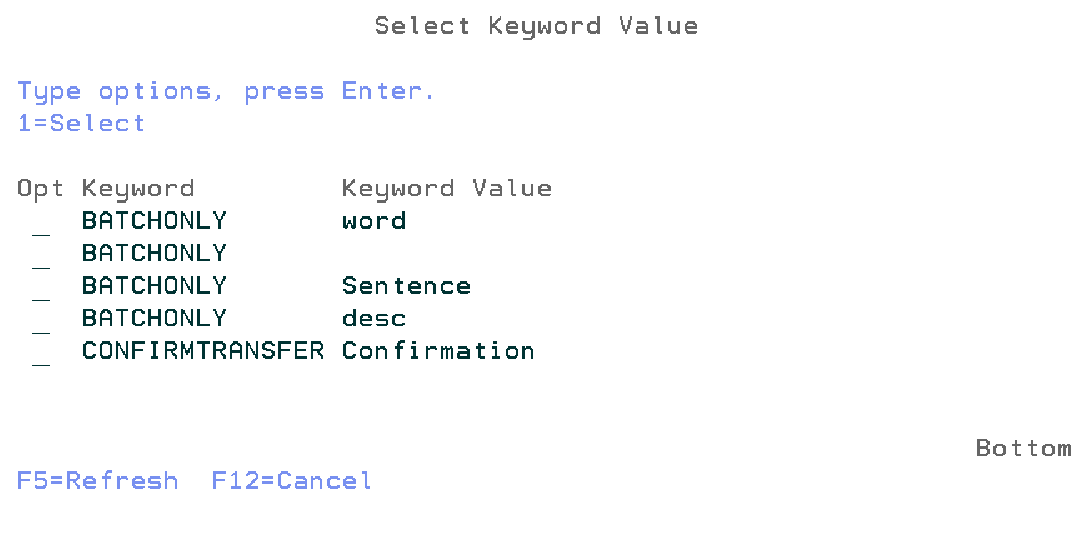
Select Keyword Value
The Select Keyword Value window shows all the keyword values in a list from the general-purpose value file. This display will be shown when you press F4 on the keyword value field in the previous screen.
Option
Use this column to select the keyword value.
- 1=Select
- Select keyword value.
Command Start Application Registry Maintenance (STRARM)
This menu command starts the application registry maintenance function. Refer to the description of the function application registry maintenance for a detailed description.
STRARM SYSI(*YES)
       APPI(*YES)
       APPC(*ALL)
       PDLI(*YES)
       PDLC(*ALL)
       ROTI(*YES)
       ROTC(*ALL)
       PGMI(*YES)
       PGMN(*ALL)
This command has nine parameters.
Pre Transfer Check
The pre-transfer check mechanism is used to check if an object can safely be transported to the next environment. The pre-transfer check will check a couple of actions, e.g.
- Level Checks for files,
- Signature Level Check for service programs,
- Etc...
A pre-transfer check defines how a check entry can be added to the pre-transfer check table OMPTC. It defines in which contexts the check entry can be added and describes the usage of the check.
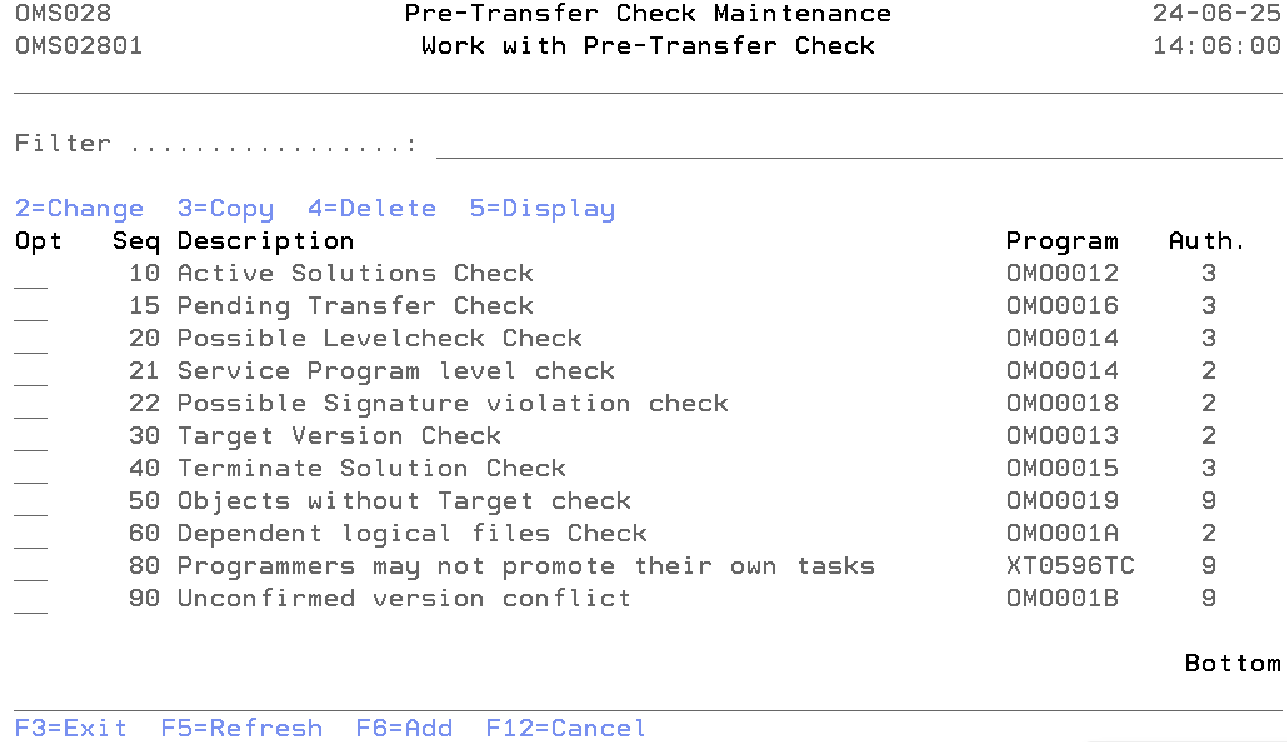
Work with Pre Transfer Check
The Work with Pre transfer check display shows the currently defined checks, including their main parameters. To select an option, type the option number in the option field area and press Enter. For more information about an option move the cursor to the option column and press Help. For more information about a function key, move the cursor to the function key area and press Help.
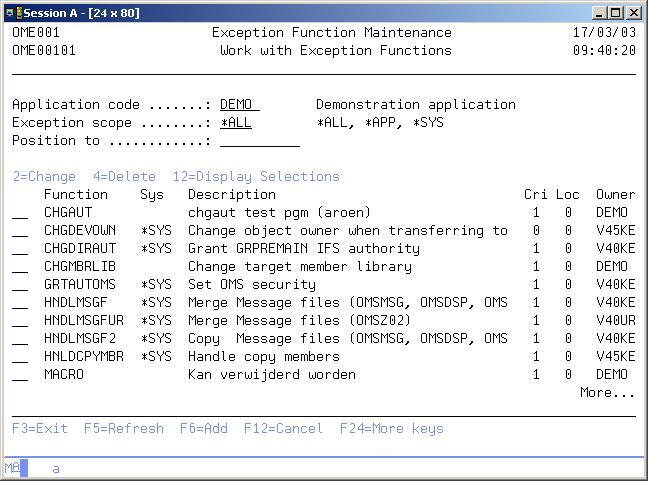
The system indicator, the description of the function, a critical indicator, a local/remote indicator and the function owner are shown in addition to the functions. Refer to the Exception Concepts for more detailed information.
You can add a new check to the list, delete a check from the list, change the attribute of a check, or display the attribute of a check.
Filter
The Filter prompt can be used for a quick filtering of the list. Type the code or partial code of the below fields you wish to show in the list.
- Sequence Number
- Description
- Program Name
Option
Use this column to perform different operations on individual entries. The possible values are:
- 2=Change
Type 2 to change the value of a check. - 3=Copy
Type 3 to copy the check from the database. - 4=Delete
Type 4 to remove a check from the database. TDOMS supplied checks can not be deleted. - 5=Display
Type 5 to display the information about the check.
- F6=Add
Add a new occurrence of the entity you are working with.
Maintain Pre Transfer Check
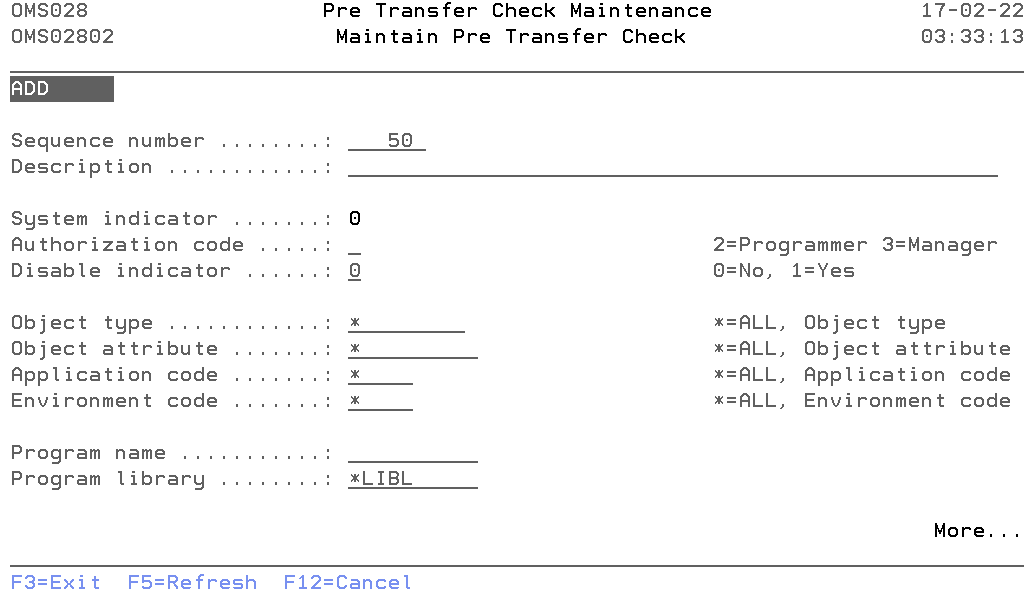
The Maintain Pre Transfer Check display shows information and allows actions depending on the option chosen on the previous display. The chosen action on the previous display is shown on line three. The following modes can be activated:
- Add
You can add a new check. The sequence number, description, Authorization code and all other mandatory fields must be entered. - Change
Change the attributes of an existing check. - Copy
Copy the check from the database. - Delete
The current pre-transfer check attributes are shown, including a confirmation message. The check is deleted from the list after pressing Enter. - Display
Show the attributes of a check. The current values are shown.
Sequence Number
The Sequence Number is the order in which the check is being executed.
You can change the system-generated sequence number but it must be unique per check. A blank value is not allowed.
Description
The pre-transfer description contains a description of the pre-transfer check entry. A blank value is not allowed.
System indicator
The System Indicator indicates whether the check is supplied by TD/OMS or by the user. Value '1' indicates that the check is a TD/OMS supplied. Value '0' indicates check is created by user.
Only authorization code and disabled indicator value can be changed for TD/OMS supplied check.
Authorization code
Specify the authentication code that can confirm the errors or warnings coming from the pre-transfer check. The possible values are:
- 2=Programmer
Programmers can not confirm error or warning. - 3=Application manager
Programmers can confirm error or warning. - 9=Block
No one can confirm the issue. The issue has to be resolved before processing can continue.
Disable indicator
The disabled indicator is defined per pre-transfer check. It indicates if this check should execute or not. The possible values are:
- 0=No
The check will run. - 1=Yes
The check will not run.
Object type
Specify the Object Type for which this check should be executed. Enter a valid object type or '*' for all object types.
Object attribute
Specify the Object Attribute for which this check should be executed. Enter a valid object attribute or '*' for all object attributes.
Application code
Specify the Application Code for which this check should be executed. Enter a valid application code or '*' if this check should be executed for all applications.
Environment code
Specify the Environment Code for which this check should be executed. Enter a valid environment code or '*' if this check should be executed for all environments.
Program name
The program name contains the name of a program which is called by TD/OMS during checkout.
Program library
The program library contains the OS/400 library where the exception program can be found.
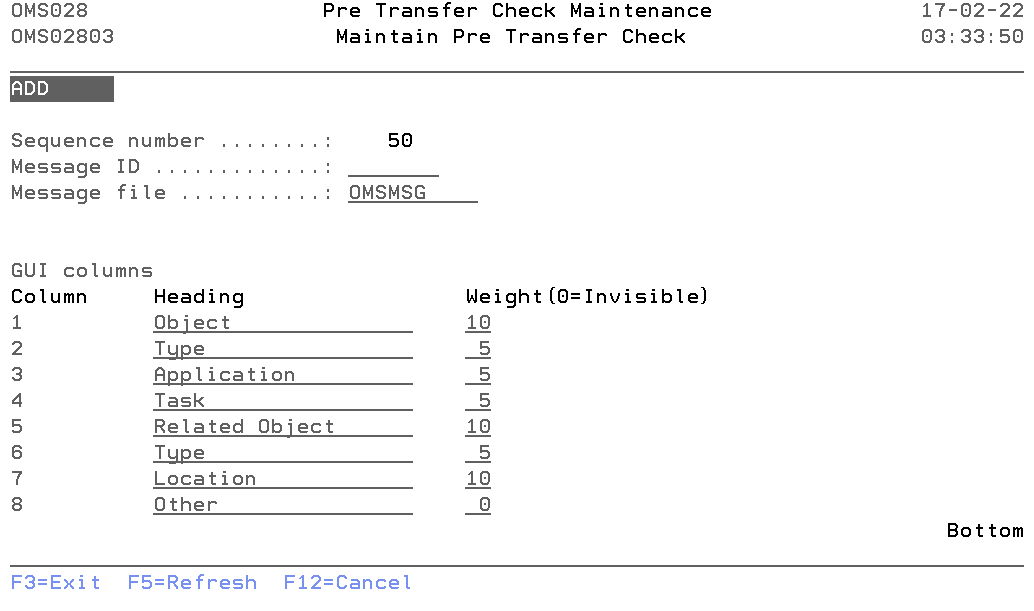
Message id
The message id contains the name of the message-id of the pre-transfer check description text.
Message file
The name of the message file from which message-id is referred. By default "OMSMSG" message file is supplied, the user can change this value.
Gui Columns
It is now possible to configure which columns are visible and the header of these columns during the pre-transfer check. This is only possible for your own pre-transfer check definitions. Not for the system-supplied definitions. Please refer to the below description for more details.
- Column
The numbers match the column number. - Heading
The columns for this particular check can be changed by entering the values in this field. - Weight
The weight is the relative size of the column in the table. Value 0 will hide the column.
Command Start Pre Transfer Check Maintenance(STRPTCM)
This menu command starts the pre-transfer check function. Refer to the description of the function Pre Transfer Check for a detailed description.
This command has no parameters.
Pre Transfer Check details
Below are the detailed functions of each pre-transfer check.
- Active Solutions Check
- If you see this message, it means that you are going to replace an object that is currently attached to another task. This does not mean it is a version conflict. It just means that the object will, from this point on, be attached to your task and the other task as a *MERGE solution.
- Unconfirmed Active Solutions Check
- If version conflict confirmation is embedded in your organization then it means that you are going to replace an object that is currently attached to another task for which we could not find a confirmation record. This does not mean it is a version conflict. It just means that the object will, from this point on, be attached to your task and the other task as a *MERGE solution.
- Object Without Target Check
- If the configuration is not correct, you may see this error. It means that TD/OMS cannot find a suitable library or directory for the indicated objects in the target environment. This is sometimes related to location types and labels.
- Possible Level check Check
- You are processing a file that has dependencies that are not part of your transfer. This could mean that a level check could occur. The list will show which objects are depending on the object that you plan to process.
- Target Version Check
- You are going to overwrite an object version that is not a direct parent of your version. Note the objects and use the version conflicts view to resolve the issues.
- Terminate Solution Check
- All objects in the target environment which use the object will be checked. If they are not part of this transfer, then this message will be shown. You should probably not terminate an object which is in use by other objects.
- Pending Transfer Check
- There are still transfers pending completion on this or other systems. To close pending remote transfers, start the remote job monitor function.
- Service Program Level Check
- This check is done when not all dependent objects of a service program are processed. If you use a signature strategy, you may disable this check in the pre transfer check maintenance program.
- Possible Signature violation check
- Checks if the program to service program signatures match.
- Check dependent logicals
- It checks if there is an abnormal dependency. This occurs when either a dependent logical file exists but is not known to TD/OMS, or the dependent logical file exists in a different library than the physical file and its source does not exist.
- Unconfirmed version conflict
- It checks if there is a target higher environment that has a higher version of the solution.
- User Defined
- It is also possible to insert your own checking program. An example source is available in QUSRSRC. File a question in the helpdesk if you require support for this.
DFG:Job Description Maintenance/en
Reorganize Files
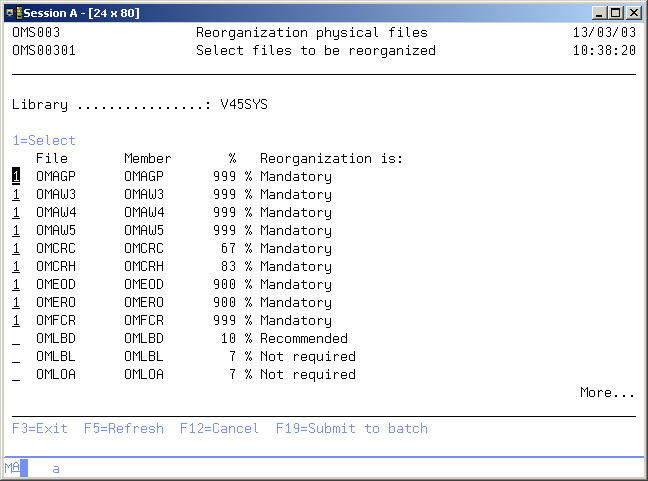
The "Reorganize files" function must be activated on a regular basis in order to remove deleted records physically. Only users having a *SECOFR or *SECADM class profile, and the TD/OMS-manager are allowed to use this function.
The files can only be reorganized, if no job has a lock of any kind on the files to be reorganized. All batch and interactive jobs using the files, must be ended and closed. If a file can not be exclusively allocated, the file(s) will not be reorganized.
Note: As part of the reorganizing activity you should make a back-up of your (TD/OMS) database, and then start the reorganize function. The files are reorganized using the RGZPFM system command.
Select Files to be Reorganized
The display shows all physical files with the file members, and per member a percentage and a recommendation. The selection indicator is pre-set with "1", when reorganization is strongly recommended or mandatory. The percentage is based on the number of deleted records in relation to the number of actual records. A percentage of 999 is shown, when the number of deleted records exceeds multiple times the number of currently active records.
The possible recommendations are "Not required", "Recommended", "Strongly recommended" and "Mandatory".
When you press Enter the selected physical file members are reorganized interactively. You will be confirmed online about the status of each reorganization. If the status of the organization is "File allocation error.." the file could not be allocated by the RGZPFM command and it is not reorganized.
Option
Use this column to select different operations on individual file entries. The possible values are:
- 1=Select
Select the physical file member for reorganization.
Use F19 to submit the selected reorganization tasks to the batch environment. The job will use job description OMSJOBD.
Command Reorganize TD/OMS Files (RGZOMSF)
The reorganize TD/OMS files command is used to start reorganizing TD/OMS files. Refer to the description of the function Reorganize TD/OMS Files for more detailed information.
RGZOMSF LIB(*OMSLIB)
Library (LIB)
Use this parameter to select the library, where the files to be reorganized are located. You can use the parameter to enter your own specific library. The possible values are:
- *OMSLIB
The command processing program will locate the TD/OMS product library containing the files. - Name
Type the name of the library containing the files to be reorganized.
Command Clear TD/OMS Log data(CLRLOGOMS)
The Clear TD/OMS Log command is used to remove all or some entries from the TD/OMS log file. Use it on a regular base to prevent the TD/OMS log file from growing beyond limits or extend the size of the TD/OMS physical file OMLOG, so it is able to contain a large number of records.
CLRLOGOMS TODATE(date)
Clear until Date - (TODATE)
Specify the date up to which you wish to delete the log entries. The possible values are:
- Date
Enter the date up to which you wish to clear the log file. - *ALL
Use this value, if you wish to clear all the entries from the log file.
Command Save OMS Log Files (SAVLOGOMS)
WARNING: This command will remove data from the current TD/OMS files, and requires exclusive access to all files. If you have some doubts, please contact TD/OMS consultancy before executing this command.
The Save OMS Log Files command is used to REMOVE data from various TD/OMS files. The command is intended to move older data to separated history files. The removal concerns data which you no longer need in the actual files. We advice NEVER using this command, unless you are very sure about which data you want to split off. The data that are removed, will be saved in identical, parallel TD/OMS history files. These files are stored in the target library you must specify. The number of data records removed and separately saved, depends on the calendar date you specify.
SAVLOGOMS          DATE(date)
                   APPL(appl)
                   LIB(lib)
Save until Date - (DATE)
Specify the date up to which the history must be removed/saved.
Date Enter the date up to which you wish to save the log file.
Application - (APPL)
Specify the application for which you want to save the history. The possible values are:
- *ALL
Select all application codes. - application-code
Specify the application code.
Library - (LIB)
Specify the library where the saved history data must be stored. The library will be created, if it doesn’t exists. When the library exists and there are already history files in that library, then the history records are added to these files.
Command Delete OMS Application (DLTAPPOMS)
This command is used to remove an application or parts of an application from the TD/OMS database.
The following elements can be selected for deletion:
- Application as a whole
- Application definitions
- Application tables
- Application security
- Requests
- Fixes and solutions
- Exceptions
- Distribution overrides
- Dumped sources
- Fall-back objects
- Object data
- Ratification data
- Action data
The command checks the consistency of the deletion request. For example, it is not possible to delete the application without deleting all of the other elements.
Furthermore, there might be conditions that prohibit the deletion of specific elements. For example, a solution might be leading solutions that are part of other applications. In that case, it is not allowed to delete the solution. These situations are signaled by the command processing program, and a report is printed to signal the error condition.
You can also run this command in a 'Check only' mode. In this case, the program checks if there are conditions that would prohibit the deletion of the application. No actual deletion will take place.
This command does not remove data which is not directly related to the specified application.
Because of the destructive nature of this command, only the *SECOFR and *SECADM users are allowed to use the command.
DLTAPPOMS           CHECK(*YES|*NO)
                    APPL(application)
                    RMVAPPL(*YES|*NO)
                    RMVDFN(*YES|*NO)
                    RMVTBL(*YES|*NO)
                    RMVSEC(*YES|*NO)
                    RMVREQ(*YES|*NO)
                    RMVFIX(*YES|*NO)
                    RMVEXC(*YES|*NO)
                    TFRAPPL(*ANY|application)
                    RMVDST(*YES|*NO)
                    RMVDMPSRC(*YES|*NO|*DATA)
                    RMVFLBCNT(*YES|*NO|*DATA)
                    RMVOBJD(*YES|*NO)
                    RMVRATI(*YES|*NO)
                    RMVACTN(*YES|*NO)
                    PRTM(*BASIC|*FULL|*NONE)
Check only CHECK()
Specify if the command should be run in Check only mode. The possible values are:
*YES
Specifies that the command should be run in Check only mode. In this mode, no actual deletion will take place. You will be informed whether or not the deletion is allowed.*NO
Specifies that the selected elements should actually be deleted.
Application (APPL)
Specify the application for which elements should be deleted.
Remove application (RMVAPPL)
Specify if the application must be removed altogether. The possible values are:
*YES
Specifies that the application must be removed. If the application must be removed, then all other application related elements should also be removed.*NO
Specifies that only specific elements should be removed from the application. The application will not be removed altogether.
Remove definition (RMVDFN)
Specify if the application definitions must be removed. The application definitions consists of library definitions, library list definitions, distribution entries, environment security and environment definitions. The application definitions are created with the environment maintenance function. The possible values are:
*YES
Specifies that the application definitions should be removed.*NO
Specifies that the application definitions should not be removed.
Remove tables (RMVTAB)
Specify if the application tables must be removed. The application tables define the request and fix types, the priority and the reason codes. The possible values are:
*YES
Specifies that the table definitions should be removed.*NO
Specifies that the table definitions should not be removed.
Remove security (RMVSEC)
Specify if the application security must be removed. The possible values are:
*YES
Specifies that the application security should be removed. Keep in mind that the application is not accessible if there are no security definitions.*NO
Specifies that the application security should not be removed.
Remove requests (RMVREQ)
Specify if the application's request database must be removed.
*YES
Specifies that the request database should be removed along with the associated fix/request relationships.
If you remove the request database but keep the application definitions, then the request numbering continues from where it has left off. You must manually set the last generated request number in the application definition if you want to (re)start numbering from 1.*NO
Specifies that the request database should not be removed.
Remove fixes (RMVFIX)
Specify if the application's fix database must be removed.
*YES
Specifies that the fix database should be removed along with the associated solutions, solution details and fix/request relationships.
If you remove the fix database but keep the application definitions, then the fix numbering continues from where it has left off. You must manually set the last generated fix number in the application definition if you want to (re)start numbering from 1.*NO
Specifies that the fix database should not be removed.
Remove exceptions (RMVEXC)
Specify if the application's exception definitions be removed. The possible values are:
*YES
Specifies that the exception definitions should be removed from the application. This includes exception functions and exception selections. System exception functions are moved to another application or removed if they are no longer in use. This is controlled by the TFRAPPL keyword.*NO
Specifies that the exception definitions should not be removed.
Transfer system exceptions to (TFRAPPL)
Specify the application to which system exceptions must be moved. The possible values are:
*ANY
If the application to be deleted contains a system exception function and the function is in use by exception selections of other applications, then it is moved to one of the applications using it. The application that is to be the new owner can be any of the applications using the system function. If the system exception is not in use by other applications, then it is removed altogether.- Application
Specifies the application which must own the system exception functions defined in the application to be deleted. The system exception functions are always moved to the specified application, even if they are not in use by that application or any other application.
Remove distribution overrides (RMVDST)
Specify if the remove location overrides must be removed from the application. The remote location overrides are specific to an application and they are defined using the STRRLO command. The possible values are:
*YES
Specifies that the remote location overrides should be removed.*NO
Specifies that the remote location overrides should not be removed.
Remove dumped sources (RMVDMPSRC)
Specify if the dumped sources data must be removed from the application. The possible values are:
*YES
Specifies that the dumped sources data should be removed from the application. However, the actual dumped sources should not be removed from the dumped sources library.*NO
Specifies that the dumped sources data should not be cleared.*DATA
Specifies that the dumped sources data should be removed from the application, and that the actual dumped sources should be removed from the dumped sources library.
Remove fall-back contents (RMVFLBCNT)
Specify if the fall-back data must be removed from the application. The possible values are:
*YES
Specifies that the fall-back data should be removed from the application. However, the actual dumped objects should not be removed from the fall-back save library.*NO
Specifies that the fall-back data should not be cleared.*DATA
Specifies that the fall-back data should be removed from the application, and that the actual dumped objects should be removed from the fall-back save library.
Remove object descriptions (RMVOBJD)
Specify if the object descriptions must be removed from TD/OMS. The internal TD/OMS database is cleared for the indicated application.
*YES
Specifies that the object descriptions should be removed from the application. This includes objects, object relations, details and detail relations.*NO
Specifies that the object descriptions should not be removed.
Remove ratification data (RMVRATI)
Specify if the ratification data should be removed from the application. The possible values are:
*YES
Specifies that the ratification data should be removed. This includes the ratification groups, the ratification group members and the ratification groups per environment.*NO
Specifies that the ratification data should not be removed.
Remove action data (RMVACTN)
Specify if the action data should be removed from the application. The only elements that are deleted are the action selections containing the name of the application. If an action group detail selection refers to the application, then the field Application is set to *ALL, but the selection is also set to Disabled. The possible values are:
*YES
Specifies that the action data should be removed. This includes only the action selections.*NO
Specifies that the action data should not be removed.
Print mode (PRTM)
Specify the amount of data that should appear on the deletion report. The possible values are:
*FULL
Specifies that a complete logging of all the deletion actions should be written on the report.*BASIC
Specifies that only a basic logging of the deletion actions should be written on the report.*NONE
Specifies that no report should be written at all.
Clear Fall Back Save library (CLRFBSOMS)
The Clear Fall Back Save library command is used to remove all or some entries from the Fall Back Save libraries file and remove the corresponding savefiles from the Fall Back Save library. Only members of the OMS Manager group are allowed to run this command (STRSD).
CLRFBSOMS APPL(DEMO) TODATE(01012010)
- Application - (APPL)
Specify the application for which the Fall Back Save library entries and corresponding savefiles must be removed.
- Code
- Enter an existing application code.
- *ALL
- The fallback entries are removed for all applications.
- Clearing range end date - (TODATE)
Specify the end date up to which you wish to delete the Fall Back Save library entries and corresponding savefiles. The possible values are:
- Date
- Enter a correct date according to the date format of
your current JOB or the format of the JOB that will execute the command. The input is an END date for which the Fall Back Save library file will be cleared (the end date is included).
- *ALL
- Use this value if you wish to clear all the entries from the Fall Back Save library entries and corresponding savefiles.
- *1-WEEK
- Use this value if you wish to clear the entries except of last one Week from the Fall Back Save library entries and corresponding savefiles.
- *2-WEEK
- Use this value if you wish to clear the entries except of last two Weeks from the Fall Back Save library entries and corresponding savefiles.
- *1-MONTH
- Use this value if you wish to clear the entries except of last one Month from the Fall Back Save library entries and corresponding savefiles.
- *3-MONTH
- Use this value if you wish to clear the entries except of last three Months from the Fall Back Save library entries and corresponding savefiles.
TD/OMS Internal
The TD/OMS Internal menu can be reached only by user profiles of *SECOFR category. After signing in you need the TD/OMS product library in your job description or in the initial library list. Next go to the TD/OMS main menu by entering the command GO OMSMAIN. From this main menu you can select option 1=System Management and then 21=TD/OMS Internal.
Display Product Information (DSPPINOMS)
This System internal menu function shows you how many TD/OMS modules are installed and until which date they will be active.
Display Product Information
Using this display you can check whether you have installed the license keys in a correct way, and you can observe the TD/OMS version of your installation. The display is not shown if any error has occurred while entering the license codes.
Check for downloads
Press F6 to check if there are updates available for the current installation. You can also use the CHKUPDOMS command.
This program enables you to download the savefile and attach it to the corresponding task of the OMS system application. The task name is determined on the basis of the selected version and the application name is picked from the data area OMS010.
Prerequisites: The following open source tooling must be installed before you can download the updates.
- wget
- unzip
- zipinfo
You also need a connection to the internet from your IBM i machine.
After the updated savefile is attached to the task, you can process the task to deploy it to your production environments.
The available types of downloads are:
- release
- Releases are stable upgrades. Releases are built upon three previous milestone releases.
- milestone
- Milestones are intermediate deliveries that build up to a release. Every milestone contains new features and bug fixes. Milestones often also contain early deliveries of work in progress.
- nightly
- Nightly updates are immediate deliveries of new functions and bug fixes. They are the most current but the least stable.
There is an update available for the current version. Press F10 to show all the nightly for the current version.
There are nightly available for the current version. Press F10 to show all the milestone/release/nightly.
Option 1 on the desired version to download and prepare.
The savefile is downloaded and attached to the corresponding task in the TD/OMS system application.
The task name is determined on the basis of the selected version and the application name is retrieved from data area OMS010.
After the updated savefile is attached to the task, you can process the task to deploy it to your remote systems.
The available types of downloads are:
- release
- Releases are stable upgrades. Releases are built upon three previous milestone releases.
- milestone
- Milestones are intermediate deliveries that build-up to a release. Every milestone contains new features and bug fixes. They often also contain early deliveries of work in progress.
- nightly
- Nightly updates are immediate deliveries of new functions and bug fixes. They are the most current but the least stable.
Request TD/OMS License Codes
To generate license codes we need to have the following information:
- Serial Number
- Use the command DSPSRVAGT TYPE(*SRVREGINF) to get the serial number.
- LPAR Number (logical partition number)
- Use the command DSPSRVAGT TYPE(*SRVREGINF) to get the LPAR number.
- Processor Feature code
- Use the command DSPSYSVAL SYSVAL(QPRCFEAT)
- Use command SYSINFOMS to retrieve the above mentioned information when TD/OMS version V11.0M02 or higher is installed.
Send that information to us together with the information if it concerns a development or a deployment partition.
Install TD/OMS License Codes Manually (INSLICOMS)
The TD/OMS license keys can be installed using this command. You must always install the general license code and at least license keys of one TD/OMS module, otherwise you are not able to work with the product. The default of this command is to install the license codes on the current IBM i system. License codes can be prepared for another (remote) system by specifying the serial number of that machine.
                     TDOMS - Install Licenses (INSLICOMS)

Type choices, press Enter.

System . . . . . . . . . . . . .   *CURRENT      Character value
System Processor feature . . . .   *CURRENT      Character value, *CURRENT
System (SYSTEM)
Specify the serial number of the system for which you want to enter the license code.
- Current
- The special value *CURRENT applies to the current system.
- Remote Serial number
Values other than the value *CURRENT (the serial number of another machine) will create a *USRSPC object in the TD/OMS library. The name of the created *USRSPC is the same as the given serial number prefixed by the character “X”. Transfer this special *USRSPC object to the correct machine to install the license keys on that system.
- Activate the license on the remote system by signing in using a user profile of *SECOFR class. Next, restore the *USRSPC object in the TD/OMS library. After that remove the existing userspace "OMX963" and rename the just copied object to "OMX963".
System Processor Feature( FEATURE)
Specify the processor feature code of the system for which you want to enter the license code.
- CURRENT
- The special value *CURRENT applies to the current system.
- Remote Feature Code
Values other than the value *CURRENT (the processor feature code of another machine) will create a *USRSPC object in the TD/OMS library. The name of the created *USRSPC is the same as the given serial number prefixed by the character “X”. Transfer this special *USRSPC object to the correct machine to install the license keys on that system.
- Activate the license on the remote system by signing in using a user profile of *SECOFR class. Next, restore the *USRSPC object in the TD/OMS library. After that remove the existing userspace "OMX963" and rename the just copied object to "OMX963".
The License Code Entry Screen
The entire license can be added at once. Enter the whole license and press Enter. The first two lines will be considered as the General License and Feature License if they have not already been added. If both already exist, then all lines will be considered as module licenses. Additionally, if the first line has fewer than 50 characters, it will be ignored. A message will be shown if the license is incorrect.
The header of the display shows the Serial Number and Feature Code of the system for which the product license keys have been registered. In the next section, the Module License will be displayed.
Create TD/OMS License Codes (CRTLICOMS)
You can install the TD/OMS product license codes with this command. The command actually does the same as the INSLICOMS command. Instead of entering the keys manually one by one, they are retrieved from the special, formatted key file, after it has been put in a IFS directory.
Before you use this command, make sure that you have the correct license key file. The name of the license key file contains the serial number and the LPAR number. You can use the command DSPSRVAGT *SRVREGINF to ensure that these values are identical. Next copy the file to a directory on the IFS.
CRTLICOMS            NAME(File name)
                     PATH(Path name)
                     LIBL(Library name)
File name
Specify the file name that contains the correctly formatted license key strokes. The possible values are:
- *ALL
Select all files in the IFS directory. - File name
Specify the file name.
Path Name
Specify the IFS directory where the license file has been stored.
Library name
Specify the library where the license keys must be installed. This is your TD/OMS product library. If the library not exists, it will be created. When the library exists, and the license keys already exist in that library, they will be replaced.
Example
Suppose:
- you received the following license file: XDD2322-1.key
- The name of your TD/OMS library is TDOMS
- You dropped the file in the base root directory of the IFS
Then the following string shows the command to be executed:
CRTLICOMS NAME('XDD2322-1.key') PATH('/') LIBL(TDOMS)
System Users Maintenance (STRSUM)
The TD/OMS System User Maintenance function allows you to maintain the user profiles, who need access to TD/OMS. The individual TD/OMS user must be registered at a system level, when you have installed a NAMED or COMBINED TD/OMS license key. To display the installed license codes use command DSPPINOMS.
The number of users registered can not exceed the number of users for which the TD/OMS Kernel module has been licensed. Users who are not registered and start a function receive a message on their display.
Only user profiles of *SECOFR or *SECADM class, and the TD/OMS manager are allowed to start this function.
All generally registered users should also be specified at one or more application levels to get the proper authority for TD/OMS functions in an application.
Work with TD/OMS Users
The Work with TD/OMS Users display shows the currently registered users. You can add an entry to the list or remove an entry from the list.
User Maintenance
The User Maintenance function enables us to work with the users. In this program, we can work with all the users, and you can add, change, delete and display them. Users belonging to the user class *SECOFR, *SECADM, or the TD/OMS manager (group) are allowed to use this function.
Work with Users
The Work with Users screen displays a list of all the existing users. We can use the options field to maintain these users.
Press F11 we can see the second view of the Work with Users screen.
Filter
The Filter prompt allows for quick filtering of the list.
Option
Use this column to perform different operations on individual entries.
- 2=Change
- Use this option to change the user details.
- 4=Delete
- Use this option to delete the user from the database.
- 5=Display
- Use this option to display the details about the user.
- 21=Change password
- Use this option to change the user password.
- F6=Add
- Press F6 to add a new user.
Maintain User
The Maintain User display maintains the user allows actions depending on the option chosen on the previous display. The chosen action on the previous display is shown on line three. The following modes can be activated:
- *Add
- You can add a new user.
- *Change
- You can change the details of the user.
- *Delete
- You can delete the user from the database.
- *Display
- You can show the details about the user.
IBMi User id
Specify the IBMi user id. A blank value is not allowed. The possible values are:
- *NONE
- If you specify *NONE, Then the password is required for the user.
- Name
- Specify a valid IBMi user id.
User id
Specify the user id. A blank value is not allowed.
User password
Specify the password for the user. Passwords can be up to 128 characters and are case-sensitive. It should be at least 6 characters.
Title
Specify the title for the user.
First name
Specify the user's first name.
Last name
Specify the user's last name.
E-mail address
Specify the user's E-mail address.
Telephone number
Specify the telephone number. It is a user-defined field that can be used as a reference.
Description
Specify the user's description.
Change User Password
The Change User Password display maintains the user's password and allows actions depending on the option chosen on the previous display. The chosen action on the previous display is shown on line three. The following modes can be activated:
- *Change
- You can change the user's password.
New password
Specify the new user's password. Passwords can be up to 128 characters and are case-sensitive. It should be at least 6 characters.
Verify new password
Specify the user's password to verify with the new password. Passwords can be up to 128 characters and are case-sensitive. It should be at least 6 characters.
Command Start User Maintenance (STRUSRM)
This menu command starts the User Maintenance function. Refer to the description of the function User Maintenance for a detailed description.
STRUSRM
This command has no parameters.
Edit Object Authorization Classes (EDTOACOMS)
The Edit Object Authorization Classes command enables you to change the pre-defined TD/OMS authorization classes. These classes are assigned to objects residing in your TD/OMS library.
TD/OMS objects are divided into operational classes. Most objects are assigned a restricted class (i.e. not accessible to *PUBLIC authority). Some objects, however, require special operational attributes in order to function properly. Such an object is for example the program, that needs access to all objects in various libraries and therefore require different authority level.
Object authority classes can be changed if you have a profile of *SECOFR category, or if your profile is the TD/OMS manager.
EDTOACOMS         CLASS(class)
                  PGM(chgpgm statements)
                  OWN(chgobjown statements)
                  AUT(grtobjaut statements)
Authorization class (CLASS)
The authorization class is an identification for a number of object operations. The operations which are stored in a class operate on the owner of the object, the object authority and the adoption of user rights. The possible range of values is:
- *C1 - *C6
Specify the identification of the class.
CHGPGM statements
Enter the keywords and the keyword values which are to be added to the CHGPGM command. The object code and library are filled by TD/OMS. The keywords are user supplied.
Note: The CHGPGM command will not be executed if authority is granted to an object which is not of type *PGM.
CHGOBJOWN statements (OWN)
Enter the keywords and the keyword values which are to be added to the CHGOBJOWN command. The object code, library and object type are filled by TD/OMS. The keywords are user supplied.
GRTOBJAUT statements (AUT)
Enter the keywords and the keyword values which are to be added to the GRTOBJAUT command. The object code, library and object type are filled by TD/OMS. The keywords are user supplied.
Edit Object Authorization Data (EDTOADOMS)
The Edit Object Authorization Data command enables you to assign a TD/OMS authorization class to an individual object or a group of objects. The authorization is then granted using the Grant TD/OMS Authority command (GRTAUTOMS).
TD/OMS objects are divided into operational classes. Most objects are assigned a restricted class (i.e. not accessible to the *PUBLIC). Some objects, however, require special operational attributes in order for them to function properly. These objects are for example the objects which search the libraries and therefore require different authorities.
Object authority data can be changed if you belong to the SECOFR group or if you are the TD/OMS manager.
EDTOADOMS         OBJC(object name)
                  TYPE(object type)
                  CLASS(class)
Object code (OBJC)
Specify the object code to be assigned an authorization class. The possible values are:
- object-name
Specify the name of the object. *ANY
Specify that the object name is not important if this class is assigned. An object would be assigned the specified class if no detailed specifications exist for it.
This is a required parameter.
Object type (TYPE)
Specify the object type to be assigned an authorization class. The possible values are:
- object-type
Specify a valid object type. *ANY
Specify that the object type is not important if this class is assigned. Any type would be assigned the specified class if no detailed specifications exist for it.
This is a required parameter.
Authorization class (CLASS)
The authorization class is an identification for a number of object operations. The operations which are stored in a class operate on the owner of the object, the object authority and the adoption of user rights. The possible values are:
*REMOVE
Remove the class for the indicated object.*C1 - *C6
Specify the identification of the class.
OMS Object Authority Factory settings
Enter these commands per class to restore the original values of the authorization classes.
*C1   EDTOACOMS  CLASS(*C1)
                 PGM('USRPRF(*USER)
                 USEADPAUT(*NO)')
                 OWN('NEWOWN(OMS)')
                 AUT('USER(*PUBLIC) AUT(*USE)')

*C2   EDTOACOMS  CLASS(*C2)
                 PGM('USRPRF(*OWNER)
                 USEADPAUT(*NO)')
                 OWN('NEWOWN(OMS)')
                 AUT('USER(*PUBLIC) AUT(*USE)')

*C3   EDTOACOMS  CLASS(*C3)
                 PGM('USRPRF(*OWNER)
                 USEADPAUT(*NO)')
                 OWN('NEWOWN(QSECOFR)')
                 AUT('USER(OMS) AUT(*USE)')

*C4   EDTOACOMS  CLASS(*C4)
                 PGM('USRPRF(*OWNER)
                 USEADPAUT(*NO)')
                 OWN('NEWOWN(QSECOFR)')
                 AUT('USER(*PUBLIC) AUT(*USE)')

*C5   EDTOACOMS  CLASS(*C5)
                 PGM('USRPRF(*OWNER)
                 USEADPAUT(*NO)')
                 OWN('NEWOWN(OMS)')
                 AUT('USER(*PUBLIC) AUT(*USE)')

*C6   EDTOACOMS  CLASS(*C6)
                 PGM('USRPRF(*USER)
                 USEADPAUT(*NO)')
                 OWN('NEWOWN(OMS)')
                 AUT('USER(*PUBLIC) AUT(*EXCLUDE)')
Display Object Authority Definition (DSPOADOMS)
The Display Object Authority Definition command enables you to view the current TD/OMS authorization settings. These settings tell you what operational attributes are required for the individual TD/OMS objects.
TD/OMS objects are divided into operational classes. Most objects are assigned a restricted class (i.e. not accessible to the *PUBLIC). Some objects, however, require special operational attributes in order for them to function properly. These objects are for example the objects which search the libraries and therefore require different authorities.
Object authority definitions can be viewed if you belong to the *SECOFR group or if you are the TD/OMS manager.
DSPOADOMS OUTPUT(*)
Output (OUTPUT) – Help
Specify where the output from the command is sent. The possible values are:
*
Routes the output to the display.
*PRINT
Routes the output to the printer.
Grant TD/OMS Authorization (GRTAUTOMS)
The Grant TD/OMS Authorization command enables you to assign the required authorization to TD/OMS objects. This command must run after the installation has been completed.
TD/OMS objects are divided into different operational classes. Most objects are assigned a restricted class (i.e. not accessible to *PUBLIC authority). Some objects, however, require special operational attributes in order to function properly. Such an object is for example the program, that needs access to all objects in various libraries and therefore require different authorities.
Object authority can be granted if you have a profile of the *SECOFR or *SECADM user class, or if your profile is the TD/OMS manager. Your user profile must also have all special authorities corresponding with the high level user class. Without these special authorities you are able to run the command but authorization assignment will be skipped for some or all objects.
This command retrieves the object authorization data and applies the operations specified in the authorization class.
GRTAUTOMS     OBJL(*OMSLIB)
              OBJC(*ALL)
              OBJT(*ALL)
TD/OMS library (OBJL)
Specify the library in which the TD/OMS object(s) reside(s). This must be a TD/OMS library. It is useless to specify another library unless you have created your own class definitions.
- *OMSLIB
Use this value to specify a TD/OMS library. The command will search for the correct library. You cannot use this value if you grant authority for additional TD/OMS module libraries. In this case the library must be specified. - library-name
Specify the name of the library which contains the objects which are to be granted TD/OMS authority.
This is a required parameter.
Object code (OBJC)
Specify the object code to be granted TD/OMS authority. The possible values are:
- *ALL
Grants authority to all objects in the library that includes the specified object type. - object-code
Specify the name of a single object.
This is a required parameter.
Object type (OBJT)
Specify the object type of the objects to be granted TD/OMS authority. The possible values are:
- *ALL
Grants authority to the specified objects of any type. - object-type
Specify an object type.
This is a required parameter.
Processing Sequence Maintenance (STRPSM)
This command changes the sequence in which objects are processed during transfer and compilation. You can ensure that objects of a specific object type, object attribute and detail (source) attribute are created in the target environment before other objects.
Since V16.0KEM02, this also works for file extensions of IFS objects.
Example: Suppose you wish to transfer a batch with a physical and a logical file. If the logical file was created first, the chance of successful creation would be slim because the logical file would be based upon the old physical file already existing in the target environment (if it is there at all).
You can use this command to specify the types of objects that have to be processed before objects of another type.
OMX986             Object Processing Sequence Maintenance             22-01-24
OMX98601            Work with Object Processing Sequence              10:11:17
------------------------------------------------------------------------------

Position to ............:   0

2=Change  3=Copy  4=Delete  5=Display

Opt  Sequence nbr.  Object type  Attribute  Detail attr.
 _   175            *FIELD       *ALL       *ALL
 _   175            *IDATTR      *ALL       *ALL
 _   225            *FILE#       *ALL       *ALL
 _   250            FILE         PHYSICAL   *ALL
 _   275            *FILE        PF         *ALL
 _   275            *FILE        PF38       *ALL
 _   300            *FILE        LF         *ALL
 _   300            *FILE        LF38       *ALL
 _   325            *MDLF        *ALL       *ALL
 _   325            FILE         LOGICAL    *ALL
 _   350            *MSGF#       *ALL       *ALL
 _   375            *BNDDIR      *ALL       *ALL
 _   375            *FILE        *ALL       *ALL
 _   375            *PROCESS     *ALL       *ALL
 _   400            *CMD         *ALL       *ALL
 _   400            *MODULE      *ALL       *ALL
 _   650            *SRVPGM      *ALL       *ALL
 _   654            *STMF        *ALL       *ALL
 _   655            *STMF        .CSS       *ALL
 _   656            *STMF        .JS        *ALL
 _   657            *STMF        .HTML      *ALL
 _   657            *STMF        .PHTML     *ALL
 _   675            *PGM         *ALL       *ALL
                                                                       Bottom
------------------------------------------------------------------------------
F3=Exit  F5=Refresh  F6=Add  F12=Cancel
TD/OMS Application Management
TD/OMS Application Management Introduction
The TD/OMS application management menu enables you to start the TD/OMS definition functions at application level, or to start the Recovery and Exception menus. The functions in this menu are meant for an application manager.
Start User Authority Maintenance (STRUAM)
This menu command starts the user authority maintenance function. Refer to the description of the function User Authority Maintenance for a detailed description.
Start Table Maintenance (STRTM)
This menu command starts the table maintenance function. Refer to the description of the function Table Maintenance for a detailed description.
Start Ratification Group Maintenance (STRRGM)
This menu command starts the ratification group maintenance function. Refer to the description of the function for a detailed description.
Start Environment Maintenance (STREM)
This menu command starts the environment maintenance function. Refer to the description of the function Environment Maintenance for a detailed description.
Start Fill Object File (STRFOF)
This menu command starts the fill object file function. The function Fill Object File is started if no application code or environment code is entered. Refer to the description of the function Fill Object File for a detailed description.
Connection Rules Maintenance (STRCRM)
This menu command starts the connection rules maintenance function. Refer to the description of the function Connection Rules Maintenance for a detailed description.
Start Type Maintenance (STRTCM)
This menu command starts the Type code maintenance function. Refer to the description of the function Type code Maintenance for a detailed description.
Start Object Maintenance (STROM)
This menu command starts the object maintenance function. Refer to the description of the function Object Maintenance for a detailed description.
Recovery Management
The Recovery Management menu contains functions concerning Fallback and Recovery. This includes the Dumped Source Maintenance, the Fallback Library Maintenance, the Start Fallback and the Resume Transfer functions.
Exception Management
The Exception Management menu contains functions concerning Exceptions. This includes the Exception Functions Maintenance, the Exception Selection Maintenance and the Conversion Maintenance functions.
Work Management
The Exception Management menu contains functions concerning Exceptions. This includes the Exception Functions Maintenance, the Exception Selection Maintenance and the Conversion Maintenance functions.
Enter Application Code
This program is used to let the user sign on to an application and deny the start of any program if they do not have the needed authority.
Enter application code
Use this display to Log on to an application defined in TD/OMS if you are not already signed on to an application. TD/OMS prompts you for the application code you want to work with.
Application code
Enter the application code you want to work in. A blank value is not allowed.
Use F4 to obtain a list of all application codes.
User not authorized
This display appears if you started a TD function, but you are not authorized to use it. Ask the TD manager to increase your authority level.
Expired license
This display appears if you started a TD/OMS module, but your license has expired. You should contact your supplier to get a new license code to prolong the TD/OMS module's use.
Module not registered
This display appears if you started a TD/OMS module, but your license code is not registered. You should contact your supplier to get the correct license code to use the TD/OMS module.
User Authority Maintenance
The User Authority Maintenance function enables you to maintain the functional security for the application you are working with by grouping users into a pre-defined TD/OMS authorization class.
Users who are not authorized to start a specific function receive a message on their display.
In addition to functional security, specific rights can be assigned to users per environment (See Environment Maintenance).
A user belonging to the group *SECOFR, *SECADM, and the TD/OMS manager can start this function.
Code 3 users are also allowed to start this function once they have been declared.
The TD manager and the users belonging to the *SECOFR and *SECADM class are not automatically granted application rights for other functions.
Work with User Rights
The Work with User Rights display shows the currently authorized users, user groups, and/or user classes for the current application with their assigned authorization code. You can add an entry to the list, remove an entry from the list, or change the entry's assigned authorization code.
Active Application
The active application shows the code of the currently active application. If this field can be changed, you can activate a new application by typing the application you desire and pressing Enter. You can also use the F4=Prompt key to select an application from the list of available applications.
Position to
Use this prompt to go to a particular application in the list.
Option
Use this column to perform different operations on individual entries. The possible values are:
- 2=Change
Change the authorization code of a user, user group, or class. - 4=Delete
Delete the entry from the list. - F21=Print list
Print a user list to your job's current active output queue.
Maintain User Rights
The Maintain User Rights display shows information and enables actions depending on the option chosen on the previous display. The chosen action on the previous display is shown on line three. The following actions can be activated;
- Add
You can add a new entry definition. The entry code and the assigned authorization code must be entered. - Change
You can change the assigned authorization code of an existing entry definition. The current authorization code will be shown. The authorization code can be changed at any time. - Delete
The current entry and authorization code will be shown, including a confirmation message.
User ID or User Class
The user ID or user class element contains an OS/400 user, user group, or user class. The following rules apply to each entry:
- User ID
Enter a valid name of an existing user profile. This is the most detailed level to assign an authorization code to and will overrule any other definition. - User group
Enter a valid name of an existing user group profile. All members of this group are implicitly selected. Specifications at the user level, however, overrule the specifications per user group. - User Class
Enter A Valid User Class. All users belonging to a specified class are implicitly selected. Specifications at group and user level, however, overrule the specification per class.
Use F4=List to get a list of the available users.
Authorization code
TD authorization code determines which TD/OMS functions can be executed for a user, user class, or user group. Some TD/OMS functions also require authority at the environment level. Valid authorization codes are:
- 0=None
No rights are assigned to the related users. This value is useful if authorization codes are assigned at the group or class level and one user has to be omitted. - 1=User
Only functions at the end-user level can be executed. In general, these users can maintain their own user requests and inquire about the related Fix information. The request processor can maintain the requests from all users if this user is assigned authorization code 1. - 2=Programmer
Code two is specially meant for functions at programmer level. They are allowed to maintain their own fixes, connect objects to fixes, and start Fix Processing. Specific authorization depends on the rights assigned at the environment level. The request processor can maintain the fixes from all programmers if this user is assigned authorization code 2. - 3=Application manager
Users with code 3 are application managers and have rights for all functions at the application level.
The assigned authorization code can be changed at any time.
Command Start User Authority Maintenance (STRUAM)
This menu command starts the user authority maintenance function. Refer to the description of the function User Authority Maintenance for a detailed description.
This command has no parameters.
Application level authorization rules
Authorization to an application is determined based on the following sequence. As soon as a valid authorization is found at any level, that authorization is applied. And no further checks will be performed:
- User level Authorization
- If the user has direct authorization to the application, that will be used.
- Group level Authorization
- If the user does not have direct authorization, the system checks for authorization at the group level. This includes both the user’s primary group and any supplemental groups. The group with the highest level of authorization will be considered.
- User class level Authorization
- If the user class has direct authorization to the application, that will be used.
- Group class level Authorization
- The system checks for authorization at the group class level. This includes the user’s group class and the classes of supplemental groups. The group class with the highest level of authorization will be considered.
Environment level authorization rules
If environment level authority is defined for a user, user group, or user class, all authorized users must be explicitly listed. The Authorization to an environment is determined based on the following sequence. As soon as a valid authorization is found at any level, that authorization will be applied and no further checks will be performed:
- Environment level authorization is not marked.
- When no environment-specific authority is defined, Code 2 is allowed for all environments except Production, and Code 3 is allowed for all environments.
- User level Authorization
- If the user has direct authorization to the environment, that will be used.
- Group level Authorization
- If the user does not have direct authorization to environment, the system checks for authorization at the group level. This includes both the user’s primary group and any supplemental groups. The group with the highest level of authorization will be considered.
- User class level Authorization
- If the user class has direct authorization to the environment, that will be used.
- Group class level Authorization
- The system checks for authorization at the group class level. This includes the user’s group class and the classes of supplemental groups. The group class with the highest level of authorization will be considered.
Table Maintenance
The Table Maintenance display enables you to edit various tables defined in TD/OMS. The current table maintenance program enables you to edit the following tables:
Priority Codes
Priority codes are used in Request and Fix Maintenance. A priority code for a request means the requested priority. A priority code for a fix indicates the assigned priority. Only the priority code 5 will be accepted as a valid priority code in Request and Fix maintenance if no priority descriptions have been entered.
Reason Codes
Reason codes are used if a Request or Fix is completed manually, to indicate the reason why the request or fix has to be completed.
Request Types
The Request Type table can be used to further specify your requests. Each request can have a request type assigned to it.
Fix Types
The Fix Type table can be used to further specify your fixes. Each fix can have a fix type assigned to it.
Users with authorization code 3 are allowed to start this function.
Work with tables
The Work with table codes display shows the currently used table elements for a selected table. The priority table is shown if no specific table is selected. Changing of table is done by entering the table number, or by pressing F4=List to select another table.
Active Application
The active application shows the code of the current active application. If this field can be changed you can activate a new application by typing the application you desire and pressing Enter. You can also use the F4=Prompt key to select an application from the list of available applications.
Table code
The table code identifies a specific TD table. The following tables and related table codes are maintained in the Table Maintenance function:
- 01=Priority codes
Priority codes are used in Request and Fix Maintenance. A priority code means the requested priority for a request. The priority code indicates the assigned priority code for a Fix. - 11=Reason codes
Reason codes are used if a Request or Fix is completed manually, to indicate the reason why the request or fix is to be completed. - 21=Request Types
The Request Type table can be used to further specify your requests. Each request can have a request type assigned to it. - 22=Fix Types
The Fix Type table can be used to further specify your fixes. Each fix can have a fix type assigned to it.
Option
Use this column to perform different operations on individual entries. The possible values are:
- 2=Change
Change the table element. - 3=Copy
Copy the table element. - 4=Delete
Delete the table element. - 5=Display
Display the table element. - F6=Add
Register a new table element.
Confirm delete
The Confirm Delete of Table Entries display shows all of the table entries you have chosen to delete by selecting option 4 (Delete) on the Work with Table Entries display. The purpose of this display is to enable you to confirm your delete requests before the entries are deleted. Press Enter to confirm the delete of the selected table entries or press F12=Cancel to return to the previous display and change your choices.
Maintain table element
The Maintain Table Element display shows information and enables actions depending on the option chosen on the previous display. The following actions can be activated;
- Add
You can add a new entry definition. The entry code and its attributes must be entered. - Change
You can change some attributes of an existing table element. The current content of these attributes is shown. - Display
You can display some attributes of an existing table element. The current content of these attributes is shown.
Short table key
The short table key is a one character identification of a table entry. It can be used instead of the Long table key.
Long table key
The long table key is a five character identification of a table entry and should have a more meaningful content than the Short table key.
Table item description
The table item description contains the description of a table entry. A blank value is not allowed.
Default indicator
The default indicator can contain the value '1' indicating that this entry will be the default one. Each TD table can have one default entry.
Command Start Table Maintenance (STRTM)
This menu command starts the table maintenance function. Refer to the description of the function Table Maintenance for a detailed description.
STRTM TABC(table)
Table (TABC)
Specify the table to be maintained. Once you started maintaining a table, you are also able to select another table for maintenance. Specify one of the following table codes:
- *PRIORITY
Specifies that the priority table is to be maintained. - *REASON
Specifies that the reason code table is to be maintained. - *TYPES
Specifies that the request type table is to be maintained.
Ratification Group Maintenance
The Ratification Group Maintenance function is used to define the ratification groups which consists of one or more persons authorized to ratify a request or a fix.
When the ratification groups are defined, you are able to link the groups to an environment using the Environment Maintenance function. In combination with the ratification type you can activate the ratification function for an environment.
When a fix or request reaches an environment for which ratification is active, the objects connected to this request or fix are not able to enter the next environment until at least one member of each ratification group has ratified the fix or the request.
Until the objects are ratified, they can only enter environments closer to the development environment. Objects are not able to leave the emergency environment until the fix or request is ratified.
Ratification Group Maintenance
The Work with Ratification Groups display allows you to add, change or remove a ratification group. You are also able to enter the Work with Members display.
To select an entry, type the option number in the option field area and press Enter. For more information about an option move the cursor to the option column and press Help. For more information about a function key, move the cursor to the function key area and press Help.
Application
The application control field shows the code of the current active application. If this field can be changed you can switch into a new application by entering the application code you wish to maintain. You can also use the F4=Prompt key to select an application from the list of available applications.
Scope
Enter the scope in which to view the ratification group list. Select one of the following;
- *ALL
Use this value to view all ratification groups of this application and all system ratification groups from other applications. - *APP
Use this value to view all ratification groups of this application only. These groups can only be used by the current application. - *SYS
Use this value to view only system ratification groups. These member groups can be used in any application.
Option
Use this column to perform different operations on individual entries. Type the option number next to an entry and press Enter. You can type the same option next to more than one entry at a time, and you can also type different options next to different entries at the same time. The possible values are:
- 2=Change
Change the description of the ratification group. - 4=Delete
Delete the ratification group. - 12=Work with member
Enter the Work with Members display. From this display you can assign employees to a ratification group.
Position to
Use this prompt to go to a particular area in the list. Use it for quick repositioning of the list, not for creating a subset of the list. The possible values are:
Name or partial name
Type the name or partial name of the entry you want to go to in the list. The list is positioned to the first entry beginning with the string specified. If no entry exists in the present list, then the list is positioned to the entry immediately preceding the item you need to select.
Use F11=View to view the list with additional information about the entries.
Use F4=List to display a list of possible entries for the field on which the cursor is placed.
Confirm Delete of Ratification Groups
Use this display to confirm the delete requests you have made on the previous display. Press Enter to remove the selected items. Press F12=Cancel to cancel your request.
Maintain Ratification Group
The Maintain Ratification Group display enables you to maintain the ratification group data. In add mode, you are able to add a new ratification group. You are able to determine whether this is a system ratification group or a ratification group only active in the current application. For more information about a specific item, move the cursor to that item and press Help.
System Group
Indicates whether this ratification group is a system or an application ratification group. System groups can be used across application where application groups can only be used in the application to which they are assigned.
Ratification group
A ratification group is a group of authorized persons which are allowed to ratify a request or a fix. At least one person of each ratification group must ratify the request or fix before the connected objects are able to leave the environment to which this ratification group is connected.
Note: The ratification type indicates if ratification must be done at the request or at the fix level.
Ratification group description
This element contains the description of the ratification group.
Work with Members
The Work with Members display enables you to maintain the employees that are linked to this ratification group. An employee can be linked to more than one ratification group, and more than one employee can be linked to the same ratification group. Once a employee is linked to a ratification group, he or she is able to start the ratification function for the request or the fix. This enables the employee to ratify the fix and enter his or her findings in the ratification function.
The employees linked to a ratification group, must be a valid i5/OS user profile. For more information about a specific item move the cursor to that item and press Help. For more information about a function key, move the cursor to the function key area and press Help.
Use option 1=Add in combination with a valid user profile to add a member into the ratification group.
Confirm Delete of Members
This display is shown when you requested a remove of a member from the ratification group. Press Enter to remove the member. Press F12=Cancel to cancel the remove and return to the previous display.
Command Start Ratification Group Maintenance (STRRGM)
This menu command starts the ratification group maintenance function and has no parameters.
Environment Maintenance
The Environment Maintenance function enables you to maintain the environments for the current, active application.
An environment is a phase in the maintenance cycle and normally contains the libraries that are part of it. Empty environments, however, can be declared in order to use them only as a status phase. Object oriented applications will have environments like Development, Test, Acceptance and Production. Objects are registered in TD/OMS including the environment code they reside in. Request, Fix and Solution also relate to an environment indicating the status of the request, fix or solution.
Refer to the Environment concepts for more detailed information about environments.
The following information can be stored per environment;
- Environment attributes
- Security per environment
- Compilation libraries per environment
- Definition of library lists
- Library list attributes
- Distribution list per library list
- Libraries per library list
- Special keywords per library
- Object types and attributes per library
Users with authorization code 3 are allowed to start this function.
Work with Environments
The Work with Environment display shows the currently defined environment codes with their sequence number, description and library list attribute. You can add an environment to the list, remove an environment from the list, change the attributes of an environment, work with security per environment and work with the library lists per environment.
Active Application
The active application shows the code of the current active application. If this field can be changed you can activate a new application by typing the application you desire and pressing Enter. You can also use the F4=Prompt key to select an application from the list of available applications.
Position to
Use this prompt to go to a particular environment in the list.
Option
Use this column to perform different operations on individual entries. The possible values are:
- 2=Change
Change the sequence number, the description, or the library list attribute of an environment. - 4=Delete
Delete an environment from the list. - 6=Print
Print the environment definitions. - 8=Security
Work with the security definitions of an environment. - 12=Work w. library lists
Work with library lists connected to an environment. This is also the starting point for further definition of libraries per library list and object types per library. - 13=Ratification
Enter the ratification specifications for this environment. The request/fix ratification must be activated before ratification can take place. To do this, use option 2=Change for the environment. - 15=Compilation Libraries
Enter the compilation libraries connected to a specific environment. - 17=Comments
Work with the comments and replies associated with a specific environment. - 18=Job Descriptions
Work with Job Descriptions. - F6=Add
Add a new environment to the list.
Maintain Environment
The Maintain Environment display shows information and enables actions depending on the option chosen on the previous display. The chosen action on the previous display is shown on line three. The following actions can be activated;
- Add
You can add a new environment definition. The environment code, sequence number, description and library list attribute must be entered. - Change
You can change the sequence number, description and library list attribute of an existing environment definition. The current values are shown. These attributes can be changed at any time and are effective immediately. - Delete
The current environment attributes are shown, including a confirmation message. After pressing "Enter" the environment definition is deleted from the list. Deletion of environments is not allowed if library lists are still connected to the environment.
Environment code
The environment code identifies a step in the application cycle and can be a short description of the environment like *DEV, *TEST or *PROD. The environment code is also used as a status attribute for requests, fixes and objects.
The code cannot be changed once it has been added. To rename an environment, delete the old environment and create a new one.
The values "*NEW", "*LCK", "*LOCK", "*CMP", "*ANY", "**DST", "**ERR" and "*PLND" are reserved by TD/OMS. A blank value is not allowed.
Note: You might wish to start the environment code with an asterisk (*), because this code is also used as a status field.
Environment description
The environment description contains a description of the environment code. A blank value is not allowed.
Environment sequence number
The environment sequence number is of importance for the routing of objects during Object Transfer and indicates the sequence of environments in the maintenance cycle. The following rules apply to the sequence number:
- Number 00 is a reserved number for an emergency environment. At the start of the maintenance cycle you can decide to follow the normal or the emergency routing. The emergency routing is specially useful for the rapid solution of the problems with the production functions. Begin sequencing with a number greater than zero if you do not wish to use an emergency environment.
- The lowest number greater then zero is the start of the normal maintenance cycle and is mostly called development.
- The highest number represents the end of the maintenance cycle, called the production environment. The status of Requests, Fixes and Objects which are placed in this environment by TD/OMS, is set to "*CMP" which indicates completion.
- Other numbers represent the phases in between the lowest and the highest number and will be passed in order of sequence number.
Note: Adding a new "Highest sequence number" to the list, will not result in resetting the status of Requests, Fixes and Objects in the previous highest environment. They will keep the status "*CMP".
Include library lists
The include library list selection code is the conditional controller for TD/OMS during Object transfer procedure: transporting Fixes and Solutions from one environment (From-environment) to a subsequent or previous environment (To-environment). If the TO-environment is divided into more than one library lists, the value of this attribute determines the way of selecting target locations in those various library lists of the TO-environment:
*ALL
All library lists in the TO-environment are automatically selected.
*SELECT
A selection display is shown during Transfer for a selection of library lists. One or more library lists can be selected.
When a transfer path is defined on the task the *SELECT setting will show only the targets that contain the Transfer Path or do not contain any Transfer Path.
*PATH
Only those library lists in the target environment are automatically selected, if the Transfer Path assigned to the Task, matches the Transfer Path that is found in one of the library list definitions of the target environment.
It is possible to define a library list:
- Without Transfer Path and without a User Profile.
- It will receive all objects, regardless of the defined Transfer Path in the Task and the user doing the transfer.
- With a User Profile without Transfer Path.
- In this case, it will be selected only when that user does the transfer.
- With a User Profile and a Transfer Path.
- In this case, it will be selected only when that user does the transfer and the Task has that Path.
- Without a User Profile and with Transfer Path.
- In this case, it will be selected only when the Task has that Path.
*USRPRF
This selection mode can be used to automatically select the correct target library list(s) for a transfer to development in case each developer has its own set of libraries. Also this option may offer a way of additional authority at library list level just preventing generally authorized users to start transfer to specific, individual library lists. An automatic selection of one or more library lists in the TO-environment will be determined by tracing the following series of conditions:
- a match is searched for the Path definition in the library list and one of the following attributes of the Job user profile:
- the user profile,
- the user class,
- the group profile,
- the Group profile class,
- a supplemental group or
- the class of a supplemental group.
- If a target library list was found AND the fix contains a Path code then that Path must also be specified for that target library list. This is an extension of the *PATH selection method.
*NONE
No library lists are selected during Fix Processing, because definitions are absent. This value is meant for environments which serve only as a status phase in the maintenance cycle. No objects are physically transferred.
Number
A selection display is shown during Fix Processing for a selection of the specified number of library lists.
Per selected library list TD/OMS will determine for each object via the object's type and attribute if the object has to be created in that library list.
Note: The values *SELECT, *PATH, *USRPRF, *ALL and *NONE are mutually exclusive with number.
Ratification type
The ratification type defines the method of ratification before objects are able to leave the environment. The possible values are:
- 0=None
This value indicates that no ratification has to be performed for objects passing trough this environment. The objects can be moved from this environment by all authorized persons. - 1=Request
Use this value to indicate that ratification is to be done at the request level. Objects which are connected to the related fixes are not able to leave the environment until the request is ratified by the required number of people. - 2=Fix
Use this value to indicate that ratification is to be done at the fix level. Objects which are connected to a fix are not able to leave the environment until the fix is ratified by the required number of people.
The number of ratifications required to release objects from a fix or request depends on the number of ratification groups defined for the environment.
Required Ratifications
This element indicates how many ratification groups are connected to this environment.
Work with Compilation library list
The Work with Compilation Libraries display shows the currently defined libraries in the selected compilation library list and allows the following actions to be activated;
- Add
If a Compilation library list has not already been defined, you can insert data in the Add mode and a new compilation library list is created. - Change
If there is already a compilation library list defined, you enter in the Change mode and the compilation library list is shown. The attributes can be changed at any time and changes are effective immediately. - Copy
Press F13 to add a new compilation library list using the current compilation library list as a base. A confirmation message is shown. The compilation library list is copied after pressing Enter. - Delete
Press F22 to delete the current compilation library list. A confirmation message is shown. The compilation library list is deleted after pressing Enter.
(STREM -> Option 15)
At the Environment Level
- *LIBS
- If this value is specified then all object and source libraries in the sub-environment will be added to the compilation list automatically.
- *OMSLIB
- A list sequence number along with the special value *OMSLIB indicates after which library the TD/OMS product library will be located. if *OMSLIB is not specified the TD/OMS product library will be added to the end automatically
At the Sub-environment Level
Please note that a compilation at the sub-environment level might not be needed. The value *LIBS and other shared libraries may be added on the environment level.
(STREM -> Option 12 -> Option 15)
The Compilation library list has to include library definitions where the compiler may locate object references needed for the compilation process. Generally, the list contains most or all libraries that are part of the library definitions in the actual and possibly higher Environment levels. Besides the TD/OMS product library should be added.
You can change the search order by changing the list sequence numbers. You can insert a library to the search list by adding its name and a sequence number. For example, adding library MYLIB in such a way that it is located after the library with sequence number 10 but before sequence 20, insert a sequence number between 11 and 19 along with the name MYLIB. To remove a library, blank out the library name and press Enter.
- *LIBS
- If this value is specified then all object and source libraries in the sub-environment will be added to the compilation list automatically.
- *ENV
- A list sequence number along with the special value *ENV defined in the compilation library list at the library list level indicates after which library the libraries defined at the environment level will be located.
- *JOBLIBL
- This value is used to insert the current job library list. The use of this value is not recommended because it depends on the current value of the job library list. However, in some rare circumstances it might be useful. Use with caution.
- *OMSLIB
- A list sequence number along with the special value *OMSLIB indicates after which library the TD/OMS product library will be located. if *OMSLIB is not specified the TD/OMS product library will be added to the end automatically
- Other Libraries
- You may need other libraries that you interface with. Add them to the list on the correct location.
Starting from i5/OS V5R1 the maximum number of libraries in the Compilation library list has been increased from 23 up to 248 libraries.
Application Groups Compilation Library List
Be aware that Compilation library lists are defined for a specific TD/OMS sub-environment (Environment library list). However during the object transfer process a Compilation library list is activated separately for each actual object using the transfer buffer variable data related to the current object.
When (in some way), your transfer procedure includes also related objects that may reside in a different Application or Environment, the transfer process will retrieve the Compilation list specification defined in that foreign Environment. This feature may cause unintended or conflicting results. So it is not prefered to use a combination of Compilation library lists and recompiling procedures (by Actions or Exceptions), when objects in different Applications and/or Environments may be involved.
In case of object references located in different Applications or Environments a new search mechanism extending the former Compilation library list method, is available from version V10M0. This new way of dynamic searching and adding relevant, reference libraries to the library list can be defined by use of the Concept of Application groups.
Work with Library Lists
The Work with Library List display shows the currently defined library lists with their sequence number, description and other attributes. You can add a library list, remove a library list, print a library list, change the contents of a library list and work with the distribution list, directories, compilation library list and Transfer path connected to a library list.
The "Library list" definition, used in TD/OMS, should not be confused with the "Library List" in OS/400 which used to set a path. The Library List Defintion in TD/OMS defines which libraries and directories are part of that application. It actually also contains a compilation library list.
Examples of working with more than one library list are;
- To divide the development environment into a library list per programmer. You can select to which library list the objects have to be copied during Object Transfer.
- If a specific environment has more than one database, each containing its own data. The production environment could contain a production database and a database for education purposes. Use the library list definition to define both databases and they will be filled by TD/OMS.
Filter
Use this prompt to display the library list(s) in the list that match the filter criteria.
Position to
Use this prompt to go to a particular library list in the list.
Option
Use this column to perform different operations on individual entries. The possible values are:
- 2=Change
Change the attributes of a library list. - 3=Copy
Copy the library list. The copied list will be added after the last library list. - 4=Delete
Delete a library list from the list. - 6=Print
Print the definition of the library lists. - 8=Distribution list
Enter work with the distribution list connected to a specific library list. - 12=Work with libraries
Enter work with the libraries connected to a specific library list. - 13=Work w Transfer path
Enter work with transfer paths connected to a specific library list. - 14=Work w directories
Enter work with the directories connected to a specific library list.
Note:This option is only valid with OS/400 version V4R3M0 or higher. - 15=Compilation Libraries
Enter work with the compilation libraries connected to a specific library list. - 17=Comments
Enter work with the comments connected to a specific library list. - F6=Add
Add a new library list to the environment.
Maintain Library List
The Maintain Library List display shows information and enables actions depending on the option chosen on the previous display. The chosen action on the previous display is shown on line three. The following actions can be activated;
- Add
You can add a new library list definition. - Change
You can change the library list attributes. The current contents are shown. These attributes can be changed at any time and are effective immediately. - Copy
You can add a new library list definition based on an existing one. - Delete
The current library list definition is shown, including a confirmation message. The library list definition is deleted from the list after pressing Enter. The objects however, are not cleared from the TD/OMS object file. Use the function Fill Object File instead.
Library List Sequence number
The Library List sequence number influences the order the library lists are shown, selected and processed during an Object Transfer. You should therefore sequence the Library Lists in order of importance, starting with the local Library Lists. A zero value is not allowed.
The first Library List is the most important List and should always receive all objects. The first Library List is the first List receiving an object.
The transfer of objects is done per Library List. All objects are placed in the first library list then in the second and so on.
Note: The objects are considered transferred if all objects are successfully created in the first library list. If creation of objects fails for additional library list then the Transfer is considered successful. The status of the Fix and the objects are set but the Transfer job ends in error. You can do a Horizontal Transfer if this situation occurs. More about this in the Object Transfer concepts and the Work Management Guide.
Library list description
The library list description contains a description of the library list. A blank value is not allowed.
Relation level
The relation level determines the extent of searching by TD/OMS for the related objects. TD/OMS uses the default highest value 4 unless filled in otherwise. The possible values are:
- 0=DB, relations only
TD/OMS keeps track of relations between physical files (PF) and logical files (LF) only. Other relations are not registered. - 1=Relations only
TD/OMS keeps track of relations between other object types besides the relations between PF and LF without, however, searching for a specific environment and library. - 2=Database, relations and locations in the same library list
This value is equal to value 1 and it specifies the environment code and library name for related objects in the same library list. - 3=Relations in the same environment
This value is equal to value 2 and it specifies the environment code and library name for related objects in the same environment. - 4=Relations and locations
This value is equal to value 3 plus it specifies the environment code and library name for related objects in the same application or related applications.
Note: Value "4" and "0" are the most commonly used values.
Save replaced objects
The save replaced objects indicator instructs Object Transfer if replaced AS/400 objects or details of an OS/400 object have to be saved in the fall back save library.
This element only influences the saving of objects, not an automatic restore of objects after an error during object transfer.
The default value is '0'. The possible values are:
- 0=No
Replaced objects are not saved. - 1=On error
Replaced objects or details of a replaced object are only saved if an error occurred during an object transfer to this library list. - 2=Always
Replaced objects or details of a replaced object are always saved during an object transfer to this library list.
Quit and Fall Back
The Quit and Fall Back indicator instructs Object Transfer if replaced AS/400 objects or details of an OS/400 object in this library list have to be automatically restored if an error occurred during an object transfer. The default value is '0'. The possible values are:
- 0=No
No automatic fall back of replaced objects is executed if an error occurs during object transfer. TD/OMS will create as many objects as possible. - 1=First failure
The processing of this library list will stop and fall back will be executed for all replaced objects in this library list if an error occurred during a transfer in this library list.
If the error occurred in the first selected library list, further processing of other selected library lists will end. Processing will otherwise continue with the next selected library list. - 2=Follow rules
The decision to stop processing and start fall back will depend on a predefined critical object if an error occurred during a transfer in this library list.
Processing will continue and no fall back is executed if this critical object has been processed successfully. The processing will stop and fall back will be executed for all replaced objects if this critical object has not been created at this point in processing.
Further processing of other selected library lists will end if the error occurred in the first selected library list. Processing will otherwise continue with the next selected library list.
A critical object can be selected from the transfer proposal in the fix processing function just before you start the actual transfer.
Library list type
The library List Type is used in conjunction with the Object Distribution module at the moment of an object transfer.
If a library list is selected (manually or automatically), the library list type determines if the objects will be processed only on the current machine, only on remote machines specified in the distribution list, or on both remote and current machine. The possible values are:
- 0=Local
The library list is only valid for the current machine. No distribution to remote machines will be started, even if a distribution list is specified. This is the default value for the library list type. - 1=Both
The library list is valid for both the current machine and for remote machines, specified in the distribution list. The distribution module is activated in order to handle the distribution of objects if a type "1" library list has been processed during an object transfer. - 2=Remote
The library list is only valid for remote machines, specified in the distribution list. No objects are created on the current machine. The distribution module is activated immediately to handle the distribution.
Note: Library list types "1" and "2" will only work if you have the TD/OMS modules Object Distribution and Object Receiving installed on the sending and receiving machine.
Use F10 to proceed with the work with libraries display.
Status
You can use the status option to prevent objects to be distributed to that library list by using option 1=Disable. You can also define this section as a branching template by using option 2=template.
- 0=Active
The library list is used normally when transferring objects. - 1=Disabled
The library list is not used when transferring objects. - 2=Template
The library list is used as a branching template
Work with Libraries
The Work with Libraries display shows the currently defined libraries in the selected library list, and includes their predefined special keywords and an object indicator ("O"), indicating whether objects in that library are stored in the TD/OMS database. You can quickly toggle to the other information about the libraries, by using the F11=View function key.
A library definition contains information for TD/OMS about which object types and object attributes must be placed in that library, and where a possible related source can be found.
In general you only have to define the libraries where objects which are owned by this application reside. Most library lists contain one library for database objects, one library for related sources and one library for all other objects. Some additional search libraries can be added to the list for object relation purposes. These search libraries are not really owned by this application.
You can add a library to the list, remove an library from the list, or change the definitions of a specific library.
Option
Use this column to perform different operations on individual entries. The possible values are:
- 2=Change
Change the special keywords for a library, or to change the predefined object types and object attributes. - 3=Copy
Add a new library definition to the list using the copied library as a base. - 4=Delete
Delete a library from a library list. - 6=Print
Print the definitions of a specific library. - 8=Display object descr.
Execute the DSPOBJD command for the selected library.
Library sequence number
The library sequence number influences the order in which libraries are shown. The order is also of importance when relations for a specific object are being built and libraries with the *SEARCH indicator are defined. You can change the sequence number for reordering purposes.
The selection of the library first depends on the placement of the object types, object attributes and special keywords. The library sequence number determines which library is selected only if duplicate definitions exist.
A duplicate definition is found in the example below:
Order Library      Type & keywords
10    DOMST1OBJ 1  *ALL
20    DOMST1DTA 1  *FILE *SOURCE
30    DOMST1SRC 1  *SOURCE
The library DOMST1DTA is to receive the objects of type *FILE. This definition states that the sources of these objects must also be placed into this library. The application manager intended to place the sources of other objects into the DOMST1SRC library. To find a source library, TD/OMS first checks if the *SOURCE keyword was defined for the library receiving the object. If the keyword was not found then the library list is searched in sequence. This means that all sources would be placed in the DOMST1DTA because it is the first *SOURCE library. This is clearly not the intention of the application manager.
The definition should be entered like this:
Order Library      Type & keywords
10    DOMST1OBJ 1  *ALL
20    DOMST1SRC 1  *SOURCE
30    DOMST1DTA 1  *FILE *SOURCE
Files are placed into the DOMST1DTA library. The source is also placed into this library because of the keyword *SOURCE. Other objects are placed into the DOMST1OBJ library. This library does not contain the *SOURCE keyword. This means that TD/OMS starts to search the library list and finds the DOMST1SRC library as the first *SOURCE library. This is a correct definition.
Library
The library name is an OS/400 library or it can be defined as a logical library for describing folder and 4GL model storage information. Libraries are checked for existence if the library list type has a value of "0" or "1".
Refer to the functions Folder library definition and 4GL library definition for more detailed information about logical library names.
Use F6 to add a new library to the list.
Use F10 to proceed with the Work with Distribution Entries display.
Maintain Library
The Maintain Library display shows information and enables actions depending on the option chosen on the previous display. The chosen action on the previous display is shown on line three. The following actions can be activated;
- Add
You can add a new library definition. The library name, sequence number, special keywords and object types must be entered. - Change
You change can all definitions of the selected library. The current values are shown. These attributes can be changed at any time and are effective immediately. - Copy
You can add a new library list definition based on an existing one. - Delete
The current library definitions are shown, including a confirmation message. The library definition is deleted from the list after pressing Enter.
Library
The library name is an OS/400 library or it can be defined as a logical library for describing folder and 4GL model storage information. Libraries are checked for existence if the library list type has a value of "0" or "1".
You will be prompted to create the library when the name entered is not found.
Enter a valid library name in the Copied from Library field to copy the contents from an existing library into the new library or leave the value to *NONE to skip this step. You will be prompted to create the library and enter a description in all cases
When you want to copy the contents of an existing library a SMBJOB command is prompted which uses the Fast jobdescription defined at the application level.
The SBMJOB will run under your userprofile by default. Please make sure that your userprofile has sufficient authorisation to copy all the objects.
Refer to the functions Folder library definition and 4GL library definition for more detailed information about logical library names.
Template
In case you are defining a branch template library, the following special values may be used to compile a library name during the creation of a branch:
- %B
- The Branch code is used to compile the name of the library during the creation of the branch. Keep the Branch number to a reasonable width (e.g. 5 or 6) in order to be able to use additional decorations in the name.
- %U
- The first 3 positions of the current username are used to compile the name of the library during the creation of the branch.
- %S
- A sequence number is used to compile the name of the library during creation of the branch. The sequence number is 6 long and will return to zero after 999999 branches have been created.
Examples for library generation
%S: 000016
%U: PATRICIA
%B: B01233

+---------------------------------+
¦ Base value      Generated value ¦
+---------------------------------+
¦  %U%SD          PAT000017D      ¦
¦  DM%BD          DMB01233D       ¦
¦  %B%S%U         B012336PAT      ¦
+---------------------------------+
%S: 312882
%U: PATRICIA
%B: B1233

+---------------------------------+
¦ Base value      Generated value ¦
+---------------------------------+
¦  %U%SD          PAT312883D      ¦
¦  DM%BD          DMT01233D       ¦
¦  %B%S%U         B123382PAT      ¦
+---------------------------------+
Library sequence number
The library sequence number influences the order in which libraries are shown. The order is also of importance when relations for a specific object are being built and libraries with the *SEARCH indicator are defined. You can change the sequence number for reordering purposes.
The selection of the library first depends on the placement of the object types, object attributes and special keywords. The library sequence number determines which library is selected only if duplicate definitions exist.
A duplicate definition is found in the example below:
Order Library      Type & keywords
10    DOMST1OBJ 1  *ALL
20    DOMST1DTA 1  *FILE *SOURCE
30    DOMST1SRC 1  *SOURCE
The library DOMST1DTA is to receive the objects of type *FILE. This definition states that the sources of these objects must also be placed into this library. The application manager intended to place the sources of other objects into the DOMST1SRC library. To find a source library, TD/OMS first checks if the *SOURCE keyword was defined for the library receiving the object. If the keyword was not found then the library list is searched in sequence. This means that all sources would be placed in the DOMST1DTA because it is the first *SOURCE library. This is clearly not the intention of the application manager.
The definition should be entered like this:
Order Library     Type & keywords
10    DOMST1OBJ 1 *ALL
20    DOMST1SRC 1 *SOURCE
30    DOMST1DTA 1 *FILE *SOURCE
Files are placed into the DOMST1DTA library. The source is also placed into this library because of the keyword *SOURCE. Other objects are placed into the DOMST1OBJ library. This library does not contain the *SOURCE keyword. This means that TD/OMS starts to search the library list and finds the DOMST1SRC library as the first *SOURCE library. This is a correct definition.
Use the special value *NEXT to use the next free library sequence number.
Catch all library
A library with the catch all indicator specified indicates that that library is the default library to be used. Objects with an unspecified object type are placed in this library. The order of specifying the catch all library is of no importance.
If no catch all library is defined in a library list, only objects with the specified types are created in that library list.
Keep library
The Keep library indicator is used for a specific library to indicate that objects are not being removed by TD/OMS if a move operation is executed during Object Transfer. This is useful for libraries containing database objects, because the data in those files should be kept for testing purposes.
Note: A keep library will keep the objects during Object Transfer. A related source member however will always be removed after a move action. Use an exception if you also want to retain the source.
Source library indicator
The Source library indicator is used to define for a specific library that the library also contains related sources of objects. All source libraries are checked in the Fill Object File function, in order of appearance.
The definition of source libraries is also used during Object Transfer to decide where source members have to be stored. If an object is placed in a library which is also defined as a source library, the related source of that object is placed in that library. If an object is placed in a library which is not defined as a source library, the first source library (if any) in that library list will be used.
Refer to the Source handling concepts for more detailed information.
Relation search library
A library with the special keyword *Search is not an active part of the actual Environment library definitions, but it is mostly part of another application environment definition. A library with this indicator specified, can not have any other indicator specified. This search-library is used to tell TD/OMS that unresolved object relationships could be located in that library. An unknown object relation location is most commonly signaled when applications are interfacing through a master file or a program object uses system procedures or API's.
For example when your objects are using any object from the QSYS library, define the QSYS library with the search indicator. Now the relationship engine will check the QSYS library when relations of objects in the actual application must be built.
NOTES: A search library should not be defined in each TD/OMS library list (subenvironment). You only need to define search libraries at the highest production environment, because the search engine always checks all higher environments for related objects.
Since TD/OMS V10.0 an alternative method for searching object relationships in different applications may be implemented by use of the Concept of Application groups.
Option
Use this column to perform different operations on individual entries. The possible values are:
- 4=Delete
Delete an object type from the list - 12=Attributes
Continue with a window containing all attributes for the selected object type.
Object type definition
The object type is defined in the Environment Maintenance function to specify for a specific library which objects are to be placed in that library during an object transfer.
Object attribute
The object attribute definition is defined in the Environment Maintenance function to indicate for a specific object type which objects with that attribute are to be placed in the library you are working with. If you leave these fields blank, TD/OMS selects all attributes for the specified object type.
Use F10 to continue the function at the "Work with Object Types" display.
Use F19 to Left enables you to see the information at the left hand side of the current display.
Use F20 to Right enables you to see the information at the right hand side of the current display.
Work with Object Types
The Work with Object Types display shows the defined object types and attributes for a specific library and enables you to change these definitions.
This display is useful if a large number of object types have been defined for a specific library.
Use F10 to switch back to the library details.
Use F19 to Left enables you to see the information at the left hand side of the current display.
Use F20 to Right enables you to see the information at the right-hand side of the current display.
Work with Object Attributes
A window is shown containing defined object attributes belonging to the object type. If no attributes are defined, all attributes are selected for the object type. Enter a valid object attribute. TD/OMS does not check for validity. Return to the previous display by pressing Enter.
Object attribute
The object attribute definition is defined in the Environment Maintenance function to indicate for a specific object type which objects with that attribute are to be placed in the library you are working with. If you leave these fields blank, TD/OMS selects all attributes for the specified object type.
Work with Distribution Lists
(STREM -> Option 12 -> Option 8)
The Work with Distribution List display shows the currently defined distribution entries connected to the current library list you are working with. All attributes of an distribution entry are shown. A distribution list is used by TD/OMS during Object Transfer to detect the addresses to which information has to be sent.
If a specific library list is selected during Object Transfer, and the library list type contains value '1' or '2', indicating a remote library list, then the distribution list is checked for its definitions.
You can add a distribution entry, remove a distribution entry or change the contents of a distribution entry.
Option
Use this column to perform different operations on individual entries. The possible values are:
- 2=Change
Change the definition of a distribution entry. - 4=Delete
Delete a distribution entry from the list. - 6=Print
Print this distribution entry. - 18=Job Descriptions
Work with Job Descriptions. - F6=Add
Add a new distribution entry to the list.
Maintain Distribution Entry
The Maintain Distribution Entry display shows information and enables actions depending on the option chosen on the previous display. The chosen action on the previous display is shown on line three. The value '*' in an input capable field indicates that the default values are being used from a higher definition level. Each address used, has default values specified via the Remote Location Maintenance function. This is the highest definition level per address. Some exceptions can be defined at application level in the Remote Location Override function. This is the second definition level per address. In this function you can use the '*' value to adopt the actual value from a higher level. Other values will only be used for this specific entry.
The following actions can be activated;
- Add
You can add a distribution definition and enter all distribution attributes. - Change
You can change some attributes of the distribution definition. The current contents is shown. These attributes can be changed at any time and are effective immediately. - Delete
The current distribution definition is shown, including a confirmation message. The distribution definition is deleted from the list after pressing Enter.
From environment code
The From Environment Code is used for further specification when distribution has to be activated. Distribution of objects will only be activated when objects are being transferred from an environment that is declared in this From Environment Code.
Use the special value *ANY to indicate that this distribution entry is valid for all "from environments".
Address
The address identifies the name of a remote AS/400. The TD/OMS distribution services require the name of a remote location to which objects can be distributed. The remote address must be defined first in the Remote Location Maintenance function in the Distribution menu.
Distribute object indicator
The Distribute object indicates the type of distribution to be activated. The possible values are:
- 0=No
No objects are sent to the address specified. Only a job is sent in order to start Object Transfer on the address specified. Use this value only if objects were distributed to the address in an earlier phase of the maintenance cycle. - 1=Yes
The objects are sent to the address specified, followed by a job for processing these objects.
Example: You use the environments *DEV(elopment), *TEST, *ACC(eptance) and *PROD(uction). The acceptance is done on the remote system. If objects are transferred from *TEST to *ACC the distribution process has to be activated to send the object. If objects are transferred from *ACC to *PROD, the objects do not have to be re-sent to the remote system. They only have to be transferred on the remote system from *ACC to *PROD. Use the following specification:
Environment From Environment Type
*DEV
*TEST
*ACC        *TEST            1
*PROD       *ACC             0
Distribute sources
The Distribute Sources indicates if sources must be sent to the remote address. The possible values are:
- 0=No
No source members are sent to the remote address, except for logical files. - 1=Yes
All source members are sent to the remote address. *=Default
The value '*' indicates that the default values are being used from a higher definition level. Each address being used, has default values specified via the Remote Location Maintenance function. This is the highest definition level per address. Some exceptions can be defined at application level in the Remote Location Override function. This is the second definition level per address.
The lowest level of definition is in the Environment Maintenance function on the Maintain Distribution List Display.
Send application definitions
The Send Application Definitions indicator is used by TD/OMS to indicate if definitions have to be sent to the remote address. The possible values are:
- 0=No
No definitions are sent to the remote address. This value is used if you do not wish the local definitions to be made active on the remote location. Please keep in mind that the remote location must have valid definitions before a remote transfer can take place. You must manually enter the remote definitions if this value is used. - 1=Yes
The definitions are always sent to the remote location. Each time objects are distributed to the remote location the definitions are included and will automatically be implemented. - 2=When changed
The definitions are only sent to the remote location if some of the definitions have been changed. TD/OMS keeps track of changes and determines if the definitions have to be sent.
Note: The sending AS/400 is not able to detect a failure in the distribution. In other words; The mutation flags which are used to trigger the sending of the definitions are reset after the definitions have been sent to the remote location. If the distribution fails, you must manually set these flags by using the Vary Definition Distribution command. This will force the definition distribution on the next transfer to this location. *=Default
The value '*' indicates that the default values are being used from a higher definition level. Each address which is used, has default values specified via the Remote Location Maintenance function. This is the highest definition level per address. Some of the attributes can be altered at the application level by using the Remote Location Override function. This is the second definition level per address.
The lowest level of definition is in the Environment Maintenance function on the Maintain Distribution List Display.
Send exception definitions
The Send Exception Definitions indicator is used by TD/OMS to detect if exceptions must have to be sent to the remote address. The possible values are:
- 0=No
No exception definitions are sent to the remote address. This value is used if you do not wish the local exceptions to be made active on the remote location. - 1=Yes
The exceptions are always sent to the remote location. Each time objects are distributed to the remote location the definitions are included and will automatically be implemented. - 2=When changed
The exceptions are only sent to the remote location if some of the definitions have been changed. TD/OMS keeps track of changes and determines if the definitions have to be sent.
Note: The sending AS/400 is not able to detect a failure in the AS/400 part of the distribution. In other words, after exceptions are sent to the remote location, the alteration flags which are used to trigger the sending of the exceptions are reset. If the distribution fails, you must manually set these flags by using the Vary Definition Distribution command.
This will force the exception distribution on the next transfer to this location. *=Default
The value '*' indicates that the default values are being used from a higher definition level. Each address that is used, has default values specified via the Remote Location Maintenance function. This is the highest definition level per address. Some of the attributes can be altered at the application level by using the Remote Location Override function. This is the second definition level per address.
The lowest level of definition is in the Environment Maintenance function on the Maintain Distribution List Display.
Monitor Remote Job
The Monitor Remote Job indicates, whether a remote distribution job started from the actual system location, will be monitored locally i.e. the distributing system. The possible values are:
- 0=No
Jobs on the remote system address are not being monitored. - 1=Yes
Remote system jobs are being monitored. The status of the process will be logged at four points during the distribution and receiving process:- The first logging is recorded once the distribution process has been sent successfully.
- Next message is sent to the originating TD/OMS on the sending address once the receiving job starts receiving the network files.
- The actual start of the Object Transfer procedure at the remote system is the third monitoring point and finally
- The result of the processing is sent to the originator once the object transfer completes the final processing of the result.*:
All messages are sent to the message queue of the user profile OMS at the sending address. You should use the Remote Job Monitor function to check the status and results of all your jobs on remote systems.*:
Note: when using SNADS, user profile OMS on both addresses must be defined in the directory entries in order to use the monitoring facilities. Please consult the Distribution Concepts for details.
*=Default
The value '*' indicates that the default values are being used from a higher definition level. Each address being used has default values specified via the Remote Location Maintenance function. This is the highest definition level per system address. At the application level, various override values can be defined in the Remote Location Override function. This is the second definition level per address.
The lowest level of definition is in the Environment Maintenance function on the Maintain Distribution List Display.
Use F14 to refill all input fields with a '*', indicating that the values from the higher level are being used.
Work with Directories
The Work with Directories display shows the currently defined directories in the selected library list, and includes their predefined special keywords and an object indicator ("O"), indicating whether objects (files and other directories) in that directory are stored in the TD/OMS-database. You can quickly toggle to the other information about the directories by using the F11=View function key.
A directory definition contains information for TD/OMS about which Route an object follows through the development-cycle. A route connects in each environment to a directory.
You can add a directory the list, remove an directory from the list, or change the definitions of a specific directory.
Option
Use this column to perform different operations on individual entries. The possible values are:
- 2=Change
Change the definition of a directory, like the special keywords and the route that owns the directory. - 4=Delete
Delete a directory from the list. - 8=Print
Execute the DSPLNK command for the selected directory. - F6=Add
Add a directory entry to the list.
Maintain Directory
The Maintain Directory display shows information and allows actions depending on the option chosen on the previous display. The chosen action on the previous display is shown on line three. The following actions can be activated;
- Add
You can add a new directory definition. The directory name, route, route description and special keywords must be entered. - Change
You change can all definitions of the selected directory, except the route. The current values are shown. These attributes can be changed at any time and are effective immediately. - Delete
The current directory definitions are shown, including a confirmation message. The directory definition is deleted from the list after pressing Enter.
Keep objects when moving
The Keep directory indicator is used for a specific directory to indicate that objects are not being removed by TD/OMS if a move operation is executed during Object Transfer. This is useful for directories containing data files, because the data in those files should be kept for testing purposes.
- '0'
When the transfer ends, the copy of the object will be deleted from this directory. - '1'
When the transfer ends, the copy of the object will remain in this directory.
Route
The route code specifies the 'path' that an object follows through the environments. In every environment, a route has a directory connected to it. During Object Transfer, the object always stays in the same route. TD/OMS uses this route to search for the target-directory where the object will be located.
Description
This is a description of the route. In most cases, the name of the route should be a good description on its own, but the route description can further clarify the purpose of a route.
Directory
The IFS directory code is the directory in which the object is located. This is a path from the root of the integrated file system (IFS).
Work with Transfer Path
The Work with Transfer path display shows the currently defined paths in the selected library list. A Transfer path definition contains information for TD/OMS about which path an object follows through the development-cycle.
A path connects in each environment to a library list. You can add a path to the list, remove a path from the list, or change the description of a specific path.
The following modes can be activated;
- Add
You can add a Path to the library list. - Delete
You can remove a Path from the library list.
Option
Use this column to perform different operations on individual entries. The possible values are:
- 2=Change
Change the description of a path. - 4=Delete
Delete a path from the list. - F6=Add
Add a new Transfer Path
Add Transfer Path
The Add Transfer Path display enables to add a completely new or existing (from another library list or environment) transfer path to the library list.
Path
Type a new path name to add or press F4 to select a path.
Description
Type a description for the path
Maintain Transfer path
The Maintain Transfer Path display shows information and enables to change the description of the Transfer Path.
Description
Add or change a description for the current Transfer path.
Work with Security per Environment
The Work with Security per Environment display shows the previously entered specifications. The default environment security is assumed if no information is shown, which means that users with an authorization code "2" have environment rights for all environments except the highest (Production) and users with an authorization code 3 have environment rights for all environments.
The security per environment indicates that only authorized users are allowed to create or remove objects in that environment.
You can add an entry to the list, remove an entry from the list or change an entry. Any specification overrules the default security.
Position to
Use this prompt to go to a particular user in the list.
Option
Use this column to perform different operations on individual entries. The possible values are:
- 2=Change
Change the user code, user group or class. - 4=Delete
Delete the entry from the list. - F6=Add
Add a new user to the environments security list.
Maintain Security per Environment
The Maintain Security per Environment display shows information and enables actions depending on the option chosen on the previous display. The chosen action on the previous display is shown on line three.
You have to enter a specific user code, group or class, or you can enter an authorization code. Entering an authorization code will result in granting all users who have that authorization code to access this environment.
The following modes can be activated;
- Add
You can add a new entry definition. Enter a user or an authorization code. - Change
You can change the currently used entry code. - Delete
The current entry code is shown, as is a confirmation message. After pressing Enter, the entry will be removed from the list.
The entries can be changed at any time. A previously valid entry remains in effect for users with an active function.
User ID or User Class
The user ID or user class element contains the name of an OS/400 user, user group or user class. The following rules apply to each entry:
- User ID
Enter a valid name of an existing user profile. This is the most detailed level to assign an authorization code to and will overrule any other definition. - User group
Enter a valid name of an existing user group profile. All members of this group are implicitly selected. Specifications at user level, however, overrules the specifications per user group. - User Class
Enter A Valid User Class.
All users belonging to a specified class are implicitly selected. Specifications at group and user level, however, overrules the specification per class.
Authorization code
The TD/OMS authorization code determines which TD/OMS functions can be executed for a user, user class or user group. Some TD/OMS functions also require authority at environment level. Valid authorization codes are:
- 0=None
No rights are assigned to the related users. This value is useful if authorization codes are assigned at group or class level and one single user has to be omitted. - 1=User
Only functions at end user level can be executed. These users are in general able to maintain their own user requests and enquire about the related Fix information. The request processor is allowed to maintain the requests from all users if he has authorization code 1 assigned to him. - 2=Programmer
Code two is specially meant for functions at programmer level. They are allowed to maintain their own fixes, to connect objects to fixes and start Fix Processing. Specific authorization depends on the rights assigned at environment level. The request processor is allowed to maintain the fixes from all programmers if he has authorization code 2 assigned to him. - 3=Application manager
Users with code 3 are application managers and have rights for all functions at application level.
Use F4 to get a list of all current users.
Work with Ratification Groups
The work with ratification groups display enables you to maintain the ratification groups needed for a specific environment.
When ratification is activated, objects are not able to leave the environment before they are ratified. Ratification can be done by any member of the group, but at least one member of all groups must ratify the fix or request before it can be processed to the next environment.
Before a ratification group can be specified, it must be created using the Ratification Group Maintenance function. Ratification is activated by specifying a value for the Ratification Type environment attribute.
Position to
Use this prompt to go to a particular area in the list. Use it for quick repositioning of the list, not for creating a subset of the list.
Option
Use this column to perform different operations on individual entries. Type the option number next to an entry and press Enter. You can type the same option next to more than one entry at a time, and you can also type different options next to different entries at the same time. The possible values are:
- 1=Add
Add a group to the environment - 4=Remove
Remove a ratification from the list. - 12=Work w member
Work with the members of the indicated ratification group. Authorized users are also able to add or remove members to the ratification group.
Ratification group
A ratification group is a group of authorized persons which are allowed to ratify a request or a fix. At least one person of each ratification group must ratify the request or fix before the connected objects are able to leave the environment to which this ratification group is connected.
Command Start Environment Maintenance (STREM)
This menu command starts the environment maintenance function. Refer to the description of the function Environment Maintenance for a detailed description.
This command has no parameters. </translate>
Fill Object File
The Object database is a crucial step in the setup of an application in TD/OMS. All objects, their dependencies and related object data, including the location of the corresponding source, are registered. To attain this you will have to fill the object file at least once per application. This function can at will but when you consistently use TD/OMS for all your object changes then the database will always be in sync. You can run the function in report mode on a regular basis to make sure that this is the case and that nobody bypasses the Change Management system.
Several reports can be generated when this function is executed.
- A report is generated if errors or warnings occur during checking of the source locations (report OMQPR1OB).
- A report is generated if the contents of the database do not match the contents of the libraries, e.g. objects were added or removed manually since the last run or you had to restore the contents of a library (report OMQPR2OB).
- A report is also generated when TD/OMS finds conflicting dependencies. For example, when a file is referenced from a program but TD/OMS does not manage this file (report OMX016P).
Note: Be sure to check this report and correct the errors. The object file has to be filled completely, with the right data, before you can use an Object Transfer function. Users with authorization code 2 are allowed to use this function. A user must be authorized to an environment before this function actually does something.
Enter selection Fields
The Enter selection Fields display enables you to enter selection fields for the next Fill Object File process. These selection fields are mainly useful if you use the same libraries in different applications.
You can execute the normal Fill Object File process more than once. The main function of this program is to load objects from the libraries specified in the environment definitions into the Object database of TD/OMS.
If you share libraries amongst applications, e.g. you store all program objects into one production library, it is possible that objects are loaded in a wrong TD application. You can utilize the Fill Object file function to remove these objects and reload them in the correct application.
Note: Use the Processing Mode value 1 (Emptying) only when necessary because valuable changed data information will get lost.
Use F9 to retrieve the last entered selections for this application.
Active Application
The active application shows the code of the current active application. If this field can be changed you can activate a new application by typing the application you desire and pressing Enter. You can also use the F4=Prompt key to select an application from the list of available applications.
Environment code
Specify the environment to extract the objects from.
Route
Specify the route to extract the objects from or use any of the special values.
Library
Specify the library to extract the objects from or use any of the special values.
Object code
Specify the object code to retrieve information from. The possible values are:
- *ALL - All objects in the selected libraries are processed.
- Name - Enter an object code to be filled.
- *generic* - Enter a generic object code name to be filled.
- ?wild? - Enter a wild card for the objects to be filled.
Object Type
Specify the object type of the selected objects. The possible values are:
- *ALL - All object types are processed.
- Type - Enter the object type of the selected objects.
Object Attribute
Specify the object attribute of the selected objects. The possible values are:
- *ALL - All objects attributes are processed.
- Attribute - Enter a specific attribute
Processing mode
The processing mode is used to specify the OS/400 environment where the transaction has to be executed. Enter the value 0 for processing the function in a batch subsystem. Enter the value 1 for processing the function immediately in your current job. Your display will be locked.
Note: The job description OMSJOBD in the TD library is used for the job to be submitted.
Processing method
The processing method is used in the Fill Object File function to specify the action to be performed on the TD object database. The possible values are:
- 0=Filling
- The TD/OMS database will be updated with the latest object information.
- 1=Emptying
- Entries in the TD/OMS database are being removed. Use this option if several applications use the same libraries and wrong objects have been stored in this application in a previous Fill Object File process.
- 2=Report
- Use value 2 to get a list of differences between the TD/OMS database and the real system. This option will produce a report with new, changed and deleted objects.
Relations only
Use the Relations Only indicator to instruct TD/OMS to rebuild the relations for each selected object. The possible values are:
- 0=No - Both object info and object relations are being refreshed. Object relations however are only rebuilt if TD/OMS detects a different object change date for a specific object.
- 1=Yes - Only the object relations are being rebuilt, even when the object change date has not been changed.
Process Objects/Groups
The Process Objects/Groups indicator will be shown in the Fill Object File function if the application has a 4GL interface defined. This indicator is used to indicate if OS/400 objects are to be processed, 4GL objects or both. The possible values are:
- 0=Both
Both objects and groups are processed using this value. The group fill functions are activated after the process of normal (OS/400) objects. The program activated depends on the applications 4GL interface. - 1=Objects only
This value indicates that normal (OS/400) objects are to be processed and no group processing programs are to be started. - 2=Groups only
This value indicates that only group programs are to be activated to load the object file with group data. The group data that is processed depends on the activated interface.
Selection code
The Selection code is valid for Synon applications. It specifies, for Synon objects only, if a specific area must be selected for processing. The possible values are:
- 1=Any
All areas of the selected 4GL libraries are being processed. - 2=*AREA
Value *AREA indicates that the Synon Object Name contains the name of the application area to be processed.
Synon object name
The Synon Object name is only valid for Synon applications. It specifies the Synon object to be processed. The possible values are:
- *ALL - All Synon objects of the selected owning object are being processed.
- Name - Enter the name of an area if the selection code contains ‘2=Area’ or enter the name of a Synon object.
- Name* - Enter a generic* name of Synon objects.
Synon object owner
The Synon Object owner is only valid for Synon applications. It specifies the Synon object to be processed. The possible values are:
- *ALLOBJ - Use this value if the Synon Object name contains *ALL.
- *ANY - All objects are selected.
- Name - Enter the owning object code name.
Command Start Fill Object File (STRFOF)
This menu command starts the fill object file function. The function Fill Object File is started if no application code or environment code is entered. Refer to the description of the function Fill Object File for a detailed description. This command accepts the same selections as the Fill Object File function. Use the command mode to enable submission from user programs.
STRFOF	APPL(application code)
       ENVC(environment code)
       ROTC(route)
       OBJL(library)
       OBJC(object)
       OBJT(object type)
       OBJA(object attribute)
       PRCI(processing mode)
       PRCM(processing methode)
       RELI(relations only)
       OOGI(object/group)
       SELC(synon selection code)
       SAOC(synon object code)
       SOOC(synon owning object code)
Application Code - (APPL)
Specify the application code to fill objects from. If the application code is blanks and the request is made in an interactive session then the Fill Object File selection display is shown.
Environment Code - (ENVC)
Specify the environment code in the selected application to fill objects from.
Route - (ROTC)
Specify the route code in the selected application to fill IFS objects from. The possible values are:
- *ALL All routes of the selected environment are selected.
- *NONE No routes are used for the filling process.
- Name Enter a route name to be filled.
Note: Values specified for Object Code and Object Type are only valid for the processing of objects in libraries. These values are not used for the selection of objects in the Integrated File System; all IFS-objects in the specified route(s) are selected.
Object Library - (OBJL)
Specify the object library to fill objects from. The possible values are:
- *ALL All libraries of the selected environment are selected.
- Name Enter a library name to be filled.
Object Code - (OBJC)
Specify which objects must be selected. The possible values are:
- *ALL All objects in the selected libraries are processed.
- Name Enter an object code to be filled.
- *generic* Enter a generic object code name to be filled.
- ?wild? Enter a wild card for the objects to be filled.
Object Type - (OBJT)
Specify the object type of the selected objects. The possible values are:
- *ALL All object types are processed.
- Type Enter the object type of the selected objects.
Object Attribute - (OBJA)
Specify the object attribute of the selected objects. The possible values are:
- *ALL All objects attributes are processed.
- Name Enter the object attribute of the selected objects.
Processing Mode - (PRCI)
Specify the OS/400 environment to process this command. The possible values are:
- *BATCH The job is submitted to the batch environment using job description OMSJOBD.
- *INTERACTIVE The command is executed in your current job.
Processing Method - (PRCM)
Specify the kind of action to perform on the selected objects. The possible values are:
- *FILL
The selected objects are loaded in the TD/OMS database. - *EMPTY
The selected objects are emptied from the TD/OMS database. - *REPORT
A report is produced with the differences between the TD/OMS database and life situation. No information is stored in the TD/OMS database.
Relations Only - (RELI)
Specify if only the relationships of the selected objects have to be rebuild. The possible values are:
- *NO The selected objects are completely loaded in the TD/OMS database.
- *YES Only relationships of the selected objects are being rebuilt.
Object / Group - (OOGI)
Specify if normal objects, 4GL objects or both have to be loaded. The possible values are:
- *OBJECT Only normal OS/400 objects are being processed.
- *BOTH Both 4GL and normal objects are being processed.
- *GROUP Only 4GL objects are being processed.
Synon selection code - (SELC)
Specify, for Synon objects only, if a specific area has to be selected for processing. The possible values are:
- *ANY All areas of the selected 4GL libraries are being processed.
- *AREA Value *AREA indicates that keyword SAOC contains the name of the application area to be processed.
Synon object code - (SAOC)
Specify, for Synon objects only, the Synon object to be processed. The possible values are:
- *ALL All Synon objects of the selected owning object are being processed.
- Name Enter the name of an area if SELC contains *AREA or enter the name of a Synon object.
- *ALL All synon objects of the selected owning object are being processed.
Synon owning object code - (SOOC)
Specify, for Synon objects only, the Synon object to be processed. The possible values are:
- *ALLOBJ Use this value when SAOC contains *ALL
- *ANY No selection is performed on the owning object code.
- Name Enter the owning object code name.
Connection Rule Maintenance
Connection rules is a function to automatically place related objects into the connection list when you select an object for maintenance. E.g. If you connect a physical file, the related logical files are connected automagically (if you decide this). Rules can be defined with which the mechanism becomes flexible and configurable. Connection rules can be defined at a global level (for all applications) and/or at a application level. A global rule is replaced by a application specific rules with the same. Application specific rules with a different name will be added to the global rules when a object is being added to the connection list with rules.
Work with Connection Rules
The Work with connection rules display shows the currently defined connection rules for the current application. You can add an entry to the list, remove an entry from the list, copy a set of connection rules or change the connection rule definition and/or its details.
Application code
The active application shows the code of the current active application. If this field can be changed you can activate a new application by typing the application you desire and pressing Enter. You can also use the F4=Prompt key to select an application from the list of available applications. Enter *ALL to display the Global connection rules. The global rules will be shown immediately when no application specific connection rules exist.
Selection code
Use this field to show active rules only (*ACTIVE) or both active and disabled rules (*ALL).
Position to
Use this field to position the list of connection rules.
Object
Use this field to create a subset of the list on object code.
Type
Use this field to create a subset of the list on object type.
Attribute
Use this field to create a subset of the list on object attribute.
Option
Use this column to perform different operations on individual entries. The possible values are:
- 2=Change
Change the description, object code, type, attribute or the detail code of a connection rule. - 3=Copy
Copy an existing connection rule to a new rule. Currently defined connection rule details also will be copied. - 4=Delete
Delete an existing connection rule. Currently defined connection rule details also will be deleted. - 12=Work with Connection Rule Details
Type 12 to work with the detail definitions of a specific connection rule. - F6=Add
Add a new connection rule.
Maintain Connection Rules
The Maintain Connection Rules display shows information and allows actions depending on the option chosen on the previous display. The chosen action on the previous display is shown on line four. The following actions can be activated:
- Add
You can add a new entry definition. The connection rule code, description, object code, object type and object attribute must be entered.
- Change
You can change the description, object code, object type and/or object attribute from an existing entry definition. The current connection rule header will be shown. The connection rule header can be changed at any time.
- Copy
All the fields will be copied from the current connection rule header to a new entry definition, except the Connection Rule code. After an unique Connection Rule code is entered, the other fields can be changed. Connection rule details defined for this current connection rule header also will be copied.
- Delete
The current connection rule header entry will be shown, including a confirmation message. Connection rule details defined for this current connection rule header also will be deleted.
Note: For more information about a specific attribute move the cursor to the attribute area and press Help.
Active Application
The active application shows the code of the current active application or *ALL in case of a global rule.
Connection rule code
The connection rule code is used as a unique identifier for the connection rule.
Connection rule description
The connection rule description can be used to indicate the function of the connection rule. A blank value is not allowed.
Primary Object RegEx
This field contains the regular expression that is used in the evaluation of the primary object. If the object code matches the regular expression, the evaluation of the primary object continues. For more information about regular expressions, please refer to the Regular Expression Concepts.
Object type
This field is used to specify the condition for the object type. The connection rule will only be applicable for objects of the specified object type. For example, when the value *FILE is specified, then the connection rule will only be further evaluated if the object being processed has the object type *FILE. This field does not allow the use of special values.
Object attribute
This field is used to specify the condition for the object attribute. The connection rule will only be applicable for objects of the specified object attribute. For example, when the value PF is specified, then the connection rule will only be further evaluated if the object being processed has the object attribute PF. (In this case, the value *FILE will most probably be used for the field Object Type.) This field does not allow the use of special values. However, the field can have a blank value.
Connection Rule type
This field is used to (temporarily) disable a item definition or rule. If the item or rule will never be used again, then it can be deleted altogether. The possible values are:
0=Enabled
The item selection is enabled, i.e. the item will be evaluated, and the item will be executed when all selection criteria have been fulfilled.
1=Disabled
The item is disabled, i.e. the item will not be evaluated, and the item will never be executed.
2=Continuation
The item will only be executed when it is defined as a "continue with rule" in a detail of another connection rule.
Work with Connection Rules Details
The Work with connection rule details display shows the currently defined set of detail records for the current connection rule. You can add detail definitions to a connection rule, remove detail definitions from a connection rule, copy a connection rule detail definition or change connection rule detail definitions.
Option
The possible values are:
- 2=Change change the environment code or the continue processing indicator of the connection rule detail.
- 3=Copy
copy an existing connection rule detail. - 4=Delete
delete an existing connection rule detail. - F6=Add
Add connection rule details
Maintain Connection Rules Details
The Maintain Connection Rules Details display shows information and allows actions depending on the option chosen on the previous display. The chosen action on the previous display is shown on line four. The following actions can be activated;
- Add
You can add a new entry definition. The object code, object type, object attribute and the continue processing indicator must be entered for the related objects. - Change
You can change the continue processing indicator from an existing entry definition. The current connection rule will be shown. The connection rule can be changed at any time. - Copy
All the fields will be copied from the current connection rule detail to a new entry definition. Related object code, object type and/or object attribute has to be changed, otherwise an error will occur (record already exists). - Delete
The current connection rule entry will be shown, including a confirmation message.
Application code
The active application shows the code of the current active application or *ALL for a global rule.
Connection rule code
The connection rule code is used as a unique identifier for the connection rule.
Connection rule description
The connection rule description can be used to indicate the function of the connection rule. A blank value is not allowed.
Object code
This field contains the regular expression that is used in the evaluation of the primary object. If the object code matches the regular expression, the evaluation of the primary object continues. For more information about regular expressions, please refer to the Regular Expression Concepts.
Object type
This field is used to specify the condition for the object type. The connection rule will only be applicable for objects of the specified object type. For example, when the value *FILE is specified, then the connection rule will only be further evaluated if the object being processed has the object type *FILE. This field does not allow the use of special values.
Object attribute
This field is used to specify the condition for the object attribute. The connection rule will only be applicable for objects of the specified object attribute. For example, when the value PF is specified, then the connection rule will only be further evaluated if the object being processed has the object attribute PF. (In this case, the value *FILE will most probably be used for the field Object Type.) This field does not allow the use of special values. However, the field can have a blank value.
Related object RegEx
TThis field contains the regular expression that is used in the evaluation of the related object. If the object code matches the regular expression, the evaluation of the related object continues. In this field, some special characters can be used. These characters are not part of the standard regular expression syntax. When these special characters are used, the advanced function field 'Object contains mask' should have the value '1'.
The special characters are the following:
Percent sign (%)
This character can be used to insert selected characters from the object code of the current primary object into the regex for the related object. For example: assume that the primary object regular expression states that the object code should have four characters, with the character 'R' on the last position. The regular expression would be '...R' (without the apostrophes). Now, the related object code should have five characters, with the character 'A' on the first position, and the character 'D' on the last position. Furthermore, the three middle characters should correspond to the starting characters of the primary object. To achieve this, the following expression should be entered: '%%%R|A%%%D' (again without the apostrophes). At runtime, the character at the first position of the primary object code is copied to the second position of the related object code, and likewise for the characters on the second and third position of the primary object code.
Ampersand sign (&)
This character can be used to insert the complete object code of the current primary object into the regex for the related object. For example: assume that documentation has been written for each program in an application. For a program named ABC001, the documentation is stored in a document named ABC001DOC. Thus, the related object code should correspond to the primary object code, followed by the characters 'DOC'. To achieve this, the following expression should be entered: '&DOC'. At runtime, the ampersand-sign is substituted with the current primary object code.
Related object type
This field is used to specify the conditions for the object type of the related object. An object will only be a candidate for being added to the connection list if it has the correct object type. This field does not allow the use of special values.
Related object attribute
This field is used to specify the conditions for the object attribute of the related object. An object will only be a candidate for being added to the connection list if it has the correct object attribute. This field does not the use of special values. However, the field can have a blank value.
Object contains mask
Specify a 1 when the % and & characters should be treated as substitution characters.
Relation scope
Specifies the scope of the connection processing. The possible values are:
*ALL The related component does not have any relation with the primary component. The component can be any existing component in the object database. Use this value to connect objects for which TD/OMS can not implicitly determine a relationship and stores that in its database, such as functional design documents that describe programs.
*RELATED    The component to find must be related to the primary object and it refers  a used-by or a using relation.
*USING      The component to find must be related to the primary object and it refers a using relation.
*USEDBY     The component to find must be related to the primary object and it refers a used-by relation.
Environment scope
Specifies the scope of the connection processing. The possible values are:
*ALL       All environments are used to determine the relation of the component.
*CURRENT   Only components in the environment where the primary object currently resides will be connected.
Continue with rule
Specifies the connection rule to continue with. The possible values are:
*ALL All connection rules are evaluated again. If your current rule definition is within a specific application, all rules of that application will be loaded and evaluated. If your current definition is a *ALL rule, rule selection will be: all rules in currently active application and the *ALL rules that do not occur in the application set. Please be very carefull when you plan to use this value. Changes in the connection rule can dramatically change the beheaviour of the connection function.
*NONE No further processing will be done.
Solution type
The solution type to assign to the object that is added to the connection list.
Disable connection rule
This field is used to (temporarily) disable a item definition or rule for example a Connection rule or an AI definition If the item or rule will never be used again, then it can be deleted altogether. The possible values are:
0=Enabled
The item selection is enabled, i.e. the item will be evaluated, and the item will be executed when all selection criteria have been fulfilled.
1=Disabled
The item is disabled, i.e. the item will not be evaluated, and the item will never be executed.
Command Start Connect Rules Maintenance (STRCRM)
This menu command starts the object maintenance function. This command has no parameters.
STRCRM
User Defined Variable Maintenance
The User Variable Maintenance function can be used to add, change and delete User Variables. With this function, the characteristics of a User-defined substitution variable are maintained. These variables can be used in action definitions and compile type codes.
Work with Variables
This screen displays a list of the currently existing user-defined substitution variables. You can use the options field to maintain these variables, or you can press F6 to add a new variable.
Position to
Use this prompt to go to a particular area on the list. Use it for quick repositioning of the list, not for creating a subset of the list. The possible values are:
- Name or partial name;
Type the name or partial name of the entry you want to go to on the list. The list is positioned to the first entry beginning with the string specified. If no entry exists in the present list, then the list is positioned to the entry immediately preceding the item you desire.
Option
Use this column to perform different operations on individual entries. Type the option number next to an entry and press Enter. You can type the same option next to more than one entry at a time, and you can also type different options next to different entries at the same time. The possible values are:
- 2=Change
Use this option to change the characteristics of an user-defined substitution variable.
- 3=Copy
Use this option to copy a user-defined substitution variable.
- 4=Delete
Use this option to delete a user-defined substitution variable.
- 5=Display
Use this option to display the characteristics of a user-defined substitution variable.
- F6=Add
Add a new Type of the currently active Variant.
Maintain Variable
This screen displays some characteristics of a user-defined substitution variable.
The User-defined substitution variable which can be used in action definition and will be substituted with the defined substitution value when the action is executed.
- Add
Used to add a new Variable definition. The name optionally the application and environment where this value is active. If the application is left blanks the variable is active for all applications. If the environment is left blanks the value is valid for all environments in that application or all applications. Multiple values can de be defined for one variable. - Change
You can change the value of the variable. - Copy
All the fields will be copied from the current Variable to a new entry definition. - Delete
The current variable will be shown, including a confirmation message. Pressing enter will delete the variable.
Note: For more information about a specific attribute move the cursor to the attribute area and press Help.
TD/OMS Recovery Management
The OMS recovery management menu enables you to start the TD/OMS recovery functions at application level. The functions in this menu are meant for an application manager.
Start Dumped Source Maintenance (STRDSM)
This menu command starts the dumped sources maintenance function. Refer to the description of the function Dumped Source Maintenance for a detailed description.
Define FallBack (STREM)
Before Fallback is active you have to specify a fallback save library in the STRAD (Application Definition) function. Then the Fallback needs to be activated for the Environment Library List.
- Application Definition (STRAD -> Option 2)
- Environment Library List Maintenance (STREM -> Option 12 -> Option 2)
Start Fall-back Library Maintenance (STRFBLM)
This menu command starts the fall-back library maintenance function. Refer to the description of the function Fall-back Library Maintenance for a detailed description.
Start Fall-back (STRFLBOMS)
The Start Fall-back command restores all objects from the fall-back library to their original location. It will always be submitted to the batch environment, using the job description OMSJOBD in the TD library.
Resume Transfer (RSMTFROMS)
The Resume Transfer OMS command can be used to restart an Object Transfer function when it ended abnormally. The restart of the transfer starts with the creation of the object which ended in error. Refer to the Fix Processing function for more detailed information.
Dumped Source Maintenance
The Dumped Source Maintenance function enables you to maintain the sources dumped in your dump library during fix processing.
If you have defined a dump library during application definition fix processing automatically dumps the source from any object containing a source when it is moved to a development environment and this version of the source was not dumped before. Please consult the Source Concepts for additional information. You can restore or delete a dumped source with this function. You can also do a mass delete of a selected number of dumped sources.
Note: The Dumped Source Maintenance function must be activated regularly in order to avoid a large number of dumped sources in your dumped source library.
Work with Sources
The Work with Sources display shows you a list with all the sources which where dumped during an Object Transfer. This list contains the object code that was moved or copied, the fix number processed, the generated name of the dumped source member, the source file where the member was dumped in, the dump library and the date the source was dumped. If you use F11 to fold the subfile, the list shows the source type, the original name of the source, the library where the source came from and the time the source was dumped.
To select an item, type the option number in the option area and press Enter. For more information about an option move the cursor to the column and press Help.
Active Application
The active application shows the code of the current active application. If this field can be changed you can activate a new application by typing the application you desire and pressing Enter. You can also use the F4=Prompt key to select an application from the list of available applications.
Position to
Use this prompt to go to a particular source member in the list.
Option
Use this column to perform different operations on individual entries. Type the option number next to an entry and press Enter. You can type the same option next to more than one entry at a time, and you can also type different options next to different entries at the same time. The possible values are:
- 3=Restore
Restore the dumped source to a new source location. - 4=Delete
Delete the dumped source. - 5=Display
Display the dumped source.
- F11=Drop/Fold
Reveal more information about a list entry. - F14=Mass Delete
Proceed with the "Mass Delete" display. - F17=Subset
Enter a subset.
Mass Delete Request
The Mass Delete Request display prompts you with several selection fields. You can enter these selection fields to delete a selected number of dumped sources. Press Enter to start the mass delete process or F12 to return to the previous display.
Delete Older Than
Use this prompt to delete the sources which were dumped before the date you entered in this prompt.
Note: The delete older than prompt is mutually exclusive with the keep last xx dumps and the delete if fix completed prompts.
Keep last xx Dumps
The dumped source handler stores a generation number, if an object is moved or copied more than once by Object Transfer. Use this prompt to have the program delete all sources, except for the last (most actual) xx sources (xx is the number you enter).
Note: The keep last xx dumps prompt is mutually exclusive with the delete older than and the delete if fix completed prompts.
Delete if Fix Completed.
Use this prompt to delete all dumped sources of completed fixes. Note: The delete if fix completed prompt is mutually exclusive with the delete older than and the keep last xx dumps prompts. Choose from the following;
- 0=No
Enter 0 (default) if you do not wish to use this selection. - 1=Yes
Enter 1 to activate this prompt and have the program delete all sources dumped by fix processing for fixes that are now completed.
Subset
The Subset display enables you to enter selection fields for the objects shown on the Work with Sources display. All selection fields contain a from-value (Default value is blank) and a to-value (Default value is all '9').
Entering a value only in the left column will result in a subset with the entered value as a starting point until the end of the list. Entering a value only in the right column will result in a subset from the first entry up to and including the entered value. Entering both values will result in a subset starting with the value in the left column and ending with the value in the right column.
Use F5=Refresh in order to reset the values.
Note: Once a subset has been activated the selection fields remain active until a new selection has been made.
Confirm Delete
Use this display to confirm the 4=Delete action you have performed on the item in the list. This display shows all attributes of the selected item. Press Enter to delete the dumped source or press F12=Cancel to keep them.
Restored Saved Member
The Restore Saved Member display enables you to restore a dumped member to a source file of your choice. This display shows the attributes of the dumped source and enables you to enter the target location of the source.
Remove Existing Source
If the target source file already contains a member with the specified name you can use this prompt to delete the existing member in the target source file. Choose from the following;
- 0=No
Enter 0 (default) if you do not wish to delete the source member in the target source file if it should already exist. If the member is in the target source file then a message is displayed.
- 1=Yes
Enter 1 to delete the member in the target source file (if any) before the dumped source is copied to it.
To Source File
Enter the name of the source file which is to receive the dumped member. This field is default filled with the source file from which the source was dumped. If the source file does not exist, it will be created.
To Source Library
Enter the name of the library which is to receive the dumped member. This prompt is default filled with the library from which the source was dumped. If the library does not exist, the restore operation will fail and an error message will be displayed.
To Source Member
Enter the name of the member which is to receive the dumped source data. This field is default filled with the member code from which the source was dumped. If the member does not exist it will be created. If the member does exist it will replace the existing member if the remove existing source prompt is filled with 1 (yes) otherwise an error message will be displayed.
Command Start Dumped Source Maintenance (STRDSM)
This menu command starts the dumped sources maintenance function. Refer to the description of the function Dumped Source Maintenance for a detailed description. This command has no parameters.
Fallback Library Maintenance
The Fallback Library Maintenance function enables you to work with the saved fallback libraries. A fallback library contains old versions of objects and sources that have been replaced during an Object Transfer by a newer version. A fallback library is automatically created by TD/OMS during an Object Transfer and its name equals the transfer code. The to be replaced objects and sources are being moved from their original location to the fallback library. When the processing has completed for that library list the fallback library is saved into a savefile. Whether objects are being saved depends on definitions at the library list level. Refer to the Recovery concepts for more detailed information.
Users with authorization code "3" are allowed to start this function.
Work with saved fall back libraries
The Work with Saved Fallback Libraries display shows the currently saved libraries including their main attributes. Use F11=View to get a list of other attributes of the list. The attributes in the list include the date and time the objects where placed into the fall back library, the transfer number, the library list sequence number which activated the save of the objects and the fix, request or release number used to transfer the objects.
Active Application
The active application shows the code of the current active application. If this field can be changed you can activate a new application by typing the application you desire and pressing Enter. You can also use the F4=Prompt key to select an application from the list of available applications.
Position to
Use this prompt to go to a particular save date in the list.
Option
Use this column to perform different operations on individual entries. The possible values are:
- 1=Restore
Submit a job, using jobdescription OMSJOBD in your TD library, that will restore the objects in the savefile into the fallback library. Note that this job will not start the actual restore to the original location of the objects. Use the Start Fallback OMS command to continue the restore.
By doing this, you are able to remove some objects from the fallback library; the remaining objects can then be restored to their original location.
Option 1 is not allowed if the fallback library has already been restored or the fallback library already exists. Use option 13=Force instead. - 2=Change
Change the tape volume and sequence number attributes of the selected entry. Also a remark text can be entered. - 4=Delete
Delete the savefile from the fallback save library. - 5=Display
Display the attributes of the fallback library. - 8=Display contents
Start the DSPSAVF command in order to get a list of the objects in the savefile. - 13=Force
Start the 1=restore option. No error will occur when the library exists or already has been restored.
Confirm Delete of Saved Fall Back Libraries
The Confirm Delete of saved Fallback libraries display shows all entries selected with option 4=Delete on the previous display. Press Enter to actual delete the savefiles or press F12 to cancel the delete request.
If no savefile exists then the record is deleted without confirmation.
Maintain Saved Fallback Library
The Maintain Saved Fallback Library display shows information about a saved fallback library and enables you to enter or change backup information and a remark line. This information is not used in any TD/OMS calculations. They are provided for your administration.
Income time
The income time shows the time the entry was registered.
Library List Sequence number
This is the library list sequence number which caused the fall back library to be created.
Transfer code
The Transfer code is a unique identifier assigned to each Object Transfer process. The transfer code starts with 'OM' and is extended with a transfer sequence number for transfers started on local addresses. The transfer code starts with 'OR' for transfers on remote addresses. The necessary work libraries per Transfer are always derived from this transfer code; The fall back library, optionally used to contain replaced objects, is also named like the transfer code.
Fall back save library
The fall back save library is a valid OS/400 library name and is defined in the Application definition function.
TD/OMS will use this library to store the savefiles containing the replaced objects. The library list definitions determine if replaced objects are to be saved.
Fix/Request/Release
Depending on the way the object transfer took place the fix or request or release number which handled the object transfer is displayed.
User ID
The user ID element contains the name of a local or remote user. This user is the user which had something to do with the entity in which it occurs. Either the user created it or changed it for the last time.
Tape volume
The tape volume used to save the fall back libraries. You are able to save the fall back libraries. If you do, this field can be used to locate the storage media..
Tape sequence number
The sequence number on the tape used to save an object.
Remark
The remark element is used in several entities and enables you to enter some free text.
Command Start Fall Back Library Maintenance (STRFBLM)
This menu command starts the fall-back library maintenance function. Refer to the description of the function Fall-back Library Maintenance for a detailed description.
Start Fall Back
The start fall back function enables you to start a fall-back of a TD/OMS transfer job from a library, that has been restored after processing the options "1" or "13" of the function Fall Back Library Maintenance.
This Maintenance function supports access to the fall back save files of all transfer jobs. Before restoring the individual objects that have been replaced in any TD/OMS transfer, you have to restore the fall back library from the correct save file in the archive library.
TD/OMS users with application authority code "3" are allowed to start this function.
Command Start Fall-back (STRFLBOMS)
The Start fall-back in OMS command restores all objects from the fall-back library to their original location. It will always be submitted to the batch environment, using the job description OMSJOBD in your standard TD/OMS library.
The fall-back function will first check, whether the input library is a known TD/OMS fall-back library. The actual processing will restore the objects from the fall-back library to their original location. The objects being replaced, are again saved, so you can decide later, what to do with those objects.
The TD/OMS object file is also update to the previous state of objects. The solutions and fix data however, are not rolled back to their status before the last replacement. Check the TD/OMS log when processing has been completed. You need a TD/OMS authority code "3" to start this command.
STRFLBOMS LIB(fallback library)
Library
Enter the name of the fall-back library. This library name is equal to the transfer code of the transfer job, that has saved the objects which now should be restored.
Confirm Fall Back
In this display you are about to activate the fall back for a previous Object Transfer. Press F22 to accept, F10 to Work with Contents, or F12 to cancel the restore operation of the fall back.
Work with Contents
This display shows the fall back Contents entries.
Fall back action
This field specifies what should happen when the fall back operation is initiated. The possible values are:
- *DELETE
- The object will be deleted during the fall back operation.
- *REPLACE
- The previous version of the object will be restored during the fall back operation.
Filter
The Filter prompt allows for quick filtering of the list.
Maintain Content
The Maintain Content feature manages fallback content and allows actions based on the option selected on the previous screen. The chosen action from the previous display is shown on line three. The following modes can be activated:
- *DELETE
- You can delete the fall back content from the database.
- *DISPLAY
- You can display the details of the fall back content.
Command Resume Transfer (RSMTFROMS)
The Resume Transfer OMS command can be used to restart an Object Transfer function, when it ended abnormally. The restart of the transfer starts with the creation of the object which ended in error. More detailed information about fix processing and the Transfer function can be found in Object Transfer Concepts. Use the SMBJOB command to start this function in the batch environment.
RSMTFROMS TFRC(transfer code)
Transfer code
Enter the transfer code which must be re-started. Each Object Transfer has a unique transfer number assigned to it. This number has to be filled in here.
Constraints and Triggers save & restore
TD/OMS provides Action functions and procedures for handling file triggers and constraints. Triggers take care of calling a function when a certain change is processed on the database and constraints provide additional referential integrity on top of what can be implemented with the use of logical files (views or indexes).
The Actions guide contains information on how to set up the automatic procedure for controlling triggers and constraints. When this mechanism is setup TD/OMS will store, remove and apply the constraints and triggers on the database without your intervention.
However, occasionally this process can fail. That will leave you with a damaged database that has been stripped of its constraint and trigger specifications. You may start recovering to its original situation by using the archive files containing all previous database information, that OMS has stored during the process. You can use that in combination with the TD/OMS command CSTTRGOMS.
Check the STRSD command to see in which library the constraint and trigger information has been stored. If this library definition contains QTEMP, you will find the archive files in the fall-back library.
The file names have the following format:
- nnnnnn stands for the transfer number
- LLL stands for the rank number of the library list(sub-environment) that is determined during the last transfer and is based on the actual definition sequence of the lists within the environment definitions at that moment.
- BVnnnnnn
- This contains the triggers of the original database in the from location as they have been before the transfer.
- DNnnnnnn
- This contains the triggers of the original database altered in such way to how they would be applied on the target database if the transfer had been completed successfully.
- DnnnnnnLLL
- This contains the triggers of the target database per target library list(sub-environment) as they have been before the transfer
- FBnnnnnn
- This contains the constraints of the original database in the from location as they have been before the transfer.
- TAnnnnnn
- This contains the constraints of the original database altered in such way to how they would be applied on the target database if the transfer had been completed was successfully.
- TnnnnnnLLL
- This contains the contraints of the target database per target library list(sub-environment) as they have been before the transfer.
So, if you are left without triggers and constraints, you have to apply the files BVnnnnnn and DnnnnnnLLL for triggers and the files FBnnnnnn and TnnnnnnLLL for constraints to return to the previous situation.
Note: file TnnnnnnLLL is not for triggers even if the files start with a T.
The command CSTTRGOMS can be used to apply the constraint and trigger information back to the database. Assume your constraints save library is OMSCSTTRG and the transfer that failed is transfer 000267. If you may wish to apply the constraints as they were before transfer 000267 started in the database of the first target library list, you would apply the following command:
CSTTRGOMS OPTI(3) CTRI(1) OUTF(T000267001) OUTL(OMSCSTTRG)
Assume your trigger save library is OMSTRIG and the transfer that failed is transfer 000270. If you wish to apply the triggers as they were before transfer 000270 started in the database of the second target library list, you would apply the following command.
CSTTRGOMS OPTI(3) CTRI(2) OUTF(D000270002) OUTL(OMSTRIG)
TD/OMS Exception Management
The TD/OMS Exception Management menu enables you to start the TD/OMS exception functions at application level. The functions in this menu are intended to be managed by an Application manager.
Start Exception Function Maintenance (STRXFM)
This menu command starts the exception function maintenance function. Refer to the description of the function Exception Function Maintenance for a detailed description.
Start Exception Selection Maintenance (STRXSM)
This menu command starts the exception selection maintenance function. Refer to the description of the function Exception Selection Maintenance for a detailed description.
Start Conversion File Maintenance (STRXCNV)
This menu command starts the conversion file maintenance function. Refer to the description of the function Conversion File Maintenance for a detailed description.
Start Registry Definition Maintenance (STRRDM)
This menu command starts Registry Definition Maintenance function. Refer to the description of the function Registry Definition Maintenance for a detailed description.
Start Application Registry Maintenance (STRARM)
This menu command starts Application Registry Maintenance function. Refer to the description of the function Application Registry Maintenance for a detailed description.
Start Pre Transfer Check (STRPTCM)
This menu command starts the pre-transfer check function. Refer to the description of the function Pre Transfer Check for a detailed description.
Exception Function Maintenance
The Exception Function Maintenance display enables you to maintain pre-defined exceptions functions for the application you are working with. You are also able to create exception functions, which can be used across applications. These exceptions may have a global implementation scope, and are indicated as system exceptions.
An exception function is an i5/OS system or TD/OMS command or program, which will be executed during Object Transfer processing, if certain conditions are valid.
The definition of the selection conditions is separated from the definition of the functions. That enables you to activate the same exception function for different selections. Use the Exception Selection Maintenance function to maintain these conditions. Refer to the Exception Concepts for more detailed information.
Users with TD/OMS authority code 3 are allowed to start this function.
Work with Exception Functions
The Work with Exception Functions display shows all function specifications in the current application, together with the functions of other applications, that are defined as a system exception. System exceptions are available for use in any other application.
The system indicator, the description of the function, a critical indicator, a local/remote indicator and the function owner are shown in addition to the functions. Refer to the Exception Concepts for more detailed information.
You can add a new Function to the list, delete a Function from the list, change the contents of a Function, or display the selections specified for this function.
Active Application
The active application shows the code of the current active application. If this field can be changed you can activate a new application by typing the application you desire and pressing Enter. You can also use the F4=Prompt key to select an application from the list of available applications.
Exception scope
The exception scope can be used to get a specific subset of the list. Choose from the following;
- *ALL
Both application functions and System defined functions are shown in the list. - *APP
The functions owned by the current application are shown in the list. - *SYS
All system functions owned by any applications are shown in the list.
Position to
Use this prompt to go to a particular function in the list.
Option
Use this column to perform different operations on individual entries. The possible values are:
- 2=Change
Change the description or the contents of the exception function. - 4=Delete
Delete an exception function from the list. - 12=Display selections
Display a list of the selections referring to this function. - F6=Add
Add a new occurrence of the entity you are working with. - F14=Work w selections
Continue with the Exception Selection function. - F21=Print list
Print a list to the current active output queue of your job.
Maintain Function
The Maintain Function display shows information and enables actions depending on the option chosen on the previous display. The chosen action on the previous display is shown on line three. The following actions can be activated;
- Add
You can add a new function definition. The function-id and all its attributes must be entered. - Change
You can change the description and command or program name of an existing function. The current values are shown. These attributes can be changed at any time and are effective immediately. - Delete
The current function attributes are shown, including a confirmation message. The function definition is deleted from the list after pressing Enter. Deletion of a function is not allowed if selections still refer to the function.
Exception function ID
The exception function ID contains the name of a function. The function ID is a short description of functions like CHGPFNOMAX, CRTCLPGM or OWNQSECOFR.
The function ID must be unique per application and the ID of system functions must be unique across all applications. The ID cannot be changed once it has been added. A blank value is not allowed.
Exception function description
The function description contains a description of the function. A blank value is not allowed.
System exception indicator
The system exception indicator is used to specify that the function can be used by other applications. A system exception can only be defined in one application with the same function ID.
Value '1' or *SYS indicates that the function is a system function. Value '0' indicates a function definition for the current application only. The system indicator cannot be changed on remote addresses when the function has been defined automatically. The indicator can also not be changed if an exception selection refers to the function or if the same function ID exists in another application.
Critical indicator
The critical indicator is defined per exception function and exception selection. It indicates if the exception is critical or not. The possible values are:
- 0=No
The exception is not critical. An error during execution of this exception will result in a warning. - 1=Yes
The exception is critical. A critical exception will only influence the Object Transfer if it is executed at User Exit Point 1, 3, 5 or 7. The processing of the object will end in error if a critical exception ends with an error.
Where to activate
The Where to Activate indicator is used to specify if the exception is meant for the local address, for remote addresses or both local and remote addresses. The possible values are:
- 0=Local
Use value '0' if the function is not valid for remote addresses. The function will not be sent to any remote address. - 1=Both
Use value '1' if the function is valid for both local and remote addresses. - 2=Remote
Use value '2' if the function is only meant for remote addresses, specified in the Address element.
Address
The address identifies the name of a remote AS/400. The TD/OMS distribution services require the name of a remote location to which objects can be distributed. Use the special value *ALL to select all addresses. Use F4=List to get a list of the available addresses.
Exception function command
The Exception function command contains any valid OS/400 command which can be executed during Object Transfer, or the special exception command Change TD variable which enables you to change one or more internal TD variables. Every exception function must have a command or a program specified, not both.
Use F4=Prompt for a prompt of the entered command, if your are in add or change mode. Every command can contain substitution parameters, which will be replaced at the time of execution with the current values. The list below describes the valid substitution variables:
Exception Substitution Variables
These variables can be used in command strings included in exception functions. Some variables are not filled during the transfer process due to various reasons.
- Request and Release
These fields are only filled when a transfer process is started from a Request or Release level (see use of TFROBJOMS) . To obtain data of the release in an exception or action use OMQRTVAP API for the current release number or the OMQRTVFI API for the release number assigned to this fix. To get the request number of a fix that is linked to it, use the OMQRTVFR API.
NOTE: Starting from V7R1 you should always use the single & character as variable field prefix instead of the former, double ## notation as prefix symbol. The # character can cause problems when your system language codepage is not CCSID value 037.
| Variable | Description | Notes |
|---|---|---|
| ##ACTO | Actions output | |
| ##APPC | Application code | |
| ##CATT | Attribute conversion type | |
| ##CATS | Attribute conv. scope | |
| ##CAUT | Authorization conv. type | |
| ##CAUS | Authorization conv. scope | |
| ##CHGX | Object Change date | |
| ##CJOT | Journal conversion type | |
| ##CJOS | Journal conversion scope | |
| ##CNVT | Data conversion type | |
| ##CNVS | Data conversion scope | |
| ##CPGL | Conversion program library (preferred) | |
| ##CPGM | Conversion program name (preferred) | |
| ##CROB | Related object code (preferred) | |
| ##DTLC | Detail code (preferred) | |
| ##EXCI | Temporary or virtual object indicator | |
| ##ERR# | Request number | |
| ##FDIL | Length of From directory | |
| ##FDIR | From directory | |
| ##FENV | From environment | preferred |
| ##FIX# | Fix number | |
| ##FIXR | Replaced Fix number | |
| ##FLBI | Fall back indicator | |
| ##FPTH | From path | |
| ##FPTL | Length of From path | |
| ##FROL | From object library | |
| ##FRPL | From environment | |
| ##FSRF | From source file | |
| ##FSRL | From source library | |
| ##FSRM | From source member | |
| ##IOBC | IFS-object | |
| ##IOBL | Length of IFS-object | |
| ##JOB# | Job number | |
| ##LBLT | To library list type | |
| ##LSQ# | To library seq# | |
| ##MBRC | Detail code | |
| ##MODB | Based-on modification | |
| ##MODR | Replaced modific. | |
| ##MOD# | New modification | |
| ##OBJA | Object attribute | |
| ##OBJC | Object code | |
| ##OBJR | Replaced object ind | |
| ##OBJT | Object type | |
| ##OBJX | Object source change date | |
| ##OCLS | Object class | |
| ##OPTI | 'M'=Move 'C'=Copy | |
| ##OVRC | Override code | |
| ##PGML | Conversion program library | |
| ##PGMN | Conversion program name | |
| ##QTPI | Quit Processing indicator | |
| ##REQ# | Request number | Preferred, not filled when during normal transfer |
| ##RLS# | Release | Not filled during normal transfer |
| ##ROBC | Related object code for conversion | |
| ##SEQ# | To library list seq# | |
| ##SOLT | Solution type | |
| ##SRCF | To source file | |
| ##SRCL | To source library | |
| ##SRCM | To source member | |
| ##SRCP | Source Processing | |
| ##SRCS | Source status | |
| ##SRCX | Source source change date | |
| ##SRTC | Sort code | |
| ##STAT | Status | |
| ##TDIL | Length of To directory | |
| ##TDIR | To directory | |
| ##TENV | To environment | (preferred) |
| ##TFRC | Transfer code | |
| ##TOOL | To object library | |
| ##TOPL | To environment | |
| ##TOVI | Temporary or virtual object indicator | (preferred) |
| ##TPTL | Length of To path | |
| ##TPTH | To path | |
| ##TSB# | Transfer sub-number | |
| ##TSRF | To source file | (preferred) |
| ##TSRL | To source library | (preferred) |
| ##TSRM | To source member | (preferred) |
| ##VRSB | Based-on version | |
| ##VRS# | New version | |
| ##VRSR | Replaced version |
Exception program name
The exception program name contains the name of a program which is called by TD/OMS if this function has to be activated. The program name and command are mutually exclusive. A program differs from a command because the program is called with a standard parameter list and a return value which will be checked. An example of the standard parameter list is shipped with your TD package and can be found in file QUSRSRC, member OME__02C in the TD library.
Exception program library
The program library contains the OS/400 library where the exception program can be found.
Interface level
The interface level is used if a TD function executes a user program, in order to describe the interface to be used. Future conflicts will be prevented by using the interface level. It is recommended to use the latest interface level, because it will provide you with more functionality.
Display Selections
The Display Selections display shows all selections which refer to the selected function. The most important selection fields are shown per selection. You can select a particular selection to be displayed in order to see all selection parameters and other attributes.
Selection Scope
The selection scope can be used to get a specific subset of the list. Choose from the following;
- *ALL - All selections are shown in the list.
- *ACT - Only active selections are shown in the list.
- *DIS - Only selections that are disabled for processing are shown in the list.
- *DST - Only selections that are executed when objects are gathered for distribution are shown in the list.
- *NRM - Only selections that are executed when objects are created locally are shown in the list.
Option
Use this column to perform different operations on individual entries. The possible values are:
- 5=Display
Display all selection parameters and other attributes of the selection.
Display Exception Selection
The Display Selection Function display shows all attributes and selection values of the selected Selection. The meaning of the different values is explained in Exception Selection Maintenance. function.
Command Start Exception Function Maintenance (STRXFM)
This menu command starts the exception function maintenance function. Refer to the description of the function Exception Function Maintenance for a detailed description.
STRXFM
This command has no parameters.
Exception Selection Maintenance
The Exception Selection function enables you to maintain the exception selections for the application you are working with. An exception selection specifies the following for a predefined Exception Function:
- The point of execution during Object Transfer
The User Exit Point specifies the phase during Object Transfer when exceptions are being executed. - The order of execution per User Exit Point
Exceptions are executed in order of the Process Sequence number per User Exit Point.
The conditions for a function to be executed Per Process Sequence number the function with the lowest Selection Sequence number and with valid selection fields is selected for execution.
The definition of the functions is separate from the definition of the selections, so you are able to activate the same function for different selections. Use the Exception Function Maintenance function to maintain these functions. Users with authorization code 3 are allowed to start this function. The use of Exception Functions will be helpful to you in customizing the standard functioning of TD/OMS.
Note: Although the use of Exception functions enables you to tailor-make your TD/OMS system, be sure you have enough knowledge about the commands you are using and the way TD/OMS handles these functions. The supplier of the TD package is not responsible for the contents of the exception functions.
Below you will find an example of the selection process during Object Transfer. Suppose the following selections have been entered:
| Uep | Psq | Ssq | Function | Object | Type |
| 5 | 10 | 898 | OWNDIF | ABCDEF | *ALL |
| 5 | 10 | 899 | OWNSEC | OBJ765 | *ALL |
| 5 | 10 | 900 | OWNSEC | OBJ12* | *ALL |
| 5 | 10 | 997 | OWNFILE | *ALL | *FILE |
| 5 | 10 | 998 | OWNPGM | *ALL | *PGM |
| 5 | 10 | 999 | OWNDFT | *ALL | *ALL |
| 5 | 11 | 999 | GRTAUT | *ALL | *PGM |
| 5 | 11 | 999 | RVKAUT | *ALL | *DTAARA |
For object XYZ with type *DTAARA the first valid selection in Psq 10 is OWNDFT and it will be executed. In Psq 11 the first valid function is RVKAUT and it will be executed next. OWNPGM is first executed and followed by GRTAUT for object CDE with type *PGM. Only OWNFILE is executed for object KLM with type *FILE. Only OWNSEQ is executed for *FILE OBJ126. OWNDIF is first executed followed by GRTAUT for object ABCDEF with type *PGM.
Work with Exception Selections
The Work with Exception Selections display shows the currently defined selections for the current application with their User exit Point, Process sequence number, Selection sequence number, Function-id and some of the conditions.
You can add a new Selection to the list, copy an existing selection to a new one, change the contents of a Selection or display the function specified for this selection. Use F17=Subset for specifying specific conditions and you will see only those selections which will be executed during Object Transfer for the entered conditions.
Active Application
The active application shows the code of the current active application. If this field can be changed you can activate a new application by typing the application you desire and pressing Enter. You can also use the F4=Prompt key to select an application from the list of available applications.
Selection scope
The selection scope can be used to get a specific subset of the list. Choose from the following;
- *ALL
All selections are shown in the list. - *ACT
Only active selections are shown in the list. - *DIS
Only selections which are disabled for processing are shown in the list. - *DST
Only selections which are executed when objects are gathered for distribution are shown in the list. - *NRM
Only selections which are executed when objects are created locally are shown in the list.
Position to
Use this prompt to position to the correct user exit point, process sequence and selection sequence.
Option
Use this column to perform different operations on individual entries. The possible values are:
- 2=Change
Type 2 to change the description or the contents of the exception selection. - 3=Copy
Type 3 to add a new selection to the list, using the current values as a base. - 4=Delete
Type 4 to delete a selection from the list. - 8=Display function
Type 8 to display the function, used in this selection.
Function Keys
- F14=Work w Functions
Continue with the Exception Function function. - F17=Simulate
Simulate data for specifying specific conditions and you will see only those selections which will be executed during Object Transfer for the entered conditions. - F21=Print list
Print a list to the current active output queue of your job.
Maintain Selection
The Maintain Selection display shows information and enables actions depending on the option chosen on the previous display. The chosen action on the previous display is shown on line four. The following actions can be activated:
- Add
You can add a new selection definition. The User Exit point, the Process Sequence number, the Selection sequence number, the function-id and the conditions must be entered. The prompts are initially filled with the values of the selection which is copied (if this is a copy action.) - Change
You can change the attributes of an existing selection. The current values are shown. These attributes can be changed at any time and are effective immediately. - Delete
The current selection attributes are shown, as is a confirmation message. The selection definition is deleted from the list after pressing Enter.
User exit point
A User Exit Point is a pre-defined phase during Object Transfer, where exception selections are being executed.
An Object Transfer process contains one or more fixes and their connected objects. Once you have selected the objects, the environment and the number of library lists in an environment, TD/OMS generates an internal creation entry for each object to be created. The Exception Selections are scanned per User Exit Point and per creation entry the Exception Selections and executed when valid. The possible values are:
- 1=When the transfer is started
Selections at User Exit Point 1 are executed at the start of an Object Transfer. No specific object information is available. - 3=Before creation of object
Selections at User Exit Point 3 are executed at the start of the processing per creation entry. Standard TD/OMS processing has not executed anything for the object. - 5=Instead of OMS creation
Selections at User Exit Point 5 are executed instead of the creation by TD/OMS per creation entry. Normally TD/OMS copies an object (compilation for logical files), but when valid selections at User Exit Point 5 are found, then TD assumes that the exception function will create the object in the to-library. - 7=After creation of object
Selections at User Exit Point 7 are executed at the end of the processing per creation entry. Standard TD processing has been finished for the object. - 8=Clean up per object group
Selections at User Exit Point 8 are executed per from- object code, -type and -library, just before the cleaning part is performed. - 9=When the transfer is about to end
Selections at User Exit Point 9 are executed at the end of an Object Transfer. No specific object information is available. All standard processing has been done for all objects.
Process sequence number
The Process Sequence number is used in an exception selection definition to further specify the order of selections to be processed at a specific User Exit Point. Note that per Process Sequence Number only one selection is executed per object.
Selection sequence number
A Selection sequence number is used in an exception selection definition to further specify the check order for valid selections within a specific process sequence number. Note that per Process Sequence number only one selection is executed per object. A valid selection with the lowest Selection Sequence number will be selected for processing. Use the highest Selection Sequence number (999) for the most general conditions. Use lower Selection Sequence number if more specific conditions are used.
Example of selection sequence usage: 100 - ABCD *PGM RPG 200 - CDE* *PGM CBL 984 - *ALL *PGM CBL 985 - *ALL *PGM RPG 990 - *ALL *PGM *ALL 999 - *ALL *ALL *ALL
Exception function ID
The exception function ID contains the name of a function. The function ID is a short description of functions like CHGPFNOMAX, CRTCLPGM or OWNQSECOFR
The function ID must be unique per application and the ID of system functions must be unique across all applications. The ID cannot be changed once it has been added. A blank value is not allowed. Use F4=List to get a list of available Exception Functions.
Object code
The object code is the OS/400 name of the object. It is 10 characters in length for normal objects and 12 for document library objects.
Object type
Use this prompt to enter the condition for the Object type. The value *ALL indicates that all object types will be selected. Type the 4GL keyword (*SYNON, *AS/SET etc.) to select only 4GL objects if you are defining 4GL exceptions.
Object attribute
Use this prompt to enter the condition for the Object attribute. The value \*ALL indicates that all object attributes are valid.
From Environment
Use this prompt to enter the condition for the From Environment. The value \*ALL indicates that no specific testing is done for the From Environment. Use F4=Prompt to select one of the available environment codes.
Use this condition whenever possible since a selected environment will speed up the exception selection process.
Critical indicator
The critical indicator is defined per exception function and exception selection. It indicates if the exception is critical or not. The possible values are:
- 0=No
The exception is not critical. An error during execution of this exception will result in a warning. - 1=Yes
The exception is critical. A critical exception will only influence the Object Transfer if it is executed at User Exit Point 1, 3, 5 or 7. The processing of the object will end in error if a critical exception ends with an error.
From Object library
Use this prompt to enter the condition for the From Object library. The value *ALL indicates that no specific testing is done for the From Object Library. Use F4=Prompt to select one of the available libraries. Note that the From Object library can be the same for more than one creation entry. The object which is copied always originates from the same library. Even if it is copied to more than one library list. This object is known as the main object
When to activate
The 'when to activate' indicator is used in exception selections to disable an exception selection or to specify if the selection has to be activated for local processing only, during the preparation of the distribution phase or both. The default value is '0'. The possible values are:
- 0=Local
The exception selection is only active if objects are created locally. The selection is not executed if objects are collected for distribution in the temporary distribution library. - 1=Never
The exception selection is disabled. - 2=Pre-Dst
The exception selection will only be activated when objects are collected for distribution in the temporary distribution library. The exception is not executed when objects are created locally. - 3=Always
The exception selection will always be activated; If objects are collected for distribution in the temporary distribution library and if objects are created locally. - 4=Pre processing
The exception selection will be activated directly. The exception is already executed when selecting objects for processing. This means before you press confirm the transfer, the exception is already executed.
To Environment
Use this prompt to enter the condition for the To Environment. The value *ALL indicates that no specific testing is done for the To Environment. Use F4=Prompt to select one of the available environment codes.
To Object library
Use this prompt to enter the condition for the To Object library. The value *ALL indicates that no specific testing is done for the To Object Library. Use F4=Prompt to select one of the available libraries.
Specify Simulation Data
The Specify Simulation Data display shows the current subset conditions for the Work with Selections display. All Exception Selection entries are shown if the subset conditions contain the value *ALL. You can check if the Exception Selections are correct by entering simulation data. These are the selections which will be executed during Object Transfer.
Object code
Use this prompt to enter the subset value for Object Code. Use the value *ALL or enter a valid Object code.
Object type
Use this prompt to enter the subset value for Object Type. Use the value *ALL or enter a valid Object type.
Object attribute
Use this prompt to enter the subset value for Object Attribute. Use the value *ALL or enter a valid Object Attribute.
From Environment
Use this prompt to enter the subset value for From Environment. Use the value *ALL or enter a valid Environment code. Use F4=Prompt to get a list of valid environment codes
From library
Use this prompt to enter the subset value for From Object library. Use the value *ALL or enter a valid library code. Use F4=Prompt to get a list of valid libraries.
To Environment
Use this prompt to enter the subset value for To Environment. Use the value *ALL or enter a valid Environment code. Use F4=Prompt to get a list of valid environment codes.
To Library
Use this prompt to enter the subset value for To Object library. Use the value *ALL or enter a valid library code. Use F4=Prompt to get a list of valid libraries.
Display Exception Function
The Display Exception Function display shows the contents of the function used in an Exception selection. The command or program name is shown.
Command Start Exception Selection Maintenance (STRXSM)
This menu command starts the exception selection maintenance function. Refer to the description of the function Exception Selection Maintenance for a detailed description.
STRXSM
This command has no parameters.
Data Conversion File Maintenance
The Work with Conversion definitions function enables you to define the non-default conversions to be done for a specific physical file. By default a conversion is executed using the copy parameters *MAP and *DROP, so new field are initialized and removed fields are skipped.
The Data Conversion Maintenance program is started by using command STRXCNV. Using the menu, use STROMS, option 3, option 21, option 3.
You can define a user program which is called during Object Transfer if another type of conversion must be executed for a specific application this user program will be called with a predefined parameter list when the conversion must be performed.
If a new physical file must be initially filled with data from another existing file for some . You are able to declare the Related Object Code. TD/OMS will then convert the data from this file into the newly created physical.
Users with authorization code 3 are allowed to start this function.
Work with Conversion Definitions
The Work with Conversion Definition display shows the currently defined exceptions for database conversion for the current application. Physical files not listed are converted with the default conversion mode; i.e. executing the CPYF command with the parameters *MAP and *DROP specified. You can add a new definition to the list, change an existing definition, or remove an existing definition from the list.
Position to
Use this prompt to go to a particular file in the list.
Active Application
The active application shows the code of the current active application. If this field can be changed you can activate a new application by typing the application you desire and pressing Enter. You can also use the F4=Prompt key to select an application from the list of available applications.
Option
Use this column to perform different operations on individual entries. The possible values are:
- 2=Change
Change the attributes of the conversion definition. - 4=Delete
Delete a definition from the list. - F6=Add
Add a new conversion definition to the list.
Maintain Conversion Definition
The Maintain Conversion Definition display shows information and enables actions depending on the option chosen on the previous display. The chosen action on the previous display is shown on line four. The following actions can be activated:
- Add
You can add a new conversion definition. The conversion type with its attributes must be entered. - Change
You can change the attributes of an existing conversion definition. The current values are shown. These attributes can be changed at any time and are effective immediately. - Delete
The current conversion definition attributes are shown, as is a confirmation message. The conversion definition is deleted from the list after you press Enter.
File code
Use this prompt to enter the object code of the physical file you are defining the conversion for. A blank value is not allowed.
Member code
Use this prompt to enter a specific member name if a single member is connected to a fix, not the physical file itself. The value *ALL must be used if a physical file is connected to a fix.
Data conversion type
The data conversion type instructs TD/OMS what action must be taken on the data in a physical file. Default conversion will be performed by TD/OMS if no conversion type is defined for a specific physical file: The contents of the replaced physical file will be copied to the newly created physical using the *MAP and *DROP parameters. The possible values are:
- 1=None
No conversion will be executed. The object will be copied as will the data it contains, thus replacing existing data members. Use this value for physical files containing changed parameter values. - 8=Call user program
A user conversion program which can be defined in the TD conversion file (See technical description below) will be called after the physical file has been created. - 9=Convert from other file
Standard conversion will be executed, though not from an equally named physical file but from a physical file with a different name.
Technical description
A user program is called using the following parameters for type '8'. All parameters are character fields:
| Parameter | Description (length) |
| FENV | The From-environment (C5) |
| FOBC | The From-object code; the physical file with data (C10) |
| FOBL | The library of the physical file to be copied (C10) |
| TENV | The To-environment code (C5) |
| TOBJ | The To-object code; the newly created physical file (C10) |
| TOBL | To library of the newly created physical file (C10) |
| STAT | The status after converting the data (C5). Use the value '*NORM' for normal ending of the program and '*TERM'for abnormal ending. |
Program name
Use this prompt in combination with conversion type 8 to enter the object code of the conversion program to be called.
Program library
Use this prompt in combination with conversion type 8 to enter the object code library of the conversion program to be called.
Related object code
Use this prompt in combination with conversion type 9 to enter the related object code. This must be a physical file which will be used to copy the data from.
Command Start Conversion File Maintenance (STRXCNV)
This menu command starts the conversion file maintenance function. Refer to the description of the function Conversion File Maintenance for a detailed description.
STRXCNV
This command has no parameters.
Dynamic Data Conversion
You can also switch on data conversion dynamically using Actions during the transfer process. You may want to do this when for any of the following reasons:
- You want to be in total control of data conversions
- Suppose you have a data conversion program that can handle all tables.
- You ship your data conversion program with the task
- You can create a special program that, when it is on the task, you want to call to convert the data
- You know that some files require FMTOPT(*NOCHK)
- Some tables may require an additional *NOCHK
To trigger this dynamically, a label on the file is a great solution to override normal data conversion with your special conversion.
Parts needed
To implement the above, we want to use an Action on processing step SO (Start of Object) that will dynamically change the conversion program using the CHGVAROMS command.
The CHGVAROMS command can change the behavior of the transfer at runtime.
We can trigger this Action based on a label that we can call 'Convert_With_NOCHK'
Registry Definition Maintenance
The Registry Definition function (STRRDM) enables you to work with the registry definitions.
Registry definitions can be added, copied, changed, deleted or viewed.
Users belonging to the user class *SECOFR, *SECADM or the TD/OMS manager (group) are allowed to use this function.
Work with the Registry Definitions
The Work with Registry Definitions display shows the currently defined registry keywords, including their main parameters. To select an option, type the option number in the option field area and press Enter. For more information about an option move the cursor to the option column and press Help. For more information about a function key, move the cursor to the function key area and press Help.
Filter
The Filter prompt allows for quick filtering of the list.
Option
Use this column to perform different operations on individual entries.
- 2=Change
- Change the registry definition keyword.
- 3=Copy
- Copy the registry definition keyword.
- 4=Delete
- Remove registry definition keyword.
- 5=Display
- Display the information of the registry definition keyword.
- 12=Values
- Work with registry definition keyword values.
- F6=Add
- Add a new registry definition keyword.
Maintain Keyword
The Maintain Keyword display shows information and allows actions depending on the option chosen on the previous display. The chosen action on the previous display is shown on line three. The following modes can be activated:
- *Add
- A new registry definition keyword is being added.
- *Change
- Change the attributes of an existing keyword.
- *Copy
- Copy the attributes of an existing keyword to a new keyword. The current values are shown.
- *Delete
- You are about to delete an existing keyword. The current values are shown.
- *Display
- Shows the attributes of an existing keyword.
Keyword
Specify the registry definition keyword. The blank value or a already existing keyword is not allowed.
System Context Indicator
Determines if context values can be specified (2=Optional), must be specified (0=Not required) or can not be specified (1=Required) when adding a registry keyword. Entering a 1 for the System context means that all other context related indicators must be 0.
Application Context Indicator
Determines if context values can be specified (2=Optional), must be specified (1=Required) or can not be specified (0=Not required) when adding a registry keyword.
Environment Context Indicator
Determines if context values can be specified (2=Optional), must be specified (1=Required) or can not be specified (0=Not required) when adding a registry keyword.
Route Context Indicator
Determines if context values can be specified (2=Optional), must be specified (1=Required) or can not be specified (0=Not required) when adding a registry keyword.
Program Context Indicator
Determines if context values can be specified (2=Optional), must be specified (1=Required) or can not be specified (0=Not required) when adding a registry keyword.
Restricted Value Indicator
Specifying a 0 means that any combination of characters is allowed when adding a registry keyword. The description may contain instructions on the required format (eg comma separated). The value entered must match with a pre-defined value in case of a 1.
Description
Explanation of the purpose of this keyword. Examples and dependancies on other keywords will be described here.
Work with the Registry Definition Key Values
The Work with the Registry Key Values display shows the list of values of the selected Registry Definition keyword (option 12 on the previous display). Entries can be Added, Copied, Changed, Deleted, and Viewed.
Filter
The Filter prompt allows for quick filtering of the list.
Option
Use this column to perform different operations on individual entries. Type the option number next to an entry and press Enter.
- 2=Change
- Change the registry keyword value.
- 3=Copy
- Copy the registry keyword value.
- 4=Delete
- Remove registry keyword value.
- 5=Display
- Display the information of the registry keyword value.
- F6=Add
- Add a new registry keyword value.
Maintain Keyword Value
The Maintain Keyword Value display shows information and allows actions depending on the option chosen on the previous display. The chosen action on the previous display is shown on line three. The following modes can be seen:
- Add
- Adding a registry keyword Value.
- Change
- Change the attributes of an existing keyword value. The current values are shown.
- Copy
- The attributes of an existing keyword value are being copied to a new value. The current values are shown.
- Delete
- Delete the attributes of an existing keyword value. The current values are shown.
- Display
- The attributes of an existing keyword value are shown.
Keyword
The keyword for the value. Display only
Sequence number
The sequence number controls the display of the values in the list. A value from 99999- until 99999 is allowed
Keyword Value
The registry definition keyword value.
Description
The clarification of the meaning of the registry definition keyword value.
Command Start Registry Definition Maintenance (STRRDM)
This menu command starts the registry definition maintenance function. Refer to the description of the function Registry Definition maintenance for a detailed description.
STRRDM
This command has no parameters.
Application Registry Maintenance
The Application Registry Maintenance function (STRARM) shows all the entries in a list that is based on the filters. Users belonging to the user profile class *SECOFR, *SECADM or the TD/OMS manager group are allowed to use this function.
System Context Indicator
Specify *YES to display keywords with a required or optional System context indicator or specify *NO to display keywords for which this context is not allowed.
Application Context Indicator
Specify *YES to display keywords with a required or optional Application Context Indicator or specify *NO to display keywords for which this context is not allowed.
Application Code
Specify the application code filter. Possible values are:
- *All
- Select all application codes.
- Application-Code
- Specify the application code.
Environment Context Indicator
Specify *YES to display keywords with a required or optional Environment Context Indicator or specify *NO to display keywords for which this context is not allowed.
Environment Code
Specify the environment code filter. Possible values are:
- *All
- Select all environment codes.
- Environment-Code
- Specify the environment code.
Route Context Indicator
Specify *YES to display keywords with a required or optional Route Context Indicator or specify *NO to display keywords for which this context is not allowed.
Route Code
Specify the route code filter. Possible values are:
- *All
- Select all route codes.
- Route-Code
- Specify the route code.
Program Context Indicator
Specify *YES to display keywords with a required or optional Program Context Indicator or specify *NO to display keywords for which this context is not allowed.
Program Name
Specify the program name filter. Possible values are:
- *All
- Select all program names.
- Program-name
- Specify the program name.
Work with Registry Values
The Work with Registry Values shows all the entries in a list from the application general-purpose file that is linked to the general-purpose definition file. Entries can be Viewed, Copied, Changed, Deleted, and Added. This screen will be shown according to the parameter of the previous display.
Application Code
You can specify the application code which you want to filter.
Environment Code
You can specify the environment code which you want to filter.
Route Code
You can specify the route code which you want to filter.
Program Name
You can specify the program name which you want to filter.
Filter
The Filter prompt can be used for quick filtering of the list.
Option
Use this column to perform different operations on individual entries. Type the option number next to an entry and press Enter.
- 2=Change
- Change the value of a registry keyword.
- 3=Copy
- Copy the registry keyword from the database.
- 4=Delete
- Remove the registry keyword from the database.
- 5=Display
- Display the information about the registry keyword.
- F6=Add
- Add a new registry keyword.
Maintain Registry Keyword
The Maintain Registry Keyword display shows information and allows actions depending on the option chosen on the previous display. The chosen action on the previous display is shown on line three. The following modes can be activated:
- Add
- Add a new registry keyword.
- Change
- Change the attributes of an existing registry keyword. The current values are shown.
- Copy
- Copy the attributes of an existing registry keyword. The current values are shown.
- Delete
- Delete the attributes of an existing registry keyword. The current values are shown.
- Display
- Show the attributes of an existing registry keyword. The current values are shown.
Keyword
You can specify the registry keyword.
Application Code
You can specify the application code of the application to which the registry key must be added.
Environment Code
You can specify the environment code for which this registry key is valid.
Route Code
You can specify the route code for which this registry key is valid.
Program Name
You can specify the program name for which this registry key is valid.
Keyword Value
You can specify the registry keyword value.
Use F4=List to get a list of the available keyword values.
Select Keyword Value
The Select Keyword Value window shows all the keyword values in a list from the general-purpose value file. This display will be shown when you press F4 on the keyword value field in the previous screen.
Option
Use this column to select the keyword value.
- 1=Select
- Select keyword value.
Command Start Application Registry Maintenance (STRARM)
This menu command starts the application registry maintenance function. Refer to the description of the function application registry maintenance for a detailed description.
STRARM SYSI(*YES)
       APPI(*YES)
       APPC(*ALL)
       PDLI(*YES)
       PDLC(*ALL)
       ROTI(*YES)
       ROTC(*ALL)
       PGMI(*YES)
       PGMN(*ALL)
This command has nine parameters.
Pre Transfer Check
The pre-transfer check mechanism is used to check if an object can safely be transported to the next environment. The pre-transfer check will check a couple of actions, e.g.
- Level Checks for files,
- Signature Level Check for service programs,
- Etc...
A pre-transfer check defines how a check entry can be added to the pre-transfer check table OMPTC. It defines in which contexts the check entry can be added and describes the usage of the check.
Work with Pre Transfer Check
The Work with Pre transfer check display shows the currently defined checks, including their main parameters. To select an option, type the option number in the option field area and press Enter. For more information about an option move the cursor to the option column and press Help. For more information about a function key, move the cursor to the function key area and press Help.
The system indicator, the description of the function, a critical indicator, a local/remote indicator and the function owner are shown in addition to the functions. Refer to the Exception Concepts for more detailed information.
You can add a new check to the list, delete a check from the list, change the attribute of a check, or display the attribute of a check.
Filter
The Filter prompt can be used for a quick filtering of the list. Type the code or partial code of the below fields you wish to show in the list.
- Sequence Number
- Description
- Program Name
Option
Use this column to perform different operations on individual entries. The possible values are:
- 2=Change
Type 2 to change the value of a check. - 3=Copy
Type 3 to copy the check from the database. - 4=Delete
Type 4 to remove a check from the database. TDOMS supplied checks can not be deleted. - 5=Display
Type 5 to display the information about the check.
- F6=Add
Add a new occurrence of the entity you are working with.
Maintain Pre Transfer Check
The Maintain Pre Transfer Check display shows information and allows actions depending on the option chosen on the previous display. The chosen action on the previous display is shown on line three. The following modes can be activated:
- Add
You can add a new check. The sequence number, description, Authorization code and all other mandatory fields must be entered. - Change
Change the attributes of an existing check. - Copy
Copy the check from the database. - Delete
The current pre-transfer check attributes are shown, including a confirmation message. The check is deleted from the list after pressing Enter. - Display
Show the attributes of a check. The current values are shown.
Sequence Number
The Sequence Number is the order in which the check is being executed.
You can change the system-generated sequence number but it must be unique per check. A blank value is not allowed.
Description
The pre-transfer description contains a description of the pre-transfer check entry. A blank value is not allowed.
System indicator
The System Indicator indicates whether the check is supplied by TD/OMS or by the user. Value '1' indicates that the check is a TD/OMS supplied. Value '0' indicates check is created by user.
Only authorization code and disabled indicator value can be changed for TD/OMS supplied check.
Authorization code
Specify the authentication code that can confirm the errors or warnings coming from the pre-transfer check. The possible values are:
- 2=Programmer
Programmers can not confirm error or warning. - 3=Application manager
Programmers can confirm error or warning. - 9=Block
No one can confirm the issue. The issue has to be resolved before processing can continue.
Disable indicator
The disabled indicator is defined per pre-transfer check. It indicates if this check should execute or not. The possible values are:
- 0=No
The check will run. - 1=Yes
The check will not run.
Object type
Specify the Object Type for which this check should be executed. Enter a valid object type or '*' for all object types.
Object attribute
Specify the Object Attribute for which this check should be executed. Enter a valid object attribute or '*' for all object attributes.
Application code
Specify the Application Code for which this check should be executed. Enter a valid application code or '*' if this check should be executed for all applications.
Environment code
Specify the Environment Code for which this check should be executed. Enter a valid environment code or '*' if this check should be executed for all environments.
Program name
The program name contains the name of a program which is called by TD/OMS during checkout.
Program library
The program library contains the OS/400 library where the exception program can be found.
Message id
The message id contains the name of the message-id of the pre-transfer check description text.
Message file
The name of the message file from which message-id is referred. By default "OMSMSG" message file is supplied, the user can change this value.
Gui Columns
It is now possible to configure which columns are visible and the header of these columns during the pre-transfer check. This is only possible for your own pre-transfer check definitions. Not for the system-supplied definitions. Please refer to the below description for more details.
- Column
The numbers match the column number. - Heading
The columns for this particular check can be changed by entering the values in this field. - Weight
The weight is the relative size of the column in the table. Value 0 will hide the column.
Command Start Pre Transfer Check Maintenance(STRPTCM)
This menu command starts the pre-transfer check function. Refer to the description of the function Pre Transfer Check for a detailed description.
This command has no parameters.
Pre Transfer Check details
Below are the detailed functions of each pre-transfer check.
- Active Solutions Check
- If you see this message, it means that you are going to replace an object that is currently attached to another task. This does not mean it is a version conflict. It just means that the object will, from this point on, be attached to your task and the other task as a *MERGE solution.
- Unconfirmed Active Solutions Check
- If version conflict confirmation is embedded in your organization then it means that you are going to replace an object that is currently attached to another task for which we could not find a confirmation record. This does not mean it is a version conflict. It just means that the object will, from this point on, be attached to your task and the other task as a *MERGE solution.
- Object Without Target Check
- If the configuration is not correct, you may see this error. It means that TD/OMS cannot find a suitable library or directory for the indicated objects in the target environment. This is sometimes related to location types and labels.
- Possible Level check Check
- You are processing a file that has dependencies that are not part of your transfer. This could mean that a level check could occur. The list will show which objects are depending on the object that you plan to process.
- Target Version Check
- You are going to overwrite an object version that is not a direct parent of your version. Note the objects and use the version conflicts view to resolve the issues.
- Terminate Solution Check
- All objects in the target environment which use the object will be checked. If they are not part of this transfer, then this message will be shown. You should probably not terminate an object which is in use by other objects.
- Pending Transfer Check
- There are still transfers pending completion on this or other systems. To close pending remote transfers, start the remote job monitor function.
- Service Program Level Check
- This check is done when not all dependent objects of a service program are processed. If you use a signature strategy, you may disable this check in the pre transfer check maintenance program.
- Possible Signature violation check
- Checks if the program to service program signatures match.
- Check dependent logicals
- It checks if there is an abnormal dependency. This occurs when either a dependent logical file exists but is not known to TD/OMS, or the dependent logical file exists in a different library than the physical file and its source does not exist.
- Unconfirmed version conflict
- It checks if there is a target higher environment that has a higher version of the solution.
- User Defined
- It is also possible to insert your own checking program. An example source is available in QUSRSRC. File a question in the helpdesk if you require support for this.
Additional definitions
User Option Maintenance
The user option maintenance function enables you to create your own list options. The functions currently supported are the four major TD/OMS entities; Object Maintenance, Solution Maintenance, Request Maintenance and Fix Maintenance. You must also start this program from one of these functions. This is done by using option \’/=User Options\’. The user options are cross application functions. This means that the user options are not owned by one of the applications, and all applications can use all user options. A user option is always calling a user program. You can specify if the program is to receive parameters. The parameters received are the data to the list entry on which the operation took place. TD/OMS comes with a few user options already installed. The sources of the corresponding programs reside in the QUSRSRC file in your TD library or you can follow this link to the technical information. Maintenance of user options is allowed for application managers. Usage of user options depends on the users environment authorization level and the assigned authority for a specific option.
Work with user options
This display is the user option maintenance list. You can select an entry from the list to retrieve it into your program. If you are authorized, you are also able to maintain the user options. Please note that user options are cross application. The user option you want to make, alter or remove can be used in other applications.
Position to
The Position to prompt can be used for a quick repositioning of the list.
Option
Use this column to perform different operations on individual objects. Choose from the following:
- 1=Select
- Select the requested user option. After you pressed enter, the code will appear on the option line of the main function you used. After you pressed enter again the user option will be processed.
- 2=Change
- Change the attributes of the user option.
- 3=Copy
- Copy a user option to a new user option.
- 4=Delete
- Delete the user option.
- 5=Display
- Display the user option.
Maintain user option
This display is invoked by every list option except 4=Delete. The user options can be viewed, added, copied and changed in this display.
User option
The user option is a user defined code which can be used together with program defined options. User options normally operate on a list entry. The user option is associated with a user program which is activated when the user option is utilized. The user program performs the designated task and communicates the status of the operation to the calling program. See the technical description of the User Option Maintenance program for details.
User option description
This is the description of the user option. It appears in the selection window and is used to identify the function of the user option.
Program
Contains the name of the program that is called when the indicated user option is used. Please keep in mind that the program you are using may not adopt authority from the calling program. Otherwise, the program would adopt TD authority because all TD functions are owned by the user OMS (including the database).
Library
Contains the name of the library where the user option program can be found.
Authorization
This is the authorization level required to execute the user option. Authorization code \’0\’ indicates that the user option is disabled.
Pass parameters
This element specifies whether or not parameters are passed to the calling program. The possible values are:
- 0=No
- No parameters are passed to the calling program.
- 1=Yes
- Parameters are passed to the calling program.
Interface Level
The interface level of the user option program indicates the TD call structure used by TD/OMS. Additional parameters can be added to the program in future releases. The possible values are:
- *V3R0M0 - Indicates the interface level to TD/OMS version 3.
Technical Information
There are currently four major entities defined for the user options, they roughly indicate from which program the user options where called. Each entity passes a different key buffer to the user option program. The user option program can be called with or without parameters. The passed parameters are:
ENTC (Entity code) - 3 characters
The entity code contains the global indication of the function from which the program was called. It also indicates the value the user can expect in the key buffer. The possible values are:
OBJ	Object entity
SOL	Solution entity
REQ	Request entity
FIX	Fix entity
KEY (Key buffer) - 100 characters
The key buffer contains the key to the entity in ENTC This key suffices to retrieve additional information about the entity. Additional information can be retrieved by using one of the OMQRTVxx API's. The layout of the keybuffer per entity is:
- OBJ - The object entity.
- This entity can be evoked from the object maintenance series. The key bufferlay-out for this entity is:
01 - 12 	(12A)	Object code
13 - 22 	(10A)	Object library
23 - 31 	(9A)	Object type
32 - 41 	(10A)	Detail code
The detail code is filled if the user option is placed in front of a file member or a message. You can use these values to retrieve other object attributes with the OMQRTVOB command API.
- SOL - The solution entity.
- This entity can be invoked from the solution maintenance program. The key buffer lay-out for this entity is:
01 -  5	(5A)	Application code
06 - 15	(10A)	Fix number
16 - 27	(12A)	Object code
28 - 36	(9A)	Object type
37 - 46	(10A)	Detail code
The detail code is filled if the user option is placed in front of a file member or a message solution. You can use these values to retrieve other solution attributes with the OMQRTVSO command API.
- FIX - The fix entity.
- This entity can be invoked from the fix maintenance series. The key buffer lay-out for this entity is:
01 -  5	(5A)	Application code
06 - 15	(10A)	Fix number
16 - 20	(5A)	Application of related request
21 - 30	(10A)	Related request
The application code of the request and the request number ore filled if this option is started from the fix/request or request/fix list. You can retrieve additional fix attributes by using these elements in the OMQRTVFI command API. Fix/Request relations can be retrieved by using the OMQRTVFR command API. Request/Fix relations can be retrieved by using the OMQRTVRF command API.
- REQ - The request entity.
- This entity can be invoked from the request maintenance program. The key buffer lay-out for this entity is:
1 -  5	(5A)	Application code
6 - 15	(10A)	Request number
You can retrieve additional attributes by using these elements in the OMQRTVRE command API. Fix/Request relations can be retrieved by using the OMQRTVFR command API. Request/Fix relations can be retrieved by using the OMQRTVRF command API.
OPTI (Option used) - 2 characters
This parameter contains the option that was used by the user.
STAT (Return status) - 5 characters
The return status field STAT is important because it control the response to the user that used the option. The possible values are:
- *TERM
- If this value is used, the calling program will act as if an error had occurred during the processing of the user option. The option in the list will be in reverse image and list processing stops. You are responsible for sending error messages to the calling program to indicate the cause of the error. This can be done with the SNDPGMMSG command.
- *CNCL
- If this value is used, the calling program will act as if the user pressed F12 on a list continuation display. The list option will be cleared but list processing will stop.
- *EXIT
- If the calling program receives this value it will terminate as if the user had pressed F3. All list processing and pending functions are canceled.
- *NORM
- Normal termination of the user option is assumed. The list option is blanked and the calling program will continue with the next list option. If no more list options are keyed, the list will be re-displayed.
Note: If the user option ended in error, you are responsible for sending error messages to the calling program to indicate the cause of the error. This can be done with the SNDPGMMSG command. The same goes for completion messages when the option completed normally. This can be done with the same command.
Registry Settings
The TD/OMS system registry is a place where additional configuration values are stored that are not part of the normal database. You can use this registry to set the values of our predefined registry settings to enforce certain TD/OMS behavior that cannot be specified elsewhere.
API has been created to change and retrieve TD/OMS system registry settings. This Application Program Interface command allows you to manipulate the TD/OMS database. This can be done from a command line or from within your programs.
The command enables you to perform all allowed actions on a registry key. You can use these command to nudge some TD/OMS behavior or you can use the registry to store your own values.
By convention, all TD/OMS system registry values start with OMQ.
Storing a Registry Setting
A registry setting can be stored by using the following command:
OMQCHGSR
- Action code (ACTC)
- Specify the action to be performed on the registry key. The possible values are:
- *ADD
- Use this action code to add a new registry key to the OMS database.
- *CHANGE
- Use this action code to change the value of a registry key.
- *CLOSE
- Use this action code to close the registry database and to close the program. This option enables you to keep the interface to the registry database open until you explicitly close it. This will make the interface faster.
- *DELETE
- Use this action code to remove a registry key from the database.
- Application (APPL)
- Specify the application code of the application to which the registry key must be added or from which a registry key has to be removed.
- Environment (ENVC)
- Specify the environment code for which this registry key is valid.
- Route code (ROTC)
- Specify the route code for which this registry key is valid.
- Program name (PGMN)
- Specify the program name for which this registry key is valied.
- Keyword (KEYW)
- Specify the registry keyword.
- Keyword value (KEYV)
- Specify the registry keyword value.
- Close API indicator (EOPI)
- Specify if the API should close all files and free storage upon completion of the requested action. The possible values are:
- *YES
- The files are closed and storage is freed by the API upon completion of the requested action. Subsequent actions must open the necessary files and programs again.
- *NO
- The state of the API was left when the requested action was completed. Files remain open and status updates are postponed. Subsequent calls to the API are considerably faster and storage is not freed.
  Note:  Note that the last action of a series should close
  the API in order to close spooled files and do status
  calculations.
Messages
OMQ5012
Unexpected end of program or command &1.
OMQC002
Value &1 for attribute &2 not allowed.
OMQC300
Requested registry key was not found.
OMQC301
Registry key &1 already exists.
OMQ6003
Change code &1 invalid for OMS API &2
OMQ500B
Interface level &2 not supported for &1.
Retrieving a Registry Setting
A registry setting can be retrieved in a CL program by using the following command:
OMQRTVSR
- Keyword (KEYW)
- Specify the registry keyword.
- Application (APPL)
- Specify the application code of the application for which this registry key is valid.
- Environment (ENVC)
- Specify the environment code for which this registry key is valid.
- Route code (ROTC)
- Specify the route code for which this registry key is valid.
- Program name (PGMN)
- Specify the program name for which this registry key is valied.
- CL Var for KEYV (KEYV)
- Specify the 256 character CL variable that is used to store the value.
Messages
OMQ5012
Unexpected end of program or command &1.
OMQ5035
Keyword is blank or not registered.
Predefined System Registry Settings
Saving Replaced Objects
If you want to update programs into an environment that is being used, you must instruct TD/OMS to move the objects being replaced to a different location. This is done by setting the value of registry setting OMQSAVRPLLIB to a valid library name on the system where you want this to happen. If the library does not exist it is created. QRPLOBJ (The library being used by IBM when a program is created with REPLACE(*YES)) is not a bad choice. In addition to this, you have to set the value of OMQSAVRPLTYPES with a list of object types to save.
Please note that manual maintenance of any other library than QRPLOBJ is required. You should empty this library after an IPL.
The registry setting is global. It cannot be specified for a specific application or environment.
OMQSAVRPLLIB - Save Replaced Objects Library
Contains the library that is used to store replaced objects in. Could be QRPLOBJ. Please note that QRPLOBJ is in the system ASP. In case of an iASP the library is called QRPLxxxxx (where xxxxx is the number of your iASP).If you have 1 iASP than the library will most likely be QRPL00033. Moving objects across ASP's is not possible. TD/OMS will generate the fallback library in the iASP so you need to use the iASP equivalent of QRPLOBJ or your own library in the same iASP.
Example
OMQCHGSR ACTC(*ADD) KEYW(OMQSAVRPLLIB) KEYV(QRPLOBJ)
OMQSAVRPLTYPES - Save Replaced Objects Types
Contains a list of comma separated object types that must be saved when replaced. E.g. *PGM, *SRVPGM, *USRSPC
Example
OMQCHGSR ACTC(*ADD) KEYW(OMQSAVRPLTYPES) KEYV('*PGM, *SRVPGM')
Since
This setting is active in version V5.1M04 and higher
OMQILEPRC - Automatically update programs and service programs
If this registry setting is set for a specific application and environment combination then every module and service program that is processed automatically updates the program or service program with the new module or service program by using the UPDPGM and UPDSRVPGM commands. Please see the UPDILEOMS command for more information.
Example
OMQCHGSR ACTC(*ADD) APPL(required application) ENVC(required environment) KEYW(OMQILEPRC) KEYV('1')
Since
This setting is active in version V5.1M04 and higher
OMQPRDDLTLOCK - Disallow Delete Object and Source from Production Environments
If an object is disconnected from the fix, or if the user uses option 4=Delete in Object Maintenance, the option to also remove the object and source is shown. This is often not desirable in a production environment and is potentially dangerous. Note that removing objects from production is only allowed to Application Managers and owners of the production environment. If you want to inhibit this behavior altogether for production environments then set this registry entry. Please note that the user is still invited to delete object and source but gets a message if the flag is set.
Since
This setting is active in version V5.1M07 and higher.
OMQPRDDLTLOCK - Production delete lock
Contains '1' if the lock is active.
Contains '0' if the lock is not active
The effect of any other value is not defined.
Create the registry setting like this:
OMQCHGSR ACTC(*ADD) APPL(optional application) KEYW(OMQPRDDLTLOCK) KEYV('1')
OMQALWOBJREG - Allow Object Registration
This routine checks if it is possible to register an object in the database outside of the regular object registration functions. This prevents objects to be introduced outside certain allowed environments.
The check is done by querying OMQALWOBJREG. This registry setting can be set system-wide, per application or per environment. The value can be:
*DEVONLY - Only allowed in development environments
*NO      - Not allowed for this system/application/environment
*YES     - Allowed for this system/application/environment
Finer definitions take preference over global definitions meaning that environment specifications override application specifications which in turn override system-wide specifications.
Since
This setting is active in version V5.0M12 and higher.
Create the registry setting like this:
OMQCHGSR ACTC(*ADD) APPL(optional application) ENVC(optional environment) KEYW(OMQALWOBJREG) KEYV('*DEVONLY')
OMQALWOBJREFILL - Allow Object Change
This setting disables the possibility to refresh the status of an object in the database outside of the regular object registration functions. This prevents objects to be changed by outside forces (e.g. recompiled) outside certain allowed environments.
The check is done by querying OMQALWOBJREFILL. This registry setting can be set system-wide, per application or per environment. The value can be:
*DEVONLY - Only allowed in development environments
*NO      - Not allowed for this system/application/environment
*YES     - Allowed for this system/application/environment
Finer definitions take preference over global definitions meaning that environment specifications override application specifications which in turn override system-wide specifications.
Since
This setting is active in version V5.0M12 and higher.
Create the registry setting like this:
OMQCHGSR ACTC(*ADD) APPL(optional application) ENVC(optional environment) KEYW(OMQALWOBJREFILL) KEYV('*DEVONLY')
Transfers only allowed in batch
Set registry key BATCHONLY to '1' in order to activate the setting. This keyword must be set in combination with the application code and the program code.
BATCHONLY - Batch transfers only
OMQCHGSR ACTC(*ADD) APPL(DEMO) PGMN(OMO001) KEYW(BATCHONLY) KEYV('1')
Force usage of connection rules
Forces the use of connection rules. The GUI will not allow connecting without rules if this flag is set. In the green screen, even if the user uses '1=Select' in the object maintenance function, the connection rules are activated.
FORCECONNRULE - Force Connection Rules
OMQCHGSR ACTC(*ADD) APPL(DEMO) KEYW(FORCECONNRULE) KEYV('1')
Confirming a Transfer
If you want a validation of the user before a transfer takes place, you are able to specify this in registry key CONFIRMTRANSFER. This will instruct TD/OMS to ask for the password of the current logged in user to ensure that this is actually the user that started the transfer.
CONFIRMTRANSFER - Confirm Transfer
Green Screen
- OMQCHGSR ACTC(*ADD) APPL(DEMO) PGMN(OMO001) KEYW(CONFIRMTRANSFER) KEYV('0')
- Transfers do not need to be confirmed.
- OMQCHGSR ACTC(*ADD) APPL(DEMO) PGMN(OMO001) KEYW(CONFIRMTRANSFER) KEYV('1')
- All transfers must be confirmed by entering the user's password.
GUI
- OMQCHGSR ACTC(*ADD) APPL(DEMO) PGMN(OMX943) KEYW(CONFIRMTRANSFER) KEYV('0')
- Transfers do not need to be confirmed.
- OMQCHGSR ACTC(*ADD) APPL(DEMO) PGMN(OMX943) KEYW(CONFIRMTRANSFER) KEYV('1')
- All transfers must be confirmed by entering the user's password.
Keep the source date
This setting instructs TD/OMS not to change the source change date of the member being transferred. This is achieved by employing save/restore rather than CPYSRCF to copy a source member. In order for this to work, the from and to file must be of the same level. This means that keeping the source date does not work if the record lengths differ between source files.
KEEPSOURCEDATE - Keep the source date
- OMQCHGSR ACTC(*ADD) KEYW(KEEPSOURCEDATE) KEYV('0')
- The sourcedate does not need to be kept in the source member. TD/OMS will guard the source change date in its database.
- OMQCHGSR ACTC(*ADD) KEYW(KEEPSOURCEDATE) KEYV('1')
- Try to do a save and restore to keep the source date. If this is not possible then ignore the error and try to copy the source file with CPYF which will change the source change date information in the sourcemember.
- OMQCHGSR ACTC(*ADD) KEYW(KEEPSOURCEDATE) KEYV('2')
- Try to do a save and restore to keep the source date. If this is not possible then an error is reported that will start fall-back processing.
Since
- This setting is NOT active anymore in version V6.4M00 and higher.
- As of IBM i/OS V6R1M0 this is solved in the CPYSRCF command.
- For IBM i/OS V5R4M0 PTF SI25844 is required.
- For IBM i/OS V5R3M0 PTF SI25796 is required.
AS/SET System libraries
In case your AS/SET libraries are not ASSETO or ASSETF then you can change this by setting registry entries per application.
OMASSETO - Set the AS/SET object library
- OMQCHGSR ACTC(*ADD) APPL(appl) KEYW('OMASSETO') KEYV(value)
OMASSETF - Set the AS/SET file library
- OMQCHGSR ACTC(*ADD) APPL(appl) KEYW('OMASSETF') KEYV(value)
- Sets the AS/SET file library to a different value.
ASSETGPL cannot be changed. Please contact us if you need this.
OMSCOPLIMLF - Logical File Creation Scope Limit
- OMQCHGSR ACTC(*ADD) APPL(appl or blanks for all applications) ENVC(environment or blanks for all environments) KEYW('OMSCOPLIMLF ') KEYV(0, 1 or 2)
The keyword restricts the library list scope of the logical file creation. If the value is not found then TD/OMS will use the standard way of creating a logical. This standard process includes a search of all environments until the correct or most probable physical file has been found. If the logical resides in an intermediate environment then all higher environments will be searched for the associated physical but never the production locations.
The possible values for KEYV are:
- 0 - Library
- Only build logicals over physicals in the same library.
- 1 - Library List (Sub-environment)
- Only build logicals over physicals in the same library list or sub-environment.
- 2 - Environment
- Logicals can be build over any physical in the same environment.
Since
This setting is active in version V5.1M07 and higher.
OMIFSSRCEXT - Stream File extension definition for Source data save
- OMQCHGSR ACTC(*ADD) APPL(appl or blanks for all applications) ENVC(only *NONE) ROTC(route or blanks for all Routes) KEYW('OMIFSSRCEXT ') KEYV(any character string representing one or a series of file extension types or *ALL for all stream files)
Determines the extension type of Stream Files for which contents (source) save in an archive file will be activated. The source save procedure will be processed when the file component is transferred to the lowest (development or emergency) environment in the Application. If a KEYV has to be defined for a series of file extensions, remind that the first four positions of the extension string will be compared with blocks of maximal four characters in the file extension definition string.
Since
This setting is active in version V5.1M13 and higher.
OMQINLLIBL - Initial Library List For Batch Jobs
Sets the library list to be used with batch jobs submitted by TD/OMS: the value is used for the INLLIBL parameter on the SBMJOB-command.
If this entry is not registered in the TD/OMS System Registry, the value *CURRENT is used (this value is also used in all versions before V51KEM11). The value can be specified as follows:
OMQCHGSR ACTC(*ADD) APPL(application | *NONE) KEYW(OMQINLLIBL) KEYV(*CURRENT | *JOBD | *SYSVAL | *NONE)
The possible values for KEYV are all described in the help panel of the command SBMJOB. Only the single values are allowed: specifying a list of libraries is not possible. The listed valid values are valid for IBM i V5R1M0; the list may be extended in future releases.
When TD/OMS submits a batch job, the value for INLLIBL is determined in three steps:
- Retrieve the value of
OMQINLLIBLfor the current application - If not found, retrieve the global value of
OMQINLLIBL(application code is*NONE) - If not found, use
*CURRENT
Step 1 is skipped for jobs that are not dependent on any application, like Reorganize Files. It is not possible to define a value for a specific environment within an application.
Since
This setting is active in version V5.1M11 and higher.
OMQFALBCKUSRX - Fall Back User Exit program
If you want to trigger a user defined program after a Fall Back has been executed, you should use this registry setting. If the call to the program defined fails a message is sent to the TD/OMS log.
- OMQCHGSR ACTC(*ADD) APPL(appl or blanks for all applications) KEYW('OMQFALBCKUSRX') KEYV(program name)
The program is called with the following parameter list:
- Transfer code (8 character)
- Application (5 character)
- From environment code (5 character)
- To environment code (5 character)
- Status (5 character)
Since
This setting is active in version V5.1M13 and higher.
OMSCANPHASES - Scan source relationship
Scan the source relationship based on the number of phases. This registry setting can be set system-wide, per application, or per environment. The value can be:
01 - To scan for included files (like copymembers) and external data structures only.
02 - To scan for fields.
The higher the number the slower the relationship processing will be but the more information can become available.
Since
This setting is active in version V5.3M00 and higher.
OMQPRCLODINT - Load internal ILE procedures in TD/OMS relation database
If you want to load the internal ILE procedures into the TD/OMS relation database, you should use this registry setting.
- OMQCHGSR ACTC(*ADD) APPL( blanks) KEYW('OMQPRCLODINT') KEYV(1)
Since
This setting is active in version V6.0M02 and higher.
OMQRMTJOBMONUSR - Remote Job Monitor User
If you have set-up TD/OMS with another TD/OMS system user then the default user profile OMS and you want to use Remote Job Monitor functions, you should use this registry setting. This registry setting must be set on the local machine and on the receiving machine(s).
- OMQCHGSR ACTC(*ADD) KEYW('OMQRMTJOBMONUSR') KEYV(TD/OMS system user profile)
Since
This setting is active in version V6.0M03 and higher.
OMQLODSQLOBJ - Load SQL Objects in TD/OMS
If you want to load the SQL long names of database objects and to see the relations with their counterpart native implementation, you shoulf use this registry setting. The loaded SQL objects cannot be used as a solution in TD/OMS and therefore the SQL objects cannot be maintained with TD/OMS.
- OMQCHGSR ACTC(*ADD) APPL(appl) ENVC(environment code or blanks for all environments) KEYW('OMQLODSQLOBJ') KEYV('1')
Since
This setting is active in version V6.0M03 and higher.
OMQGUIDIAPORT - GUI Dialog Server Port
If you want to be able to start a dialog with a client running the TD/OMS GUI, you have to specify a TCP/IP port with this registry key. After the port is changed, clients must restart in order to listen to the new port.
- OMQCHGSR ACTC(*ADD) KEYW('OMQGUIDIAPORT') KEYV('01234')
Replace '01234' with the required port. Please use 5 positions.
Since
This setting is active in version V6.4M00 and higher.
OMQRATFIX - Ratification Fix setting
- OMQCHGSR ACTC(*ADD) APPL(appl or blanks for all applications) ENVC(environment or blanks for all environments) KEYW('OMQRATFIX') KEYV(0, 1 or 2)
Determines the way the ratification authority validation is executed. If the value is not found then TD/OMS will use the classic way of ratification authority validation.
The possible values for KEYV are:
- 0 - Any user can ratify a fix.
- Any user who is a member of the ratification group can ratify the fix.
- 1 - User can not ratify his own fix.
- Any user who is a member of the ratification group can ratify the fix, except if the user is the programmer of the fix.
- 2 - Only user can ratify his own fix.
- Any user who is a member of the ratification group can only ratify their own fixes.
Since
This setting is active in version V6.4M00 and higher.
OMQDSTPROFILE - OMS Distribution Profile
- OMQCHGSR ACTC(*ADD) KEYW('OMQDSTPROFILE') KEYV([user profile|*CURRENT])
This user profile is used to perform TD/OMS distributions. If this registry setting is not defined it is taken from the owner of the file OMOBJ. This is normally the user OMS. However, on systems with more then one OMS installation you could need a different profile.
The possible values for KEYV are:
- user profile
- Specify the user profile to be used for distributions.
- *CURRENT
- The current user profile is used.
Since
This setting is active in version V6.4M00 and higher.
OMQTCPSYSNAME - OMS TCP Distribution System Name
- OMQCHGSR ACTC(*ADD) KEYW('OMQTCPSYSNAME') KEYV(System name)
This system name is used to send back the messages needed for the remote job monitor mechanism when the TD/OMS TCP distribution is used. If this registry setting is not defined the local location name from the network attributes is used. This registry setting should only be used when the local location name (on the remote system) does not match the hostname used for TCP communication.
The possible values for KEYV are:
- System Name
- Specify the system name used for TCP communication.
OMQSOCSRMV - Remove Solution After Split
- OMQCHGSR ACTC(*ADD) KEYW('OMQSOCSRMV') APPL(application) KEYV('1')
The user option CS from supplied user option program OMUSROPTSO (source resides in QUSRSRC) is able to move a solution from one fix to another.
The possible values for KEYV are:
- 1
- The solution is removed after it was successfully attached to the new fix.
- other then 1 or not defined
- The solution stays connected to the old fix as a *FOLLOW solution
Since
This setting is active in version V6.4M00 and higher.
OMQAUTREFTYP - Adopt Authorization from OMSREFOBJ with specific object type
- OMQCHGSR ACTC(*ADD) APPL(appl or blanks for all applications) ENVC(environment or blanks for all environments) KEYW('OMQAUTREFTYP') KEYV(0 or 1)
If in the Application Definition the authority conversion type is set to value 1=adopt or 2=OMSREFOBJ, TD/OMS tries to adopt the authority from object OMSREFOBJ with type *DTAARA. This registry setting makes it possible adopt the authority from object OMSREFOBJ with a specific object type.
The possible values for KEYV are:
- 1 : The authority is adopted from object OMSREFOBJ with the specific object type if it exists, otherwise it is adopted from object OMSREFOBJ with type *DTAARA.
- 0 : The authority is adopted as described in Application Definition.
Since
This setting is active in version V6.5M04 and higher.
OMQDISTR1ADDR - Distribution object set per address
- OMQCHGSR ACTC(*ADD) APPL(application or blanks for all applications) ENVC(environment or blanks for all environments) KEYW('OMQDISTR1ADDR') KEYV(0 or 1)
According to default processing, TD/OMS creates one distribution set with all objects involved in a transfer and sends this set to all the addresses selected within that transfer. On the receiving systems, the final selection is made which objects should be processed at the specific address and which can be skipped according to conditions and selections in the environment definitions.
If the requirement is to restrict the distribution set to only those objects that have been really passed selection criteria for the specific address, this registry setting must be activated.
The possible values for KEYV parameter are:
- 1 : The object distribution set is restricted to objects filtered for the specific sub-environment.
- 0 : The object distribution set is created for all addresses at once.
Since
This setting is active in version V6.5M05 and higher.
OMQDISTRBASEDIR
- OMQCHGSR ACTC(*ADD) KEY('OMQDISTRBASEDIR') VALUE('path/to/dir')
This keyword is automatically set when the INZOMSSVR command is run. It contains the base queuing directory for this installation.
TD/OMS Compilation settings
OMQCOMPJOBD - Compilation Job Description
OMQCHGSR ACTC(*ADD) APPL(application or blanks for all applications) ENVC(environment or blanks for all environments) KEYW('OMQCOMPJOBD') KEYV('*LIBL YOURJOBD ')
If you use the TD/OMS compile in batch function the TD/OMS compile command is submitted to batch with the job description from the user. If you want to use a specific job description for TD/OMS batch compiles, you should use this registry setting. This job description is used for sequential compiles. Some object types can be compiled in parallel, for this, take a look at registry setting OMQCOMPJOBDP.
The key value first ten positions must contain the job descriptions library and the key value positions 11-20 must contain the job description name.
If you want to activate parallel compiles then see also
- OMQCOMPJOBDP
- OMQCOMPPRCSEQ
Since
This setting is active in version V6.5M00 and higher.
OMQCOMPJOBDP - Job Description for Parallel Compilation
OMQCHGSR ACTC(*ADD) APPL(application or blanks for all applications) ENVC(environment or blanks for all environments) KEYW('OMQCOMPJOBDP') KEYV('*LIBL YOURJOBD ')
If you use the TD/OMS compile in batch function the TD/OMS compile command is submitted to batch with the job description from the user. If you want to take advantage of the parallel compile function, you should use this registry setting. This job description is used for parallel compiles and is used in combination with OMQCOMPJOBD. Define a job description which uses a jobqueue for which multiple jobs can be active at the same time.
The key value first ten positions must contain the job descriptions library and the key value positions 11-20 must contain the job description name.
See also
- OMQCOMPJOBD
- OMQCOMPPRCSEQ
Since
This setting is active in version V11.0M01 and higher.
OMQCOMPPRCSEQ - Parallel Compilation Processing Sequence
- OMQCHGSR ACTC(*ADD) KEYW('OMQCOMPPRCSEQ') KEYV(Processing Sequence Number)
If you use the TD/OMS parallel compilation functionality then you will have to use this registry setting. If you don't specify the processing sequence number then it would pick 67500 as a default processing number.
If the objects processing sequence value is less than the specified number then compile jobs will be submitted in the job queue specified in OMQCOMPJOBD. Otherwise, jobs will be submitted in a parallel queue which is specified by setting OMQCOMPJOBDP. The processing sequence can be changed here.
See also
- OMQCOMPJOBD
- OMQCOMPJOBDP
Since
This setting is active in version V11.0M01 and higher.
OMQAUTIFSDIR - Stream file authorization from target directory
- OMQCHGSR ACTC(*ADD) APPL(application or blanks for all applications) ENVC(environment or blanks for all environments) KEYW('OMQAUTIFSDIR') KEYV(0, 1 or 2)
According to default processing TD/OMS creates stream file objects with the authority settings from the from object (see parameter AUT(*OBJ) on the CPY command). If the requirement is to create stream file objects with authority settings from the directory it is created in, this registry setting must be activated.
The possible values for KEYV parameter are:
- 0 : The stream file object is created default with authority (like parameter AUT(*OBJ) on the CPY command).
- 1 : The stream file object is created default with authority from the target directory (like parameter AUT(*INDIR) on the CPY command).
- 2 : The stream file object is created default with authority from the target directory and the from object (like parameter AUT(*INDIROBJ) on the CPY command).
WARNING: Using a 2 on a receiving system may give unexpected results as the authorizations of the TD/OMS receiving directory (which is a temporary directory) are also taken into account.
Since
This setting is active in version V6.5M05 and higher, also IBM i/OS V6R1M0 or higher is required.
OMQAUTPGMRCHG - Authorisation for fix programmer change
- OMQCHGSR ACTC(*ADD) APPL(application or blanks for all applications) ENVC(environment or blanks for all environments) KEYW('OMQAUTPGMRCHG') KEYV(3)
This registry setting can be used to prevent the change of the fix programmer.
If it is required to prevent programmers to assign their own fixes to another programmer this registry setting must be activated.
The possible values for KEYV parameter are:
- 3 : The fix programmer can only be changed by users with authorization code 3.
Since
This setting is active in version V9.0M01 and higher.
OMQWORKDIRCANDM - Work directory for compare and merge
- OMQCHGSR ACTC(*ADD) KEYW('OMQWORKDIRCANDM') KEYV('/QOpenSys/TD/tmp/CMWDIR')
This registry setting can be used to point to a new working directory for source compare and merge.
If this key is not defined, programs should assume the default value of '/QOpenSys/TD/tmp/CMWDIR'.
Since
This setting is active in version V9.0M01 and higher.
OMQ4GLGENOBJ - Scope limit for generated objects check
- OMQCHGSR ACTC(*ADD) APPL(application) KEYW('OMQ4GLGENOBJ') KEYV('FIX') or 'TFR'
see: 2E scope limit for generated objects check
OMQGITURL - Git base URL
- OMQCHGSR ACTC(*ADD) APPL(application) ROTC(route) KEYW('OMQGITURL') KEYV('https://github.com/githubname/myapplication.git')
This registry setting is used as the URL for the Git repository of the route of this application. This registry setting is automatically set by the INZGITOMS command. If you manually import your sources you have to manually set the values below as well.
Since
This setting is active in version V9.1M00 and higher.
OMQOMSGITDIR - TD/OMS Git Script Directory
- OMQCHGSR ACTC(*ADD) KEYW('OMQOMSGITDIR') KEYV('/QOpenSys/TD/Git/')
This registry setting is used to indicate the directory where the Git scripts are saved. This setting is automatically created when command INZOMSSRV *GIT is performed.
Since
This setting is active in version V9.1M00 and higher.
OMQGITPRCRTE - GIT Process Route code
- OMQCHGSR ACTC(*ADD) APPL(<application>) KEYW('OMQGITPRCRTE') KEYV(<route>)
This registry setting is used to define the TD/OMS route code where the IBM i sources can be found. Use this registry setting when your IBM i sources are managed by TD/OMS and Git to indicate additional processing (connect objects to a task when checking in an IFS source. See the Git manual for more information. This registry setting is automatically set by the INZGITOMS command. If you manually import your sources you have to manually set the values below as well.
Since
This setting is active in version V10.0M01 and higher.
OMQGITAMSTRPUSH - GIT Allow Push to Master
- OMQCHGSR ACTC(*ADD) APPL(<application>) RPTC(<route>) KEYW('OMQGITAMSTRPUSH') KEYV(<0|1>)
This registry setting is used to define if you allow (1) a direct push to master for the specified route. The default value is not to allow a direct push (2) but use feature branches.
Since
This setting is active since version V10.0M02
OMQEXTCMPLIBL - Extended Compilation library list
- OMQCHGSR ACTC(*ADD) KEYW('OMQEXTCMPLIBL') KEYV('1')
This registry setting is used to define that the Environment Compilation library lists are extended with additional libraries to locate object relations outside the active, current TD/OMS application. When using this option all applications involved in the relationship search must be classified in Application Group definitions.
Since
This setting is active in version V10.1M00 and higher.
OMQOPENAPIRTE - Route for OpenAPI Generation
- OMQCHGSR ACTC(*ADD) KEYW('OMQOPENAPIRTE') KEYV(<route code>)
- OMQCHGSR ACTC(*ADD) APPL(<application>) KEYW('OMQOPENAPIRTE') KEYV(<route code>)
This registry setting is used to define where OpenAPI specifications have to be generated. This can be set on the application level or on the system level. Application level will take precedence over system level.
Since
This setting is active in version V10.0M03 and higher.
OMQJRNWRKLIB - Work Library for Journal Analyzer
- OMQCHGSR ACTC(*ADD) KEYW('OMQJRNWRKLIB') KEYV(<Work Library Name>)
This registry setting is used to define the library where temporary information would be stored. Please specify the value of "<Work Library Name>" accordingly. The contents of this library may grow but can be discarded at any time. QTEMP will not work.
Since
This setting is active in version V11.0M01 and higher.
OMQTESTOBJREGEX - Test Objects Regex
- OMQCHGSR ACTC(*ADD) APPC(<application|empty>) KEYW('OMQTESTOBJREGEX') KEYV(<valid java regex>)
This registry setting is used to identify programs and service programs that are test objects. These objects will be folded in the Work Management tree under the Test node. Enter a valid java regular expression on the system level or fill in a specific application code to override the system level. The default value is "(TS.*|.*TST.*)".
The objects are matched against a qualified name. For example, the qualified name for an RPGLE program object is NAME.PGM.RPGLE. If you only want RPGLE objects to match as test objects, the regex could be TST.*RPGLE$ which matches all objects starting with TST and ending in RPGLE.
Changes in this setting are active after restarting the GUI.
Since
This setting is active in version V12.0M01 and higher.
OMQJOBLOGGEN - Generate Job Log after GUI Call
- OMQCHGSR ACTC(*ADD) KEYW('OMQJOBLOGGEN') KEYV('OMC022')
This registry setting is used to determine which TD/OMS programs must generate a job log after being called from the GUI. The default program is OMC022 which is used to interactively compile an object. The program names must be uppercase and separated by a space.
Changes in this setting are active after the GUI is restarted.
Since
This setting is active in version V12.1M00 and higher.
OMQLINKPREFIX - Generated Tracker Link Prefix
When a Task or Request is connected to a tracker item like Jira or Gravity, a backlink is generated in the tracker item. This registry setting is used to define a custom link that is used as a prefix for the generated tracker backlink to TD/OMS. The total link length should be 150 positions or less.
Syntax:
- OMQCHGSR ACTC(*ADD) KEYW('OMQLINKPREFIX') APPC(*NONE|_application_) PGMN(*NONE|'TASK'|'REQUEST') KEYV(_url_)
'TASK' and 'REQUEST' are literals.
You can define the variable multiple times in different combinations. Consider the following entries (stored in table OMAGP)
| Table OMAGP | |||||
|---|---|---|---|---|---|
| Entry | APPC | PGMN | KEYV | ||
| 1 | *NONE | TASK | https://octo.remainsoftware.com/org/remain?handle=tdoms/tasks/{application}/{number} | ||
| 2 | *NONE | REQUEST | https://octo.remainsoftware.com/org/remain?handle=tdoms/request/{application}/{number} | ||
| 3 | ORDER | *NONE | https://order.remainsoftware.com/org/remain?handle=orders/?number={number}&application={application} | ||
| 4 | *NONE | *NONE | https://octo.remainsoftware.com/welcome.html/?type={type}&number={number}&application={application} | ||
The following search order will be used:
- Application / Type
- Application / *NONE
- *NONE / Type
- *NONE / *NONE
Given application 'TEST' Type='TASK' and the Task number='T0001'
Entry 1 is taken because it is the only entry that matches application 'TEST' and type 'TASK'
https://octo.remainsoftware.com/?handle=tdoms/tasks/TEST/T0001
Given application 'ORDER' Type='TASK' and the Task number='T0001'
Entry 3 is taken over entry 1 because the application takes precedence.
https://order.remainsoftware.com/?handle=orders/?number=T0001&application=ORDER
Given application 'BOOK' Type='REQUEST' and the number='R9999'
Entry 2 matches 'Request' and application 'BOOK' does not have a key.
https://octo.remainsoftware.com/?handle=tdoms/request/BOOK/R9999
Entry 4 is used only in cases where the type will not be 'Task' or 'Request'. This situation does not occur.
You can use the following variables:
- {type}
- 'Task' or 'Request'
- {number}
- The Task or Request number
- {application}
- The Application code
Changes in this setting are active after the GUI is restarted.
Since
This setting is active in version V14.0M01 and higher.
OMQFLBCOPYTYPES - Copy or Move the object to fall-back library
- OMQCHGSR ACTC(*ADD) KEYW(OMQFLBCOPYTYPES) KEYV('*PGM *SRVPGM')
- This registry setting is used during the promotion. The object type is matched with the value of the OMQFLBCOPYTYPES keyword, it contains a space-separated list of object types. If a match is successful, the object is copied to the fallback library else it is moved.
Since
This setting is active in version V14.0M03 and higher.
OMQUSRDTALIB - User Session Data library
The OMQUSRDTALIB setting controls the location of the OMS user session data. When this registry setting is used, it can point to a library where the session data must be stored. The special value *OMSLIB is used to point to the OMS library. This entry is required if you use the TD/OMS REST API.
Since
This setting is active in version V14.1M00 and higher.
OMQCREATEBRANCH - Automatic Branch Creation
- OMQCHGSR ACTC(*ADD) APPL(optional application) KEYW(OMQCREATEBRANCH ) KEYV('1')
This registry setting activates automatic branch creation when a new task is added.
The possible values for KEYV are:
- 1
The branch will be created automatically.
- other than 1 or not defined
The branch will not be created automatically.
Since
This setting is active in version V15.0M01 and higher.
OMQAUTOTSKREQNR - Fill the task and request number automatically
- OMQCHGSR ACTC(*ADD) KEYW(OMQAUTOTSKREQNR) KEYV('1')
This registry setting is used to automatically fill the task and request number from a ticket.
The possible values for KEYV are:
- 1
The task and request number will be filled out automatically.
- other than 1 or not defined
The task and request number will not be filled out automatically.
Since
This setting is active in version V15.0M01 and higher.
OMQRMTJDBSYNDFT - Local job descriptions automatically synchronize the remote job descriptions
- OMQCHGSR ACTC(*ADD) APPL(<application|empty>) ENVC(<environment|empty>) KEYW(OMQRMTJDBSYNDFT) KEYV('1')
When the user sets the local job description during transfer, then the remote job descriptions are automatically switched to the same value when this registry is active. You can override this value at three different levels.
The possible values for KEYV are:
- 1
Synchronize.
- other than 1 or not defined
Do not synchronize.
Since
This setting is active in version V15.0M02 and higher.
OMQJWTSECRET- This registry setting is used to store the JWT secret key
- OMQCHGSR ACTC(*ADD) KEYW(OMQJWTSECRET) KEYV('<secret key>')
This registry setting stores the JWT secret key, which is used to generate JWT tokens. If this key cannot be found when the JWT key generation process needs it, it is automatically generated.
Since
This setting is active in version V15.0M02 and higher.
OMQJWTEXP - JWT expiration time in seconds
- OMQCHGSR ACTC(*ADD) KEYW(OMQJWTEXP) KEYV(numeric value)
Defines the JWT expiration time in seconds. It defauls to 43200 seconds (12 hours).
Since
This setting is active in version V18.0M01 and higher.
OMQSSHXFRDIR - The location of the SSH Transfer server
- OMQCHGSR ACTC(*ADD) KEYW(OMQSSHXFRDIR) KEYV('/QOpenSys/TD')
This registry setting is used to store the location of the SSH Transfer server. This key is installation-wide and is set automatically by the installation process.
Since
This setting is active in version V15.0M03 and higher.
OMQWSWEBPATH - The location of the WebSmart Web Path
- OMQCHGSR ACTC(*ADD) KEYW(OMQWSWEBPATH) KEYV('http:\/\/100.64.64.40\/&OBJL\/&OBJC.pgm')
Stores the web path template for WebSmart. This path should be 'regex save,' meaning that special regex characters must be escaped with '\' as seen in the above example. The variables &OBJL and &OBJC can be placed in the path. See the online WebSmart manual for details.
Since
This setting is active in version V15.1M00 and higher.
OMQTRACKERURL - Default Tracker URL
This setting stores the default tracker URL. The URL is prefilled with this value when a new tracker server is created.
Since
This setting is active in version V16.0M01 and higher.
Use the STRARM function to add the registry setting or create the registry setting from the command line like this:
OMQCHGSR ACTC(*ADD) PGMN(server) KEYW(OMQTRACKERURL) KEYV(server-url)
Replace server with the following keywords:
- AZD (Azure Devops)
- BBCLOUD (BitBucket Cloud)
- BBSERVER (BitBucket Server)
- CW (ConnectWise)
- GITHUB
- GITLAB
- GRAVITY
- JIRA
- OTRS
- SDP (ServiceDesk Plus)
- SERVICENOW
- ZENDESK
This list is not exhaustive. If your tracker is not listed, don't hesitate to contact us.
OMQDFTSRCFLEN - Default length for new source files
- OMQCHGSR ACTC(*ADD) KEYW(OMQDFTSRCFLEN ) KEYV('112')
This registry setting sets the new default source file length if a new source file must be created.
The value must be a numeric integer value.
Since
This setting is active in version V15.1M01 and higher.
OMQUNAUTCOMPILE - Unauthorized compile command
This setting controls the unauthorized compile overrides command during the transfer.
- OMQCHGSR ACTC(*ADD) KEYW(OMQUNAUTCOMPILE) KEYV(*WARN)
When set, log a warning message.
- OMQCHGSR ACTC(*ADD) KEYW(OMQUNAUTCOMPILE) KEYV(*NONE)
When set, unauthorized compile commands are not reported.
- OMQCHGSR ACTC(*ADD) KEYW(OMQUNAUTCOMPILE) KEYV(*ERROR)
When set, an error is logged and the object is not transferred to the target environment. The transfer starts the rollback procedure if rollback is required for the target environment.
Since
This setting is active in version V16.0M01 and higher.
OMQDSTSVDTACPR - Data compression for save files
This system-wide setting controls the compression of the savefile sent to the other machines. The value must be any of the values in the SAV commands for the DTACPR keyword. When not specified the value will be *YES.
- Example
- OMQCHGSR ACTC(*ADD) KEYW(OMQDSTSVDTACPR) KEYV(*ZLIB)
Since
This setting is active in version V16.0M03 and higher.
OMQDSTSVCOMPACT - Data compaction for save files
This system-wide setting controls the compaction of the savefile sent to the other machines. The value must be any of the values in the SAV commands for the COMPACT keyword. When not specified the value will be *DEV.
- Example
- OMQCHGSR ACTC(*ADD) KEYW(OMQDSTSVCOMPACT) KEYV(*NO)
Since
This setting is active in version V16.0M03 and higher.
OMQOCTOORG - Link to your OCTO organization
This system-wide setting contains the link to your OCTO organization.
- Example
- OMQCHGSR ACTC(*ADD) KEYW(OMQOCTOORG) KEYV('https://octo.remainsoftware.com/org/remain')
Since
This setting is active in version V17.0M02 and higher.
OMQDEPLOYCTL - Deployment control
This registry setting determines whether the transfer is done through the Managed Deployment system or directly to the remote. If this setting is enabled, deployments are managed, otherwise, the deployment is immediate.
- Example
- OMQCHGSR ACTC(*ADD) APPL(XMP) KEYW(OMQDEPLOYCTL) KEYV(0)
Deployments are immediate.
- Example
- OMQCHGSR ACTC(*ADD) APPL(XMP) KEYW(OMQDEPLOYCTL) KEYV(1)
The transfer is managed. It is placed in a staging area for further processing.
Since
This setting is active in version V17.0M03 and higher.
OMQCGITEMPLIB - CGi State Library
This registry setting specifies the library used by the TD/OMS Rest service to store program state.
- Example
- OMQCHGSR ACTC(*ADD) KEYW(OMQCGITEMPLIB) KEYV(OMSCGIWORK)
You can specify your own library to store source changes when saving. The library must be created before using the TD/OMS Rest Service and public access must be *USE. If no custom library is set in the registry, the default library OMSCGIWORK will be used.
Since
This setting is active in version V18.0M01 and higher.
How to skip attributes
The TD/OMS attribute programs use the definitions to determine how attributes of a object should be treated. Attributes are retrieved from a TD/OMS reference object called OMSREFOBJ, the existing object in the target environment, or from the object in the previous environment.
Some attributes (like the attribute TEXT) must be excluded from being retrieved from the reference or target object. These exclusions can be defined in file OMX964W1. Exclusions must be defined for each relevant change command.
This file has following layout:
File name :  OMX964W1

Field      T From   To Length Description

W1CMDC     A    1   10   10   Command
W1PARC     A   11   11    1   Parameter code
W1KWDC     A   12   61   50   Keyword code
Field W1CMDC must contain the command (eg CHGPGM).
Field W1PARC must contain a 0.
Field W1KWDC must contain the keyword and the opening bracket (eg "TEXT(" ).
Warning
Field W1PARC must be 6 in case of command CHGPF.
Remain Research & Development
User Exits
Request & Fix Status Handler
The request and fix status handler are called when the status of a fix or request changes. The programs called are:
- OMX9404G
This program is used to handle 4GL specific actions when the fix or request status changes. - OMX940HD
This program is used to handle actions inside the helpdesk when a fix or request status changed. - OMX940US
This program is provided to the user to handle stuff upon change of a status.
The templates of the program is:
  /* ---------------------------------------------------------------- */
  /* Parameters .: OPTI - '0'=Request status change                   */
  /*                      '1'=Fix status change                       */
  /*               APPC - Application code                            */
  /*               ROF# - Request or fix code                         */
  /*               OLDS - Request or fix status old.                  */
  /*               NEWS - Request or fix status new.                  */
  /*               STAT - '*TERM' - Error detected.                   */
  /*                      '*NORM' - Normal completion.                */
  /*                                                                  */
  /* This program is called when the status of a fix or request       */
  /* changed.                                                         */
  /* ---------------------------------------------------------------- */

              PGM        PARM(&OPTI &APPC &ROF# &OLDS &NEWS &STAT)

  /* ---------------------------------------------------------------- */
  /* Declare parameter/variables                                      */
  /* ---------------------------------------------------------------- */
             DCL        VAR(&OPTI)    TYPE(*CHAR) LEN(1)
             DCL        VAR(&APPC)    TYPE(*CHAR) LEN(5)
             DCL        VAR(&ROF#)    TYPE(*CHAR) LEN(10)
             DCL        VAR(&OLDS)    TYPE(*CHAR) LEN(5)
             DCL        VAR(&NEWS)    TYPE(*CHAR) LEN(5)
             DCL        VAR(&STAT)    TYPE(*CHAR) LEN(5)
Version Exit Program
If TD/OMS finds a version of the same object in a related application it is possible to execute a version conflict handling program. This program must exist in the current library list. If the program is found it is called. The name of the program is OMUSRXVRS. A version of the file is located in the QUSRSRC file in your TD/OMS library. The sample program below creates a new fix in the related application, connects that fix to a request if applicable and connects the object in the related application to the fix just created.
/* ---------------------------------------------------------------- */
/* Description                                                      */
/* ---------------------------------------------------------------- */
/*                                                                  */
/* Program ....: OMUSRXVRS                                          */
/* Function ...: Copy Fix/Solution to application                   */
/* Author .....: Remain BV                                          */
/* Startdate ..: 12-02-2007                                         */
/* Parameters .: &APPCF- Application code From                      */
/*               &FIX#F- Fix number From                            */
/*               &OBJC - Object Code                                */
/*               &OBJT - Oject Type                                 */
/*               &FROL - Library From                               */
/*               &TOOL - Library To                                 */
/*               &APPCT- Application code To                        */
/*               &ROTC - Related Route                              */
/*               &ELBC - Related path extension  (subpath)          */
/*               &STAT - Status                                     */
/*                                                                  */
/* ---------------------------------------------------------------- */

PGM PARM(&APPCF &FIX#F &OBJC &OBJT &DTLC  &FROL  &TOOL +
         &APPCT &ROTC &ELBC &STAT)


/* ---------------------------------------------------------------- */
/* Declare the parameters                                           */
/* ---------------------------------------------------------------- */
            DCL        VAR(&APPCF)   TYPE(*CHAR) LEN(5)
            DCL        VAR(&FIX#F)   TYPE(*CHAR) LEN(10)
            DCL        VAR(&OBJC)   TYPE(*CHAR) LEN(12)
            DCL        VAR(&OBJT)   TYPE(*CHAR) LEN(9)
            DCL        VAR(&DTLC)   TYPE(*CHAR) LEN(10)
            DCL        VAR(&FROL)   TYPE(*CHAR) LEN(10)
            DCL        VAR(&TOOL)   TYPE(*CHAR) LEN(10)
            DCL        VAR(&APPCT)   TYPE(*CHAR) LEN(5)
            DCL        VAR(&ROTC)   TYPE(*CHAR) LEN(10)
            DCL        VAR(&ELBC)   TYPE(*CHAR) LEN(10)
            DCL        VAR(&STAT)   TYPE(*CHAR) LEN(5)

/* ---------------------------------------------------------------- */
/* Declare the program variables                                    */
/* ---------------------------------------------------------------- */
            DCL        VAR(&TYPE)  TYPE(*CHAR) LEN(1)
            DCL        VAR(&MSGD)  TYPE(*CHAR) LEN(256)
            DCL        VAR(&MSGI)  TYPE(*CHAR) LEN(7)
            DCL        VAR(&MSGF)  TYPE(*CHAR) LEN(10) VALUE('OMSMSG')

            DCL        VAR(&RELAPPL)  TYPE(*CHAR) LEN(5)
            DCL        VAR(&RELREQ)  TYPE(*CHAR) LEN(10)
            DCL        VAR(&FIX#T)   TYPE(*CHAR) LEN(10)

            DCL        VAR(&APPCODE)   TYPE(*CHAR) LEN(1)
            DCL        VAR(&LIBFROM) TYPE(*CHAR) LEN(10)
            DCL        VAR(&LIBTO) TYPE(*CHAR) LEN(10)

            DCL        VAR(&OCLS) TYPE(*CHAR) LEN(1)
            DCL        VAR(&CLASS) TYPE(*CHAR) LEN(7)

/* ---------------------------------------------------------------- */
/* Set global error monitor                                         */
/* ---------------------------------------------------------------- */
            MONMSG     MSGID(CPF0000) EXEC(GOTO CMDLBL(ERROR))

            MONMSG MSGID(OMQ400A) /* Already connected */

/* ---------------------------------------------------------------- */
/* Determine unique fix number for To application:                  */
/* ---------------------------------------------------------------- */

ChgVar &APPCODE (%SST(&APPCT 4 1))

            CHGVAR     VAR(&FIX#T) VALUE(&FIX#F *TCAT 'X')

/* ---------------------------------------------------------------- */
/* Retrieve some stuff                                              */
/* ---------------------------------------------------------------- */
            OMQRTVOB   OBJC(&OBJC) OBJL(&FROL) OBJT(&OBJT) +
                         DTLC(&DTLC) OCLS(&OCLS)

            CHGVAR     VAR(&CLASS) VALUE('*GL4')

            IF         COND(&OCLS *EQ '0') THEN(CHGVAR VAR(&CLASS) +
                         VALUE('*OS400'))

            IF         COND(&OCLS *EQ 'A') THEN(CHGVAR VAR(&CLASS) +
                         VALUE('*HFSOBJ'))

            IF         COND(&OCLS *EQ 'B') THEN(CHGVAR VAR(&CLASS) +
                         VALUE('*IFSOBJ'))

/* ---------------------------------------------------------------- */
/* Get first related request from fix.                              */
/* ---------------------------------------------------------------- */
            OMQRTVFR   APPL(&APPCF) FIX(&FIX#F) RELAPPL(&RELAPPL) +
                         RELREQ(&RELREQ)
            MONMSG     MSGID(OMQ0000)

/* ---------------------------------------------------------------- */
/* Create new fix to same Request                                   */
/* ---------------------------------------------------------------- */
            OMQCHGFI   ACTC(*COPY) APPL(&APPCF) FIX(&FIX#F) +
                         SOLI(*NO) TAPL(&APPCT) TFIX(&FIX#T) +
                         EOPI(*YES)
           MONMSG MSGID(OMQ2009) /* Already exists */

/* ---------------------------------------------------------------- */
/* Connect fix to same Request (if filled)                          */
/* ---------------------------------------------------------------- */

If (&RELREQ *Ne ' ') Do

            OMQCHGFI   ACTC(*CONNECT) APPL(&APPCT) FIX(&FIX#T) +
                         RAPL(&RELAPPL) REQ(&RELREQ) EOPI(*YES)
     MONMSG MSGID(OMQ0000) /* ignore errors */
EndDo

/* ---------------------------------------------------------------- */
/* Connect solution to new fix                                     */
/* ---------------------------------------------------------------- */
            OMQCHGSO   ACTC(*CONNECT) APPL(&APPCT) FIX(&FIX#T) +
                         OBJC(&OBJC) OBJT(&OBJT) OBJL(*LASTVRS) +
                         ENVC(*OBJD) DTLC(&DTLC) EOPI(*YES) +
                         FRCI(*NO) NEWI(*NO) OCLS(&CLASS)

MONMSG MSGID(OMQ400C) +
     Exec(Do) /* Already to other Fix - Connect and lock */

/* New (this) solution will be locked                              */
            OMQCHGSO   ACTC(*CONNECT) APPL(&APPCT) FIX(&FIX#T) +
                         OBJC(&OBJC) OBJT(&OBJT) OBJL(*LASTVRS) +
                         ENVC(*ANY) DTLC(&DTLC) ROTC(&ROTC) +
                         PTXC(&ELBC) STAT(*LOCK) OVRC(*SAME) +
                         EOPI(*YES) FRCI(*NO) NEWI(*NO) OCLS(&CLASS)

/* If other solution should be locked, please use code underneath   */
/*OMQCHGSO ACTC(*CONNECT) APPL(&APPCT) FIX(&FIX#T) +                */
/*                        OBJC(&OBJC) OBJT(&OBJT) OBJL(*LASTVRS) +  */
/*                        ENVC(*ANY) DTLC(&DTLC) STAT(*ACT) +       */
/*                       OVRC(*SAME) EOPI(*YES) FRCI(*YES) NEWI(*NO)*/
     EndDo

GoTo ENDPGM

/* ---------------------------------------------------------------- */
/* Error                                                            */
/* ---------------------------------------------------------------- */
ERROR:
            SNDPGMMSG  MSGID(CPF9898) MSGF(QCPFMSG) MSGDTA('Errors +
                         occured during copying fix. Please see +
                         job-log') TOPGMQ(*PRV) MSGTYPE(*ESCAPE)
            CALL       PGM(OMX928C)
            MONMSG     MSGID(CPF0000)
            RETURN

/* ---------------------------------------------------------------- */
/* End of program                                                   */
/* ---------------------------------------------------------------- */
ENDPGM:
            RMVMSG     PGMQ(*SAME *) CLEAR(*ALL)
            RETURN
            ENDPGM

