EWM:Creating Objects and Members
Creating Objects, Members and Messages
Creating a New Object Template
New Object Templates are used to quickly create a new object. The template already fills in a number of fields that no longer have to be typed in manually.
You have to be an Application Manager or OMS Manager to add, change, or delete a New Object Template.
New Object Templates can be created from the New Object wizard. The tutorial below shows this process.
Do the following:
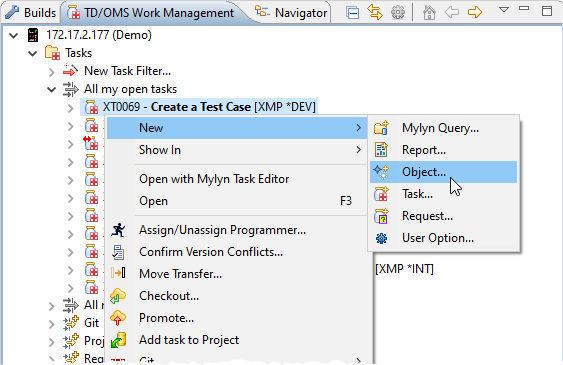
- Open the TD/OMS Work Management view
- Select the task that must accept the solution(s)
- Right-click the task to show the context menu
- Select New/Object... or New/Object/Object..
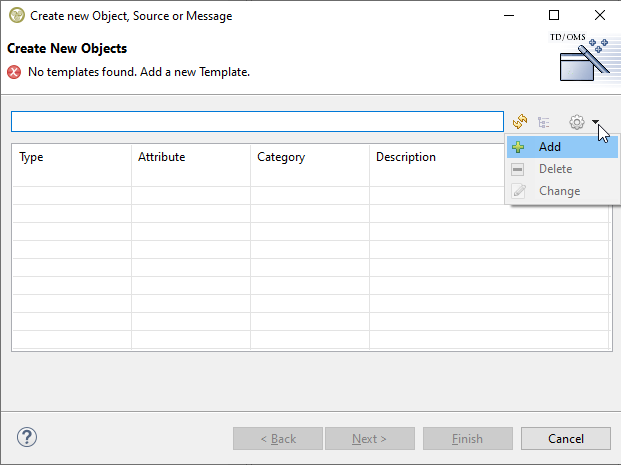
A list with all available object templates will pop up:
As you can see, the list is empty. We can add a new template by using the toolbar as shown in the picture or use the context menu on the table.
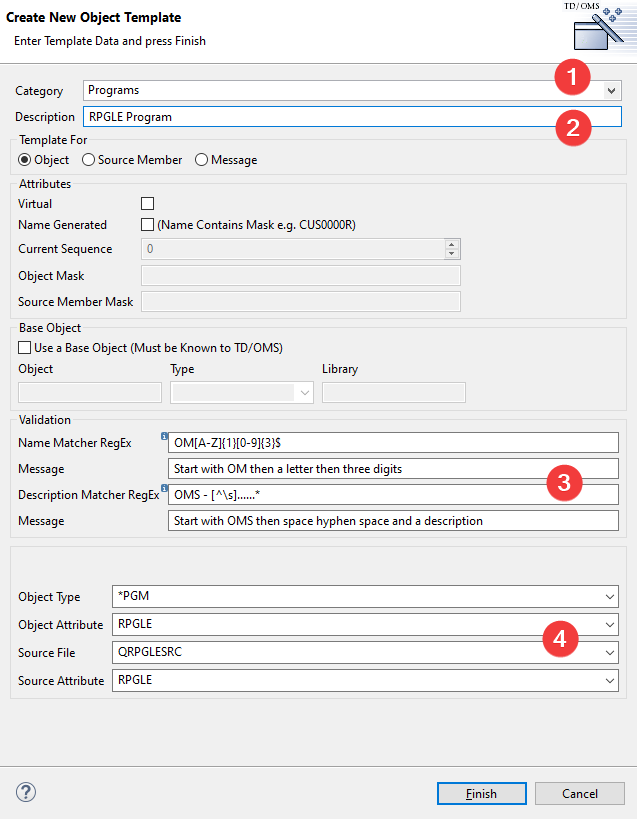
Go ahead and select Add. The following dialog will open:
- 1. Category
- You can organize templates in categories. This will change the way templates are listed in the menu. Templates in a category will be shown together in a submenu.
- 2. Description
- Type a description of the Template. In this case, we are going to create an RPGLE program.
- 2. Template Type
- You can create templates for Objects, Source members and Messages. Select Object.
- 3. Validation RegEx
- In this section, you can specify your naming standards for the object and the description. It is a regular expression (RegEx). The complete regular expression syntax is documented here. Some examples:
- OM[A-Z][0-9]{3}$
- : OM The name must start with OM. [A-Z] then one letter between A and Z. [0-9] next is a number between 0 and 9. {3} the previous must occur exactly 3 times. $ end of string. No more characters allowed. Valid names for this regex are OMO123 and OMX999 but not OM1232 (the third character is not A-Z) and OMA1234 (only three digits allowed).
- OM[0-9,A-Z]{3,5}$
- : OM The name must start with OM. [0-9,A-Z] next is a number between 0 and 9 or an uppercase letter A to Z. {3,5} the previous must occur at least 3 times but at most 5 times. $ end of string. No more characters allowed. Valid names for this regex are OM12A and OMABC01 but not OXABC (does not start with OM) and OMAB (we require at least three characters after OM).
- [A-D][A-Z,0-9]{1,5}C$
- : [A-D] the name must start with one uppercase letter between A and D, [A-Z,0-9] means any letter or digit, {1,5} at least one but no more than five times. C$ must end with a C. Valid names are AA001C and D12345C but not F001C (the first letter is not between A and D) and B123456C (6 digits between B and C where only 5 are allowed).
- 3. Validation Message
- The message to display to the user when the RegEx is failing. Here you can provide the name requirements. Use \n in between the lines for a line break.
- 4. Other Attributes
- Specify what type of object you are creating and what the source file and the source member attribute should be.
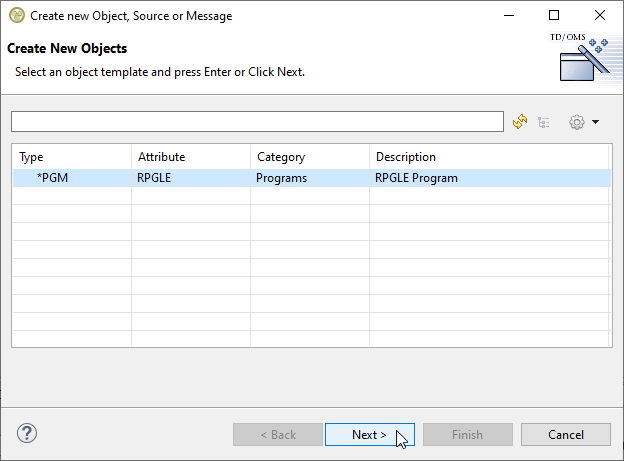
After you have pressed Finish the object will be added to the list of available templates. To create an object based on this template, select the line in the list and press Next.
Virtual and Automatic Name Generation
This section enables you to define a virtual object and/or a name generation mask.
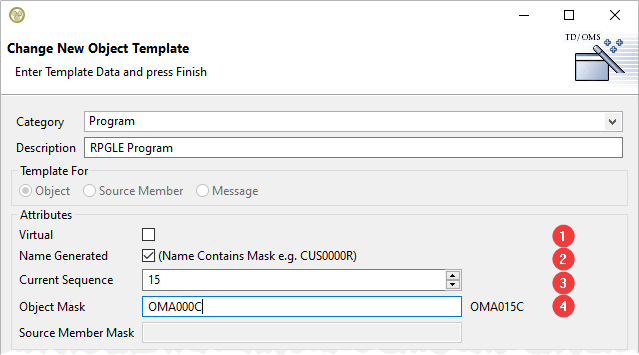
In case you want TD/OMS to generate the program sequence number, you can add a template with a sequence number. Whenever a new object is created, TD/OMS will automatically generate the next sequence. Regular expressions on the name should not be set in this case.
In the example above a name generator has been set.
- 1. Virtual
- Tick this flag if you wish to create a virtual object. A Virtual object is an object that has no representation on disk but exists in the TD/OMS database only. Virtual objects are very versatile and can be used to control different aspects ranging from creating SQL objects to triggering an action during the transfer. Search for virtual objects in the wiki if you want to know more about them.
- 2. Name Generated
- Tick this box to access the next two fields, sequence and mask.
- 3. Current Sequence
- This is the last generated sequence in this mask range. The next object will be this number plus 1.
- 4. Òbject Mask
- Specify an object mask with at least three digits. In this example OMA000C. The number will be replaced with the next sequence during name generation. The text after the input field will show you what a generated name would look like.
Base Object
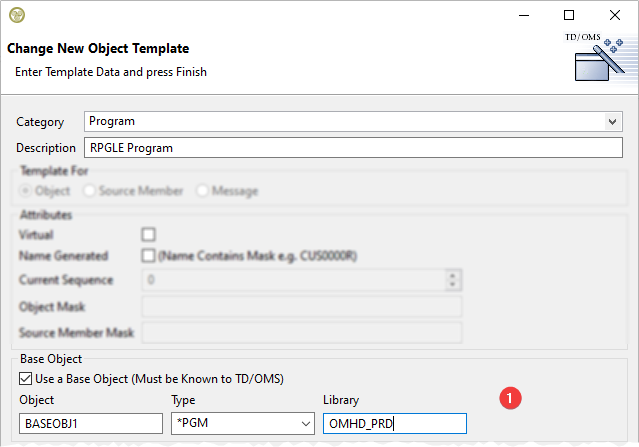
You are able to specify a base object. A base object is an object that must already exist in TD/OMS. The base object and associated source will be copied when the new object is created. This enables you to define an example source to get the programmer started. For example, suppose the programmer wants to create a new SQLRPGLE object. You could already provide a source with some SQL statements as an example.
- 1. Base Object
- Specify the name, type, and library of an already-existing object.
No Base Object - Sourcefile Creation
If you do not use a base object, and a new source file has to be created as part of the process, then the new source file will be created on a best effort basis with CCSID *HEX (65535). The length of the source file will be fetched from the same source file in the source archive library (the "dump library" found in the application definition).
If you want to control the creation of the source file, then you can create a user program that must exist in the TD/OMS library list. This program will be called to create the source file. The signature of the program is:
CALL       PGM(OMO008C2U) PARM(&SRCF &SRCL &RECL &STAT)

DCL        VAR(&NSRL) TYPE(*CHAR) LEN(10)
DCL        VAR(&NSRF) TYPE(*CHAR) LEN(10)
DCL        VAR(&RECL) TYPE(*DEC)  LEN(15 6)
DCL        VAR(&STAT) TYPE(*CHAR) LEN(5) // '*NORM' is normal ending, '*TERM' is abnormal ending
You can find an example of program OMO008C2U in your QUSRSRC file in the TD/OMS library.
Copy Members and Scripts
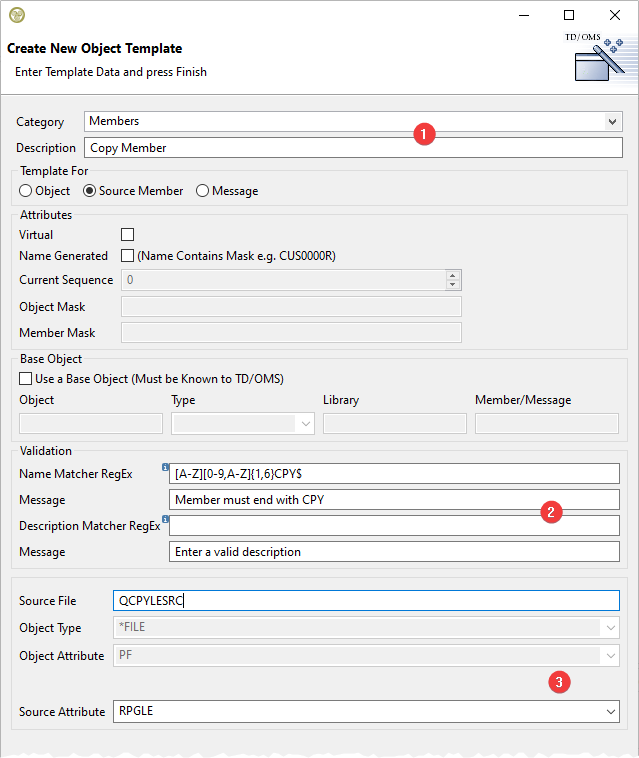
You are also able to create copy members or SQL scripts in members.
Select Member in Template For
- 1. Category
- Enter a meaningful category and description
- 2. RegEx
- Define the regular expressions for the name. For example, you might require that the name ends with CPY.
- 3. Source File
- Enter the name of the source file the member must reside in.
Messages
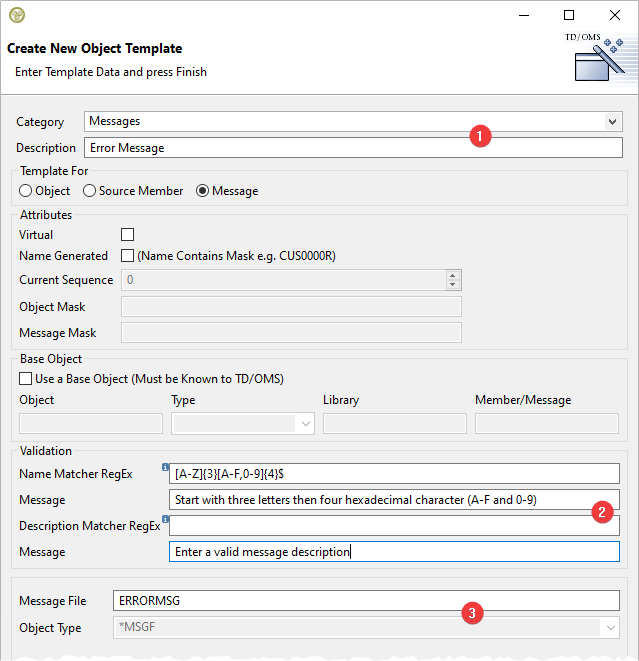
You are also able to create messages in message files.
Select Message in Template For
- 1. Category
- Enter a meaningful category and description
- 2. RegEx
- Define the regular expressions for the name. For example, you might require that the name ends with CPY.
- 3. Message file
- Define the name of the message file.
Change a message
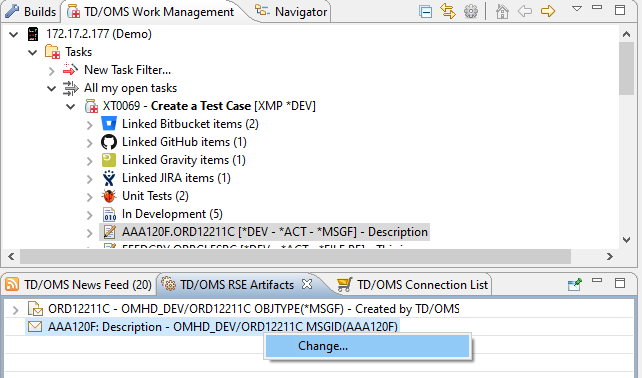
Once the message is created, you can select it in the Task en use "Show in/RSE Artifacts". Then select the message and choose Change... from the context menu.
Connecting a new Object
Solutions are components (objects, IFS files, 4GL objects), messages and source members that are connected to a task. Expanding a task shows the solutions already connected to that task.
This section describes the following:
- Connecting a new object to a task
- Connecting a new member to a task
- Connecting a new message to a task
Ensure that the following steps have been taken:
- Open the TD/OMS Work Management view
- Select the task that must accept the solution(s)
- Right-click the task to show the context menu
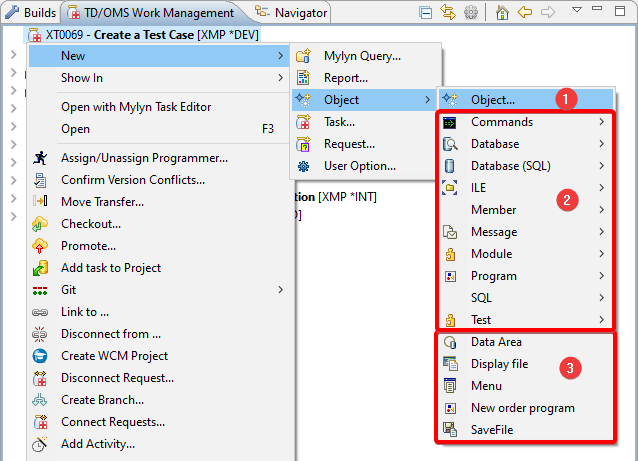
- Select New/Object/Object... (You can also select a specific template from the submenus shown blow this option)
Creating a new Object Template
Creating a New Object Template can be done by using the menu described below. It is described in detail here:
Creating a New Object Template
- 1. Object...
- A list with all templates will be shown from which you can choose one.
- 2. Categories
- This section of the menu will show all object templates that are placed in categories
- 3. Uncategorized
- These templates do not have a category.
Selecting an Object Template
New Object Templates are templates to create a new object. If you create a new object regularly then it is useful to create template where most of the fields are already filled in. We will take a new RPGLE program as the basis of this example.
With the new object template you can also let TD/OMS generate the object, member or message code with a sequence number as we will see later.
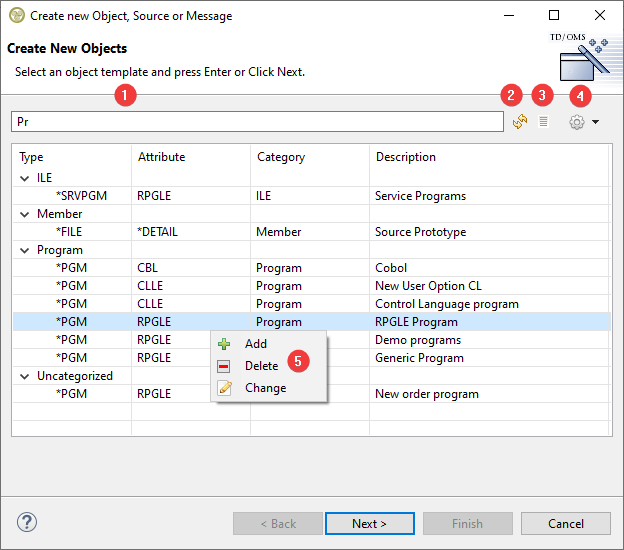
A dialog will open where you can select, add, change or delete a new object template.
- 1. Filter
- The filter box can be used to select a template if you have many. Just type some description or an object type or attribute and the matching templates will be shown. We have typed Pr in the box which has already removed some templates.
- 2. Refresh
- If you think the list of template is out of sync, just press refresh to reload it from the database.
- 3. Presentation
- If you have many filters then sometimes it is easier to view the list in a tree form. Just press this button to toggle the presentation that you like best. The presentation is remembered for the next time you visit the templates.
- 4. Menu
- This box enables you to add, create or delete a new template record. Press the little arrow next to the gear icon to open a menu.
- 5. Pop-up Menu
- This is same menu as before but now as a pop-up menu. You can use it to add, change or delete a template. You can copy a template by first selecting a template and then use Add.
The Object Template file (OMNOT) is shipped with a number of default records but you can add more templates to this file. Please follow this link to see how.
Create a New Object
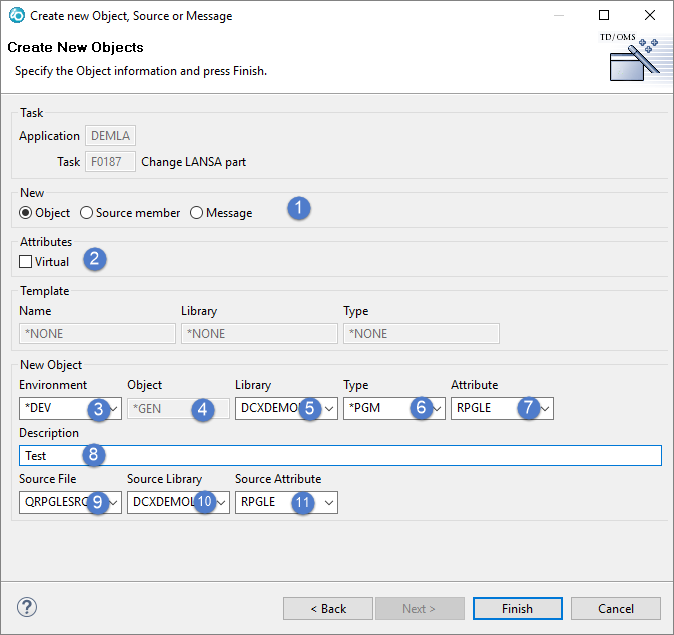
When a new native IBM i Library Object is selected, the object button is checked ![]() .
.
 Virtual
- Select the virtual button if you want to create an object which is virtual or temporary. A temporary object can be a work file to which programs relate but only exist for the duration of a job.
 Environment
- Select an Environment where the Object must be created. The Environment that can be selected depends on the Application of the selected Task. Only Development and optionally an Emergency Environment can be selected.
 Object
- Enter the name of the new Object. If the name already exists a warning will be displayed. The name must adhere to the naming conventions on the IBM i and also match a possible RegEx that was defined in the template. If the name can not be changed but says *GEN then the name will be generated for you as dictated by the template.
 Library
- Select OR Enter the name of the Library. The Libraries to be selected are depending on the Application of the Task and the selected Environment. If the Library is not part of the selected Environment as a valid Library where Objects can be created then a warning will be displayed.
 Type
Type- Select OR Enter the desired Object Type. The list is populated with a list of Object Types from the Application of the selected Task but the list can contain invalid Types or Types can be missing. If this is the case, enter the Type manually, e.g. *PGM.
 Attribute
- Select OR Enter the desired Object Attribute. This will also be the Source Attribute so take good care what you fill in this field because it will affect the editor that is opened AND possibly the compile that is executed. Select the Attribute from the list but note that the list is populated with a list of Object Attributes from the Application of the selected Task in combination with the selected Object Type. The list can contain invalid Attributes or Attributes can be missing. If this is the case, enter the Attribute manually, e.g. RPGLE.
 Source File
- Select OR Enter the desired Source File to create the Source Member in. The Source Member will have the same name as the Object. The Files to be selected are depending on the Application of the Task and the selected Environment.
 Source Library
- Select OR Enter the desired Source Library to create the Source Member in. The Libraries to be selected are depending on the Application of the Task and the selected Environment. If the Library is not part of the selected Environment as a valid Library where Source can be created then a warning will be displayed.
 Source Attribute
- Select OR Enter the desired Source Attribute of the Source Member. The attributes in the combo box are all attributes known to TD/OMS. You can specify an attribute manually if the one you want to specify is not in the list.
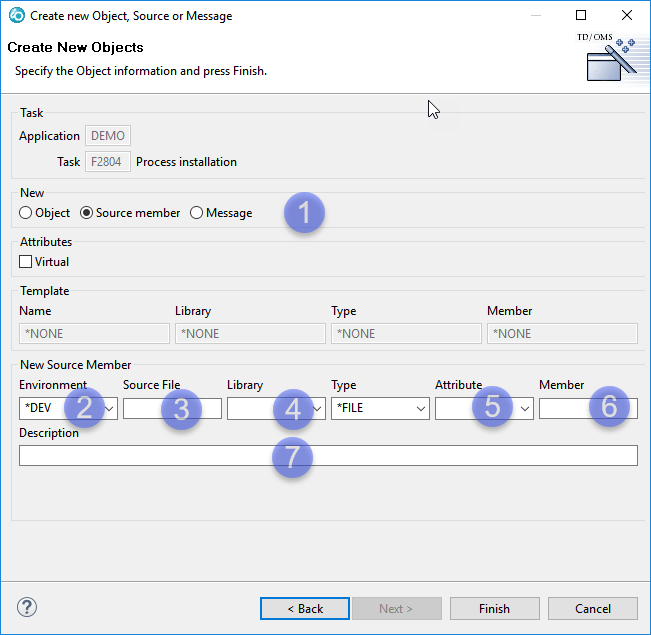
Create a New Source Member
When a new native IBM i Source Member is selected (*FILE, *DETAIL) the Source member is checked![]() .
.
 Environment
- Select an Environment where the Member must be created. The Environment that can be selected depends on the Application of the selected Task. Only Development and optionally an Emergency Environment can be selected.
 Source File
- Select OR Enter the desired Source File to create the Source Member in. The Source Member will have the same name as the Object. The Files to be selected are depending on the Application of the Task and the selected Environment.
 Source Library
- Select OR Enter the desired Source Library to create the Source Member in. The Libraries to be selected are depending on the Application of the Task and the selected Environment. If the Library is not part of the selected Environment as a valid Library where Source can be created then a warning will be displayed.
 Attribute
- Select OR Enter the desired Source Attribute. Select the Attribute from the list but note that the list is populated with a list of Object Attributes from the Application of the selected Task in combination with the selected Object Type. The list can contain invalid Attributes or Attributes can be missing. If this is the case, enter the Attribute manually, e.g. RPGLE.
 Member
- Enter the name of the new Member. If the name already exists a warning will be displayed. The name must adhere to the naming conventions on the IBM i.
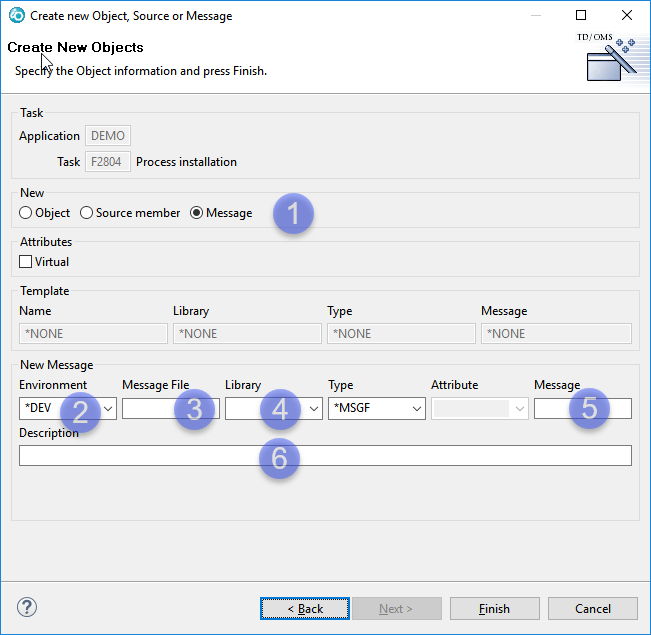
Create a New Message
When a new native IBM i Message in a Message File is selected (*MSGF, *DETAIL), message is checked ![]() .
.
 Environment
- Select an Environment where the Message can be created. The Environment that can be selected depends on the Application of the selected Task. Only Development and optionally an Emergency Environment can be selected.
 Message File
- Select OR Enter the desired Message File to create the Message in. The list of Message Files is populated from the known Message Files in the Application of the selected Task. Enter one manually if it is not in the list.
 Library
- Select OR Enter the desired Library. The Libraries to be selected are depending on the Application of the Task and the selected Environment. If the Library is not part of the selected Environment as a valid Library where the Message File is located, a warning will be displayed.
 Message
- Enter the name of the new Message. If the name already exists a warning will be displayed. The name must adhere to the naming conventions on the IBM i.
Create a New IFS File
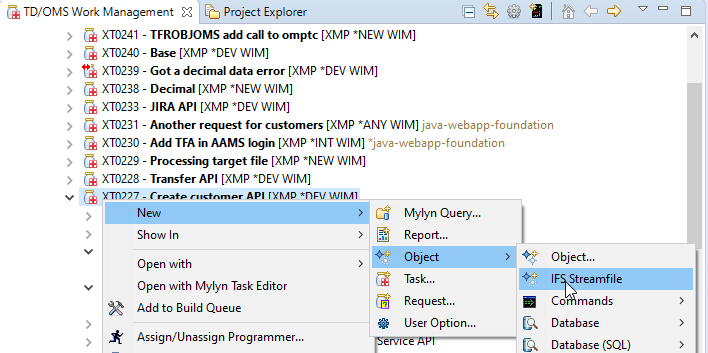
To create a new IFS object, select the task and use the context menu. Select New/Object/IFS Streamfile.
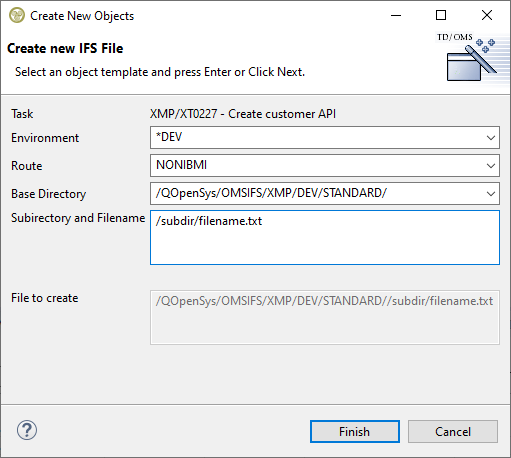
A dialog will appear where you can select the environment, route, and base directory.
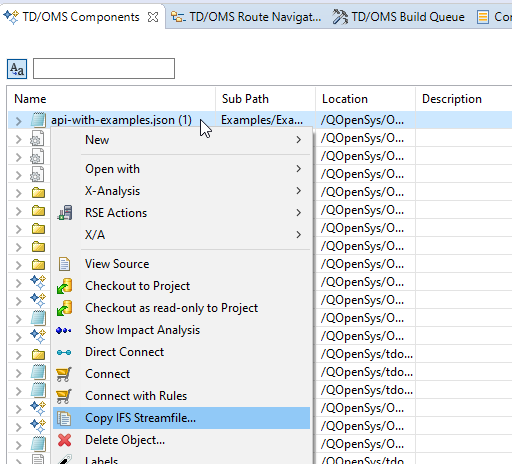
You can also copy an existing IFS object. For this, open the Components View and find the IFS object that you want to copy. Right-click to open the context menu and select "Copy IFS Streamfile..."
Copy an Existing Object
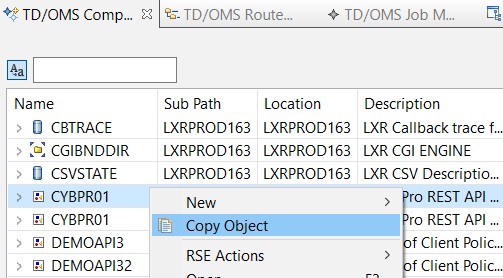
If you want to make a copy of an existing object you can use the context menu. If you select a solution or a component, the context menu contains the Copy Object action. This action is a specialization of the "New Object" action.
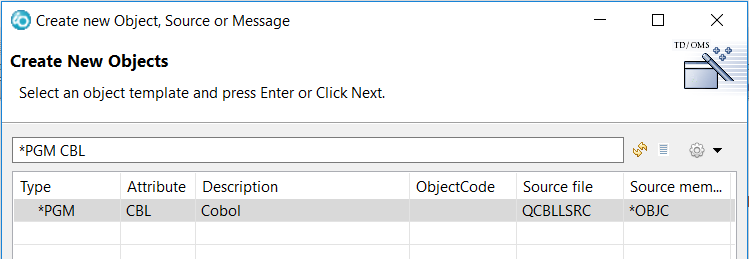
After selecting the object the "New Object Template" wizard will start with a filtered list. Only the templates that match your selection are initially visible. Of course you are able to reset or refine the filter to show more or less templates.
Selecting an Object Template
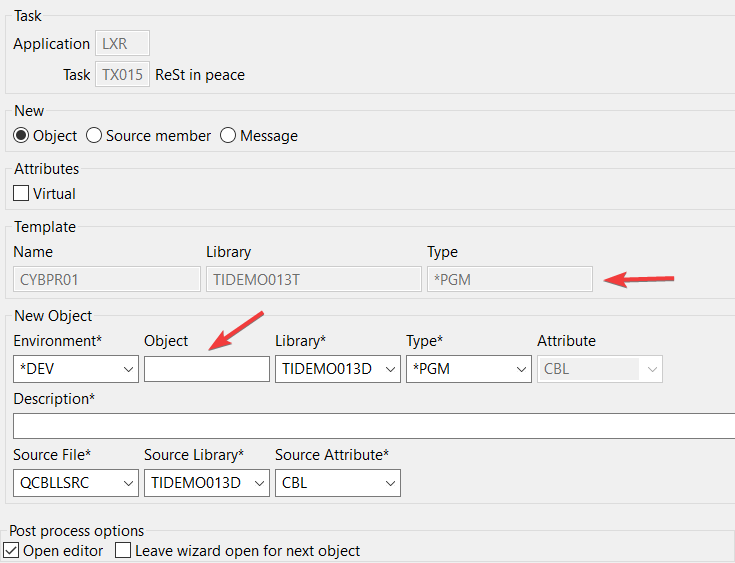
Double click the template of your choice and the next page will be shown where you can enter the object details. The parameters that should be changed are at least the name of the component.
If the object to be copied has an associated source then that source will be copied as well.

