EWM:Creating a new Object
Connecting a new Object
Solutions are components (objects, IFS files, 4GL objects), messages and source members that are connected to a task. Expanding a task shows the solutions already connected to that task.
This section describes the following:
- Connecting a new object to a task
- Connecting a new member to a task
- Connecting a new message to a task
Ensure that the following steps have been taken:
- Open the TD/OMS Work Management view
- Select the task that must accept the solution(s)
- Right-click the task to show the context menu
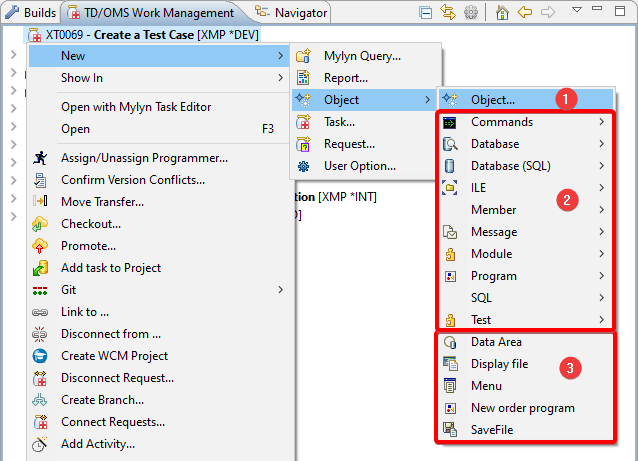
- Select New/Object/Object... (You can also select a specific template from the submenus shown blow this option)
Creating a new Object Template
Creating a New Object Template can be done by using the menu described below. It is described in detail here:
Creating a New Object Template
- 1. Object...
- A list with all templates will be shown from which you can choose one.
- 2. Categories
- This section of the menu will show all object templates that are placed in categories
- 3. Uncategorized
- These templates do not have a category.
Selecting an Object Template
New Object Templates are templates to create a new object. If you create a new object regularly then it is useful to create template where most of the fields are already filled in. We will take a new RPGLE program as the basis of this example.
With the new object template you can also let TD/OMS generate the object, member or message code with a sequence number as we will see later.
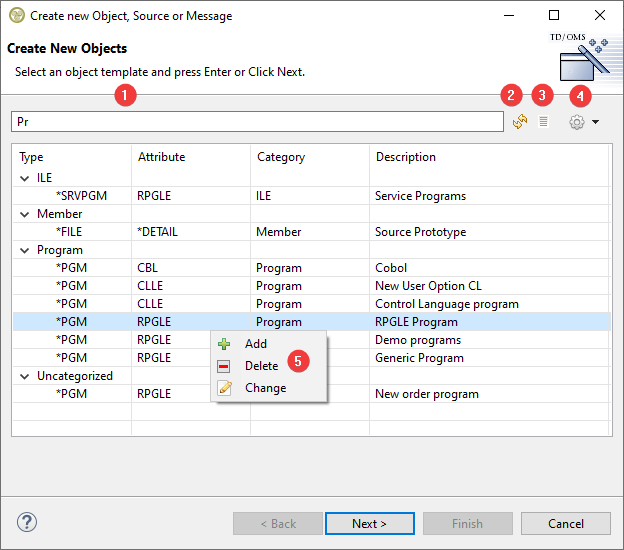
A dialog will open where you can select, add, change or delete a new object template.
- 1. Filter
- The filter box can be used to select a template if you have many. Just type some description or an object type or attribute and the matching templates will be shown. We have typed Pr in the box which has already removed some templates.
- 2. Refresh
- If you think the list of template is out of sync, just press refresh to reload it from the database.
- 3. Presentation
- If you have many filters then sometimes it is easier to view the list in a tree form. Just press this button to toggle the presentation that you like best. The presentation is remembered for the next time you visit the templates.
- 4. Menu
- This box enables you to add, create or delete a new template record. Press the little arrow next to the gear icon to open a menu.
- 5. Pop-up Menu
- This is same menu as before but now as a pop-up menu. You can use it to add, change or delete a template. You can copy a template by first selecting a template and then use Add.
The Object Template file (OMNOT) is shipped with a number of default records but you can add more templates to this file. Please follow this link to see how.
Create a New Object
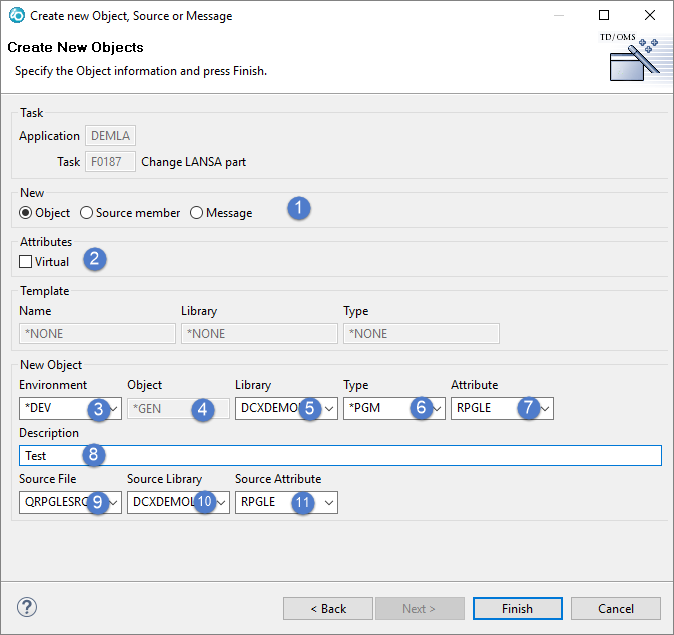
When a new native IBM i Library Object is selected, the object button is checked ![]() .
.
 Virtual
- Select the virtual button if you want to create an object which is virtual or temporary. A temporary object can be a work file to which programs relate but only exist for the duration of a job.
 Environment
- Select an Environment where the Object must be created. The Environment that can be selected depends on the Application of the selected Task. Only Development and optionally an Emergency Environment can be selected.
 Object
- Enter the name of the new Object. If the name already exists a warning will be displayed. The name must adhere to the naming conventions on the IBM i and also match a possible RegEx that was defined in the template. If the name can not be changed but says *GEN then the name will be generated for you as dictated by the template.
 Library
- Select OR Enter the name of the Library. The Libraries to be selected are depending on the Application of the Task and the selected Environment. If the Library is not part of the selected Environment as a valid Library where Objects can be created then a warning will be displayed.
 Type
Type- Select OR Enter the desired Object Type. The list is populated with a list of Object Types from the Application of the selected Task but the list can contain invalid Types or Types can be missing. If this is the case, enter the Type manually, e.g. *PGM.
 Attribute
- Select OR Enter the desired Object Attribute. This will also be the Source Attribute so take good care what you fill in this field because it will affect the editor that is opened AND possibly the compile that is executed. Select the Attribute from the list but note that the list is populated with a list of Object Attributes from the Application of the selected Task in combination with the selected Object Type. The list can contain invalid Attributes or Attributes can be missing. If this is the case, enter the Attribute manually, e.g. RPGLE.
 Source File
- Select OR Enter the desired Source File to create the Source Member in. The Source Member will have the same name as the Object. The Files to be selected are depending on the Application of the Task and the selected Environment.
 Source Library
- Select OR Enter the desired Source Library to create the Source Member in. The Libraries to be selected are depending on the Application of the Task and the selected Environment. If the Library is not part of the selected Environment as a valid Library where Source can be created then a warning will be displayed.
 Source Attribute
- Select OR Enter the desired Source Attribute of the Source Member. The attributes in the combo box are all attributes known to TD/OMS. You can specify an attribute manually if the one you want to specify is not in the list.
Create a New Source Member
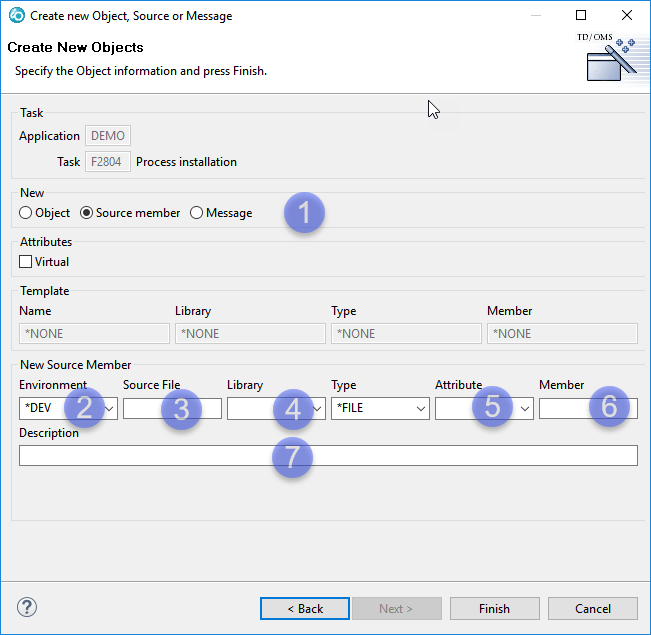
When a new native IBM i Source Member is selected (*FILE, *DETAIL) the Source member is checked![]() .
.
 Environment
- Select an Environment where the Member must be created. The Environment that can be selected depends on the Application of the selected Task. Only Development and optionally an Emergency Environment can be selected.
 Source File
- Select OR Enter the desired Source File to create the Source Member in. The Source Member will have the same name as the Object. The Files to be selected are depending on the Application of the Task and the selected Environment.
 Source Library
- Select OR Enter the desired Source Library to create the Source Member in. The Libraries to be selected are depending on the Application of the Task and the selected Environment. If the Library is not part of the selected Environment as a valid Library where Source can be created then a warning will be displayed.
 Attribute
- Select OR Enter the desired Source Attribute. Select the Attribute from the list but note that the list is populated with a list of Object Attributes from the Application of the selected Task in combination with the selected Object Type. The list can contain invalid Attributes or Attributes can be missing. If this is the case, enter the Attribute manually, e.g. RPGLE.
 Member
- Enter the name of the new Member. If the name already exists a warning will be displayed. The name must adhere to the naming conventions on the IBM i.
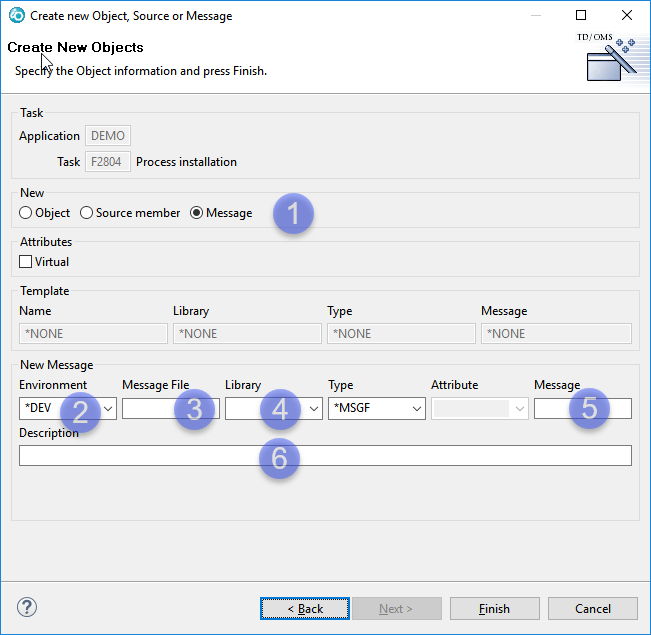
Create a New Message
When a new native IBM i Message in a Message File is selected (*MSGF, *DETAIL), message is checked ![]() .
.
 Environment
- Select an Environment where the Message can be created. The Environment that can be selected depends on the Application of the selected Task. Only Development and optionally an Emergency Environment can be selected.
 Message File
- Select OR Enter the desired Message File to create the Message in. The list of Message Files is populated from the known Message Files in the Application of the selected Task. Enter one manually if it is not in the list.
 Library
- Select OR Enter the desired Library. The Libraries to be selected are depending on the Application of the Task and the selected Environment. If the Library is not part of the selected Environment as a valid Library where the Message File is located, a warning will be displayed.
 Message
- Enter the name of the new Message. If the name already exists a warning will be displayed. The name must adhere to the naming conventions on the IBM i.
Create a New IFS File
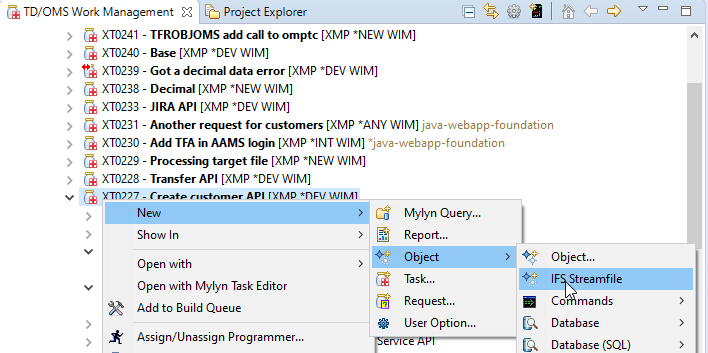
To create a new IFS object, select the task and use the context menu. Select New/Object/IFS Streamfile.
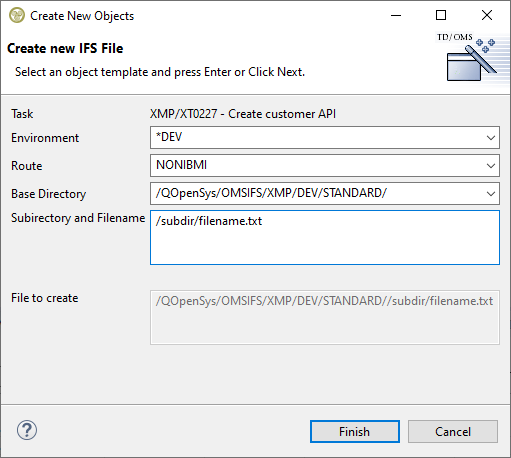
A dialog will appear where you can select the environment, route, and base directory.
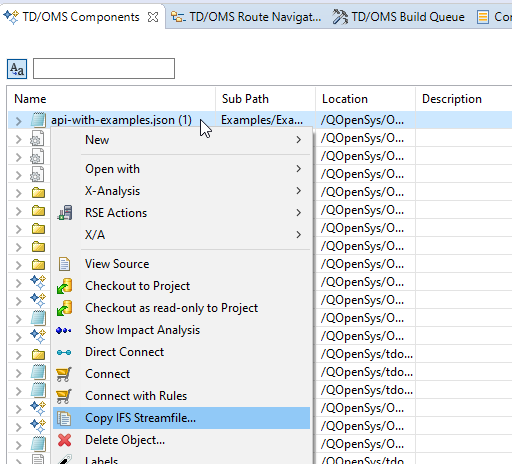
You can also copy an existing IFS object. For this, open the Components View and find the IFS object that you want to copy. Right-click to open the context menu and select "Copy IFS Streamfile..."
