GR:Gravity/Definitions/Activity Stages/URL Call
SINCE: V2.0.2
URL Call
The URL Call Activity enables you to make a network connection. This can be used to call a single url (e.g. a build server trigger) or to call a webservice. You can include POST data that includes text, json or other data, You can include Gravity variables which will be substituted at runtime.
Use Case 1
You want to call a webservice and include some data in the call. The data must be in JSon format and the call must be a POST. The call will return a JSon which much match a specific text.
In the example, we will call the user registration function in Gravity.
Examining the API Call
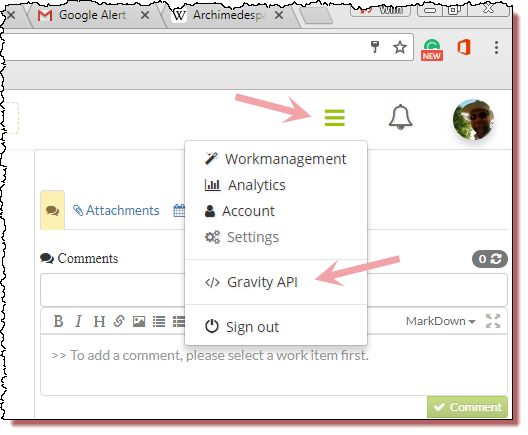
For this example, we are going to call the Gravity register user API that is can be called from your Gravity. This is a simple call that demonstrates how the Activity can be used. You can navigate from your Gravity web page to the API by using the menu:
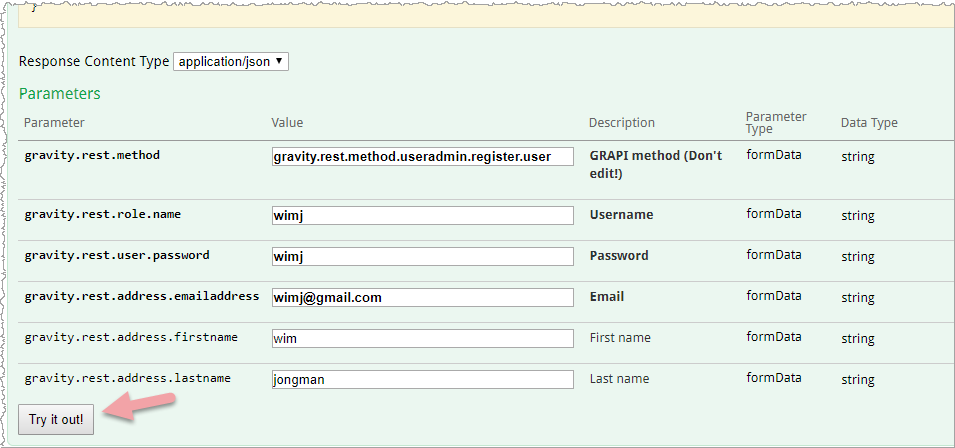
After the API definitions have loaded find the USER section, expand it and look for UserAdminService/#sign-up and expand that as well.
You are now able to examine this specific API. You can see that you will need to enter a number of parameters and that these parameters are passed in JSon format.
After a call to this service, the user will be added to the database. However,
the user can only be activated manually or by clicking the link that is sent to
the user's e-mail address.
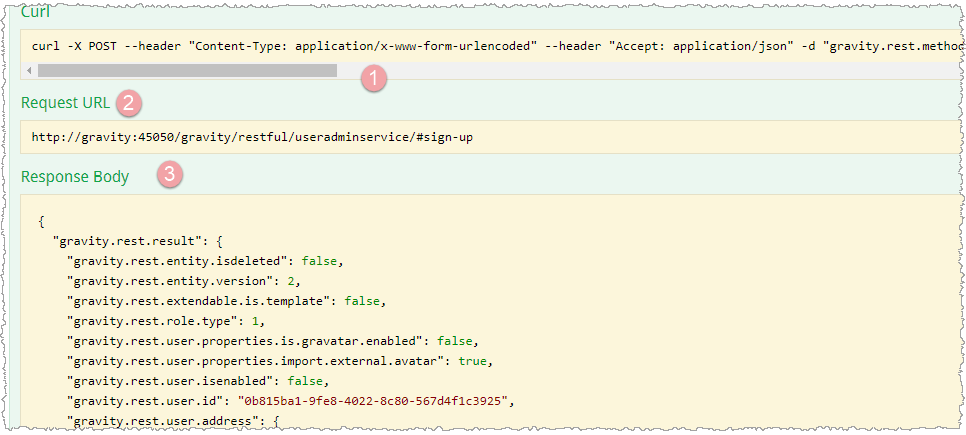
The result of the call is also returned (3) as well as the exact URL you need to call (2) and the curl call (3). Please note that we will get a "gravity.rest.result" JSon upon successful return (3).
Open the Activity tab in the Properties View
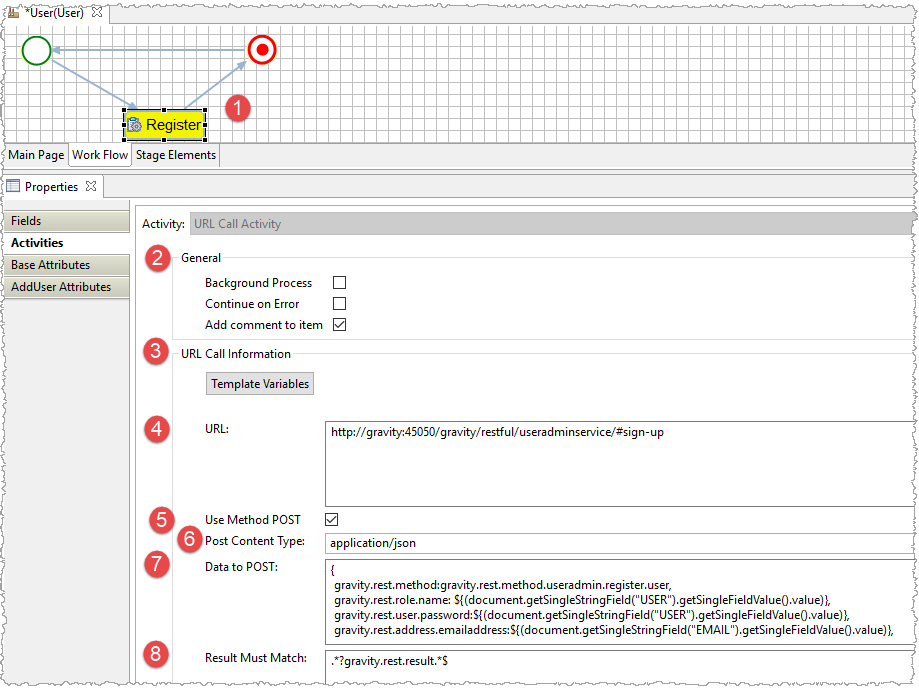
Select the Activity in the workflow editor (1) and open the Activity tab (2). This tab is only visible when the selected Stage is an Activity stage. In the general section (4) you can define the following fields.
General Section
After you have opened the properties view, select the URL call stage (1) that you want to modify.
In the general section (2) you can enter the following variables.
- Background process
- Check this if you don't want the workflow to wait for the connection to complete. This means that the call could fail while the workflow has advanced.
- Continue on error
- Check this to ignore any error that arises from the call.
- Add comment to Item
- Check this if you want to add a comment to the item to indicate that the Stage has been processed.
the JSon data for this particular call is:
{
gravity.rest.method:gravity.rest.method.useradmin.register.user,
gravity.rest.role.name: ${(document.getSingleStringField("USER").getSingleFieldValue().value)},
gravity.rest.user.password:${(document.getSingleStringField("USER").getSingleFieldValue().value)},
gravity.rest.address.emailaddress:${(document.getSingleStringField("EMAIL").getSingleFieldValue().value)},
gravity.rest.address.firstname:${(document.getSingleStringField("FIRST").getSingleFieldValue().value)},
gravity.rest.address.lastname:${(document.getSingleStringField("LAST").getSingleFieldValue().value)}
}

${(document.getSingleStringField("USER").getSingleFieldValue().value)} is the way to extract an item extended field value with this name.
URL Call Information
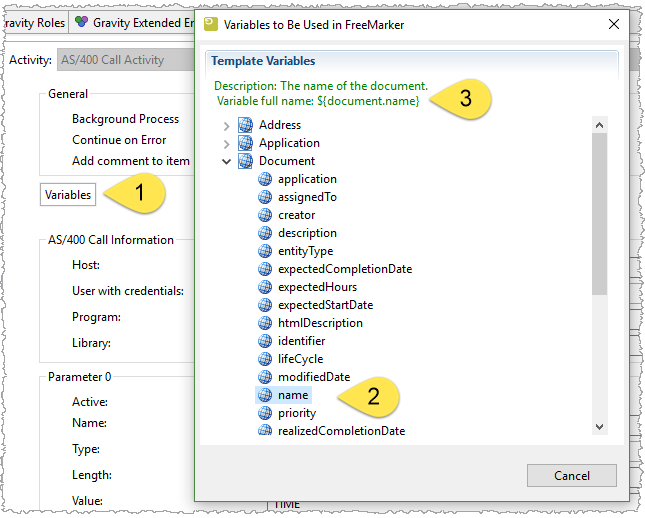
In case you want to insert regular variables, you can open the Template Variables dialog. You can use variables from Gravity to be included in the parameter values. Click this button to show a list of Gravity variables. Insert the variables in this form: ${document.name}
If you want to add extended fields, the syntax for this can be found here.
1 - Click the Variables button
2 - Find the field you want to insert as parameter value or want to use as a compare value for the return variable.
3 - Copy this field into the clipboard and paste it in the target location.
URL Call information
- (4) URL
- Type the exact address of the API.
- (5) Use Method POST
- Tick this box if you want to call the URL with a POST call (may contain embedded "invisible" data).
- (6) Post content type
- Specify the type of content you want to include
- (7) Data to POST
- Enter the data exactly as the web service expects it. This can be tricky.
- (8) Results must match
- Enter the regular expression that matches the return data. In case of a no-match, the transfer ends in error
