GR:Gravity/Event Templates
Events templates
Event topics
What's an event topic?
gravity/wm/item/added. Yes. You just saw one. It's an event topic and it reads: A new item has been created.
Whenever a Gravity service performs an action, it, subsequently, creates an event, populates it with some properties, stamps it with a topic and then fires it.
Examples:
- When the work management service creates a work item successfully, it lets the world know by dispatching an event with this topic gravity/wm/item/added
- When the work management service updates a work item successfully, it dispatches an event with this topic gravity/wm/item/updated.
- When the definitions service creates an application successfully, it dispatches an event with this topic gravity/definitions/application/added
- When the filter service deletes a filter successfully, it dispatches an event with the topic gravity/filterservice/filter/deleted
Now you get the topic pattern. It read from left (less details) to right (more details).
So, topics differentiate events into recognizable categories so that you can pick which event category you want to handle (receive / listen to,..). So if I want to listen to any item update, be it a subject, description, stage, you name it, then I'd register for the topic gravity/wm/item/updated. If I want to be picky and only get events about item priority changes, then I'd rather pick: gravity/wm/item/priority/updated (Notice the word priority there).
OK. Now, how to know which topics come from which Gravity service. This is exactly what the next section is about.
Who provides topics?
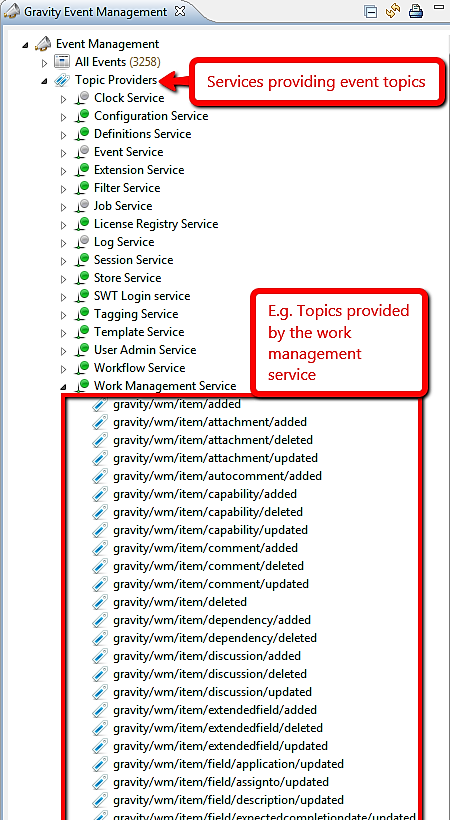
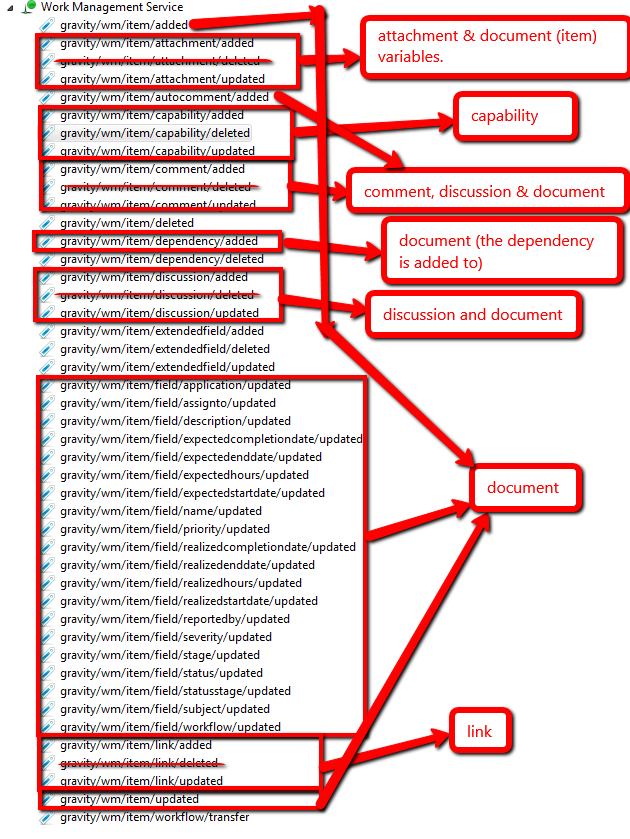
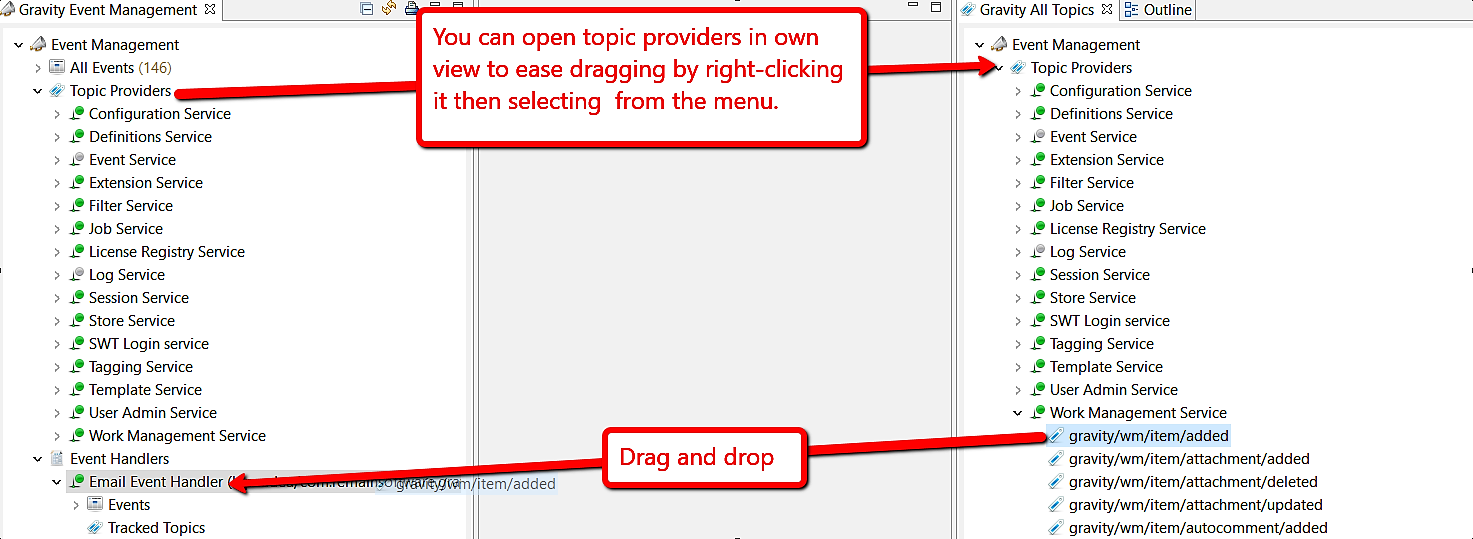
Most Gravity services declare topics they will send (with events) upon some action they perform. We call such services Topic Providers. Visually, these are available from within the Gravity Event Management view.
You can also view topic providers in a separate view:
What's an event template
Templates can be used to generate formatted output using the event information. Some examples are:
- Convert the event information to HTML and send it as an e-mail
- Convert the event information to JSON or XML and send it to a web service.
- Convert the event information to Markup and save it to disk.
The event handler must be able to process the result of the template. E.g., the Email Event Handler expects the template output it's going to send as an HTML format.
What template engine Gravity uses?
Gravity supports Apache FreeMarker template engine. So, your event templates can also use FreeMarker Template Language (FTL).
Event template editor
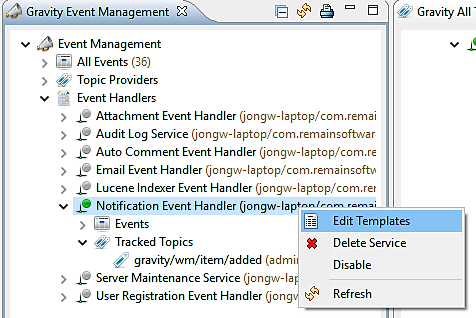
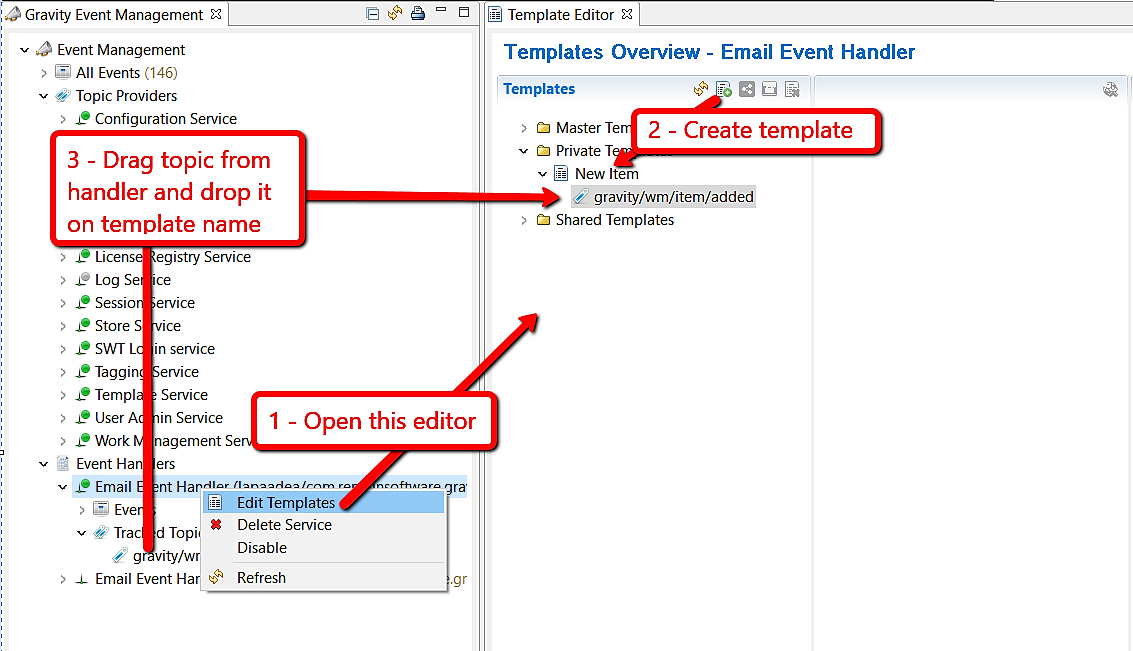
You can open the template editor by right-clicking any event handler within the Gravity Event Management view and then selecting Edit Templates from menu.
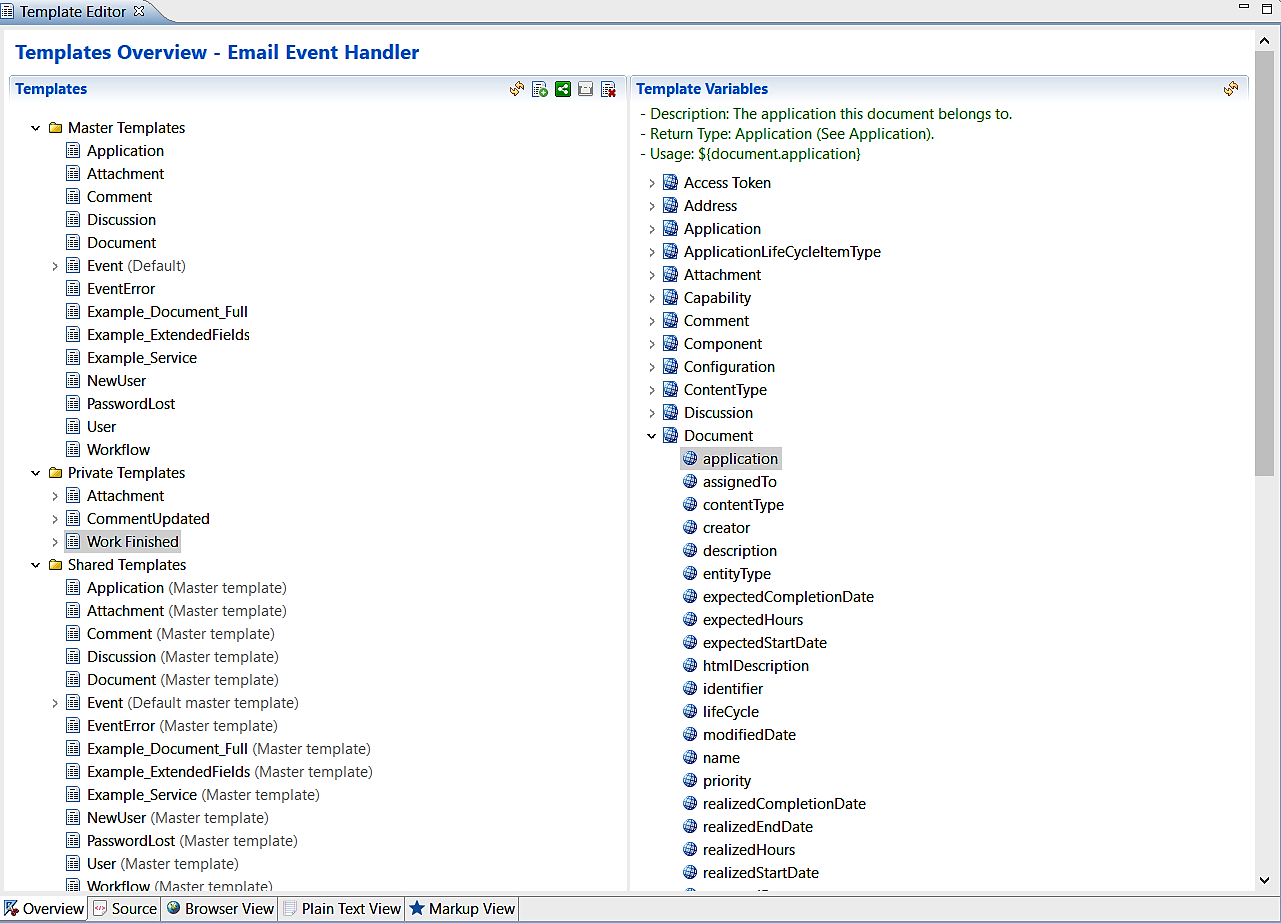
Then this event templates editor shows up. At the left column of the editor you can see the templates.
Overview
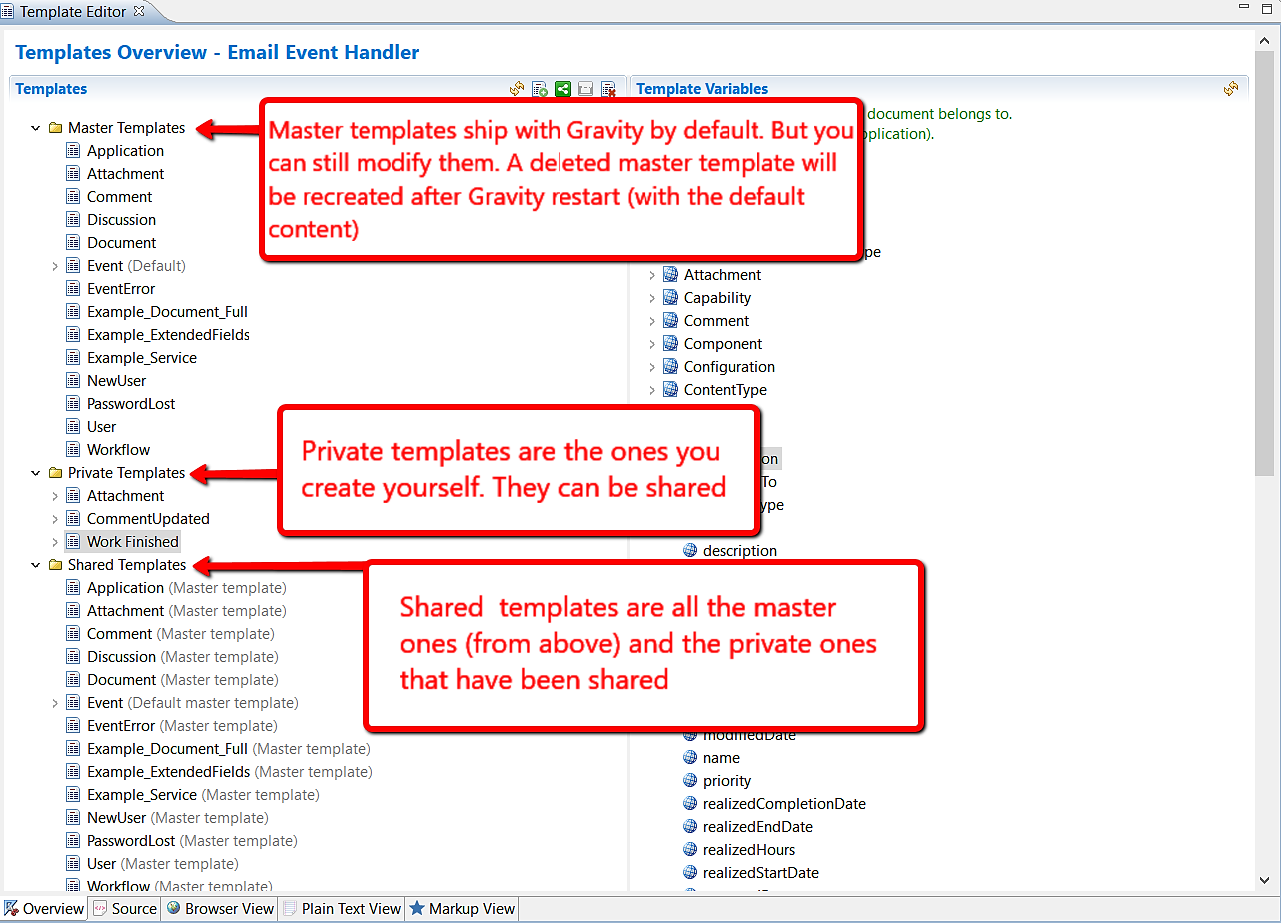
Gravity ships with default templates we call Master Templates. These are also editable. if you delete one of them it'll be re-created upon Gravity restart (but any edition will be lost). A master template can be used by all users.
An example of a master template is Document which is, by default, used to create output for item related events. That is, if you make your Email Event Handler track events having the topic gravity/wm/item/added but you don't create any template specifically for such topic. Then next time an item is created, the Email Event Handler (after receiving an event about the new item) will use the default/master template, Document, to generate the email body it's going to send.
When you create (either from scratch or copy a master one) a template, then we call it a private template which an event handler will use to generate outputs targeting/related to you, if applicable. You can share a private template so that it can be used by everyone. We call it then a shared template.
What are these templates groups good for?
When an event handler (be it the Email Event handler or any other) receives an event it has to generate an output for, then it proceeds so:
- The event handler tries to find a private template having that event topic, if found, it uses it
- If not, the event handler looks up that topic in the shared templates, if found, it uses it
- Else it falls back to master templates and picks the most topic-related one.
Create a new template
Before proceeding, please note that Gravity can automatically determine which master template (which is still under the node Master Templates) goes with which event topic. Hence, the no need to attach topics to master templates. But for the private templates (the ones under Private Templates node), be it created from scratch or copied from a master template, MUST have topic(s) attached to them to function correctly.
You can either create a new template from scratch or copy and reuse a master one. That is, for the first option you get an empty template. For the second copying option, you get a filled template (with the same content as the master template you're copying) that you can customize further. (of course it can be renamed as well).
Here are both options:
First Option - Creating from scratch: Use the menu atop of the left column:
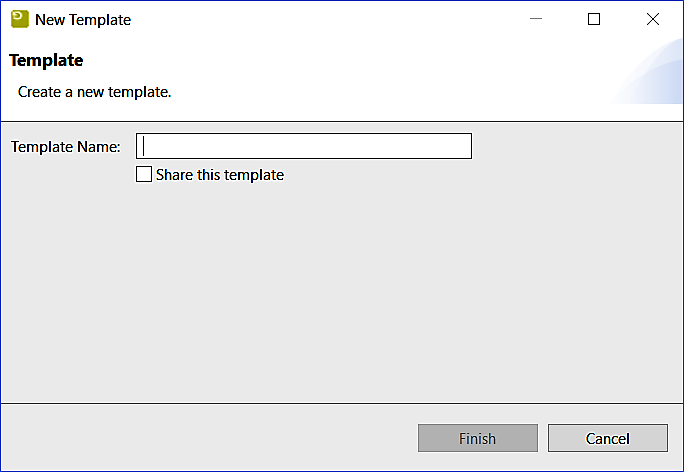
A form pops up:
Fill in the name (and, optionally, whether you want to share it by checking the box under the name field), then save it. After creation, the new template appears under your Private Templates folder.
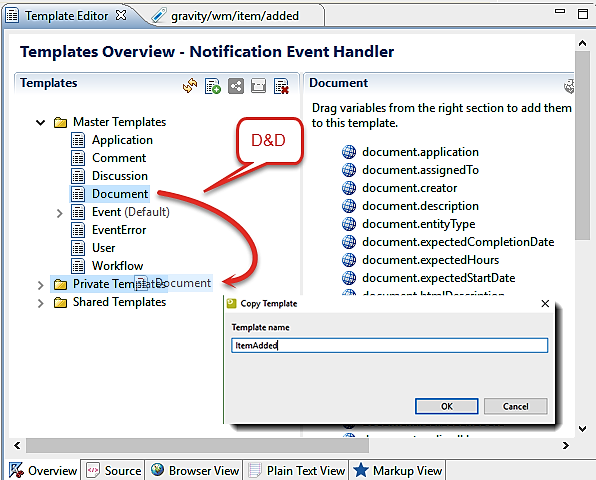
Second Option - Reuse a master template by copying it: Drag a master template (from Master Templates folder) then drop it on your Private Templates folders. You'll be then prompted to give it a name.
Sharing a template means making it public so that it can be used by others. A template can be shared:
- At creation time (How to Create a Template) by checking the box under the name field or
- By dragging it from the Private Templates folder and dropping it on the Shared Templates folder or
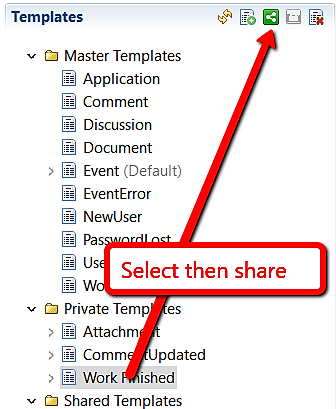
- Using either the Share button from the editor main menu as the following shows:
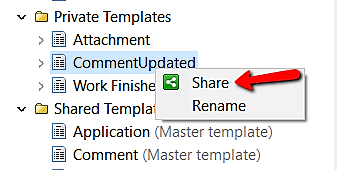
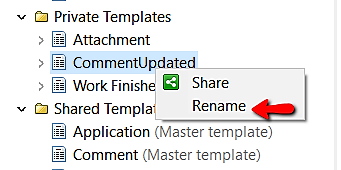
Or from context menu by right-clicking the template you want to share then selecting Share:
Rename a template
Right-click the (non-master) template you want to rename then choose the option Rename from the context menu.
Reload/Replace master templates
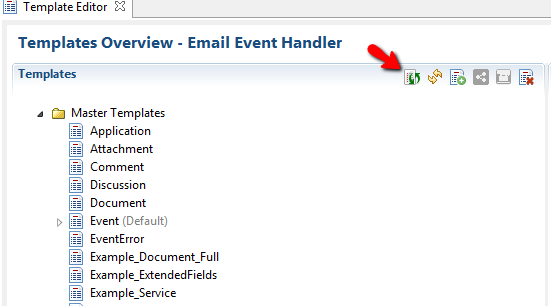
After each Gravity release (or if you've accidentally deleted a master template), please do use the reloading button at the top menu (Or right-click the Master Templates node for pop-up menu) to replace and get the latest master templates.
Delete a template
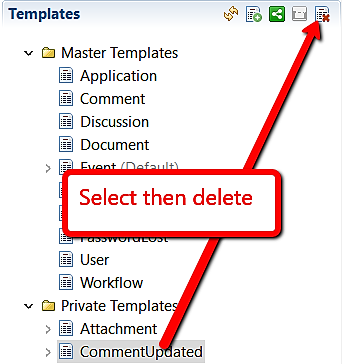
Select the template you want to delete then click the deletion button from the editor main menu. If you delete a master template it'll be re-created upon Gravity restart but with original/default content.
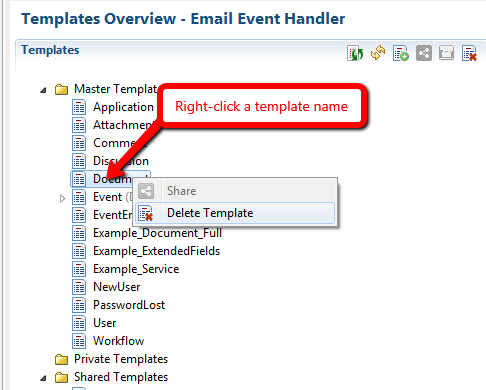
Or right-click the template(s) you want to delete then use the delete button in the pop-up menu:
Add a topic to template
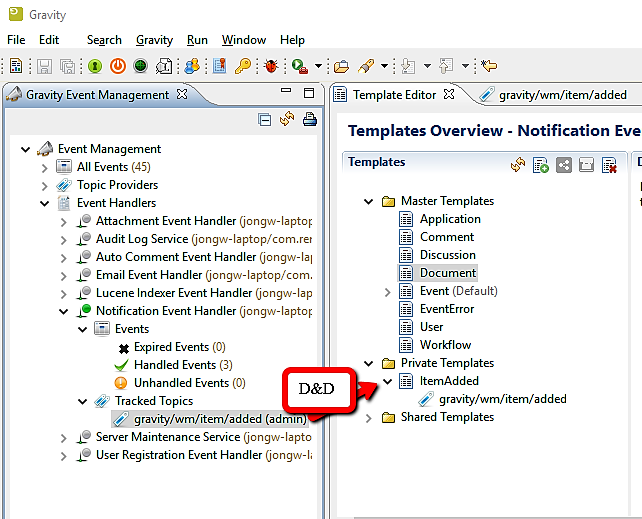
For a template to do its job, it needs an event object. therefore, it should indicate which events it expects by declaring events topics. It can only use topics from the event handler it belongs to (The event handler you right-clicked to get this template editor open). To add a topic to an event template, drag that topic from the event handler then drop it on the template you want.
Once added successfully, that topic should appear under your template. From now on, when the event handler receives an event with a topic matching the topic you just added, it'll use your template to process the event. The event itself and other objects will be made available by Gravity to use at run-time within the template.
For example, if you add the event topic "gravity/wm/item/added" to your template. Then, next time, an item is created, the event handler will use your template to process the event. The event itself, the new item and other objects are then available (as template variables) for the template to use at run-time. Those are explained here: Which Gravity fields can I use in template
Remove a topic from template
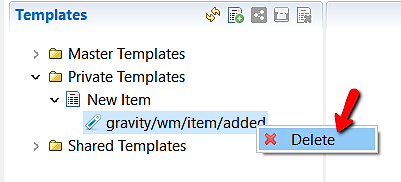
Select then right-click the topic you want to remove from the template then select Delete.
Source View and Edition
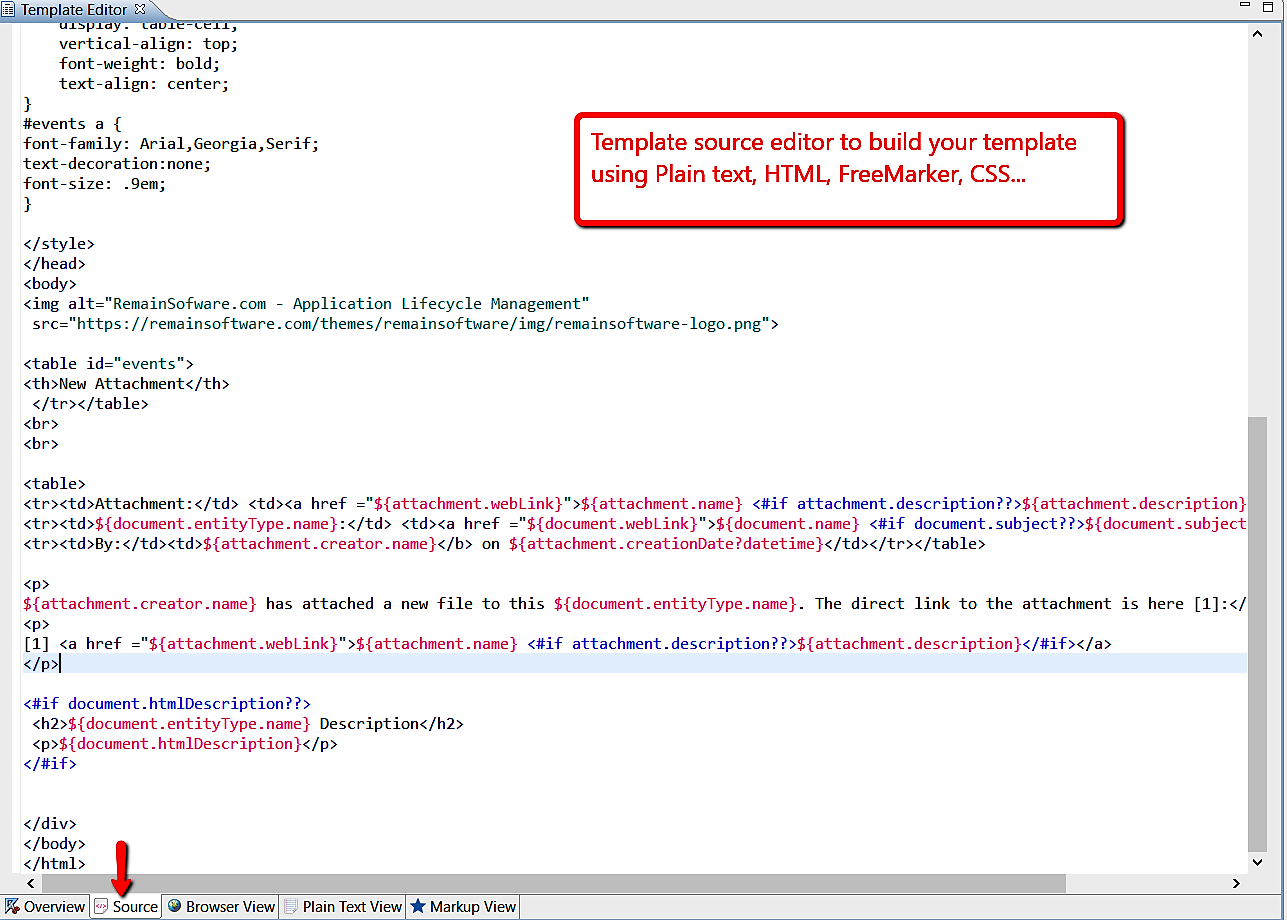
This is the place where you can view and edit a template content. You can activate this tab from the bottom left of the editor.
To build your template, you can use, among others, HTML, FreeMarker Template Language (FTL), plain-text, Markdown/MediaWiki markup languages, internal or inline CSS. Of course, that is in addition of some Gravity fields and services made available as variables within the template at run-time .
Template output preview
There are three previews of what the template would generate: Browser, plain-text and Markup previews.
Please note that the preview (the following views: Browser View, Plain Text View and Markup View in next sub-sections) may fail viewing your template source. Mostly due to some variables unavailability at the (static) preview time (in contradiction to run-time or event-time). Gravity tries to inject some dummy variables for previewing purpose but this cannot catch all possible variable combinations in the being previewed template. So, if it fails previewing (and you're confident your FreeMarker syntax usage is correct and needed variables do exist and will also be there at run-time) then test it live by the triggering an event having a topic your template has. E.g., you can trigger an event with topic with gravity/wm/item/updated by, obviously, updating an item.
Browser View
To preview what the template would look like in a browser click the Browser View tab (at the bottom of the editor, right to the Source tab).
Plain Text View
For a plain-text preview (showing the template source as-is except from variables being filled in/swapped by their values at rune-time), click then Plain Text View tab:
Markup View
And for Markdown/MediaWiki markup preview click Markup View:
Which Gravity fields can I use
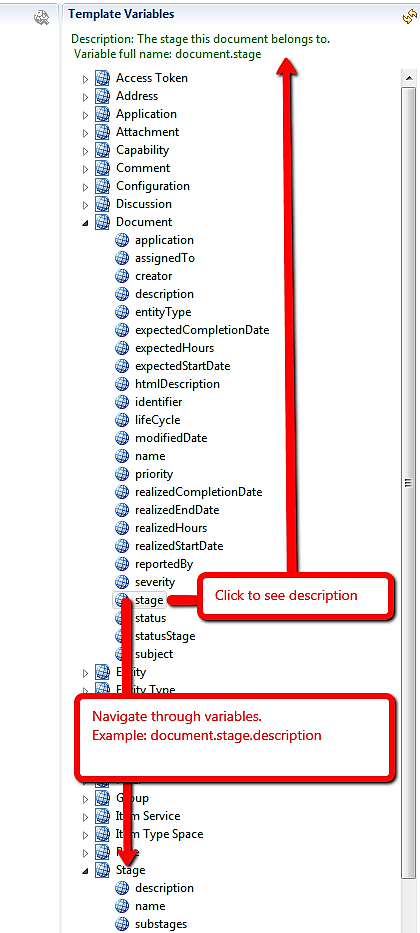
Gravity makes many entity fields and some services available as variables within templates at run-time. They can be viewed in the right column of the Source tab with name Template Variables.
It contains entity fields and services. The later can be recognized with the word Service in its name (e.g. item Service). Let's refer to both entity fields and services as variables for template's sake.
When you click a variable, a short description appears at the top showing how you'd use to that variable in your template. For example to show the description of the item in the incoming event:
document.description
And because our template engine is FreeMarker, variables should be used within some FreeMarker syntax (E.g. ${someVariable}) to be interpreted. A small example could be:
Item description: ${document.description}
The dot (.) is there for object navigation purposes and stands for a (JavaBeans Spec) getter. It reads from right to the left: the description of the document (or as a getter: document.getDescription()).
Variables inheritance
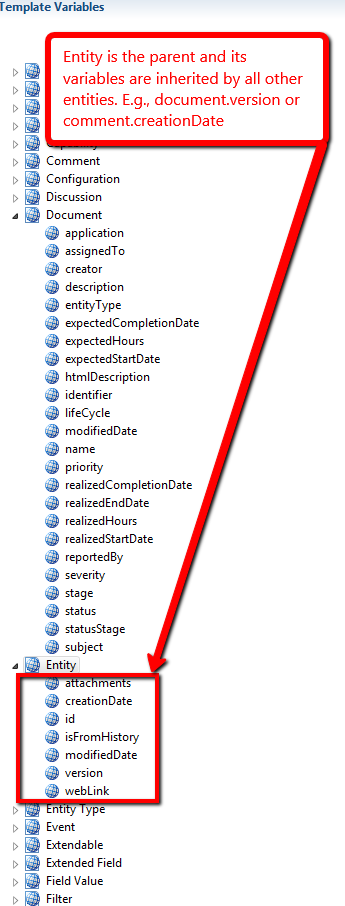
Entity, the ancestor
The entity with the name Entity is the ancestor of all other entities (e.g., document, comment, attachment, user,...). So, all variables within Entity are inherited and therefore are accessible from other entities. This allows you, for example, to refer the creatioinDate variable (coming from Entity) and use it when you have a comment:
Comment inherits Entity
So, it's valid to to write this FreeMarker snippet:
${comment.creationDate?datetime}
User, the ancestor
The entity with the name User is the parent of Group. And, of course, User is an entity.
Group inherits User inherits Entity
So, it's valid to to write:
${user.creationDate?datetime}
${group.creationDate?datetime}
${user.name}
${group.name}
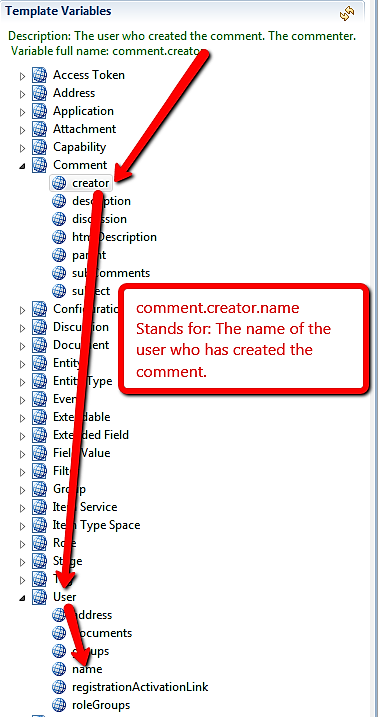
A variable may contain other variables. For example, you can drill down from the variable document (just another name of item) to stage name:
document.stage.name
Or the creator (also the poster) of a comment you can write
User "${comment.creator.name}" has added a new comment.
where the creator is a direct child variable of comment. And because the creator is a user, we can use variables under the variable User, among which, is the name.
And you can extend that template, for instance, like this:
Comment added by "${comment.creator.name}" on ${comment.creationDate?datetime} ${comment.description}
Which variables in which template?
Always available variables
These variables are available in any template:
- The event object as event variable. Example
${event.topic}
- The object containing your Gravity instance web configurations: webconfiguration. Example:
Database Name: ${webconfiguration.databaseName!'NOT FOUND'}
- The UserAdmin service as variable: useradminservice. Example:
User Name: ${(useradminservice.getUser("someUserName").name)!'USER NOT FOUND'}
- The Item Service (a.k.a, Work Management Service) as variable with name: itemService. Example:
${itemService.findItem("someItemId")}
Topic dependent variables
Which variables are available for direct access in my template at run-time?
It depends on which event topics your template has (those are topics hanging under your template. See how to add a topic to template).
As a rule of thumb: The entity the topic is about is always available (unless the topic is about deletion).
So, for the topic gravity/filterservice/filter/added is about adding a new filter. Then, the filter the event is about will be available as variable for direct access in the template (that topic belongs to/hangs under). Still, the filter creator can be indirectly accessed through the filter itself:
${filter.creator.name}
Another example is gravity/item/comment/added. The topic is about a newly created comment, therefore that new comment is directly accessible in the template (that topic belongs to/hangs under). In this common case and some other ones and for convenience, Gravity goes ahead and makes also the discussion this comment belongs to, and the document (item) the discussion belongs to available in the template for direct access:
New Comment added to issue: ${document.subject}
Comment: ${comment.subject}
Number of Comments: ${discussion.comments?size}
But the above can also be indirectly accessed via the comment itself (hence the convenience above)
New Comment added to issue: ${comment.discussion.document.subject}
Comment: ${comment.subject}
Number of Comments: ${comment.discussion.comments?size}
How to specify the email subject in the template
If a template is used by the Email Event Handler then you can specify the email subject in the header of the template itself using this custom tag:
<!--<gravity.template.subject></gravity.template.subject>-->
(All default master templates are provided with that tag as the first line of the template.)
Example:
//For a newly created item
<!--<gravity.template.subject> New: ${document.subject}</gravity.template.subject>-->
//For a newly signed up user
<!--<gravity.template.subject>Welcome!</gravity.template.subject>-->
//For a new comment
<!--<gravity.template.subject>${document.name}-${document.subject}: ${comment.subject}</gravity.template.subject>-->
How to use an image that is stored in the resources directory of the Gravity server
If want to use an image in a template but the location of the image is not accessible, for example due to HTTPS certificate issues, then you may be able to work around the problem by storing the image local to the Gravity server. Gravity server has a resources directory that is exported by the server, i.e. the files in the resources directory are open for downloading. To this end the custom tag:
${gravity.resources.http.url}
can be used in an <img alt=...> definition indicating that the image is to be accessed from the Gravity server. For example:
<img alt="RemainSoftware.com - Application Lifecycle Management" src="${gravity.resources.http.url}/img/remainsoftware-logo.png">
The Gravity server 'resources' directory is located in the .data directory of the Gravity server installation directory. Images can for example be stored and accessed (as shown above) from the ./resources/img directory, for example:
./data/resources/img/remain-footer.png
./data/resources/img/remainsoftware-logo.png
Examples
- Please refer to FreeMarker documentation for more details about using FreeMarker Template Language (FTL).
- These issues in Gravity Helpdesk may be of help as well
- Here are also some Stackoverflow FTL answers that might help as well.
Template examples
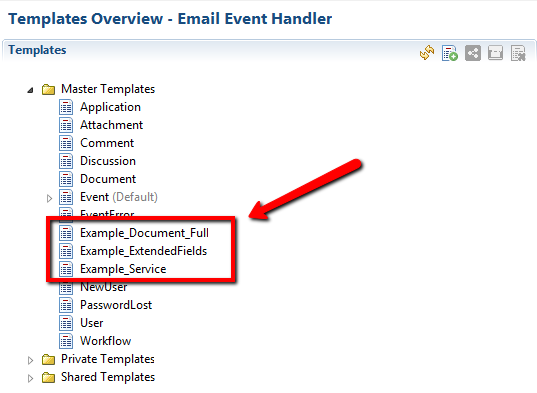
Every master template may be used as an illustrative example of FreeMarker usage within templates or a base of your own template. Moreover, we've also provided some example templates (we'll keep updating them) covering cases that need more focus such as extended fields and services usage.
You can locate these example templates under the Master Templates node with names starting with Example_. To view a template example, click its name then click the tab Browser View .
After each Gravity release please do use the reloading button to replace and get the latest master templates)
Walk-through example
Before proceeding, please note that Gravity can automatically determine which master template (which is still under the node Master Templates) goes with which event topic. Hence, the no need to attach topics to master templates. But for the private templates (the ones under Private Templates node), be it created from scratch or copied from a master template, MUST have topic(s) attached to them to function correctly.
Let's say we want to get notified by email about new new items. So, we use the Email Event Handler for this purpose ( More about Event handlers) and make it listen to events fired when new items have been created. Such event are recognized by the event topic gravity/wm/item/added.
So, the first step is to add the topic gravity/wm/item/added to Email Event Handler by dragging it from the topic provider Work Management Service
Then:
- Right-click the Email Event Handler and select Edit Templates to open templates editor. (Template Editor)
- Create a new template or copy a master one(How to Create a Template)
- Add the topic gravity/wm/item/added to the newly template by dragging it from the Email Event Handler. (How to Add a Topic to Template)
Select the template you just created the click the Source tab at bottom of the editor. Copy the following small text example.
You can preview it by clicking one the views: Browser View, Text View or Markup View tab (right to the current tab).
Topic: ${event.topic.name}

New work item ${document.name} has been added!
Subject: ${document.subject}
Created on ${document.creationDate?datetime} By :${document.creator.name}
You can read more about Gravity variables you can use within templates.
To get more familiar with template coding you can test your template by copying code from the master templates. Also see the example ones under the masters' node folder.
Don't forget to save your template once done (by using top Save button or CTRL+S).
Using and Reading an item within a template
- Work Item Name: ${document.name}
- Creator: ${document.creator.name}
- Assignee: ${(document.assignedTo.name)! "Work item not assigned yet!"}
- Application Name: ${document.application.name}
- Workflow Name: ${document.lifeCycle.name}
- Stage Name: ${(document.stage.name)! "Work item has no stage yet!"}
- Status: ${document.status.getName()} (${document.status.value})
- Priority: ${document.priority.getName()} (${document.priority.value})
- Severity: ${document.severity.getName()} (${document.severity.value})
- Realized Start Date: ${document.realizedStartDate?datetime}
// The demo output would look like:
- Work Item Name: Demo Item
- Creator: demo user
- Assignee: demo user
- Application Name: Demo Application
- Workflow Name: Demo Workflow
- Stage Name: Dev
- Status: New (2)
- Priority: Normal (3)
- Severity: Normal (4)
- Realized Start Date: Sep 14, 2017 11:28:51 AM
Extended field example
This is a small example of extended fields usage. For more extensive examples, please refer to the example templates provided within the template editor. Namely the template example: Example_ExtendedFields.
// Get a field label by first checking for field existence:
<#if document.getSingleStringField("nameOfSomeExistingStringField") ??>
- Label: ${(document.getSingleStringField("nameOfSomeExistingStringField").label)!"Label not found!"}
<#else>
The string field with the given name doesn't exist
</#if>
// Or shorter:
Label= ${(document.getSingleStringField("nameOfSomeExistingStringField").label)!"Field or Label not found!"}
// Get a field value by first checking for field existence:
<#if document.getSingleStringField("nameOfSomeExistingStringField") ??>
- Value: ${(document.getSingleStringField("nameOfSomeExistingStringField").singleFieldValue.value)!"Field or Value not found!"}
<#else>
The string field with the given name doesn't exist
</#if>
// Or shorter:
 - Value: ${(document.getSingleStringField("nameOfSomeExistingStringField").singleFieldValue.value)!"Field or Value not found!"}
// Or by using this syntax allowing recovery from any execution error:
<#attempt>
- Value = ${document.getSingleStringField("nameOfSomeExistingStringField").singleFieldValue.value}
<#recover>
String field value not available
</#attempt>
// Get the selected value of a multi-valued field by first checking for field existence:
<#if document.getSingleStringField("nameOfSomeExistingStringField") ??>
- Value: ${(document.getSingleStringField("nameOfSomeExistingStringField").selectedFieldValue.value)!"Selected value not found!"}
<#else>
The string field with the given name doesn't exist
</#if>
// Or shorter:
 - Selected value: ${(document.getSingleStringField("nameOfSomeExistingStringField").selectedFieldValue.value)!"Field or Selected value not found!"}
// Or by using this syntax allowing recovery from any execution error:
<#attempt>
- Selected value= ${document.getSingleStringField("nameOfSomeExistingStringField").selectedFieldValue.value}
<#recover>
String field value not available
</#attempt>
//A bit more complete string field output:
- Name: ${(document.getSingleStringField("Demo String Field").name)!"Field or name not found!"}
- Label: ${(document.getSingleStringField("Demo String Field").label)!"Field or label not found!"}
- Weight: ${(document.getSingleStringField("Demo String Field").weight)!"Field or weight not found!"}
- Creation Date: ${(document.getSingleStringField("Demo String Field").creationDate?datetime)!"Field or creation-date not found!"}
// Reading all number values:
<#list document.allNumberFields as field>
Field Name: ${field.name}
Values=[
<#list field.values as value>
${value.value},
</#list>
]
</#list>
// Reading an entity extended field:
<#if document.getSingleEntityField("nameOfSomeExistingEntityField") ??>
 <#assign myEntityField = document.getSingleEntityField("nameOfSomeExistingEntityField")>
 <#if myEntityField.singleFieldValue.value ??>
<#assign myEntityValue = myEntityField.singleFieldValue.value>
 - Entity Field Value (a document in this case) Name: ${myEntityValue.name}
 - Creator: ${myEntityValue.creator.name}
 - Assignee: ${myEntityValue.assignedTo.name}
 - Application Name: ${myEntityValue.application.name}
 - Workflow Name: ${myEntityValue.lifeCycle.name}
 - Stage Name: ${myEntityValue.stage.name}
 - Status: ${myEntityValue.status.getName()} (${myEntityValue.status.value})
 - Priority: ${myEntityField.singleFieldValue.value.priority.getName()} (${myEntityValue.priority.value})
 - Severity: ${myEntityValue.severity.getName()} ($myEntityValue.severity.value})
 - Realized Start Date: ${myEntityValue.realizedStartDate?datetime}
 </#if>
<#else>
Entity field with the given name not found!
</#if>
// Result would look like:
- Entity Field Value (a document in this case) Name: Demo Item
- Creator: demo user
- Assignee: demo user
- Application Name: Demo Application
- Workflow Name: Demo Workflow
- Stage Name: Production
- Status: New (2)
- Priority: Normal (3)
- Severity: Normal (4)
- Realized Start Date: Sep 19, 2017 10:45:41 AM
// Reading the first, second and last value of a multi-valued number field:
<#if document.getSingleNumberField("Demo Number Field") ??>
<#assign numberField = document.getSingleNumberField("Demo Number Field")>
The first number value is: ${numberField.values?first.value!"No first value was found"}
The second number value is: ${numberField.values[1].value!"No second value was found"}
The last number value is: ${numberField.values?last.value!"No last value was found"}
<#else> The number field with the given name doesn't exist </#if>
These issues in Gravity Helpdesk may be of help as well
Please refer to FreeMarker documentation for more details about using FreeMarker Template Language (FTL).
Here are also some Stackoverflow FTL answers that might help as well.
