GR:Gravity/Installation
Server Hardware Requirements Guide
Server administrators can use this guide in combination with the free Gravity trial period to evaluate their server hardware requirements. Because server load is difficult to predict, live testing is the best way to determine what hardware a Gravity instance will require in production.
Peak visitors are the maximum number of browsers simultaneously making requests to access or update pages in Gravity. Visitors are counted from their first page request until the connection is closed and if public access is enabled, this includes internet visitors as well as logged in users. Storage requirements will vary depending on how many items and attachments you wish to store inside Gravity.
Minimum hardware requirements
The values below refer to the minimum available hardware required to run Gravity only; for example, the minimum heap size to allocate to Gravity is 1GB. You'll need additional physical hardware, of at least the minimum amount required by your Operating System and any other applications that run on the server.
On small instances, server load is primarily driven by peak visitors, so minimum system requirements are difficult to judge. We provide these figures as a guide to the absolute minimum required to run Gravity, and your configuration will likely require better hardware.
The installed Java runtime, required to run the Gravity server or client, should be at least Java JRE/JDK version 11.
- 5 Concurrent Users
- CPU: Intel Dual Core i5 (2.3 Ghz+ CPU)
- RAM: 4GB
- Minimum database space: 2+ GB
- 25 Concurrent Users
- CPU: Intel Quad Core (2.5 GHz+ CPU)
- RAM: 8GB
- Minimum database space: 5+ GB
Note: Please be aware that while some of our customers run Gravity on SPARC-based hardware, we only officially support Gravity running on x86 hardware and 64-bit derivatives of x86 hardware and POWER7 and higher processors. Gravity typically will not perform well in a tightly constrained, shared environment. Please be careful to ensure that your choice of hosting platform is capable of supplying sustained processing and memory capacity for the server.
Server load and scalability
When planning server hardware requirements for your Gravity deployment, you will need to estimate the server scalability based on peak visitors.
Hard disk requirements
All page content is stored in the database, while attachments use both the database and the file system. The more attachments you have, the more disk space you will require.
Private and public comparison
Private instances manage their users either internally or through a user repository such as LDAP, while online instances have public signup enabled and must handle the additional load of guest internet visitors.
Examples
- Remain Software Helpdesk (as of 21/5/2018)
- Operational 4 years
- 151 users in 7 roles and 13 groups
- 1651 Items
- 1 Application, 3 Workflows and 41 stages
- 10000 total comments with 3337 system comments and 6663 user comments
- 13 public filters and 18 private filters
- 1395 Attachments
- Server Linux
- Database MySQL
- Database Size 1069 MB
- Gravity Directory Size 1GB
- Remain Software Internal Project Management (as of 30/6/2016)
- Operational 3 years
- 28 users in 9 roles and 24 groups
- 2664 Items
- 4 Application, 10 Workflows and 108 stages
- 5471 total comments with 2073 system comments and 3398 user comments
- 34 public filters and 69 private filters
- 460 Attachments
- Server Linux
- Database DB2/400
- Database Size 3800 MB
- Gravity Directory Size 403MB
- Customer Internal/External Project Management (as of 30/6/2016)
- Operational 1 year
- 316 users in 6 roles and 9 groups
- 8412 Items
- 3 Application, 11 Workflows and 81 stages
- 9672 total comments with 1649 system comments and 8023 user comments
- 140 Attachments
- Server IBM i
- Database DB2/400
- Database Size 5400 MB
- Gravity Directory Size 1300MB
Install the Gravity Server on your Windows machine
To download the Gravity Server from our download area first log in to our website and then get the latest windows server by clicking on this link and picking the correct server. The file name will have the following layout gravity_server_eao_win64_setup-n.n.n.yyyymmddhhmm, where n.n.n is the 3 digit version number and yyyymmddhhmm the date and time.
Run the Installer
Run the executable after it has been downloaded and follow the installation instructions on the screen. If you have previously installed Gravity Server then the old server will be uninstalled first. Your data will be retained.
Uninstalling the Server
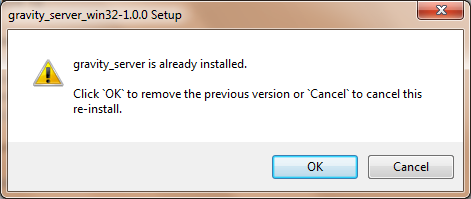
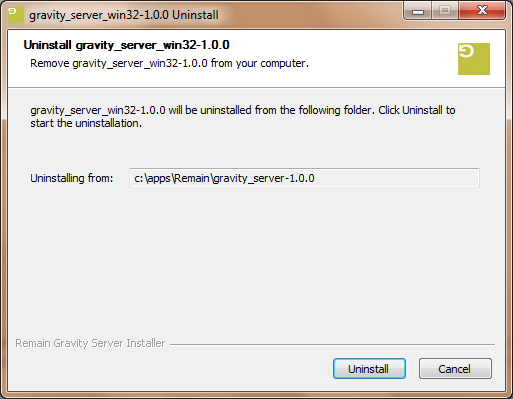
If the installer detects that the server is already running it starts the uninstaller.
Press OK
Press Uninstall
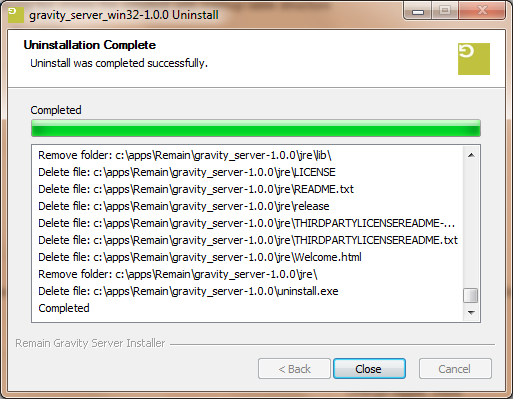
Press Close
Installing the Server
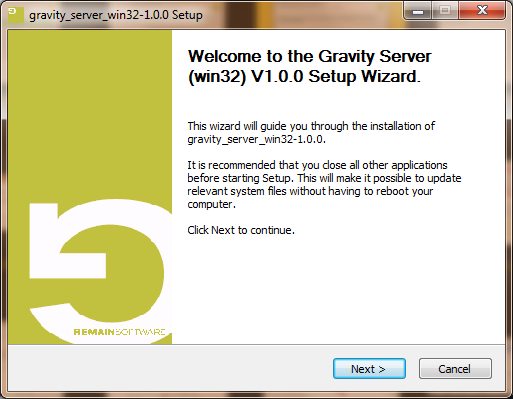
To install the server, follow the pages of the install wizard.
The first page introduces the Gravity Server installer. Press Next.
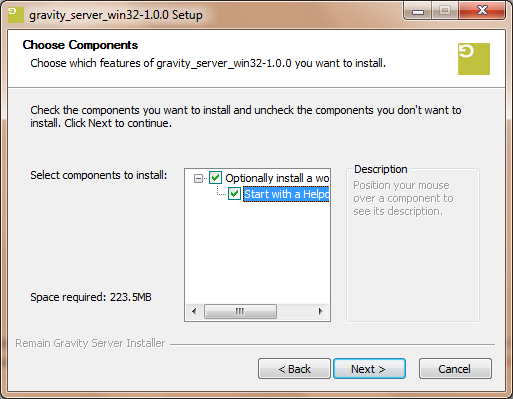
If you want to install a predefined database with some content then you can select this as an option here. The database is pre filled with a helpdesk type workflow and it already contains some workflow documents.
If you are following the Definitions Tutorial, make sure that you DO NOT select this option because we will define everything from scratch.
Press Next.
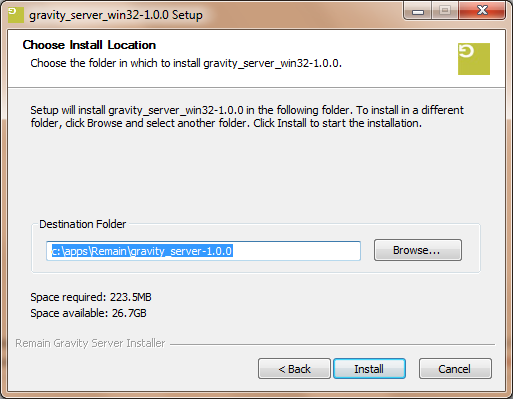
This next screen enables you to define the install location. Make any changes you want or accept the defaults.
Press Install.
Note
On Windows, you should install the Gravity server outside Program Files to avoid problems with Windows file registry virtualization. If you plan to run the Gravity server specific for a user you could install into the AppData\Local directory of that user's home directory. Otherwise, accept the default 'C:\apps\Remain\...'.
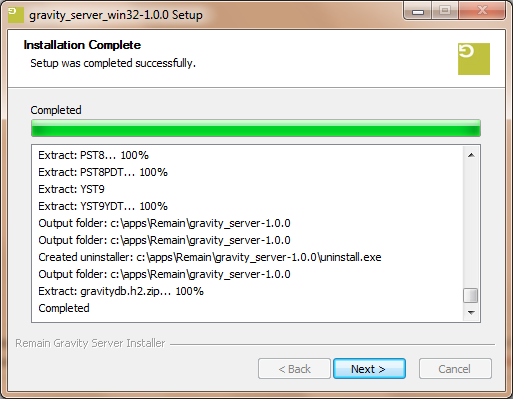
Wait until the installation has finished.
Press Next
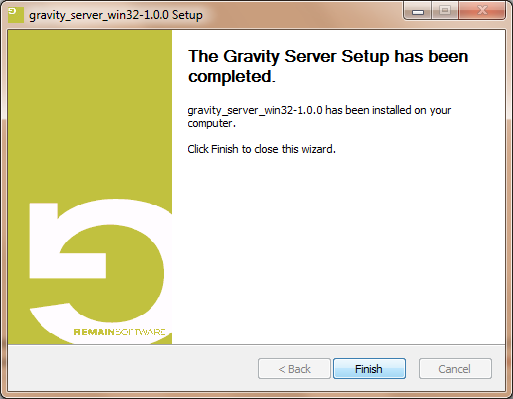
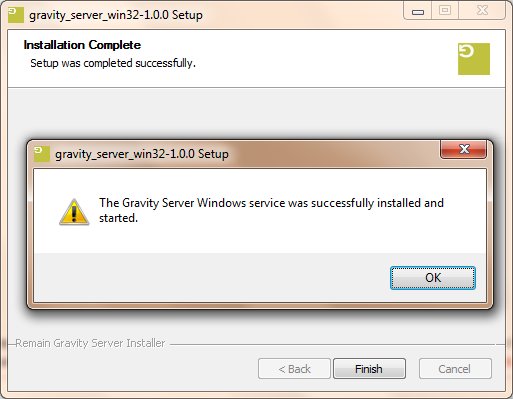
Press Finish. A blank page will appear for a few seconds. During this time the Windows Server installer will be installed.
Press Finish to complete the installation.
Open the Webpage
In a few seconds your server will be available on this link: http://localhost:45050/gravity/wm. Login with user admin and password admin. </translate>
First time Install or Upgrade the Gravity Server on your IBM i machine
This page describes the procedures for the installation or upgrade of the Gravity Server on the IBMi. In the installation procedures we frequently refer to the 'required' Gravity Server. As there can be 3 versions of the Gravity Server it is important that you select the correct version for your installation or upgrade. The 3 versions we have are:
- Release
- Milestone
- Nightly
A release is the final version of the development effort of a Gravity server or client, for example Gravity Server 1.1.0.
A milestone builds on a base development version of a Gravity server/client (for example 1.0.0) with bug fixes and enhancements added. Each milestone builds on the previous milestone and in the end results in a new release (for example 1.1.0). Only the patch (last number) will change with each new milestone for example 1.0.1 -> 1.0.2.
A nightly can be considered as an unfinished milestone (a beta version of a Gravity server/client). It may not be 100% stable and should definitely NOT be used in production.
First Time Installation
First time installation of Gravity on the IBM i assumes you have already installed the TD/OMS change management product.
The installation contains the following steps:
- Create user GRAVITYDB
- Create schema GRAVITYDB
- Run the TD/OMS command to prepare a Gravity environment (INZOMSSRV *GRAVITY)
- Run the Windows 'Gravity Server for IBMi' installer (or do a manual install)
- Configure the Gravity server for automatic startup
Create user GRAVITYDB
Log on with QSECOFR and create a user GRAVITYDB. Remember the password.
CRTUSRPRF USRPRF(GRAVITYDB) PASSWORD(*USRPRF) USRCLS(*USER) INLMNU(*LIBL/MAIN) PWDEXPITV(*NOMAX) TEXT('Gravity Owner') MAXSTGLRG(*NOMAX) JOBD(QGPL/QDFTJOBD) LANGID(ENU) CCSID(37) CHRIDCTL(*JOBCCSID)
Make sure that the user GRAVITYDB has the *USE right to it's own user profile object, if not then the GRAVITYDB user will not be able to access the GRAVITYDB database due to a sign-on failure (server logging will show an error: General security error.:GRAVITYDB).
When Gravity is installed and run for the first time it will be configured to use the database name GRAVITYDB with the password GRAVITYDB. This setup assumes that the user GRAVITYDB actually was created using the password GRAVITYDB. If this is not the case and another password was provided then the password needs to be updated in the GRAVITY configuration file. To update the GRAVITDB password the property 'store.user.password=?password?' needs to be updated with the correct password. The property can be found in the file '_config_admin_config.properties' which is located in the directory '/QOpenSys/TD/Gravity/.data/store'. Note that a password entered in clear text will be automatically encrypted when Gravity is run. Check out the paragraph Updating the password of the GRAVITYDB user further down.
Create schema GRAVITYDB
Logon with the GRAVITYDB user to create a database owned by this user.
- STRSQL
- CREATE SCHEMA GRAVITYDB
Change user GRAVITYDB
Log on with QSECOFR and change the initial menu of user GRAVITYDB.
CHGUSRPRF USRPRF(GRAVITYDB) INLMNU(*SIGNOFF)
Optionally download and Install Java
The minimal java requirement for Gravity is Java 11 or higher.
To ensure that your system has Java 11 run the following commands:
GO LICPGM
10 Display installed licensed programs
Look for licensed program 5770JV1 with the description Java SE 11 64 bit
If there is no Java 11 installed then ask your IBMi administrator to download and install Java SE 11 support.
Setup the initial Gravity Server environment
Log on with QSECOFR for the Gravity server setup. Add TD/OMS to the library list and run the following command:
INZOMSSRV SERVICE(*GRAVITY)
The default choice for the Gravity base directory is '/QopenSys/TD'. This will prepare the Gravity Server environment (Gravity Server startup scripts in /QOpenSys/TD/Gravity).
Using the Gravity OSGi Server for IBMi installer
If you are able to use the Gravity Server for IBMi installer then the installer will automate the steps required for a correct Gravity server installation (or upgrade). Make sure FTP client access on your IBMi is enabled and that your FTP User has sufficient authorization to run TD/OMS commands and access the directory /QSysOpen/TD/Gravity.
- Download the required gravity_server_ibmi_setup-V.R.M.YYYYMMDDHHMM.exe from the website at this location.
- Run this installer from your Windows workstation, for details on how to use the installer follow this link Gravity Server IBM i Installer
After completion of the installer it may take some minutes for the Gravity Server to complete its startup.
Using the Gravity server zip file
If you cannot use the installer for IBMi then you will need to use a Gravity OSGi server zip file.
- Download the required gravitysaoserver-lin64-V.R.M.YYYY-MM-DD_HH-MM-SS.zip from the website at this location.
- Stop the Gravity service with
ENDOMSSRV *GRAVITY
- Place the zip file in /QOpenSys/TD/Gravity/
- Start the Gravity service with
STROMSSRV *GRAVITY
After a successful installation the server zip file will have been renamed to include the date and time of the installation as its file extension.
Adding the Gravity service for auto startup
The best way to set up the Gravity service to auto-start is to include the lines below in your TD/OMS subsystem start-up program (source member OMQOMSTRU2 in QUSRSRC)
  /* ------------------------------------------------------- */
  /* Start GRAVITY                                           */
  /* ------------------------------------------------------- */
  STROMSSRV  SERVICE(*GRAVITY) DB(GRAVITYDB)
Add the line again and compile it. You may need to delete the program first before it can be compiled again (owner). After compilation set the default authority with
GRTAUTOMS OBJC(OMQOMSTRU2)
The next time the subsystem is started the Gravity server will also be started. If you want to test it you can run:
ENDSBS OMSTCPSVR *IMMED
STRSBS OMSTCPSVR
Upgrading your Gravity server installation
There are 3 procedures that can be followed here, the first 2 procedures requires TD/OMS to be installed;
- 1. Using the IBMi Windows installer
- 2. With TD/OMS installed a manual upgrade
- 3. Wihout TD/OMS installed a manual upgrade
1. Using the IBMi Windows installer
- Download the required Windows installer as gravitysaoserver_setup-V.R.M.YYYYMMDDHHMM.exe from the website at this location.
- Run this installer from your Windows workstation, for details on how to use the installer follow this link Gravity Server IBM i Installer
2. With TD/OMS installed, a manual upgrade
- Download the required gravitysaoserver-lin64-V.R.M.YYYY-MM-DD_HH-MM-SS.zip from the website at this location.
Upgrade by performing the following steps:
- Stop the Gravity service with ENDOMSSRV *GRAVITY
- Copy and or replace the file(s) in /QOpenSys/TD/Gravity/
- Start the Gravity service with STROMSSRV *GRAVITY
3. Without TD/OMS installed, a manual upgrade
- Download the required gravitysaoserver-lin64-V.R.M.YYYY-MM-DD_HH-MM-SS.zip from the website at this location. and place it in an IFS directory, for example /Qopensys/TD/Gravity
- Start the install/upgrade with the script gravityserver.qsh
To make sure your installation can perform the upgrade you need the following files in the installation root directory: gravityserver.qsh and update.qsh. If you do not have these files then they can be extracted from the downloaded zip file, use the qshell command 'jar -xvf ?name-of-zip?.zip update.qsh gravityserver.qsh'. Gravityserver.qsh will run the update.qsh and start Gravity. Make sure the user access properties on the zip file allow the user running the gravityserver.qsh script to read and move the zip file (i.e. you might need to change the permissions and owner of the zip file). When the zip file is placed in the installation root directory and gravityserver.qsh is run then the zip is renamed and unpacked, when unpacking is finished the zip is renamed once more (with a date and time at the end) and gravity will be started based on what was just unpacked. The gravityserver.log will contain information about the upgrade process.
Run any required post upgrade steps
Depending on what is in the release notes, an additional upgrade step might be required to get the Gravity server into a fully updated state. For more information on post upgrade steps goto Server Post Upgrade Steps
Problems after upgrading the Gravity Server
After a correct upgrade the Gravity Web client should be accessible after a few minutes. Test this by opening the main Gravity Web page using URL:
http://?host:port?/gravity/wm
On the displayed page you should be able to login into Gravity using the administrator's user id and password.
Also on the displayed page you can check the server version by hovering over ‘Powered by Remain Software Gravity’ (near the bottom of the page), this will show the Gravity database version and build time.
If the Gravity Server is not starting after an upgrade then it could be that ports previously in use by Gravity, are pending close. These ports are no longer used by Gravity but are still semi active. Restarting Gravity usually resolves this issue, perform the following steps:
- Stop the Gravity service with ENDOMSSRV *GRAVITY
- Wait 5 minutes
- Start the Gravity service with STROMSSRV *GRAVITY
If you still cannot login to Gravity using a Web browser then you will need to contact Gravity support.
Updating the password of the GRAVITYDB user
Updating the Gravity template or final properties file will be necessary if the password of the GRAVITYDB user is not 'THE' default password or the password has changed. In this case the correct password needs to be set in either the Gravity template properties file or the final properties file. The property to be updated is 'store.user.password=...' If the server was already started then you need to edit the final properties file else the template properties file.
Run the following command to edit the final properties file:
EDTF STMF('/qopensys/TD/GravitySave/.data/store/_config_admin_config.properties.org')
Run the following command to edit the template properties file:
EDTF STMF('/qopensys/TD/Gravity/_config_admin_config.properties')
When the server starts for the first time, the properties file in the root of the server is copied to the .data/store directory (the final location). Also, any plain text password in the final properties file will be encrypted by the Gravity server. If a password was updated in the template properties file then after server startup either mask the property or remove it from the file.
Note: Long IBM i passwords are case sensitive!
Gravity Server in a DR environment
There are 2 aspects of Gravity that need attention when planning for a Gravity DR. First is the progam files side of Gravity and second is the data files side of Gravity. Both aspects can be handled in different ways depending on the situation at hand. The most easiest way to replicate a Gravity instance is to stop it (ENDOMSSRV *GRAVITY) and copy it to another location and to make sure you can start the DR Gravity instance with a 'STROMSSRV *GRAVITY' command. If it is not possible to stop the Gravity production instance then see the instructions below on how to replicate the different parts of Gravity.
Gravity Server program
The Gravity server program consists of all files and directories located in the root Gravity directory but not including the top level directory ‘.data’. These files can be safely replicated to a new location as no files are being locked with an update in mind. If you cannot replicate then you also have the option of providing a base Gravity server installation consisting of the Gravity server zip file and 2 scripts required to get the server running. The root Gravity server directory will then look something like this:
update.qsh
gravityserver.qsh
gravitysaoserver-lin64-3.0.1.2017-09-18_12-47-08.zip
Having these three files is enough to get the Gravity server application started with the command ‘SRTOMSSRV *GRAVITY’. The file ‘gravitysaoserver-lin64-3.0.1.2017-09-18_12-47-08.zip’ is for example the zip file as available from the Remain site. It also possible to use the current production zip file as was used to install the latest Gravity server on your IBMi. The zip file is stored in the root Gravity directory and will look similar to the following file: ‘gravitysaoserver.zip.170919-110159’. This zip file is the same as the download zip file but on install (by Gravity scripting) it is renamed to contain the day of installation and the .zip extension is moved from the end of the file name. When the file is renamed to once more contain the .zip extension it can be used for a Gravity server installation, ‘gravitysaoserver.zip.170919-110159’ should then become ‘gravitysaoserver.170919-110159.zip’.
Gravity Server data
In the root Gravity server directory there is the ‘.data’ directory. This directory contains all the essential Gravity configuration and runtime data. If you run Gravity with the embedded H2 database then the database will also be located in this directory, but in most cases on the IBMi the IBMi DB2 database is used and is external to any Gravity directory. Replicating the ‘.data’ directory can only be safely done when the Gravity server is not running. The main reason for this is that replicating the ‘.data/solr’ directory of a running Gravity server can result in corrupted Solr lucene indexes in the target environment (these indexes contain Gravity search information). If you need to replicate/copy the ‘.data’ directory of an active Gravity server instance (live copy) then you can do this by excluding the solr sub directory. On the DR side you can re-populate the indexes with the Gravity OSGi console command grsolrri (see Wiki: Gravity; Rebuild Search Index). The Gravity OSGi console can be accessed through the Gravity web settings page (requires admin rights).
Below is a list of sub-directories contained in the .data directory:
Directory		Required 	Live copy allowed
------------		------------	-----------------------
(.data/)cassandra	no		no
(.data/)logs		no		yes
(.data/)public*         no		yes
(.data/)resources	yes		yes
(.data/)solr		yes		no
(.data/)store		yes		yes
(.data/)work**		yes		yes
(.data/)xref***        	yes		no
*public contains cached versions of document attachments.
**live copy allowed only if not using the embedded H2 database.
If advised not to run the cassandra caching server due to resource limitations, then the caching server can be disabled with the Gravity configuration setting:
caching.server.disable=true
***the xref contents do not necessarily have to be replicated, the xref locations will be automatically recreated but this can take some time depending on the number of locations configured.
Note. The store directory contains, amongst others, the all important Gravity configuration file: _config_admin_config.properties. The file contents are primarily static by nature but the entries server.contact.name and store.server.name can change if the same ip-address (i.e. numeric dotted address) is used to configure these properties. These 2 properties will be updated with the actual host ip-address detected during server startup. Again these 2 properties may change if an ip-address is used not if a (DNS) host name is used. If the DR store configuration is going to be updated with diverging port, ip-address or host name values then make sure the configuration is usable (port conflicts) when replicated back to the original installation.
The directories that have the indication Required: no, do not need to be copied at all. These directories will be recreated upon server startup.
Gravity Server License
On a failed over Gravity server, the license check will most likely fail and a new licenses will need to be installed. Licensing will fail if the host name and or the Gravtiy server installation directory changes. The Gravity server will still be functional with an invalidated base license but only the user 'admin' will be able to login. When requesting a new license use the Gravity admin RCP to lookup the system-id of the Gravity server, the system-id will be required when generating a new license.
Tuning Gravity DB2/400 Driver
When Gravity is running on the AS/400 we can tune the DB2 JDBC driver with the following java command line properties:
"-Dgravity.jt400.use.native.driver=<true>"
This property only has effect when running the server on OS/400. Make sure that the database is on the same system as the server when using "true" for this property, otherwise the results cannot be predicted.
"-Dgravity.jt400.query.optimize.goal=<value>"
Setting to specify that you want to change the DB2/400 optimization goal.
0 = Optimize query for first block of data (*ALLIO) when extended dynamic packages are used; Optimize query for entire result set (*FIRSTIO) when packages are not used.
1 = Optimize query for first block of data (*FIRSTIO)
2 = Optimize query for entire result set (*ALLIO)
The default is "0". Nothing will be set if this property is not specified.
"-Dgravity.jt400.qaqqini.lib=<value>"
Setting to specify from what library to use the qaqqini file. See the documentation for as400JDBCDatasource
Changing server port settings
The default port for the Gravity web en rest services is 45050. To change the port the Gravity server is listening on you need to update the port setting for the web en rest services. The most straight forward way is to update the Gravity server configuration file '_config_admin_config.properties' located in the '.data/store' of the Gravity installation directory. The 2 properties that need to be updated are 'web.http.port' and 'web.rest.server.port' for example 'web.http.port=80' and 'web.rest.server.port=80'. Restart the server after updating the properties.
With regards to using the very popular port 80, make sure no other service is listening on this port. If another service is already bound to port 80 then the internal web/rest server in Gravity will not be able to start. If there is another service using port 80 then you will need to resort to the assignment of an interface (network card). You will then have to configure each service to use port 80 on a specific interface.
If you need the Gravity server to use a specific interface then add the following property (in the same configuration file): web.http.bind.address=[ip-address | DNS address], for example 'web.http.bind.address=192.168.1.26'.
Below are configuration settings that can be set post installation:
web.allow.cors=xref | gravity, comma delimited list of web applications for which the default CORS handling is to be overridden.

caching.server.disable=true | false, if true then the sub system handling Gravity caching (Cassandra) will not be started, Disabling caching will have a minor negative impact on performance. When enabling this option and restarting Gravity, it can occur that there will be Cassandra jobs still active, if this is the case then these jobs can be safely terminated.
Installation of the Standalone Client
The Standalone client comes in two flavors. The Administration Client is used to configure and work with Gravity, The Work Management client is used to work with Gravity.
Installing the Standalone Client
Download one of the Gravity Standalone Client from our download area by first logging on to our website and then by clicking on this link [1]. Pick the correct installer for your Operating System. If you want to administer Gravity then download one of the Admin clients otherwise download one of the Work Management clients.
Once downloaded, run the installer and follow the instructions of the installer.
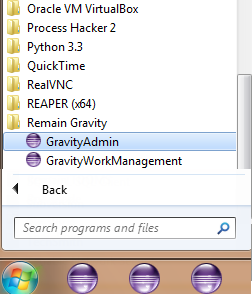
Once installed, Gravity is available from your programs menu in the Windows Task bar;
[1] (https://remainsoftware.com/extranet/software-downloads/gravity-releases)
Running the Client for the First Time
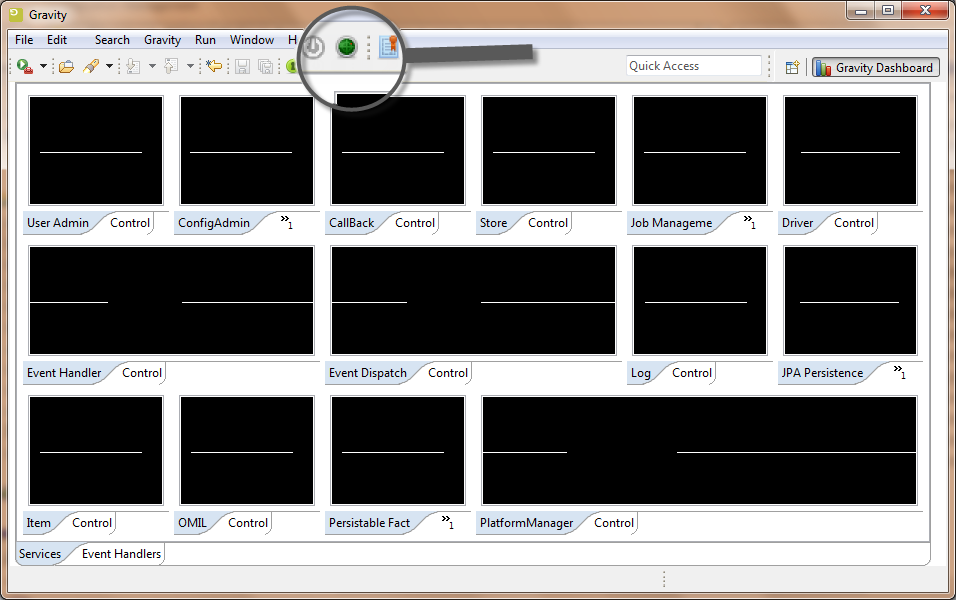
When the client starts up for the first time, it will show the Gravity Dashboard. On the toolbar, there is a little radar shaped icon that will enable you to discover a Gravity server. Since we have already installed a Gravity server, we can discover that.
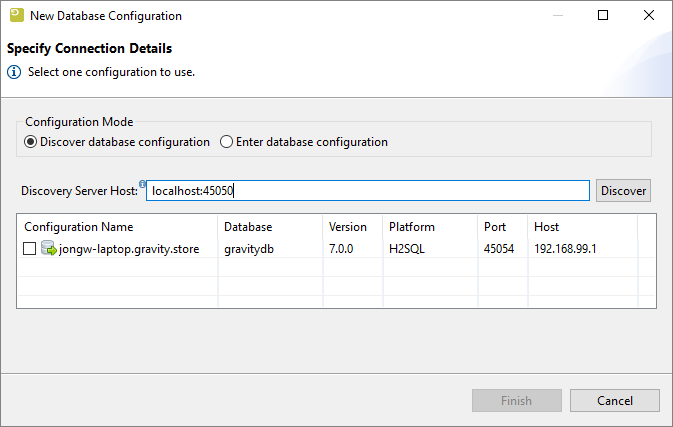
Press the Discovery icon and in the dialog that appears, type the name of the server as indicated in the image below. If your server is running on your localhost type "localhost" otherwise type the IP address or the hostname of your Gravity server. Optionally add :45050 and press the Discover button. The list will be populated with an entry. Check the entry in the table and press "Finish".
The server configuration will be retrieved and the client will restart if required. You may be required to press the login button ![]() before the login window appears. If this is the first time you access the server or if you did not change the admin password you can log in with:
before the login window appears. If this is the first time you access the server or if you did not change the admin password you can log in with:
user: admin
password: admin
Try to also discover our public helpdesk at helpdesk.remainsoftware.com
</translate>
Running multiple clients
If you need to maintain multiple versions of the Gravity client then this is possible by renaming the installation directory of an already installed client and configuring a new subpath (data location) for the client. After Renaming the installation you need to redirect the client’s data and configuration directories (logs, store and publlc). By setting the application property -Dgravity.home.subpath=?gravity_admin_501? you define which directory is to be used to store the client’s runtime configuration and data. This directory is always created under the .\remain\gravity directory in your home directory. The ‘-Dgravity.home.subpath=’ is put in the GravityAdmin.ini file (or eclipse.ini for clients installed into an eclipse installation), located in the client’s root installation directory. For example in C:\Program Files\Remain\gravity_admin_client-5.0.1_copy\GravityAdmin.ini, the last line added refers to the new configuration and data directory:
-startup
plugins/org.eclipse.equinox.launcher_1.3.201.v20161025-1711.jar
--launcher.library
plugins/org.eclipse.equinox.launcher.win32.win32.x86_64_1.1.401.v20161122-1740
--launcher.appendVmargs
-vmargs
-Dgravity.log.print.level=info
-Dgravity.log4j.print.level=info
-Dgravity.app=rcpadmin
-Dgravity.log.file.level=info
-Djava.net.preferIPv4Stack=true
-Dfile.encoding=UTF-8
-Xms512m
-Xmx1024m
-Xss2m
-XX:PermSize=128m
-XX:MaxPermSize=384m
-Xverify:none
-XX:+UseConcMarkSweepGC
-XX:+CMSClassUnloadingEnabled
-XX:+DisableExplicitGC
-Dgravity.home.subpath=gravity_admin_501
When the client is started the directory c:\users\?user?\.remain\gravity\gravity_admin_501 will have been created. Initially the configuration is empty so you will need to (re) discover a Gravity server to get the client going.
Installation of the Embedded Client
The embedded client is installed inside the Rational tooling like RDi and RDp. The client is used to work with Gravity. Install the Administration Client if you want to administer Gravity
Installing the Client
Download the Embedded Client from our download area by clicking on this link [1] and by picking the correct installer for your Operating System. Search for installers labeled rdi.
Once downloaded, run the installer and follow the instructions of the installer.
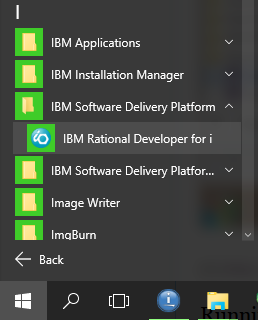
Once installed, Gravity is available inside your RDi or RDp or RTC client from your programs menu in the Windows Task bar;
[1] (https://remainsoftware.com/extranet/software-downloads/gravity-releases)
Running the Client for the First Time
When the client starts up you can open the Gravity Work Management perspective by typing this in the search bar. You can also use the Window Menu to open the perspective.
On the toolbar there is a little radar shaped icon that will enable you to discover a Gravity server. Since we have already installed a Gravity server, we can discover that.
Press the Discovery icon and in the dialog that appears type the name of the server as indicated in the image below. If your server is running on your local host type "localhost" otherwise type the ip address or the hostname of your Gravity server. Optionally add :45050 and press the Discover button. The list will be populated with an entry. Check the entry in the table and press "Finish".
The server configuration will be retrieved and the client will restart if required. You may be required to press the login button ![]() before the login window appears. If this is the first time you access the server or if you did not change the admin password you can login with:
before the login window appears. If this is the first time you access the server or if you did not change the admin password you can login with:
user:     admin
password: admin
Try to also discover our public helpdesk at helpdesk.remainsoftware.com
Configure a proxy
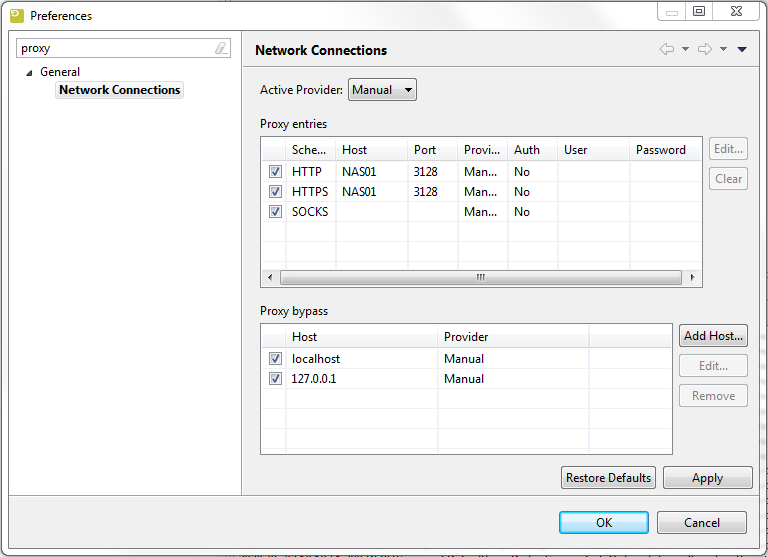
The client can be setup to use a proxy for http/s requests by configuring the 'Network connections' of the Eclipse preferences. The 'Network Connections' prefence can be accessed from the eclipse top menu: 'Window -> Preferences -> General -> Network Connections'. Below is an example of a proxy configuration.
Note that when setting the SOCKS proxy make sure that the proxy server can handle SOCKS, if not and a proxy server is applied for SOCKS then this will block the Gravity database access, essentially blocking the Gravity client.
License Management
A short intro
The Gravity license system is based around a public key infrastructure. The provided infrastructure gives Remain the means to supply licenses in a secure and user friendly manner. Gravity licensing consists of two licensing parts, the Gravity license (also mentioned as product license) and the Gravity license Confirm Key. The Gravity product license contains information regarding the actual license, for example the name of the Gravity product being licensed and the number of users that can use the license. The Gravity license Confirm Key contains information on how license details can be extracted from the Gravity license.
With respect to licensing Gravity can run in either trial or non-trial mode. The difference being that a trial mode with a trial license is usually short lived. The default mode for Gravity is trial. In this mode Gravity does not require you to import a Confirm key or Base license simplifying setup and use of Gravity. In trial mode it is sufficient to import a trial Work-management license to get Gravity up and running.
A non-trial Gravity system requires a Base license and a commercial Work-management license. The Base license fully enables the Gravity licensing system. If no Base license and/or product related licenses are imported then only the initial Admin can log-in and use the Gravity system.
Requesting a License
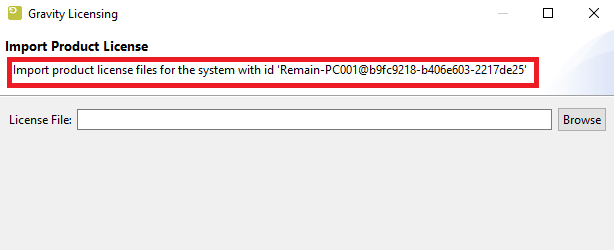
Most Base and commercial licenses will be generated for a specific system id. This system id can be made visible by clicking the small-key-in-document icon which is used to import the base and commercial license. Copy this text and send it over to your license supplier.
1. Open the License Dialog
2. Copy the System id
Importing a license confirm key and product licenses
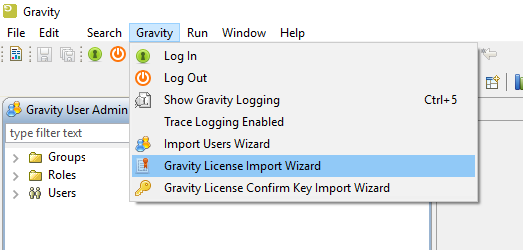
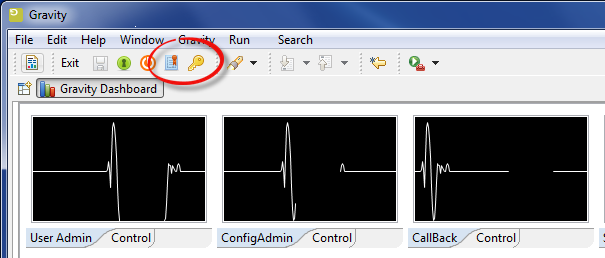
After you have received the license files, they can be imported by pressing the appropriate toolbar button. As shown below, the large single key icon depicts the button to press when importing a license Confirm Key file and the small-key-in-document icon depicts the button to press when 1 or more licensed product files are to be imported. These tool buttons are only available in the Gravity Admin product.
Pressing either button will evoke a wizard dialog that will prompt for a location of either the license confirm key file or the product license file(s). However, order of import is of importance here. As the license confirm key is used to extract information from a product license, a confirm key must already exist in the system before any product license files can be imported.
Import a license Confirm Key file
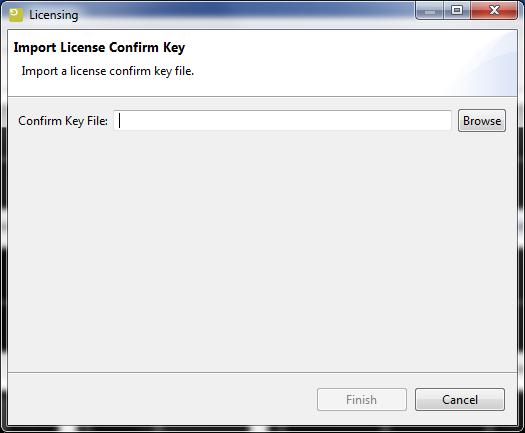
Press the toolbar ![]() button to start the 'License Key file' import:
button to start the 'License Key file' import:
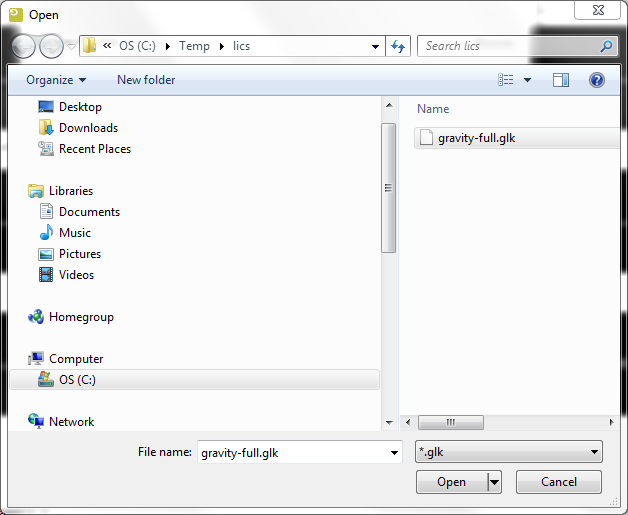
By pressing the <Browse> button a file dialog will be shown where you can select the license confirm key file, from the location where it was saved (after receiving it by email or by other means). The browse option will only show files that match the file extension of the Gravity license confirm key file, in this case it expects to find a file with the extension 'glk' (Gravity License Key). For example :
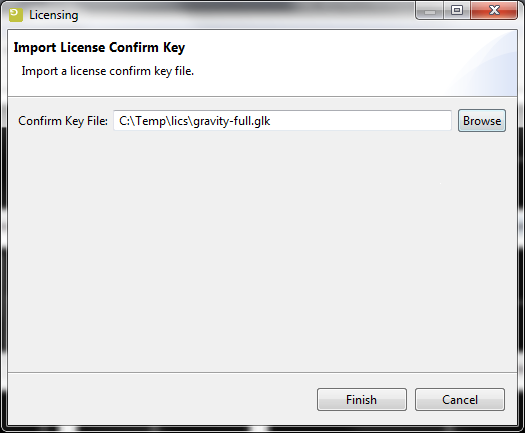
Selecting the appropriate file and pressing enter or clicking on the <Open> button will set the file as the license confirm key file to be imported:
At this point pressing <Finish> will load the license confirm key into the Gravity system. This will be confirmed by a pop-up info panel, for example:
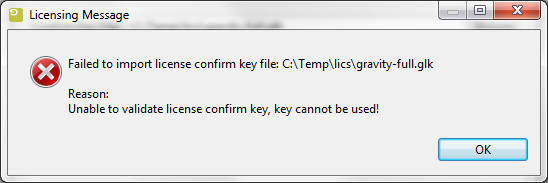
Failed import of a license confirm key file
Importing a license key can fail if the licensing system detects that the key file being imported is not a Gravity license key file (possibly corrupt) or is not a valid (revoked) license key file. If this is detected an error message will be displayed that states the problem at hand, for example:
Recovery from this type of error is only possible by requesting a new confirm key from your distributor.
Import 1 or more product license files
A similar procedure is to be followed for the import of 1 or more product license files. To start the 'Product License file' import, press the
![]() icon.
icon.
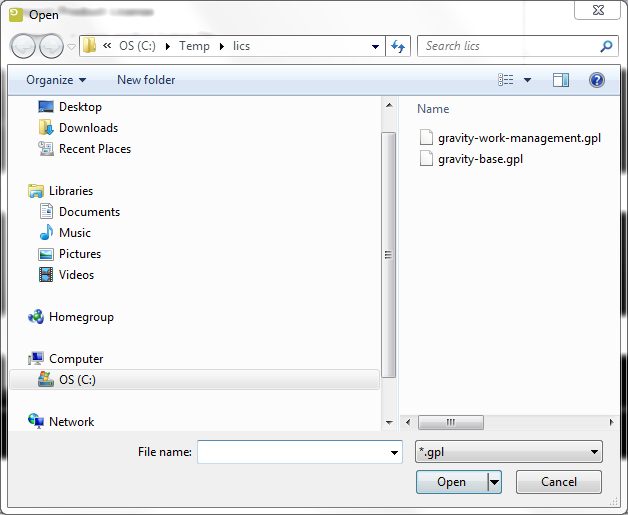
Major difference with the previous import wizard is that with this import 1 or more files with the extension 'gpl' (Gravity Product License) are to be selected for the import, for example:
By selecting both gravity-base.gpl and gravity-work-management.gpl and pressing enter or clicking on <Open> will set the 2 licenses as the product licenses to be imported. Pressing finish on the next dialog will finalize the import request. A pop-up info panel will confirm that the licenses were successfully imported:
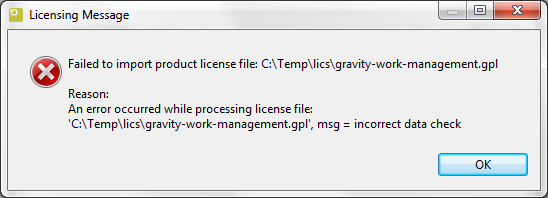
Failed import of a product license file
Importing a product license file can fail if the licensing system detects that the file being imported is not a Gravity license file (possibly corrupt) or cannot be validated against the current license confirm key. If this is detected an error message will be displayed that states the problem at hand.
The above error occurred due a to corrupt product license file, but an error can also occur if the imported license confirm key is not compatible with the offered product license file. There is an enforced incompatibility between trial and commercial keys and licenses, it is not possible to interchange a commercial license with a trial key and visa versa.
Recovery from most errors is only possible by requesting a new product license from your distributor.
License administration
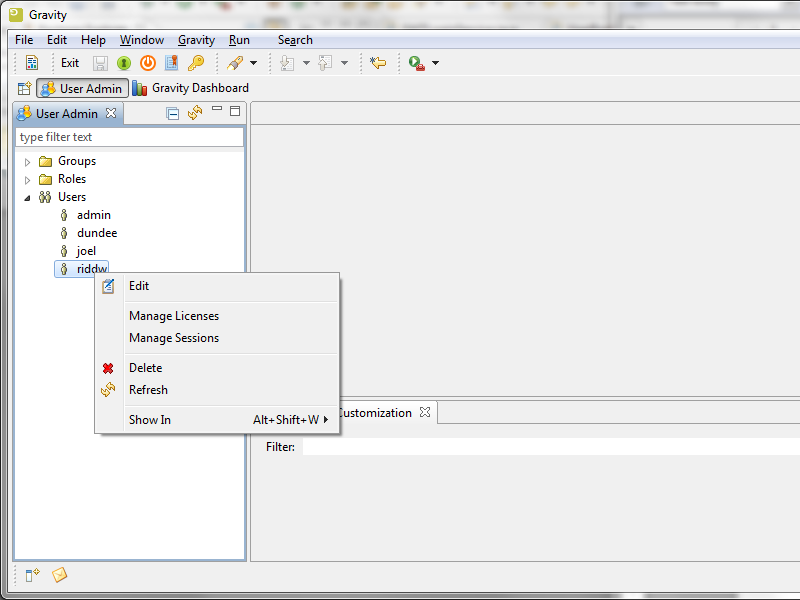
The license administration, i.e. to register or deregister a user to or from a product license, is performed by the Admin from the User Admin perspective. By opening the 'Users' container and by right clicking on an available user, the menu option 'Manage Licenses' will appear:
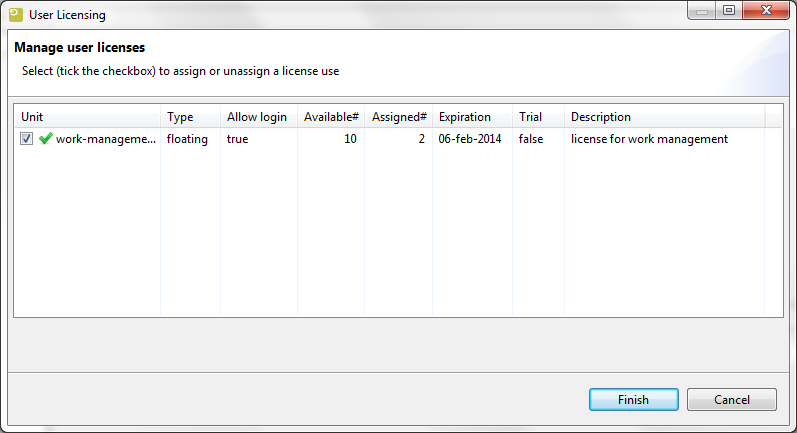
Selecting 'Manage License' will show the Manage User Licenses dialog. Based on previously import license products this will show for example:
By ticking the check box the user can be registered to a license and by unticking, deregistered from a license. In the example above the selected user will be registered to the work-management license. Pressing <Finish> confirms the (de)registration request and the request is processed by the licensing system.
Product license details
As can be seen in the 'Manage user licenses' dialog a license product consists of a number of licensing related fields, some fields are informative of nature but others influence the usability and availability of a license.
License Unit
The license unit is the product unique name. During license import the unit unlocks or makes available specific Gravity features to a registered user or in the case of the Gravity base license the unlocking of the Gravity user licensing system.
License type
Gravity Licensing supports to license types, they are:
- Named license.
- Floating license.
Named license
A named license is a license that is registered to a user. The number of users that can be registered to a named license is determined by the license unit count (above displayed as the column Available#). A named license is hard-wired to a user and cannot be shared amongst users in the way possible with a floating license. That being said, a license can be re-used by re-assigning it to another user. With a named license the amount of available licenses determines the maximum number of users that can be assigned to a unit. The column 'Assigned#' displays the number of users currently registered to the license.
Floating license
With a Floating license there is a pool of Gravity users that can make use of an available unit. As with the named license, each user is registered to a unit but the difference here is that with a floating license the amount of licenses available (within a unit) does not determine the number users that can be registered to a license. The blocking factor here is the number of concurrent (logged-in) registered licensees. With a floating license the number of logged in users cannot exceed the available unit count. In our example we can have 100 users registered to the work-management license but only 10 users can log-in and use it. If user 11 attempts to login then the login will be rejected and a notification message will be displayed.
Note.
If a user tries to log-in with a license that has log-in capabilities (Allow log-in) but the use count has already reached its maximum then the log-in request will be rejected. In this case a notification message will be displayed with the reason of rejection.
License activation and expiration
A license has a start and an end date. The start date is the date from which a license can be actively used and the end date is the date the license can no longer be used. In 'Manage user licenses' only the end date is displayed as 'Expiration'. Technically the license expires at midnight of the displayed date.
Base license system-id
The base license system-id is the hardware id of a system that will run a Gravity server installation. The system-id is requested from the user and tied into a product base license, specific to the user's Gravity Server installation. The system-id that is used to create a base license can be retrieved by running the command gSHI from the Gravity Server osgi console.
Switching from a trial license to a commercial license
If you have engaged in a Gravity trial license and you of course want to use Gravity commercially then a switch from trial to commercial is a trivial task. After receiving the appropriate key and licenses from your distributor the switch can begin.
If the product licenses are the same as the trial licenses (unit names are the same) then perform the following steps:
- import the commercial license confirm key
- import the commercial base product license
- import the rest of the commercial product licenses
If the trial product licenses are not the same then you will have to first delete the trial licenses before importing the new commercial licenses, in this case the steps to be performed are:
- delete all product licenses
- import the commercial license confirm key
- import the commercial base product license
- import the rest of the commercial product licenses
- optionally re-assign users to appropriate licenses
As you can see you don't necessarily have to remove users or definitions already applied in Gravity during the trial period. You can continue without data loss when switching from trial to commercial use of Gravity.
To delete a product license the Admin must go to the User Admin perspective and on the 'Users' container right click and select the menu option 'Delete Licenses'. Of course once a license is deleted then license registration will also be cleaned-up and users will no longer be able use the license,. If the license had the 'Allow log-in' attribute set then at this point only Admin can use the Gravity system, all other users will be locked out.
Managing license sessions
A side effect of actively managing licenses is that there are situations that a user log-out cannot be tracked and license usage not properly updated to reflect an up-to-date license usage count. This for example happens when a user is logged-in to Gravity and the system the user is working on crashes unexpectedly. In this case the license registration system cannot be updated to reflect the fact that the user is not using a specific license anymore. If this situation occurs to often then the license use count can inappropriately reach its use limit prohibiting a user from logging-in to Gravity or from using specific license related Gravity features.
To help manage and cleanup inactive license usage there is a menu option 'Manage Licenses'. This menu option is available at the same level as the previously mentioned 'Manage Licenses'. Selecting this menu option displays the following dialog:
The dialog will display license sessions for the selected user. A user can only see his/her own license sessions and cannot see sessions of other users (although the Admin does have the privilege to manage sessions for others). By ticking the check box under the 'User' column and pressing <Finish> license session will be removed from the license registry system(freeing up precious license resources).
There is 1 important effect of removing a session s that if the session is a live session (the user is currently logged in more than once) then removing the session will have the effect of a remote log-out for that session. The running Gravity instance for that session will be requested to log-out , if the user does not respond within a certain time limit then the selected Gravity instance will be automatically logged out (freeing up the license usage).
As already stated users can only manage there own sessions and only the Admin user has the ability to manage all sessions (Admin can right click on the 'User' container, select 'Manage sessions' and see all sessions).
Manage license sessions when logging in
The possibility to manage a user's own session has been added to the User log-in process. If at time of log-in the licensing system detects that there are insufficient license resources to allow the user to log-in but it also detects that there are registered license sessions for this user, then the user is given the opportunity to manage his/her sessions at time of a log-in. At this point removing 1 or more license sessions should allow the user to log in to Gravity.
If a user cannot log in to Gravity because the user has no license assigned or license usage has reached a maximum then the Admin must assign a license to the user or clean-up in-active license usage as shown above. If clean-up is not possible then you must wait for a license to become available or consider acquiring extra licenses. The following notification will pop-up in the right hand corner of the display:
If a user cannot log in because the 'base' license has not been imported then the following notification will pop-up in the right hand corner of the display:
License notifications
Gravity has built in functionality to notify users about the state of registered licenses. A notification will occur when a license is pending expiration or when a license has been invalidated. For a pending license expiration the period and interval of when to be notified can be set in the License section of the General Settings configuruation (Gravity Admin RCP). The notification of a license that has been invalidated due to tampering or server relocation will always be sent out the moment the invalidation is detected. For invalidated licenses the License 'Notify repeat interval' in the Gerneral settings configuration will be used to repeat the notification (see GR:Gravity/Views/ConfigurationAdmin/GeneralConfig). Licensing checking is performed when the server is started and from there on on a daily basis.
Viewing licensing messages
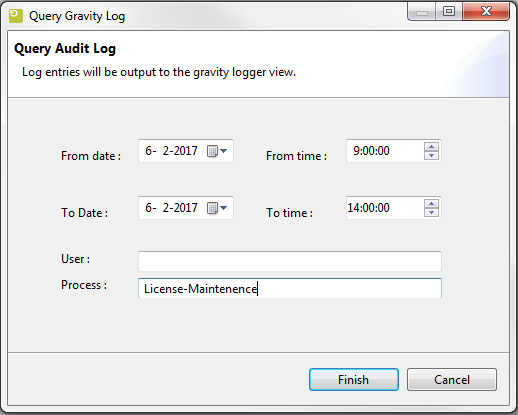
To view logged license messages you can use the Query Audit Log functionality to display audit messages logged by the license maintenance service. The Query Audit Log dialog can be opened by clicking on the appropriate toolbar icon;
Select a period over which the to view logged messages by setting a From date: and To date: and by setting the Process to: 'License-Maintenance'. Suggested is to select a period that is quite a few hours before the current date and time.
The result of the Qeury Audit Log will be shown in the Log Viewer (which will automatically be opened if it wasn't already open), for example:
2017-02-06 14:00:46,832  INFO AuditLog: 17-02-06 14:43 [License-Maintenance] ERROR [$userSystem$@RIDDW-PC@172.17.2.108]: Invalidated license: 'work-management', expired on 19-01-2017
2017-02-06 14:00:46,832  INFO AuditLog: 17-02-06 14:43 [License-Maintenance] ERROR [$userSystem$@RIDDW-PC@172.17.2.108]: Invalidated license: 'gravity-base', expired on 19-01-2017
Server SSL Certificate Setup
Setting up the Gravity OSGi (Web) server as a certificate provider allows clients to access the Gravity server over a secure connection using the HTTPS protocol. You can setup the server to use a certificate key-store that you provide or use the certificate key-store generated by the server. By default the Gravity OSGi server will use an internally created key-store when the 'web.https.port' property has been set in the server configuration. The key-store will contain a self-signed certificate with the common-name set to the configured server.contact.name. Note that as the internally created certificate is self-signed, it will not be automatically be trusted by clients (see Setup Gravity client to accept SSL certificates).
The procedure described here does not apply to the Tomcat based Gravity server. If you want to use (self-signed) server certificates then you must switch to the Gravity OSGi server.
If you are running Gravity server behind a reverse proxy then the server must be configured as outlined in Gravity Server behind a Reverse Proxy
Setup using your own key-store
To configure the Gravity standalone jetty server as a certificate provider you need to provide a java key store file in JKS format, and the storepass password. The following configuration properties need to be set in the gravity properties file:
- web.ssl.keystore.file=?/home/user/keystore.jks?
- web.ssl.keystore.password=?secret?
The properties file is located in the Gravity installation directory under ?Gravity-Installation-Dir?/.data/store/_config_admin_config.properties.
Note the key-store file must be fully qualified. On Windows preferably use forward slashes as the path separator, for example c:/temp/keystore.jks. If you cannot use forward slashes then you must escape a backslash with a second backslash, for example c:\\temp\\keystore.jks. The provided key-store password will be automatically encrypted when the Gravity server processes the configuration file during startup. Also if the key-store was created with the keypass and storepass option then both passwords must be the same.
If the key-store has multiple certificates then you can define the certificate to be used by setting the certificate alias, for example:
- web.ssl.keyalias=cert - v1.1
Note. If the key-store contains more than 1 certificate but no key-store alias is defined then the first certificate will be used, this may not necessarily be the one the server should be using. Also if the web.ssl.keystore.file is updated with a different file name or location then the web.ssl.keystore.password must be set as clear text again (will be automatically encrypted upon Gravity startup).
Finally a HTTPS port needs to be assigned for the HTTPS requests:
- web.https.port=?45053?, this port must be open on the firewalls leading to the Gravity server.
If it also required to redirect HTTP requests to HTTPS then the following configuration property must be set:
- web.https.only=true
An example of a HTTPS configuration:
web.https.only=true
web.http.port=45050
web.https.port=45053
web.ssl.keystore.file=c:/data/certificates/server.jks
web.ssl.keystore.password=secret
With the above example configuration, if loading the jks key-store was successful then a line similar to the one below will be logged in the gravity.log:
INFO c.r.g.s.j.JettyServerComponent: successfully started the jetty server ..., port=45050/45053, https-only=true, bind-address=0.0.0.0
If loading the jks key-store failed then an exception will have been logged previous to the above INFO line and only port 45050 will be available for HTTP communication.
If Gravity was previously configured to use an internally created jks key-store then the property 'web.ssl.server.internal.keystore=true' needs to be removed.
Setup using the Server key-store
If you do not have your own SSL certificate key-store but you still want to have a secure (encrypted) connection between the server and a client then the Gravity server can create a keystore for you containing a self-signed certificate. To enable this option you need to set the configuration property 'web.https.port=?45053?' and optionally the property 'web.https.only=true'.
A keystore and certificate will be created in the server's home location in the directory '.data/store'. The keystore and certificate base name will be the same as the server's contact name (server.contact.name in the properties file). The keystore is of type java keystore and file will have the extension jks, the certificate will have the extension .crt. The certificate's common name (a.k.a. host or domain name) and subject alternate name (SAN) will be set with the server's contact name as this is the name that will be used by clients to contact the server.
Note that using a self-signed certificate is under most circumstance considered unwise, you are advised not to use self-signed certificates over a public connection unless you are completely aware of the consequences (see section About SSL Certificates). Then again self-signed certificates can be useful if you require encryption but do not need to verify the identity of the Gravity site you are accessing as might be the case with a Gravity site running in your intranet.
If the Gravity server has a self-signed certificate then the property '.web.ssl.is.server.internal.keystore=true' will be set in the server's configuration file.
Using self-signed certificates in a web client
When a web client tries to access the server over a secure HTTPS connection then the server will send its certificate to the client and the web client will respond with a dialog asking you to accept or reject the certificate. In the case of a self-signed certificate the web client will also warn you that the certificate has not been signed by a Certificate Authority and that there is insufficient information to verify its identity, requiring a second confirmation to accept the certificate.
For self-signed certificates you can avoid questions about certificate authenticity by importing the (Gravity server) certificate into the web client and, depending on the web client, assigning it as a trusted certificate. Once loaded the web client will check its list of trusted SSL certificates before presenting a dialog. Upon request your Gravity administrator should be able to provide you with a certificate for the Gravity server you wish to access.
Note that if the Gravity server is accessible via different names or additional IP addresses then the host name in the URL won't match the server's certificate domain/host name and the web client will handle the name mismatch as a security exception.
To fix this you must either add a Security Exception for the failing URL. Optionally, you could also add an entry to your 'hosts' file that maps the server's host name to the IP address that you are using to access the server.
There are scenarios in Gravity where the client needs to be set up for the handling of SSL/TLS (X509) certificates. The first scenario is when the server involved is a Gravity server that can only connect over HTTPS. The second scenario is when the client is used to test an LDAP or Mail server configuration over a secure connection. In any situation where server certificates are involved the idea is to set up the client so that it does not fail due to certificate checking errors. The first line of defense is always the java runtime which contains a list of CA-root certificates that are you used to verify a certificate sent from a server. If the signer of a certificate cannot be determined and applied by the java runtime then the server certificate will be rejected and the connection will fail with the exception: javax.net.ssl.SSLHandshakeException: sun.security.validator.ValidatorException: PKIX path building failed.
For all the above scenarios there are multiple ways to handle the SSL configuration so that a certificate does not get rejected, the option you choose depends on the certificate packaging and access to configuration items. If you have a singular self-signed certificate then you can use option 1 or 2 to integrate the certificate as part of the certificate checking process. If the certificate (and optional intermediate certificates) is contained in a trust store file (jks or pcks#12 format) then you need to apply options 3, 4, or 5. Note that if you choose to use options 2 or 5 then the changes made to the client regarding certificates will be lost upon client (re)installation.
1. Adding a certificate to the Remain certificates directory (using the UI).
2. Importing one or more certificates into the java runtime trust-store
3. Adding 1 or more trust stores to the Remain certificates directory.
4. Applying a trust store in the Gravity configuration with the ssl.trust.store option.
5. Applying a trust store with the -Djavax.net.ssl.trustStore option.
Although this section uses Gravity as the application that needs a certificate remedy, the described procedures can also be applied to the TD/OMS client.
The most simple way to add certificates to Gravity is by adding the certificate or trust-store file to the Remain certificates directory as described in options 1 and 3.
Note concerning the Gravity server certificate, the setting up of a certificate for the Gravity client will only be necessary if the Gravity server certificate involved has not been signed by a known Certificate Authority (CA) or is a self-signed certificate not created by the Gravity server itself (i.e. provided by the user). If the server certificate has been signed by a CA and the authority's trusted root certificate (and any intermediate certificates) are already a part of the java runtime, then it will not be necessary to manually handle the server certificate. In this situation CA certified certificates will automatically be handled by the java runtime.
1. Adding a certificate to the Remain certificates directory
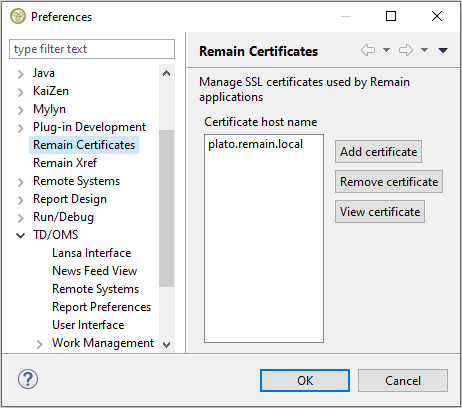
Adding a certificate to the Gravity client runtime implies that the certificate will be used by Gravity to aid the java security runtime in its decision to deny or accept a received server certificate. SSL certificates that will become a part of the Gravity runtime need to have a proper identity (subject or SAN must have a domain or server name) and needs to be placed in the client's certificates directory. For the default installed Gravity client (RCP or RDi) the certificates directory can be found in the user's home directory at location '.remain\certificates'. The client loads certificates into its runtime at startup. Note that the client needs to be restarted if a certificate is added manually to the directory while the client is still running. To ease the process of adding a certificate use the Remain Certificates preference page to add, delete or view a certificate to be added or already located in the certificates directory.
Depending on if your security administrator has provided you with a single self-signed certificate file or a jks or pkcs12 trust store file (containing 1 or more (intermediate) certificates), you can copy any of these files to the Remain certificates directory located in your home directory: '?user-dir?./remain/certificates'. Upon Gravity startup any certificate with the extension der, cer or crt or any trust-store with the extension jks, p12 or pfx will be added to the TD/OMS trusted certificate manager. If the trust-store is protected by a password then the password must be made available in a file with the same name as the trust-store file name (including the extension) but with the extension .pwd, for example, plato.remain.local.jks.pwd. The clear password in the password file will be automatically encrypted and saved back to file the first time it is read.
With regards to a certificate file, Gravity can read and process a certificate in either the binary DER or ASCII PEM format.
As of version 2 of the Gravity client a self-signed Gravity server certificate will be automatically added to the client's certificates directory during discovery. When discovery is used to access a Gravity server that can only communicate over HTTPS then on first contact the user will be asked to confirm that the received server certificate is to be trusted. If the user responds with a yes then the certificate will be stored in the Gravity certificates directory (~.remain\work\certificates). Stored certificates will be used to accept a secure server connection of which the initial nature of the connection was untrusted. As of version 2 the Gravity OSGi server can be set up to automatically create a self-signed certificate to support those environments that want a secure (encrypted) connection between client and server but do not want or require a CA signed certificate. Using self-signed server certificates will most likely only occur in a private network as this construction can succumb to certain security threats if used on a public network (although there is no guarantee that such security issues will not occur on a private network). See the following article if you would like to know more about the use of self-signed SSL certificates; When are self-signed certificates acceptable.
Extracting server certificate
If you are unable to obtain a certificate for a server from you administrator then you can use a tool such as openssl to extract the certificate from a server and save it to a file. For example to extract a certificate from a Windows LDAP (Active Directory) server the following command was used:
openssl s_client -connect WIN-SERVER2008:636 -showcerts > WIN-SERVER2008.crt
The created .crt file will first have to be cleaned up to contain only the X509 certificate relevant data. This is done by removing everything before the line
-----BEGIN CERTIFICATE-----
and everything after the line
-----END CERTIFICATE-----
leave one empty line after the '-----END CERTIFICATE-----' and save the file.
The .crt file will then have to be copied to the Gravity client's '../certificates' directory. For the client, the 'certificates' directory is located in the user's home directory under .remain/gravity/work. The client has to be restarted to load the new certificate.
2. Importing a self-signed certificate into the Java trust-store
Importing a self-signed certificate into the Java trust-store
The most convenient way to import a self-signed certificate is to use the InstallCert tool. This tool will access the server providing the certificate and add the server certificate to the java runtime from which the tool is run.
Download this zip file and unpack the java classes into the jre/bin directory of the client application (TD/OMS RCP, Gravity RCP or RDi). Open a command line and switch to the application's ../jre/bin directory.
Execute the following command:
java InstallCert host:port
Then follow the instructions on the screen:
Examples:
 java InstallCert exchange01:993
 java InstallCert jira:443
Importing CA root certificate(s) into the Java trust-store
The import certificate solution using InstallCert will only work if the server certificate is a self-signed certificate. If not then you will have to obtain the CA root certificate (and any intermediate certificate) used to sign the server certificate and import the certificate(s) into the java trust-store using the keytool utility:
keytool
-import
-storepass changeit
-noprompt
-alias ?unique-certificate-alias-name?
-keystore ?APP_JRE_HOME?/lib/security/cacerts
-trustcacerts
-file ?path-tot-certificate file?
for example:
keytool
-import
-storepass changeit
-noprompt
-alias ?unique-certificate-alias-name?
-keystore "c:/Program Files/IBM/SDP/jdk/jre/lib/security/cacerts"
-trustcacerts
-file c:/temp/mycert.crt
Depending on the certificate(s) being imported the extension of the certificate file can differ (cer, crt, p7b ...).
Note that with this solution when you upgrade the client you will most likely have to repeat this procedure (it is possible though that an upgrade will also have an updated Java runtime that includes the previously missing CA root certificate).
3. Adding 1 or more trust stores to the Remain certificates directory
Adding a trust store to Gravity extends the default java trust store mechanism with user provided trust stores. For the default installed Gravity client (RCP or RDi) the trust store(s) directory is the same as the certificates directory which is the user's home directory at location '.remain\certificates'. The client loads trust stores into the java runtime at startup. Note that the client needs to be restarted if a trust store is added to the directory while the client is still running.
Gravity can read and process a trust store packaged in either the JKS or PKCS#12 format. The trust store file must have the file extension 'jks', 'p12', or 'pfx'.
If the trust-store is protected by a password then the password must be made available in a file with the same name as the trust-store file name (including the extension) but with the extension .pwd, for example plato.remain.local.jks.pwd. The clear password in the password file will be automatically encrypted and saved back to file the first time it is read.
4. Applying a trust store in the Gravity configuration with the ssl.trust.store option
A single JKS packaged trust store file can be added to java trust store mechanism by making a reference to the trust store from the Gravity configuration. To do this add the entry:
'ssl.trust.store=?fully_qualified_truststore_file_name?'
to the Gravity congfiguration file. Advantage of this option is that the trust store can be located in a location not local to Gravity, for example in a directory on a shared drive.
5. Applying a custom trust-store
The last option to manually apply a server's certificate is to use a custom trust-store. The client will be configured with a custom trust-store that overrides the default java trust-store and the trust-store set with option 4 (applying a ssl.trust.store entry in the configuration file). The trust-store contains public keys or trusted server certificates (root and intermediate). Your security administrator should be able to supply you with the required trust-store file and password. To include the trust-store as part of java's SSL security layer then the following java system properties need to be set:
'-Djavax.net.ssl.trustStore=?fully_qualified_truststore_file_name?'
These properties need to be added to the Eclipse startup ini file.
Depending on the client being used this option should be added to the TDOMS.ini, GravityAdmin.ini, GravityWorkManagement.ini or eclipse.ini (RDi) file to be found in the root of the program's installation directory. The property can be added to the bottom of the list of already configured properties, for example in the GravityAdmin.ini:
-startup
plugins/org.eclipse.equinox.launcher_1.3.0.v20130327-1440.jar
--launcher.library
plugins/org.eclipse.equinox.launcher.win32.win32.x86_64_1.1.200.v20140116-2212
--launcher.appendVmargs
-vmargs
-Dgravity.log.print.level=info
-Dgravity.log4j.print.level=info
-Dgravity.app=rcpadmin
-Dgravity.log.file.level=info
-Xms512m
-Xmx1024m
-Xss2m
-XX:PermSize=128m
-XX:MaxPermSize=384m
-Xverify:none
-XX:+UseConcMarkSweepGC
-XX:+CMSClassUnloadingEnabled
-XX:+DisableExplicitGC
-Djavax.net.ssl.trustStore=c:/certificates/gravity/truststore.jks
Override option to indicate that a server is to be trusted
Within Gravity, if you have setup a trust-store or certificate but your connection is still being rejected with a message like 'there is no SSL certificate that supports the hostname' or 'HTTPS hostname wrong' then you are accessing the server with the incorrect hostname. The message implies that the hostname as set in your URL does not match the hostname as set in the server's certificate. This may occur in a test environment where you need to access the server but you cannot use the certificate set hostname (for whatever reason). To overcome this situation you can create an exception for 1 or more servers. To do so add the following java system property:
-Dssl.trusted.hosts=?host1?
to the Eclipse startup ini file as described above.
or add the following property to the Gravity client or server configuration:
ssl.trusted.hosts=?host1?
If you have multiple hosts then these need to be comma separated.
Be aware that trusted servers configured in this manner will be trusted whatever the cause of a trust failure. Use this option only if you are absolutely certain the server can be trusted.
The provided host name may also contain wildcard values '*' or '?', for example 'remainsoftware.*', which will for example resolve remainsoftware.com and remainsoftware.nl.
Note that in the case of host name mismatch it would be better to update your machines 'hosts' file (on Windows this file is located in the directory c:/windows/system32/drivers/etc, on Linux this file is /etc/hosts) to include the host/domain name specified in the certificate, but if this is not possible then use the above described trusted hosts as a alternative option.

