GR:Gravity/Solr
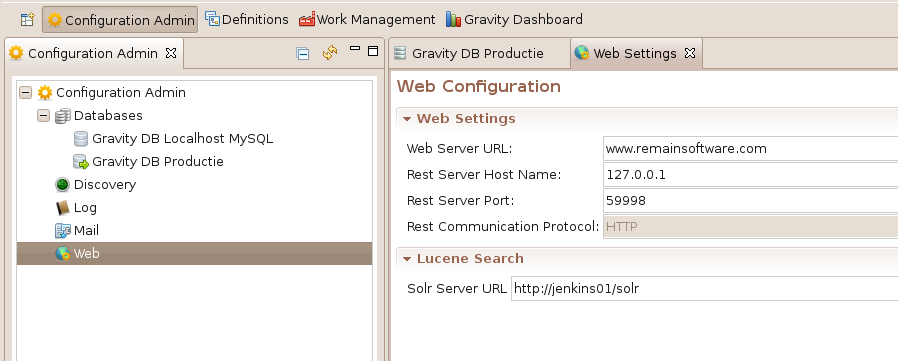
Webconfig
Make sure you have specified a Solr Server. In this example http://jenkins01/solr is used. If the Gravity server is hosting the solr server and the Gravity server is configured to run https exclusively then make sure the solr URL is also set with https protocol.
Commands
List of console Commands
| Command | Short explanation |
| ghelpsolr | Solr Command Overview |
| gsolrri | Solr reindex |
| gsolrdi | drop Solr index |
| gsq | search Solr index with querystring |
| gsqf | search Solr index with querystring and filterstring |
| gsqmf | search Solr index with querystring and multiple filterstrings |
| gsqfd | search Solr index for documents with querystring |
| gsqfc | search Solr index for comments with querystring |
| ggrbi | get all Solr results by Id |
| ggrbdi | get all Solr results by document_id |
| ggar | get all Solr results |
| ggad | get all Solr documents from Solr index |
| ggac | get all Solr comments from Solr index |
| ggaa | get all Solr attachments from Solr index |
| gssolrs | set solr server !DO NOT RUN on Gravity Standalone instances, SOLR server is already pre-configured! |
| ggsolrs | get solr server |
Work Management
This section describes the Work Management part of Gravity.
Work Management Perspective
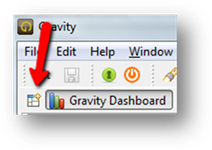
There is a special perspective with all views related to the work management. You can open the perspective by clicking on the Open Perspective shortcut on the Perspective bar.
Items
An Item can be a Question, an Issue, and Enhancement request or any other type. You are free to define the Item Types as described in the ![]() side of Gravity.
side of Gravity.
How to Create an Item
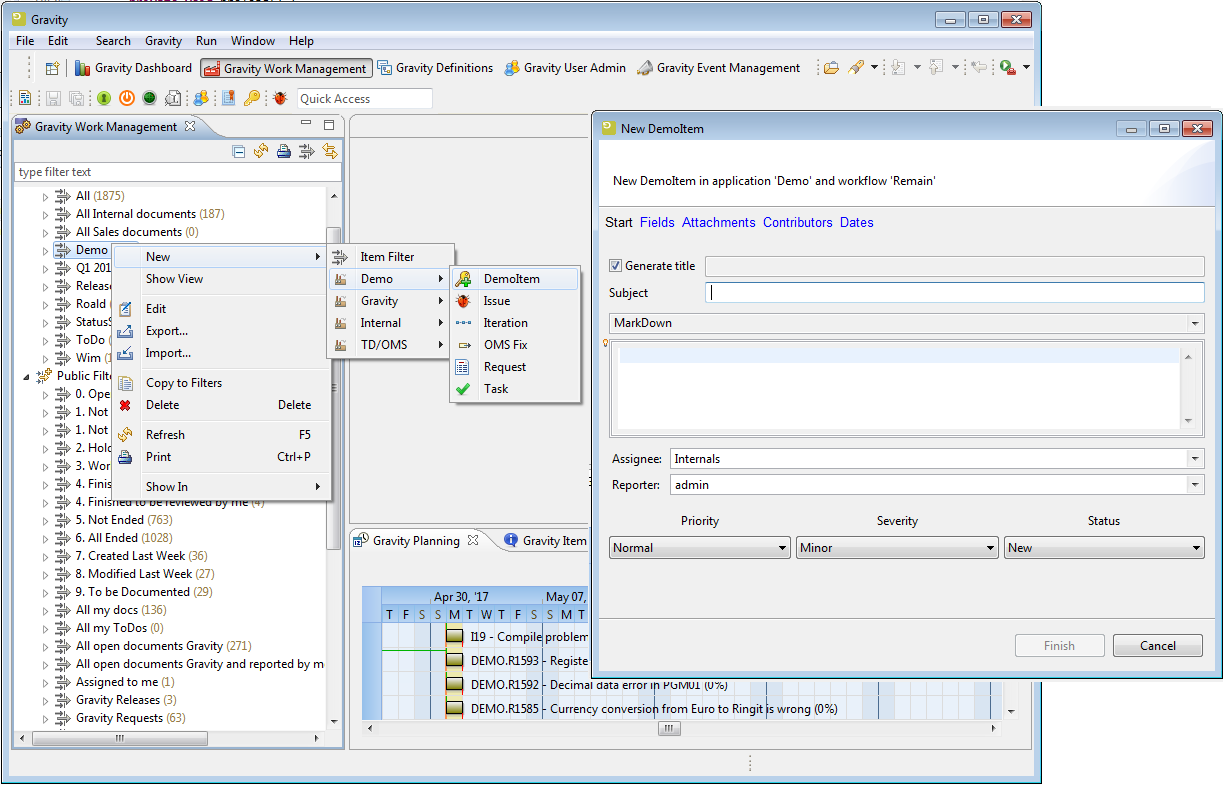
Right-click on any element within the Work Management view to trigger the context-menu, select New, then select the Item type you want to create. A wizard pops up.
Fill in the wizards fields (only the subject field is mandatory) then hit the Finish button. Done!
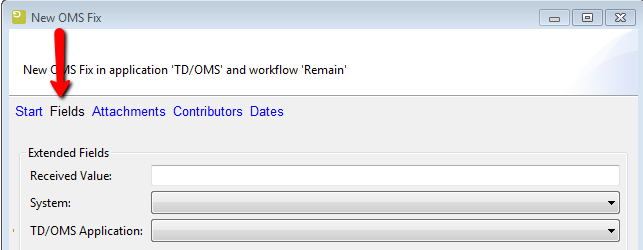
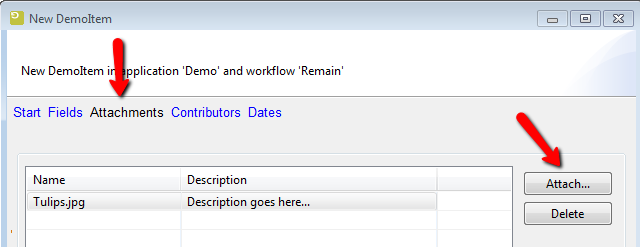
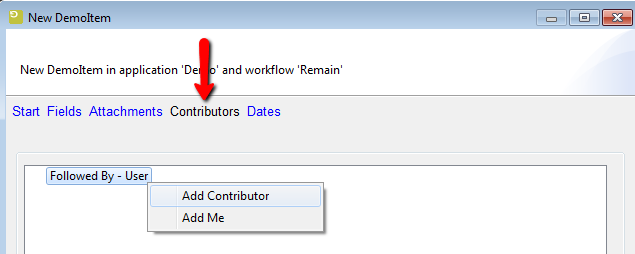
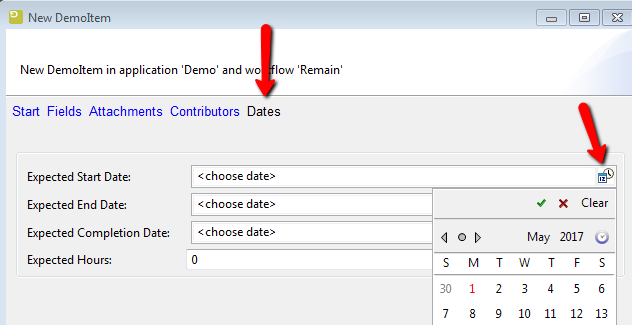
Should you also want to fill in extended fields, dates, add some attachments and contributors before finishing. Then use the links in the top of the wizard:![]()
Fill in extended fields
Click Fields link then the extended fields to fill in show up. Important: If the item you're about to create doesn't have any extended fields or you don't have enough authority then this Fields link won't be shown.
Add attachments
Click Attachments link, then click Attach... button then select the attachment you want to add. A description may be added as well. To delete an attachment, first select it then click Delete button.
Add Contributors
Click Contributors link, then right-click to trigger the context-menu which allows you to select users you want to add.
Add Dates
After item creation, existing filters will automatically refresh themselves. So, you should be seeing this newly created item in any filter with filtering criteria mapping this new item.( See: How to create Item filter).
How to Edit or Delete Items
Select one or more items from the work management tree, right-click and then select Edit (only possible for one selected item) or Delete.
Quick Item Info
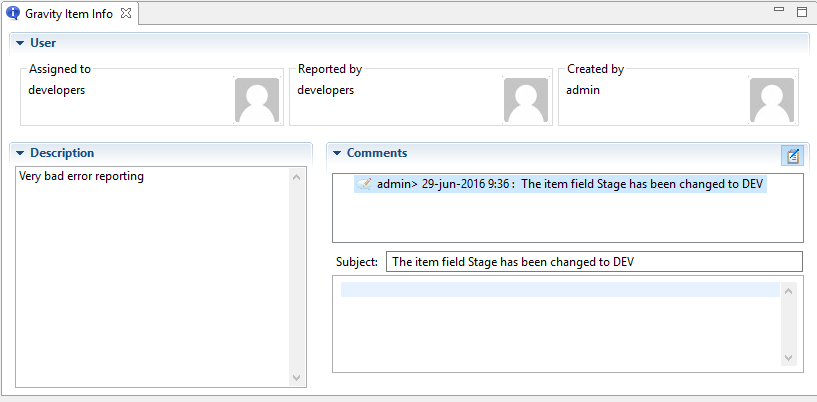
Quick Item info can help you to quickly view the main item information, like description, creator, assignee and comments.
To open the Item Info, click Window ->Show View -> Gravity -> Gravity Item Info.
After opening the view select an item and the information will be displayed on the Gravity Item Info view.
How to Add Comment to Item
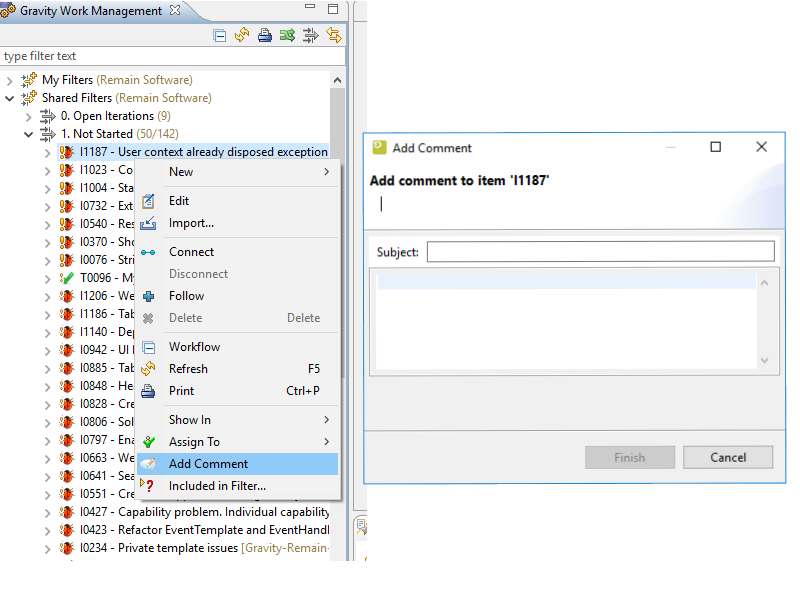
The easiest way to add a comment is to use the Add Comment context menu.
Add Comment from Context Menu
Mouse right click on Item -> select Add Comment -> add the subject and click on Finish.
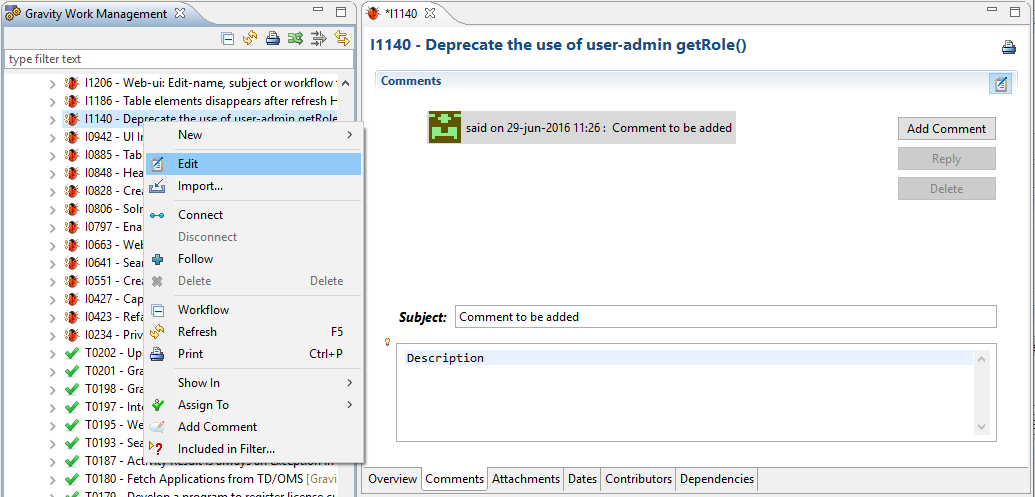
Add Comment from Item Editor
The easiest way to open the Item editor is double click on the Item.
Mouse right click on Item -> select Edit option -> select the Comments tab from the Item editor -> click on Add Comment button -> Add the subject and the description and save the changes.
For the comment description the lightweight markup language Wikitext and Commonmark are used to provide editable formatted text.
The markup languages are configurable, to see which language is configured hover over the information icon.
To reply to a comment you have first to select the comment and then click on Reply button.
How to Add Item Relations
An Item can be connected to another Item if and only if there is a connection between two this items configured.
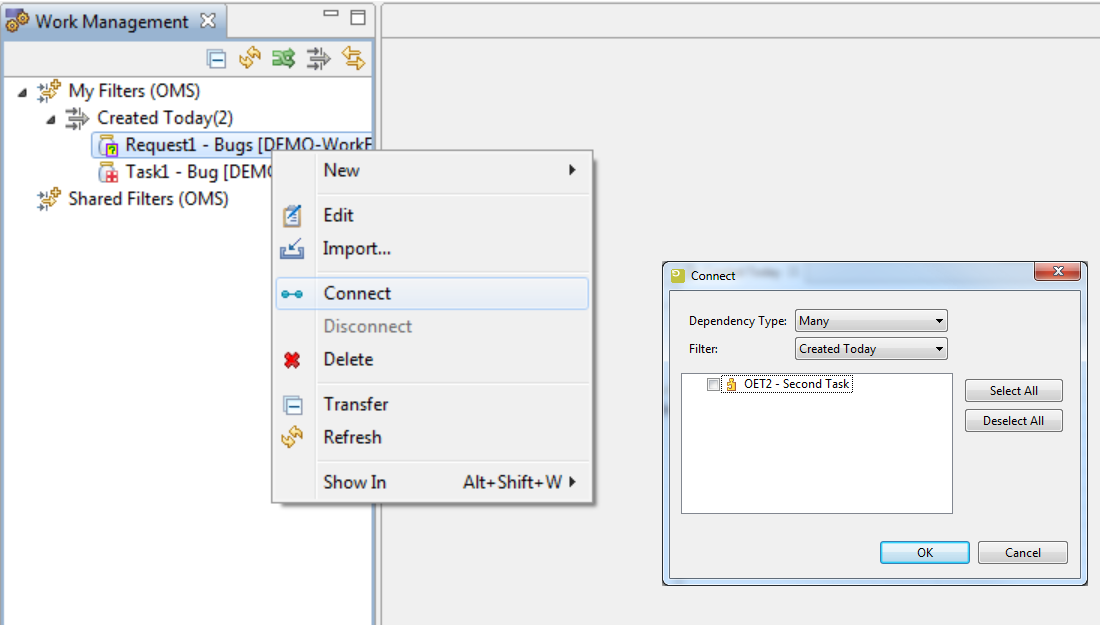
A connection between two items can be added by performing the following steps.
- Select an Item from the Work Management view.
- Mouse right click on the Item.
- Select the option Connect . If the option Connect is disabled it means that there is no relation defined for the Item.
- Select the desired Dependency Type and the Filter to display the items that can be connected, select the item(s) and click on OK button.
- The connected Items will be displayed under the selected Item, expand the Item if it is not yet expanded.
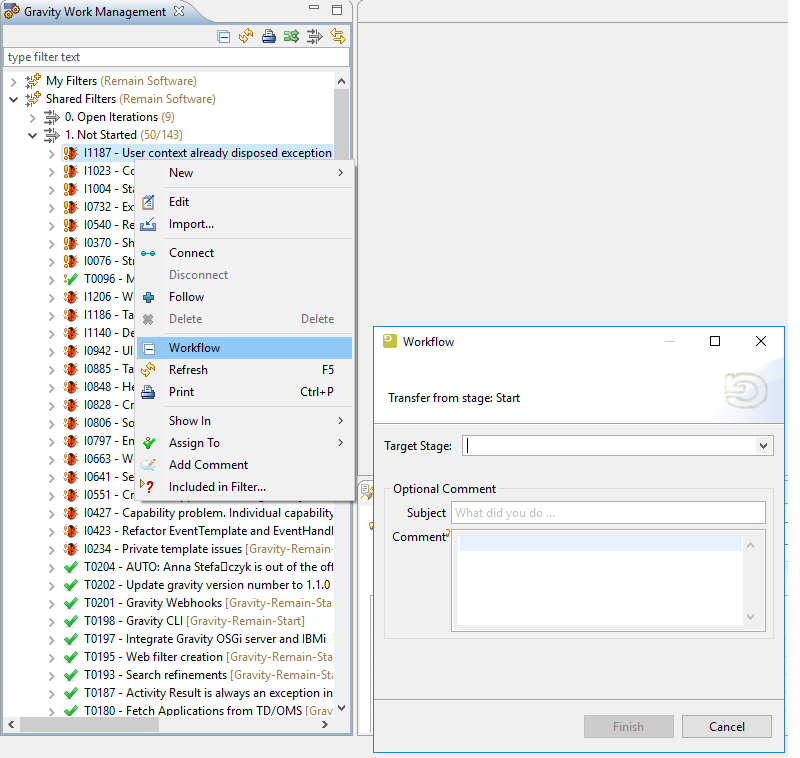
How to Transfer an Item through the Work Flow
An Item can be transferred to a related step in the Work Flow by performing the following steps:
- Select an Item from the Work Management view.
- Mouse right click on the Item.
- Select the option Workflow.
- Select the Target Stage from the wizard.
- Enter text in Subject and Comment (optional).
- Click on the Finish button.
- The new stage will be displayed behind the selected Item, hoover over the Item if it is not shown.
How to Re-assign an Item
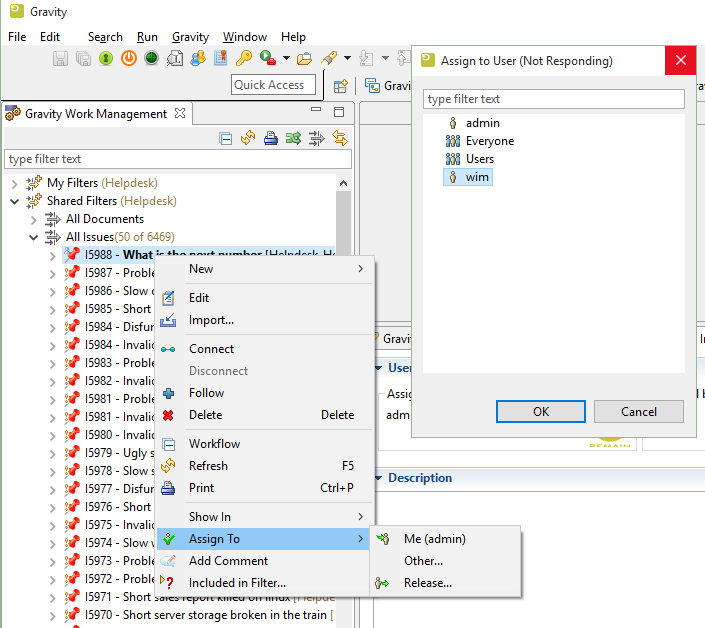
An Item can be re-assigned by changing the Assigned To in edit mode. Another (faster) way to re-assign an Item is done by performing the following steps:
- Select an Item from the Work Management view.
- Mouse right click on the Item.
- Select the option Assign To.
- Select Me to assign the Item to your account. Other and Release to select the user or group to assign it to.You can only select a group in case of Release.
- Click on the OK button.
- The selected Item will be shown in bold when it is assigned to your account.
- The selected account will be added as a shortcut to the assign menu.
- Select "Release" to assign the item to a group
Work Item Filter
Work item filter is used to reduce the amount work items to be shown. Each filter can be a private filter (user depending) or pubic filter (all users can use it).
The work item filter is very flexible which can filter the work items on all their fields.
How to Create Work Item Filter
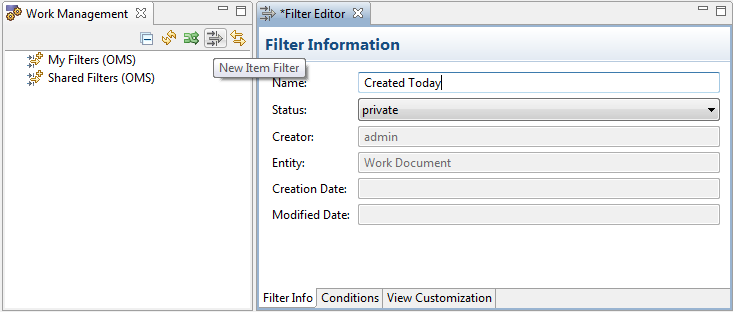
Click on the filter toolbar of Work Management view to open the filter editor -> fill the filter name and the status in the displayed editor and save the changes.
If filter has status private, it will be displayed under My Filters holder of Work Management view.
If filter has status public, it will be displayed under Shared Filters holder of Work Management view.
How to Add Work Item Filter Conditions
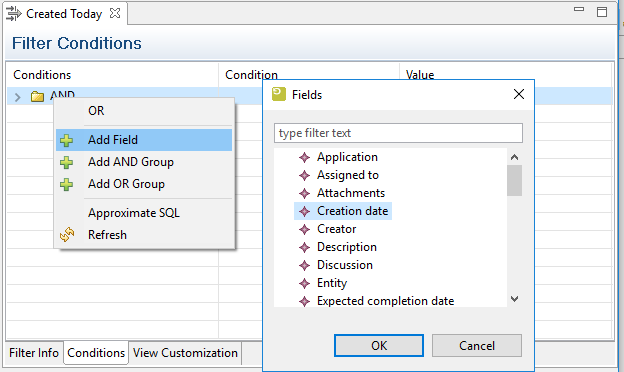
A filter condition can be added by performing the following steps:
- Select the Conditions tab of the filter editor
- Mouse right click on root condition (AND is default)
- Select Add Field
- Select the field to be filtered form the wizard
- Click on OK
Work Item Filter Example
The following definition is required to show the Work Items that are created today.
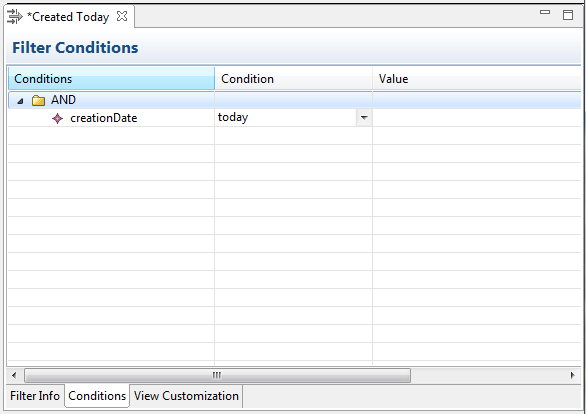
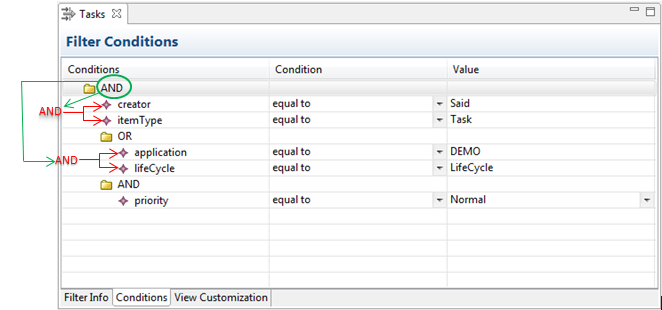
The filter example showing in the figure above will execute the following query:
SELECT * FROM WorkItem WHERE
( itemType= 'Task' AND creator = 'Said')
OR( application = 'DEMO' AND lifeCycle = 'LifeCycle')
AND( priority = 'Normal')
- Red AND in the above query represents the root condition.
- Green OR and AND in the above query represent the group conditons.
How to Copy Filter
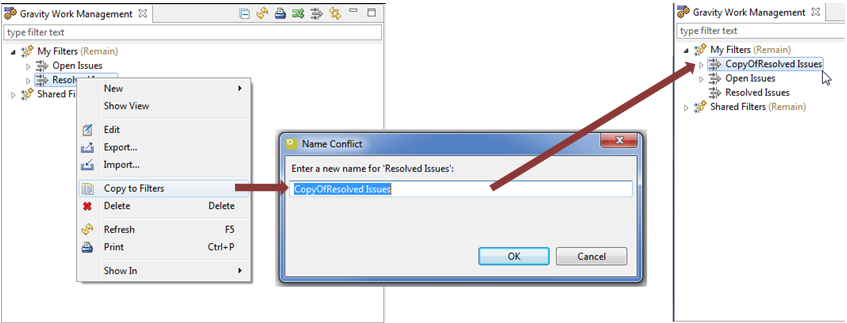
Each displayed filter can be copied to the filter container, namely, My Filters or Shared Filters.
There are two ways to copy a filter:
1)Copy Filter Using Popup Menu
Select a filter -> click on the right mouse button -> click on the popup menu Copy to Filters -> rename the filter and click on Ok.
In the example the created filter will be copied to the filter container that includes the selected filter.
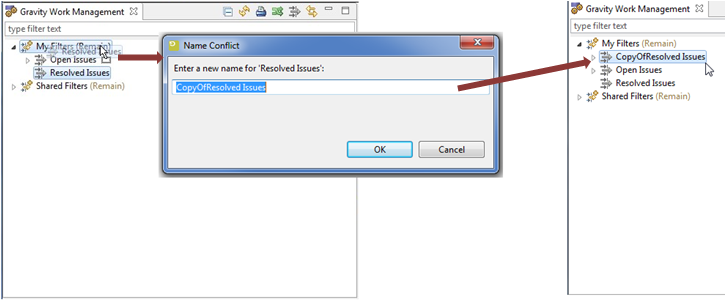
2)Copy Filter Using Drag and Drop
Drag a filter into one of the filter containers-> rename the filter -> click on Ok.
Work Item Filter View Customization
View customization is used to define the fields of the work item that can be show in the filter view and eventually the width and the sorting of columns. Each work item filter can be associated with a customized view.
How to Add Customized View to Work Item Filter
A customized view is a view that is connected to a filter and it displays the data of the user selected fields.
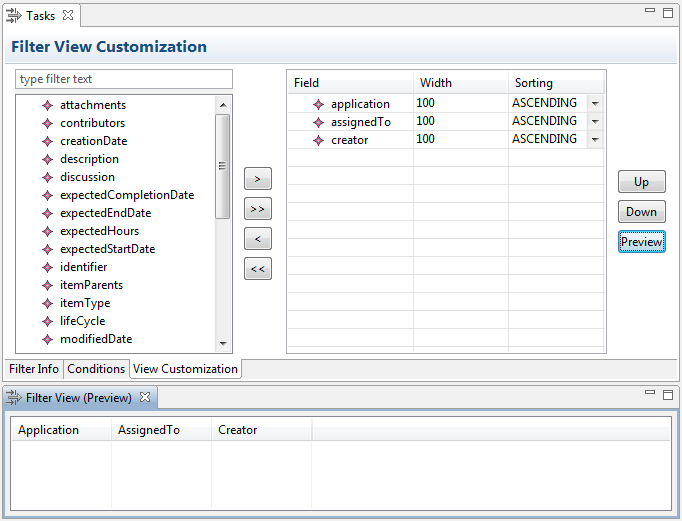
A customized view can be constructed by performing the following steps:
- Open the filter editor
- Select View Customization tab
- Move the fields to be filtered from the left table to the right table
- Adjust the column weight (weight is an indication of the filter view columns width)
- Adjust the sorting direction
- Click on the Preview button to preview the results on the filter view
- Save the changes.
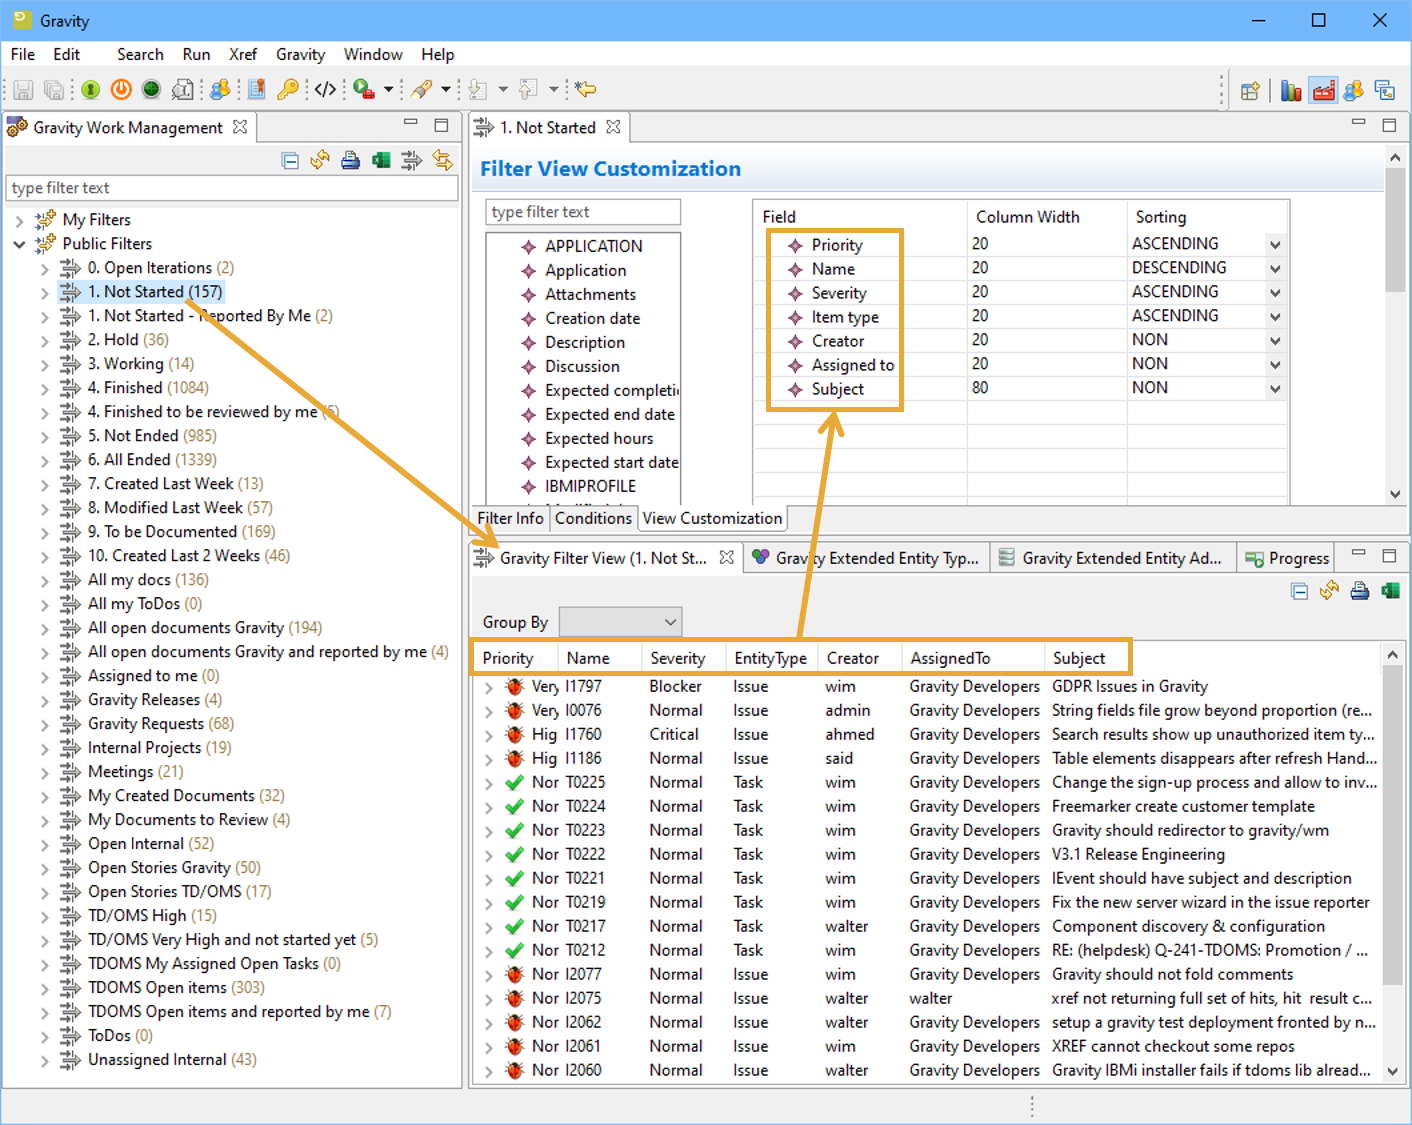
The top down fields order of the right table is corresponding to the columns left right order of the filter view.
To display the complete result of the work item filter on the filter view you have first to select the filter and mouse right click on it and then select the option Show View.
Filter View
A Filter View is a view that displays information about the work item filter. The information is displayed according to the customized filter from the customized view.
Open the filter view > select a filter from the Workmanagment view > filter view will react on the selection and displays the filter details.
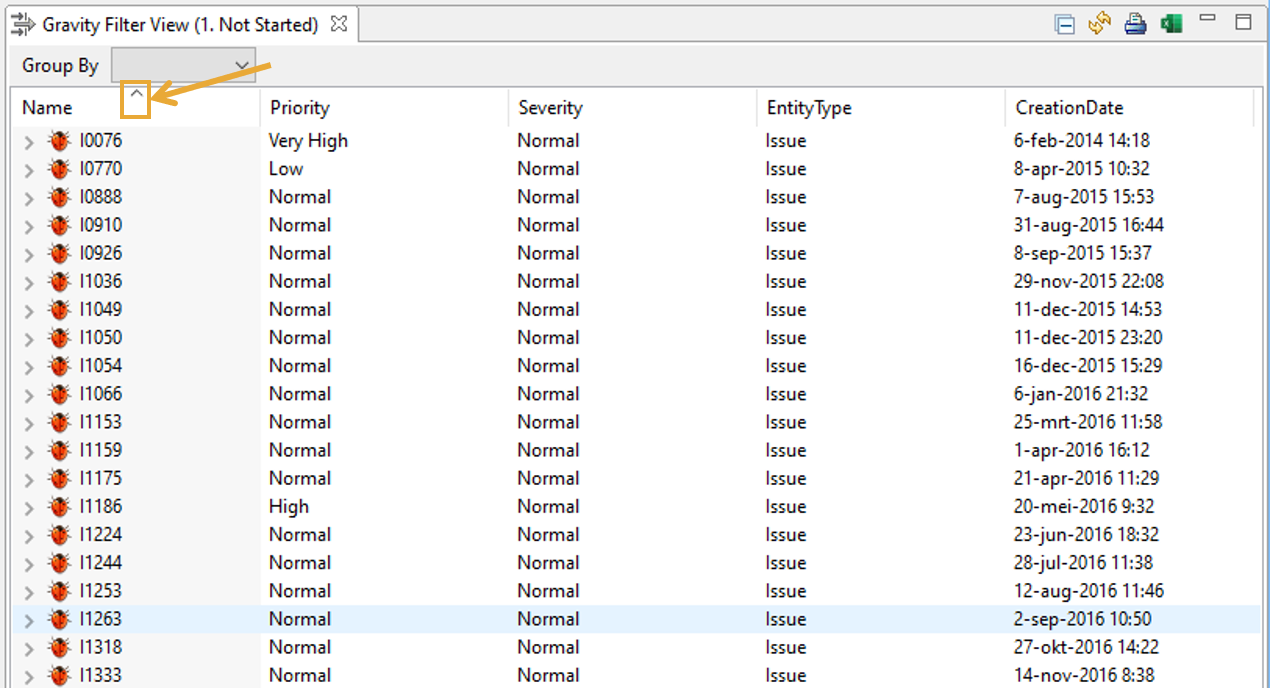
Sort Filter View by Columns
Click on the table column to sort the filter view on that field.
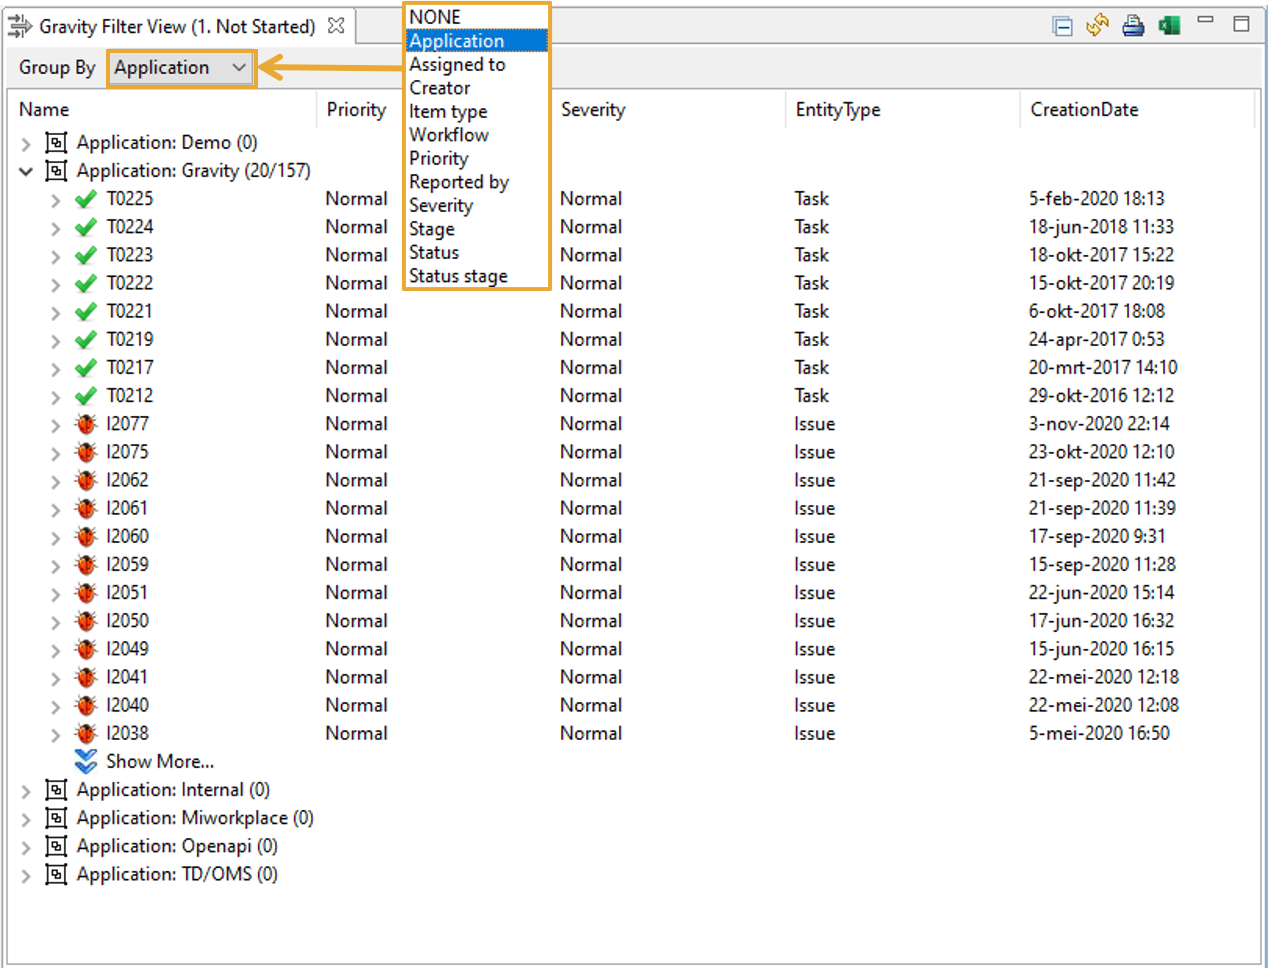
Grouping by Item Field
Select an item field from the combo box list > the work items will be grouped on that field and displayed in the view.
Export Filter View to Excel
Select the excel toolbar button > enter the name of the excel file and save > the items loaded on the filter view will be exported.
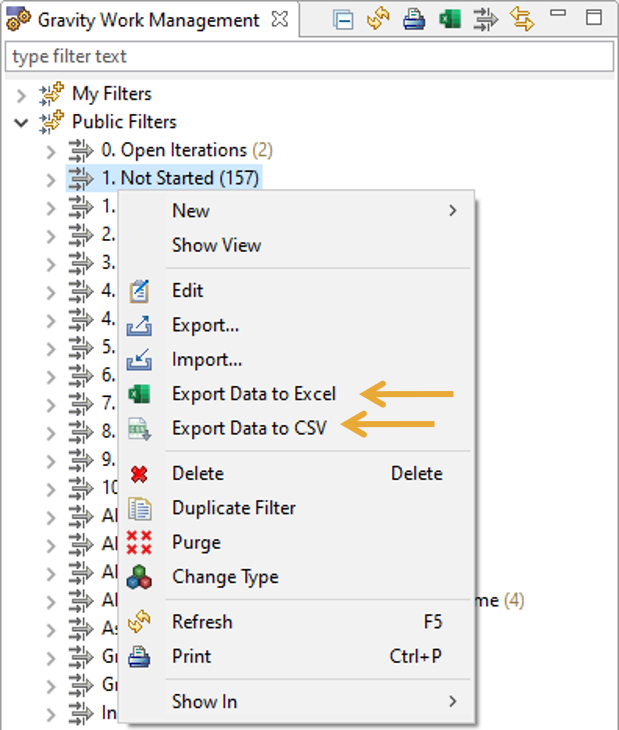
Export Filter Data
Select a filter from the Workmanagement view > mouse right-click > click on Export Data to Excel or CSV > enter the name of the file and save.
Search View
Many times you want to search for an item. The search view in Gravity makes use of the Gravity search index that is generated in the background when you work with items.
Search Syntax
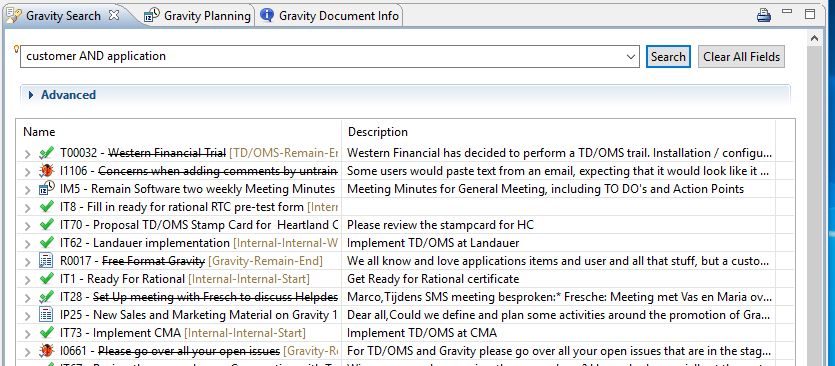
In general just type what you want to search for like: customer application to search for all items containing one or both of the strings. Press enter or click the search button to start the search.
If you want to search items containing both fields you type: customer AND application
Other examples:
- cust* to search for everything starting with cust.
- customer AND !application to search for everything with customer but without application.
If you want to search for a string in a specific field, for example, description, do it like this: description:string. Please see the list at the end of this section to see the fields that you can use.
- stage:Working AND customer to search for customer in all items in the Working stage.
- is:Closed AND customer AND application to search for customer AND application in closed items.
- is:Open AND customer
- is:Parent AND application
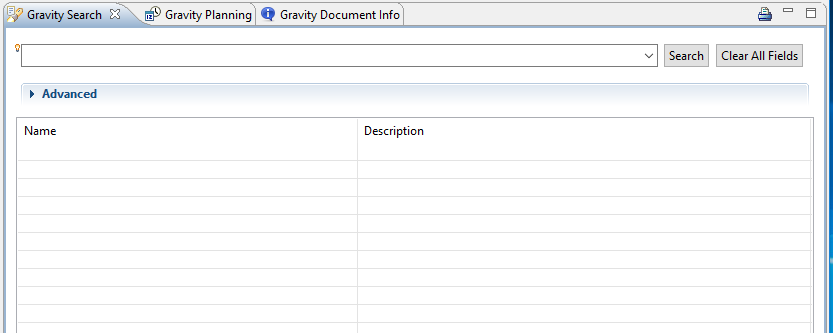
If you want to clear all search fields press the "Clear All Fields" button.
Advanced
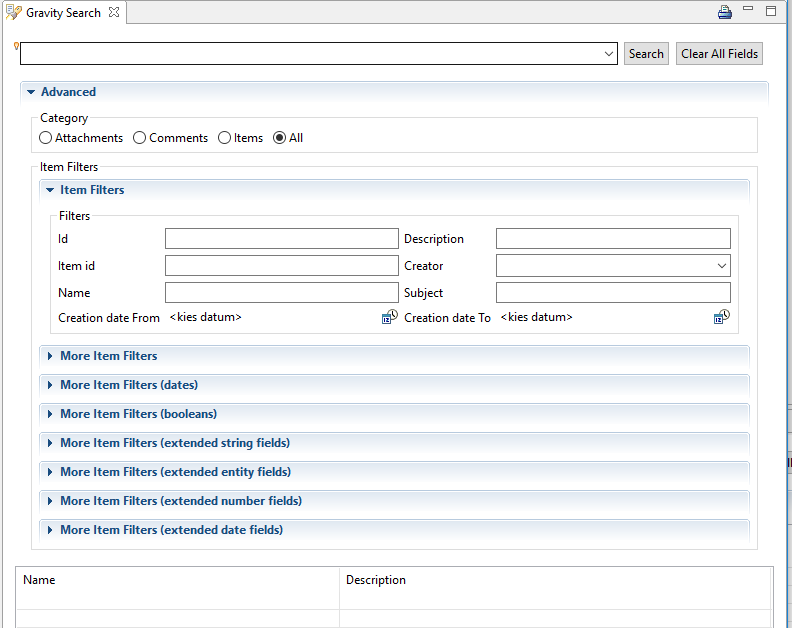
Field selection and other ways to build a search string can be done using the "Advanced" section.
Click on the advanced button to see this section.
The advanced section (with all it's subsections) provides a way to easily pass Filter Queries to Solr.
For example if you want your query to only return Comments you can select the category Comments.
To use creation_date as a Filter Query you have to provide both creation_date From and creation_date To. In this way you can search for a string with a creation_date between creation_date From and creation_date To.
Item Filters
When you are inside the advanced section click on the "Item Filters" button to see this section.
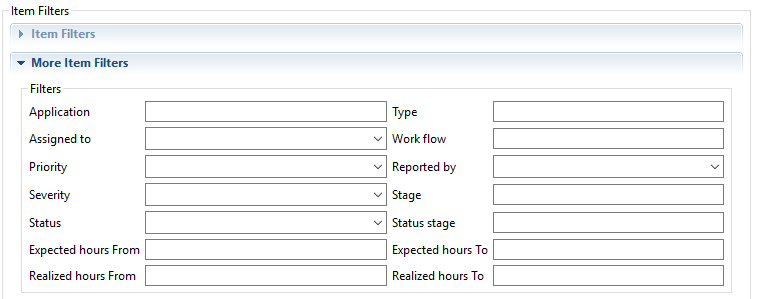
More Item Filters
When you are inside the advanced section click on the "More Item Filters" button to see this section.
More Item Filters (Dates)
When you are inside the advanced section click on the "More Item Filters (Dates)" button to see this section.
To use a date as a Filter Query you have to provide both From and To dates.
More Item Filters (Booleans)
When you are inside the advanced section click on the "More Item Filters (Boooleans) " button to see this section.
More Item Filters (extended string fields)
When you are inside the advanced section click on the "More Item Filters (extended string fields)" button to see this section.
Fields of type IStringFieldExtended show up here.
More Item Filters (extended entity fields)
When you are inside the advanced section click on the "More Item Filters (extended entity fields)" button to see this section.
Fields of type IEntityTypeFieldExtended and IEntityFieldExtended show up here.
More Item Filters (extended number fields)
When you are inside the advanced section click on the "More Item Filters (extended number fields)" button to see this section.
Fields of type INumberFieldExtended show up here.
More Item Filters (extended date fields)
When you are inside the advanced section click on the "More Item Filters (extended date fields)" button to see this section.
Fields of type IDateFieldExtended show up here.
Searching for User Fields
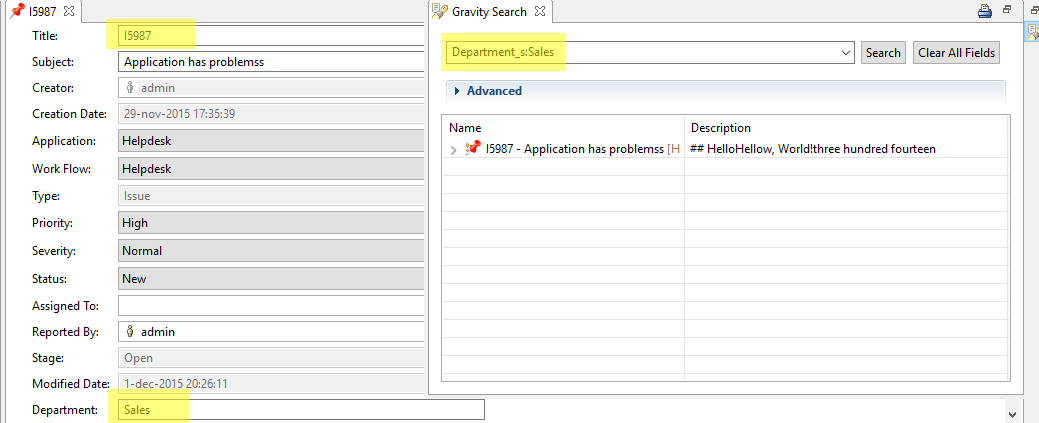
You can also search for fields that you have added yourself. For example, if you have a field called "Department" with a value of "Sales". You can search all items like so:
- Department_s:Sales
Make sure to add the _s suffix to the original field name.
 Please note that each field has a label
 and a name which can be the same but doesn't have to be.
List of searchable fields
The list below is a reference of all the fields that can be used in the Gravity Search engines. We use Lucene Syntax in the background which has extended help.
- id
- id:f172a2a1-84af-4e5f-a901-00f3542e546c
- item_id
- see id
- description full item and comment description
- problem AND login
- creator
- creator:admin
- application
- application:Demo
- assigned_to
- assigned_to:joe
- has_attachments
- has_attachments:true
- creation_date
- creation_date:[NOW-1DAY TO NOW] (date units: NOW/YEAR/MONTH/DAY/HOUR/MINUTE/SECOND)
- expected_completion_date
- (see creation_date)
- expected_end_date
- (see creation_date)
- expected_hours
- expected_hours:[4 TO 10]
- expected_start_date
- (see creation_date)
- has_item_parents
- has_item_parents:true
- type
- type:Issue (also is:Issue)
- work_flow
- work_flow:Helpdesk
- modified_date
- (see creation_date)
- name The work item name.
- name:R0007
- name_generated
- Whether the item name has been automatically generated: name_generated:false
- priority
- priority:"Very High" ("Very High", High, Normal, Low, "Very Low")
- realized_completion_date
- (see creation_date)
- realized_end_date
- see creation_date)
- realized_hours
- expected_hours:[10 TO *]
- realized_start_date (see creation_date)
- reported_by
- (reported_by:joe OR reported_by:mike)
- severity
- severity:Blocker (Blocker, Critical, Major, Normal, Minor, Trivial, Enhancement)
- has_source_dependencies
- has_source_dependencies:true
- stage
- -stage:End (everything not in End)
- status
- (Unconfirmed, New, Assigned, Reopened, Resolved, Verified or Closed): (status:New OR status:Assigned OR status:Reopened) for all open items (alternative for is:open)
- status_stage
- -status_stage:Working (- is a negative selection)
- has_sub_items
- has_sub_items:true (alternative for has:children)
- has_target_dependencies
- , has_target_dependencies:true
- is
- (is:closed, is:open, is:connected, is:not_connected, is:tagged, is:not_tagged, is:"item type" (: is:Issue), is:late (i.e. An item is considered late in these cases: when realized end date is after expected end date. Or, realized start date is not set and expected start date is before today. Or realized end date is after expected end date. Or, realized end date is not set and expected end date is before today), is:overdue (i.e. An item is considered overdue when realized completion date is after expected completion date. Or, realized completion date is not set and expected completion date is after today))
- has
- has:children, has:parents, has:attachments
- tag
- tag:"TDOMS / GUI", tag:API
- connection
- (A connection is a dependency between two items: connection:"See also", connection:Duplicate)
Gravity Planning View
A planning view is a view that reads the progress data from the Work Items. This information is formatted in various ways in the view to reflect the actual status and progress of the planned Work Items.
The planned completion date of an item can be adjusted from the view by enlarging the beam that represents the item.
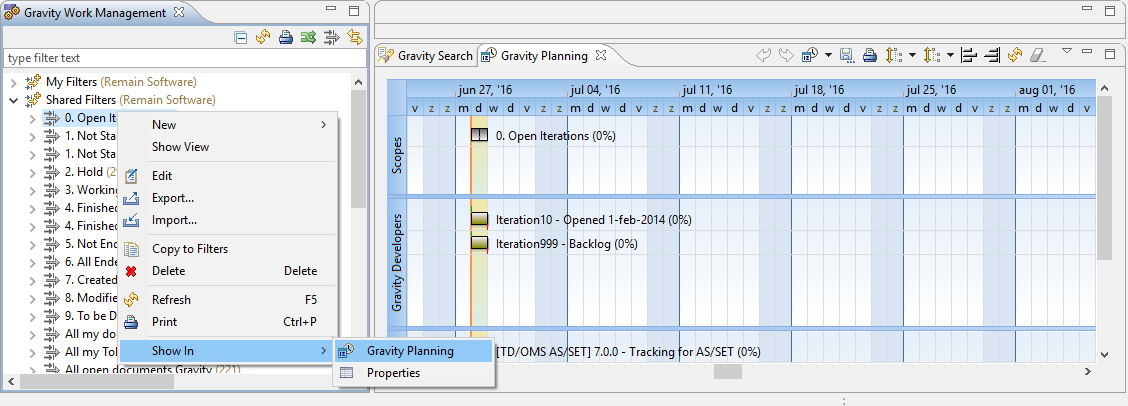
You can open the planning view by mouse right-click on the item filter -> select Show in menu -> click on Gravity planning sub-menu.
Gravity Capture List
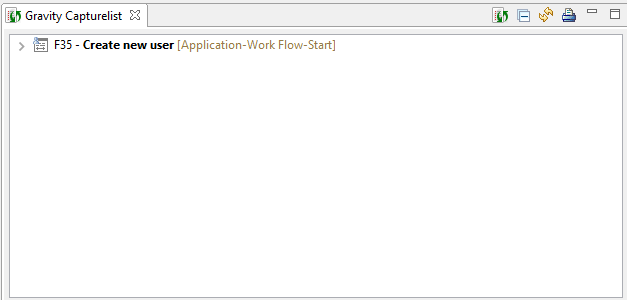
Gravity Capture List is a view that collects the items dragged from the Work Management View and the Search View. These items can be managed from the Capture List and also can be connected to another item of the Work Management View and vice versa.
To open the Gravity Capture List, click on Window -> Show View -> Gravity -> Gravity Capturelist.
