GR:Gravity/Views/ConfigurationAdmin
Configuration Admin View
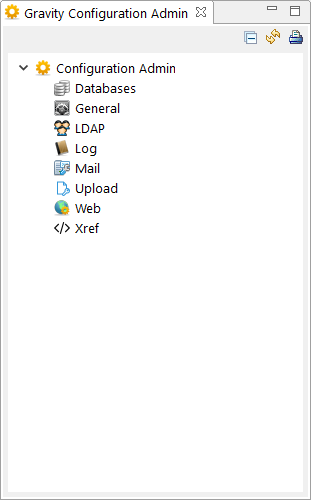
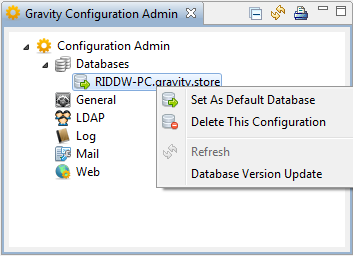
Once in the Configuration Admin perspective you will see the Configuration Admin view. Expand the "Configuration Admin" tree node by clicking on the configuration icon (![]() ). There will be a number of tree items presented. Double click on the configuration item of interest to open the configuration form.
). There will be a number of tree items presented. Double click on the configuration item of interest to open the configuration form.
 Databases
The Database node in the Configuration Admin view contains the currently configured databases. Expand the Database node to view the configured database(s).
 General
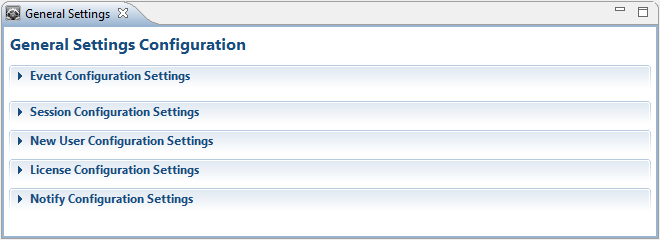
Double click on the General item to open the General Settings Configuration form. In this form you will find general settings pertinent to event, session and new user settings.
 LDAP
LDAP
Double click on the LDAP item to open the LDAP Configuration form. The LDAP Configuration form contains settings to support the inclusion of an LDAP server as an external authenticator. LDAP can then used to authenticate a user when he or she logs in. For instructions on how to configure the LDAP integration follow this link: Configure LDAP
 Log
Log
Double click on the Log item to open the Log Configuration form. This form contains settings related to client logging. Configure Logging
 Mail
Mail
Double click on the Mail item to open the Mail Configuration form. The Mail form contains the following sections:
- SMTP Server, Configure SMTP
- Mail Client
- Email Event Handler
- Mail-Handler Mailbox Configuration, Configure Mail-Handler
 Upload
Double click on the Upload item to open the Upload Configuration form. This form contains the maximum file upload size.
 Web
Web
Double click on the Web item to open the Web Configuration form. This form contains settings that are specific for internet-related settings and connection types.
 Databases
The Database node in the Configuration Admin view contains the currently configured database(s). Right Click on the databases link to open a context menu. From this context menu a database can be added, removed or upgraded. Please see this link to find the supported databases. Note that under normal circumstances you would not be required to configure a Gravity database as a database will be automatically configured and made available by a Gravity server. When you connect to a Gravity server using discovery (or configuring manually) then the database configuration for this server will show up as the default database under the Databases node. Double clicking on this database configuration will open the database form. If the database configuration is a read-only type configuration then you will not be allowed to edit any of the configuration fields. The ability to add a database is only possible if the node does not contain a database configuration. Delete the current configuration to enable the add database menu option (a read-only configuration will be removed from the view but not physically deleted from the database).
 Adding a Database
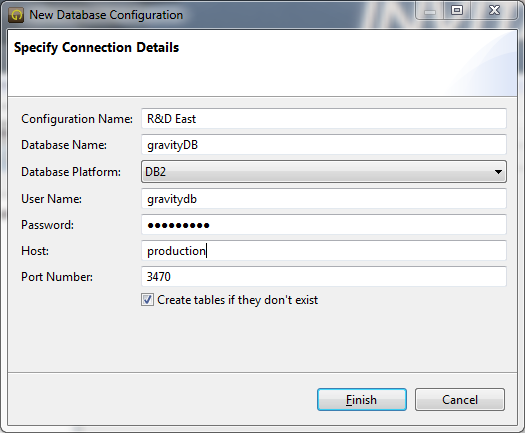
When you select to add a database from the Databases context menu, a wizard will start that enables you to create a new database.
Configuration Name
This is the name of the configuration. It should explain what is stored in this database.
Database Name
This is the name of the database schema as it is created in the database system.
Database Platform
This is the database brand. Select your database from the drop down box.
User Name
This is the name of the user that has full access to the database. All read and write operations will be done with this profile.
Password
This is the password of the database user.
Host
This is the machine where the database is hosted. It is a network name or ip address.
Port
This is the port on which the database is listening. It is prefilled with the default port once a database is selected but it can be changed here in case you DBMS is listening on a different port.
 Changing a Database Configuration
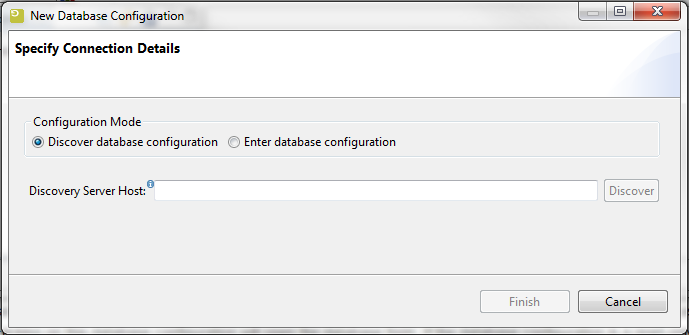
When you select to add a database from the Databases context menu, a wizard will start that enables you to discover or create a new database. Note that the add database menu option is only available if there are no database configurations currently set so it might be necessary to delete the current configuration to enable this menu option.
If you select to discover the database then after you provide the Gravity server host name the database configuration will be retrieved and will become the default database.
To manually enter a database configuration
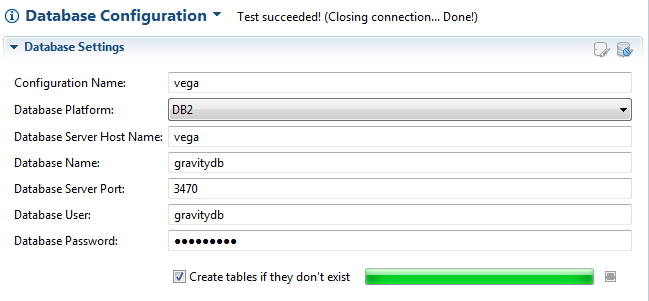
Press the change icon (![]() ) to set the configuration in change mode. Press the database connect icon (
) to set the configuration in change mode. Press the database connect icon (![]() ) to test the connection to the database.
) to test the connection to the database.
See the field descriptions in the Add Database section to see what you can change.
 Set Database as Default
When you select the context menu of one of the nodes in Databases you can choose to set the database as the default database. This will be the starting database when Gravity starts. A form will be displayed with the progress of the activation. You can deactivate a configuration by setting another database as the default. Note that database that has been configured through the discovery mechanism will automatically become the default database.
You can also double click on the database if you want to make some changes (although a read-only database configuration will not be editable). This will open the database editor.
 Delete Database Configuration
When you select the context menu of one of the items in Databases you can choose to delete the database configuration. No data will be removed only the configuration will be removed. To enable the database after you have deleted the configuration you must add it again.
 General
The General node in the Configuration Admin view contains the following sections:
Event Configuration Settings
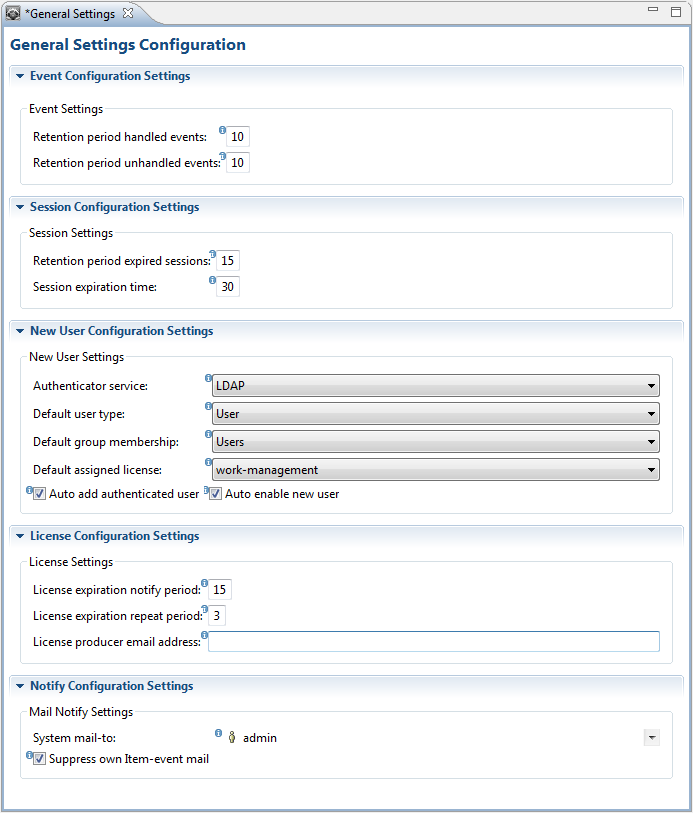
With the event settings you can adjust the retention periods of handled and unhandled events. The retention period indicates the number of days after which an event will be removed from event processing by an event handler. The available event settings are:
Retention period handled events: This is the number of days after which a handled event (delivered/expired) will be removed from the store, if set to 0 then a handled event will be removed as soon as possible.
Retention period Unhandled events: This is the number of days after which an unhandled (not delivered) event will be removed from the store if no time-to-live or deliver time has been set on a handler-event-topic. The time-to-live and deliver time are set per event-handler
Session Configuration Settings
With the session settings you can adjust the session retention and expiration periods. The session retention period indicates the number of days after which a sessions history will be removed. The session expiration period indicates the number of minutes after which a session will be removed from the active session list. An event will be removed from event processing by an event handler. The available session settings are:
Retention period expired sessions: This is the number of days after which an expired session will be removed from the store.
Session expiration time: This is the number of minutes after which an inactive web session will expire and the session license reclaimed for reuse. Note that if expiration is triggered due to session inactivity, the user will still be able to use the browser session if licensing allows it.
New User Configuration Settings
With the new User settings you can define the behavior of how a user is created. The values set will be used as defaults when creating a new user from the Gravity UI. The available new user settings are:
Authenticator service: The authenticator service is the service that will perform the user password authentication, default is the Gravity 'Internal' authenticator service. Other authenticator services, for example LDAP, are external authenticator services which may need to be setup prior to use.
Default user type: This type refers to the user type as created in Gravity definitions. If no selection is available then the default type 'User' will be used.
Default group membership: This is the group a new user will become a member of. If left empty then the user will not be added to a group. An assigned group will determine the capabilities the user obtains after a log-in.
Default assigned license: This is the license the new user will be registered to. If left empty then no license registry will take place (user license registry will need to be done manually).
Auto add authenticated user: Enable this option if you want to automatically add a new user to Gravity after the user has been successfully authenticated (first time). For example when a user logins in for the first time through LDAP then after a successful authentication the user will be registered as a Gravity user (in accordance with the selected user type). This simplifies the administrators work as the admin no longer needs to add these users manually. This setting is not available if the 'Authenticator service' is set to 'Internal'.
Auto enable new user: Enable this option if a new user should automatically obtain the state enabled and be allowed to login. Note that the ability to login not only depends on the user-enabled state but also if the user has an assigned license (see also group membership as this can also have an influence on what the user can do after a log-in)
License Configuration Settings
In the License settings you can configure the number of days you want to be notified (by mail) before a license expires and the number of days after which to repeat the notification message (repeat interval). If a license has been found to be invalid (as opposed to 'about to expire') then there is no before days that will be applied, this type of notification will always be sent out (although it does respect the repeat interval days). The configured system administrators (see System mail-to: in 'Mail Notify Settings') are the first to receive a notification. Optionally you can provide an email address of the person or company that provides support regarding Gravity licenses (for example support@remainsoftware.com), this person or company will receive a notification only on the very first time a licensing notification is sent out.
Expiration notify period: Set the number of days previous to a license expiration for which a notification will be sent to the system administrator(s) and the licensing contact person or company.
Notify repeat interval: Set the number of days after which a license notification will be repeated. A repeated licensing notification message will only be sent to the system administrator(s), not to the licensing contact person/company.
Email address licensing contact: The email address of the person or company involved in providing support for Gravity licenses.
Mail Notify Settings
System mail-to: With this setting you can assign the user or group that will receive Gravity system notifications by mail, for example mail notifications sent by the Mail-handler. By default the user 'admin' is selected as the user to receive email notifications.
Suppress own Item-event mail: Enable this option to suppress the email of an Item event created by the logged-in user. This will mean that the user creating, updating or deleting an item (or related part) will not receive an email about the action.
Example General Configuration:
 Log
Log
The General node in the Configuration Admin view contains the following sections:
- Logging Settings
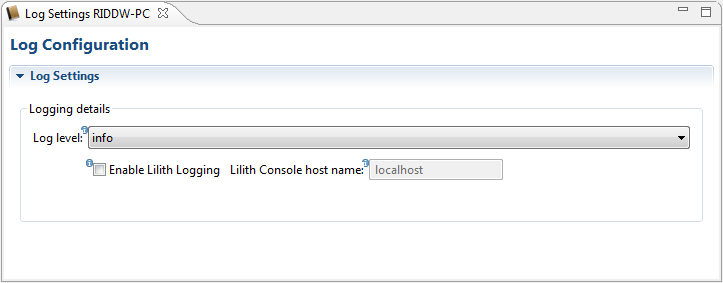
The logging settings figuration Admin view contains the settings that allow you set the client logging level and optionally a means to attach a Lilith console to the client's logging. Logging to a Lilith console is useful for those occasions where the client's logging needs to be made available to the administrator on a remote site.
Logging details
Log level: Setting a log level of 'info', 'warning' and 'error' will not include extra debug messages. Log levels 'debug', 'trace' will include debug messages growing in detail. Setting a log level of 'none' will disable all logging.
Enable Lilith logging: Enable this option if want the client logging to be sent to a Lilith enterprise console (this will also require the setting of the Lilith host).
Lilith console host name: Required setting if Lilith logging is enabled. Provide a host name and optional port as 'host[:port]'
 Mail
Mail
Double click on the Mail item to open the Mail Configuration form. The Mail form contains the following sections:
- SMTP Server, Configure SMTP
- Mail Client
- Email Event Handler
- Mail-Handler Mailbox Configuration, Configure Mail-Handler
 Mail Server Change
SMTP Server Host Name
This is the name of the machine that hosts the mail server.
SMTP Server Port
This is the port number of the mail SMTP server. For example port 25 if using the default unsecure (no encryption) SMTP port or 587 if using a SSL/TLS configured secure port. Ask your mail administrator for the correct port to be used. Note that in some SMTP server configurations, port 25 can double as a secure port, in such a setup it will be required to enable TLS.
SMTP Security
There are several options that can be set to configure Gravity for access to a secured SMTP server. What needs to be set here is depends on the type of SMTP server (Outlook, Gmail ...). You will most likely need to consult your mail administrator to find out what needs to be configured here. The example shown is for Outlook 365 and has the most secure combination possible, not only is TLS enabled (requiring the exchange and acceptance of SSL certificates) but also a user name and password is set for server authentication.
SMTP Security with Exchange
For Exchange (or Outlook 365) it will be necessary to set the Gravity's Email Address Suffix and the Email Address Prefix to values that when combined will result in an existing mail account. For example if the Mail Client/Email Event Handler section was configured as follows: 'Email Suffix: @remainsoftware.com', 'Email Address Prefix: gravity-mail'. In this case an email's from address will become 'gravity-mail@remainsoftware.com' which matches an already existing mail account.
 Upload
If you doubleclick on the Upload configuration node then the File Configuration form will open.
Max Upload File size
This is the maximum file size than can be uploaded. The size must be given in Megabyte (MB).
 Web
Web
If you doubleclick on the Web configuration node then the Rest Configuration form will open. The Gravity Rest configuration refers to the Gravity internal Rest server and how it should configured for access.
Rest Server Host
This is the server on which the Rest server will run.
Rest Server Port
This is the port on which the REST server can be reached.
Communication Protocol
Select the communication protocol that this REST server uses. It can be either HTTP or HTTPS.

