Translations:PRINT:DFG:Definitions & Recovery Guide/5/en
TD/OMS Internal
The TD/OMS Internal menu can be reached only by user profiles of *SECOFR category. After signing in you need the TD/OMS product library in your job description or in the initial library list. Next go to the TD/OMS main menu by entering the command GO OMSMAIN. From this main menu you can select option 1=System Management and then 21=TD/OMS Internal.
Display Product Information (DSPPINOMS)
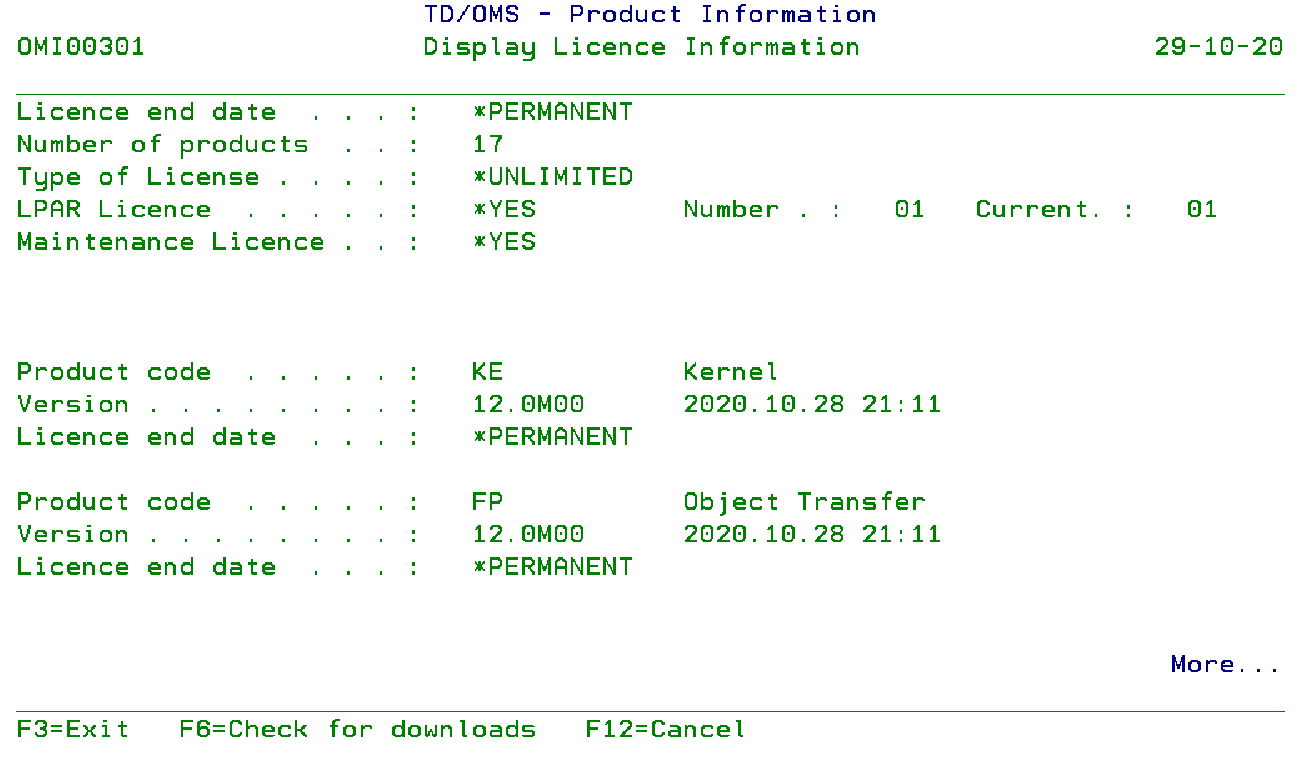
This System internal menu function shows you how many TD/OMS modules are installed and until which date they will be active.
Display Product Information
Using this display you can check whether you have installed the license keys in a correct way, and you can observe the TD/OMS version of your installation. The display is not shown if any error has occurred while entering the license codes.
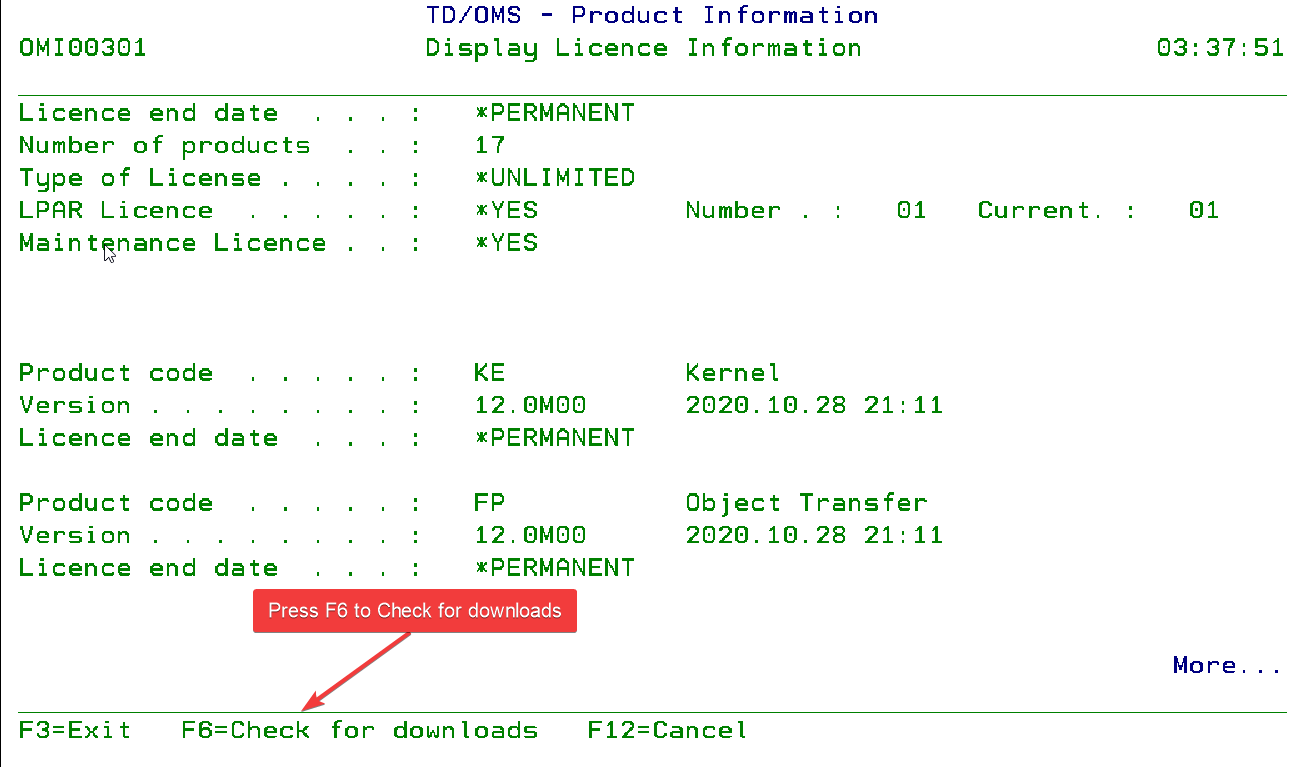
Check for downloads
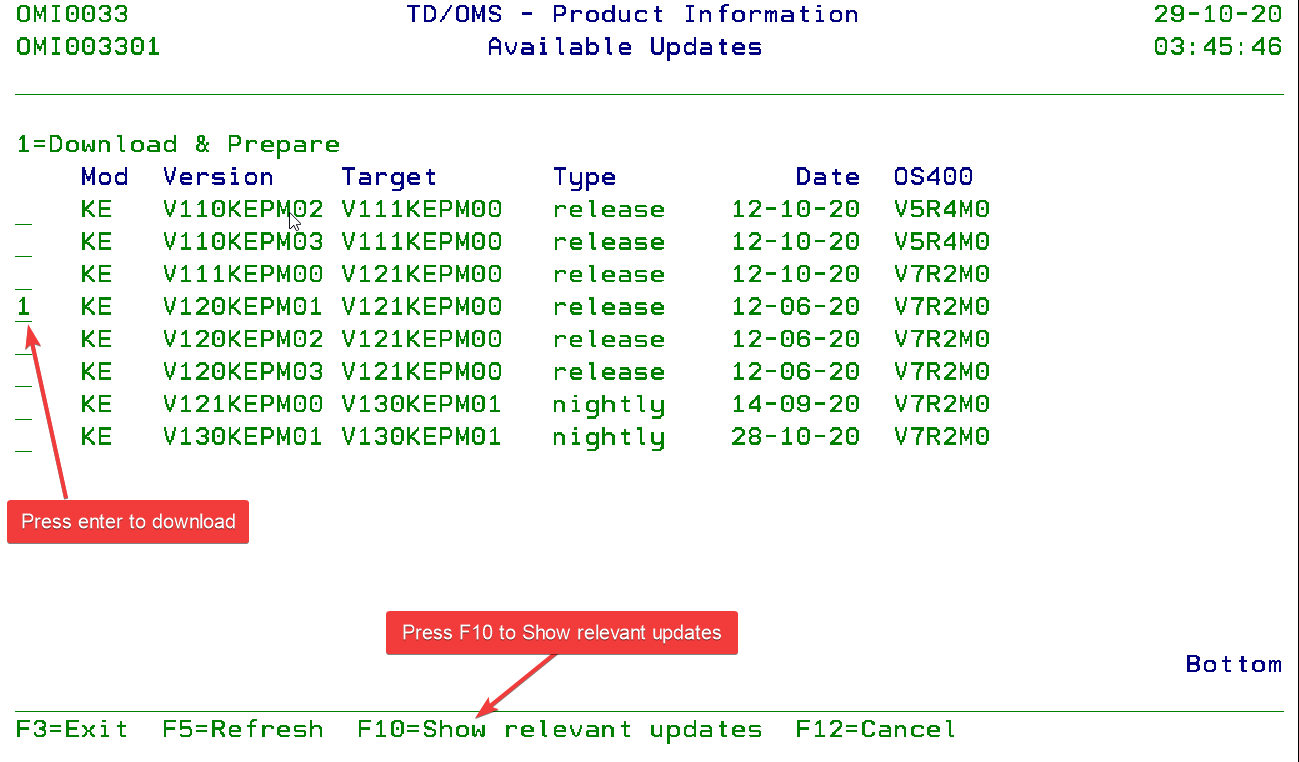
Press F6 to check if there are updates available for the current installation. You can also use the CHKUPDOMS command.
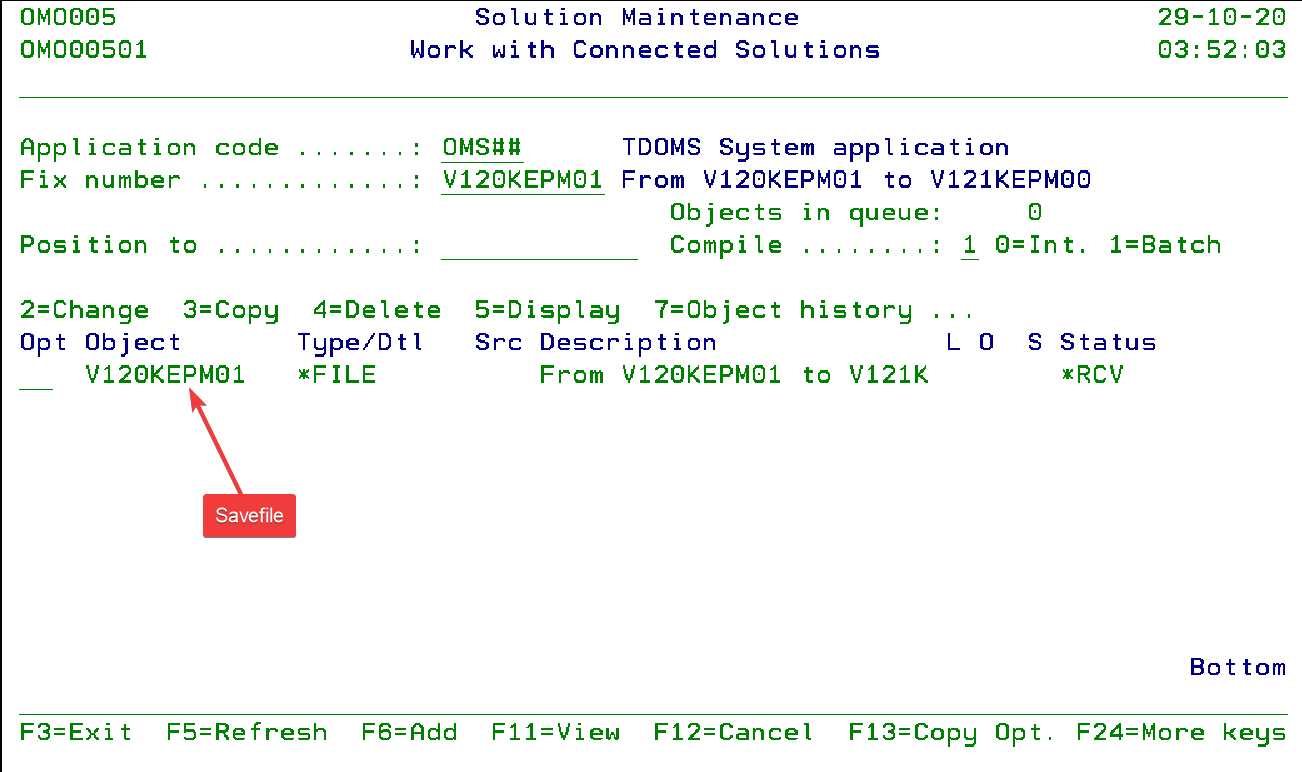
This program enables you to download the savefile and attach it to the corresponding task of the OMS system application. The task name is determined on the basis of the selected version and the application name is picked from the data area OMS010.
Prerequisites: The following open source tooling must be installed before you can download the updates.
- wget
- unzip
- zipinfo
You also need a connection to the internet from your IBM i machine.
After the updated savefile is attached to the task, you can process the task to deploy it to your production environments.
The available types of downloads are:
- release
- Releases are stable upgrades. Releases are built upon three previous milestone releases.
- milestone
- Milestones are intermediate deliveries that build up to a release. Every milestone contains new features and bug fixes. Milestones often also contain early deliveries of work in progress.
- nightly
- Nightly updates are immediate deliveries of new functions and bug fixes. They are the most current but the least stable.
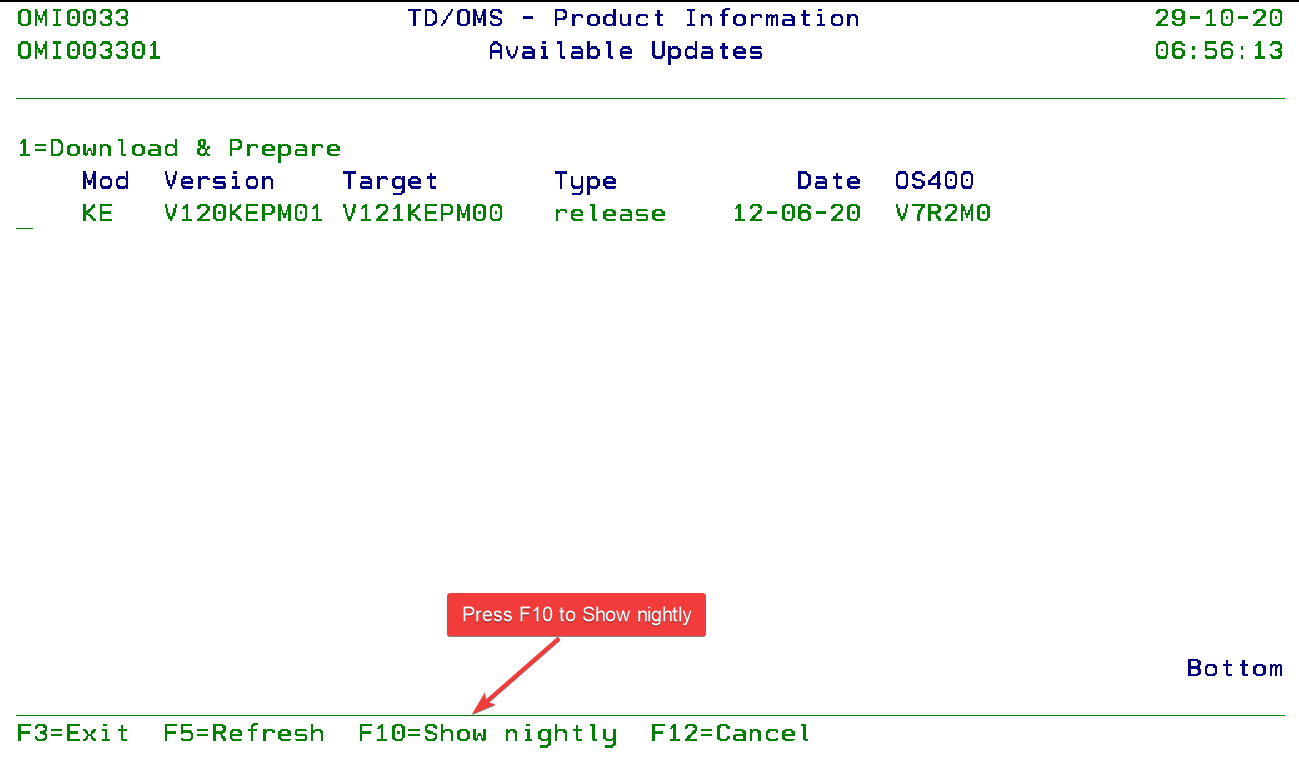
There is an update available for the current version. Press F10 to show all the nightly for the current version.
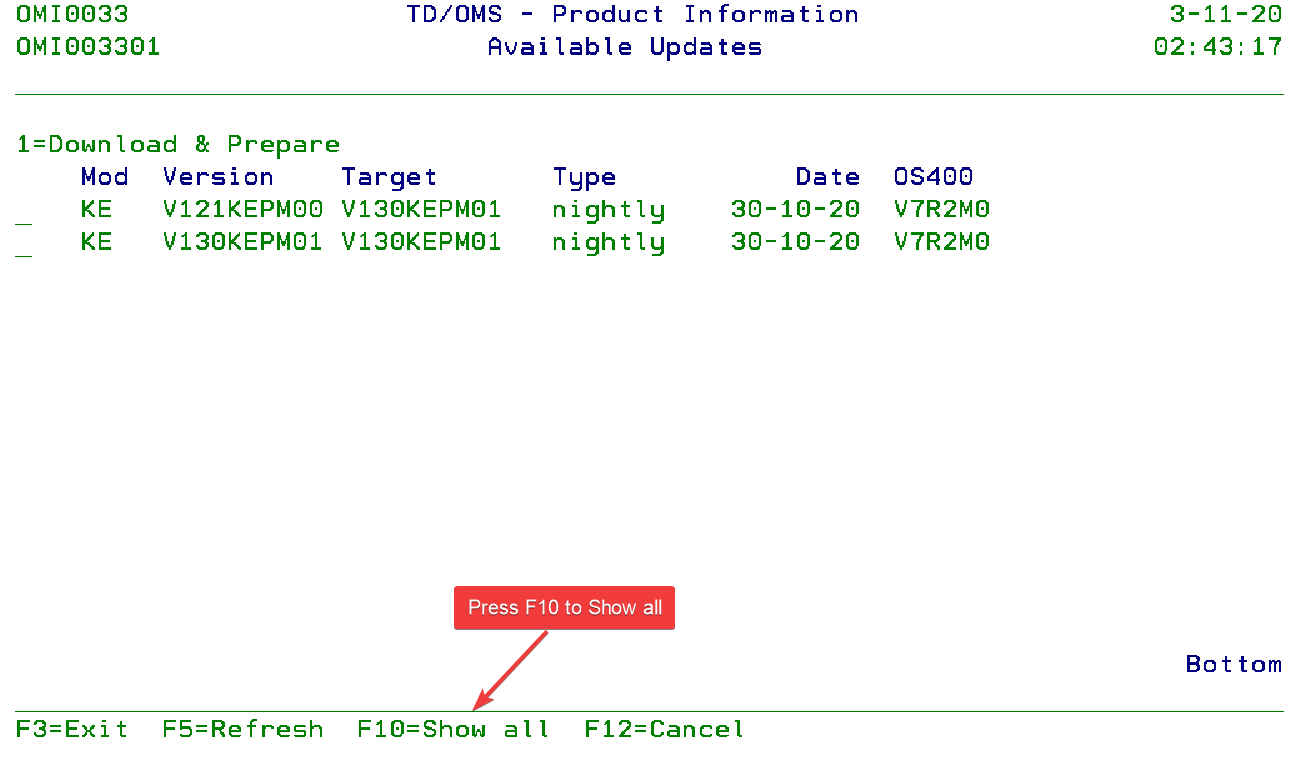
There are nightly available for the current version. Press F10 to show all the milestone/release/nightly.
Option 1 on the desired version to download and prepare.
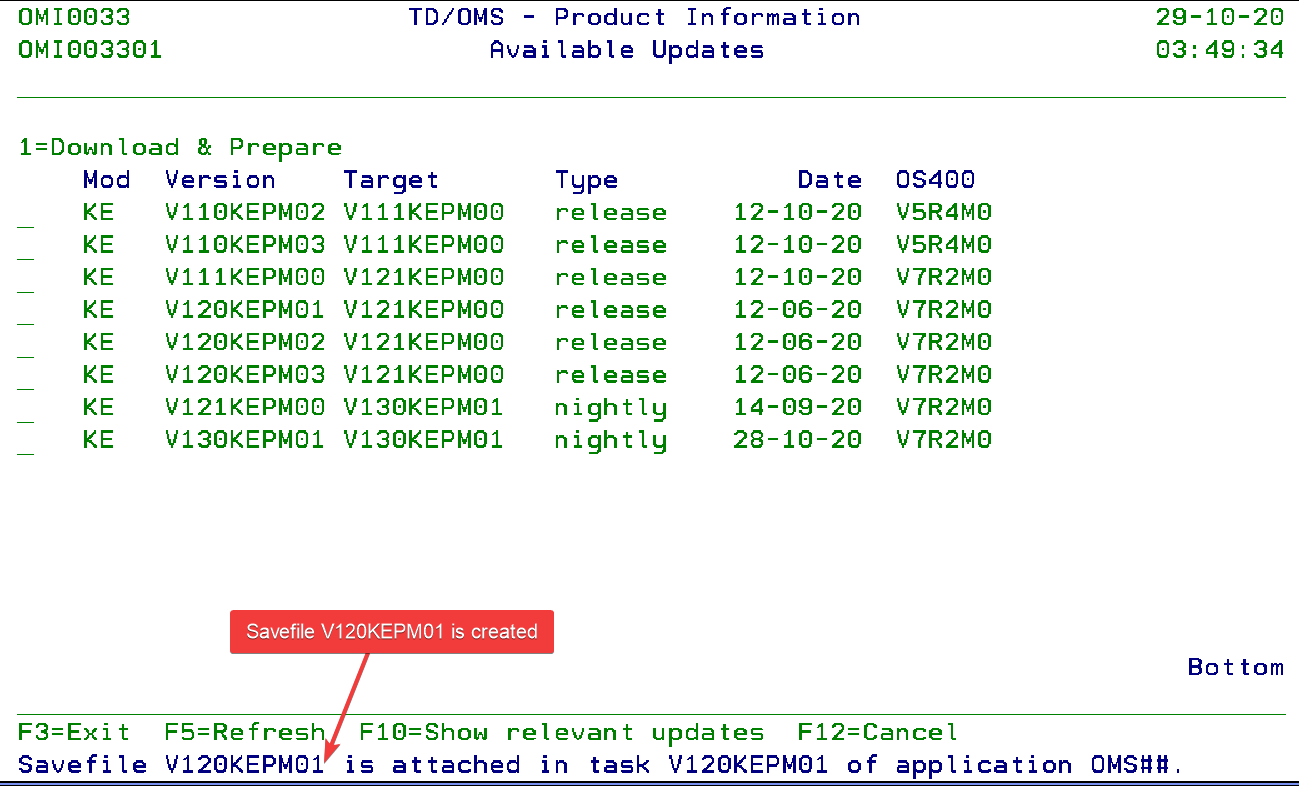
The savefile is downloaded and attached to the corresponding task in the TD/OMS system application.
The task name is determined on the basis of the selected version and the application name is retrieved from data area OMS010.
After the updated savefile is attached to the task, you can process the task to deploy it to your remote systems.
The available types of downloads are:
- release
- Releases are stable upgrades. Releases are built upon three previous milestone releases.
- milestone
- Milestones are intermediate deliveries that build-up to a release. Every milestone contains new features and bug fixes. They often also contain early deliveries of work in progress.
- nightly
- Nightly updates are immediate deliveries of new functions and bug fixes. They are the most current but the least stable.
Request TD/OMS License Codes
To generate license codes we need to have the following information:
- Serial Number
- Use the command DSPSRVAGT TYPE(*SRVREGINF) to get the serial number.
- LPAR Number (logical partition number)
- Use the command DSPSRVAGT TYPE(*SRVREGINF) to get the LPAR number.
- Processor Feature code
- Use the command DSPSYSVAL SYSVAL(QPRCFEAT)
- Use command SYSINFOMS to retrieve the above mentioned information when TD/OMS version V11.0M02 or higher is installed.
Send that information to us together with the information if it concerns a development or a deployment partition.
Install TD/OMS License Codes Manually (INSLICOMS)
The TD/OMS license keys can be installed using this command. You must always install the general license code and at least license keys of one TD/OMS module, otherwise you are not able to work with the product. The default of this command is to install the license codes on the current IBM i system. License codes can be prepared for another (remote) system by specifying the serial number of that machine.
                     TDOMS - Install Licenses (INSLICOMS)

Type choices, press Enter.

System . . . . . . . . . . . . .   *CURRENT      Character value
System Processor feature . . . .   *CURRENT      Character value, *CURRENT
System (SYSTEM)
Specify the serial number of the system for which you want to enter the license code.
- Current
- The special value *CURRENT applies to the current system.
- Remote Serial number
Values other than the value *CURRENT (the serial number of another machine) will create a *USRSPC object in the TD/OMS library. The name of the created *USRSPC is the same as the given serial number prefixed by the character “X”. Transfer this special *USRSPC object to the correct machine to install the license keys on that system.
- Activate the license on the remote system by signing in using a user profile of *SECOFR class. Next, restore the *USRSPC object in the TD/OMS library. After that remove the existing userspace "OMX963" and rename the just copied object to "OMX963".
System Processor Feature( FEATURE)
Specify the processor feature code of the system for which you want to enter the license code.
- CURRENT
- The special value *CURRENT applies to the current system.
- Remote Feature Code
Values other than the value *CURRENT (the processor feature code of another machine) will create a *USRSPC object in the TD/OMS library. The name of the created *USRSPC is the same as the given serial number prefixed by the character “X”. Transfer this special *USRSPC object to the correct machine to install the license keys on that system.
- Activate the license on the remote system by signing in using a user profile of *SECOFR class. Next, restore the *USRSPC object in the TD/OMS library. After that remove the existing userspace "OMX963" and rename the just copied object to "OMX963".
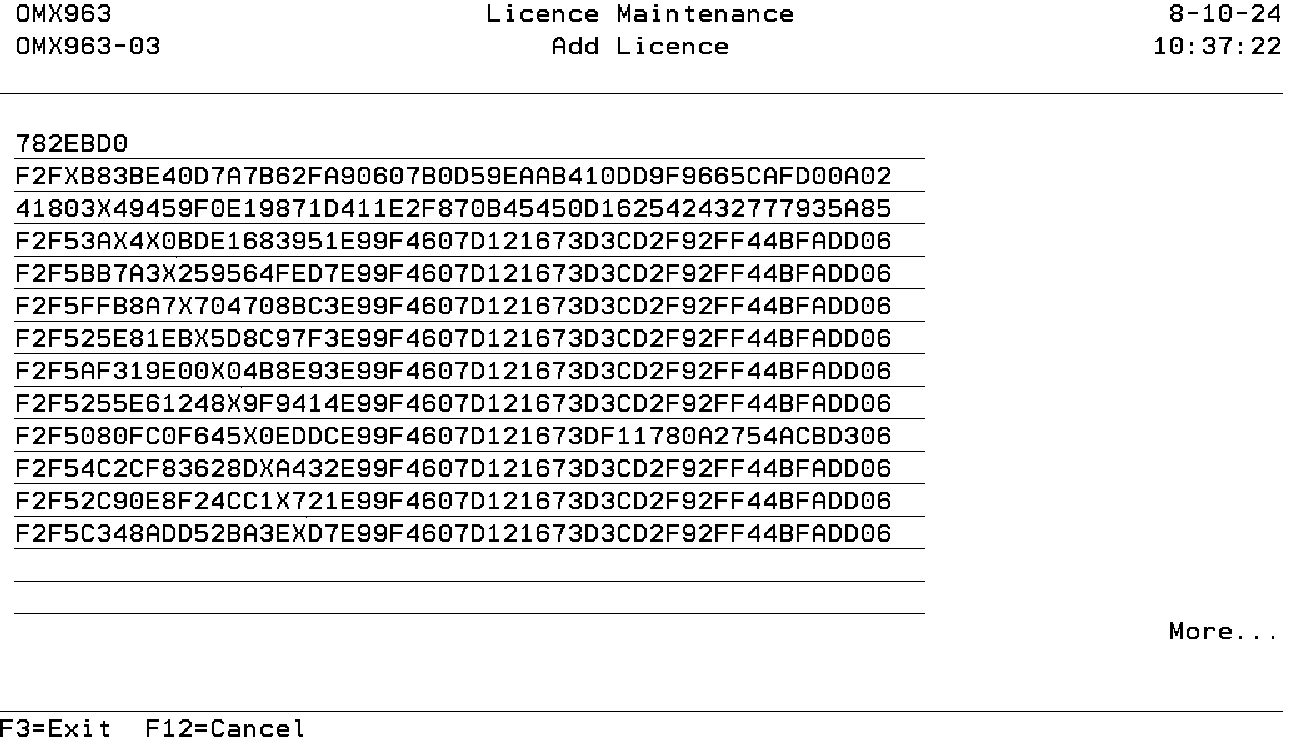
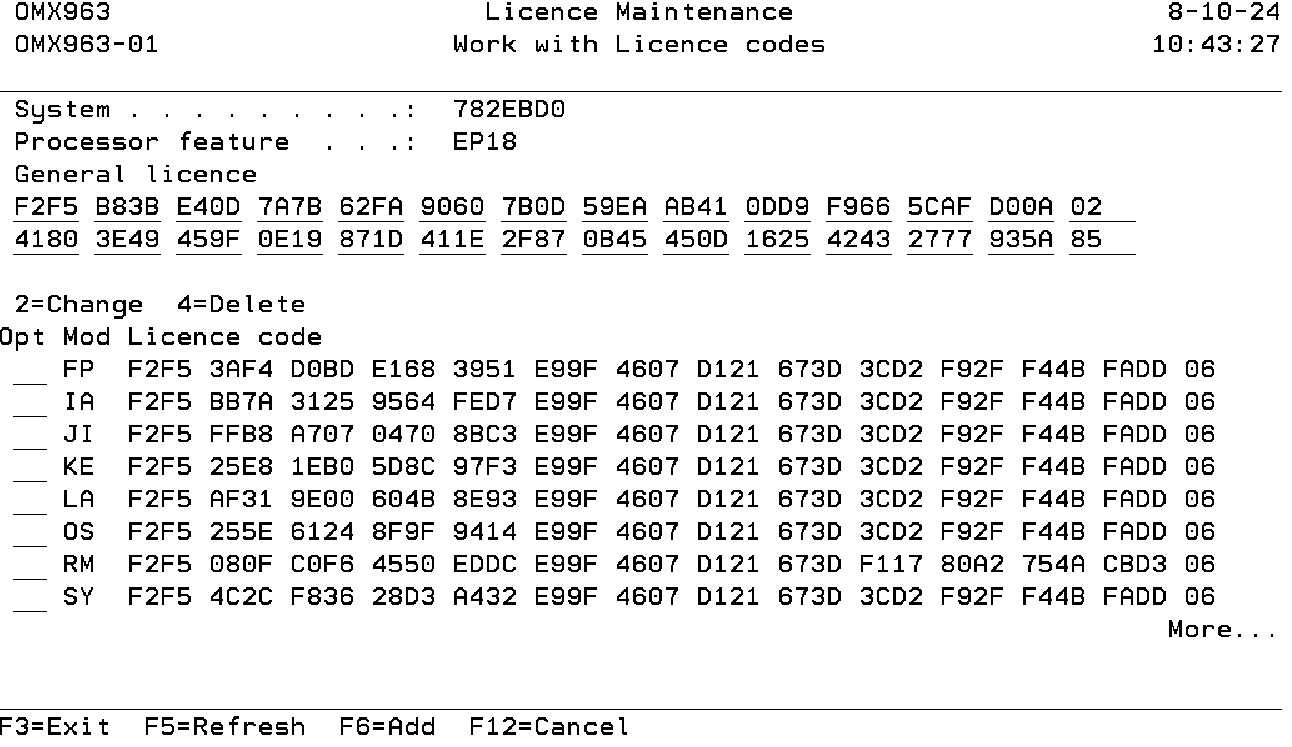
The License Code Entry Screen
The entire license can be added at once. Enter the whole license and press Enter. The first two lines will be considered as the General License and Feature License if they have not already been added. If both already exist, then all lines will be considered as module licenses. Additionally, if the first line has fewer than 50 characters, it will be ignored. A message will be shown if the license is incorrect.
The header of the display shows the Serial Number and Feature Code of the system for which the product license keys have been registered. In the next section, the Module License will be displayed.
Create TD/OMS License Codes (CRTLICOMS)
You can install the TD/OMS product license codes with this command. The command actually does the same as the INSLICOMS command. Instead of entering the keys manually one by one, they are retrieved from the special, formatted key file, after it has been put in a IFS directory.
Before you use this command, make sure that you have the correct license key file. The name of the license key file contains the serial number and the LPAR number. You can use the command DSPSRVAGT *SRVREGINF to ensure that these values are identical. Next copy the file to a directory on the IFS.
CRTLICOMS            NAME(File name)
                     PATH(Path name)
                     LIBL(Library name)
File name
Specify the file name that contains the correctly formatted license key strokes. The possible values are:
- *ALL
Select all files in the IFS directory. - File name
Specify the file name.
Path Name
Specify the IFS directory where the license file has been stored.
Library name
Specify the library where the license keys must be installed. This is your TD/OMS product library. If the library not exists, it will be created. When the library exists, and the license keys already exist in that library, they will be replaced.
Example
Suppose:
- you received the following license file: XDD2322-1.key
- The name of your TD/OMS library is TDOMS
- You dropped the file in the base root directory of the IFS
Then the following string shows the command to be executed:
CRTLICOMS NAME('XDD2322-1.key') PATH('/') LIBL(TDOMS)
System Users Maintenance (STRSUM)
The TD/OMS System User Maintenance function allows you to maintain the user profiles, who need access to TD/OMS. The individual TD/OMS user must be registered at a system level, when you have installed a NAMED or COMBINED TD/OMS license key. To display the installed license codes use command DSPPINOMS.
The number of users registered can not exceed the number of users for which the TD/OMS Kernel module has been licensed. Users who are not registered and start a function receive a message on their display.
Only user profiles of *SECOFR or *SECADM class, and the TD/OMS manager are allowed to start this function.
All generally registered users should also be specified at one or more application levels to get the proper authority for TD/OMS functions in an application.
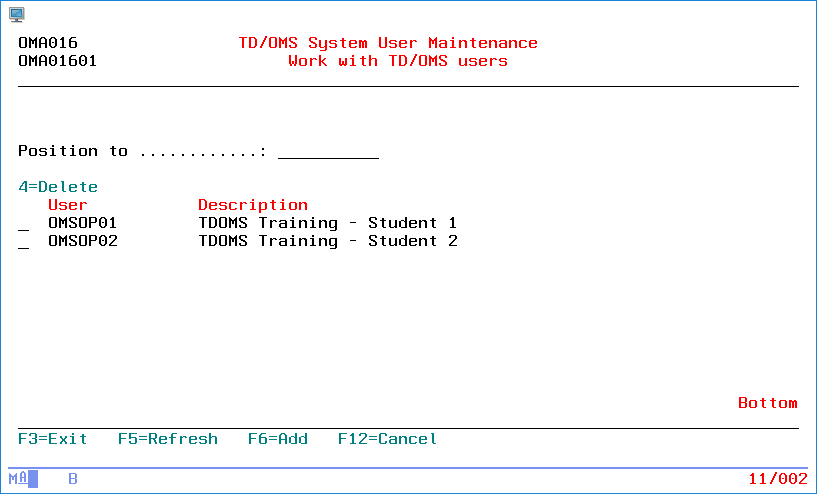
Work with TD/OMS Users
The Work with TD/OMS Users display shows the currently registered users. You can add an entry to the list or remove an entry from the list.
User Maintenance
The User Maintenance function enables us to work with the users. In this program, we can work with all the users, and you can add, change, delete and display them. Users belonging to the user class *SECOFR, *SECADM, or the TD/OMS manager (group) are allowed to use this function.
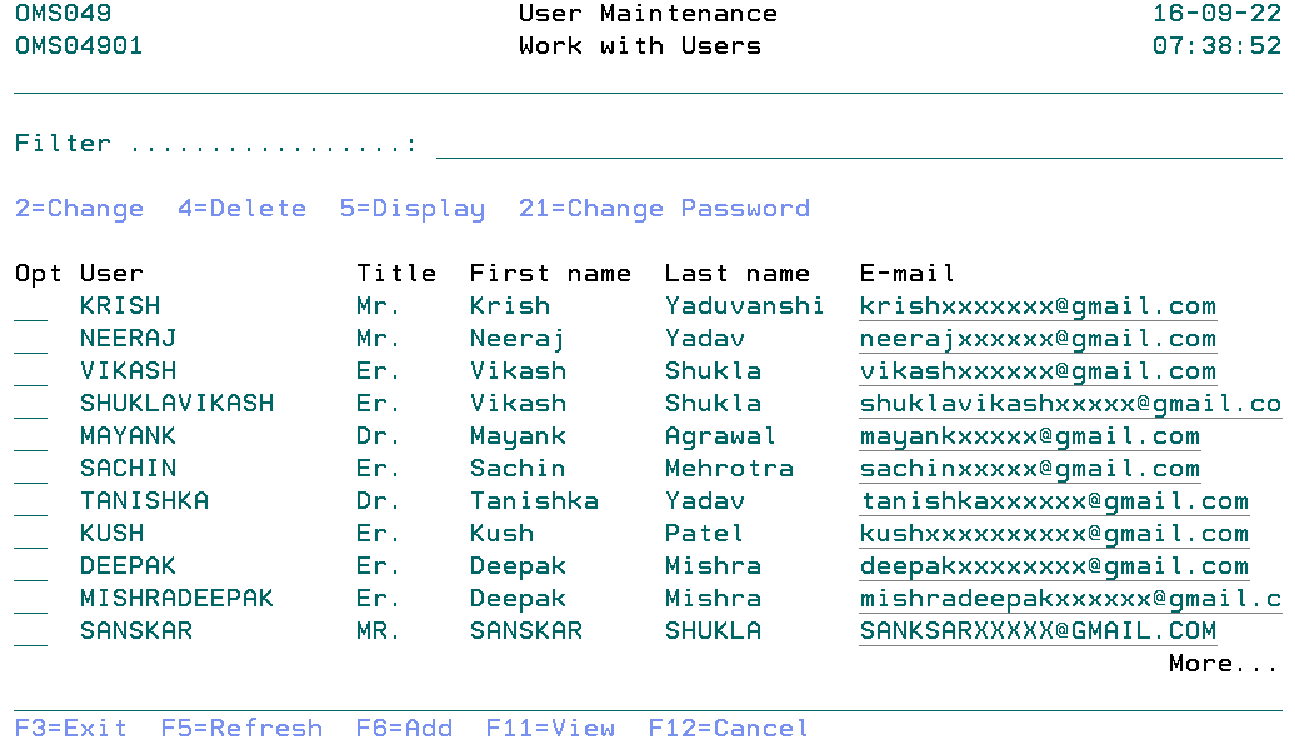
Work with Users
The Work with Users screen displays a list of all the existing users. We can use the options field to maintain these users.
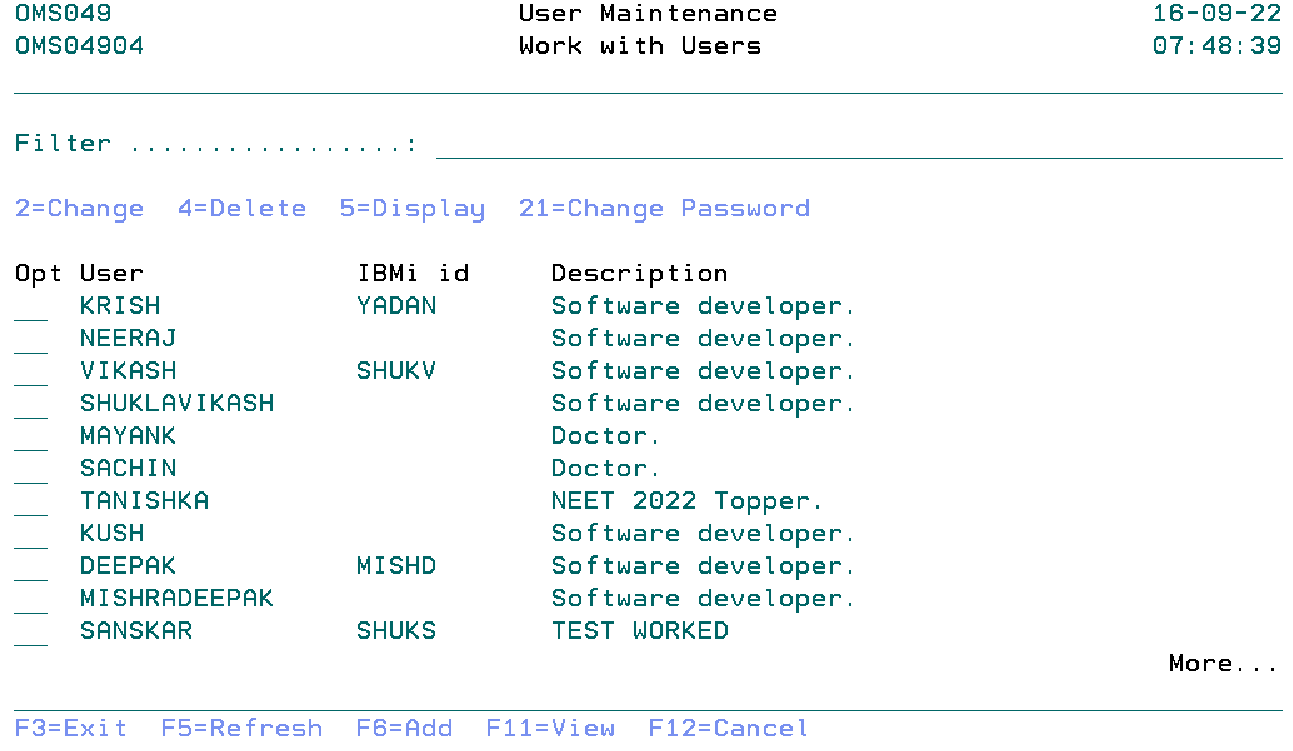
Press F11 we can see the second view of the Work with Users screen.
Filter
The Filter prompt allows for quick filtering of the list.
Option
Use this column to perform different operations on individual entries.
- 2=Change
- Use this option to change the user details.
- 4=Delete
- Use this option to delete the user from the database.
- 5=Display
- Use this option to display the details about the user.
- 21=Change password
- Use this option to change the user password.
- F6=Add
- Press F6 to add a new user.
Maintain User
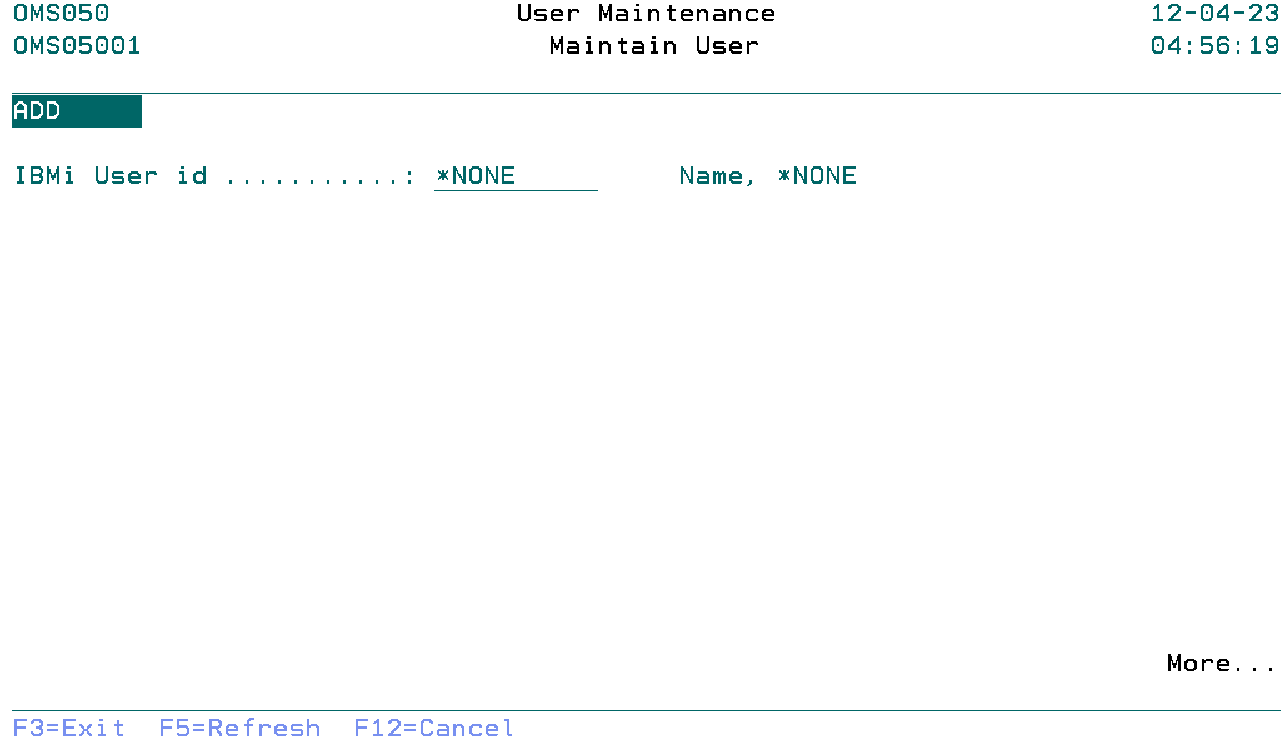
The Maintain User display maintains the user allows actions depending on the option chosen on the previous display. The chosen action on the previous display is shown on line three. The following modes can be activated:
- *Add
- You can add a new user.
- *Change
- You can change the details of the user.
- *Delete
- You can delete the user from the database.
- *Display
- You can show the details about the user.
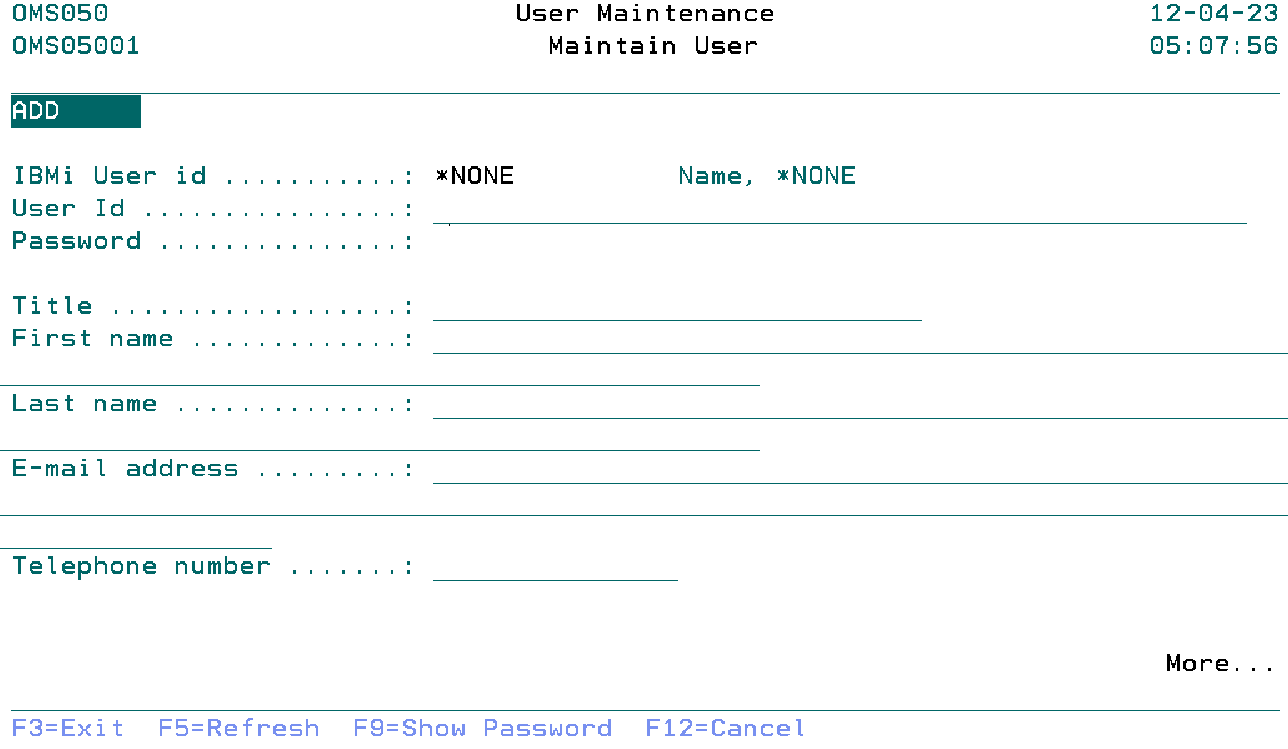
IBMi User id
Specify the IBMi user id. A blank value is not allowed. The possible values are:
- *NONE
- If you specify *NONE, Then the password is required for the user.
- Name
- Specify a valid IBMi user id.
User id
Specify the user id. A blank value is not allowed.
User password
Specify the password for the user. Passwords can be up to 128 characters and are case-sensitive. It should be at least 6 characters.
Title
Specify the title for the user.
First name
Specify the user's first name.
Last name
Specify the user's last name.
E-mail address
Specify the user's E-mail address.
Telephone number
Specify the telephone number. It is a user-defined field that can be used as a reference.
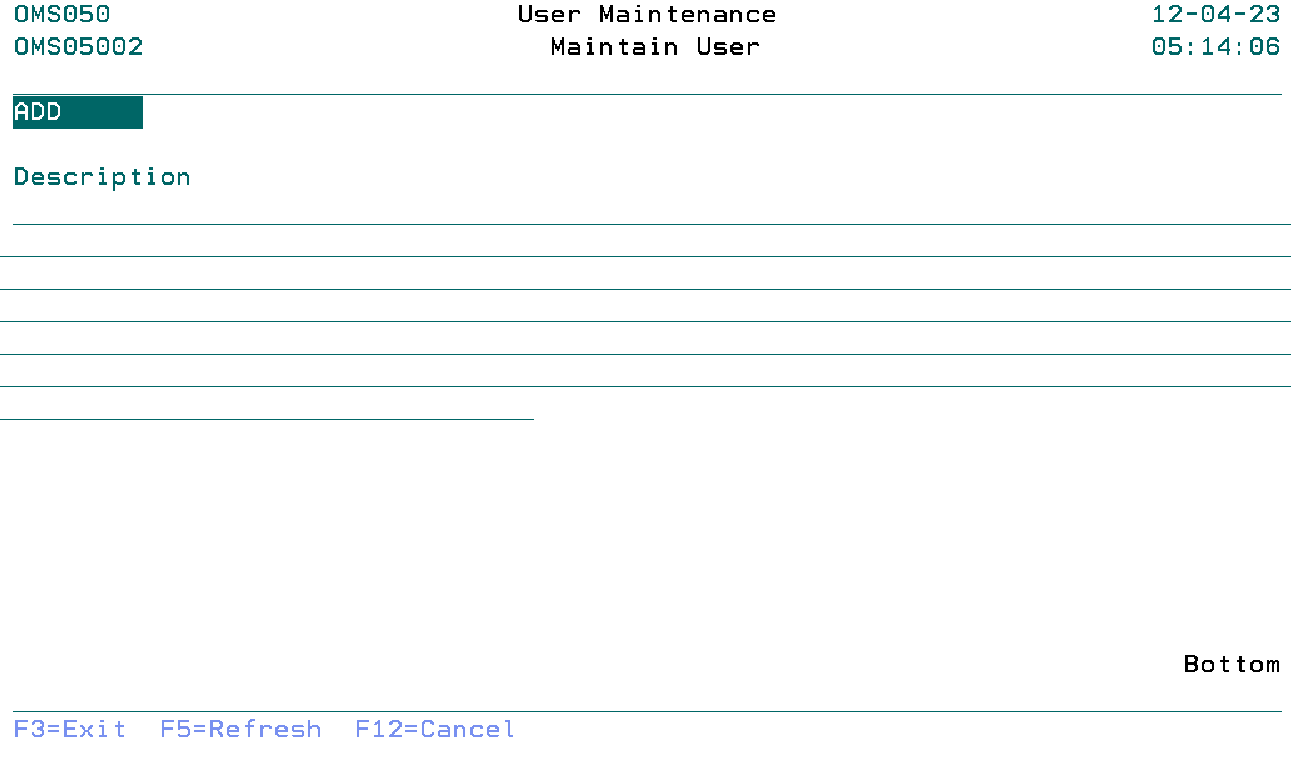
Description
Specify the user's description.
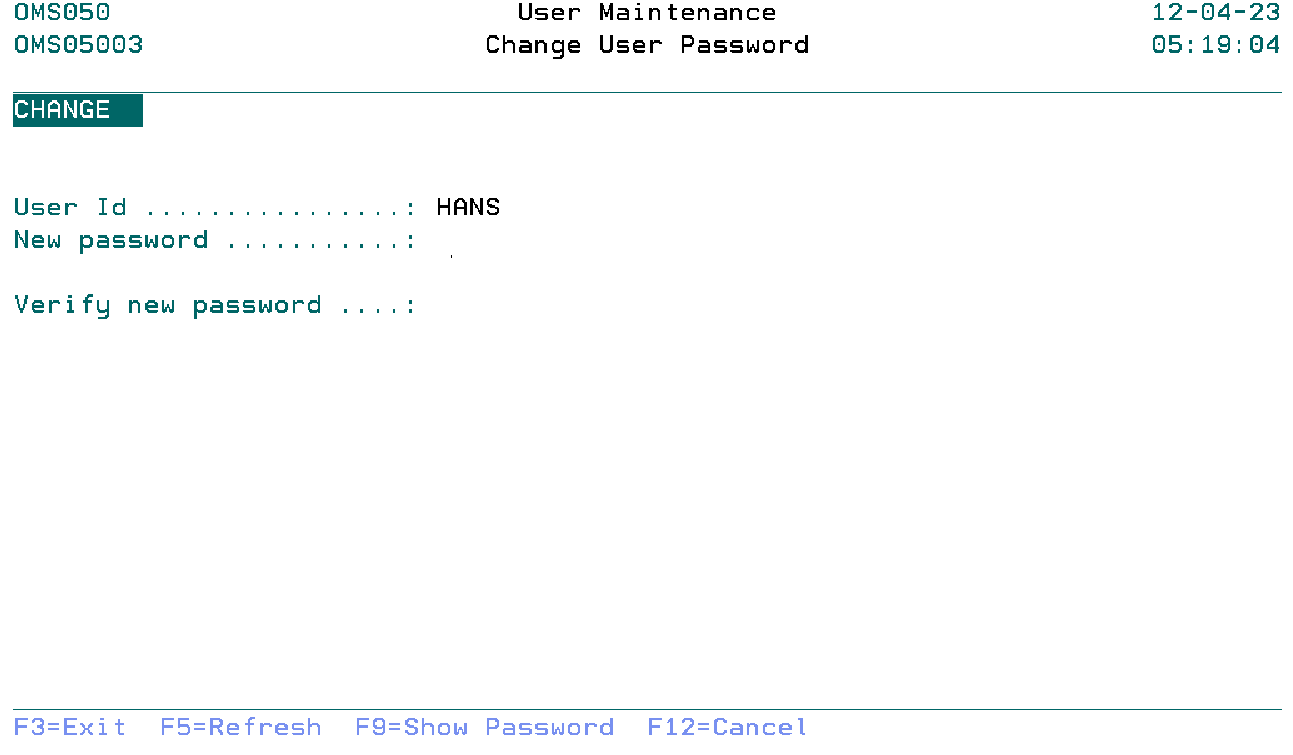
Change User Password
The Change User Password display maintains the user's password and allows actions depending on the option chosen on the previous display. The chosen action on the previous display is shown on line three. The following modes can be activated:
- *Change
- You can change the user's password.
New password
Specify the new user's password. Passwords can be up to 128 characters and are case-sensitive. It should be at least 6 characters.
Verify new password
Specify the user's password to verify with the new password. Passwords can be up to 128 characters and are case-sensitive. It should be at least 6 characters.
Command Start User Maintenance (STRUSRM)
This menu command starts the User Maintenance function. Refer to the description of the function User Maintenance for a detailed description.
STRUSRM
This command has no parameters.
Edit Object Authorization Classes (EDTOACOMS)
The Edit Object Authorization Classes command enables you to change the pre-defined TD/OMS authorization classes. These classes are assigned to objects residing in your TD/OMS library.
TD/OMS objects are divided into operational classes. Most objects are assigned a restricted class (i.e. not accessible to *PUBLIC authority). Some objects, however, require special operational attributes in order to function properly. Such an object is for example the program, that needs access to all objects in various libraries and therefore require different authority level.
Object authority classes can be changed if you have a profile of *SECOFR category, or if your profile is the TD/OMS manager.
EDTOACOMS         CLASS(class)
                  PGM(chgpgm statements)
                  OWN(chgobjown statements)
                  AUT(grtobjaut statements)
Authorization class (CLASS)
The authorization class is an identification for a number of object operations. The operations which are stored in a class operate on the owner of the object, the object authority and the adoption of user rights. The possible range of values is:
- *C1 - *C6
Specify the identification of the class.
CHGPGM statements
Enter the keywords and the keyword values which are to be added to the CHGPGM command. The object code and library are filled by TD/OMS. The keywords are user supplied.
Note: The CHGPGM command will not be executed if authority is granted to an object which is not of type *PGM.
CHGOBJOWN statements (OWN)
Enter the keywords and the keyword values which are to be added to the CHGOBJOWN command. The object code, library and object type are filled by TD/OMS. The keywords are user supplied.
GRTOBJAUT statements (AUT)
Enter the keywords and the keyword values which are to be added to the GRTOBJAUT command. The object code, library and object type are filled by TD/OMS. The keywords are user supplied.
Edit Object Authorization Data (EDTOADOMS)
The Edit Object Authorization Data command enables you to assign a TD/OMS authorization class to an individual object or a group of objects. The authorization is then granted using the Grant TD/OMS Authority command (GRTAUTOMS).
TD/OMS objects are divided into operational classes. Most objects are assigned a restricted class (i.e. not accessible to the *PUBLIC). Some objects, however, require special operational attributes in order for them to function properly. These objects are for example the objects which search the libraries and therefore require different authorities.
Object authority data can be changed if you belong to the SECOFR group or if you are the TD/OMS manager.
EDTOADOMS         OBJC(object name)
                  TYPE(object type)
                  CLASS(class)
Object code (OBJC)
Specify the object code to be assigned an authorization class. The possible values are:
- object-name
Specify the name of the object. *ANY
Specify that the object name is not important if this class is assigned. An object would be assigned the specified class if no detailed specifications exist for it.
This is a required parameter.
Object type (TYPE)
Specify the object type to be assigned an authorization class. The possible values are:
- object-type
Specify a valid object type. *ANY
Specify that the object type is not important if this class is assigned. Any type would be assigned the specified class if no detailed specifications exist for it.
This is a required parameter.
Authorization class (CLASS)
The authorization class is an identification for a number of object operations. The operations which are stored in a class operate on the owner of the object, the object authority and the adoption of user rights. The possible values are:
*REMOVE
Remove the class for the indicated object.*C1 - *C6
Specify the identification of the class.
OMS Object Authority Factory settings
Enter these commands per class to restore the original values of the authorization classes.
*C1   EDTOACOMS  CLASS(*C1)
                 PGM('USRPRF(*USER)
                 USEADPAUT(*NO)')
                 OWN('NEWOWN(OMS)')
                 AUT('USER(*PUBLIC) AUT(*USE)')

*C2   EDTOACOMS  CLASS(*C2)
                 PGM('USRPRF(*OWNER)
                 USEADPAUT(*NO)')
                 OWN('NEWOWN(OMS)')
                 AUT('USER(*PUBLIC) AUT(*USE)')

*C3   EDTOACOMS  CLASS(*C3)
                 PGM('USRPRF(*OWNER)
                 USEADPAUT(*NO)')
                 OWN('NEWOWN(QSECOFR)')
                 AUT('USER(OMS) AUT(*USE)')

*C4   EDTOACOMS  CLASS(*C4)
                 PGM('USRPRF(*OWNER)
                 USEADPAUT(*NO)')
                 OWN('NEWOWN(QSECOFR)')
                 AUT('USER(*PUBLIC) AUT(*USE)')

*C5   EDTOACOMS  CLASS(*C5)
                 PGM('USRPRF(*OWNER)
                 USEADPAUT(*NO)')
                 OWN('NEWOWN(OMS)')
                 AUT('USER(*PUBLIC) AUT(*USE)')

*C6   EDTOACOMS  CLASS(*C6)
                 PGM('USRPRF(*USER)
                 USEADPAUT(*NO)')
                 OWN('NEWOWN(OMS)')
                 AUT('USER(*PUBLIC) AUT(*EXCLUDE)')
Display Object Authority Definition (DSPOADOMS)
The Display Object Authority Definition command enables you to view the current TD/OMS authorization settings. These settings tell you what operational attributes are required for the individual TD/OMS objects.
TD/OMS objects are divided into operational classes. Most objects are assigned a restricted class (i.e. not accessible to the *PUBLIC). Some objects, however, require special operational attributes in order for them to function properly. These objects are for example the objects which search the libraries and therefore require different authorities.
Object authority definitions can be viewed if you belong to the *SECOFR group or if you are the TD/OMS manager.
DSPOADOMS OUTPUT(*)
Output (OUTPUT) – Help
Specify where the output from the command is sent. The possible values are:
*
Routes the output to the display.
*PRINT
Routes the output to the printer.
Grant TD/OMS Authorization (GRTAUTOMS)
The Grant TD/OMS Authorization command enables you to assign the required authorization to TD/OMS objects. This command must run after the installation has been completed.
TD/OMS objects are divided into different operational classes. Most objects are assigned a restricted class (i.e. not accessible to *PUBLIC authority). Some objects, however, require special operational attributes in order to function properly. Such an object is for example the program, that needs access to all objects in various libraries and therefore require different authorities.
Object authority can be granted if you have a profile of the *SECOFR or *SECADM user class, or if your profile is the TD/OMS manager. Your user profile must also have all special authorities corresponding with the high level user class. Without these special authorities you are able to run the command but authorization assignment will be skipped for some or all objects.
This command retrieves the object authorization data and applies the operations specified in the authorization class.
GRTAUTOMS     OBJL(*OMSLIB)
              OBJC(*ALL)
              OBJT(*ALL)
TD/OMS library (OBJL)
Specify the library in which the TD/OMS object(s) reside(s). This must be a TD/OMS library. It is useless to specify another library unless you have created your own class definitions.
- *OMSLIB
Use this value to specify a TD/OMS library. The command will search for the correct library. You cannot use this value if you grant authority for additional TD/OMS module libraries. In this case the library must be specified. - library-name
Specify the name of the library which contains the objects which are to be granted TD/OMS authority.
This is a required parameter.
Object code (OBJC)
Specify the object code to be granted TD/OMS authority. The possible values are:
- *ALL
Grants authority to all objects in the library that includes the specified object type. - object-code
Specify the name of a single object.
This is a required parameter.
Object type (OBJT)
Specify the object type of the objects to be granted TD/OMS authority. The possible values are:
- *ALL
Grants authority to the specified objects of any type. - object-type
Specify an object type.
This is a required parameter.
Processing Sequence Maintenance (STRPSM)
This command changes the sequence in which objects are processed during transfer and compilation. You can ensure that objects of a specific object type, object attribute and detail (source) attribute are created in the target environment before other objects.
Since V16.0KEM02, this also works for file extensions of IFS objects.
Example: Suppose you wish to transfer a batch with a physical and a logical file. If the logical file was created first, the chance of successful creation would be slim because the logical file would be based upon the old physical file already existing in the target environment (if it is there at all).
You can use this command to specify the types of objects that have to be processed before objects of another type.
OMX986             Object Processing Sequence Maintenance             22-01-24
OMX98601            Work with Object Processing Sequence              10:11:17
------------------------------------------------------------------------------

Position to ............:   0

2=Change  3=Copy  4=Delete  5=Display

Opt  Sequence nbr.  Object type  Attribute  Detail attr.
 _   175            *FIELD       *ALL       *ALL
 _   175            *IDATTR      *ALL       *ALL
 _   225            *FILE#       *ALL       *ALL
 _   250            FILE         PHYSICAL   *ALL
 _   275            *FILE        PF         *ALL
 _   275            *FILE        PF38       *ALL
 _   300            *FILE        LF         *ALL
 _   300            *FILE        LF38       *ALL
 _   325            *MDLF        *ALL       *ALL
 _   325            FILE         LOGICAL    *ALL
 _   350            *MSGF#       *ALL       *ALL
 _   375            *BNDDIR      *ALL       *ALL
 _   375            *FILE        *ALL       *ALL
 _   375            *PROCESS     *ALL       *ALL
 _   400            *CMD         *ALL       *ALL
 _   400            *MODULE      *ALL       *ALL
 _   650            *SRVPGM      *ALL       *ALL
 _   654            *STMF        *ALL       *ALL
 _   655            *STMF        .CSS       *ALL
 _   656            *STMF        .JS        *ALL
 _   657            *STMF        .HTML      *ALL
 _   657            *STMF        .PHTML     *ALL
 _   675            *PGM         *ALL       *ALL
                                                                       Bottom
------------------------------------------------------------------------------
F3=Exit  F5=Refresh  F6=Add  F12=Cancel

