Translations:PRINT:DFG:Definitions & Recovery Guide/6/en
TD/OMS Application Management
TD/OMS Application Management Introduction
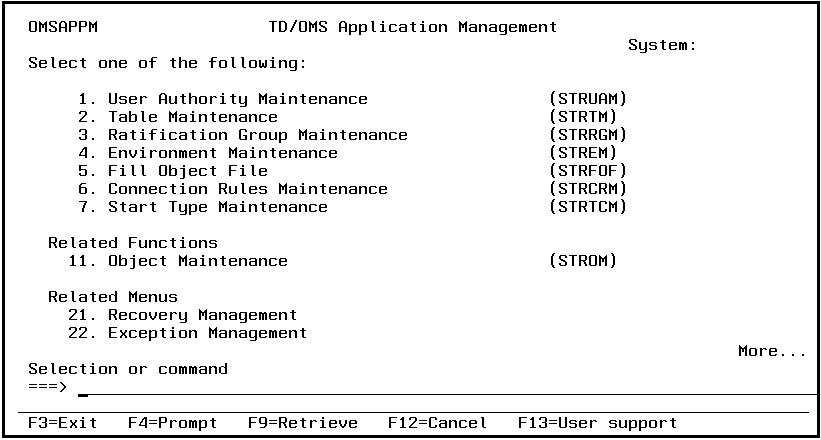
The TD/OMS application management menu enables you to start the TD/OMS definition functions at application level, or to start the Recovery and Exception menus. The functions in this menu are meant for an application manager.
Start User Authority Maintenance (STRUAM)
This menu command starts the user authority maintenance function. Refer to the description of the function User Authority Maintenance for a detailed description.
Start Table Maintenance (STRTM)
This menu command starts the table maintenance function. Refer to the description of the function Table Maintenance for a detailed description.
Start Ratification Group Maintenance (STRRGM)
This menu command starts the ratification group maintenance function. Refer to the description of the function for a detailed description.
Start Environment Maintenance (STREM)
This menu command starts the environment maintenance function. Refer to the description of the function Environment Maintenance for a detailed description.
Start Fill Object File (STRFOF)
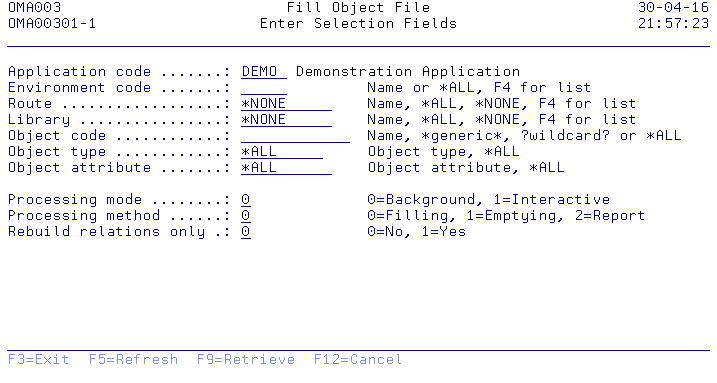
This menu command starts the fill object file function. The function Fill Object File is started if no application code or environment code is entered. Refer to the description of the function Fill Object File for a detailed description.
Connection Rules Maintenance (STRCRM)
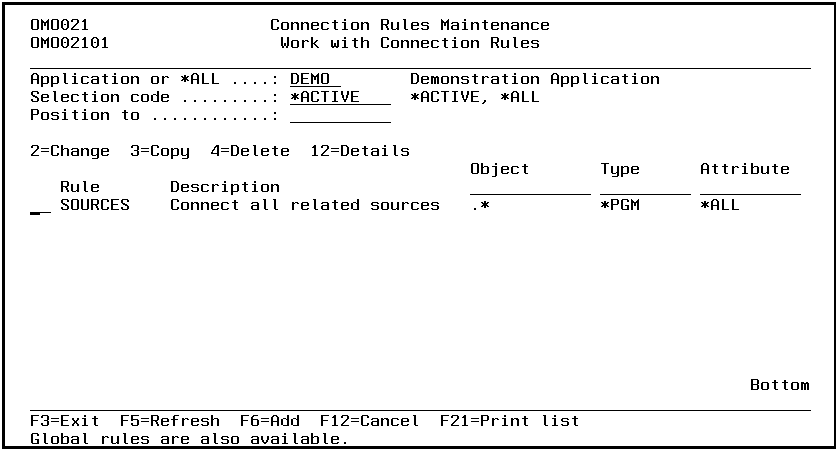
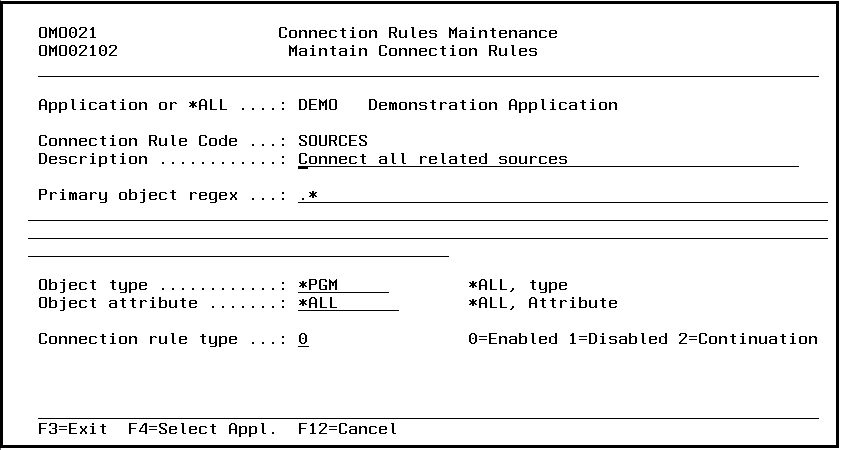
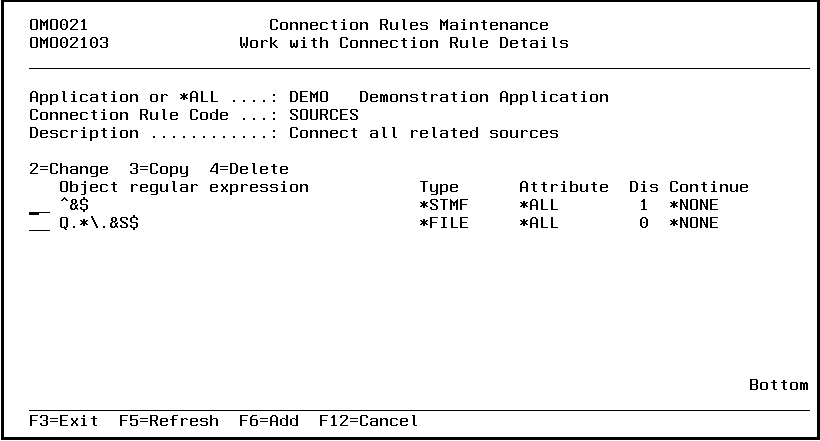
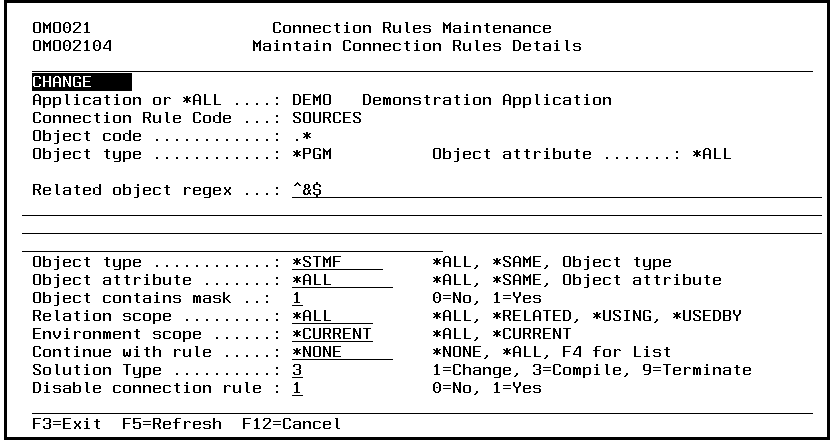
This menu command starts the connection rules maintenance function. Refer to the description of the function Connection Rules Maintenance for a detailed description.
Start Type Maintenance (STRTCM)
This menu command starts the Type code maintenance function. Refer to the description of the function Type code Maintenance for a detailed description.
Start Object Maintenance (STROM)
This menu command starts the object maintenance function. Refer to the description of the function Object Maintenance for a detailed description.
Recovery Management
The Recovery Management menu contains functions concerning Fallback and Recovery. This includes the Dumped Source Maintenance, the Fallback Library Maintenance, the Start Fallback and the Resume Transfer functions.
Exception Management
The Exception Management menu contains functions concerning Exceptions. This includes the Exception Functions Maintenance, the Exception Selection Maintenance and the Conversion Maintenance functions.
Work Management
The Exception Management menu contains functions concerning Exceptions. This includes the Exception Functions Maintenance, the Exception Selection Maintenance and the Conversion Maintenance functions.
Enter Application Code
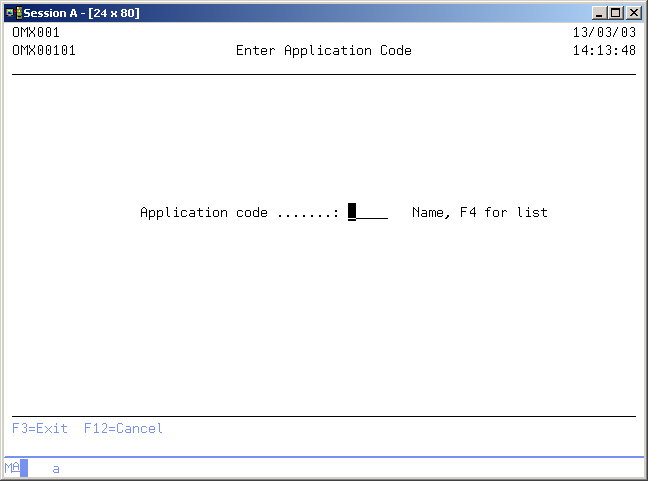
This program is used to let the user sign on to an application and deny the start of any program if they do not have the needed authority.
Enter application code
Use this display to Log on to an application defined in TD/OMS if you are not already signed on to an application. TD/OMS prompts you for the application code you want to work with.
Application code
Enter the application code you want to work in. A blank value is not allowed.
Use F4 to obtain a list of all application codes.
User not authorized
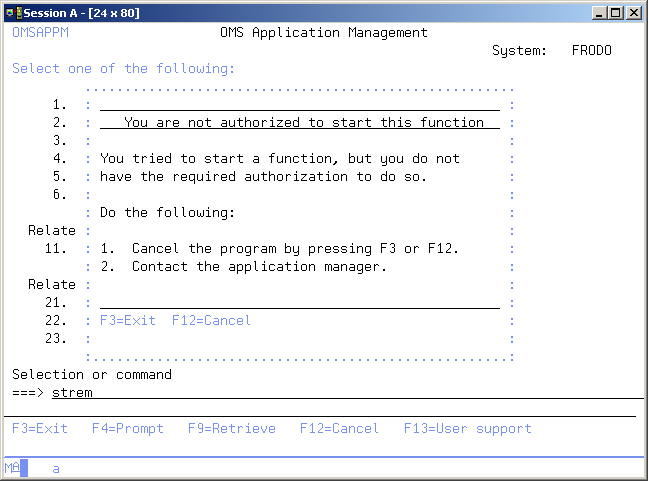
This display appears if you started a TD function, but you are not authorized to use it. Ask the TD manager to increase your authority level.
Expired license
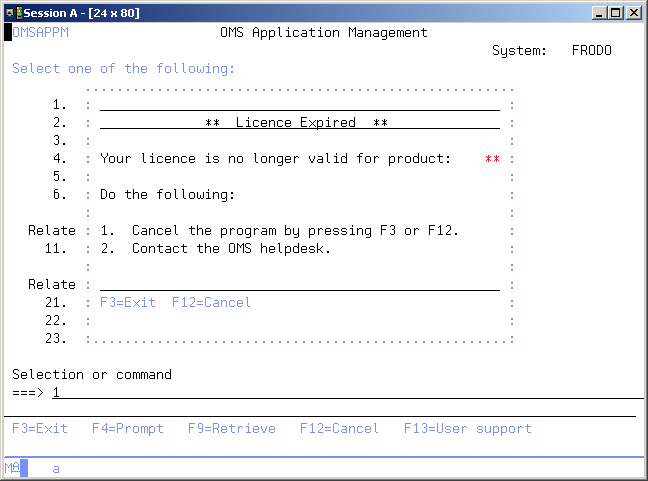
This display appears if you started a TD/OMS module, but your license has expired. You should contact your supplier to get a new license code to prolong the TD/OMS module's use.
Module not registered
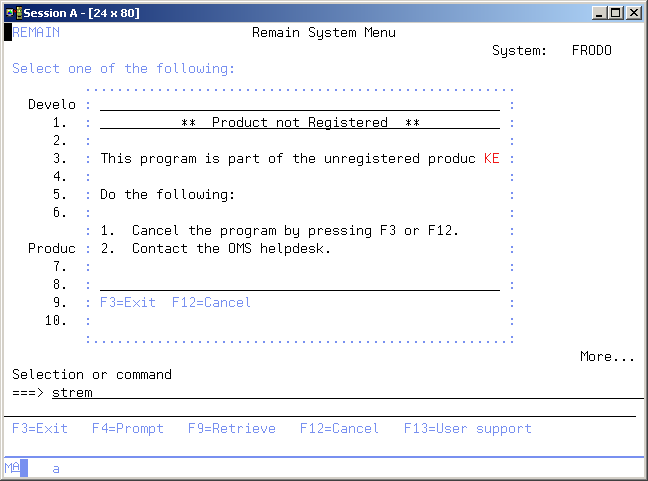
This display appears if you started a TD/OMS module, but your license code is not registered. You should contact your supplier to get the correct license code to use the TD/OMS module.
User Authority Maintenance
The User Authority Maintenance function enables you to maintain the functional security for the application you are working with by grouping users into a pre-defined TD/OMS authorization class.
Users who are not authorized to start a specific function receive a message on their display.
In addition to functional security, specific rights can be assigned to users per environment (See Environment Maintenance).
A user belonging to the group *SECOFR, *SECADM, and the TD/OMS manager can start this function.
Code 3 users are also allowed to start this function once they have been declared.
The TD manager and the users belonging to the *SECOFR and *SECADM class are not automatically granted application rights for other functions.
Work with User Rights
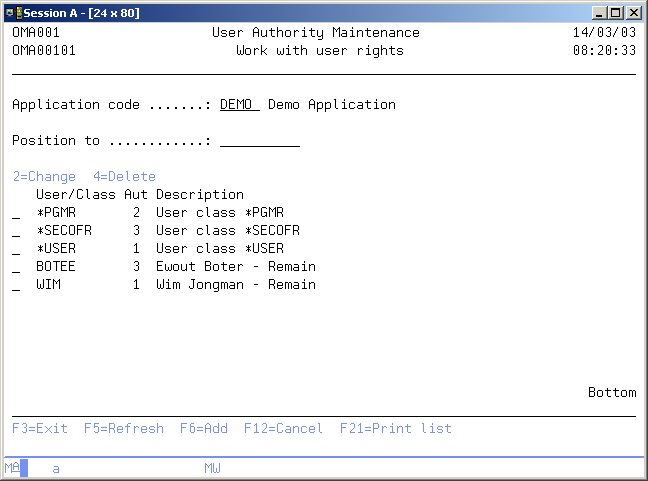
The Work with User Rights display shows the currently authorized users, user groups, and/or user classes for the current application with their assigned authorization code. You can add an entry to the list, remove an entry from the list, or change the entry's assigned authorization code.
Active Application
The active application shows the code of the currently active application. If this field can be changed, you can activate a new application by typing the application you desire and pressing Enter. You can also use the F4=Prompt key to select an application from the list of available applications.
Position to
Use this prompt to go to a particular application in the list.
Option
Use this column to perform different operations on individual entries. The possible values are:
- 2=Change
Change the authorization code of a user, user group, or class. - 4=Delete
Delete the entry from the list. - F21=Print list
Print a user list to your job's current active output queue.
Maintain User Rights
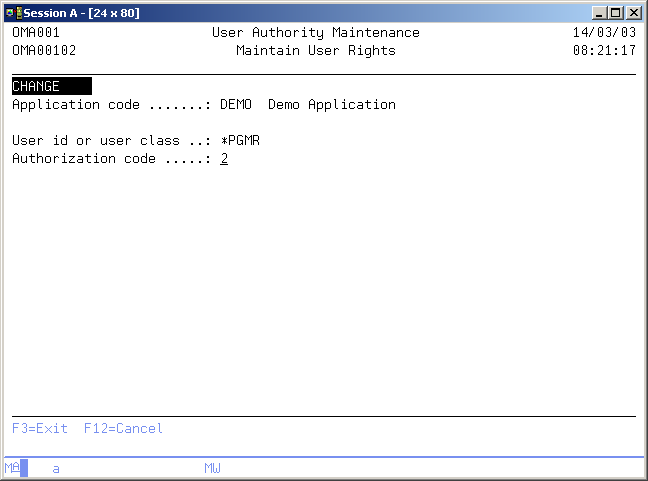
The Maintain User Rights display shows information and enables actions depending on the option chosen on the previous display. The chosen action on the previous display is shown on line three. The following actions can be activated;
- Add
You can add a new entry definition. The entry code and the assigned authorization code must be entered. - Change
You can change the assigned authorization code of an existing entry definition. The current authorization code will be shown. The authorization code can be changed at any time. - Delete
The current entry and authorization code will be shown, including a confirmation message.
User ID or User Class
The user ID or user class element contains an OS/400 user, user group, or user class. The following rules apply to each entry:
- User ID
Enter a valid name of an existing user profile. This is the most detailed level to assign an authorization code to and will overrule any other definition. - User group
Enter a valid name of an existing user group profile. All members of this group are implicitly selected. Specifications at the user level, however, overrule the specifications per user group. - User Class
Enter A Valid User Class. All users belonging to a specified class are implicitly selected. Specifications at group and user level, however, overrule the specification per class.
Use F4=List to get a list of the available users.
Authorization code
TD authorization code determines which TD/OMS functions can be executed for a user, user class, or user group. Some TD/OMS functions also require authority at the environment level. Valid authorization codes are:
- 0=None
No rights are assigned to the related users. This value is useful if authorization codes are assigned at the group or class level and one user has to be omitted. - 1=User
Only functions at the end-user level can be executed. In general, these users can maintain their own user requests and inquire about the related Fix information. The request processor can maintain the requests from all users if this user is assigned authorization code 1. - 2=Programmer
Code two is specially meant for functions at programmer level. They are allowed to maintain their own fixes, connect objects to fixes, and start Fix Processing. Specific authorization depends on the rights assigned at the environment level. The request processor can maintain the fixes from all programmers if this user is assigned authorization code 2. - 3=Application manager
Users with code 3 are application managers and have rights for all functions at the application level.
The assigned authorization code can be changed at any time.
Command Start User Authority Maintenance (STRUAM)
This menu command starts the user authority maintenance function. Refer to the description of the function User Authority Maintenance for a detailed description.
This command has no parameters.
Application level authorization rules
Authorization to an application is determined based on the following sequence. As soon as a valid authorization is found at any level, that authorization is applied. And no further checks will be performed:
- User level Authorization
- If the user has direct authorization to the application, that will be used.
- Group level Authorization
- If the user does not have direct authorization, the system checks for authorization at the group level. This includes both the user’s primary group and any supplemental groups. The group with the highest level of authorization will be considered.
- User class level Authorization
- If the user class has direct authorization to the application, that will be used.
- Group class level Authorization
- The system checks for authorization at the group class level. This includes the user’s group class and the classes of supplemental groups. The group class with the highest level of authorization will be considered.
Environment level authorization rules
If environment level authority is defined for a user, user group, or user class, all authorized users must be explicitly listed. The Authorization to an environment is determined based on the following sequence. As soon as a valid authorization is found at any level, that authorization will be applied and no further checks will be performed:
- Environment level authorization is not marked.
- When no environment-specific authority is defined, Code 2 is allowed for all environments except Production, and Code 3 is allowed for all environments.
- User level Authorization
- If the user has direct authorization to the environment, that will be used.
- Group level Authorization
- If the user does not have direct authorization to environment, the system checks for authorization at the group level. This includes both the user’s primary group and any supplemental groups. The group with the highest level of authorization will be considered.
- User class level Authorization
- If the user class has direct authorization to the environment, that will be used.
- Group class level Authorization
- The system checks for authorization at the group class level. This includes the user’s group class and the classes of supplemental groups. The group class with the highest level of authorization will be considered.
Table Maintenance
The Table Maintenance display enables you to edit various tables defined in TD/OMS. The current table maintenance program enables you to edit the following tables:
Priority Codes
Priority codes are used in Request and Fix Maintenance. A priority code for a request means the requested priority. A priority code for a fix indicates the assigned priority. Only the priority code 5 will be accepted as a valid priority code in Request and Fix maintenance if no priority descriptions have been entered.
Reason Codes
Reason codes are used if a Request or Fix is completed manually, to indicate the reason why the request or fix has to be completed.
Request Types
The Request Type table can be used to further specify your requests. Each request can have a request type assigned to it.
Fix Types
The Fix Type table can be used to further specify your fixes. Each fix can have a fix type assigned to it.
Users with authorization code 3 are allowed to start this function.
Work with tables
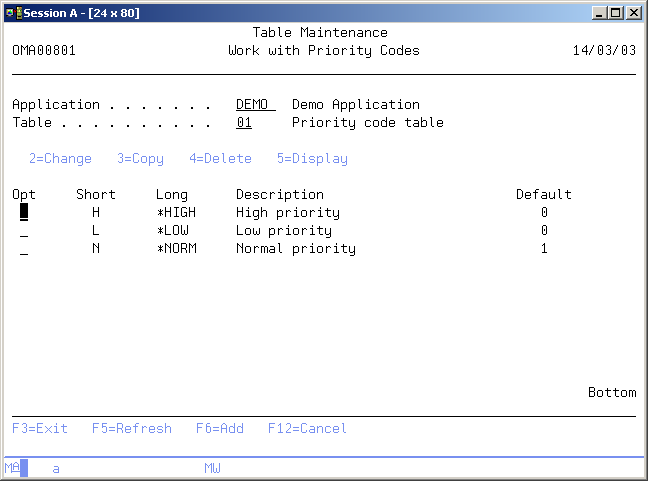
The Work with table codes display shows the currently used table elements for a selected table. The priority table is shown if no specific table is selected. Changing of table is done by entering the table number, or by pressing F4=List to select another table.
Active Application
The active application shows the code of the current active application. If this field can be changed you can activate a new application by typing the application you desire and pressing Enter. You can also use the F4=Prompt key to select an application from the list of available applications.
Table code
The table code identifies a specific TD table. The following tables and related table codes are maintained in the Table Maintenance function:
- 01=Priority codes
Priority codes are used in Request and Fix Maintenance. A priority code means the requested priority for a request. The priority code indicates the assigned priority code for a Fix. - 11=Reason codes
Reason codes are used if a Request or Fix is completed manually, to indicate the reason why the request or fix is to be completed. - 21=Request Types
The Request Type table can be used to further specify your requests. Each request can have a request type assigned to it. - 22=Fix Types
The Fix Type table can be used to further specify your fixes. Each fix can have a fix type assigned to it.
Option
Use this column to perform different operations on individual entries. The possible values are:
- 2=Change
Change the table element. - 3=Copy
Copy the table element. - 4=Delete
Delete the table element. - 5=Display
Display the table element. - F6=Add
Register a new table element.
Confirm delete
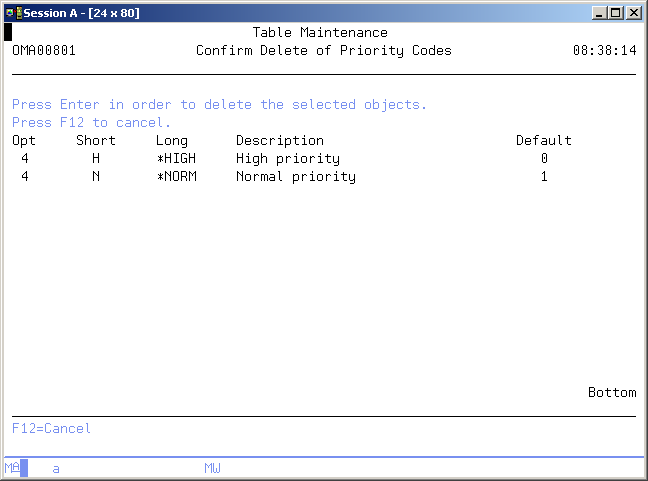
The Confirm Delete of Table Entries display shows all of the table entries you have chosen to delete by selecting option 4 (Delete) on the Work with Table Entries display. The purpose of this display is to enable you to confirm your delete requests before the entries are deleted. Press Enter to confirm the delete of the selected table entries or press F12=Cancel to return to the previous display and change your choices.
Maintain table element
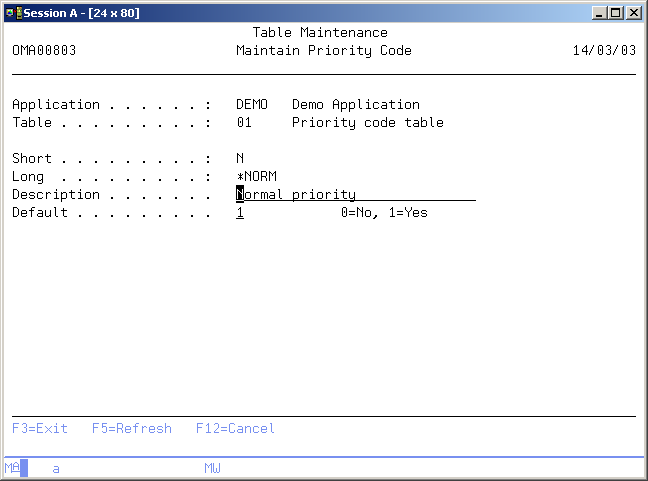
The Maintain Table Element display shows information and enables actions depending on the option chosen on the previous display. The following actions can be activated;
- Add
You can add a new entry definition. The entry code and its attributes must be entered. - Change
You can change some attributes of an existing table element. The current content of these attributes is shown. - Display
You can display some attributes of an existing table element. The current content of these attributes is shown.
Short table key
The short table key is a one character identification of a table entry. It can be used instead of the Long table key.
Long table key
The long table key is a five character identification of a table entry and should have a more meaningful content than the Short table key.
Table item description
The table item description contains the description of a table entry. A blank value is not allowed.
Default indicator
The default indicator can contain the value '1' indicating that this entry will be the default one. Each TD table can have one default entry.
Command Start Table Maintenance (STRTM)
This menu command starts the table maintenance function. Refer to the description of the function Table Maintenance for a detailed description.
STRTM TABC(table)
Table (TABC)
Specify the table to be maintained. Once you started maintaining a table, you are also able to select another table for maintenance. Specify one of the following table codes:
- *PRIORITY
Specifies that the priority table is to be maintained. - *REASON
Specifies that the reason code table is to be maintained. - *TYPES
Specifies that the request type table is to be maintained.
Ratification Group Maintenance
The Ratification Group Maintenance function is used to define the ratification groups which consists of one or more persons authorized to ratify a request or a fix.
When the ratification groups are defined, you are able to link the groups to an environment using the Environment Maintenance function. In combination with the ratification type you can activate the ratification function for an environment.
When a fix or request reaches an environment for which ratification is active, the objects connected to this request or fix are not able to enter the next environment until at least one member of each ratification group has ratified the fix or the request.
Until the objects are ratified, they can only enter environments closer to the development environment. Objects are not able to leave the emergency environment until the fix or request is ratified.
Ratification Group Maintenance
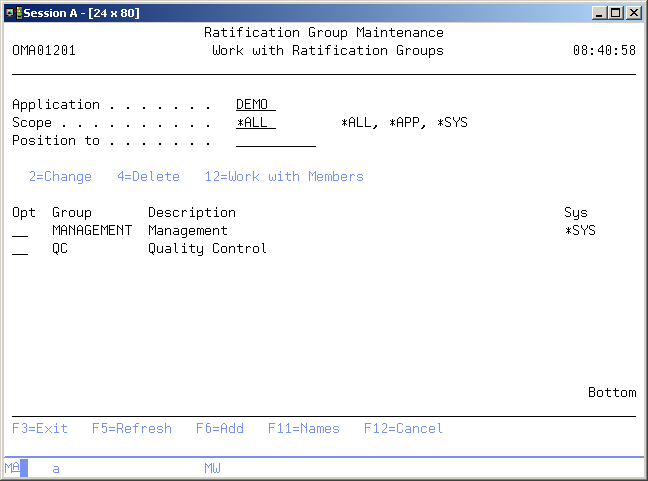
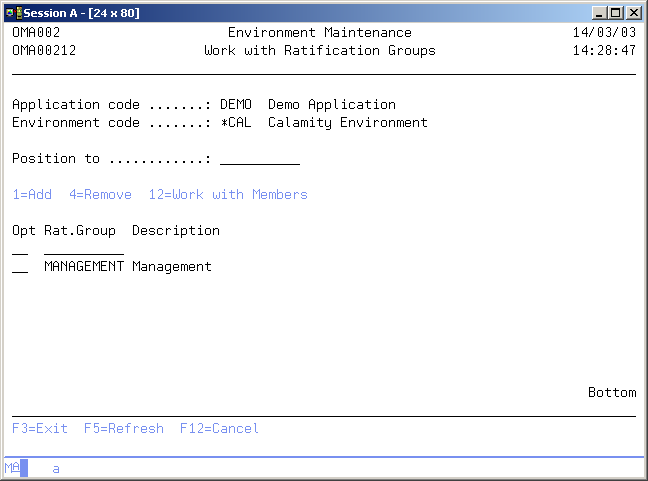
The Work with Ratification Groups display allows you to add, change or remove a ratification group. You are also able to enter the Work with Members display.
To select an entry, type the option number in the option field area and press Enter. For more information about an option move the cursor to the option column and press Help. For more information about a function key, move the cursor to the function key area and press Help.
Application
The application control field shows the code of the current active application. If this field can be changed you can switch into a new application by entering the application code you wish to maintain. You can also use the F4=Prompt key to select an application from the list of available applications.
Scope
Enter the scope in which to view the ratification group list. Select one of the following;
- *ALL
Use this value to view all ratification groups of this application and all system ratification groups from other applications. - *APP
Use this value to view all ratification groups of this application only. These groups can only be used by the current application. - *SYS
Use this value to view only system ratification groups. These member groups can be used in any application.
Option
Use this column to perform different operations on individual entries. Type the option number next to an entry and press Enter. You can type the same option next to more than one entry at a time, and you can also type different options next to different entries at the same time. The possible values are:
- 2=Change
Change the description of the ratification group. - 4=Delete
Delete the ratification group. - 12=Work with member
Enter the Work with Members display. From this display you can assign employees to a ratification group.
Position to
Use this prompt to go to a particular area in the list. Use it for quick repositioning of the list, not for creating a subset of the list. The possible values are:
Name or partial name
Type the name or partial name of the entry you want to go to in the list. The list is positioned to the first entry beginning with the string specified. If no entry exists in the present list, then the list is positioned to the entry immediately preceding the item you need to select.
Use F11=View to view the list with additional information about the entries.
Use F4=List to display a list of possible entries for the field on which the cursor is placed.
Confirm Delete of Ratification Groups
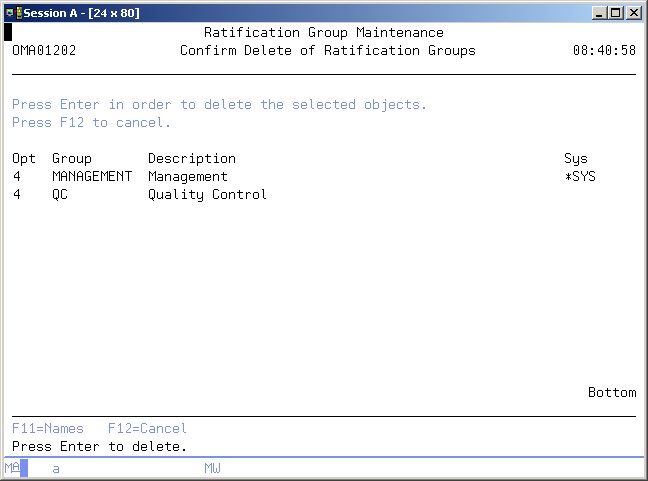
Use this display to confirm the delete requests you have made on the previous display. Press Enter to remove the selected items. Press F12=Cancel to cancel your request.
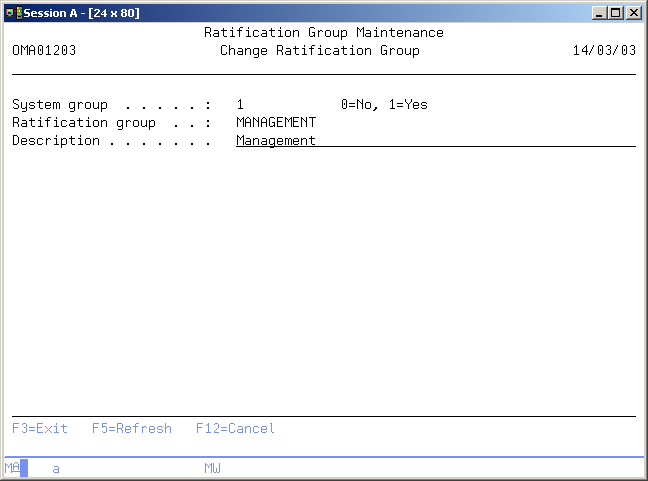
Maintain Ratification Group
The Maintain Ratification Group display enables you to maintain the ratification group data. In add mode, you are able to add a new ratification group. You are able to determine whether this is a system ratification group or a ratification group only active in the current application. For more information about a specific item, move the cursor to that item and press Help.
System Group
Indicates whether this ratification group is a system or an application ratification group. System groups can be used across application where application groups can only be used in the application to which they are assigned.
Ratification group
A ratification group is a group of authorized persons which are allowed to ratify a request or a fix. At least one person of each ratification group must ratify the request or fix before the connected objects are able to leave the environment to which this ratification group is connected.
Note: The ratification type indicates if ratification must be done at the request or at the fix level.
Ratification group description
This element contains the description of the ratification group.
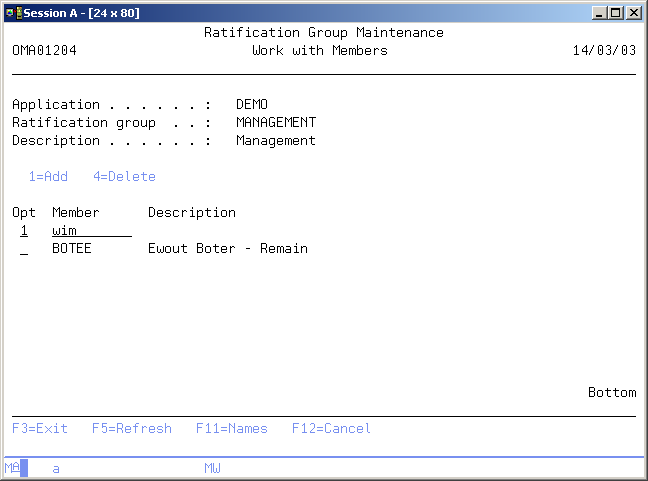
Work with Members
The Work with Members display enables you to maintain the employees that are linked to this ratification group. An employee can be linked to more than one ratification group, and more than one employee can be linked to the same ratification group. Once a employee is linked to a ratification group, he or she is able to start the ratification function for the request or the fix. This enables the employee to ratify the fix and enter his or her findings in the ratification function.
The employees linked to a ratification group, must be a valid i5/OS user profile. For more information about a specific item move the cursor to that item and press Help. For more information about a function key, move the cursor to the function key area and press Help.
Use option 1=Add in combination with a valid user profile to add a member into the ratification group.
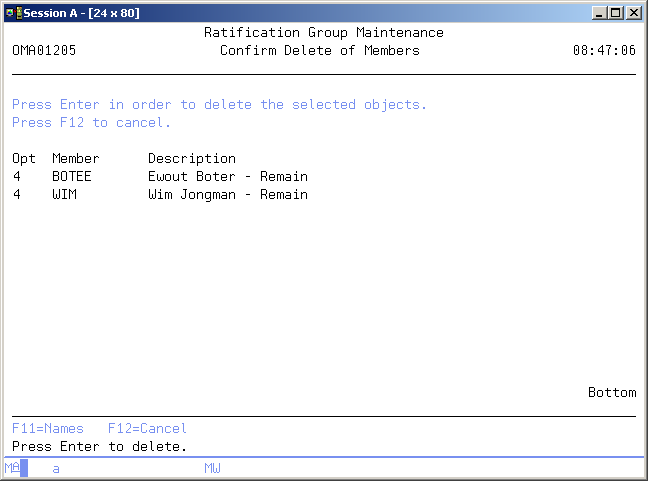
Confirm Delete of Members
This display is shown when you requested a remove of a member from the ratification group. Press Enter to remove the member. Press F12=Cancel to cancel the remove and return to the previous display.
Command Start Ratification Group Maintenance (STRRGM)
This menu command starts the ratification group maintenance function and has no parameters.
Environment Maintenance
The Environment Maintenance function enables you to maintain the environments for the current, active application.
An environment is a phase in the maintenance cycle and normally contains the libraries that are part of it. Empty environments, however, can be declared in order to use them only as a status phase. Object oriented applications will have environments like Development, Test, Acceptance and Production. Objects are registered in TD/OMS including the environment code they reside in. Request, Fix and Solution also relate to an environment indicating the status of the request, fix or solution.
Refer to the Environment concepts for more detailed information about environments.
The following information can be stored per environment;
- Environment attributes
- Security per environment
- Compilation libraries per environment
- Definition of library lists
- Library list attributes
- Distribution list per library list
- Libraries per library list
- Special keywords per library
- Object types and attributes per library
Users with authorization code 3 are allowed to start this function.
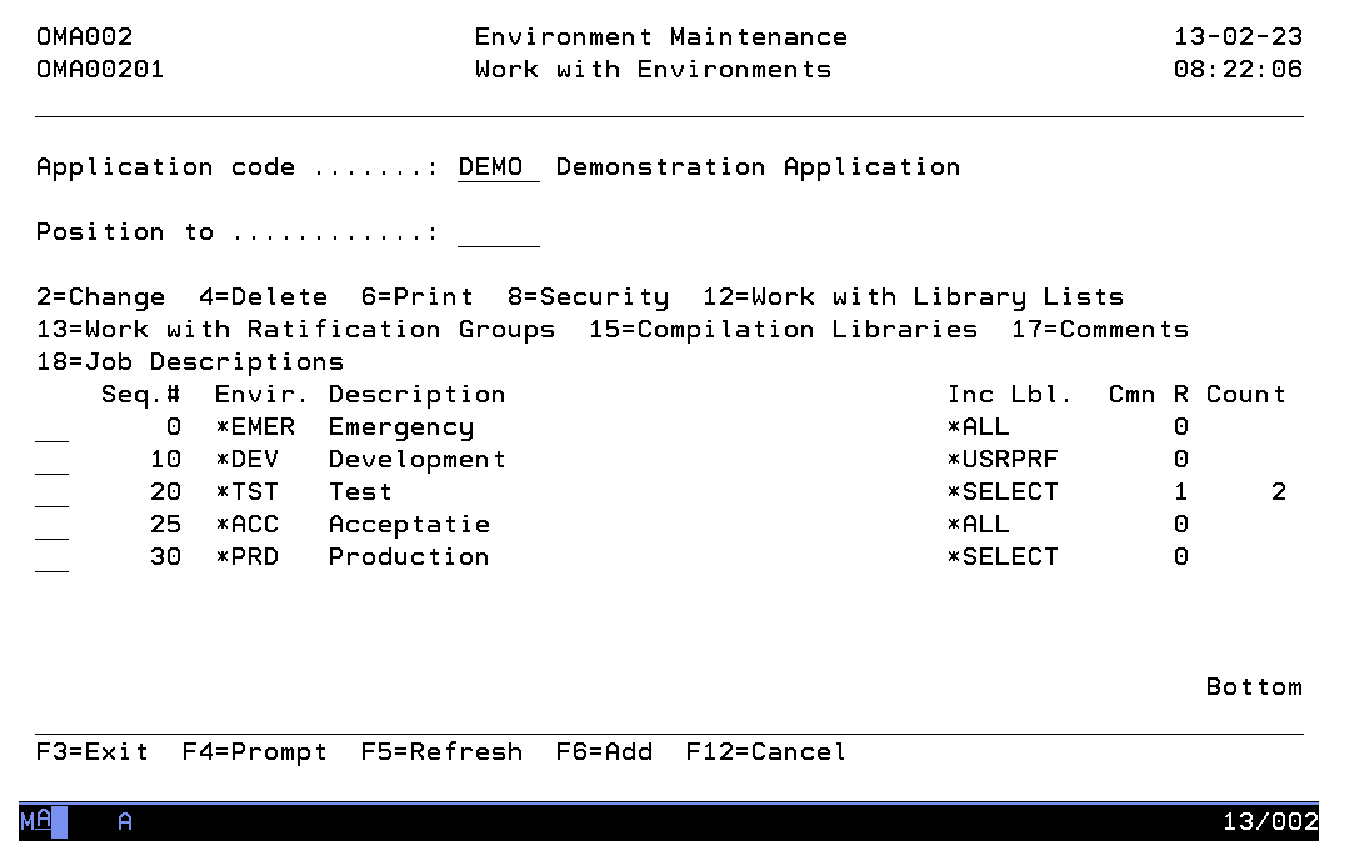
Work with Environments
The Work with Environment display shows the currently defined environment codes with their sequence number, description and library list attribute. You can add an environment to the list, remove an environment from the list, change the attributes of an environment, work with security per environment and work with the library lists per environment.
Active Application
The active application shows the code of the current active application. If this field can be changed you can activate a new application by typing the application you desire and pressing Enter. You can also use the F4=Prompt key to select an application from the list of available applications.
Position to
Use this prompt to go to a particular environment in the list.
Option
Use this column to perform different operations on individual entries. The possible values are:
- 2=Change
Change the sequence number, the description, or the library list attribute of an environment. - 4=Delete
Delete an environment from the list. - 6=Print
Print the environment definitions. - 8=Security
Work with the security definitions of an environment. - 12=Work w. library lists
Work with library lists connected to an environment. This is also the starting point for further definition of libraries per library list and object types per library. - 13=Ratification
Enter the ratification specifications for this environment. The request/fix ratification must be activated before ratification can take place. To do this, use option 2=Change for the environment. - 15=Compilation Libraries
Enter the compilation libraries connected to a specific environment. - 17=Comments
Work with the comments and replies associated with a specific environment. - 18=Job Descriptions
Work with Job Descriptions. - F6=Add
Add a new environment to the list.
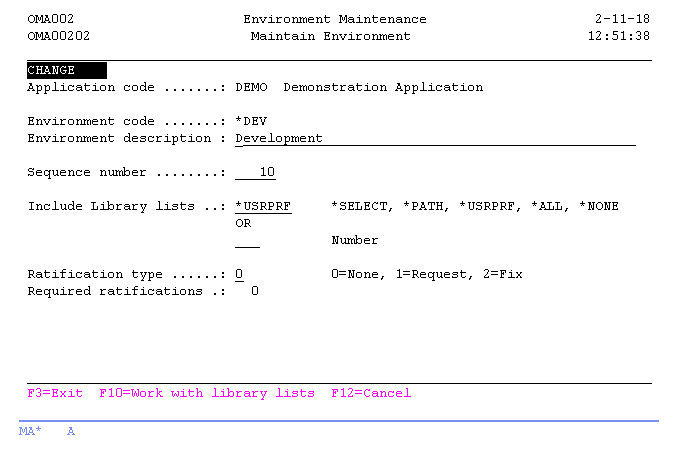
Maintain Environment
The Maintain Environment display shows information and enables actions depending on the option chosen on the previous display. The chosen action on the previous display is shown on line three. The following actions can be activated;
- Add
You can add a new environment definition. The environment code, sequence number, description and library list attribute must be entered. - Change
You can change the sequence number, description and library list attribute of an existing environment definition. The current values are shown. These attributes can be changed at any time and are effective immediately. - Delete
The current environment attributes are shown, including a confirmation message. After pressing "Enter" the environment definition is deleted from the list. Deletion of environments is not allowed if library lists are still connected to the environment.
Environment code
The environment code identifies a step in the application cycle and can be a short description of the environment like *DEV, *TEST or *PROD. The environment code is also used as a status attribute for requests, fixes and objects.
The code cannot be changed once it has been added. To rename an environment, delete the old environment and create a new one.
The values "*NEW", "*LCK", "*LOCK", "*CMP", "*ANY", "**DST", "**ERR" and "*PLND" are reserved by TD/OMS. A blank value is not allowed.
Note: You might wish to start the environment code with an asterisk (*), because this code is also used as a status field.
Environment description
The environment description contains a description of the environment code. A blank value is not allowed.
Environment sequence number
The environment sequence number is of importance for the routing of objects during Object Transfer and indicates the sequence of environments in the maintenance cycle. The following rules apply to the sequence number:
- Number 00 is a reserved number for an emergency environment. At the start of the maintenance cycle you can decide to follow the normal or the emergency routing. The emergency routing is specially useful for the rapid solution of the problems with the production functions. Begin sequencing with a number greater than zero if you do not wish to use an emergency environment.
- The lowest number greater then zero is the start of the normal maintenance cycle and is mostly called development.
- The highest number represents the end of the maintenance cycle, called the production environment. The status of Requests, Fixes and Objects which are placed in this environment by TD/OMS, is set to "*CMP" which indicates completion.
- Other numbers represent the phases in between the lowest and the highest number and will be passed in order of sequence number.
Note: Adding a new "Highest sequence number" to the list, will not result in resetting the status of Requests, Fixes and Objects in the previous highest environment. They will keep the status "*CMP".
Include library lists
The include library list selection code is the conditional controller for TD/OMS during Object transfer procedure: transporting Fixes and Solutions from one environment (From-environment) to a subsequent or previous environment (To-environment). If the TO-environment is divided into more than one library lists, the value of this attribute determines the way of selecting target locations in those various library lists of the TO-environment:
*ALL
All library lists in the TO-environment are automatically selected.
*SELECT
A selection display is shown during Transfer for a selection of library lists. One or more library lists can be selected.
When a transfer path is defined on the task the *SELECT setting will show only the targets that contain the Transfer Path or do not contain any Transfer Path.
*PATH
Only those library lists in the target environment are automatically selected, if the Transfer Path assigned to the Task, matches the Transfer Path that is found in one of the library list definitions of the target environment.
It is possible to define a library list:
- Without Transfer Path and without a User Profile.
- It will receive all objects, regardless of the defined Transfer Path in the Task and the user doing the transfer.
- With a User Profile without Transfer Path.
- In this case, it will be selected only when that user does the transfer.
- With a User Profile and a Transfer Path.
- In this case, it will be selected only when that user does the transfer and the Task has that Path.
- Without a User Profile and with Transfer Path.
- In this case, it will be selected only when the Task has that Path.
*USRPRF
This selection mode can be used to automatically select the correct target library list(s) for a transfer to development in case each developer has its own set of libraries. Also this option may offer a way of additional authority at library list level just preventing generally authorized users to start transfer to specific, individual library lists. An automatic selection of one or more library lists in the TO-environment will be determined by tracing the following series of conditions:
- a match is searched for the Path definition in the library list and one of the following attributes of the Job user profile:
- the user profile,
- the user class,
- the group profile,
- the Group profile class,
- a supplemental group or
- the class of a supplemental group.
- If a target library list was found AND the fix contains a Path code then that Path must also be specified for that target library list. This is an extension of the *PATH selection method.
*NONE
No library lists are selected during Fix Processing, because definitions are absent. This value is meant for environments which serve only as a status phase in the maintenance cycle. No objects are physically transferred.
Number
A selection display is shown during Fix Processing for a selection of the specified number of library lists.
Per selected library list TD/OMS will determine for each object via the object's type and attribute if the object has to be created in that library list.
Note: The values *SELECT, *PATH, *USRPRF, *ALL and *NONE are mutually exclusive with number.
Ratification type
The ratification type defines the method of ratification before objects are able to leave the environment. The possible values are:
- 0=None
This value indicates that no ratification has to be performed for objects passing trough this environment. The objects can be moved from this environment by all authorized persons. - 1=Request
Use this value to indicate that ratification is to be done at the request level. Objects which are connected to the related fixes are not able to leave the environment until the request is ratified by the required number of people. - 2=Fix
Use this value to indicate that ratification is to be done at the fix level. Objects which are connected to a fix are not able to leave the environment until the fix is ratified by the required number of people.
The number of ratifications required to release objects from a fix or request depends on the number of ratification groups defined for the environment.
Required Ratifications
This element indicates how many ratification groups are connected to this environment.
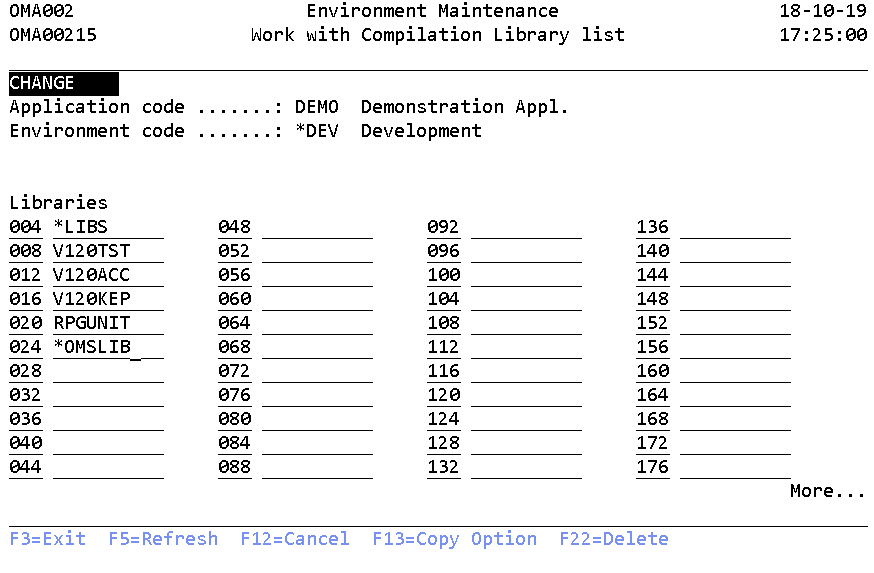
Work with Compilation library list
The Work with Compilation Libraries display shows the currently defined libraries in the selected compilation library list and allows the following actions to be activated;
- Add
If a Compilation library list has not already been defined, you can insert data in the Add mode and a new compilation library list is created. - Change
If there is already a compilation library list defined, you enter in the Change mode and the compilation library list is shown. The attributes can be changed at any time and changes are effective immediately. - Copy
Press F13 to add a new compilation library list using the current compilation library list as a base. A confirmation message is shown. The compilation library list is copied after pressing Enter. - Delete
Press F22 to delete the current compilation library list. A confirmation message is shown. The compilation library list is deleted after pressing Enter.
(STREM -> Option 15)
At the Environment Level
- *LIBS
- If this value is specified then all object and source libraries in the sub-environment will be added to the compilation list automatically.
- *OMSLIB
- A list sequence number along with the special value *OMSLIB indicates after which library the TD/OMS product library will be located. if *OMSLIB is not specified the TD/OMS product library will be added to the end automatically
At the Sub-environment Level
Please note that a compilation at the sub-environment level might not be needed. The value *LIBS and other shared libraries may be added on the environment level.
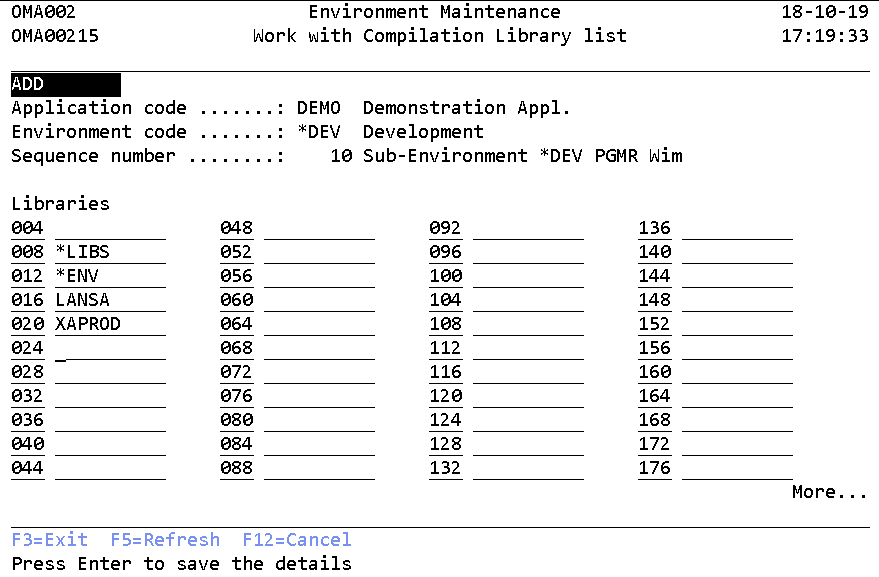
(STREM -> Option 12 -> Option 15)
The Compilation library list has to include library definitions where the compiler may locate object references needed for the compilation process. Generally, the list contains most or all libraries that are part of the library definitions in the actual and possibly higher Environment levels. Besides the TD/OMS product library should be added.
You can change the search order by changing the list sequence numbers. You can insert a library to the search list by adding its name and a sequence number. For example, adding library MYLIB in such a way that it is located after the library with sequence number 10 but before sequence 20, insert a sequence number between 11 and 19 along with the name MYLIB. To remove a library, blank out the library name and press Enter.
- *LIBS
- If this value is specified then all object and source libraries in the sub-environment will be added to the compilation list automatically.
- *ENV
- A list sequence number along with the special value *ENV defined in the compilation library list at the library list level indicates after which library the libraries defined at the environment level will be located.
- *JOBLIBL
- This value is used to insert the current job library list. The use of this value is not recommended because it depends on the current value of the job library list. However, in some rare circumstances it might be useful. Use with caution.
- *OMSLIB
- A list sequence number along with the special value *OMSLIB indicates after which library the TD/OMS product library will be located. if *OMSLIB is not specified the TD/OMS product library will be added to the end automatically
- Other Libraries
- You may need other libraries that you interface with. Add them to the list on the correct location.
Starting from i5/OS V5R1 the maximum number of libraries in the Compilation library list has been increased from 23 up to 248 libraries.
Application Groups Compilation Library List
Be aware that Compilation library lists are defined for a specific TD/OMS sub-environment (Environment library list). However during the object transfer process a Compilation library list is activated separately for each actual object using the transfer buffer variable data related to the current object.
When (in some way), your transfer procedure includes also related objects that may reside in a different Application or Environment, the transfer process will retrieve the Compilation list specification defined in that foreign Environment. This feature may cause unintended or conflicting results. So it is not prefered to use a combination of Compilation library lists and recompiling procedures (by Actions or Exceptions), when objects in different Applications and/or Environments may be involved.
In case of object references located in different Applications or Environments a new search mechanism extending the former Compilation library list method, is available from version V10M0. This new way of dynamic searching and adding relevant, reference libraries to the library list can be defined by use of the Concept of Application groups.
Work with Library Lists
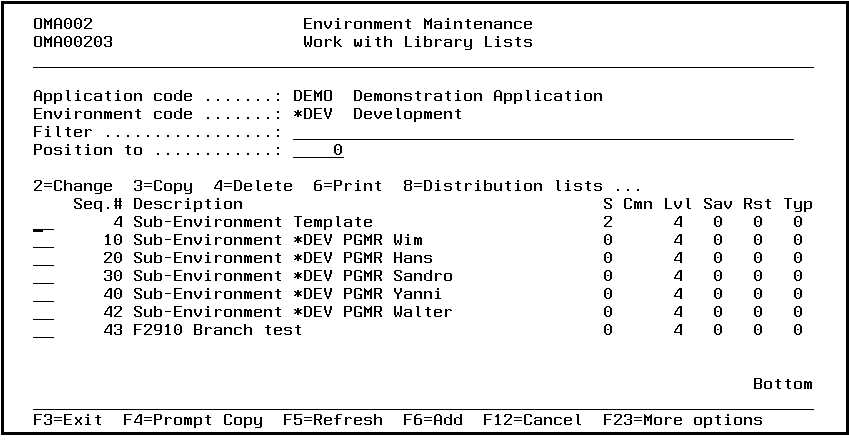
The Work with Library List display shows the currently defined library lists with their sequence number, description and other attributes. You can add a library list, remove a library list, print a library list, change the contents of a library list and work with the distribution list, directories, compilation library list and Transfer path connected to a library list.
The "Library list" definition, used in TD/OMS, should not be confused with the "Library List" in OS/400 which used to set a path. The Library List Defintion in TD/OMS defines which libraries and directories are part of that application. It actually also contains a compilation library list.
Examples of working with more than one library list are;
- To divide the development environment into a library list per programmer. You can select to which library list the objects have to be copied during Object Transfer.
- If a specific environment has more than one database, each containing its own data. The production environment could contain a production database and a database for education purposes. Use the library list definition to define both databases and they will be filled by TD/OMS.
Filter
Use this prompt to display the library list(s) in the list that match the filter criteria.
Position to
Use this prompt to go to a particular library list in the list.
Option
Use this column to perform different operations on individual entries. The possible values are:
- 2=Change
Change the attributes of a library list. - 3=Copy
Copy the library list. The copied list will be added after the last library list. - 4=Delete
Delete a library list from the list. - 6=Print
Print the definition of the library lists. - 8=Distribution list
Enter work with the distribution list connected to a specific library list. - 12=Work with libraries
Enter work with the libraries connected to a specific library list. - 13=Work w Transfer path
Enter work with transfer paths connected to a specific library list. - 14=Work w directories
Enter work with the directories connected to a specific library list.
Note:This option is only valid with OS/400 version V4R3M0 or higher. - 15=Compilation Libraries
Enter work with the compilation libraries connected to a specific library list. - 17=Comments
Enter work with the comments connected to a specific library list. - F6=Add
Add a new library list to the environment.
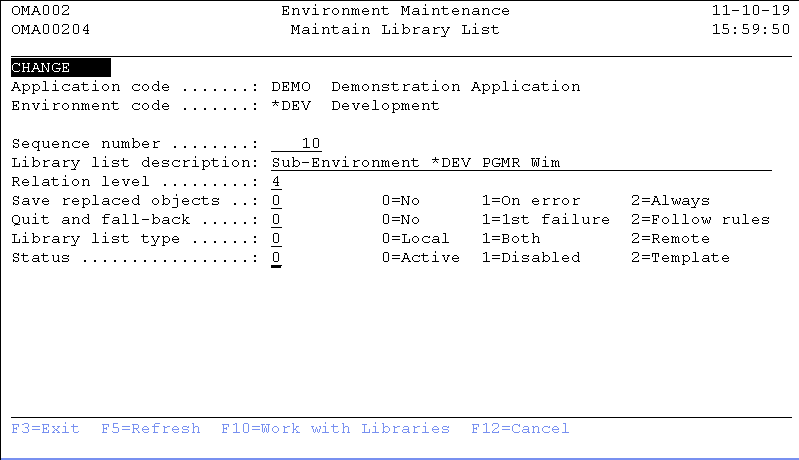
Maintain Library List
The Maintain Library List display shows information and enables actions depending on the option chosen on the previous display. The chosen action on the previous display is shown on line three. The following actions can be activated;
- Add
You can add a new library list definition. - Change
You can change the library list attributes. The current contents are shown. These attributes can be changed at any time and are effective immediately. - Copy
You can add a new library list definition based on an existing one. - Delete
The current library list definition is shown, including a confirmation message. The library list definition is deleted from the list after pressing Enter. The objects however, are not cleared from the TD/OMS object file. Use the function Fill Object File instead.
Library List Sequence number
The Library List sequence number influences the order the library lists are shown, selected and processed during an Object Transfer. You should therefore sequence the Library Lists in order of importance, starting with the local Library Lists. A zero value is not allowed.
The first Library List is the most important List and should always receive all objects. The first Library List is the first List receiving an object.
The transfer of objects is done per Library List. All objects are placed in the first library list then in the second and so on.
Note: The objects are considered transferred if all objects are successfully created in the first library list. If creation of objects fails for additional library list then the Transfer is considered successful. The status of the Fix and the objects are set but the Transfer job ends in error. You can do a Horizontal Transfer if this situation occurs. More about this in the Object Transfer concepts and the Work Management Guide.
Library list description
The library list description contains a description of the library list. A blank value is not allowed.
Relation level
The relation level determines the extent of searching by TD/OMS for the related objects. TD/OMS uses the default highest value 4 unless filled in otherwise. The possible values are:
- 0=DB, relations only
TD/OMS keeps track of relations between physical files (PF) and logical files (LF) only. Other relations are not registered. - 1=Relations only
TD/OMS keeps track of relations between other object types besides the relations between PF and LF without, however, searching for a specific environment and library. - 2=Database, relations and locations in the same library list
This value is equal to value 1 and it specifies the environment code and library name for related objects in the same library list. - 3=Relations in the same environment
This value is equal to value 2 and it specifies the environment code and library name for related objects in the same environment. - 4=Relations and locations
This value is equal to value 3 plus it specifies the environment code and library name for related objects in the same application or related applications.
Note: Value "4" and "0" are the most commonly used values.
Save replaced objects
The save replaced objects indicator instructs Object Transfer if replaced AS/400 objects or details of an OS/400 object have to be saved in the fall back save library.
This element only influences the saving of objects, not an automatic restore of objects after an error during object transfer.
The default value is '0'. The possible values are:
- 0=No
Replaced objects are not saved. - 1=On error
Replaced objects or details of a replaced object are only saved if an error occurred during an object transfer to this library list. - 2=Always
Replaced objects or details of a replaced object are always saved during an object transfer to this library list.
Quit and Fall Back
The Quit and Fall Back indicator instructs Object Transfer if replaced AS/400 objects or details of an OS/400 object in this library list have to be automatically restored if an error occurred during an object transfer. The default value is '0'. The possible values are:
- 0=No
No automatic fall back of replaced objects is executed if an error occurs during object transfer. TD/OMS will create as many objects as possible. - 1=First failure
The processing of this library list will stop and fall back will be executed for all replaced objects in this library list if an error occurred during a transfer in this library list.
If the error occurred in the first selected library list, further processing of other selected library lists will end. Processing will otherwise continue with the next selected library list. - 2=Follow rules
The decision to stop processing and start fall back will depend on a predefined critical object if an error occurred during a transfer in this library list.
Processing will continue and no fall back is executed if this critical object has been processed successfully. The processing will stop and fall back will be executed for all replaced objects if this critical object has not been created at this point in processing.
Further processing of other selected library lists will end if the error occurred in the first selected library list. Processing will otherwise continue with the next selected library list.
A critical object can be selected from the transfer proposal in the fix processing function just before you start the actual transfer.
Library list type
The library List Type is used in conjunction with the Object Distribution module at the moment of an object transfer.
If a library list is selected (manually or automatically), the library list type determines if the objects will be processed only on the current machine, only on remote machines specified in the distribution list, or on both remote and current machine. The possible values are:
- 0=Local
The library list is only valid for the current machine. No distribution to remote machines will be started, even if a distribution list is specified. This is the default value for the library list type. - 1=Both
The library list is valid for both the current machine and for remote machines, specified in the distribution list. The distribution module is activated in order to handle the distribution of objects if a type "1" library list has been processed during an object transfer. - 2=Remote
The library list is only valid for remote machines, specified in the distribution list. No objects are created on the current machine. The distribution module is activated immediately to handle the distribution.
Note: Library list types "1" and "2" will only work if you have the TD/OMS modules Object Distribution and Object Receiving installed on the sending and receiving machine.
Use F10 to proceed with the work with libraries display.
Status
You can use the status option to prevent objects to be distributed to that library list by using option 1=Disable. You can also define this section as a branching template by using option 2=template.
- 0=Active
The library list is used normally when transferring objects. - 1=Disabled
The library list is not used when transferring objects. - 2=Template
The library list is used as a branching template
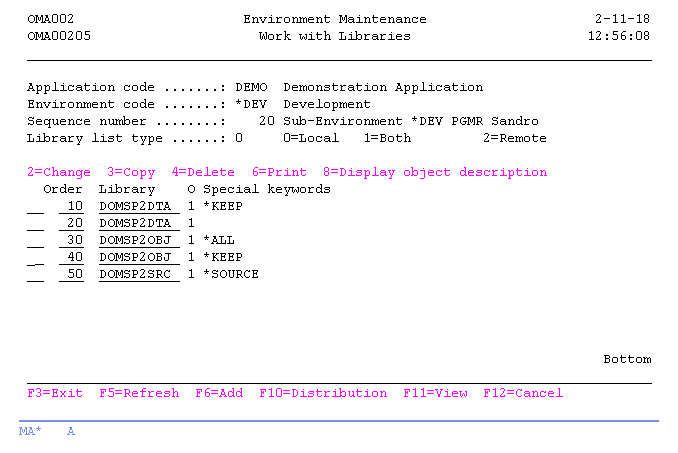
Work with Libraries
The Work with Libraries display shows the currently defined libraries in the selected library list, and includes their predefined special keywords and an object indicator ("O"), indicating whether objects in that library are stored in the TD/OMS database. You can quickly toggle to the other information about the libraries, by using the F11=View function key.
A library definition contains information for TD/OMS about which object types and object attributes must be placed in that library, and where a possible related source can be found.
In general you only have to define the libraries where objects which are owned by this application reside. Most library lists contain one library for database objects, one library for related sources and one library for all other objects. Some additional search libraries can be added to the list for object relation purposes. These search libraries are not really owned by this application.
You can add a library to the list, remove an library from the list, or change the definitions of a specific library.
Option
Use this column to perform different operations on individual entries. The possible values are:
- 2=Change
Change the special keywords for a library, or to change the predefined object types and object attributes. - 3=Copy
Add a new library definition to the list using the copied library as a base. - 4=Delete
Delete a library from a library list. - 6=Print
Print the definitions of a specific library. - 8=Display object descr.
Execute the DSPOBJD command for the selected library.
Library sequence number
The library sequence number influences the order in which libraries are shown. The order is also of importance when relations for a specific object are being built and libraries with the *SEARCH indicator are defined. You can change the sequence number for reordering purposes.
The selection of the library first depends on the placement of the object types, object attributes and special keywords. The library sequence number determines which library is selected only if duplicate definitions exist.
A duplicate definition is found in the example below:
Order Library      Type & keywords
10    DOMST1OBJ 1  *ALL
20    DOMST1DTA 1  *FILE *SOURCE
30    DOMST1SRC 1  *SOURCE
The library DOMST1DTA is to receive the objects of type *FILE. This definition states that the sources of these objects must also be placed into this library. The application manager intended to place the sources of other objects into the DOMST1SRC library. To find a source library, TD/OMS first checks if the *SOURCE keyword was defined for the library receiving the object. If the keyword was not found then the library list is searched in sequence. This means that all sources would be placed in the DOMST1DTA because it is the first *SOURCE library. This is clearly not the intention of the application manager.
The definition should be entered like this:
Order Library      Type & keywords
10    DOMST1OBJ 1  *ALL
20    DOMST1SRC 1  *SOURCE
30    DOMST1DTA 1  *FILE *SOURCE
Files are placed into the DOMST1DTA library. The source is also placed into this library because of the keyword *SOURCE. Other objects are placed into the DOMST1OBJ library. This library does not contain the *SOURCE keyword. This means that TD/OMS starts to search the library list and finds the DOMST1SRC library as the first *SOURCE library. This is a correct definition.
Library
The library name is an OS/400 library or it can be defined as a logical library for describing folder and 4GL model storage information. Libraries are checked for existence if the library list type has a value of "0" or "1".
Refer to the functions Folder library definition and 4GL library definition for more detailed information about logical library names.
Use F6 to add a new library to the list.
Use F10 to proceed with the Work with Distribution Entries display.
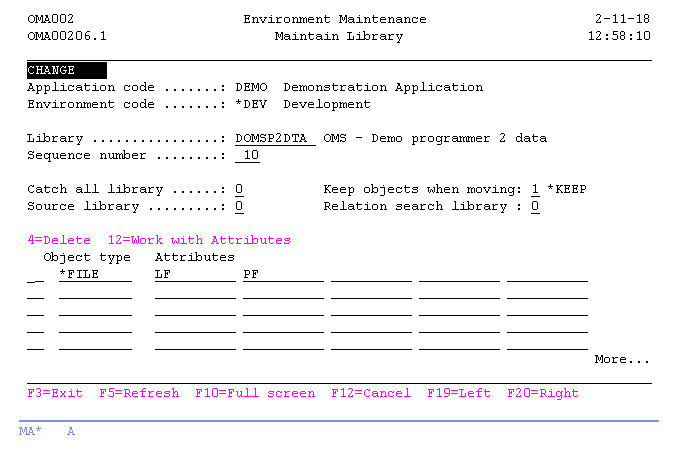
Maintain Library
The Maintain Library display shows information and enables actions depending on the option chosen on the previous display. The chosen action on the previous display is shown on line three. The following actions can be activated;
- Add
You can add a new library definition. The library name, sequence number, special keywords and object types must be entered. - Change
You change can all definitions of the selected library. The current values are shown. These attributes can be changed at any time and are effective immediately. - Copy
You can add a new library list definition based on an existing one. - Delete
The current library definitions are shown, including a confirmation message. The library definition is deleted from the list after pressing Enter.
Library
The library name is an OS/400 library or it can be defined as a logical library for describing folder and 4GL model storage information. Libraries are checked for existence if the library list type has a value of "0" or "1".
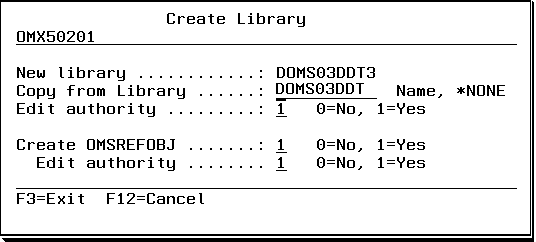
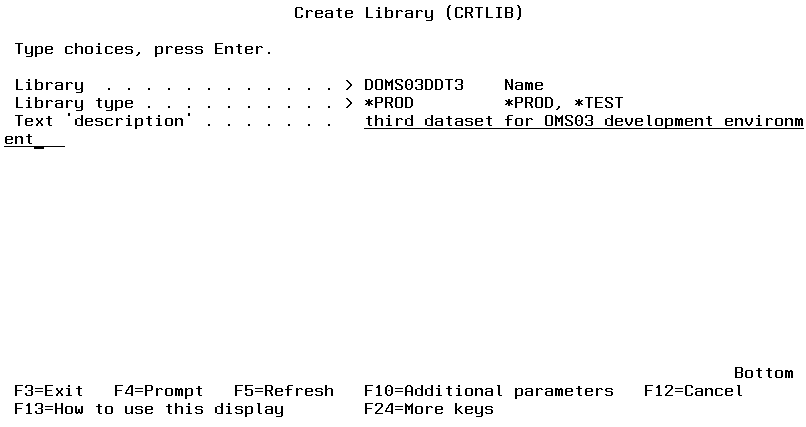
You will be prompted to create the library when the name entered is not found.
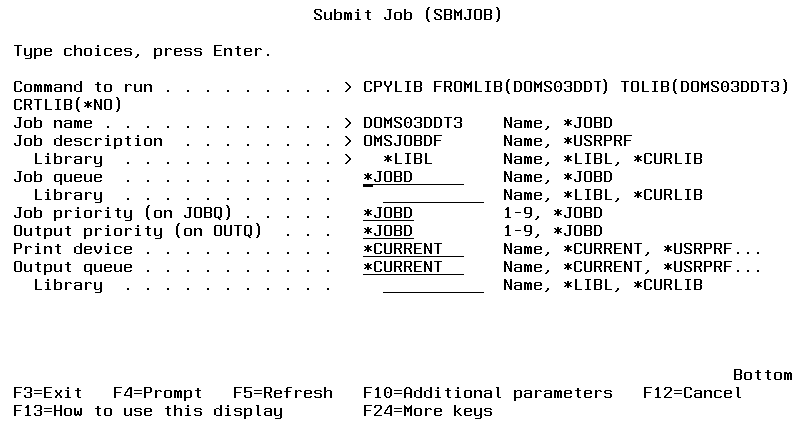
Enter a valid library name in the Copied from Library field to copy the contents from an existing library into the new library or leave the value to *NONE to skip this step. You will be prompted to create the library and enter a description in all cases
When you want to copy the contents of an existing library a SMBJOB command is prompted which uses the Fast jobdescription defined at the application level.
The SBMJOB will run under your userprofile by default. Please make sure that your userprofile has sufficient authorisation to copy all the objects.
Refer to the functions Folder library definition and 4GL library definition for more detailed information about logical library names.
Template
In case you are defining a branch template library, the following special values may be used to compile a library name during the creation of a branch:
- %B
- The Branch code is used to compile the name of the library during the creation of the branch. Keep the Branch number to a reasonable width (e.g. 5 or 6) in order to be able to use additional decorations in the name.
- %U
- The first 3 positions of the current username are used to compile the name of the library during the creation of the branch.
- %S
- A sequence number is used to compile the name of the library during creation of the branch. The sequence number is 6 long and will return to zero after 999999 branches have been created.
Examples for library generation
%S: 000016
%U: PATRICIA
%B: B01233

+---------------------------------+
¦ Base value      Generated value ¦
+---------------------------------+
¦  %U%SD          PAT000017D      ¦
¦  DM%BD          DMB01233D       ¦
¦  %B%S%U         B012336PAT      ¦
+---------------------------------+
%S: 312882
%U: PATRICIA
%B: B1233

+---------------------------------+
¦ Base value      Generated value ¦
+---------------------------------+
¦  %U%SD          PAT312883D      ¦
¦  DM%BD          DMT01233D       ¦
¦  %B%S%U         B123382PAT      ¦
+---------------------------------+
Library sequence number
The library sequence number influences the order in which libraries are shown. The order is also of importance when relations for a specific object are being built and libraries with the *SEARCH indicator are defined. You can change the sequence number for reordering purposes.
The selection of the library first depends on the placement of the object types, object attributes and special keywords. The library sequence number determines which library is selected only if duplicate definitions exist.
A duplicate definition is found in the example below:
Order Library      Type & keywords
10    DOMST1OBJ 1  *ALL
20    DOMST1DTA 1  *FILE *SOURCE
30    DOMST1SRC 1  *SOURCE
The library DOMST1DTA is to receive the objects of type *FILE. This definition states that the sources of these objects must also be placed into this library. The application manager intended to place the sources of other objects into the DOMST1SRC library. To find a source library, TD/OMS first checks if the *SOURCE keyword was defined for the library receiving the object. If the keyword was not found then the library list is searched in sequence. This means that all sources would be placed in the DOMST1DTA because it is the first *SOURCE library. This is clearly not the intention of the application manager.
The definition should be entered like this:
Order Library     Type & keywords
10    DOMST1OBJ 1 *ALL
20    DOMST1SRC 1 *SOURCE
30    DOMST1DTA 1 *FILE *SOURCE
Files are placed into the DOMST1DTA library. The source is also placed into this library because of the keyword *SOURCE. Other objects are placed into the DOMST1OBJ library. This library does not contain the *SOURCE keyword. This means that TD/OMS starts to search the library list and finds the DOMST1SRC library as the first *SOURCE library. This is a correct definition.
Use the special value *NEXT to use the next free library sequence number.
Catch all library
A library with the catch all indicator specified indicates that that library is the default library to be used. Objects with an unspecified object type are placed in this library. The order of specifying the catch all library is of no importance.
If no catch all library is defined in a library list, only objects with the specified types are created in that library list.
Keep library
The Keep library indicator is used for a specific library to indicate that objects are not being removed by TD/OMS if a move operation is executed during Object Transfer. This is useful for libraries containing database objects, because the data in those files should be kept for testing purposes.
Note: A keep library will keep the objects during Object Transfer. A related source member however will always be removed after a move action. Use an exception if you also want to retain the source.
Source library indicator
The Source library indicator is used to define for a specific library that the library also contains related sources of objects. All source libraries are checked in the Fill Object File function, in order of appearance.
The definition of source libraries is also used during Object Transfer to decide where source members have to be stored. If an object is placed in a library which is also defined as a source library, the related source of that object is placed in that library. If an object is placed in a library which is not defined as a source library, the first source library (if any) in that library list will be used.
Refer to the Source handling concepts for more detailed information.
Relation search library
A library with the special keyword *Search is not an active part of the actual Environment library definitions, but it is mostly part of another application environment definition. A library with this indicator specified, can not have any other indicator specified. This search-library is used to tell TD/OMS that unresolved object relationships could be located in that library. An unknown object relation location is most commonly signaled when applications are interfacing through a master file or a program object uses system procedures or API's.
For example when your objects are using any object from the QSYS library, define the QSYS library with the search indicator. Now the relationship engine will check the QSYS library when relations of objects in the actual application must be built.
NOTES: A search library should not be defined in each TD/OMS library list (subenvironment). You only need to define search libraries at the highest production environment, because the search engine always checks all higher environments for related objects.
Since TD/OMS V10.0 an alternative method for searching object relationships in different applications may be implemented by use of the Concept of Application groups.
Option
Use this column to perform different operations on individual entries. The possible values are:
- 4=Delete
Delete an object type from the list - 12=Attributes
Continue with a window containing all attributes for the selected object type.
Object type definition
The object type is defined in the Environment Maintenance function to specify for a specific library which objects are to be placed in that library during an object transfer.
Object attribute
The object attribute definition is defined in the Environment Maintenance function to indicate for a specific object type which objects with that attribute are to be placed in the library you are working with. If you leave these fields blank, TD/OMS selects all attributes for the specified object type.
Use F10 to continue the function at the "Work with Object Types" display.
Use F19 to Left enables you to see the information at the left hand side of the current display.
Use F20 to Right enables you to see the information at the right hand side of the current display.
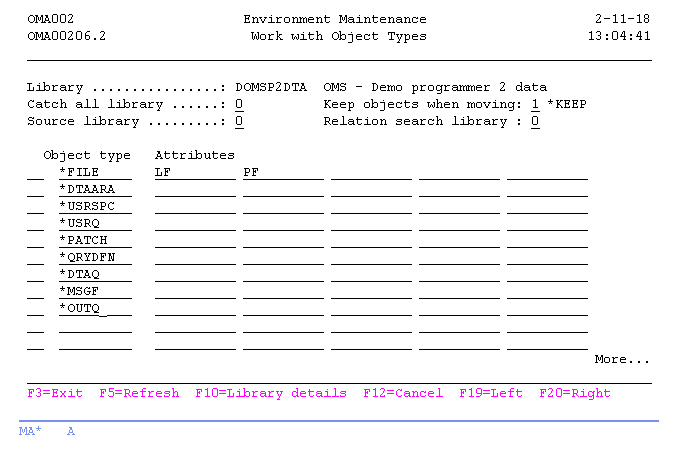
Work with Object Types
The Work with Object Types display shows the defined object types and attributes for a specific library and enables you to change these definitions.
This display is useful if a large number of object types have been defined for a specific library.
Use F10 to switch back to the library details.
Use F19 to Left enables you to see the information at the left hand side of the current display.
Use F20 to Right enables you to see the information at the right-hand side of the current display.
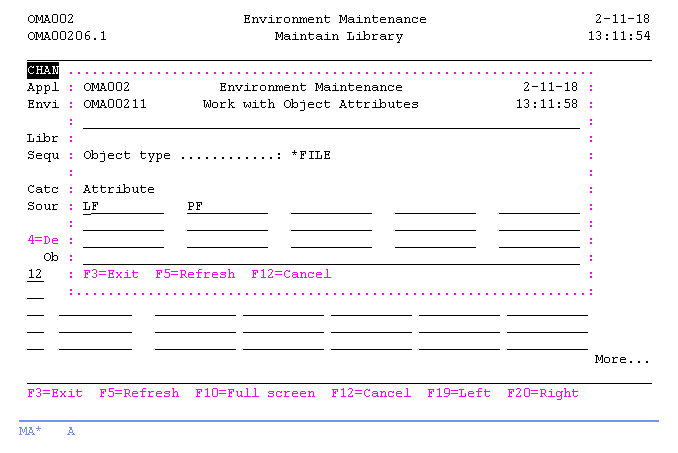
Work with Object Attributes
A window is shown containing defined object attributes belonging to the object type. If no attributes are defined, all attributes are selected for the object type. Enter a valid object attribute. TD/OMS does not check for validity. Return to the previous display by pressing Enter.
Object attribute
The object attribute definition is defined in the Environment Maintenance function to indicate for a specific object type which objects with that attribute are to be placed in the library you are working with. If you leave these fields blank, TD/OMS selects all attributes for the specified object type.
Work with Distribution Lists
(STREM -> Option 12 -> Option 8)
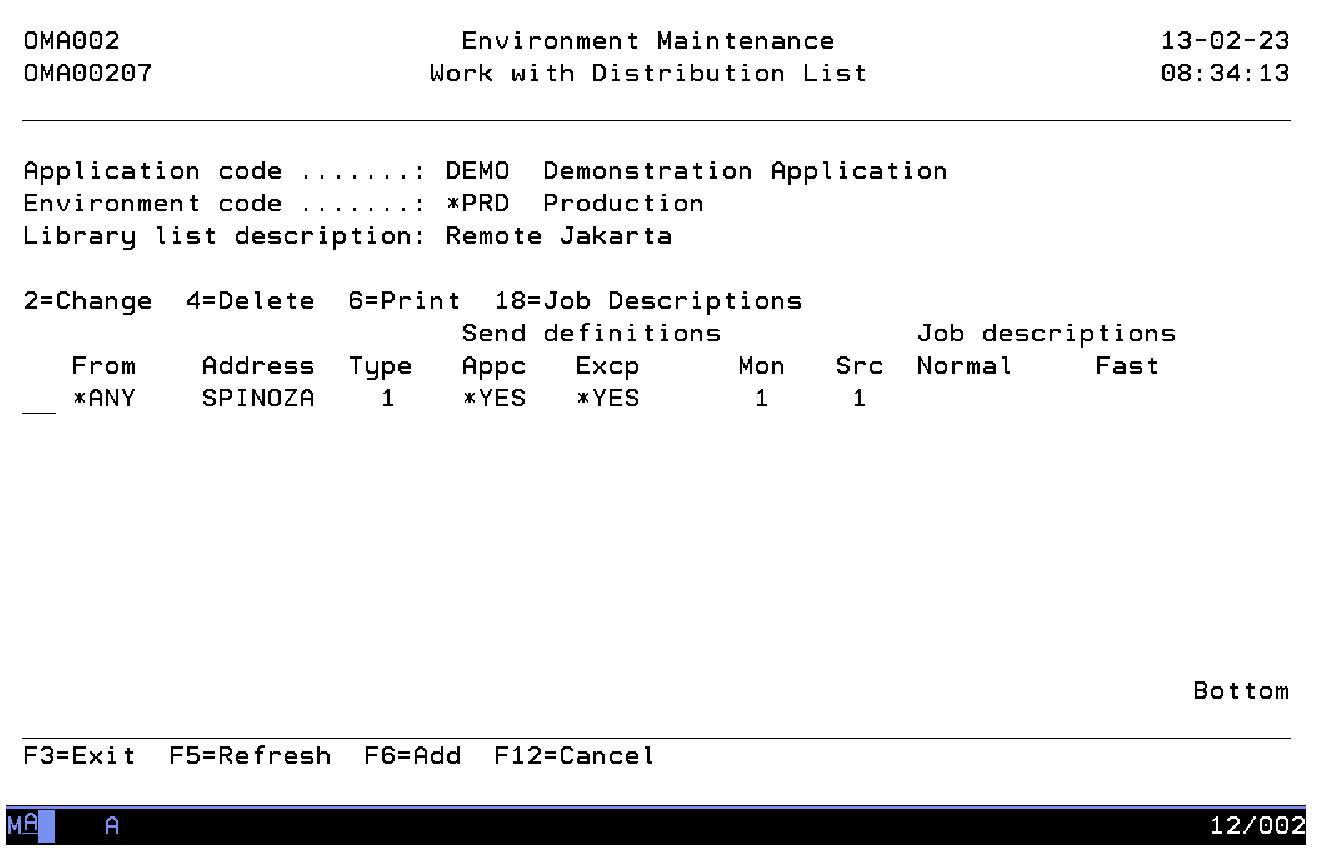
The Work with Distribution List display shows the currently defined distribution entries connected to the current library list you are working with. All attributes of an distribution entry are shown. A distribution list is used by TD/OMS during Object Transfer to detect the addresses to which information has to be sent.
If a specific library list is selected during Object Transfer, and the library list type contains value '1' or '2', indicating a remote library list, then the distribution list is checked for its definitions.
You can add a distribution entry, remove a distribution entry or change the contents of a distribution entry.
Option
Use this column to perform different operations on individual entries. The possible values are:
- 2=Change
Change the definition of a distribution entry. - 4=Delete
Delete a distribution entry from the list. - 6=Print
Print this distribution entry. - 18=Job Descriptions
Work with Job Descriptions. - F6=Add
Add a new distribution entry to the list.
Maintain Distribution Entry
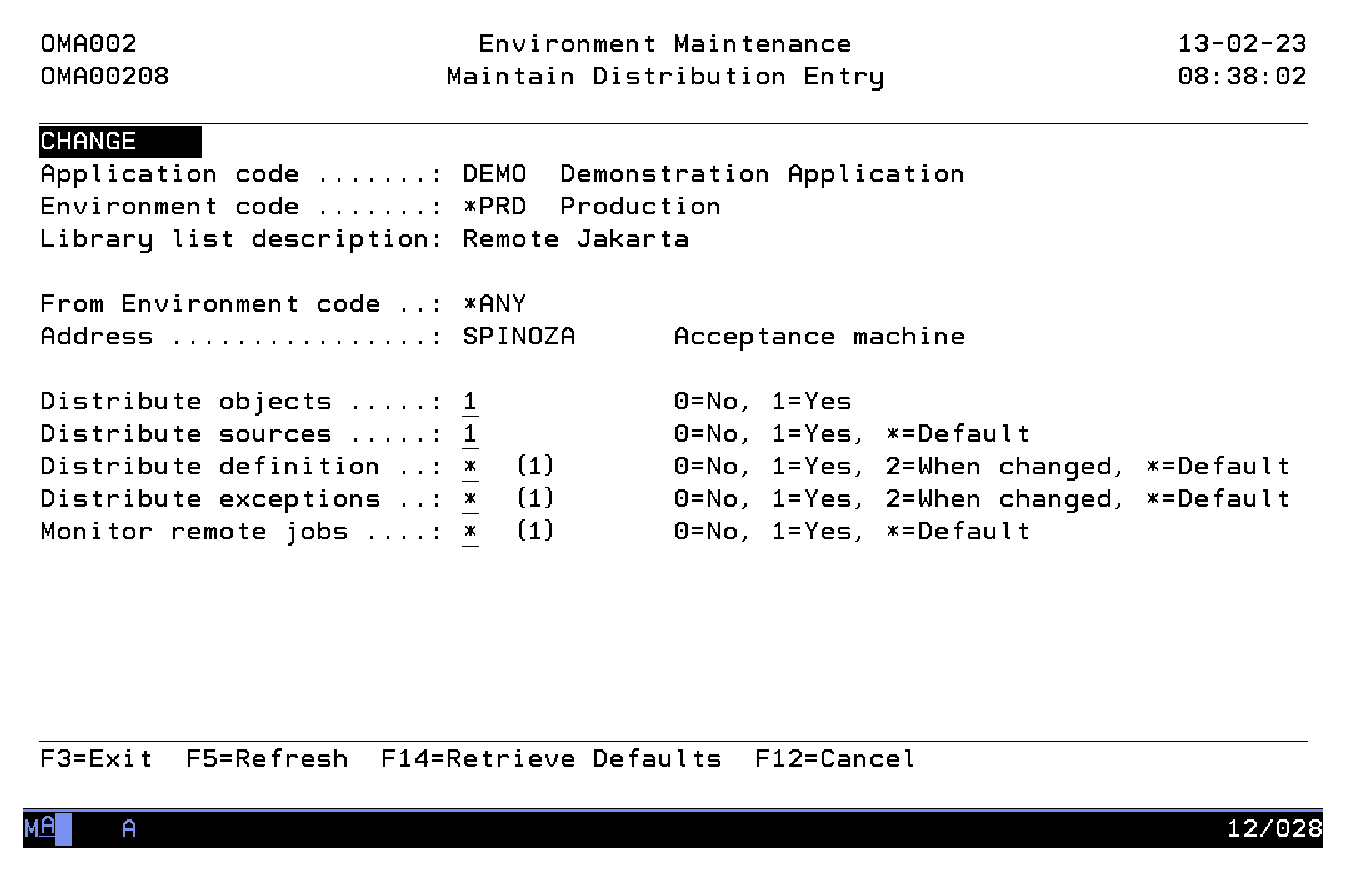
The Maintain Distribution Entry display shows information and enables actions depending on the option chosen on the previous display. The chosen action on the previous display is shown on line three. The value '*' in an input capable field indicates that the default values are being used from a higher definition level. Each address used, has default values specified via the Remote Location Maintenance function. This is the highest definition level per address. Some exceptions can be defined at application level in the Remote Location Override function. This is the second definition level per address. In this function you can use the '*' value to adopt the actual value from a higher level. Other values will only be used for this specific entry.
The following actions can be activated;
- Add
You can add a distribution definition and enter all distribution attributes. - Change
You can change some attributes of the distribution definition. The current contents is shown. These attributes can be changed at any time and are effective immediately. - Delete
The current distribution definition is shown, including a confirmation message. The distribution definition is deleted from the list after pressing Enter.
From environment code
The From Environment Code is used for further specification when distribution has to be activated. Distribution of objects will only be activated when objects are being transferred from an environment that is declared in this From Environment Code.
Use the special value *ANY to indicate that this distribution entry is valid for all "from environments".
Address
The address identifies the name of a remote AS/400. The TD/OMS distribution services require the name of a remote location to which objects can be distributed. The remote address must be defined first in the Remote Location Maintenance function in the Distribution menu.
Distribute object indicator
The Distribute object indicates the type of distribution to be activated. The possible values are:
- 0=No
No objects are sent to the address specified. Only a job is sent in order to start Object Transfer on the address specified. Use this value only if objects were distributed to the address in an earlier phase of the maintenance cycle. - 1=Yes
The objects are sent to the address specified, followed by a job for processing these objects.
Example: You use the environments *DEV(elopment), *TEST, *ACC(eptance) and *PROD(uction). The acceptance is done on the remote system. If objects are transferred from *TEST to *ACC the distribution process has to be activated to send the object. If objects are transferred from *ACC to *PROD, the objects do not have to be re-sent to the remote system. They only have to be transferred on the remote system from *ACC to *PROD. Use the following specification:
Environment From Environment Type
*DEV
*TEST
*ACC        *TEST            1
*PROD       *ACC             0
Distribute sources
The Distribute Sources indicates if sources must be sent to the remote address. The possible values are:
- 0=No
No source members are sent to the remote address, except for logical files. - 1=Yes
All source members are sent to the remote address. *=Default
The value '*' indicates that the default values are being used from a higher definition level. Each address being used, has default values specified via the Remote Location Maintenance function. This is the highest definition level per address. Some exceptions can be defined at application level in the Remote Location Override function. This is the second definition level per address.
The lowest level of definition is in the Environment Maintenance function on the Maintain Distribution List Display.
Send application definitions
The Send Application Definitions indicator is used by TD/OMS to indicate if definitions have to be sent to the remote address. The possible values are:
- 0=No
No definitions are sent to the remote address. This value is used if you do not wish the local definitions to be made active on the remote location. Please keep in mind that the remote location must have valid definitions before a remote transfer can take place. You must manually enter the remote definitions if this value is used. - 1=Yes
The definitions are always sent to the remote location. Each time objects are distributed to the remote location the definitions are included and will automatically be implemented. - 2=When changed
The definitions are only sent to the remote location if some of the definitions have been changed. TD/OMS keeps track of changes and determines if the definitions have to be sent.
Note: The sending AS/400 is not able to detect a failure in the distribution. In other words; The mutation flags which are used to trigger the sending of the definitions are reset after the definitions have been sent to the remote location. If the distribution fails, you must manually set these flags by using the Vary Definition Distribution command. This will force the definition distribution on the next transfer to this location. *=Default
The value '*' indicates that the default values are being used from a higher definition level. Each address which is used, has default values specified via the Remote Location Maintenance function. This is the highest definition level per address. Some of the attributes can be altered at the application level by using the Remote Location Override function. This is the second definition level per address.
The lowest level of definition is in the Environment Maintenance function on the Maintain Distribution List Display.
Send exception definitions
The Send Exception Definitions indicator is used by TD/OMS to detect if exceptions must have to be sent to the remote address. The possible values are:
- 0=No
No exception definitions are sent to the remote address. This value is used if you do not wish the local exceptions to be made active on the remote location. - 1=Yes
The exceptions are always sent to the remote location. Each time objects are distributed to the remote location the definitions are included and will automatically be implemented. - 2=When changed
The exceptions are only sent to the remote location if some of the definitions have been changed. TD/OMS keeps track of changes and determines if the definitions have to be sent.
Note: The sending AS/400 is not able to detect a failure in the AS/400 part of the distribution. In other words, after exceptions are sent to the remote location, the alteration flags which are used to trigger the sending of the exceptions are reset. If the distribution fails, you must manually set these flags by using the Vary Definition Distribution command.
This will force the exception distribution on the next transfer to this location. *=Default
The value '*' indicates that the default values are being used from a higher definition level. Each address that is used, has default values specified via the Remote Location Maintenance function. This is the highest definition level per address. Some of the attributes can be altered at the application level by using the Remote Location Override function. This is the second definition level per address.
The lowest level of definition is in the Environment Maintenance function on the Maintain Distribution List Display.
Monitor Remote Job
The Monitor Remote Job indicates, whether a remote distribution job started from the actual system location, will be monitored locally i.e. the distributing system. The possible values are:
- 0=No
Jobs on the remote system address are not being monitored. - 1=Yes
Remote system jobs are being monitored. The status of the process will be logged at four points during the distribution and receiving process:- The first logging is recorded once the distribution process has been sent successfully.
- Next message is sent to the originating TD/OMS on the sending address once the receiving job starts receiving the network files.
- The actual start of the Object Transfer procedure at the remote system is the third monitoring point and finally
- The result of the processing is sent to the originator once the object transfer completes the final processing of the result.*:
All messages are sent to the message queue of the user profile OMS at the sending address. You should use the Remote Job Monitor function to check the status and results of all your jobs on remote systems.*:
Note: when using SNADS, user profile OMS on both addresses must be defined in the directory entries in order to use the monitoring facilities. Please consult the Distribution Concepts for details.
*=Default
The value '*' indicates that the default values are being used from a higher definition level. Each address being used has default values specified via the Remote Location Maintenance function. This is the highest definition level per system address. At the application level, various override values can be defined in the Remote Location Override function. This is the second definition level per address.
The lowest level of definition is in the Environment Maintenance function on the Maintain Distribution List Display.
Use F14 to refill all input fields with a '*', indicating that the values from the higher level are being used.
Work with Directories
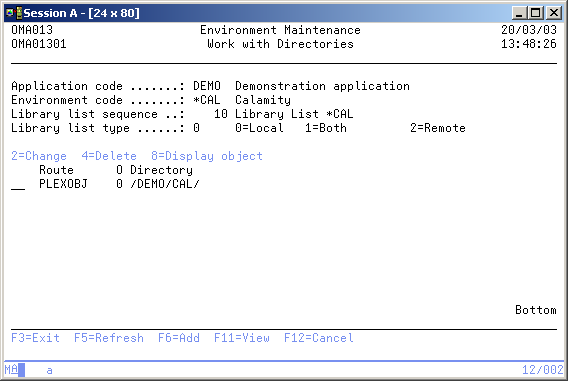
The Work with Directories display shows the currently defined directories in the selected library list, and includes their predefined special keywords and an object indicator ("O"), indicating whether objects (files and other directories) in that directory are stored in the TD/OMS-database. You can quickly toggle to the other information about the directories by using the F11=View function key.
A directory definition contains information for TD/OMS about which Route an object follows through the development-cycle. A route connects in each environment to a directory.
You can add a directory the list, remove an directory from the list, or change the definitions of a specific directory.
Option
Use this column to perform different operations on individual entries. The possible values are:
- 2=Change
Change the definition of a directory, like the special keywords and the route that owns the directory. - 4=Delete
Delete a directory from the list. - 8=Print
Execute the DSPLNK command for the selected directory. - F6=Add
Add a directory entry to the list.
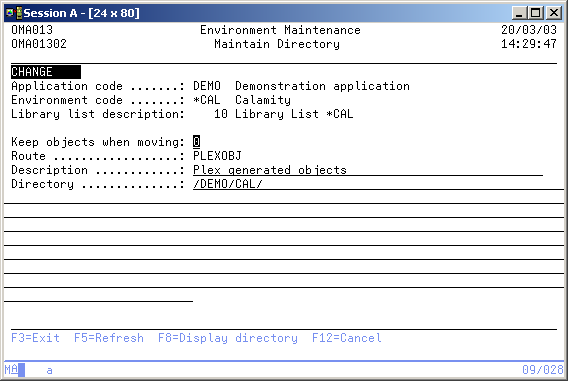
Maintain Directory
The Maintain Directory display shows information and allows actions depending on the option chosen on the previous display. The chosen action on the previous display is shown on line three. The following actions can be activated;
- Add
You can add a new directory definition. The directory name, route, route description and special keywords must be entered. - Change
You change can all definitions of the selected directory, except the route. The current values are shown. These attributes can be changed at any time and are effective immediately. - Delete
The current directory definitions are shown, including a confirmation message. The directory definition is deleted from the list after pressing Enter.
Keep objects when moving
The Keep directory indicator is used for a specific directory to indicate that objects are not being removed by TD/OMS if a move operation is executed during Object Transfer. This is useful for directories containing data files, because the data in those files should be kept for testing purposes.
- '0'
When the transfer ends, the copy of the object will be deleted from this directory. - '1'
When the transfer ends, the copy of the object will remain in this directory.
Route
The route code specifies the 'path' that an object follows through the environments. In every environment, a route has a directory connected to it. During Object Transfer, the object always stays in the same route. TD/OMS uses this route to search for the target-directory where the object will be located.
Description
This is a description of the route. In most cases, the name of the route should be a good description on its own, but the route description can further clarify the purpose of a route.
Directory
The IFS directory code is the directory in which the object is located. This is a path from the root of the integrated file system (IFS).
Work with Transfer Path
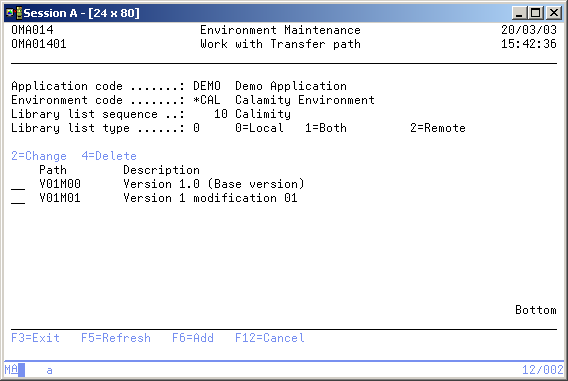
The Work with Transfer path display shows the currently defined paths in the selected library list. A Transfer path definition contains information for TD/OMS about which path an object follows through the development-cycle.
A path connects in each environment to a library list. You can add a path to the list, remove a path from the list, or change the description of a specific path.
The following modes can be activated;
- Add
You can add a Path to the library list. - Delete
You can remove a Path from the library list.
Option
Use this column to perform different operations on individual entries. The possible values are:
- 2=Change
Change the description of a path. - 4=Delete
Delete a path from the list. - F6=Add
Add a new Transfer Path
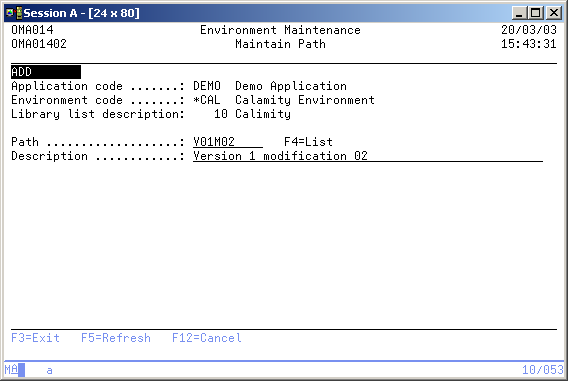
Add Transfer Path
The Add Transfer Path display enables to add a completely new or existing (from another library list or environment) transfer path to the library list.
Path
Type a new path name to add or press F4 to select a path.
Description
Type a description for the path
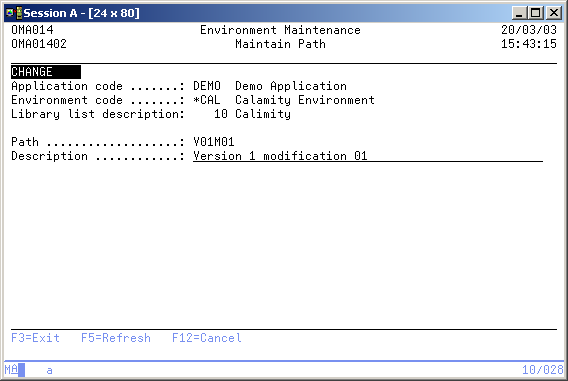
Maintain Transfer path
The Maintain Transfer Path display shows information and enables to change the description of the Transfer Path.
Description
Add or change a description for the current Transfer path.
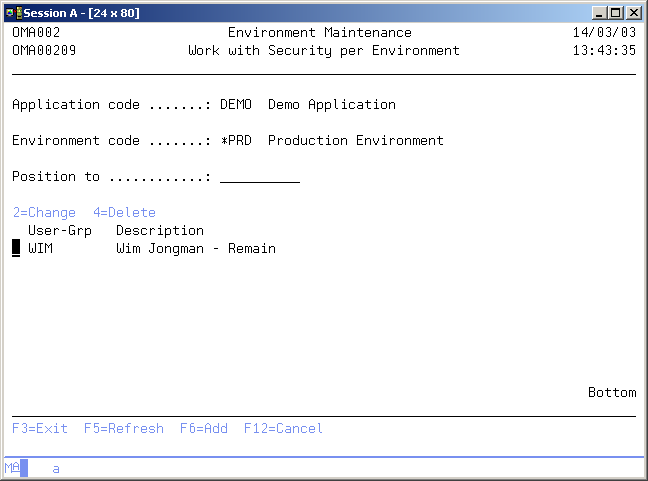
Work with Security per Environment
The Work with Security per Environment display shows the previously entered specifications. The default environment security is assumed if no information is shown, which means that users with an authorization code "2" have environment rights for all environments except the highest (Production) and users with an authorization code 3 have environment rights for all environments.
The security per environment indicates that only authorized users are allowed to create or remove objects in that environment.
You can add an entry to the list, remove an entry from the list or change an entry. Any specification overrules the default security.
Position to
Use this prompt to go to a particular user in the list.
Option
Use this column to perform different operations on individual entries. The possible values are:
- 2=Change
Change the user code, user group or class. - 4=Delete
Delete the entry from the list. - F6=Add
Add a new user to the environments security list.
Maintain Security per Environment
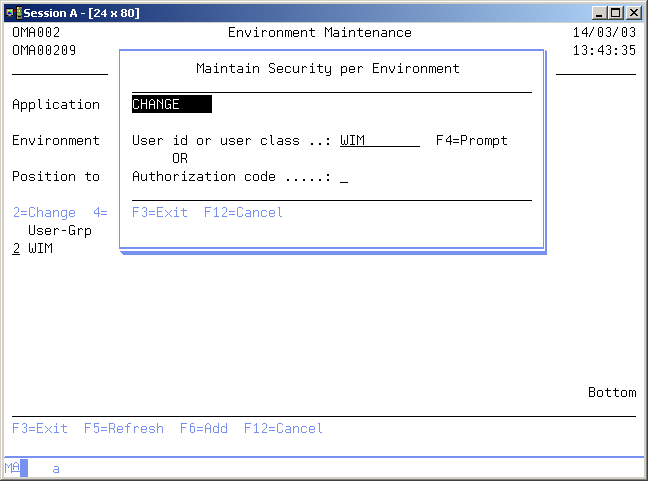
The Maintain Security per Environment display shows information and enables actions depending on the option chosen on the previous display. The chosen action on the previous display is shown on line three.
You have to enter a specific user code, group or class, or you can enter an authorization code. Entering an authorization code will result in granting all users who have that authorization code to access this environment.
The following modes can be activated;
- Add
You can add a new entry definition. Enter a user or an authorization code. - Change
You can change the currently used entry code. - Delete
The current entry code is shown, as is a confirmation message. After pressing Enter, the entry will be removed from the list.
The entries can be changed at any time. A previously valid entry remains in effect for users with an active function.
User ID or User Class
The user ID or user class element contains the name of an OS/400 user, user group or user class. The following rules apply to each entry:
- User ID
Enter a valid name of an existing user profile. This is the most detailed level to assign an authorization code to and will overrule any other definition. - User group
Enter a valid name of an existing user group profile. All members of this group are implicitly selected. Specifications at user level, however, overrules the specifications per user group. - User Class
Enter A Valid User Class.
All users belonging to a specified class are implicitly selected. Specifications at group and user level, however, overrules the specification per class.
Authorization code
The TD/OMS authorization code determines which TD/OMS functions can be executed for a user, user class or user group. Some TD/OMS functions also require authority at environment level. Valid authorization codes are:
- 0=None
No rights are assigned to the related users. This value is useful if authorization codes are assigned at group or class level and one single user has to be omitted. - 1=User
Only functions at end user level can be executed. These users are in general able to maintain their own user requests and enquire about the related Fix information. The request processor is allowed to maintain the requests from all users if he has authorization code 1 assigned to him. - 2=Programmer
Code two is specially meant for functions at programmer level. They are allowed to maintain their own fixes, to connect objects to fixes and start Fix Processing. Specific authorization depends on the rights assigned at environment level. The request processor is allowed to maintain the fixes from all programmers if he has authorization code 2 assigned to him. - 3=Application manager
Users with code 3 are application managers and have rights for all functions at application level.
Use F4 to get a list of all current users.
Work with Ratification Groups
The work with ratification groups display enables you to maintain the ratification groups needed for a specific environment.
When ratification is activated, objects are not able to leave the environment before they are ratified. Ratification can be done by any member of the group, but at least one member of all groups must ratify the fix or request before it can be processed to the next environment.
Before a ratification group can be specified, it must be created using the Ratification Group Maintenance function. Ratification is activated by specifying a value for the Ratification Type environment attribute.
Position to
Use this prompt to go to a particular area in the list. Use it for quick repositioning of the list, not for creating a subset of the list.
Option
Use this column to perform different operations on individual entries. Type the option number next to an entry and press Enter. You can type the same option next to more than one entry at a time, and you can also type different options next to different entries at the same time. The possible values are:
- 1=Add
Add a group to the environment - 4=Remove
Remove a ratification from the list. - 12=Work w member
Work with the members of the indicated ratification group. Authorized users are also able to add or remove members to the ratification group.
Ratification group
A ratification group is a group of authorized persons which are allowed to ratify a request or a fix. At least one person of each ratification group must ratify the request or fix before the connected objects are able to leave the environment to which this ratification group is connected.
Command Start Environment Maintenance (STREM)
This menu command starts the environment maintenance function. Refer to the description of the function Environment Maintenance for a detailed description.
This command has no parameters. </translate>
Fill Object File
The Object database is a crucial step in the setup of an application in TD/OMS. All objects, their dependencies and related object data, including the location of the corresponding source, are registered. To attain this you will have to fill the object file at least once per application. This function can at will but when you consistently use TD/OMS for all your object changes then the database will always be in sync. You can run the function in report mode on a regular basis to make sure that this is the case and that nobody bypasses the Change Management system.
Several reports can be generated when this function is executed.
- A report is generated if errors or warnings occur during checking of the source locations (report OMQPR1OB).
- A report is generated if the contents of the database do not match the contents of the libraries, e.g. objects were added or removed manually since the last run or you had to restore the contents of a library (report OMQPR2OB).
- A report is also generated when TD/OMS finds conflicting dependencies. For example, when a file is referenced from a program but TD/OMS does not manage this file (report OMX016P).
Note: Be sure to check this report and correct the errors. The object file has to be filled completely, with the right data, before you can use an Object Transfer function. Users with authorization code 2 are allowed to use this function. A user must be authorized to an environment before this function actually does something.
Enter selection Fields
The Enter selection Fields display enables you to enter selection fields for the next Fill Object File process. These selection fields are mainly useful if you use the same libraries in different applications.
You can execute the normal Fill Object File process more than once. The main function of this program is to load objects from the libraries specified in the environment definitions into the Object database of TD/OMS.
If you share libraries amongst applications, e.g. you store all program objects into one production library, it is possible that objects are loaded in a wrong TD application. You can utilize the Fill Object file function to remove these objects and reload them in the correct application.
Note: Use the Processing Mode value 1 (Emptying) only when necessary because valuable changed data information will get lost.
Use F9 to retrieve the last entered selections for this application.
Active Application
The active application shows the code of the current active application. If this field can be changed you can activate a new application by typing the application you desire and pressing Enter. You can also use the F4=Prompt key to select an application from the list of available applications.
Environment code
Specify the environment to extract the objects from.
Route
Specify the route to extract the objects from or use any of the special values.
Library
Specify the library to extract the objects from or use any of the special values.
Object code
Specify the object code to retrieve information from. The possible values are:
- *ALL - All objects in the selected libraries are processed.
- Name - Enter an object code to be filled.
- *generic* - Enter a generic object code name to be filled.
- ?wild? - Enter a wild card for the objects to be filled.
Object Type
Specify the object type of the selected objects. The possible values are:
- *ALL - All object types are processed.
- Type - Enter the object type of the selected objects.
Object Attribute
Specify the object attribute of the selected objects. The possible values are:
- *ALL - All objects attributes are processed.
- Attribute - Enter a specific attribute
Processing mode
The processing mode is used to specify the OS/400 environment where the transaction has to be executed. Enter the value 0 for processing the function in a batch subsystem. Enter the value 1 for processing the function immediately in your current job. Your display will be locked.
Note: The job description OMSJOBD in the TD library is used for the job to be submitted.
Processing method
The processing method is used in the Fill Object File function to specify the action to be performed on the TD object database. The possible values are:
- 0=Filling
- The TD/OMS database will be updated with the latest object information.
- 1=Emptying
- Entries in the TD/OMS database are being removed. Use this option if several applications use the same libraries and wrong objects have been stored in this application in a previous Fill Object File process.
- 2=Report
- Use value 2 to get a list of differences between the TD/OMS database and the real system. This option will produce a report with new, changed and deleted objects.
Relations only
Use the Relations Only indicator to instruct TD/OMS to rebuild the relations for each selected object. The possible values are:
- 0=No - Both object info and object relations are being refreshed. Object relations however are only rebuilt if TD/OMS detects a different object change date for a specific object.
- 1=Yes - Only the object relations are being rebuilt, even when the object change date has not been changed.
Process Objects/Groups
The Process Objects/Groups indicator will be shown in the Fill Object File function if the application has a 4GL interface defined. This indicator is used to indicate if OS/400 objects are to be processed, 4GL objects or both. The possible values are:
- 0=Both
Both objects and groups are processed using this value. The group fill functions are activated after the process of normal (OS/400) objects. The program activated depends on the applications 4GL interface. - 1=Objects only
This value indicates that normal (OS/400) objects are to be processed and no group processing programs are to be started. - 2=Groups only
This value indicates that only group programs are to be activated to load the object file with group data. The group data that is processed depends on the activated interface.
Selection code
The Selection code is valid for Synon applications. It specifies, for Synon objects only, if a specific area must be selected for processing. The possible values are:
- 1=Any
All areas of the selected 4GL libraries are being processed. - 2=*AREA
Value *AREA indicates that the Synon Object Name contains the name of the application area to be processed.
Synon object name
The Synon Object name is only valid for Synon applications. It specifies the Synon object to be processed. The possible values are:
- *ALL - All Synon objects of the selected owning object are being processed.
- Name - Enter the name of an area if the selection code contains ‘2=Area’ or enter the name of a Synon object.
- Name* - Enter a generic* name of Synon objects.
Synon object owner
The Synon Object owner is only valid for Synon applications. It specifies the Synon object to be processed. The possible values are:
- *ALLOBJ - Use this value if the Synon Object name contains *ALL.
- *ANY - All objects are selected.
- Name - Enter the owning object code name.
Command Start Fill Object File (STRFOF)
This menu command starts the fill object file function. The function Fill Object File is started if no application code or environment code is entered. Refer to the description of the function Fill Object File for a detailed description. This command accepts the same selections as the Fill Object File function. Use the command mode to enable submission from user programs.
STRFOF	APPL(application code)
       ENVC(environment code)
       ROTC(route)
       OBJL(library)
       OBJC(object)
       OBJT(object type)
       OBJA(object attribute)
       PRCI(processing mode)
       PRCM(processing methode)
       RELI(relations only)
       OOGI(object/group)
       SELC(synon selection code)
       SAOC(synon object code)
       SOOC(synon owning object code)
Application Code - (APPL)
Specify the application code to fill objects from. If the application code is blanks and the request is made in an interactive session then the Fill Object File selection display is shown.
Environment Code - (ENVC)
Specify the environment code in the selected application to fill objects from.
Route - (ROTC)
Specify the route code in the selected application to fill IFS objects from. The possible values are:
- *ALL All routes of the selected environment are selected.
- *NONE No routes are used for the filling process.
- Name Enter a route name to be filled.
Note: Values specified for Object Code and Object Type are only valid for the processing of objects in libraries. These values are not used for the selection of objects in the Integrated File System; all IFS-objects in the specified route(s) are selected.
Object Library - (OBJL)
Specify the object library to fill objects from. The possible values are:
- *ALL All libraries of the selected environment are selected.
- Name Enter a library name to be filled.
Object Code - (OBJC)
Specify which objects must be selected. The possible values are:
- *ALL All objects in the selected libraries are processed.
- Name Enter an object code to be filled.
- *generic* Enter a generic object code name to be filled.
- ?wild? Enter a wild card for the objects to be filled.
Object Type - (OBJT)
Specify the object type of the selected objects. The possible values are:
- *ALL All object types are processed.
- Type Enter the object type of the selected objects.
Object Attribute - (OBJA)
Specify the object attribute of the selected objects. The possible values are:
- *ALL All objects attributes are processed.
- Name Enter the object attribute of the selected objects.
Processing Mode - (PRCI)
Specify the OS/400 environment to process this command. The possible values are:
- *BATCH The job is submitted to the batch environment using job description OMSJOBD.
- *INTERACTIVE The command is executed in your current job.
Processing Method - (PRCM)
Specify the kind of action to perform on the selected objects. The possible values are:
- *FILL
The selected objects are loaded in the TD/OMS database. - *EMPTY
The selected objects are emptied from the TD/OMS database. - *REPORT
A report is produced with the differences between the TD/OMS database and life situation. No information is stored in the TD/OMS database.
Relations Only - (RELI)
Specify if only the relationships of the selected objects have to be rebuild. The possible values are:
- *NO The selected objects are completely loaded in the TD/OMS database.
- *YES Only relationships of the selected objects are being rebuilt.
Object / Group - (OOGI)
Specify if normal objects, 4GL objects or both have to be loaded. The possible values are:
- *OBJECT Only normal OS/400 objects are being processed.
- *BOTH Both 4GL and normal objects are being processed.
- *GROUP Only 4GL objects are being processed.
Synon selection code - (SELC)
Specify, for Synon objects only, if a specific area has to be selected for processing. The possible values are:
- *ANY All areas of the selected 4GL libraries are being processed.
- *AREA Value *AREA indicates that keyword SAOC contains the name of the application area to be processed.
Synon object code - (SAOC)
Specify, for Synon objects only, the Synon object to be processed. The possible values are:
- *ALL All Synon objects of the selected owning object are being processed.
- Name Enter the name of an area if SELC contains *AREA or enter the name of a Synon object.
- *ALL All synon objects of the selected owning object are being processed.
Synon owning object code - (SOOC)
Specify, for Synon objects only, the Synon object to be processed. The possible values are:
- *ALLOBJ Use this value when SAOC contains *ALL
- *ANY No selection is performed on the owning object code.
- Name Enter the owning object code name.
Connection Rule Maintenance
Connection rules is a function to automatically place related objects into the connection list when you select an object for maintenance. E.g. If you connect a physical file, the related logical files are connected automagically (if you decide this). Rules can be defined with which the mechanism becomes flexible and configurable. Connection rules can be defined at a global level (for all applications) and/or at a application level. A global rule is replaced by a application specific rules with the same. Application specific rules with a different name will be added to the global rules when a object is being added to the connection list with rules.
Work with Connection Rules
The Work with connection rules display shows the currently defined connection rules for the current application. You can add an entry to the list, remove an entry from the list, copy a set of connection rules or change the connection rule definition and/or its details.
Application code
The active application shows the code of the current active application. If this field can be changed you can activate a new application by typing the application you desire and pressing Enter. You can also use the F4=Prompt key to select an application from the list of available applications. Enter *ALL to display the Global connection rules. The global rules will be shown immediately when no application specific connection rules exist.
Selection code
Use this field to show active rules only (*ACTIVE) or both active and disabled rules (*ALL).
Position to
Use this field to position the list of connection rules.
Object
Use this field to create a subset of the list on object code.
Type
Use this field to create a subset of the list on object type.
Attribute
Use this field to create a subset of the list on object attribute.
Option
Use this column to perform different operations on individual entries. The possible values are:
- 2=Change
Change the description, object code, type, attribute or the detail code of a connection rule. - 3=Copy
Copy an existing connection rule to a new rule. Currently defined connection rule details also will be copied. - 4=Delete
Delete an existing connection rule. Currently defined connection rule details also will be deleted. - 12=Work with Connection Rule Details
Type 12 to work with the detail definitions of a specific connection rule. - F6=Add
Add a new connection rule.
Maintain Connection Rules
The Maintain Connection Rules display shows information and allows actions depending on the option chosen on the previous display. The chosen action on the previous display is shown on line four. The following actions can be activated:
- Add
You can add a new entry definition. The connection rule code, description, object code, object type and object attribute must be entered.
- Change
You can change the description, object code, object type and/or object attribute from an existing entry definition. The current connection rule header will be shown. The connection rule header can be changed at any time.
- Copy
All the fields will be copied from the current connection rule header to a new entry definition, except the Connection Rule code. After an unique Connection Rule code is entered, the other fields can be changed. Connection rule details defined for this current connection rule header also will be copied.
- Delete
The current connection rule header entry will be shown, including a confirmation message. Connection rule details defined for this current connection rule header also will be deleted.
Note: For more information about a specific attribute move the cursor to the attribute area and press Help.
Active Application
The active application shows the code of the current active application or *ALL in case of a global rule.
Connection rule code
The connection rule code is used as a unique identifier for the connection rule.
Connection rule description
The connection rule description can be used to indicate the function of the connection rule. A blank value is not allowed.
Primary Object RegEx
This field contains the regular expression that is used in the evaluation of the primary object. If the object code matches the regular expression, the evaluation of the primary object continues. For more information about regular expressions, please refer to the Regular Expression Concepts.
Object type
This field is used to specify the condition for the object type. The connection rule will only be applicable for objects of the specified object type. For example, when the value *FILE is specified, then the connection rule will only be further evaluated if the object being processed has the object type *FILE. This field does not allow the use of special values.
Object attribute
This field is used to specify the condition for the object attribute. The connection rule will only be applicable for objects of the specified object attribute. For example, when the value PF is specified, then the connection rule will only be further evaluated if the object being processed has the object attribute PF. (In this case, the value *FILE will most probably be used for the field Object Type.) This field does not allow the use of special values. However, the field can have a blank value.
Connection Rule type
This field is used to (temporarily) disable a item definition or rule. If the item or rule will never be used again, then it can be deleted altogether. The possible values are:
0=Enabled
The item selection is enabled, i.e. the item will be evaluated, and the item will be executed when all selection criteria have been fulfilled.
1=Disabled
The item is disabled, i.e. the item will not be evaluated, and the item will never be executed.
2=Continuation
The item will only be executed when it is defined as a "continue with rule" in a detail of another connection rule.
Work with Connection Rules Details
The Work with connection rule details display shows the currently defined set of detail records for the current connection rule. You can add detail definitions to a connection rule, remove detail definitions from a connection rule, copy a connection rule detail definition or change connection rule detail definitions.
Option
The possible values are:
- 2=Change change the environment code or the continue processing indicator of the connection rule detail.
- 3=Copy
copy an existing connection rule detail. - 4=Delete
delete an existing connection rule detail. - F6=Add
Add connection rule details
Maintain Connection Rules Details
The Maintain Connection Rules Details display shows information and allows actions depending on the option chosen on the previous display. The chosen action on the previous display is shown on line four. The following actions can be activated;
- Add
You can add a new entry definition. The object code, object type, object attribute and the continue processing indicator must be entered for the related objects. - Change
You can change the continue processing indicator from an existing entry definition. The current connection rule will be shown. The connection rule can be changed at any time. - Copy
All the fields will be copied from the current connection rule detail to a new entry definition. Related object code, object type and/or object attribute has to be changed, otherwise an error will occur (record already exists). - Delete
The current connection rule entry will be shown, including a confirmation message.
Application code
The active application shows the code of the current active application or *ALL for a global rule.
Connection rule code
The connection rule code is used as a unique identifier for the connection rule.
Connection rule description
The connection rule description can be used to indicate the function of the connection rule. A blank value is not allowed.
Object code
This field contains the regular expression that is used in the evaluation of the primary object. If the object code matches the regular expression, the evaluation of the primary object continues. For more information about regular expressions, please refer to the Regular Expression Concepts.
Object type
This field is used to specify the condition for the object type. The connection rule will only be applicable for objects of the specified object type. For example, when the value *FILE is specified, then the connection rule will only be further evaluated if the object being processed has the object type *FILE. This field does not allow the use of special values.
Object attribute
This field is used to specify the condition for the object attribute. The connection rule will only be applicable for objects of the specified object attribute. For example, when the value PF is specified, then the connection rule will only be further evaluated if the object being processed has the object attribute PF. (In this case, the value *FILE will most probably be used for the field Object Type.) This field does not allow the use of special values. However, the field can have a blank value.
Related object RegEx
TThis field contains the regular expression that is used in the evaluation of the related object. If the object code matches the regular expression, the evaluation of the related object continues. In this field, some special characters can be used. These characters are not part of the standard regular expression syntax. When these special characters are used, the advanced function field 'Object contains mask' should have the value '1'.
The special characters are the following:
Percent sign (%)
This character can be used to insert selected characters from the object code of the current primary object into the regex for the related object. For example: assume that the primary object regular expression states that the object code should have four characters, with the character 'R' on the last position. The regular expression would be '...R' (without the apostrophes). Now, the related object code should have five characters, with the character 'A' on the first position, and the character 'D' on the last position. Furthermore, the three middle characters should correspond to the starting characters of the primary object. To achieve this, the following expression should be entered: '%%%R|A%%%D' (again without the apostrophes). At runtime, the character at the first position of the primary object code is copied to the second position of the related object code, and likewise for the characters on the second and third position of the primary object code.
Ampersand sign (&)
This character can be used to insert the complete object code of the current primary object into the regex for the related object. For example: assume that documentation has been written for each program in an application. For a program named ABC001, the documentation is stored in a document named ABC001DOC. Thus, the related object code should correspond to the primary object code, followed by the characters 'DOC'. To achieve this, the following expression should be entered: '&DOC'. At runtime, the ampersand-sign is substituted with the current primary object code.
Related object type
This field is used to specify the conditions for the object type of the related object. An object will only be a candidate for being added to the connection list if it has the correct object type. This field does not allow the use of special values.
Related object attribute
This field is used to specify the conditions for the object attribute of the related object. An object will only be a candidate for being added to the connection list if it has the correct object attribute. This field does not the use of special values. However, the field can have a blank value.
Object contains mask
Specify a 1 when the % and & characters should be treated as substitution characters.
Relation scope
Specifies the scope of the connection processing. The possible values are:
*ALL The related component does not have any relation with the primary component. The component can be any existing component in the object database. Use this value to connect objects for which TD/OMS can not implicitly determine a relationship and stores that in its database, such as functional design documents that describe programs.
*RELATED    The component to find must be related to the primary object and it refers  a used-by or a using relation.
*USING      The component to find must be related to the primary object and it refers a using relation.
*USEDBY     The component to find must be related to the primary object and it refers a used-by relation.
Environment scope
Specifies the scope of the connection processing. The possible values are:
*ALL       All environments are used to determine the relation of the component.
*CURRENT   Only components in the environment where the primary object currently resides will be connected.
Continue with rule
Specifies the connection rule to continue with. The possible values are:
*ALL All connection rules are evaluated again. If your current rule definition is within a specific application, all rules of that application will be loaded and evaluated. If your current definition is a *ALL rule, rule selection will be: all rules in currently active application and the *ALL rules that do not occur in the application set. Please be very carefull when you plan to use this value. Changes in the connection rule can dramatically change the beheaviour of the connection function.
*NONE No further processing will be done.
Solution type
The solution type to assign to the object that is added to the connection list.
Disable connection rule
This field is used to (temporarily) disable a item definition or rule for example a Connection rule or an AI definition If the item or rule will never be used again, then it can be deleted altogether. The possible values are:
0=Enabled
The item selection is enabled, i.e. the item will be evaluated, and the item will be executed when all selection criteria have been fulfilled.
1=Disabled
The item is disabled, i.e. the item will not be evaluated, and the item will never be executed.
Command Start Connect Rules Maintenance (STRCRM)
This menu command starts the object maintenance function. This command has no parameters.
STRCRM
User Defined Variable Maintenance
The User Variable Maintenance function can be used to add, change and delete User Variables. With this function, the characteristics of a User-defined substitution variable are maintained. These variables can be used in action definitions and compile type codes.
Work with Variables
This screen displays a list of the currently existing user-defined substitution variables. You can use the options field to maintain these variables, or you can press F6 to add a new variable.
Position to
Use this prompt to go to a particular area on the list. Use it for quick repositioning of the list, not for creating a subset of the list. The possible values are:
- Name or partial name;
Type the name or partial name of the entry you want to go to on the list. The list is positioned to the first entry beginning with the string specified. If no entry exists in the present list, then the list is positioned to the entry immediately preceding the item you desire.
Option
Use this column to perform different operations on individual entries. Type the option number next to an entry and press Enter. You can type the same option next to more than one entry at a time, and you can also type different options next to different entries at the same time. The possible values are:
- 2=Change
Use this option to change the characteristics of an user-defined substitution variable.
- 3=Copy
Use this option to copy a user-defined substitution variable.
- 4=Delete
Use this option to delete a user-defined substitution variable.
- 5=Display
Use this option to display the characteristics of a user-defined substitution variable.
- F6=Add
Add a new Type of the currently active Variant.
Maintain Variable
This screen displays some characteristics of a user-defined substitution variable.
The User-defined substitution variable which can be used in action definition and will be substituted with the defined substitution value when the action is executed.
- Add
Used to add a new Variable definition. The name optionally the application and environment where this value is active. If the application is left blanks the variable is active for all applications. If the environment is left blanks the value is valid for all environments in that application or all applications. Multiple values can de be defined for one variable. - Change
You can change the value of the variable. - Copy
All the fields will be copied from the current Variable to a new entry definition. - Delete
The current variable will be shown, including a confirmation message. Pressing enter will delete the variable.
Note: For more information about a specific attribute move the cursor to the attribute area and press Help.

