Translations:PRINT:DFG:Definitions & Recovery Guide/8/ja
TD/OMS Exception Management
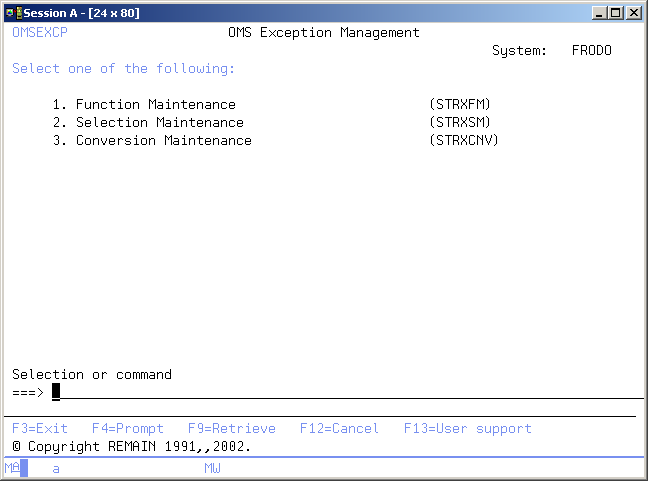
The TD/OMS Exception Management menu enables you to start the TD/OMS exception functions at application level. The functions in this menu are intended to be managed by an Application manager.
例外ファンクション修正の開始 (STRXFM)
このメニュー・コマンドは、例外ファンクションの修正機能を開始します。機能の詳細説明は、例外ファンクション修正を参照してください。
例外選択保守の開始 (STRXSM)
このメニュー・コマンドは、例外選択の保守機能を開始します。機能の詳細説明は、例外選択の保守を参照してください。
Start Conversion File Maintenance (STRXCNV)
This menu command starts the conversion file maintenance function. Refer to the description of the function Conversion File Maintenance for a detailed description.
Start Registry Definition Maintenance (STRRDM)
This menu command starts Registry Definition Maintenance function. Refer to the description of the function Registry Definition Maintenance for a detailed description.
Start Application Registry Maintenance (STRARM)
This menu command starts Application Registry Maintenance function. Refer to the description of the function Application Registry Maintenance for a detailed description.
Start Pre Transfer Check (STRPTCM)
This menu command starts the pre-transfer check function. Refer to the description of the function Pre Transfer Check for a detailed description.
Exception Function Maintenance
The Exception Function Maintenance display enables you to maintain pre-defined exceptions functions for the application you are working with. You are also able to create exception functions, which can be used across applications. These exceptions may have a global implementation scope, and are indicated as system exceptions.
An exception function is an i5/OS system or TD/OMS command or program, which will be executed during Object Transfer processing, if certain conditions are valid.
The definition of the selection conditions is separated from the definition of the functions. That enables you to activate the same exception function for different selections. Use the Exception Selection Maintenance function to maintain these conditions. Refer to the Exception Concepts for more detailed information.
Users with TD/OMS authority code 3 are allowed to start this function.
Work with Exception Functions
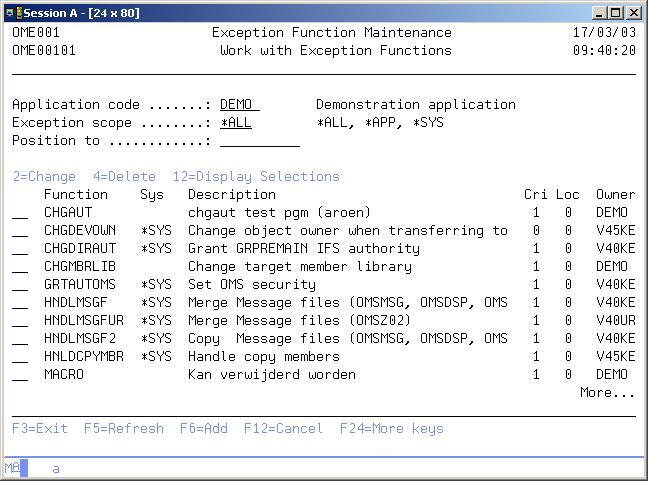
The Work with Exception Functions display shows all function specifications in the current application, together with the functions of other applications, that are defined as a system exception. System exceptions are available for use in any other application.
The system indicator, the description of the function, a critical indicator, a local/remote indicator and the function owner are shown in addition to the functions. Refer to the Exception Concepts for more detailed information.
You can add a new Function to the list, delete a Function from the list, change the contents of a Function, or display the selections specified for this function.
アクティブなアプリケーション
アクティブなアプリケーションは、現在アクティブなアプリケーションのコードを表示します。このフィールドを変更できる場合は、必要なアプリケーションを入力してEnterを押して、新しいアプリケーションをアクティブにすることができます。また、「F4=プロンプト」キーを使用して、使用可能なアプリケーションのリストからアプリケーションを選択することもできます。
例外スコープ
例外スコープを使用して、リストの特定のサブセットを取得できます。以下から選択してください。
- *ALL
アプリケーション機能とシステム定義機能の両方がリストに表示されます。 - *APP
現在のアプリケーションが所有する機能がリストに表示されます。 - *SYS
任意のアプリケーションが所有するすべてのシステム機能がリストに表示されます。
位置指定
このプロンプトを使用して、リスト内の特定の機能に移動します。
オプション
この列を使用して、個々のエントリに対して異なる操作を実行します。可能な値は次のとおりです。
- 2=変更
例外機能の記述または内容を変更します。 - 4=削除
リストから例外機能を削除します。 - 12=選択を表示
この機能を参照している選択のリストを表示します。 - F6=追加
処理しているエンティティの新しいオカレンスを追加します。 - F14=選択の処理
例外選択機能に進みます。 - F21=リストを印刷
ジョブの現在のアクティブ出力キューにリストを印刷します。
保守機能
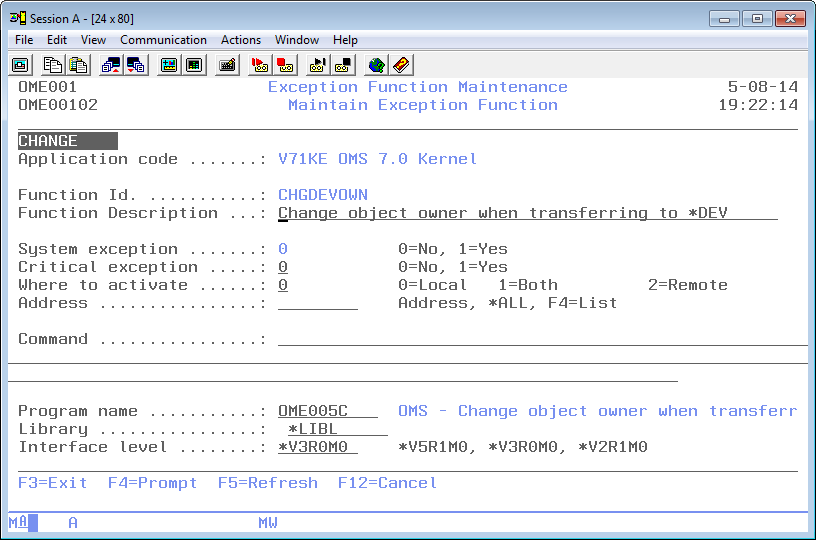
保守機能画面には情報が表示され、前の画面で選択したオプションに応じてアクションが有効になります。前の画面で選択されたアクションが三行目に表示されます。以下のアクションを有効にすることができます。
- 追加
新しい機能定期を追加できます。機能IDとそのすべての属性を入力する必要があります。 - 変更
既存の機能の記述、コマンドまたはプログラム名を変更することができます。現在の値が表示されます。これらの属性はいつでも変更することができ、すぐに有効になります。 - 削除
確認メッセージを含む、現在の機能属性が表示されます。Enterを押すと、機能定義がリストから削除されます。選択がまだ機能を参照する場合、機能の削除は許可されません。
例外機能ID
例外機能IDには、機能の名前が含まれます。機能IDは、CHGPFNOMAX、CRTCLPGM、またはOWNQSECOFRのような機能の短い記述です。
機能IDはアプリケーションごとに一意でなければならず、システム機能のIDはすべてのアプリケーションで一意でなければなりません。IDは、一度追加されると変更できません。空白値は許可されません。
例外機能の記述
機能記述には、機能の説明が含まれます。空白値は許可されません。
システム例外インジケータ
システム例外インジケータは、その機能を他のアプリケーションが使用できるように指定するために使用されます。システム例外は、同じ機能IDを持つ一つのアプリケーションでのみ定義できます。
値「1」または*SYSは、その機能がシステム機能であることを示します。値「0」は、現在のアプリケーションの機能定義のみを示します。 機能が自動的に定義された場合は、リモート・インジケータでシステム・インジケータを変更することはできません。例外選択が機能を参照する場合、または同じ機能IDが別のアプリケーションに存在する場合は、インジケータを変更することもできません。
重要度インジケータ
重要度インジケータは、例外機能ならびに例外選択ごとに定義されます。例外が重要かどうかを示します。可能な値は次のとおりです。
- 0=いいえ
例外は重要ではありません。この例外の実行中にエラーが発生すると、警告が発生します。 - 1=はい
例外は重要です。重要な例外は、ユーザー出口ポイント1、3、5または7で実行される場合にのみオブジェクト転送に影響します。重要な例外がエラーで終了した場合、オブジェクトの処理はエラーで終了します。
アクティブにする場所
アクティブにする場所インジケータは、例外がローカル・アドレス、リモート・アドレス、またはローカル・アドレスとリモート・アドレスの両方に該当するかを指定するために使用されます。可能な値は次のとおりです。
- 0=ローカル
機能がリモート・アドレスに対して有効でない場合は、値「0」を使用します。この機能はどのリモート・アドレスにも送信されません。 - 1=両方
機能がローカル・アドレスとリモート・アドレスの両方に有効な場合は、値「1」を使用します。 - 2=リモート
機能がアドレス要素で指定されたリモート・アドレス用である場合は、値「2」を使用します。
アドレス
アドレスは、リモートAS/400の名前を識別します。TD/OMS配布サービスには、オブジェクトの配布先となるリモート・ロケーションの名前が必要です。 すべてのアドレスを選択するには、特殊値*ALLを使用します。利用可能なアドレスのリストを取得するには、「F4=リスト」を使用します。
例外機能コマンド
例外機能コマンドには、オブジェクト転送中に実行できる有効なOS/400コマンド、または一つ以上の内部TD変数を変更できる特別な例外コマンドChange TD変数が含まれます。すべての例外機能は、コマンドまたはプログラムを指定する必要があります。両方を指定することはできません。
追加も度または変更モードの場合は、入力されたコマンドのプロンプトに対して「F4=プロンプト」を使用します。 すべてのコマンドには置換パラメータを含めることができます。置換パラメータは、実行時に現在の値に置き換えられます。以下のリストは、有効な置換変数を示します。
Exception Substitution Variables
These variables can be used in command strings included in exception functions. Some variables are not filled during the transfer process due to various reasons.
- Request and Release
These fields are only filled when a transfer process is started from a Request or Release level (see use of TFROBJOMS) . To obtain data of the release in an exception or action use OMQRTVAP API for the current release number or the OMQRTVFI API for the release number assigned to this fix. To get the request number of a fix that is linked to it, use the OMQRTVFR API.
NOTE: Starting from V7R1 you should always use the single & character as variable field prefix instead of the former, double ## notation as prefix symbol. The # character can cause problems when your system language codepage is not CCSID value 037.
| 変数 | 記述 | 注釈 |
|---|---|---|
| ##ACTO | アクション出力 | |
| ##APPC | アプリケーション・コード | |
| ##CATT | 属性変換タイプ | |
| ##CATS | 属性変換スコープ | |
| ##CAUT | 認可変換タイプ | |
| ##CAUS | 認可変換スコープ | |
| ##CHGX | オブジェクト変更日 | |
| ##CJOT | ジャーナル変換タイプ | |
| ##CJOS | ジャーナル変換スコープ | |
| ##CNVT | データ変換タイプ | |
| ##CNVS | データ変換スコープ | |
| ##CPGL | 変換プログラム・ライブラリ(推奨) | |
| ##CPGM | 変換プログラム名(推奨) | |
| ##CROB | 関連オブジェクト・コード(推奨) | |
| ##DTLC | 詳細コード(推奨) | |
| ##EXCI | 一時または仮想オブジェクト・インジケータ | |
| ##ERR# | リクエスト番号 | |
| ##FDIL | Fromディレクトリの長さ | |
| ##FDIR | Fromディレクトリ | |
| ##FENV | From環境 | 推奨 |
| ##FIX# | 修正番号 | |
| ##FIXR | 置き換えられた修正番号 | |
| ##FLBI | フォールバック・インジケータ | |
| ##FPTH | Fromパス | |
| ##FPTL | Fromパスの長さ | |
| ##FROL | Fromオブジェクト・ライブラリ | |
| ##FRPL | From環境 | |
| ##FSRF | Fromソース・ファイル | |
| ##FSRL | Fromソース・ライブラリ | |
| ##FSRM | Fromソース・メンバー | |
| ##IOBC | IFSオブジェクト | |
| ##IOBL | IFSオブジェクトの長さ | |
| ##JOB# | ジョブ番号 | |
| ##LBLT | Toライブラリ・リスト・タイプ | |
| ##LSQ# | Toライブラリ・シーケンス# | |
| ##MBRC | 詳細コード | |
| ##MODB | ベースの変更 | |
| ##MODR | 置換された変更 | |
| ##MOD# | 新しい変更 | |
| ##OBJA | オブジェクト属性 | |
| ##OBJC | オブジェクト・コード | |
| ##OBJR | 置換されたオブジェクト・インジケータ | |
| ##OBJT | オブジェクト・タイプ | |
| ##OBJX | オブジェクト・ソース変更日 | |
| ##OCLS | オブジェクト・クラス | |
| ##OPTI | 「M」=移動 「C」=コピー | |
| ##OVRC | オーバーライド・コード | |
| ##PGML | 変換プログラム・ライブラリ | |
| ##PGMN | 変換プログラム名 | |
| ##QTPI | 終了処理インジケータ | |
| ##REQ# | リクエスト番号 | 推奨、通常の転送中は設定されません |
| ##RLS# | リリース | 通常の転送中は設定されません |
| ##ROBC | 変換の関連オブジェクト・コード | |
| ##SEQ# | Toライブラリ・リスト・シーケンス# | |
| ##SOLT | ソリューション・タイプ | |
| ##SRCF | Toソース・ファイル | |
| ##SRCL | Toソース・ライブラリ | |
| ##SRCM | Toソース・メンバー | |
| ##SRCP | ソース処理 | |
| ##SRCS | ソース・ステータス | |
| ##SRCX | ソースのソース変更日 | |
| ##SRTC | ソート・コード | |
| ##STAT | ステータス | |
| ##TDIL | Toディレクトリの長さ | |
| ##TDIR | Toディレクトリ | |
| ##TENV | To環境 | (推奨) |
| ##TFRC | 転送コード | |
| ##TOOL | Toオブジェクト・ライブラリ | |
| ##TOPL | To環境 | |
| ##TOVI | 一時または仮想オブジェクト・インジケータ | (推奨) |
| ##TPTL | Toパスの長さ | |
| ##TPTH | Toパス | |
| ##TSB# | 転送サブ番号 | |
| ##TSRF | Toソース・ファイル | (推奨) |
| ##TSRL | Toソース・ライブラリ | (推奨) |
| ##TSRM | Toソース・メンバー | (推奨) |
| ##VRSB | ベースのバージョン | |
| ##VRS# | 新しいバージョン | |
| ##VRSR | 置換されたバージョン |
例外プログラム名
例外プログラム名には、この機能を有効にする必要がある場合にTD/OMSによって呼び出されるプログラムの名前が含まれます。プログラム名とコマンドは互いに排他的です。プログラムはコマンドとは異なります。なぜなら、プログラムは標準のパラメータ・リストと戻り値で呼び出され、チェックされるからです。標準パラメータ・リストの例は、TDパッケージに付属しており、TDライブラリのファイルQUSRSRC、メンバーOME__02C/jaにあります。
例外プログラム・ライブラリ
プログラム・ライブラリには、例外プログラムがあるOS/400ライブラリが含まれます。
インタフェース・レベル
インタフェース・レベルは、TD機能が使用されるインタフェースを記述するためにユーザー・プログラムを実行する場合に使用されます。将来の競合は、インタフェース・レベルを使用することによって防止されます。より多くの機能を提供するため、最新のインタフェース・レベルを使用することをお勧めします。
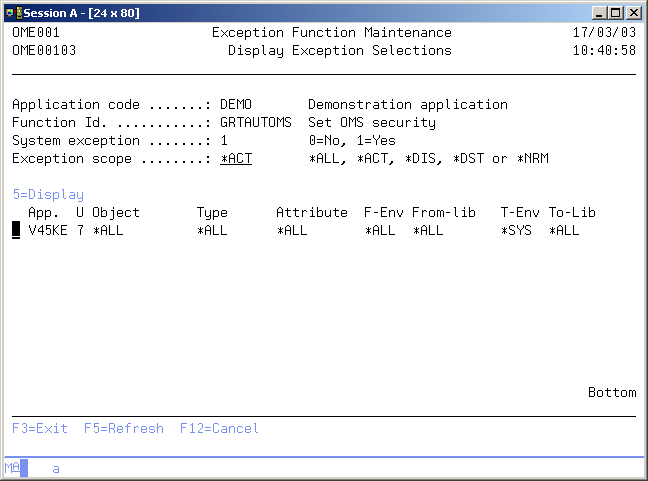
選択を表示
選択を表示画面には、選択した機能を参照するすべての選択が表示されます。最も重要な選択フィールドは選択ごとに表示されます。 すべての選択パラメータと他の属性を表示するために、表示する特定の選択肢を選択することができます。
選択スコープ
選択スコープは、リストの特定のサブセットを取得するために使用できます。以下から選択してください。
- *ALL - すべての選択がリストに表示されます。
- *ACT - アクティブな選択のみがリストに表示されます。
- *DIS - 処理のために無効になる選択のみがリストに表示されます。
- *DST - オブジェクトが配布用に収集されたときに実行される選択のみがリストに表示されます。
- *NRM - オブジェクトがローカルで作成されるときに実行される選択のみがリストに表示されます。
オプション
この列を使用して、個々のエントリに対して異なる操作を実行します。可能な値は次のとおりです。
- 5=表示
選択肢のすべての選択パラメータと他の属性を表示します。
例外選択を表示
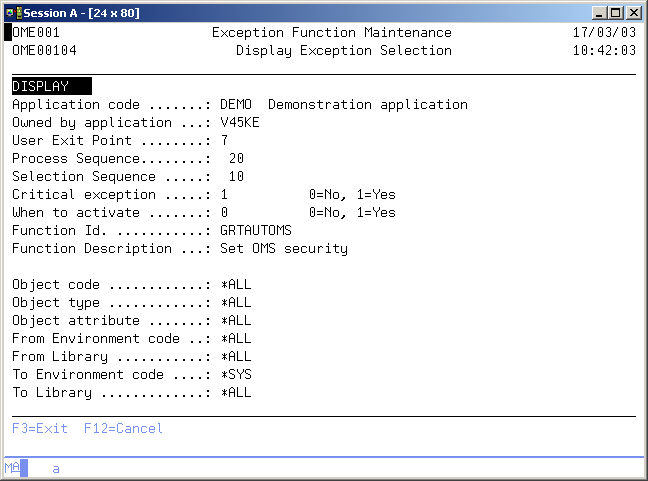
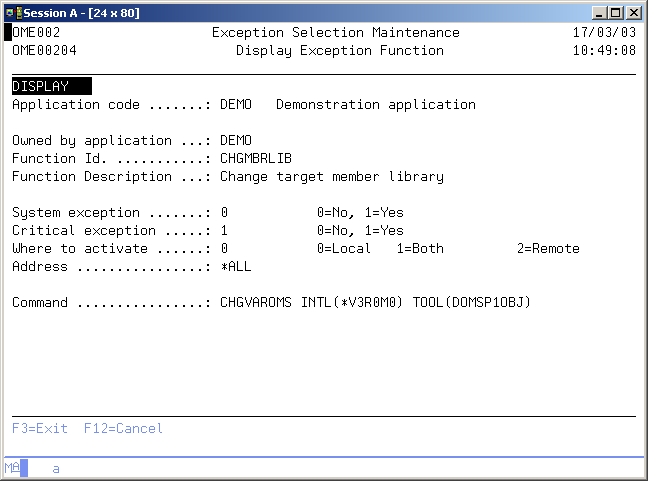
例外機能の表示画面には、選択された選択肢のすべての属性と選択値が表示されます。異なる値の意味については、例外選択の保守機能で説明します。
コマンド:例外機能の保守を開始(STRXFM)
このメニュ・コマンドは、「例外機能の保守」機能を開始します。詳細な説明は、機能「例外機能の保守」の説明を参照してください。
STRXFM
このコマンドにはパラメータはありません。
例外選択の保守
例外選択機能を使用すると、処理しているアプリケーションの例外選択を保守することができます。例外選択では、事前定義された例外機能に対して以下を指定します。
- オブジェクト転送中の実行ポイント
ユーザー出口ポイントは、例外が実行されるときのオブジェクト転送中のフェーズを指定します。 - ユーザ出口ポイントごとの実行順序
例外は、ユーザー出口ポイントごとに処理シーケンス番号の順に実行されます。
処理シーケンス番号ごとの実行する機能の条件は、最も低い選択シーケンス番号の機能と、選択されて実行される有効な選択フィールドです。
機能の定義は選択の定義とは別になるため、さまざまな選択に対して同じ機能を有効にすることができます。これらの機能を保守するには、例外機能の保守機能を使用してください。 認証コード3のユーザーは、この機能を起動することができます。 例外機能の使用は、TD/OMSの標準機能をカスタマイズする際に役立ちます。
注意:例外機能を使用すると、TD/OMSシステムをカスタマイズすることができますが、使用するコマンドならびにTD/OMSがこれらの機能を処理する方法について十分な知識があることを確認してください。TDパッケージのサプライヤは、例外機能の内容に責任を負いません。
以下に、オブジェクト転送中の選択プロセスの例を示します。次の選択が入力されたとします。
| Uep | Psq | Ssq | 機能 | オブジェクト | タイプ |
| 5 | 10 | 898 | OWNDIF | ABCDEF | *ALL |
| 5 | 10 | 899 | OWNSEC | OBJ765 | *ALL |
| 5 | 10 | 900 | OWNSEC | OBJ12* | *ALL |
| 5 | 10 | 997 | OWNFILE | *ALL | *FILE |
| 5 | 10 | 998 | OWNPGM | *ALL | *PGM |
| 5 | 10 | 999 | OWNDFT | *ALL | *ALL |
| 5 | 11 | 999 | GRTAUT | *ALL | *PGM |
| 5 | 11 | 999 | RVKAUT | *ALL | *DTAARA |
タイプ*DTAARAのオブジェクトXYZの場合、Psq 10の最初の有効な選択はOWNDFTで実行されます。Psq 11では、最初に有効な機能はRVKAUTであり、次に実行されます。最初にOWNPGMが実行され、タイプ*PGMのオブジェクトCDEのGRTAUTが続きます。タイプ*FILEのオブジェクトKLMに対しては、OWNFILEのみが実行されます。*FILE OBJ126に対してOWNSEQのみが実行されます。OWNDIFが最初に実行され、次にタイプ*PGMのオブジェクトABCDEFのGRTAUTが続きます。
例外選択の処理
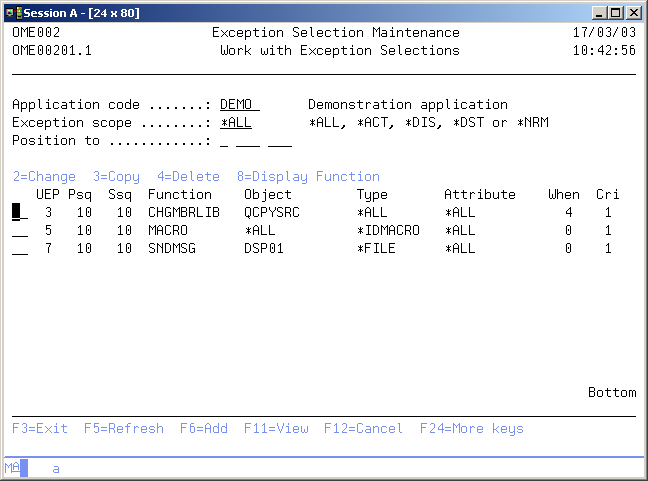
例外選択の処理画面には、ユーザー出口ポイント、処理シーケンス番号、選択シーケンス番号、機能ID,ならびにいくつかの条件を使用して、現在のアプリケーションの現在定義された選択が表示されます。
リストに新しい選択を追加したり、既存の選択を新しい選択にコピーしたり、選択の内容を変更したり、またはこの選択に指定された機能を表示したりできます。 特定の条件を指定するには「F17=サブセット」を使用します。入力された条件のオブジェクト転送中に実行される選択のみが表示されます。
アクティブなアプリケーション
アクティブなアプリケーションは、現在アクティブなアプリケーションのコードを表示します。このフィールドを変更できる場合は、必要なアプリケーションを入力してEnterを押して、新しいアプリケーションをアクティブにすることができます。また、「F4=プロンプト」キーを使用して、使用可能なアプリケーションのリストからアプリケーションを選択することもできます。
選択スコープ
選択スコープは、リストの特定のサブセットを取得するために使用できます。以下から選択してください。
- *ALL
すべての選択がリストに表示されます。 - *ACT
アクティブな選択のみがリストに表示されます。 - *DIS
処理のために無効になる選択のみがリストに表示されます。 - *DST
配布用にオブジェクトが収集されたときに実行される選択のみがリストに表示されます。 - *NRM
オブジェクトがローカルで作成されたときに実行される選択のみがリストに表示されます。
位置指定
このプロンプトを使用して、ユーザー出口ポイント、処理シーケンス、ならびに選択シーケンスに正しい位置を指定します。
オプション
この列を使用して、個々のエントリに対して異なる操作を実行します。可能な値は次のとおりです。
- 2=変更
例外選択の説明または内容を変更するには、2を入力します。 - 3=コピー
現在の値をベースとして新しいリストをリストに追加するには、3を入力します。 - 4=削除
リストから選択を削除するには、4を入力します。 - 8=機能を表示
この選択に使用する機能を表示するには、8を入力します。
ファンクション・キー
- F14=機能の処理
「例外機能」機能に進みます。 - F17=シミュレート
特定の条件を指定するためのデータをシミュレートします。入力された条件に対してオブジェクト転送中に実行される選択のみが表示されます。 - F21=リストを印刷
ジョブの現在のアクティブ出力キューにリストを印刷します。
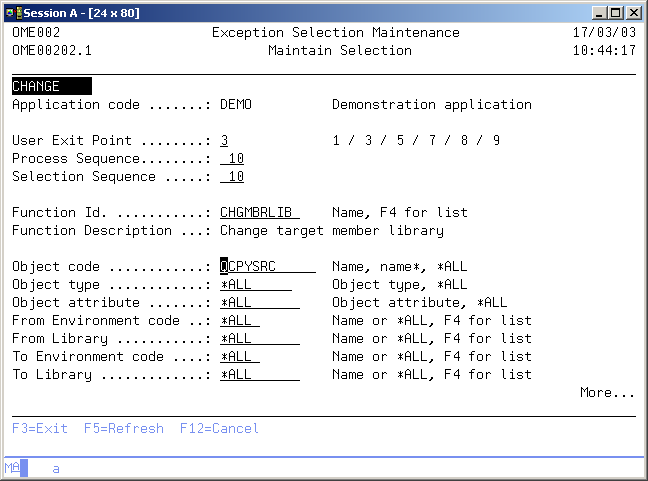
選択を保守
選択の保守画面には情報が表示され、前の画面で選択したオプションに応じてアクションが有効になります。前の画面で選択されたアクションが四行目に表示されます。次のアクションを有効にすることができます。
- 追加
新しい選択定義を追加することができます。ユーザー出口ポイント、処理シーケンス番号、選択シーケンス番号、機能ID、ならびに条件を入力する必要があります。プロンプトには最初にコピーされた選択の値が設定されます(コピー・アクションの場合)。 - 変更
既存の選択の属性を変更することができます。現在の値が表示されます。これらの属性はいつでも変更することができ、すぐに有効になります。 - 削除
確認メッセージと同様に、現在の選択属性が表示されます。Enterを押すと、選択定義がリストから削除されます。
ユーザー出口ポイント
ユーザー出口ポイントは、例外選択が実行されるオブジェクト転送中の事前定義されたフェーズです。
オブジェクト転送プロセスには、一つまたは複数の修正とその接続されたオブジェクトが含まれます。オブジェクト、環境、ならびに環境内のライブラリ・リストの数を選択すると、TD/OMSは作成されるオブジェクトごとに内部作成エントリを生成します。 例外選択は、ユーザー出口ポイントと例外選択の作成エントリごとにスキャンされ、有効な時に実行します。可能な値は次のとおりです。
- 1=転送開始時
ユーザー出口ポイント1での選択は、オブジェクト転送の開始時に実行されます。特定のオブジェクト情報はありません。 - 3=オブジェクトの作成前
ユーザー出口ポイント3での選択は、作成エントリごとの処理の開始時に実行されます。標準のTD/OMS処理ではオブジェクトに対して何も実行されませんでした。 - 5=OMS作成の代わり
TD/OMSによる作成エントリの作成ではなく、ユーザー出口ポイント5での選択が実行されます。通常、TD/OMSはオブジェクト(論理ファイルのコンパイル)をコピーしますが、ユーザー出口ポイント5で有効な選択が見つかると、TDは例外機能がtoライブラリにオブジェクトを作成するとみなします。 - 7=オブジェクトの作成後
ユーザー出口ポイント7での選択は、作成エントリごとの処理の最後に実行されます。標準のTD処理がオブジェクトに対して終了しました。 - 8=オブジェクト・グループごとのクリーン・アップ
ユーザー出口ポイント8での選択は、クリーニング部分が実行される直前に、-object code、-type、ならびに-libraryごとに実行されます。 - 9=転送が終了する予定の場合
ユーザー出口ポイント9での選択は、オブジェクト転送の終了時に実行されます。特定のオブジェクト情報はありません。すべての標準処理がすべてのオブジェクトに対して実行されました。
処理シーケンス番号
処理シーケンス番号は例外選択定義で使用され、特定のユーザー出口ポイントで処理される選択の順序をさらに指定します。 処理シーケンス番号ごとに、オブジェクトごとに一つの選択だけが実行されることに注意してください。
選択シーケンス番号
選択シーケンス番号は例外選択定義で使用され、特定の処理シーケンス番号内で有効な選択のチェック順序をさらに指定します。 処理シーケンス番号ごとに、オブジェクトごとに一つの選択だけが実行されることに注意してください。最も低い選択シーケンス番号を持つ有効な選択が処理のために選択されます。 最も一般的な条件では、最も高い選択シーケンス番号(999)を使用してください。特定の条件を使用する場合は、選択シーケンス番号を低くしてください。
選択シーケンスの使用例。 100 - ABCD *PGM RPG 200 - CDE* *PGM CBL 984 - *ALL *PGM CBL 985 - *ALL *PGM RPG 990 - *ALL *PGM *ALL 999 - *ALL *ALL *ALL
例外機能ID
例外機能IDには、機能の名前が含まれます。機能IDは、CHGPFNOMAX、CRTCLPGM、またはOWNQSECOFRのような機能の短い記述です。
機能IDはアプリケーションごとに一意でなければならず、システム機能のIDはすべてのアプリケーションで一意でなければなりません。IDは、一度追加されると変更できません。空白値は許可されません。使用可能な例外機能のリストを取得するには、「F4=リスト」を使用します。
オブジェクト・コード
オブジェクト・コードは、オブジェクトOS/400名です。通常のオブジェクトでは10文字、ドキュメント・ライブラリ・オブジェクトでは12文字です。
オブジェクト・タイプ
このプロンプトを使用して、オブジェクト・タイプの条件を入力します。値*ALLは、すべてのオブジェクト・タイプが選択されることを示します。4GLの例外を定義する場合は、4GLキーワード(*SYNON、*AS/SETなど)を入力して4GLオブジェクトのみを選択します。
オブジェクト・属性
このプロンプトを使用して、オブジェクト属性の条件を入力します。値\*ALLは、すべてのオブジェクト属性が有効であることを示します。
From環境
このプロンプトを使用して、From環境の条件を入力します。値\*ALLは、From環境に対して特定のテストが行われないことを示します。使用可能な環境コードの一つを選択するには、「F4=プロンプト」を使用します。
選択された環境が例外選択プロセスをスピード・アップするので、可能であればこの条件を使用してください。
重要度インジケータ
重要度インジケータは、例外機能ならびに例外選択ごとに定義されます。例外が重要であるかどうかを示します。可能な値は次のとおりです。
- 0=いいえ
例外は重要ではありません。この例外の実行中にエラーが発生すると、警告が発生します。 - 1=はい
例外は重要です。重要な例外は、ユーザー出口ポイント1、3、5または7で実行される場合にのみオブジェクト転送に影響します。重要な例外がエラーで終了した場合、オブジェクトの処理はエラーで終了します。
Fromオブジェクト・ライブラリ
このプロンプトを使用して、Fromオブジェクト・ライブラリの条件を入力します。値*ALLは、Fromオブジェクト・ライブラリに対して特定のテストが行われないことを示します。使用可能なライブラリの一つを選択するには、「F4=プロンプト」を使用します。Fromオブジェクト・ライブラリは、複数の作成エントリで同じにすることができます。コピーされるオブジェクトは、常に同じライブラリから発生します。たとえそれが複数のライブラリ・リストにコピーされたとしても。このオブジェクトはメイン・オブジェクトとして知られます。
有効にする時点
「有効にする時点」インジケータは、例外選択で例外選択を無効にするか、選択をローカル処理専用にするか、配布フェーズの準備中に行うか、またはその両方を行うかを指定するために使用されます。デフォルト値は「0」です。可能な値は次のとおりです。
- 0=ローカル
例外選択は、オブジェクトがローカルで作成される場合にのみ有効です。一時配布ライブラリに配布するためにオブジェクトが収集される場合、選択は実行されません。 - 1=決してしない
例外選択は無効です。 - 2=事前配布
例外選択は、一時配布ライブラリに配布するためにオブジェクトが収集された場合にのみ有効になります。オブジェクトがローカルに作成された場合、例外は実行されません。 - 3=常に
一時配布ライブラリで配布用にオブジェクトが収集され、オブジェクトがローカルで作成される場合、例外選択は常にアクティブになります。 - 4=事前処理
例外選択は直接有効化されます。例外は、処理するオブジェクトを選択するときに既に実行されます。これは転送を確認する前に例外が既に実行されることを意味します。
To環境
このプロンプトを使用して、To環境の条件を入力します。値*ALLは、To環境に対して特定のテストが行われないことを示します。使用可能な環境コードの一つを選択するには、「F4=プロンプト」を使用します。
Toオブジェクト・ライブラリ
このプロンプトを使用して、Toオブジェクト・ライブラリの条件を入力します。値*ALLは、Toオブジェクト・ライブラリに対して特定のテストが行われないことを示します。使用可能なライブラリの一つを選択するには、「F4=プロンプト」を使用します。
シミュレーション・データを指定
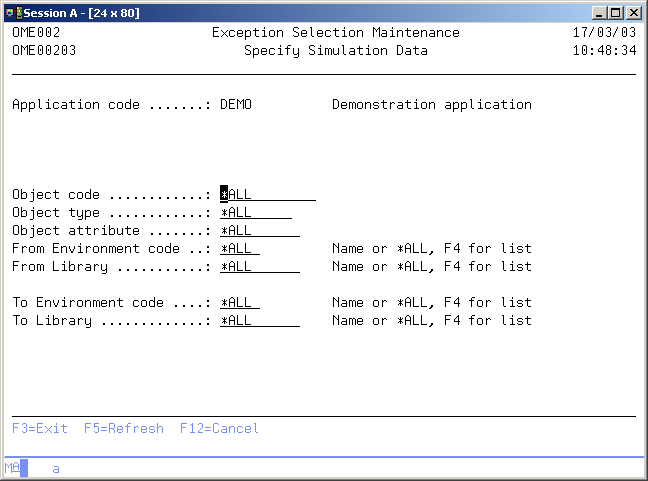
シミュレーション・データの指定画面には、選択の処理画面の現行のサブセット条件が表示されます。サブセット条件に値*ALLが含まれる場合は、すべての例外選択エントリが表示されます。シミュレーション・データを入力することにより、例外選択が正しかどうかを確認することができます。これらは、オブジェクト転送中に実行される選択です。
オブジェクト・コード
このプロンプトを使用して、オブジェクト・コードのサブセット値を入力します。値*ALLを使用するか、有効なオブジェクト・コードを入力してください。
オブジェクト・タイプ
このプロンプトを使用して、オブジェクト・タイプのサブセット値を入力します。値*ALLを使用するか、有効なオブジェクト・タイプを入力してください。
オブジェクト属性
このプロンプトを使用して、オブジェクト属性のサブセット値を入力します。値*ALLを使用するか、有効なオブジェクト属性を入力してください。
From環境
このプロンプトを使用して、From環境のサブセット値を入力します。値*ALLを使用するか、有効な環境コードを入力してください。有効な環境コードのリストを表示するには、「F4=プロンプト」を使用してください。
Fromライブラリ
このプロンプトを使用して、Fromオブジェクト・ライブラリのサブセット値を入力します。値*ALLを使用するか、有効なライブラリ・コードを入力してください。有効なライブラリのリストを取得するには、「F4=プロンプト」を使用してください。
To環境
このプロンプトを使用して、To環境のサブセット値を入力します。値*ALLを使用するか、有効な環境コードを入力してください。有効な環境コードのリストを取得するには、「F4=プロンプト」を使用してください。
Toライブラリ
このプロンプトを使用して、Toオブジェクト・ライブラリのサブセット値を入力します。値*ALLを使用するか、有効なライブラリ・コードを入力してください。有効なライブラリのリストを取得するには、「F4=プロンプト」を使用してください。
例外機能を表示
例外機能の表示画面には、例外選択で使用される機能の内容が表示されます。コマンドまたはプログラム名が表示されます。
コマンド:例外選択の保守を開始(STRXSM)
このメニュー・コマンドは、例外選択の保守機能を開始します。詳細な説明については、機能「例外選択の保守」の説明を参照してください。
STRXSM
このコマンドにはパラメータはありません。
Data Conversion File Maintenance
The Work with Conversion definitions function enables you to define the non-default conversions to be done for a specific physical file. By default a conversion is executed using the copy parameters *MAP and *DROP, so new field are initialized and removed fields are skipped.
The Data Conversion Maintenance program is started by using command STRXCNV. Using the menu, use STROMS, option 3, option 21, option 3.
You can define a user program which is called during Object Transfer if another type of conversion must be executed for a specific application this user program will be called with a predefined parameter list when the conversion must be performed.
If a new physical file must be initially filled with data from another existing file for some . You are able to declare the Related Object Code. TD/OMS will then convert the data from this file into the newly created physical.
Users with authorization code 3 are allowed to start this function.
Work with Conversion Definitions
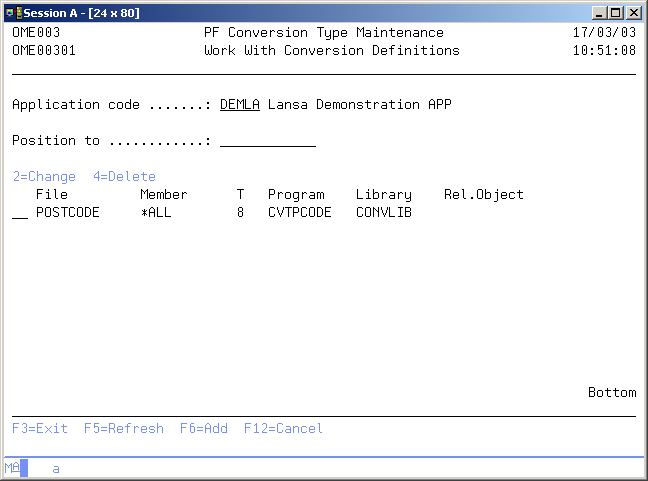
The Work with Conversion Definition display shows the currently defined exceptions for database conversion for the current application. Physical files not listed are converted with the default conversion mode; i.e. executing the CPYF command with the parameters *MAP and *DROP specified. You can add a new definition to the list, change an existing definition, or remove an existing definition from the list.
Position to
Use this prompt to go to a particular file in the list.
Active Application
The active application shows the code of the current active application. If this field can be changed you can activate a new application by typing the application you desire and pressing Enter. You can also use the F4=Prompt key to select an application from the list of available applications.
Option
Use this column to perform different operations on individual entries. The possible values are:
- 2=Change
Change the attributes of the conversion definition. - 4=Delete
Delete a definition from the list. - F6=Add
Add a new conversion definition to the list.
Maintain Conversion Definition
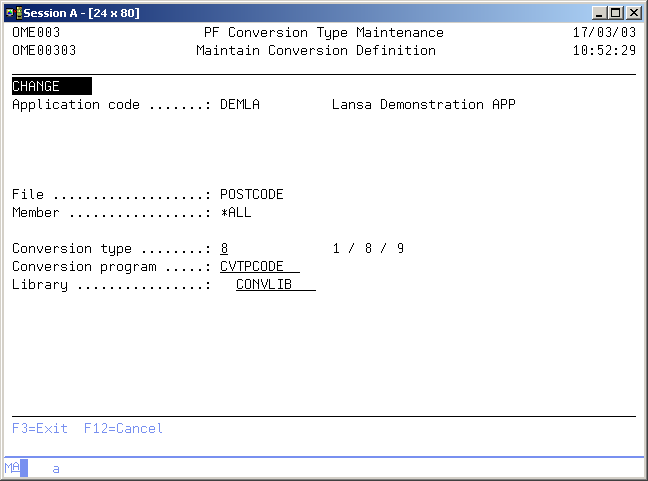
The Maintain Conversion Definition display shows information and enables actions depending on the option chosen on the previous display. The chosen action on the previous display is shown on line four. The following actions can be activated:
- Add
You can add a new conversion definition. The conversion type with its attributes must be entered. - Change
You can change the attributes of an existing conversion definition. The current values are shown. These attributes can be changed at any time and are effective immediately. - Delete
The current conversion definition attributes are shown, as is a confirmation message. The conversion definition is deleted from the list after you press Enter.
File code
Use this prompt to enter the object code of the physical file you are defining the conversion for. A blank value is not allowed.
Member code
Use this prompt to enter a specific member name if a single member is connected to a fix, not the physical file itself. The value *ALL must be used if a physical file is connected to a fix.
Data conversion type
The data conversion type instructs TD/OMS what action must be taken on the data in a physical file. Default conversion will be performed by TD/OMS if no conversion type is defined for a specific physical file: The contents of the replaced physical file will be copied to the newly created physical using the *MAP and *DROP parameters. The possible values are:
- 1=None
No conversion will be executed. The object will be copied as will the data it contains, thus replacing existing data members. Use this value for physical files containing changed parameter values. - 8=Call user program
A user conversion program which can be defined in the TD conversion file (See technical description below) will be called after the physical file has been created. - 9=Convert from other file
Standard conversion will be executed, though not from an equally named physical file but from a physical file with a different name.
Technical description
A user program is called using the following parameters for type '8'. All parameters are character fields:
| Parameter | Description (length) |
| FENV | The From-environment (C5) |
| FOBC | The From-object code; the physical file with data (C10) |
| FOBL | The library of the physical file to be copied (C10) |
| TENV | The To-environment code (C5) |
| TOBJ | The To-object code; the newly created physical file (C10) |
| TOBL | To library of the newly created physical file (C10) |
| STAT | The status after converting the data (C5). Use the value '*NORM' for normal ending of the program and '*TERM'for abnormal ending. |
Program name
Use this prompt in combination with conversion type 8 to enter the object code of the conversion program to be called.
Program library
Use this prompt in combination with conversion type 8 to enter the object code library of the conversion program to be called.
Related object code
Use this prompt in combination with conversion type 9 to enter the related object code. This must be a physical file which will be used to copy the data from.
Command Start Conversion File Maintenance (STRXCNV)
This menu command starts the conversion file maintenance function. Refer to the description of the function Conversion File Maintenance for a detailed description.
STRXCNV
This command has no parameters.
Dynamic Data Conversion
You can also switch on data conversion dynamically using Actions during the transfer process. You may want to do this when for any of the following reasons:
- You want to be in total control of data conversions
- Suppose you have a data conversion program that can handle all tables.
- You ship your data conversion program with the task
- You can create a special program that, when it is on the task, you want to call to convert the data
- You know that some files require FMTOPT(*NOCHK)
- Some tables may require an additional *NOCHK
To trigger this dynamically, a label on the file is a great solution to override normal data conversion with your special conversion.
Parts needed
To implement the above, we want to use an Action on processing step SO (Start of Object) that will dynamically change the conversion program using the CHGVAROMS command.
The CHGVAROMS command can change the behavior of the transfer at runtime.
We can trigger this Action based on a label that we can call 'Convert_With_NOCHK'
Registry Definition Maintenance
The Registry Definition function (STRRDM) enables you to work with the registry definitions.
Registry definitions can be added, copied, changed, deleted or viewed.
Users belonging to the user class *SECOFR, *SECADM or the TD/OMS manager (group) are allowed to use this function.
Work with the Registry Definitions
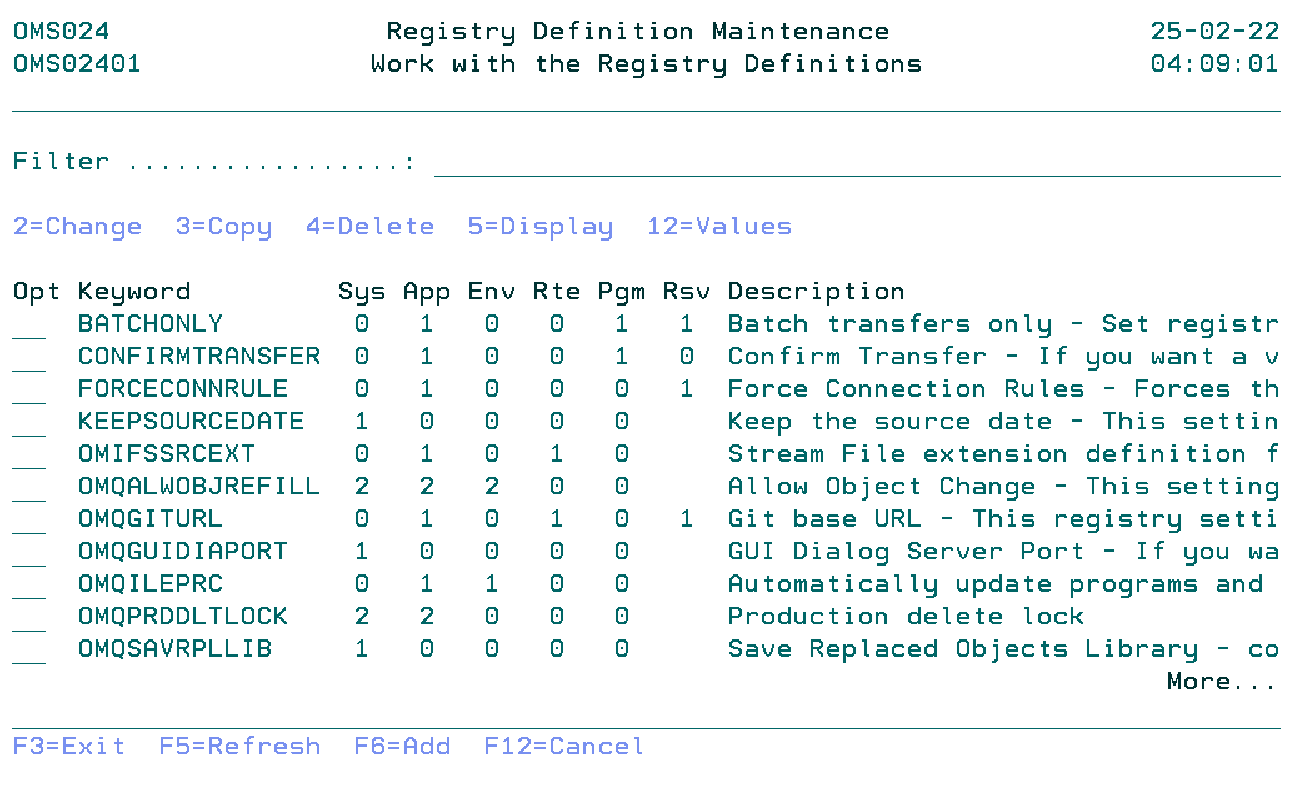
The Work with Registry Definitions display shows the currently defined registry keywords, including their main parameters. To select an option, type the option number in the option field area and press Enter. For more information about an option move the cursor to the option column and press Help. For more information about a function key, move the cursor to the function key area and press Help.
Filter
The Filter prompt allows for quick filtering of the list.
Option
Use this column to perform different operations on individual entries.
- 2=Change
- Change the registry definition keyword.
- 3=Copy
- Copy the registry definition keyword.
- 4=Delete
- Remove registry definition keyword.
- 5=Display
- Display the information of the registry definition keyword.
- 12=Values
- Work with registry definition keyword values.
- F6=Add
- Add a new registry definition keyword.
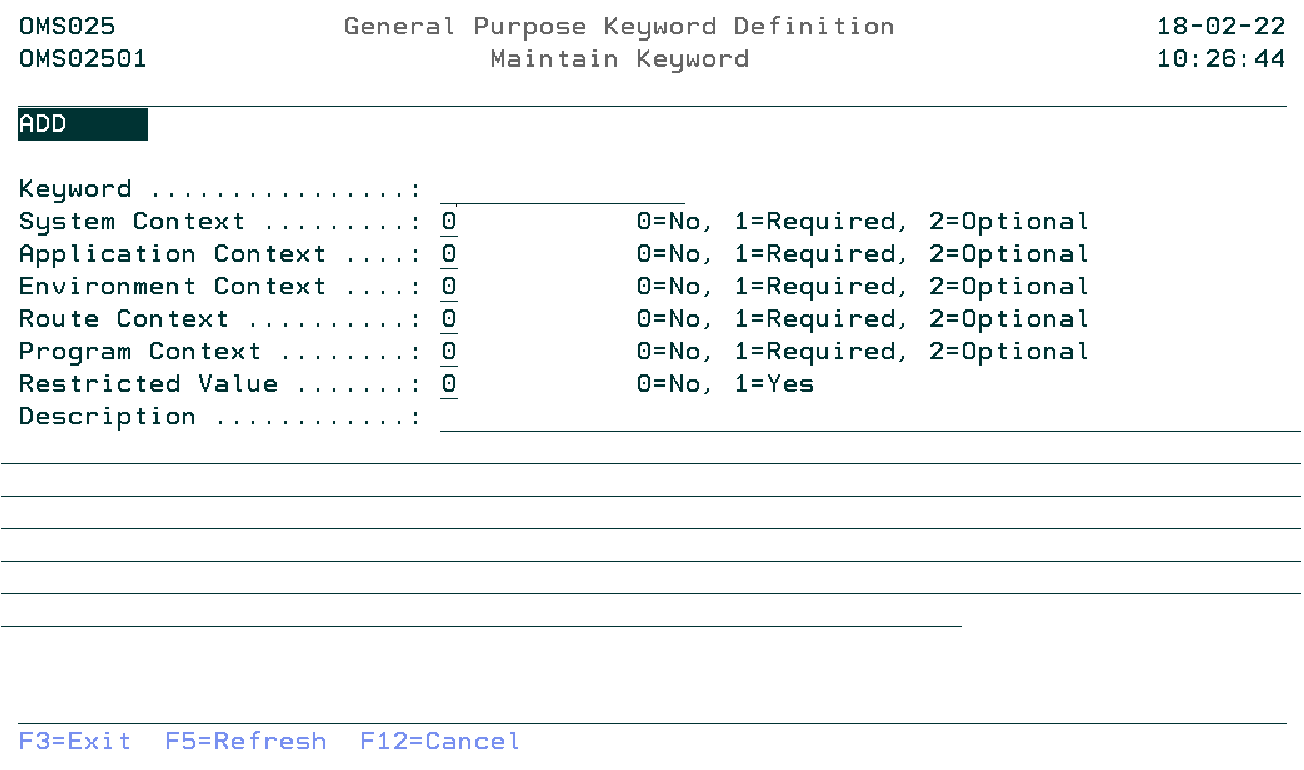
Maintain Keyword
The Maintain Keyword display shows information and allows actions depending on the option chosen on the previous display. The chosen action on the previous display is shown on line three. The following modes can be activated:
- *Add
- A new registry definition keyword is being added.
- *Change
- Change the attributes of an existing keyword.
- *Copy
- Copy the attributes of an existing keyword to a new keyword. The current values are shown.
- *Delete
- You are about to delete an existing keyword. The current values are shown.
- *Display
- Shows the attributes of an existing keyword.
Keyword
Specify the registry definition keyword. The blank value or a already existing keyword is not allowed.
System Context Indicator
Determines if context values can be specified (2=Optional), must be specified (0=Not required) or can not be specified (1=Required) when adding a registry keyword. Entering a 1 for the System context means that all other context related indicators must be 0.
Application Context Indicator
Determines if context values can be specified (2=Optional), must be specified (1=Required) or can not be specified (0=Not required) when adding a registry keyword.
Environment Context Indicator
Determines if context values can be specified (2=Optional), must be specified (1=Required) or can not be specified (0=Not required) when adding a registry keyword.
Route Context Indicator
Determines if context values can be specified (2=Optional), must be specified (1=Required) or can not be specified (0=Not required) when adding a registry keyword.
Program Context Indicator
Determines if context values can be specified (2=Optional), must be specified (1=Required) or can not be specified (0=Not required) when adding a registry keyword.
Restricted Value Indicator
Specifying a 0 means that any combination of characters is allowed when adding a registry keyword. The description may contain instructions on the required format (eg comma separated). The value entered must match with a pre-defined value in case of a 1.
Description
Explanation of the purpose of this keyword. Examples and dependancies on other keywords will be described here.
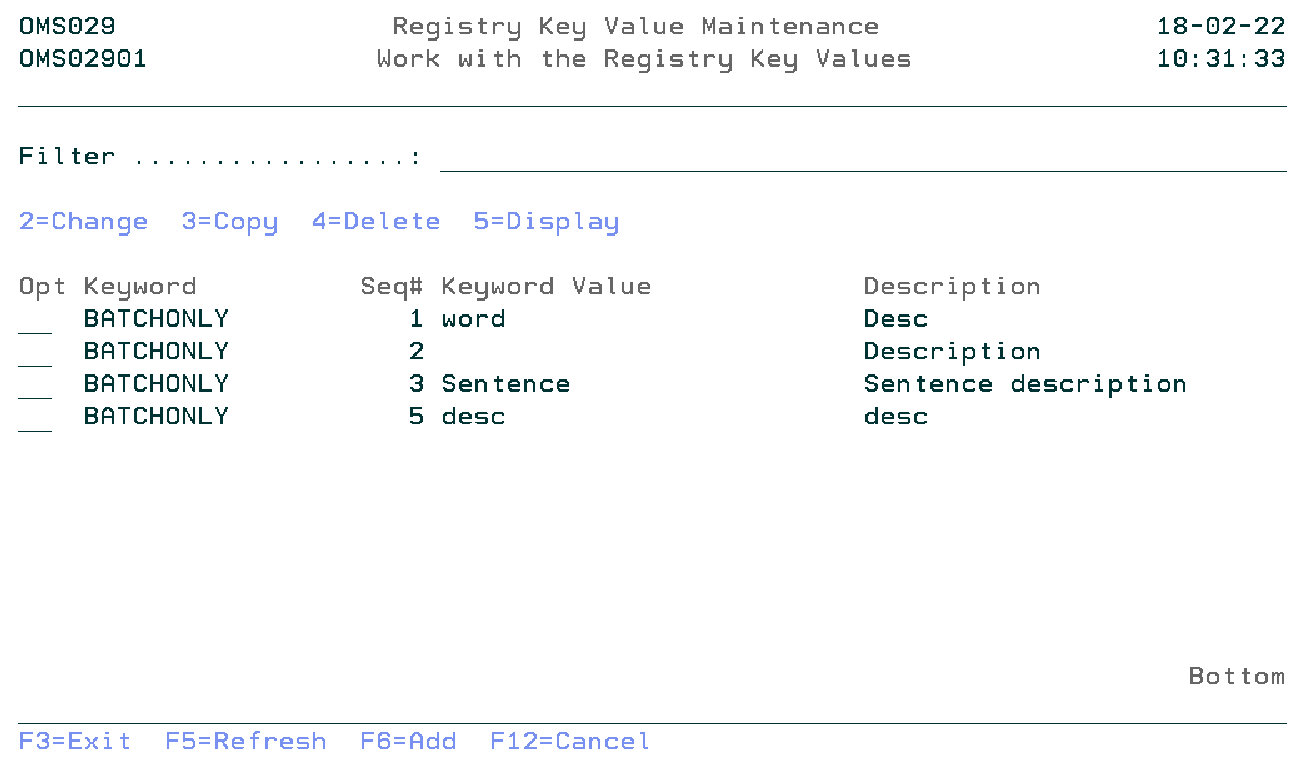
Work with the Registry Definition Key Values
The Work with the Registry Key Values display shows the list of values of the selected Registry Definition keyword (option 12 on the previous display). Entries can be Added, Copied, Changed, Deleted, and Viewed.
Filter
The Filter prompt allows for quick filtering of the list.
Option
Use this column to perform different operations on individual entries. Type the option number next to an entry and press Enter.
- 2=Change
- Change the registry keyword value.
- 3=Copy
- Copy the registry keyword value.
- 4=Delete
- Remove registry keyword value.
- 5=Display
- Display the information of the registry keyword value.
- F6=Add
- Add a new registry keyword value.
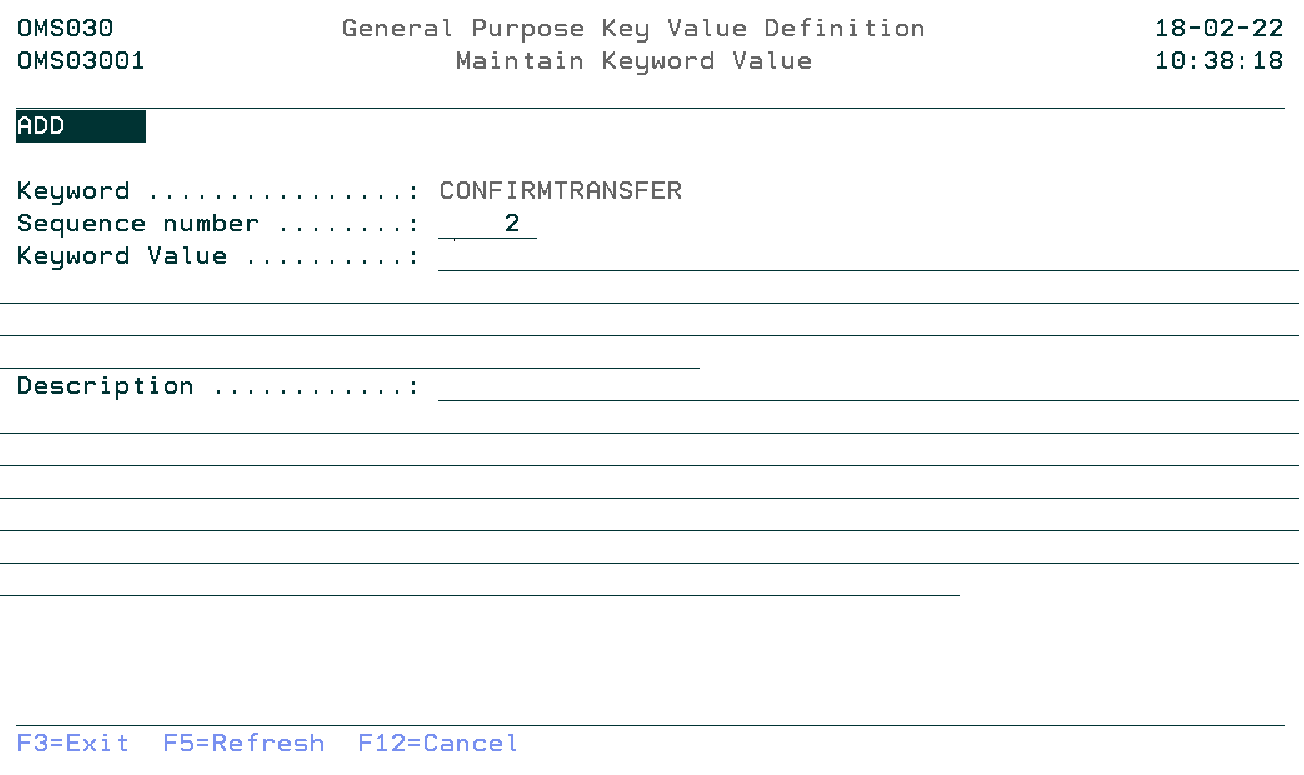
Maintain Keyword Value
The Maintain Keyword Value display shows information and allows actions depending on the option chosen on the previous display. The chosen action on the previous display is shown on line three. The following modes can be seen:
- Add
- Adding a registry keyword Value.
- Change
- Change the attributes of an existing keyword value. The current values are shown.
- Copy
- The attributes of an existing keyword value are being copied to a new value. The current values are shown.
- Delete
- Delete the attributes of an existing keyword value. The current values are shown.
- Display
- The attributes of an existing keyword value are shown.
Keyword
The keyword for the value. Display only
Sequence number
The sequence number controls the display of the values in the list. A value from 99999- until 99999 is allowed
Keyword Value
The registry definition keyword value.
Description
The clarification of the meaning of the registry definition keyword value.
Command Start Registry Definition Maintenance (STRRDM)
This menu command starts the registry definition maintenance function. Refer to the description of the function Registry Definition maintenance for a detailed description.
STRRDM
This command has no parameters.
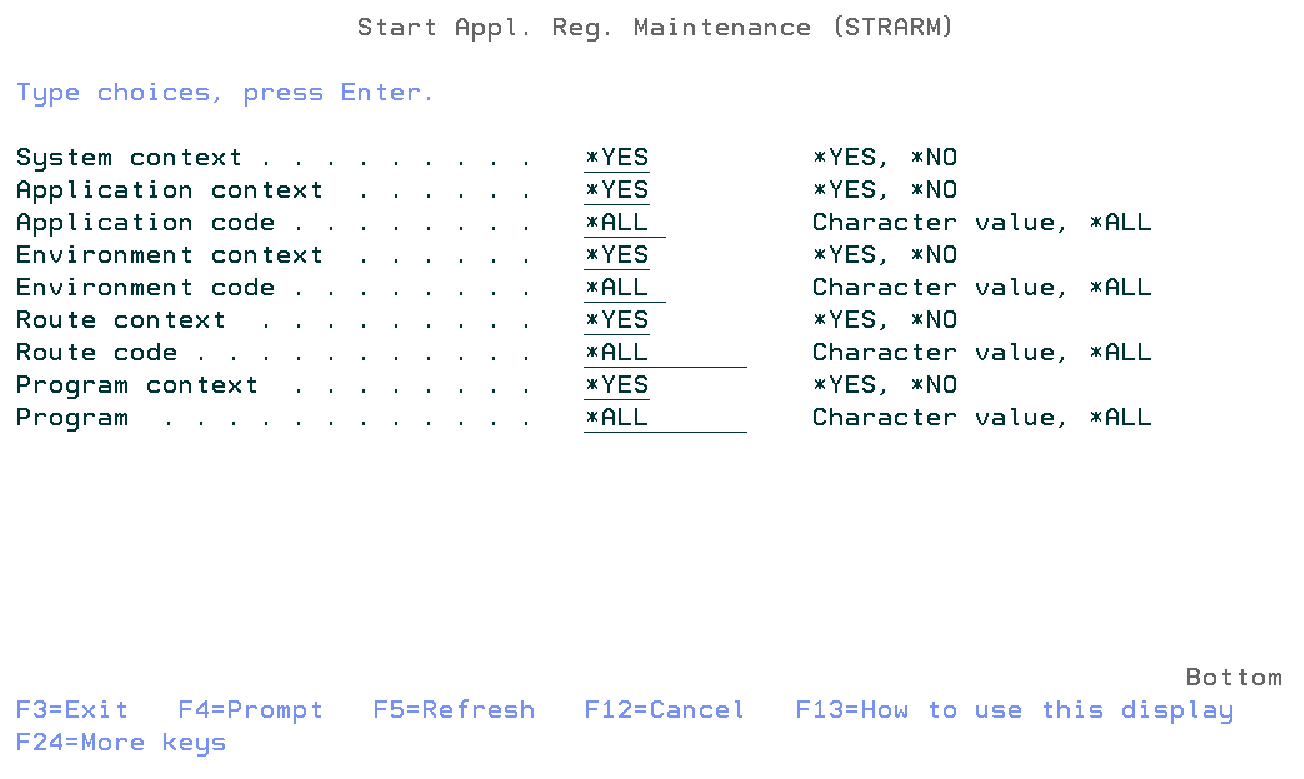
Application Registry Maintenance
The Application Registry Maintenance function (STRARM) shows all the entries in a list that is based on the filters. Users belonging to the user profile class *SECOFR, *SECADM or the TD/OMS manager group are allowed to use this function.
System Context Indicator
Specify *YES to display keywords with a required or optional System context indicator or specify *NO to display keywords for which this context is not allowed.
Application Context Indicator
Specify *YES to display keywords with a required or optional Application Context Indicator or specify *NO to display keywords for which this context is not allowed.
Application Code
Specify the application code filter. Possible values are:
- *All
- Select all application codes.
- Application-Code
- Specify the application code.
Environment Context Indicator
Specify *YES to display keywords with a required or optional Environment Context Indicator or specify *NO to display keywords for which this context is not allowed.
Environment Code
Specify the environment code filter. Possible values are:
- *All
- Select all environment codes.
- Environment-Code
- Specify the environment code.
Route Context Indicator
Specify *YES to display keywords with a required or optional Route Context Indicator or specify *NO to display keywords for which this context is not allowed.
Route Code
Specify the route code filter. Possible values are:
- *All
- Select all route codes.
- Route-Code
- Specify the route code.
Program Context Indicator
Specify *YES to display keywords with a required or optional Program Context Indicator or specify *NO to display keywords for which this context is not allowed.
Program Name
Specify the program name filter. Possible values are:
- *All
- Select all program names.
- Program-name
- Specify the program name.
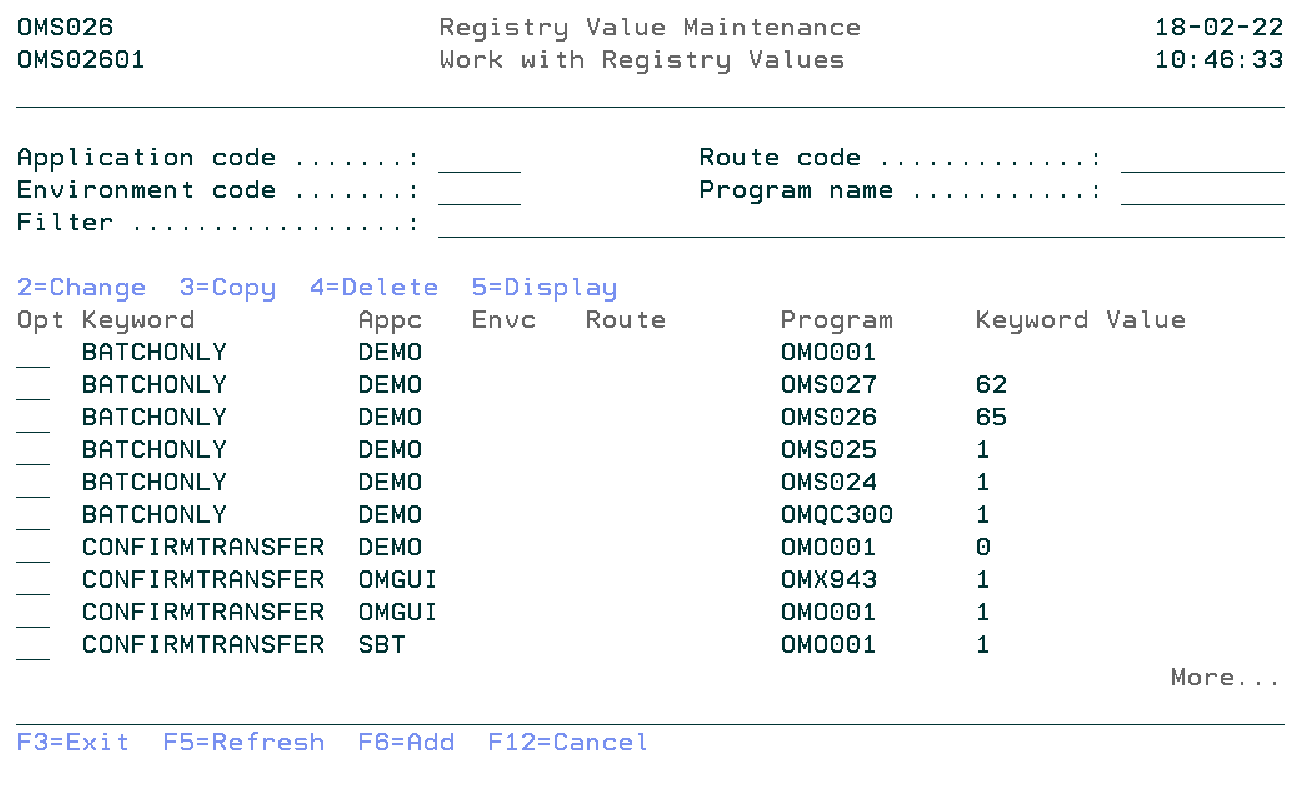
Work with Registry Values
The Work with Registry Values shows all the entries in a list from the application general-purpose file that is linked to the general-purpose definition file. Entries can be Viewed, Copied, Changed, Deleted, and Added. This screen will be shown according to the parameter of the previous display.
Application Code
You can specify the application code which you want to filter.
Environment Code
You can specify the environment code which you want to filter.
Route Code
You can specify the route code which you want to filter.
Program Name
You can specify the program name which you want to filter.
Filter
The Filter prompt can be used for quick filtering of the list.
Option
Use this column to perform different operations on individual entries. Type the option number next to an entry and press Enter.
- 2=Change
- Change the value of a registry keyword.
- 3=Copy
- Copy the registry keyword from the database.
- 4=Delete
- Remove the registry keyword from the database.
- 5=Display
- Display the information about the registry keyword.
- F6=Add
- Add a new registry keyword.
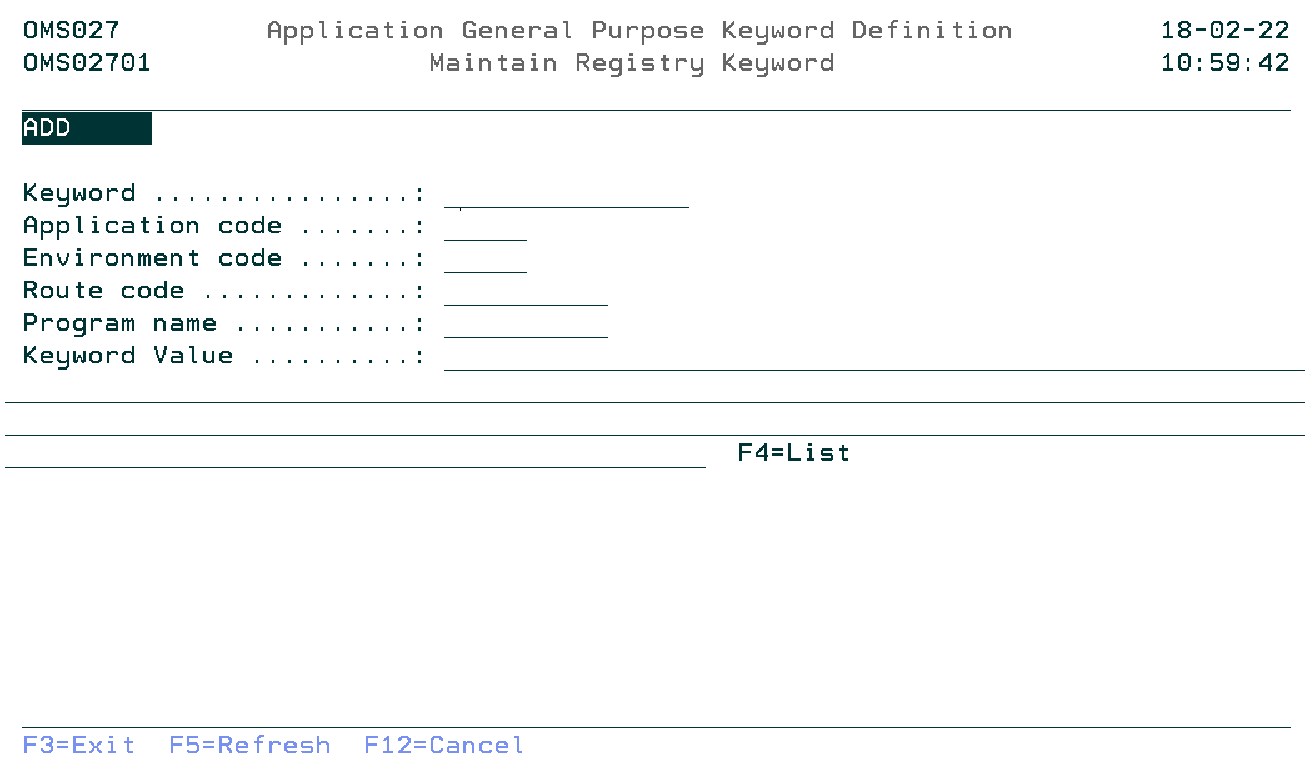
Maintain Registry Keyword
The Maintain Registry Keyword display shows information and allows actions depending on the option chosen on the previous display. The chosen action on the previous display is shown on line three. The following modes can be activated:
- Add
- Add a new registry keyword.
- Change
- Change the attributes of an existing registry keyword. The current values are shown.
- Copy
- Copy the attributes of an existing registry keyword. The current values are shown.
- Delete
- Delete the attributes of an existing registry keyword. The current values are shown.
- Display
- Show the attributes of an existing registry keyword. The current values are shown.
Keyword
You can specify the registry keyword.
Application Code
You can specify the application code of the application to which the registry key must be added.
Environment Code
You can specify the environment code for which this registry key is valid.
Route Code
You can specify the route code for which this registry key is valid.
Program Name
You can specify the program name for which this registry key is valid.
Keyword Value
You can specify the registry keyword value.
Use F4=List to get a list of the available keyword values.
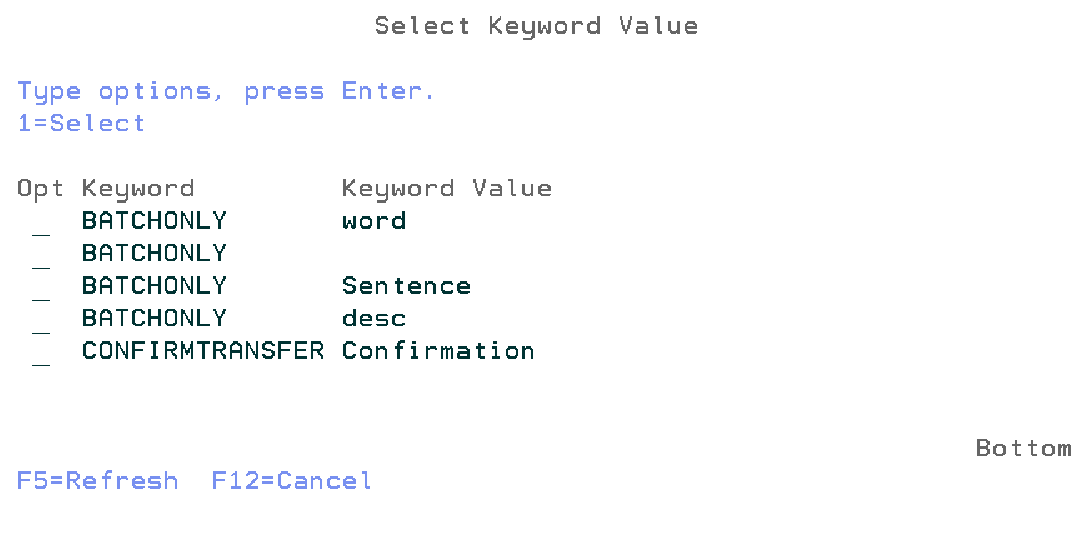
Select Keyword Value
The Select Keyword Value window shows all the keyword values in a list from the general-purpose value file. This display will be shown when you press F4 on the keyword value field in the previous screen.
Option
Use this column to select the keyword value.
- 1=Select
- Select keyword value.
Command Start Application Registry Maintenance (STRARM)
This menu command starts the application registry maintenance function. Refer to the description of the function application registry maintenance for a detailed description.
STRARM SYSI(*YES)
       APPI(*YES)
       APPC(*ALL)
       PDLI(*YES)
       PDLC(*ALL)
       ROTI(*YES)
       ROTC(*ALL)
       PGMI(*YES)
       PGMN(*ALL)
This command has nine parameters.
Pre Transfer Check
The pre-transfer check mechanism is used to check if an object can safely be transported to the next environment. The pre-transfer check will check a couple of actions, e.g.
- Level Checks for files,
- Signature Level Check for service programs,
- Etc...
A pre-transfer check defines how a check entry can be added to the pre-transfer check table OMPTC. It defines in which contexts the check entry can be added and describes the usage of the check.
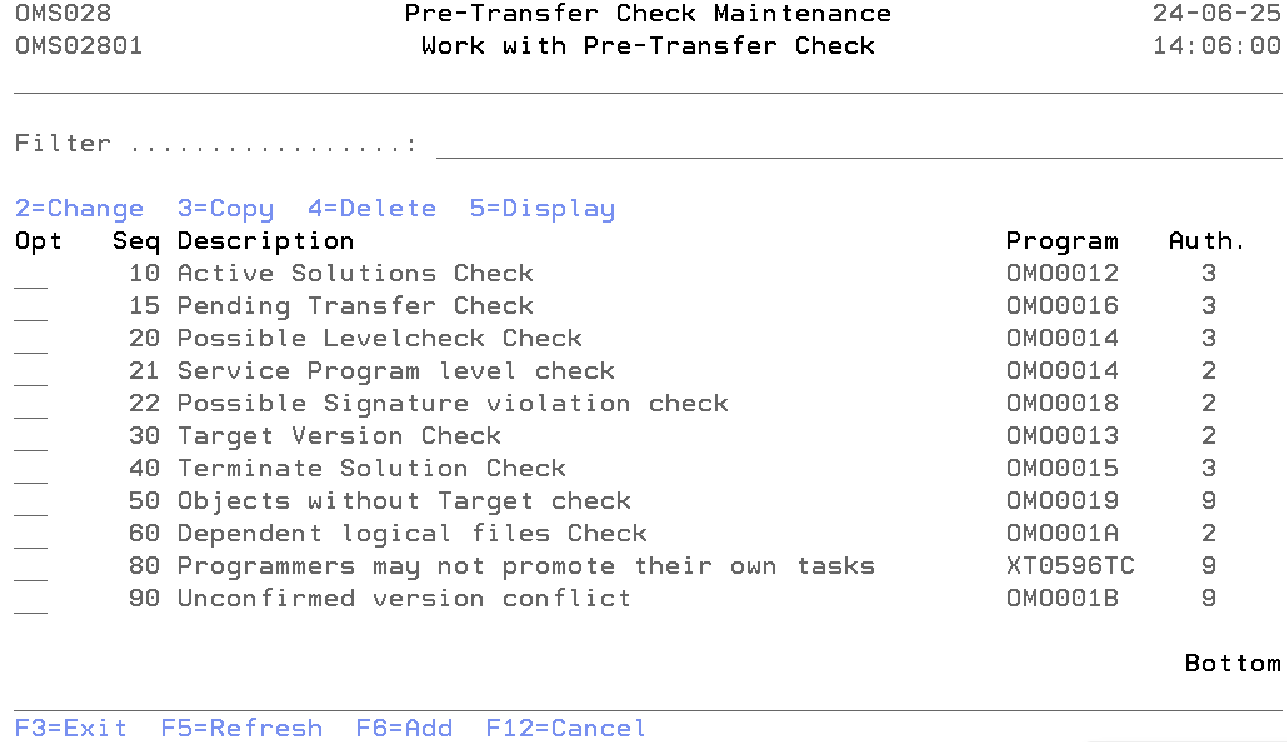
Work with Pre Transfer Check
The Work with Pre transfer check display shows the currently defined checks, including their main parameters. To select an option, type the option number in the option field area and press Enter. For more information about an option move the cursor to the option column and press Help. For more information about a function key, move the cursor to the function key area and press Help.
The system indicator, the description of the function, a critical indicator, a local/remote indicator and the function owner are shown in addition to the functions. Refer to the Exception Concepts for more detailed information.
You can add a new check to the list, delete a check from the list, change the attribute of a check, or display the attribute of a check.
Filter
The Filter prompt can be used for a quick filtering of the list. Type the code or partial code of the below fields you wish to show in the list.
- Sequence Number
- Description
- Program Name
Option
Use this column to perform different operations on individual entries. The possible values are:
- 2=Change
Type 2 to change the value of a check. - 3=Copy
Type 3 to copy the check from the database. - 4=Delete
Type 4 to remove a check from the database. TDOMS supplied checks can not be deleted. - 5=Display
Type 5 to display the information about the check.
- F6=Add
Add a new occurrence of the entity you are working with.
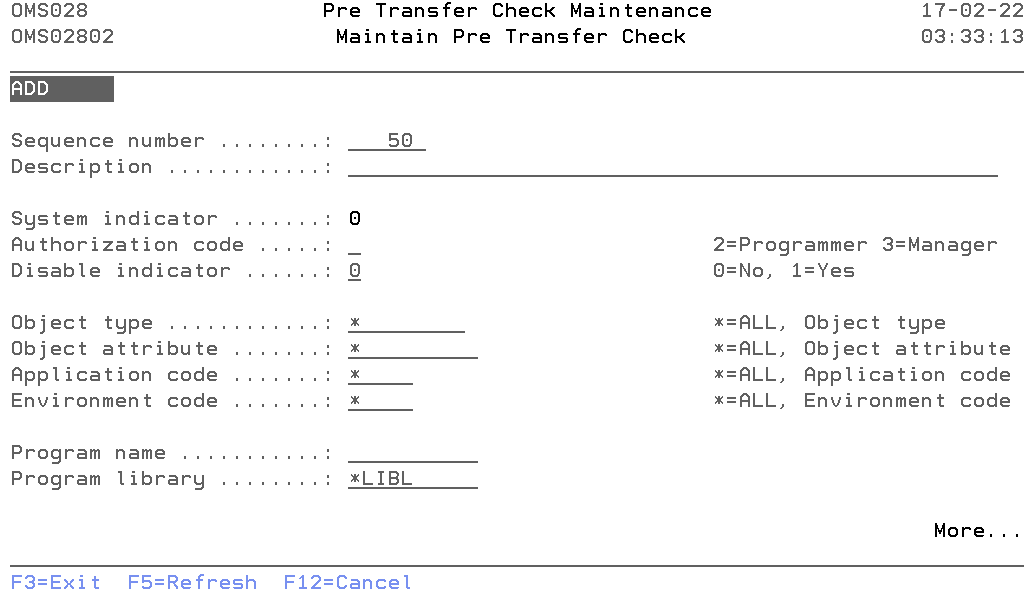
Maintain Pre Transfer Check
The Maintain Pre Transfer Check display shows information and allows actions depending on the option chosen on the previous display. The chosen action on the previous display is shown on line three. The following modes can be activated:
- Add
You can add a new check. The sequence number, description, Authorization code and all other mandatory fields must be entered. - Change
Change the attributes of an existing check. - Copy
Copy the check from the database. - Delete
The current pre-transfer check attributes are shown, including a confirmation message. The check is deleted from the list after pressing Enter. - Display
Show the attributes of a check. The current values are shown.
Sequence Number
The Sequence Number is the order in which the check is being executed.
You can change the system-generated sequence number but it must be unique per check. A blank value is not allowed.
Description
The pre-transfer description contains a description of the pre-transfer check entry. A blank value is not allowed.
System indicator
The System Indicator indicates whether the check is supplied by TD/OMS or by the user. Value '1' indicates that the check is a TD/OMS supplied. Value '0' indicates check is created by user.
Only authorization code and disabled indicator value can be changed for TD/OMS supplied check.
Authorization code
Specify the authentication code that can confirm the errors or warnings coming from the pre-transfer check. The possible values are:
- 2=Programmer
Programmers can not confirm error or warning. - 3=Application manager
Programmers can confirm error or warning. - 9=Block
No one can confirm the issue. The issue has to be resolved before processing can continue.
Disable indicator
The disabled indicator is defined per pre-transfer check. It indicates if this check should execute or not. The possible values are:
- 0=No
The check will run. - 1=Yes
The check will not run.
Object type
Specify the Object Type for which this check should be executed. Enter a valid object type or '*' for all object types.
Object attribute
Specify the Object Attribute for which this check should be executed. Enter a valid object attribute or '*' for all object attributes.
Application code
Specify the Application Code for which this check should be executed. Enter a valid application code or '*' if this check should be executed for all applications.
Environment code
Specify the Environment Code for which this check should be executed. Enter a valid environment code or '*' if this check should be executed for all environments.
Program name
The program name contains the name of a program which is called by TD/OMS during checkout.
Program library
The program library contains the OS/400 library where the exception program can be found.
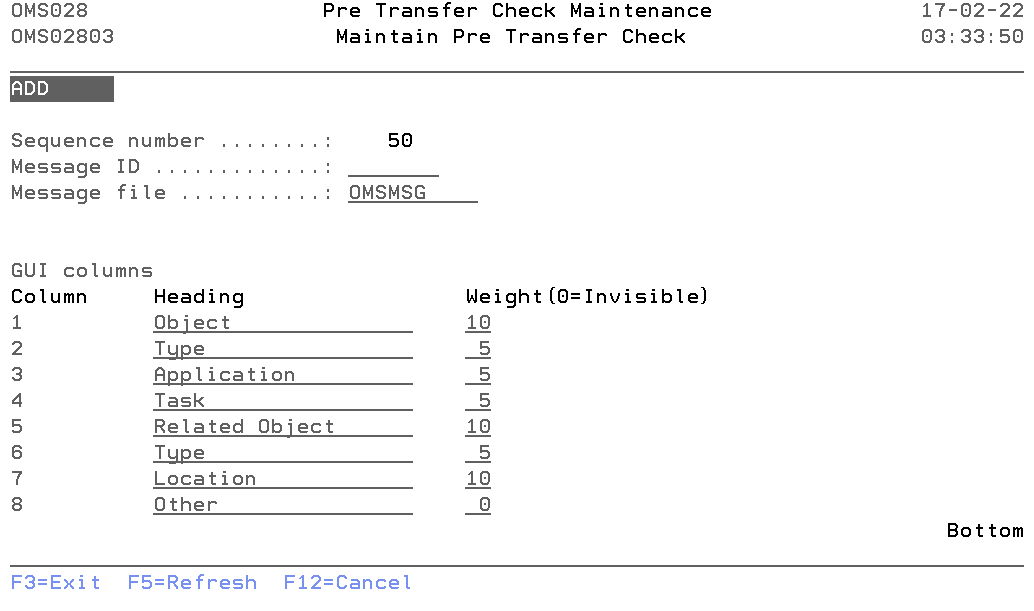
Message id
The message id contains the name of the message-id of the pre-transfer check description text.
Message file
The name of the message file from which message-id is referred. By default "OMSMSG" message file is supplied, the user can change this value.
Gui Columns
It is now possible to configure which columns are visible and the header of these columns during the pre-transfer check. This is only possible for your own pre-transfer check definitions. Not for the system-supplied definitions. Please refer to the below description for more details.
- Column
The numbers match the column number. - Heading
The columns for this particular check can be changed by entering the values in this field. - Weight
The weight is the relative size of the column in the table. Value 0 will hide the column.
Command Start Pre Transfer Check Maintenance(STRPTCM)
This menu command starts the pre-transfer check function. Refer to the description of the function Pre Transfer Check for a detailed description.
This command has no parameters.
Pre Transfer Check details
Below are the detailed functions of each pre-transfer check.
- Active Solutions Check
- If you see this message, it means that you are going to replace an object that is currently attached to another task. This does not mean it is a version conflict. It just means that the object will, from this point on, be attached to your task and the other task as a *MERGE solution.
- Unconfirmed Active Solutions Check
- If version conflict confirmation is embedded in your organization then it means that you are going to replace an object that is currently attached to another task for which we could not find a confirmation record. This does not mean it is a version conflict. It just means that the object will, from this point on, be attached to your task and the other task as a *MERGE solution.
- Object Without Target Check
- If the configuration is not correct, you may see this error. It means that TD/OMS cannot find a suitable library or directory for the indicated objects in the target environment. This is sometimes related to location types and labels.
- Possible Level check Check
- You are processing a file that has dependencies that are not part of your transfer. This could mean that a level check could occur. The list will show which objects are depending on the object that you plan to process.
- Target Version Check
- You are going to overwrite an object version that is not a direct parent of your version. Note the objects and use the version conflicts view to resolve the issues.
- Terminate Solution Check
- All objects in the target environment which use the object will be checked. If they are not part of this transfer, then this message will be shown. You should probably not terminate an object which is in use by other objects.
- Pending Transfer Check
- There are still transfers pending completion on this or other systems. To close pending remote transfers, start the remote job monitor function.
- Service Program Level Check
- This check is done when not all dependent objects of a service program are processed. If you use a signature strategy, you may disable this check in the pre transfer check maintenance program.
- Possible Signature violation check
- Checks if the program to service program signatures match.
- Check dependent logicals
- It checks if there is an abnormal dependency. This occurs when either a dependent logical file exists but is not known to TD/OMS, or the dependent logical file exists in a different library than the physical file and its source does not exist.
- Unconfirmed version conflict
- It checks if there is a target higher environment that has a higher version of the solution.
- User Defined
- It is also possible to insert your own checking program. An example source is available in QUSRSRC. File a question in the helpdesk if you require support for this.

