Translations:PRINT:EWM:Graphical Work Management Guide/5/en
Using the views
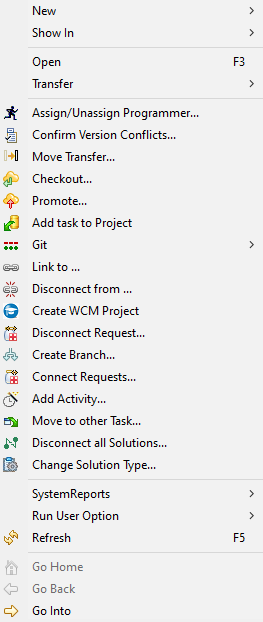
Each TD/OMS view offers a specific way of looking at the TD/OMS information. However, views offer more than just a query on the TD/OMS-database. The Context-menu (shown through right-click on a element of the view) offers you all the possible actions for the selected element. These can be actions like Move/Copy and Disconnect when the selected element is a solution or Direct connect when the element is a object in the Component view. Only the actions that make sense for the selected element (task, solution, request etc.) will be shown / enabled in the context-menu.
Some actions will only be enabled based on a selection made in another view (you can only use Direct connect in the Components view when you first select a Task in the Work Management view) or on other criteria such as the TD/OMS registry settings.
Another characteristic of views is that views react on the selection made in a different view. So will the Component view be updated when you select a different application in the Work Management view and will the Object History view be updated when you select a (different) Component in the Components view.
A detailed description of the possible Context menu actions can be found throughout this manual. A reference is made to this detailed description when applicable.
TD/OMS Work Management view
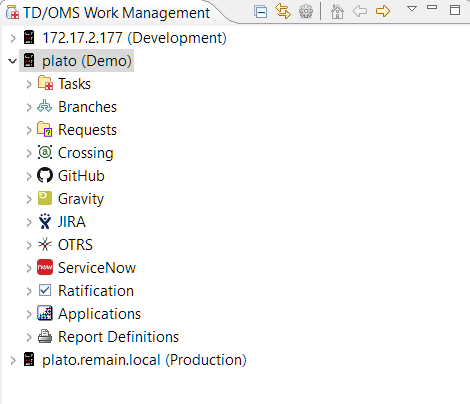
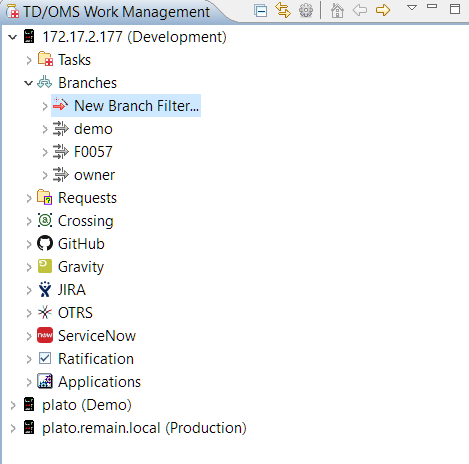
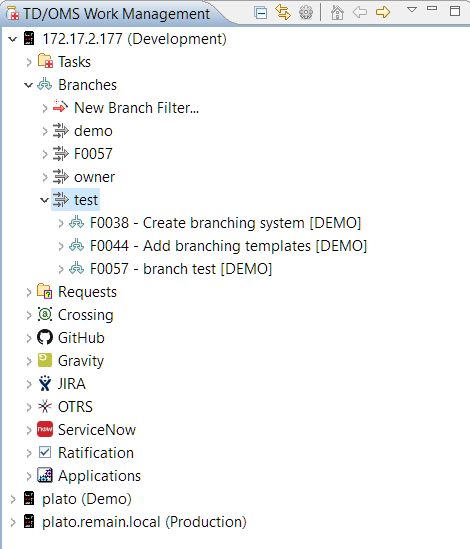
All defined hosts will appear in the Work Management view. When you expand the system node, additional nodes will appear below it. The number of nodes will vary depending on the number of installed TD/OMS-modules and plug-ins. The nodes represent the main entities of the work management view.
The most important nodes are:
- Tasks
- Shows lists of tasks, each one defined by a filter. Every list may contain tasks of different applications.
- Branches
- Shows lists of branches, each one defined by a filter. A list may contain branches from different applications.
- Requests
- Shows lists of requests, each one defined by a filter. A list may contain requests from different applications.
- Applications
- Shows lists of applications, each one defined by a filter.
- Ratification
- Shows a list of the ratification groups of which you are a member for all application/environment combinations defined.
- Report Definitions
- Shows the canned and user-defined reports that are currently defined. It enables you to create, run and modify reports.
Decorations
Sometimes, the icons and texts are decorated. This is visible by a change in text style or by an overlay on the icon. The following decorations are used:
Icon Decorations
 - Compilation failed
 - Potential version conflict (plus blue underlined text)
 - Version conflict (plus red double underlined text)
 - Item is in development, you may edit it.
 - This object is in the Terminate state.
 - Item is locked. It cannot be transferred.
 - Item is being deployed.
 - Deployment has failed. Check the logs.
 - Blue Dot. The item has labels.
 - Pink Dot. The item has compile overrides.
 - Information icon. The item has comments.
Text Decorations
 - Assigned to you (bold description)
 - This item is complete (strikethrough)
 - Potential version conflict (plus blue top-left arrow in icon)
 - Version conflict (plus red top-left arrow in icon)
 - This item is attached to (2) tasks.
 - This item is attached to (1) local task but also to tasks in related applications (+).
Context Menu Actions
The actions you see in the context menu will vary depending on the context and the number of plugins that you installed.
If the action that you are looking for is not in this list, try searching for it in the search box at the top of the screen.
The common context menu actions are:
- New > Create new items like Tasks and Objects.
- Show In > The Show In menu tells you where there is more information about the selected item.
- Open
- Assign/Unassign programmer...
- Confirm Version Conflicts...
- Move Transfer...
- Checkout...
- Promote...
- Add Task to Project...
- Git...
- Link to...
- Disconnect from...
- Connect Task to Request
- Connect Request to Task
- Disconnect Task
- Complete Task and Complete Request
- Disconnect Solution
- Change Solution Type
- Move Solutions
Create a Task Filter
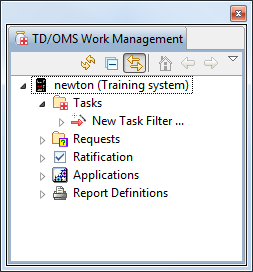
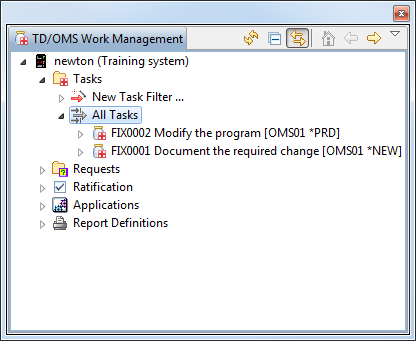
The first node in the Work Management view shows lists of tasks, each one defined by a filter. Every list may contain tasks of different applications. Before you can see tasks you must create a Filter. When a Filter is expanded, it shows the Tasks included in that Filter which could be in turn included in a Filter Group.
Expand the node called Tasks.
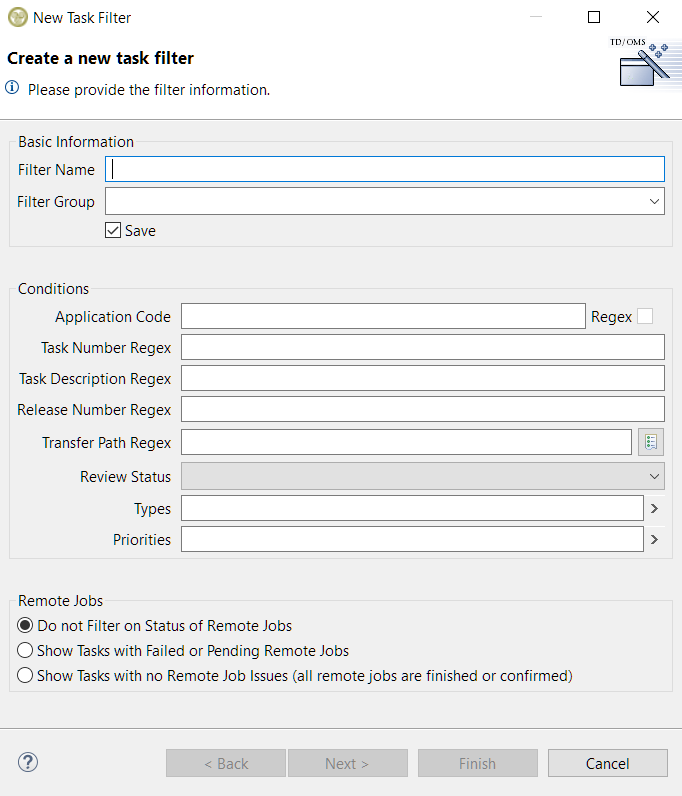
Double-clicking New Task Filter… starts a dialog for specifying the selection criteria. A task must pass ALL criteria to be selected.
If Save is not checked, the filter will be deleted when the client is closed !
- Filter Name
- Define the name of the filter. This is also the name the filter is saved with so some restrictions apply.
- Filter Group
- When specified, a filter group is created that contains the filter. It is convenient to group filters if you have a large number of filters.
- Save
- If you uncheck this then the filter will become a session filter which will be removed after restart.
- Application Code
- Specify an application code or a Regular Expression like DEM.* or (ORDER|TOOLS).
- Regex
- Will cause the tasks to be selected in the client rather than in the database request. It is therefor slower but more flexible.
- Task Number Regex
- Type a regular expression to find the task number like F0122 or F01.*
- Task Description Regex
- Type a regular expression to find the task description like .*decimal.*
- Release Number Regex
- Key a regular expression to find the task release like V3R0M0 or V3.*
- Transfer Path Regex
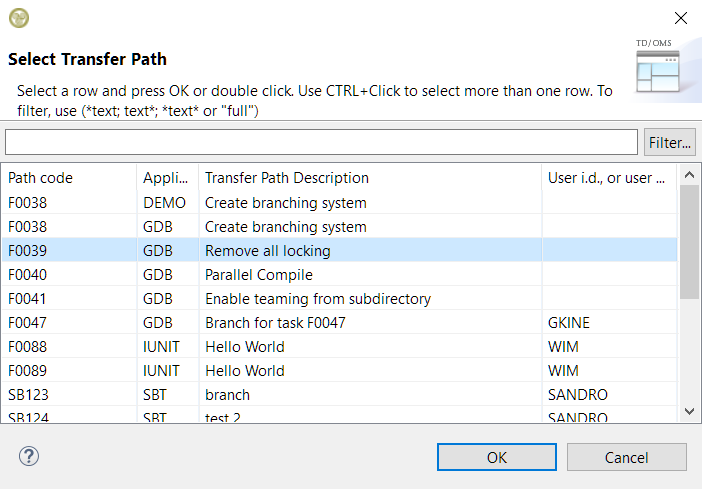
- Key a regular expression to find the task with the request Transfer Path like DB or (DB|WIM) or D*. You can press the list button (
 ) to get a list of all available transfer paths.
 - Review Status
- Select the ratification status to filter the task.
- Types
- Select the task types that the tasks must be filtered with by clicking the arrow on the right.
- Priorities
- Select the priorities the tasks must be filtered with by clicking the arrow on the right.
- Remote Jobs
- Do not filter on status of remote jobs
- Show Tasks with Failed or Pending Remote Jobs
- Show Tasks with no Remote Job Issues
Regular Expression
For some fields, a Regex (Regular Expression) can be specified. A regular expression is a very sophisticated way of specifying wildcards that goes far beyond the well known Windows wildcards * and ?.
A thorough treatment of regular expressions is outside the scope of this manual. Remember the following:
| Character | Meaning | Windows-wildcard |
| An arbitrary character | ? | |
| Zero or more occurrences of the preceding character | ||
| Any string | * |
Examples:
| Expression | Matches |
| A*C | C, AC, AAC |
| A.C | AAC, ABC, ACC, ADC |
| (DEMO|TOOLS) | DEMO or TOOLS |
Regex logic will only be applied to the Application code definition when the related checkbox is checked.
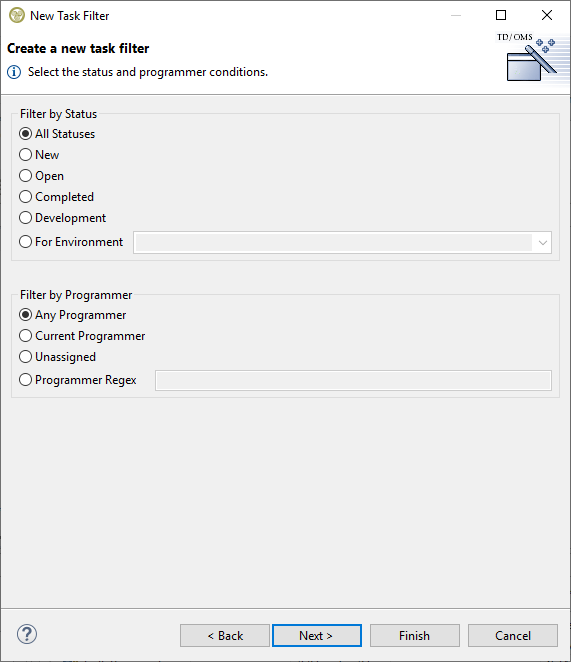
You can indicate to the filter mechanism that no filtering on a specific field is required by leaving it blank. Press the Next button to enable you to specify a selection on status and/or programmer.
Use For Environment Only to show Task with a specific Task Status. A Task status can be identical to a environment code (eg QA) or have a special status. A completed task is selected by entering *CMP into For Environment Only.
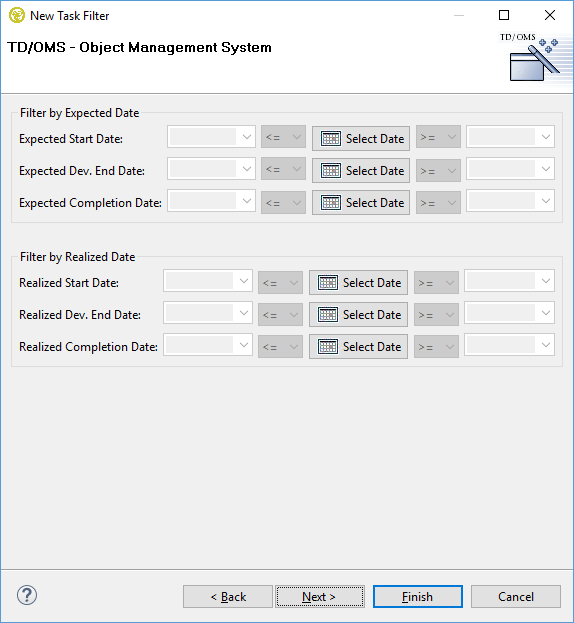
Pressing the Next button will enable you to specify a selection on one or more dates.
You need to press the Select Date button to enable filtering on that specific date.
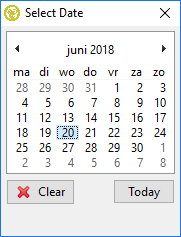
You can select a specific date, clear the selection made previously or select Today. Using Today means that the current system date will be used.
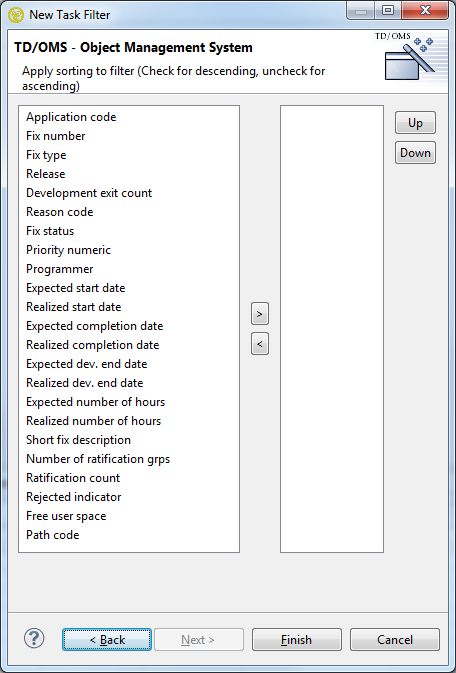
Pressing the Next button will enable you to specify the fields to sort on and the sorting sequence.
The tasks will be sorted on application (ascending) and Task number (descending) when no sorting criteria are specified.
Press the Finish button and all tasks that pass the filter criteria will appear. Note that the list can contain tasks from several applications, as shown in the decorators (the text between the [….] ).
You can define as many filters as you like.
Create a Request Filter
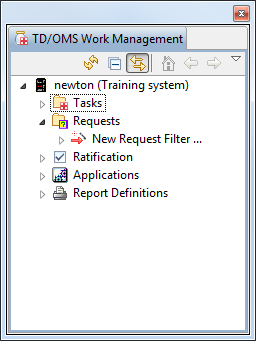
The second node in the Work Management view shows lists of requests, each one defined by a filter. Every list may contain requests of different applications. Before you can see requests you must create a Filter. When a Filter is expanded, it shows the requests included in that Filter which could be in turn included in a Filter Group.
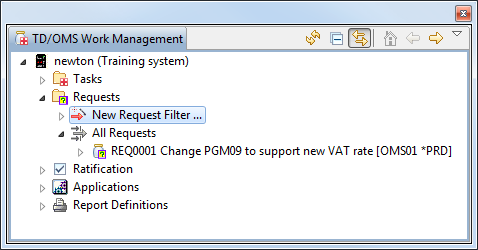
Expand the node called Requests.
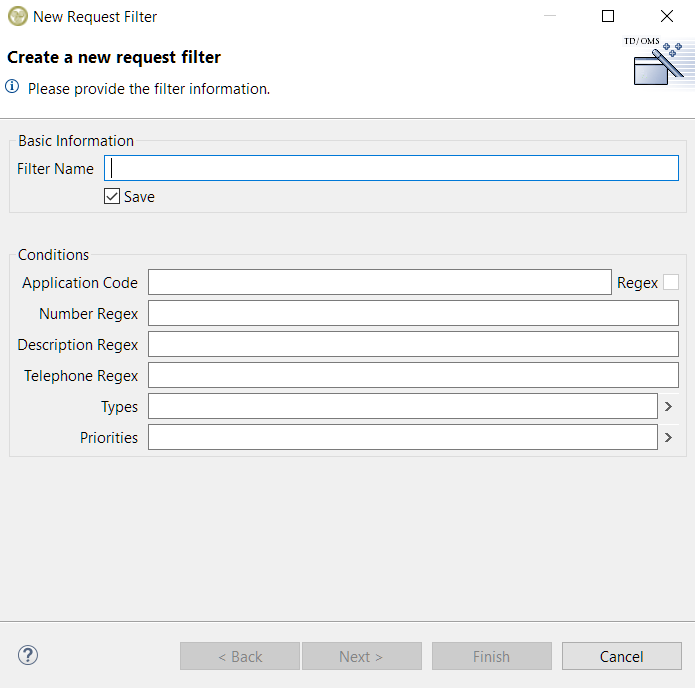
Double-clicking New Request Filter… starts a dialog for specifying the selection criteria. A request must pass ALL criteria to be selected.
If Save is not checked, the filter will be deleted when the client is closed !
- Filter Name
- Define the name of the filter. This is also the name the filter is saved with so some restrictions apply.
- Save
- If you uncheck this then the filter will become a session filter which will be removed after restart.
- Application Code
- Specify an application code or a Regular Expression like DEM.* or (ORDER|TOOLS).
- Regex
- Will cause the requests to be selected in the client rather than in the database request. It is therefor slower but more flexible.
- Number Regex
- Type a regular expression to find the request number like F0122 or F01.*
- Description Regex
- Type a regular expression to find the request description like .*decimal.*
- Telephone
- Search requests based on the given telephone.
- Types
- Select the request types that the tasks must be filtered with by clicking the arrow on the right.
- Priorities
- Select the priorities the requests must be filtered with by clicking the arrow on the right.
Regular Expression
For some fields, a Regex (Regular Expression) can be specified. A regular expression is a very sophisticated way of specifying wildcards that goes far beyond the well known Windows wildcards * and ?.
A thorough treatment of regular expressions is outside the scope of this manual. Remember the following:
| Character | Meaning | Windows-wildcard |
| An arbitrary character | ? | |
| Zero or more occurrences of the preceding character | ||
| Any string | * |
Examples:
| Expression | Matches |
| A*C | C, AC, AAC |
| A.C | AAC, ABC, ACC, ADC |
Regex logic will only be applied to the Application code definition when the related checkbox is checked.
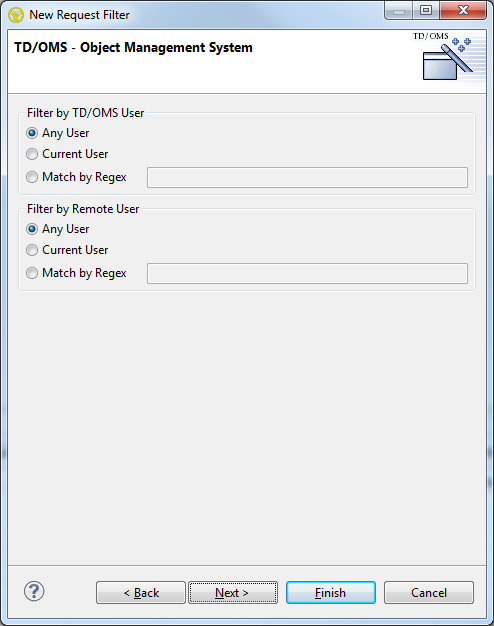
You can indicate to the filter mechanism that no filtering on a specific field is required by leaving it blank. Press the Next button to enable you to specify a selection on TD/OMS and/or Remote user.
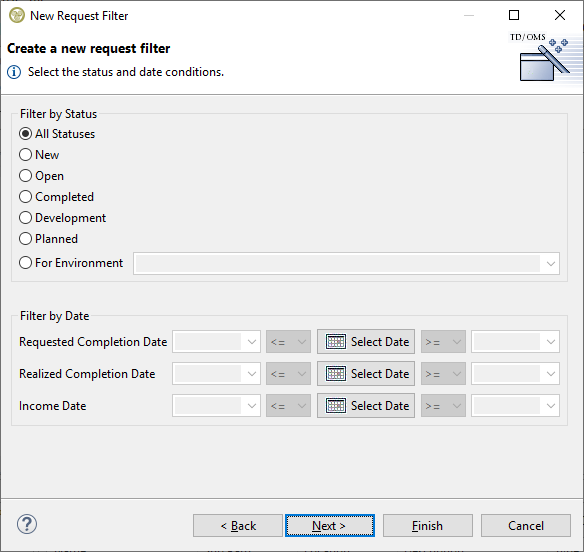
Press the Next button to enable you to specify a selection on status and/or various dates.
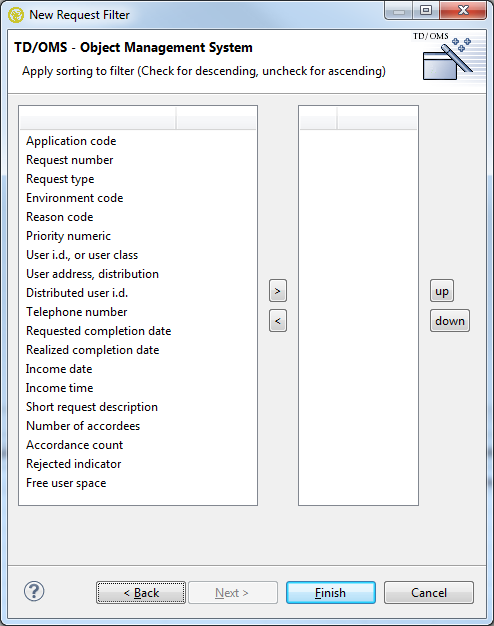
Pressing the Next button will enable you to specify the fields to sort on and the sorting sequence.
Press the Finish button and all Requests that pass the filter criteria will appear. Note that the list can contain requests from several applications, as shown in the decorators (the text between the [….] ).
You can define as many filters as you like.
Create an Application Filter
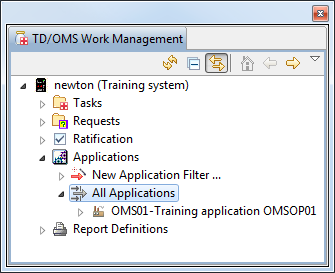
The fourth node in the Work Management view shows lists of applications, each one defined by a filter. Before you can see applications you must create a Filter. When a Filter is expanded, it shows the applications included in that Filter which could be in turn included in a Filter Group.
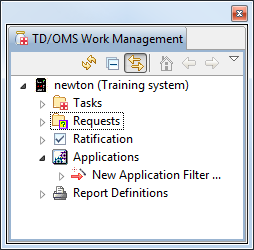
Expand the node called Applications.
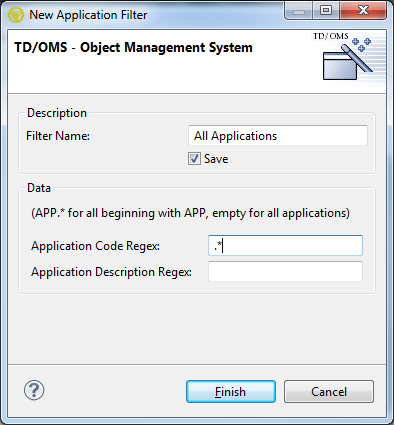
Double-clicking New Application Filter… starts a dialog for specifying the selection criteria. An application must pass ALL criteria to be selected. If Save is not checked, the filter will be deleted when the client is closed !
Regular Expression
For some fields, a Regex (Regular Expression) can be specified. A regular expression is a very sophisticated way of specifying wildcards that goes far beyond the well known Windows wildcards * and ?.
Remember the following:
| Character | Meaning | Windows-wildcard |
| An arbitrary character | ? | |
| Zero or more occurrences of the preceding character | ||
| Any string | * |
Examples:
| Expression | Matches |
| A*C | C, AC, AAC |
| A.C | AAC, ABC, ACC, ADC |
You can indicate to the filter mechanism that no filtering on a specific field is required by leaving it blank.
Press the Finish button and all Applications that pass the filter criteria will appear. Note that the list can contain requests from several applications, as shown in the decorators (the text between the [….] ).
You can define as many filters as you like.
Create a Branch Filter
Expand the node called Branches.
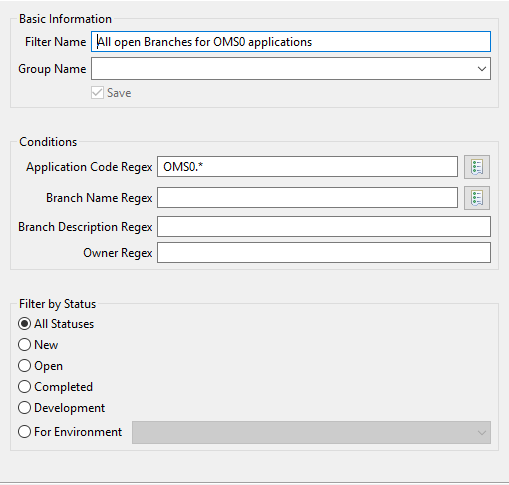
Double-clicking New Branch Filter… starts a dialog for specifying the selection criteria.
- Filter Name: The name of the filter. This is the only field that is mandatory.
- Filter Group: Choose if the filter is going to belong to a group or not and select the desired group if it does.
- Save: Check to save the filter. If not, it will be deleted the next time TD/OMS is started.
- Application Code Regex: The application code of the branches.
- Branch Name Regex: The name of the branches.
- Branch Description Regex: The description of the branches.
- Owner Regex: The owner of the branches.
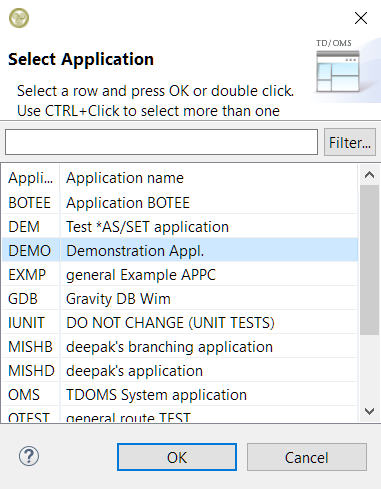
For the application code and branch name fields it is possible to select your choices from the available options by clicking the button next to the field. This will open a small dialog with all the available applications or transfer paths (branch names) for your choosing. Filtering of these options along with multiple selection is also possible.
Regular Expression
For some fields, a Regex (Regular Expression) can be specified. A regular expression is a very sophisticated way of specifying wildcards that goes far beyond the well known Windows wildcards * and ?.
Remember the following:
| Character | Meaning | Windows-wildcard
|
| An arbitrary character | ? | |
| Zero or more occurrences of the preceding character |
| |
| Any string | * |
Examples:
| Expression | Matches
|
| A*C | C, AC, AAC
|
| A.C | AAC, ABC, ACC, ADC |
You can indicate to the filter mechanism that no filtering on a specific field is required by leaving it blank.
Press Finish to create the filter.
Creating a request
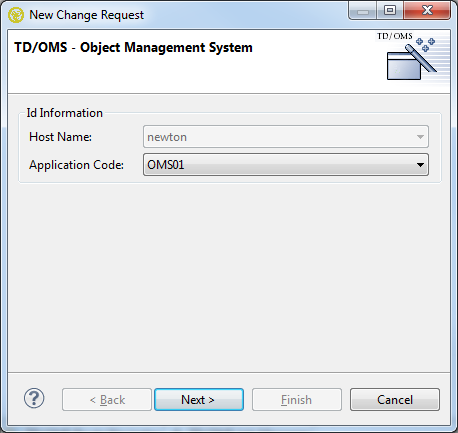
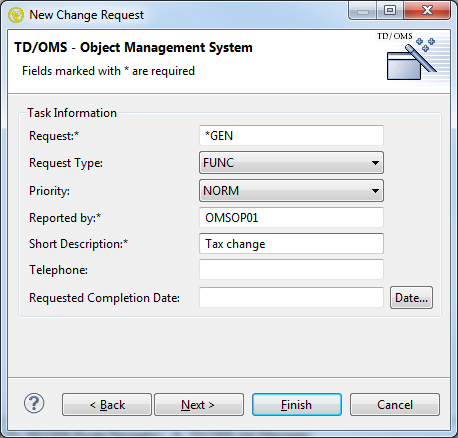
You can start creating a new request by choosing New->Request from the context-menu in any TD/OMS view or by pressing the New Change Request ![]() button in the toolbar. This will start the New Change Request wizard.
button in the toolbar. This will start the New Change Request wizard.
Page 1 - Enter System and Application
The Host (Remote system) name is already filled in and can not be changed when a detail line of a Remote system has been selected within the TD/OMS Work Management view. Select the Host name when this is not the case and select/change the Application if required. Press the Next-button.
Page 2 - Enter Request Attributes
All fields indicated with an asterisk are required. Specifying *GEN for the Request will instruct TD/OMS to generate the request number based of the application specific settings. Overwrite the *GEN value to avoid this default behaviour. Press the Finish-button if there is no requirement to enter extended text or press the Next-button if there is.
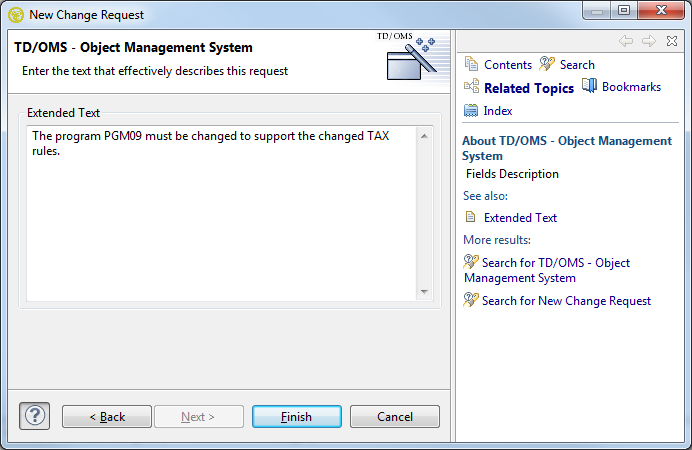
Page 3 - Enter Extended Text Description
Enter the extended text (if needed) and press the Finish-button.
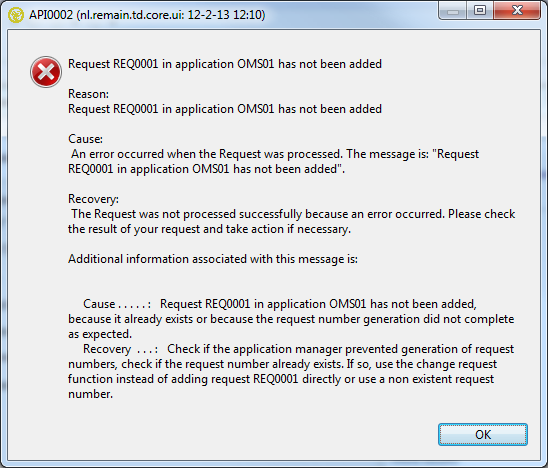
You can press the question mark button in the lower left corner to obtain context sensitive help. Adding a request may fail in which case you will receive an error message.
Page 4 - Continue
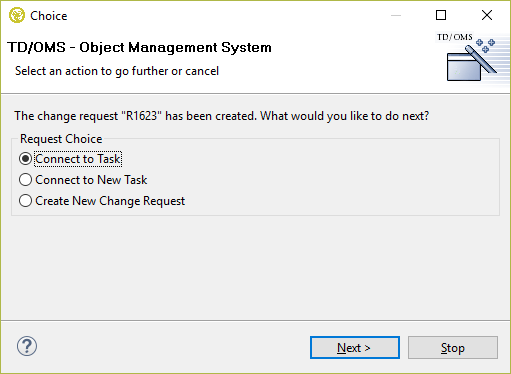
After generating a Request the wizard will show the Choice screen. This screen informs you about the action performed and enables you to immediately initiate the next step (Connecting a (new) Fix) or repeat the current activity (Creating a Request).
You can press the Stop button to end the wizard.
Creating a Task
You can start creating a new task by choosing New->Task from the context-menu in any TD/OMS view or by pressing the New Task ![]() button in the toolbar. This will start the New Task wizard.
button in the toolbar. This will start the New Task wizard.
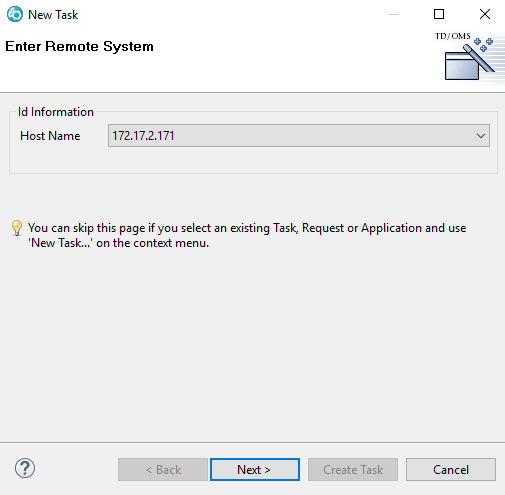
Page 1 - Enter Remote System
This page will not be shown when you have started the wizard and the context could have been determined from the current selected element. The Host (Remote system) name is already filled in and can not be changed when a detail line of a Remote system has been selected within the TD/OMS Work Management view. Select the Host name when this is not the case and press the Next-button.
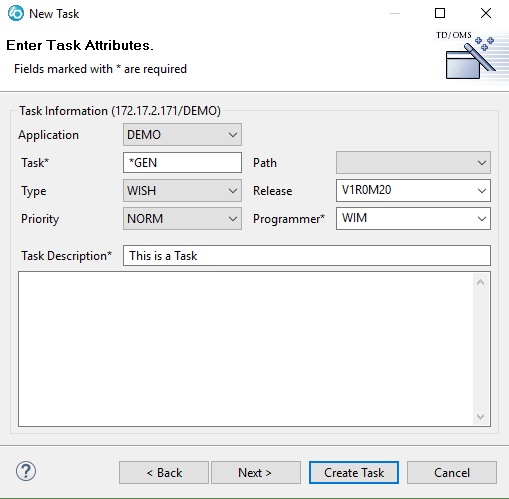
Page 2 - Enter Task Attributes
All fields indicated with an asterisk are required. Specifying *GEN for the Task will instruct TD/OMS to generate the Task number based of the application specific settings. Enter a long description (if needed). Press the Create Task button if there is no requirement to enter Task Project information or press the Next-button if there is.
Fields
- Application
- Task
- Transfer Path
- Task Type
- Release
- Priority Code
- Programmer
- Short Task Description
- Extended Task Description
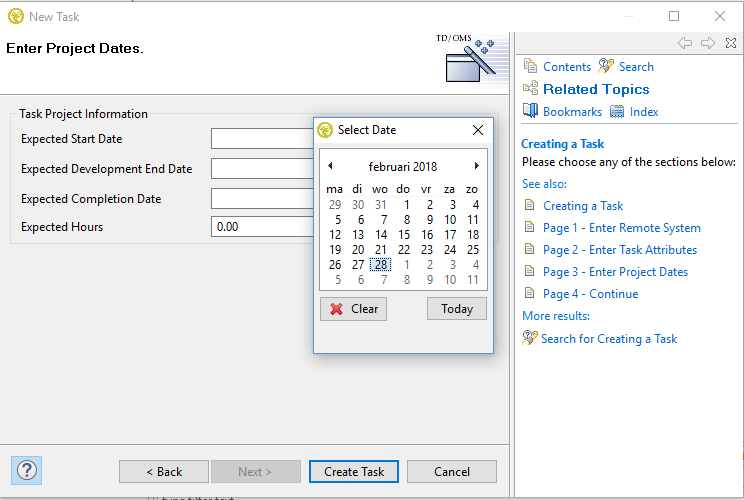
Page 3 - Enter Project Dates
Enter the Task Project information (if needed) and press the Create Task button. You can press the question mark button in the lower left corner to obtain context sensitive help. Please note that you can also use the planning view to manipulate the project dates.
Fields
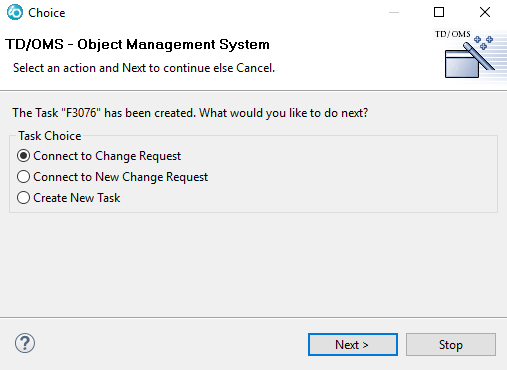
Page 4 - Continue
Adding a Task may fail in which case you will receive an error message. After generating a Task the wizard will show the Choice screen. This screen informs you about the action performed and enables you to immediately initiate the next step (Connecting a (new) Request) or repeat the current activity (Creating a Task).
You can press the Stop button to end the wizard.
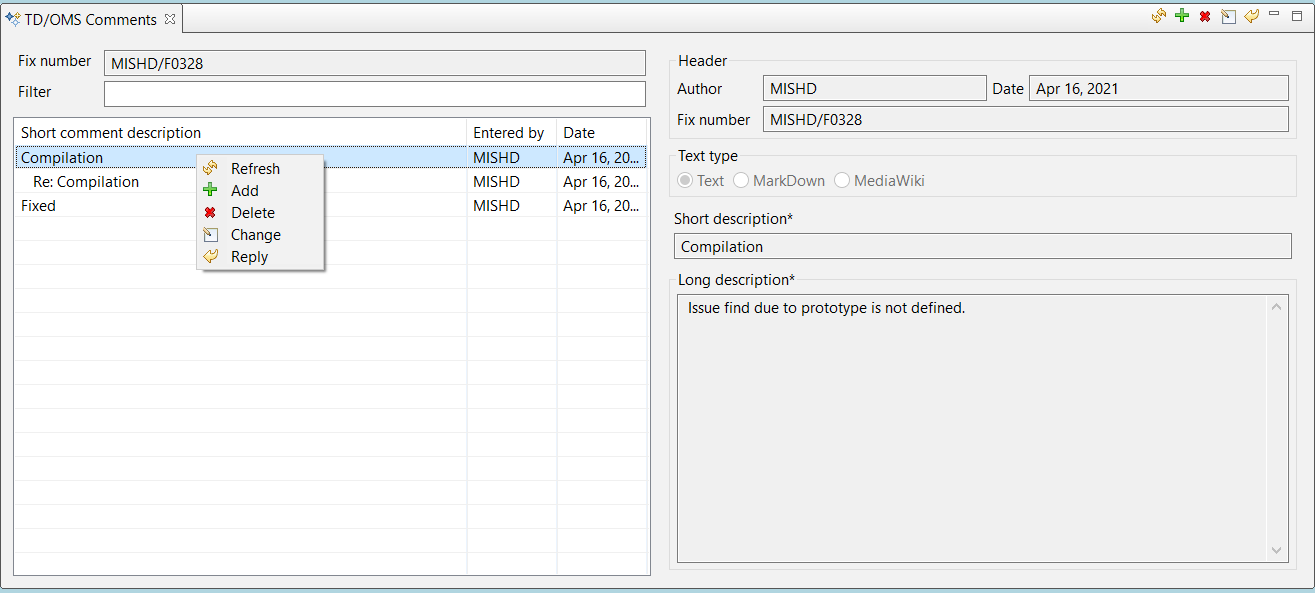
The TD/OMS Comments view shows comments about the item that is currently selected. You may create comments for applications, environments, sub-environments, objects and details, solutions, tasks, and requests.
The TD/OMS Comments View
Opening the comments view can be done by:
- Selecting a Task (or any other of the types mentioned above) and using the Show in .. context menu;
- Using the quick-access box in the toolbar and typing Comments;
Toolbar Items
Use the toolbar to execute below actions.
 Pin the Current Selection
- Click this icon to lock the view for further selection changes. When you select another line, the view will not repopulate.
 Refresh
- Refresh the comments list.
 Add
Add- Add a new comment.
 Delete
- The selected comment in the list will be removed.
 Change
- Change the comment, a comment can only be changed on the same day the comment was entered and by the same user.
 Reply
Reply- Reply to an existing comment or reply.
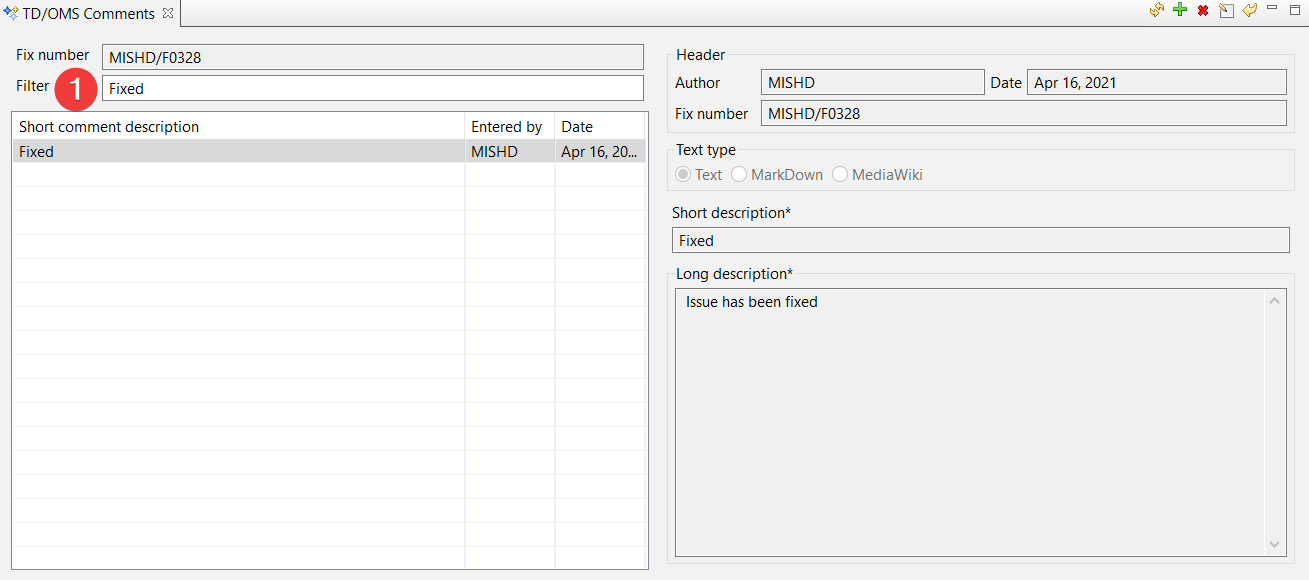
Finding a comment
You can use the Filter field for quick filtering of the comments in the list. It will find the typed words in the subject of the comment.
Branching
<translate>
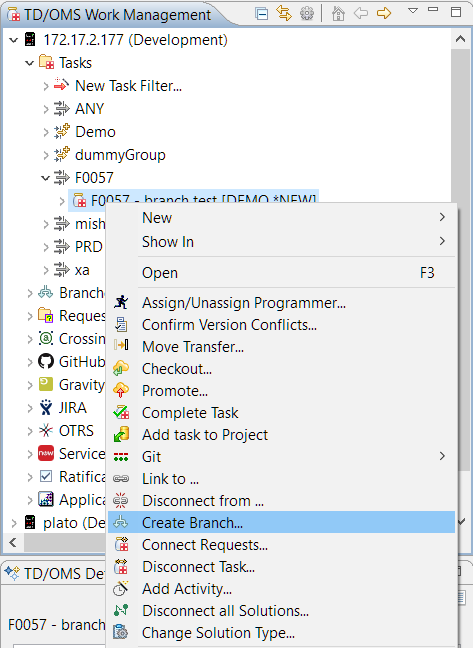
Create Branch
To create a branch, you must right-click on a task (or many) and select the "Create Branch" action.
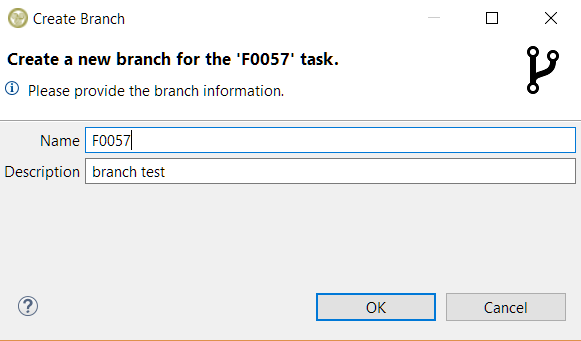
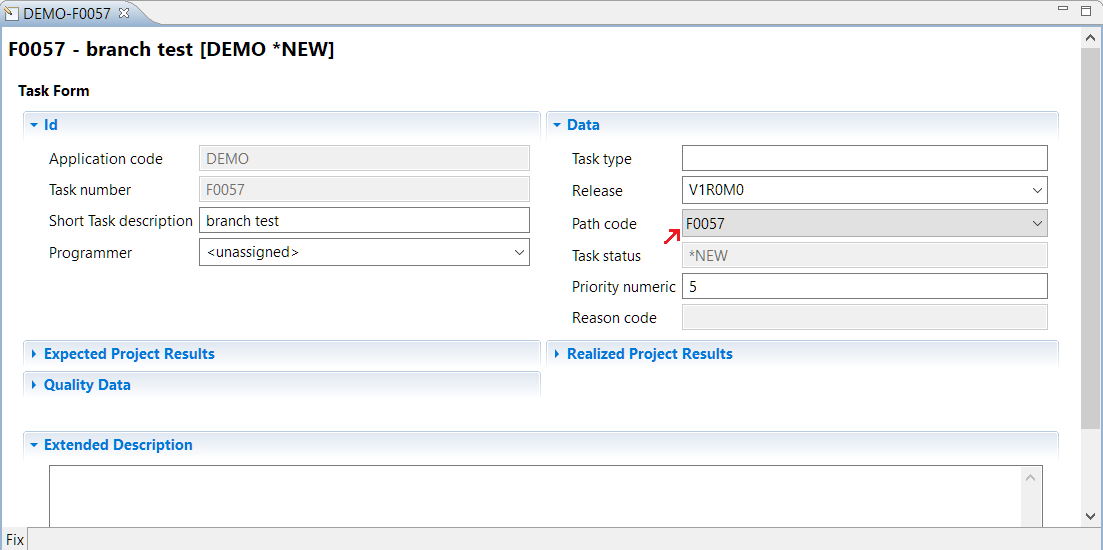
This will open the respective dialog that allows you to choose the name and the description of the branch. For convenience, these values will be automatically filled for you from the task itself. If many tasks are selected then they will be filled in from the first task in your selection. Both fields are mandatory for a branch to be created.
When OK is pressed then the newly created branch will also be assigned to the tasks that you selected to create it.
Delete Branch
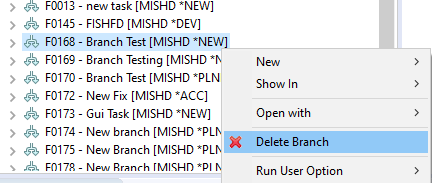
To delete a branch, right click on it and select the Delete Branch option. A branch can be deleted only if all the tasks that are assigned to it are completed meaning that it must have either *NEW or *CMP status.
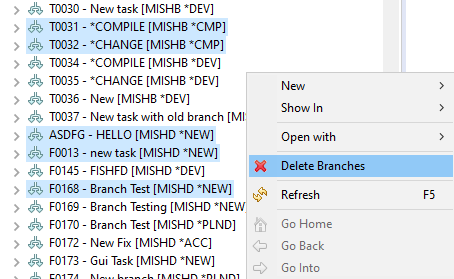
If many branches need to be deleted then they all need to have the *NEW or *CMP status or the option won't be available. They can also be from different applications but not from a different host.
Another option is to right click a single branch filter.
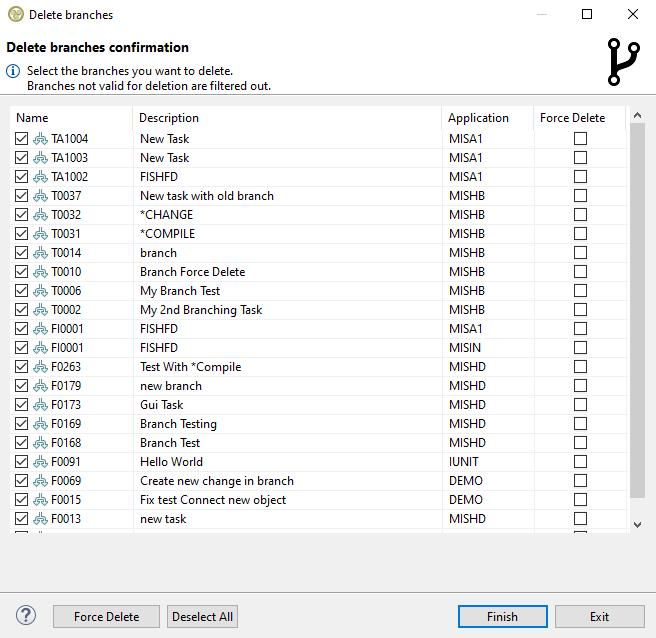
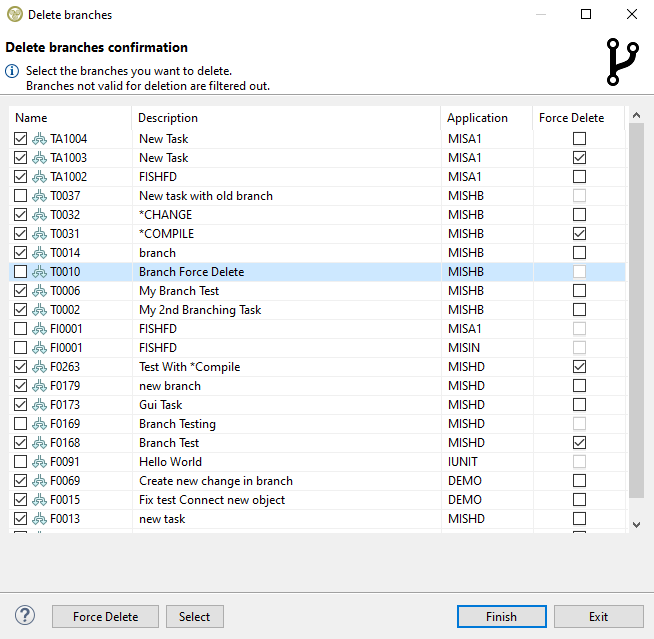
The delete branch wizard has a table with the branches and a checkbox for each one defining if it should be force deleted. Force delete is useful if a branch can't be deleted normally because its libraries or routes still contain objects. In case a branch filter was selected, any branches that don't have the *NEW or *CMP status will be automatically filtered out and won't show in the table. When the wizard opens all branches will be preselected for deletion.
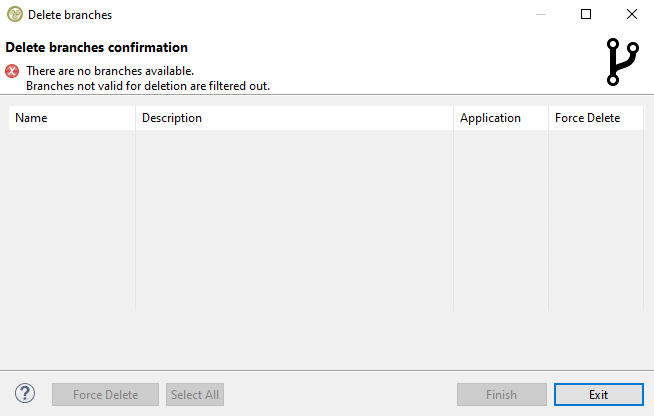
If a branch filter doesn't have a single branch with the *NEW or *CMP status then no branches are valid for deletion and the wizard will show the error with the table will being empty without any possible actions.
Wizard Content and Actions
The table itself has four resizable columns with the branch name, description, application and a checkbox to select if a branch must be force deleted. The table can be ordered by clicking on the columns to sort the branches based on their name, description or application. On the bottom left there are shortcut buttons that allow you to force delete (or don't force delete) all selected branches and a button to select/deselect all available branches or select only the ones that are selected on the table.
When you have made your choices press finish to start the process.
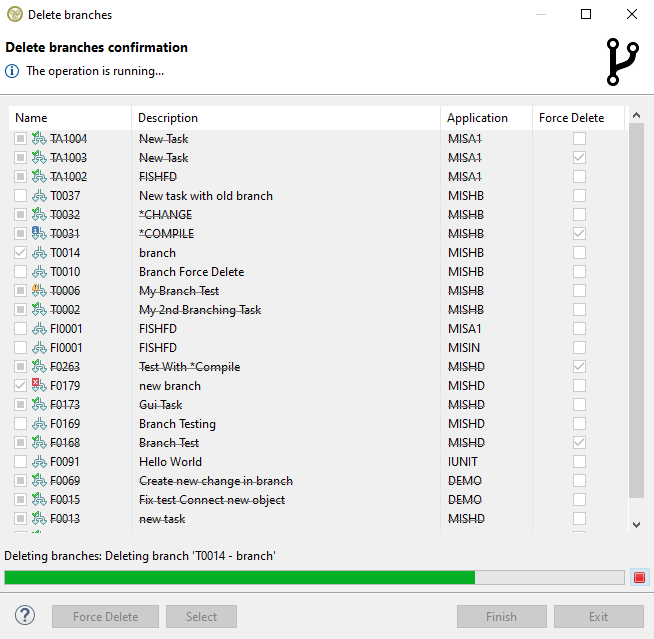
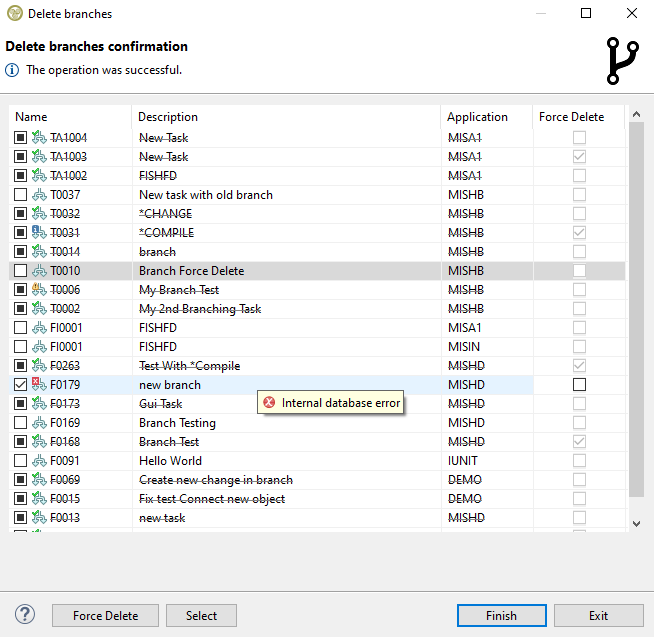
A progress bar will appear showing which branch is processed at the moment. As the progress continues the table will update the branches based on the returned status of each one: Deleted, Deleted with an informational or warning message, or Not Deleted with an error. If the branch is deleted it will have a strike-through line in the middle of its text and if there is no extra information to display then it will have a green check on the top left of its icon. If there is extra information to display it can be viewed when hovering over a branch row with an extra icon.
The operation can be cancelled by pressing the red box at the right of the progress bar and the table will show the status of the branches that have been processed already. Any deleted branches will be gray-checked and won't be available for selection anymore and they will be excluded from any actions in the wizard.
If all available branches on the table are deleted without any extra messages to show then the wizard will close automatically when the process is finished. Any affected objects that are visible in a tree in all open views will be refreshed and all affected open editors will be refreshed or closed accordingly.
</translate>
Connecting a Component to a Task
Solutions are components (objects, IFS files, 4GL objects), messages and source members that are connected to a task. Expanding a task shows the solutions already connected to that task.
This section describes the following:
- Connecting an object to a task
- Connecting a member to a task
- Connecting a message to a task
Creating a solution requires using the TD/OMS Work Management view and the TD/OMS Components view. Depending on the method chosen the TD/OMS Connection List view can be used during the process.
Ensure that the following steps are/have been taken:
- Open the TD/OMS Work Management view
- Select the task that must accept the solution(s)
- Right-click the task to show the context menu
- Select Show in.. / TD/OMS Components
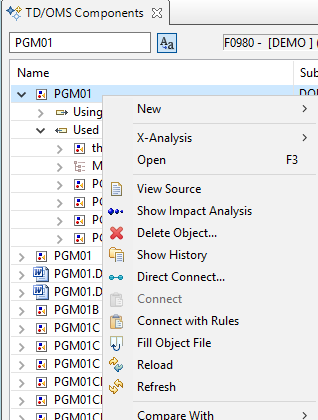
Once the components view is open you can find the required component by searching for it in the quick search box or by applying a filter. Right-click the desired component, member or message to show the connect options.
The menu contains 3 options for creating solutions:
- Direct Connect
- Components are immediately connected to the task that is selected in the TD/OMS Work Management view. This is done by
- running the connection rules if required by this registry setting.
- adding the objects to the Connection List
- starting processing of the connection list
- Connect
- The selected components are made visible in the Connection List view. Components in the Connection List view can be removed from the Connection List or assigned to another group (task). The components in the Connection List can be transformed into solutions by pressing the
 Process Connection List button on the TD/OMS Components view or the TD/OMS Connection List view.
If the Connect option is disabled then only connection with rules is allowed (by using Direct Connect or Connect with Rules.
- Connect with Rules
- The connection rules defined within TD/OMS are applied to the selected components. The selected components and the (additional) components meeting the selection criteria are made visible in the Connection List view. Components in the Connection List view can be removed from the Connection List or assigned to another group. The components in the Connection List can be transformed into solutions by pressing the
 Process Connection List button on the TD/OMS Components view or the TD/OMS Connection List view.
Note that the Connect options only work as expected if a task is selected in the Work Management view. If no task is selected then the component will still be added to the connection list but not where you might expect it. The selected task is visible in the header of the view.
In addition, this feature (the context-menu on a list or tree-item depends on the item itself and on selected items in other views) is applied wherever possible. The availability of certain Connect action is also dependent on authorisation, TD/OMS registry settings and task status (Connect can not be used when task status is *CMP (Completed)).
Connecting a source member or message to a task
The procedure to attach a member from source file (if it is not already a source of a component) or a message from a message file is done in the same way as stated above. Please note that there is a separate Details view to better search for the required member or message. You can open the Details view as usual by using the Quick Access field in the toolbar or by selecting a Message File or a Source File and using the context menu Show in ... / TD/OMS Details view.

