Translations:PRINT:EWM:Graphical Work Management Guide/5/ja
ビューの使用
各TD/OMSビューがTD/OMS情報を見る特定方法を提供しています。しかし、ビューがTD/OMSデータベースのクエリより多くの情報を提供します。コンテキスト・メニュー(ビューの要素を右クリックすると表示)は選択した要素に対し、すべての可能なアクションを提供します。例えば、選択した要素はソリューションの場合、 Move/Copy および Disconnect が使用できます。要素はコンポーネント・ビュー内のオブジェクトの場合、 Direct connect が使用できます。選択した要素(タスク、ソリューション、リクエストなど)に対し、意味があるアクションのみがコンテキスト・メニューで有効となり、表示されます。
一部のアクションのみが他のビューで行った選択(最初に作業管理ビューでタスクを選択するとき、コンポーネント・ビューで直接接続のみが使用できます)、またはTD/OMSレジストリ設定などのほかの基準に基づいて有効になります。
ビューのもう一つの特徴は他のビューでの選択に反応することです。例えば、作業管理ビューで他のアプリケーションを選択すると、コンポーネント・ビューが更新されます。コンポーネント・ビューで(ほかの)コンポーネントを選択すると、オブジェクト履歴ビューが更新されます。
可能なコンテキスト・メニュー・アクションの詳細な説明はこのマニュアルで確認できます。該当する場合、この詳細な説明を参照します。
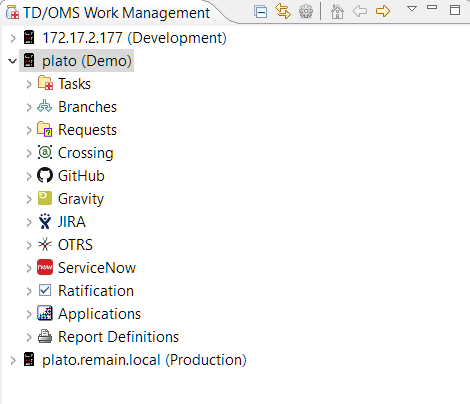
TD/OMS Work Management view
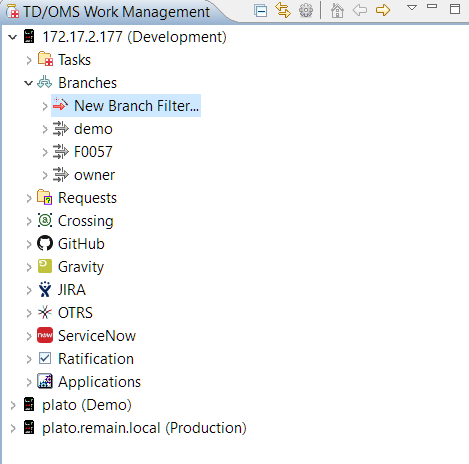
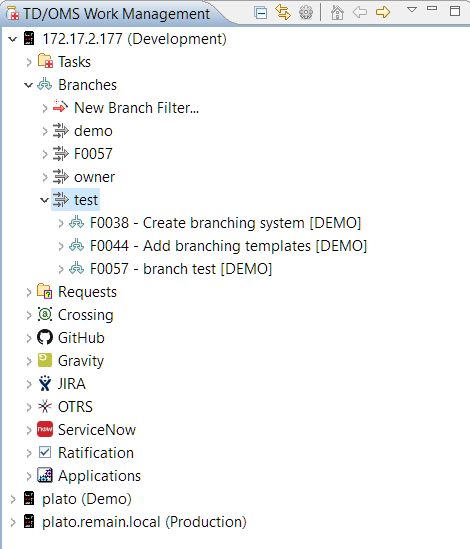
All defined hosts will appear in the Work Management view. When you expand the system node, additional nodes will appear below it. The number of nodes will vary depending on the number of installed TD/OMS-modules and plug-ins. The nodes represent the main entities of the work management view.
最も重要なノードは次の通りです。
- Tasks
- Shows lists of tasks, each one defined by a filter. Every list may contain tasks of different applications.
- Branches
- Shows lists of branches, each one defined by a filter. A list may contain branches from different applications.
- Requests
- Shows lists of requests, each one defined by a filter. A list may contain requests from different applications.
- Applications
- Shows lists of applications, each one defined by a filter.
- Ratification
- Shows a list of the ratification groups of which you are a member for all application/environment combinations defined.
- Report Definitions
- Shows the canned and user-defined reports that are currently defined. It enables you to create, run and modify reports.
Decorations
Sometimes, the icons and texts are decorated. This is visible by a change in text style or by an overlay on the icon. The following decorations are used:
Icon Decorations
 - Compilation failed
 - Potential version conflict (plus blue underlined text)
 - Version conflict (plus red double underlined text)
 - Item is in development, you may edit it.
 - This object is in the Terminate state.
 - Item is locked. It cannot be transferred.
 - Item is being deployed.
 - Deployment has failed. Check the logs.
 - Blue Dot. The item has labels.
 - Pink Dot. The item has compile overrides.
 - Information icon. The item has comments.
Text Decorations
 - Assigned to you (bold description)
 - This item is complete (strikethrough)
 - Potential version conflict (plus blue top-left arrow in icon)
 - Version conflict (plus red top-left arrow in icon)
 - This item is attached to (2) tasks.
 - This item is attached to (1) local task but also to tasks in related applications (+).
Context Menu Actions
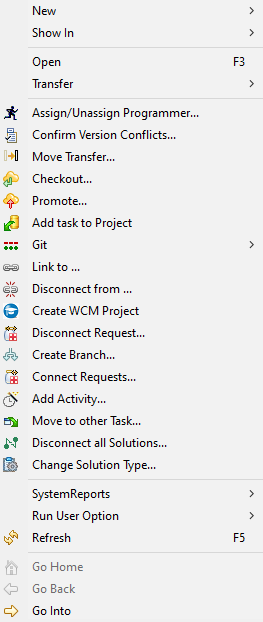
The actions you see in the context menu will vary depending on the context and the number of plugins that you installed.
If the action that you are looking for is not in this list, try searching for it in the search box at the top of the screen.
The common context menu actions are:
- New > Create new items like Tasks and Objects.
- Show In > The Show In menu tells you where there is more information about the selected item.
- Open
- Assign/Unassign programmer...
- Confirm Version Conflicts...
- Move Transfer...
- Checkout...
- Promote...
- Add Task to Project...
- Git...
- Link to...
- Disconnect from...
- Connect Task to Request
- Connect Request to Task
- Disconnect Task
- Complete Task and Complete Request
- Disconnect Solution
- Change Solution Type
- Move Solutions
Create a Task Filter
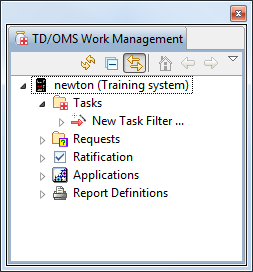
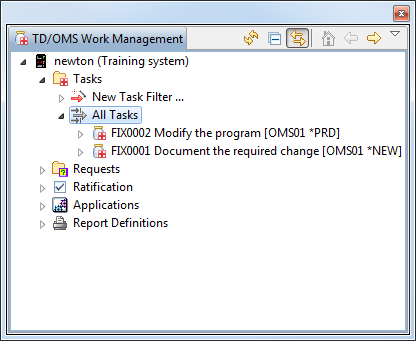
The first node in the Work Management view shows lists of tasks, each one defined by a filter. Every list may contain tasks of different applications. Before you can see tasks you must create a Filter. When a Filter is expanded, it shows the Tasks included in that Filter which could be in turn included in a Filter Group.
Expand the node called Tasks.
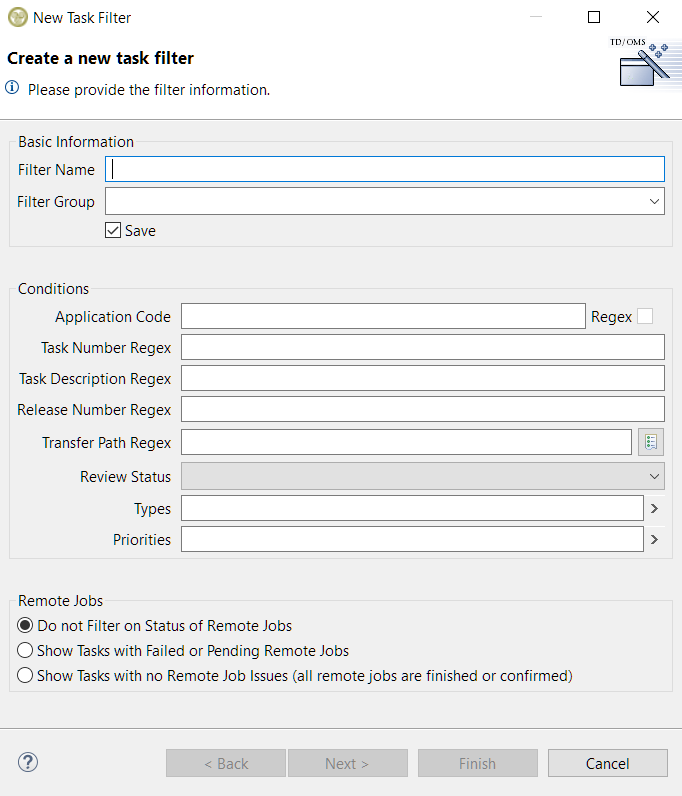
Double-clicking New Task Filter… starts a dialog for specifying the selection criteria. A task must pass ALL criteria to be selected.
If Save is not checked, the filter will be deleted when the client is closed !
- Filter Name
- Define the name of the filter. This is also the name the filter is saved with so some restrictions apply.
- Filter Group
- When specified, a filter group is created that contains the filter. It is convenient to group filters if you have a large number of filters.
- Save
- If you uncheck this then the filter will become a session filter which will be removed after restart.
- Application Code
- Specify an application code or a Regular Expression like DEM.* or (ORDER|TOOLS).
- Regex
- Will cause the tasks to be selected in the client rather than in the database request. It is therefor slower but more flexible.
- Task Number Regex
- Type a regular expression to find the task number like F0122 or F01.*
- Task Description Regex
- Type a regular expression to find the task description like .*decimal.*
- Release Number Regex
- Key a regular expression to find the task release like V3R0M0 or V3.*
- Transfer Path Regex
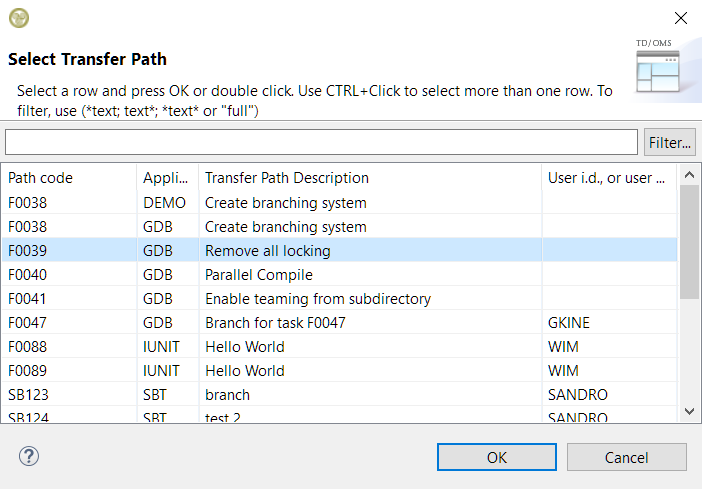
- Key a regular expression to find the task with the request Transfer Path like DB or (DB|WIM) or D*. You can press the list button (
 ) to get a list of all available transfer paths.
 - Review Status
- Select the ratification status to filter the task.
- Types
- Select the task types that the tasks must be filtered with by clicking the arrow on the right.
- Priorities
- Select the priorities the tasks must be filtered with by clicking the arrow on the right.
- Remote Jobs
- Do not filter on status of remote jobs
- Show Tasks with Failed or Pending Remote Jobs
- Show Tasks with no Remote Job Issues
Regular Expression
For some fields, a Regex (Regular Expression) can be specified. A regular expression is a very sophisticated way of specifying wildcards that goes far beyond the well known Windows wildcards * and ?.
A thorough treatment of regular expressions is outside the scope of this manual. Remember the following:
| Character | Meaning | Windows-wildcard |
| An arbitrary character | ? | |
| Zero or more occurrences of the preceding character | ||
| Any string | * |
Examples:
| Expression | Matches |
| A*C | C, AC, AAC |
| A.C | AAC, ABC, ACC, ADC |
| (DEMO|TOOLS) | DEMO or TOOLS |
Regex logic will only be applied to the Application code definition when the related checkbox is checked.
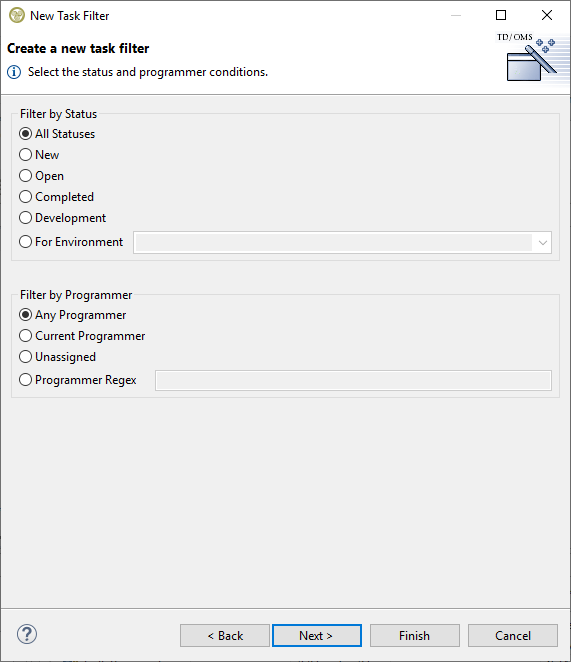
You can indicate to the filter mechanism that no filtering on a specific field is required by leaving it blank. Press the Next button to enable you to specify a selection on status and/or programmer.
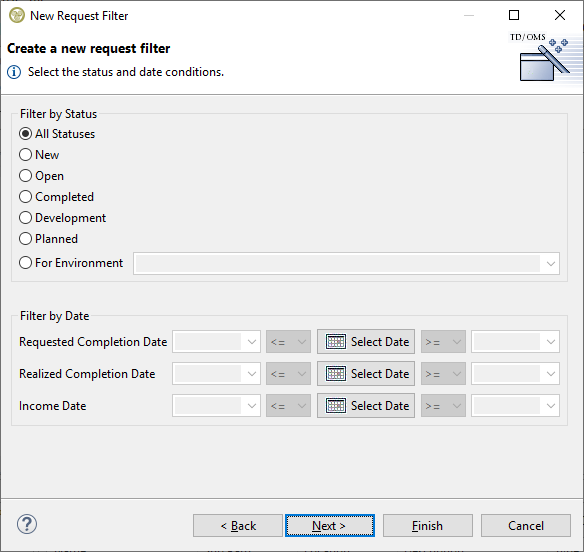
Use For Environment Only to show Task with a specific Task Status. A Task status can be identical to a environment code (eg QA) or have a special status. A completed task is selected by entering *CMP into For Environment Only.
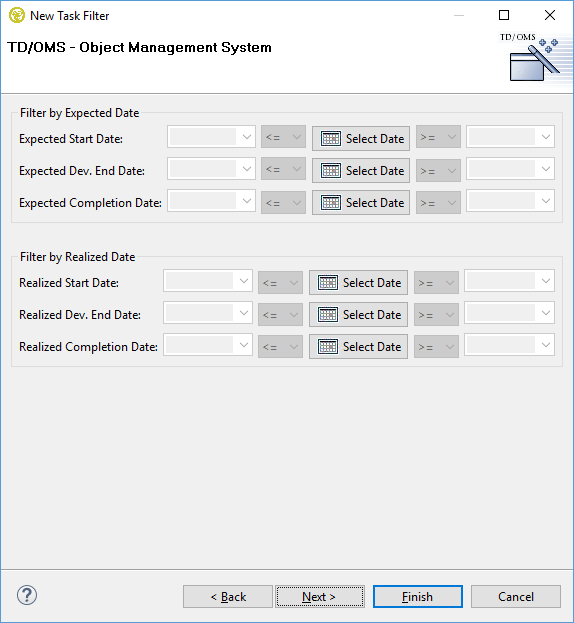
Pressing the Next button will enable you to specify a selection on one or more dates.
You need to press the Select Date button to enable filtering on that specific date.
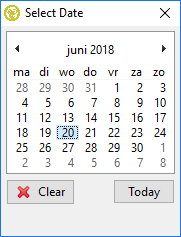
You can select a specific date, clear the selection made previously or select Today. Using Today means that the current system date will be used.
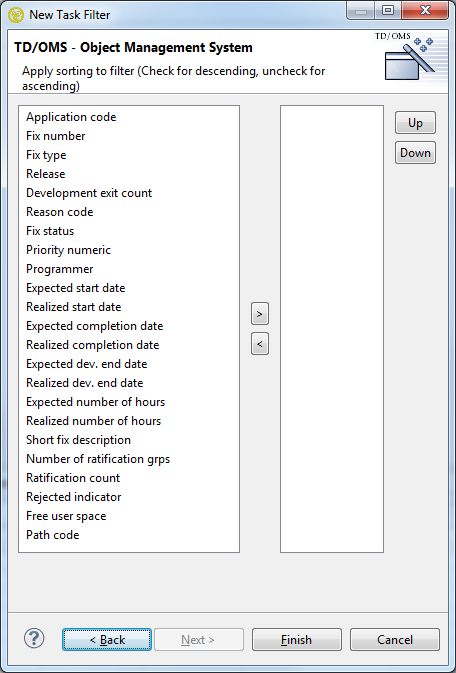
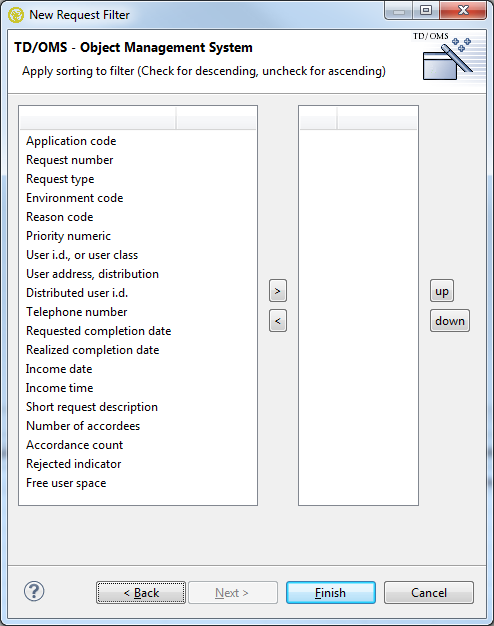
Pressing the Next button will enable you to specify the fields to sort on and the sorting sequence.
The tasks will be sorted on application (ascending) and Task number (descending) when no sorting criteria are specified.
Press the Finish button and all tasks that pass the filter criteria will appear. Note that the list can contain tasks from several applications, as shown in the decorators (the text between the [….] ).
You can define as many filters as you like.
Create a Request Filter
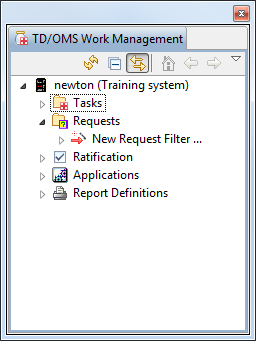
The second node in the Work Management view shows lists of requests, each one defined by a filter. Every list may contain requests of different applications. Before you can see requests you must create a Filter. When a Filter is expanded, it shows the requests included in that Filter which could be in turn included in a Filter Group.
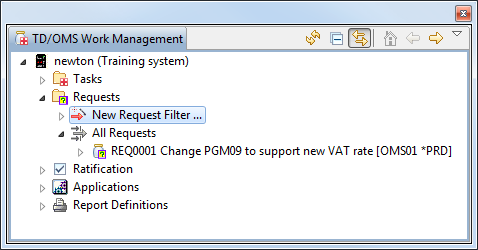
Expand the node called Requests.
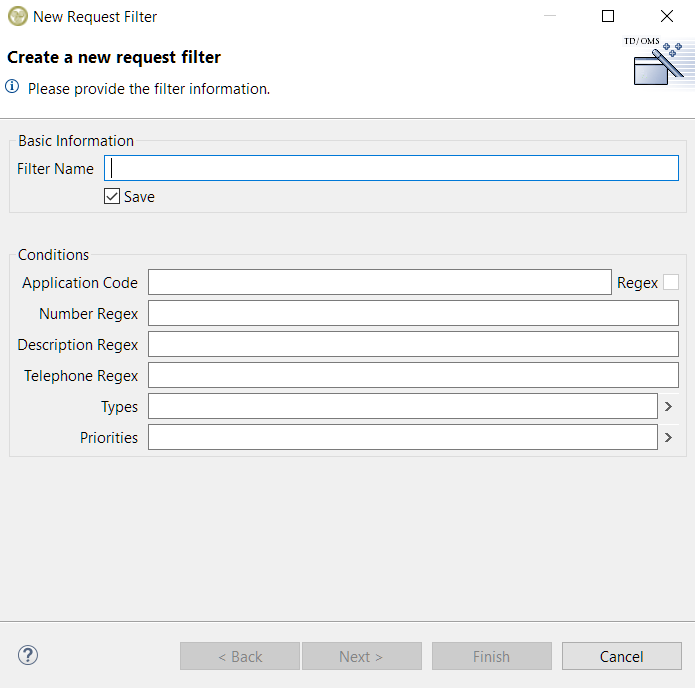
Double-clicking New Request Filter… starts a dialog for specifying the selection criteria. A request must pass ALL criteria to be selected.
If Save is not checked, the filter will be deleted when the client is closed !
- Filter Name
- Define the name of the filter. This is also the name the filter is saved with so some restrictions apply.
- Save
- If you uncheck this then the filter will become a session filter which will be removed after restart.
- Application Code
- Specify an application code or a Regular Expression like DEM.* or (ORDER|TOOLS).
- Regex
- Will cause the requests to be selected in the client rather than in the database request. It is therefor slower but more flexible.
- Number Regex
- Type a regular expression to find the request number like F0122 or F01.*
- Description Regex
- Type a regular expression to find the request description like .*decimal.*
- Telephone
- Search requests based on the given telephone.
- Types
- Select the request types that the tasks must be filtered with by clicking the arrow on the right.
- Priorities
- Select the priorities the requests must be filtered with by clicking the arrow on the right.
Regular Expression
For some fields, a Regex (Regular Expression) can be specified. A regular expression is a very sophisticated way of specifying wildcards that goes far beyond the well known Windows wildcards * and ?.
A thorough treatment of regular expressions is outside the scope of this manual. Remember the following:
| Character | Meaning | Windows-wildcard |
| An arbitrary character | ? | |
| Zero or more occurrences of the preceding character | ||
| Any string | * |
Examples:
| Expression | Matches |
| A*C | C, AC, AAC |
| A.C | AAC, ABC, ACC, ADC |
Regex logic will only be applied to the Application code definition when the related checkbox is checked.
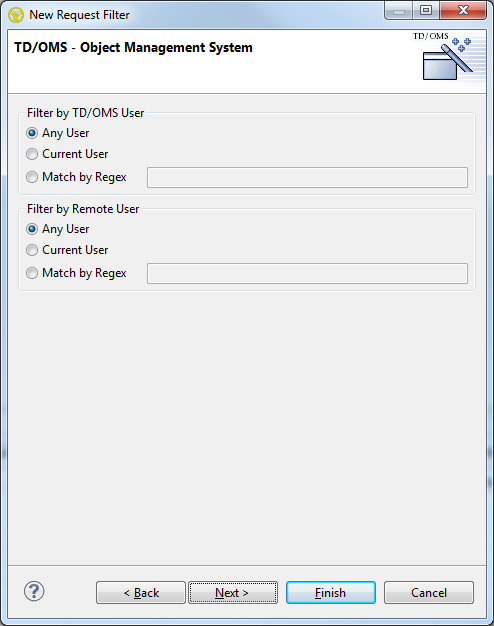
You can indicate to the filter mechanism that no filtering on a specific field is required by leaving it blank. Press the Next button to enable you to specify a selection on TD/OMS and/or Remote user.
Press the Next button to enable you to specify a selection on status and/or various dates.
Pressing the Next button will enable you to specify the fields to sort on and the sorting sequence.
Press the Finish button and all Requests that pass the filter criteria will appear. Note that the list can contain requests from several applications, as shown in the decorators (the text between the [….] ).
You can define as many filters as you like.
Create an Application Filter
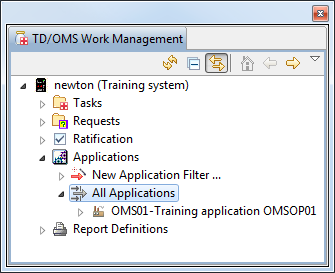
The fourth node in the Work Management view shows lists of applications, each one defined by a filter. Before you can see applications you must create a Filter. When a Filter is expanded, it shows the applications included in that Filter which could be in turn included in a Filter Group.
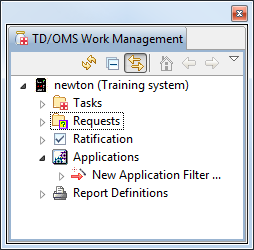
Expand the node called Applications.
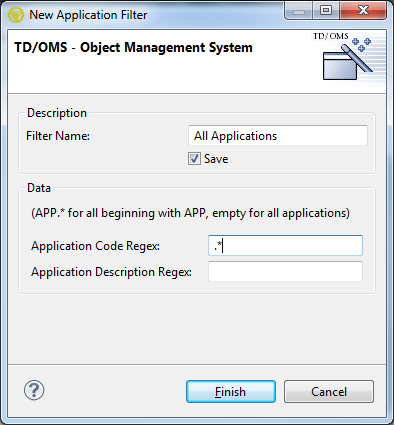
Double-clicking New Application Filter… starts a dialog for specifying the selection criteria. An application must pass ALL criteria to be selected. If Save is not checked, the filter will be deleted when the client is closed !
Regular Expression
For some fields, a Regex (Regular Expression) can be specified. A regular expression is a very sophisticated way of specifying wildcards that goes far beyond the well known Windows wildcards * and ?.
Remember the following:
| Character | Meaning | Windows-wildcard |
| An arbitrary character | ? | |
| Zero or more occurrences of the preceding character | ||
| Any string | * |
Examples:
| Expression | Matches |
| A*C | C, AC, AAC |
| A.C | AAC, ABC, ACC, ADC |
You can indicate to the filter mechanism that no filtering on a specific field is required by leaving it blank.
Press the Finish button and all Applications that pass the filter criteria will appear. Note that the list can contain requests from several applications, as shown in the decorators (the text between the [….] ).
You can define as many filters as you like.
Create a Branch Filter
Expand the node called Branches.
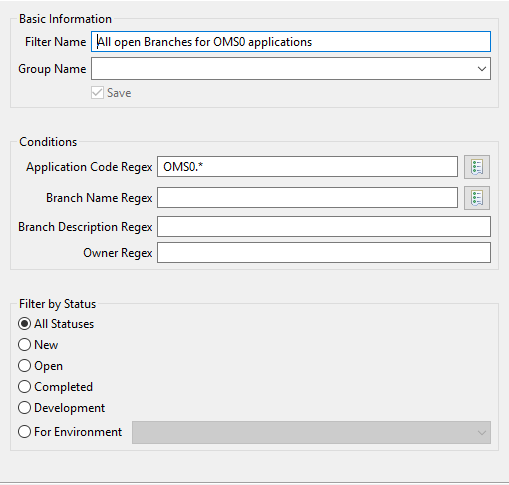
Double-clicking New Branch Filter… starts a dialog for specifying the selection criteria.
- Filter Name: The name of the filter. This is the only field that is mandatory.
- Filter Group: Choose if the filter is going to belong to a group or not and select the desired group if it does.
- Save: Check to save the filter. If not, it will be deleted the next time TD/OMS is started.
- Application Code Regex: The application code of the branches.
- Branch Name Regex: The name of the branches.
- Branch Description Regex: The description of the branches.
- Owner Regex: The owner of the branches.
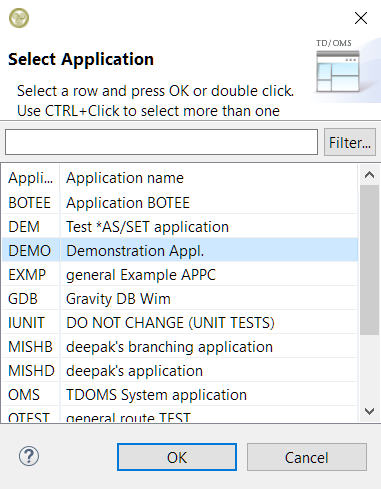
For the application code and branch name fields it is possible to select your choices from the available options by clicking the button next to the field. This will open a small dialog with all the available applications or transfer paths (branch names) for your choosing. Filtering of these options along with multiple selection is also possible.
Regular Expression
For some fields, a Regex (Regular Expression) can be specified. A regular expression is a very sophisticated way of specifying wildcards that goes far beyond the well known Windows wildcards * and ?.
Remember the following:
| Character | Meaning | Windows-wildcard
|
| An arbitrary character | ? | |
| Zero or more occurrences of the preceding character |
| |
| Any string | * |
Examples:
| Expression | Matches
|
| A*C | C, AC, AAC
|
| A.C | AAC, ABC, ACC, ADC |
You can indicate to the filter mechanism that no filtering on a specific field is required by leaving it blank.
Press Finish to create the filter.
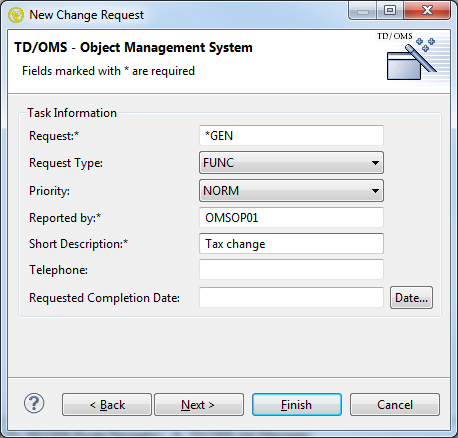
リクエストの作成
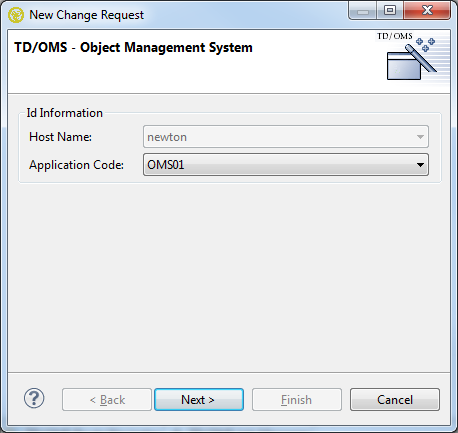
任意のTD/OMSビューのコンテキスト・メニューから「New->Request」を選択するか、またはツールバーの New Change Request ![]() ボタンを押すことによって新しいリクエストの作成を開始できます。これは New Change Request ウィザードを起動します。
ボタンを押すことによって新しいリクエストの作成を開始できます。これは New Change Request ウィザードを起動します。
Page 1 - Enter System and Application
リモート・システムの詳細ラインがTD/OMS作業管理ビュー内で選択されたとき、ホスト(リモート・システム)名は、既に入力されており、変更できません。そうでないとき、ホスト名を選択し、必要に応じてアプリケーションを選択または変更します。「Next」ボタンを押します。
Page 2 - Enter Request Attributes
アスタリスクで示されたすべてのフィールドが必要です。リクエストに対して*GENを指定すると、アプリケーション固有の設定に基づいてリクエスト番号を生成するようにTD/OMSに指示します。このデフォルトの動作を回避するためには、*GEN値を上書きします。拡張テキストを入力する必要がない場合、「Finish」ボタンを押すか、または必要がある場合、「Next」ボタンを押します。
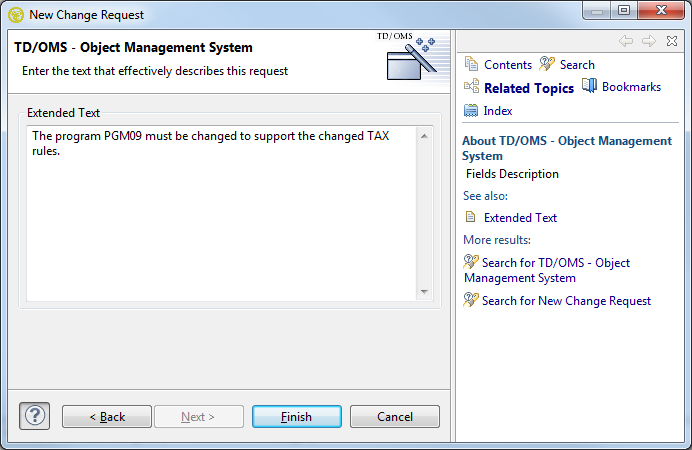
Page 3 - Enter Extended Text Description
拡張テキストを入力し(必要な場合)、「Finish」ボタンを押します。
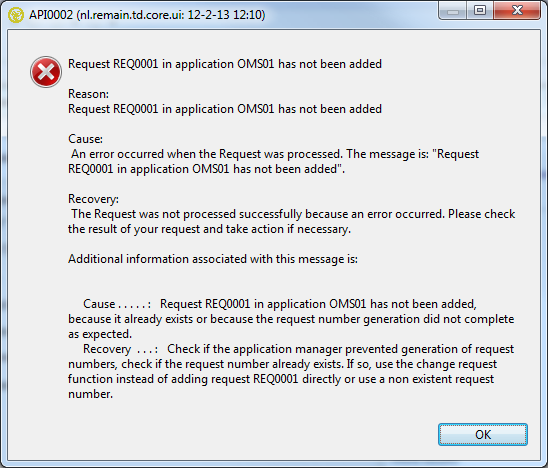
左下隅にある疑問符ボタンを押すと、状況依存ヘルプを取得できます。リクエストを追加すると失敗することがあります。その場合、エラー・メッセージが表示されます。
Page 4 - Continue
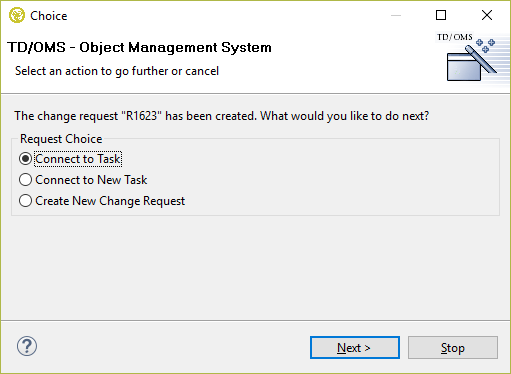
リクエストを作成した後、ウィザードは選択画面を表示します。この画面には実行したアクションについて通知し、次のステップ((新しい)修正の接続)をすぐに開始するか、または現在のアクティビティ(リクエストの作成)を繰り返すことができます。
You can press the Stop button to end the wizard.
タスクの作成
任意のTD/OMSビューのコンテキスト・メニューからNew->Taskを選択するか、またはツールバーのNew Task ![]() ボタンを押すことによって新しいタスクの作成を開始できます。これはNew Taskウィザードを起動します。
ボタンを押すことによって新しいタスクの作成を開始できます。これはNew Taskウィザードを起動します。
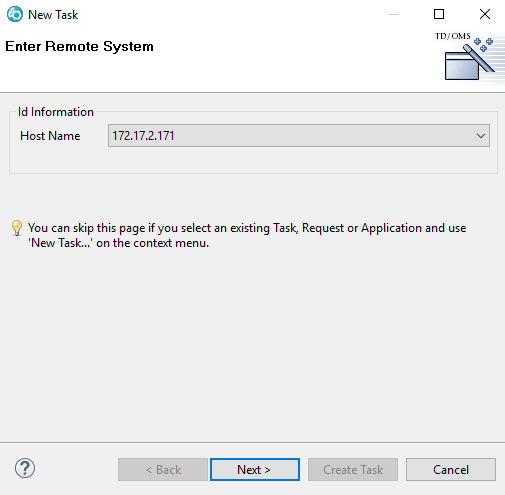
ページ1 - リモート・システムに入る
ウィザードを開始しており、コンテキストが現在選択されている要素から決定されているとき、このページは表示されません。リモート・システムの詳細ラインがTD/OMS作業管理ビュー内で選択されたとき、ホスト(リモート・システム)名が既に入力されており、変更できません。そうでないときはホスト名を選択し、「Next」ボタンを押します。
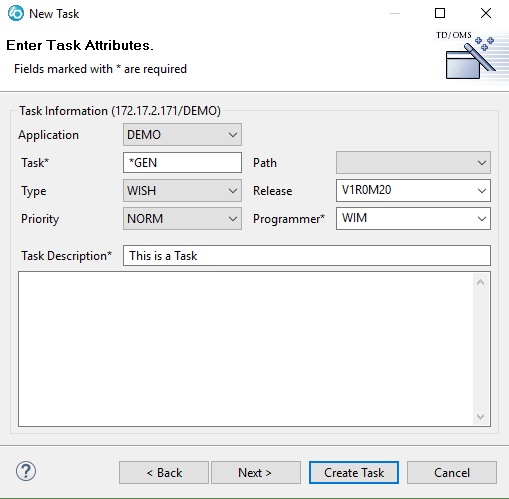
Page 2 - Enter Task Attributes
All fields indicated with an asterisk are required. Specifying *GEN for the Task will instruct TD/OMS to generate the Task number based of the application specific settings. Enter a long description (if needed). Press the Create Task button if there is no requirement to enter Task Project information or press the Next-button if there is.
フィールド
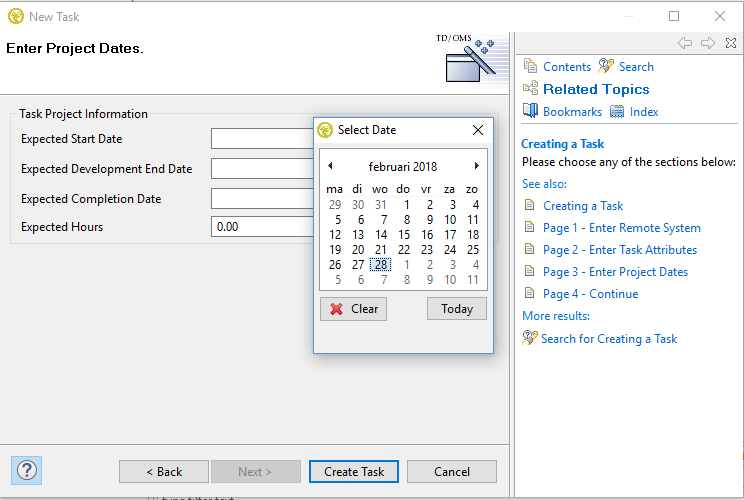
Page 3 - Enter Project Dates
Enter the Task Project information (if needed) and press the Create Task button. You can press the question mark button in the lower left corner to obtain context sensitive help. Please note that you can also use the planning view to manipulate the project dates.
フィールド
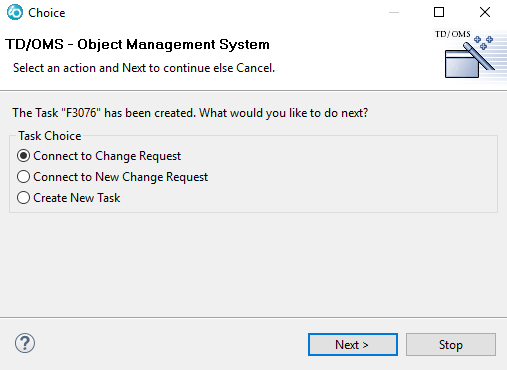
ページ4 - 続き
タスクの追加が失敗した場合は、エラー・メッセージが表示されます。タスクが生成した後、ウィザードには選択画面を表示します。この画面では、実行されたアクションについて通知され、次のステップ((新しい)リクエストの接続)をすぐに開始するか、または現在のアクティビティ(タスクの作成)を繰り返すことができます。
「Stop」ボタンを押すと、ウィザードを終了できます。
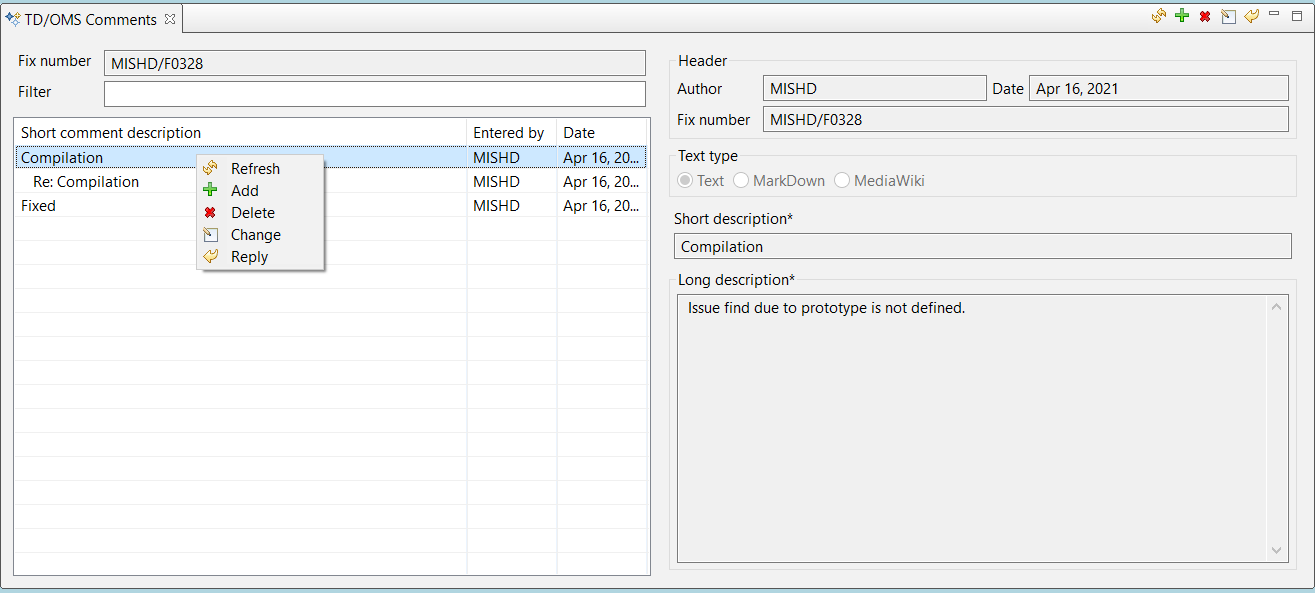
The TD/OMS Comments view shows comments about the item that is currently selected. You may create comments for applications, environments, sub-environments, objects and details, solutions, tasks, and requests.
The TD/OMS Comments View
Opening the comments view can be done by:
- Selecting a Task (or any other of the types mentioned above) and using the Show in .. context menu;
- Using the quick-access box in the toolbar and typing Comments;
Toolbar Items
Use the toolbar to execute below actions.
 Pin the Current Selection
- Click this icon to lock the view for further selection changes. When you select another line, the view will not repopulate.
 Refresh
- Refresh the comments list.
 Add
Add- Add a new comment.
 Delete
- The selected comment in the list will be removed.
 Change
- Change the comment, a comment can only be changed on the same day the comment was entered and by the same user.
 Reply
Reply- Reply to an existing comment or reply.
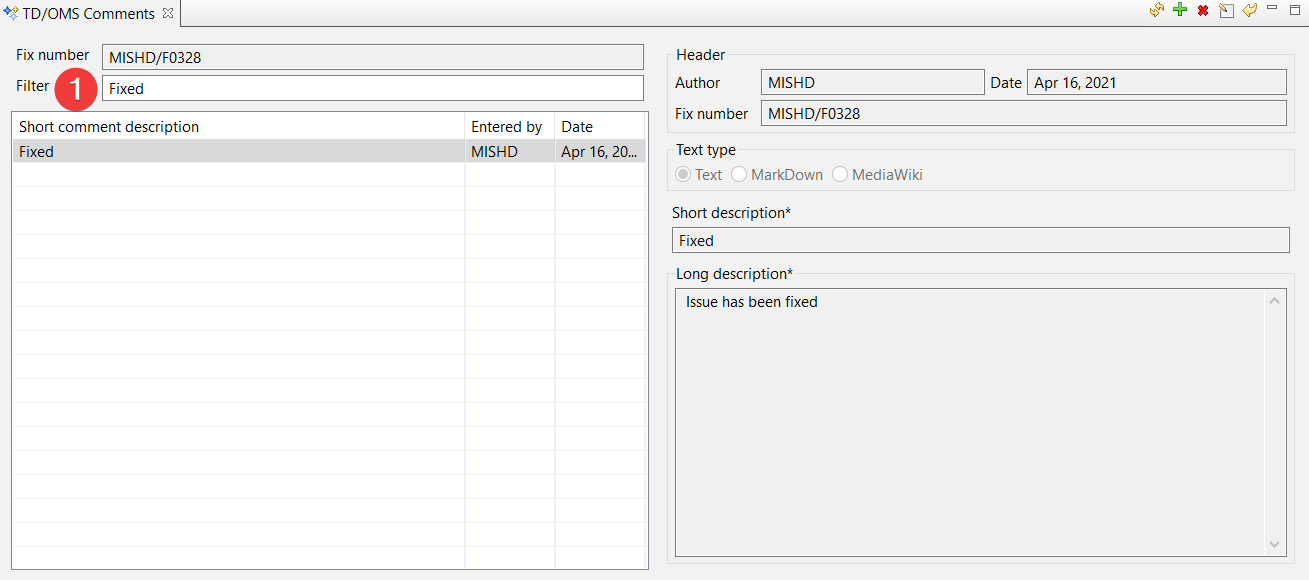
Finding a comment
You can use the Filter field for quick filtering of the comments in the list. It will find the typed words in the subject of the comment.
Branching
<translate>
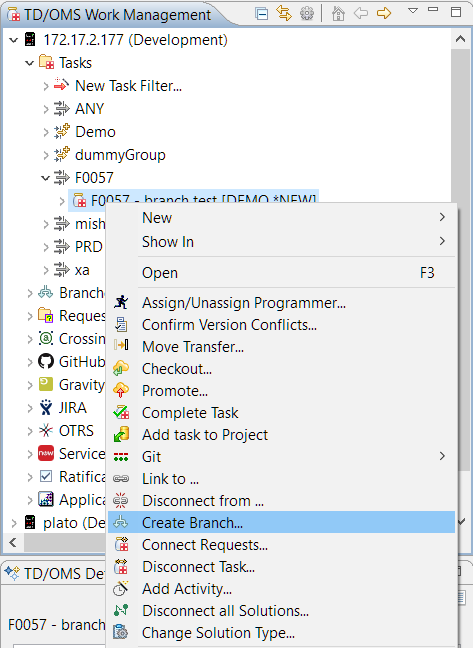
Create Branch
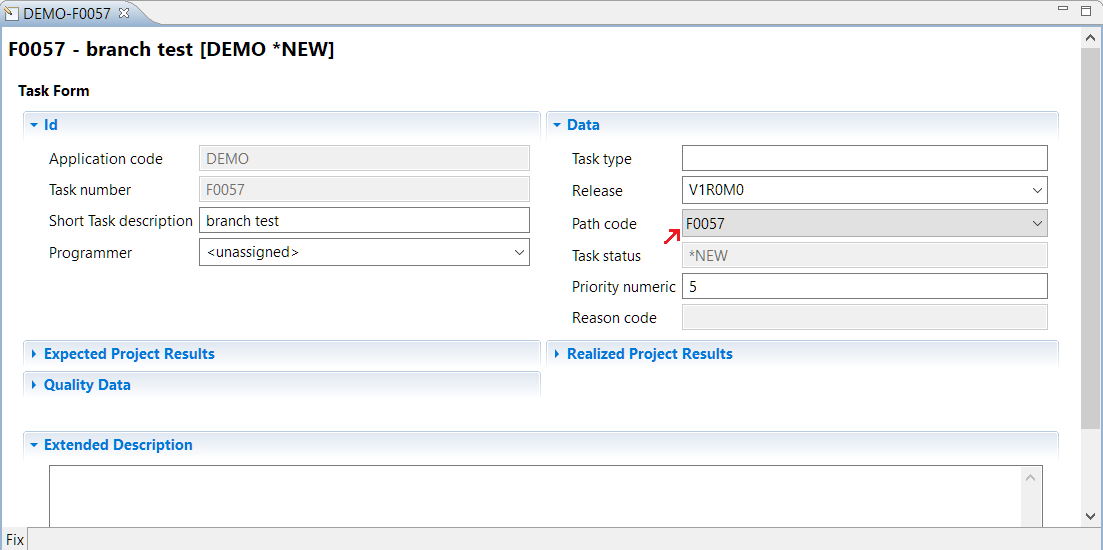
To create a branch, you must right-click on a task (or many) and select the "Create Branch" action.
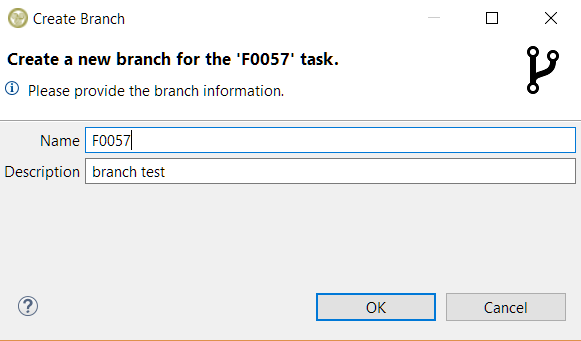
This will open the respective dialog that allows you to choose the name and the description of the branch. For convenience, these values will be automatically filled for you from the task itself. If many tasks are selected then they will be filled in from the first task in your selection. Both fields are mandatory for a branch to be created.
When OK is pressed then the newly created branch will also be assigned to the tasks that you selected to create it.
Delete Branch
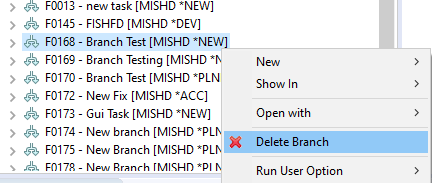
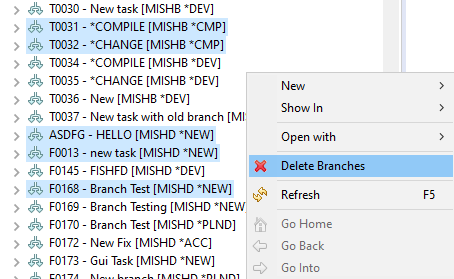
To delete a branch, right click on it and select the Delete Branch option. A branch can be deleted only if all the tasks that are assigned to it are completed meaning that it must have either *NEW or *CMP status.
If many branches need to be deleted then they all need to have the *NEW or *CMP status or the option won't be available. They can also be from different applications but not from a different host.
Another option is to right click a single branch filter.
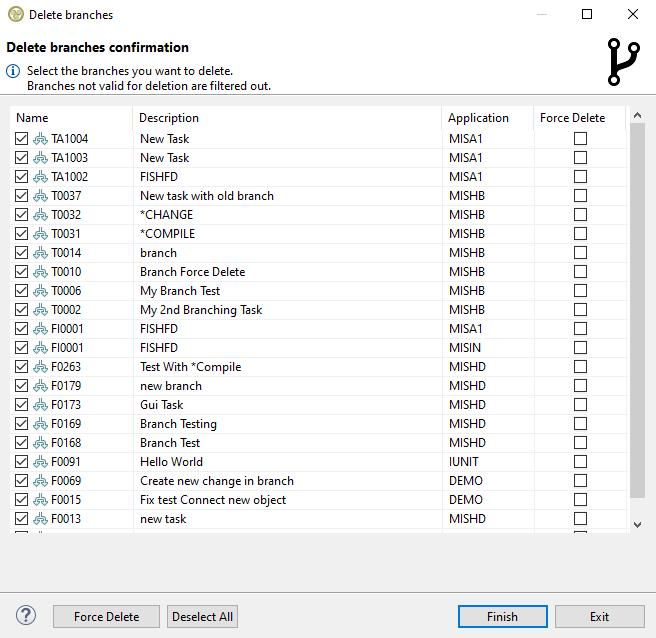
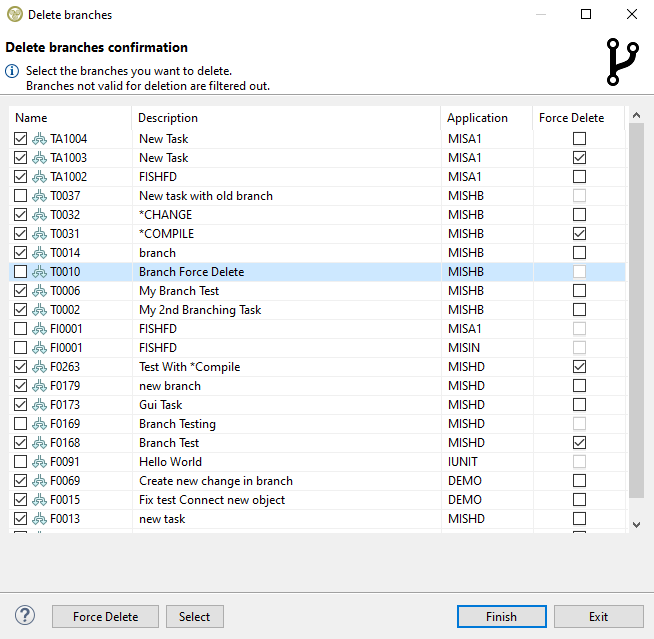
The delete branch wizard has a table with the branches and a checkbox for each one defining if it should be force deleted. Force delete is useful if a branch can't be deleted normally because its libraries or routes still contain objects. In case a branch filter was selected, any branches that don't have the *NEW or *CMP status will be automatically filtered out and won't show in the table. When the wizard opens all branches will be preselected for deletion.
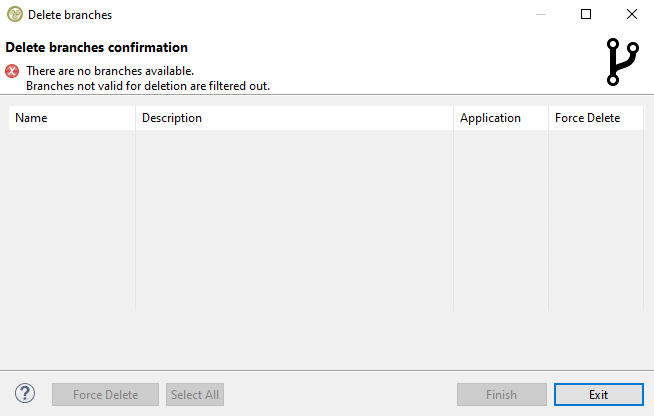
If a branch filter doesn't have a single branch with the *NEW or *CMP status then no branches are valid for deletion and the wizard will show the error with the table will being empty without any possible actions.
Wizard Content and Actions
The table itself has four resizable columns with the branch name, description, application and a checkbox to select if a branch must be force deleted. The table can be ordered by clicking on the columns to sort the branches based on their name, description or application. On the bottom left there are shortcut buttons that allow you to force delete (or don't force delete) all selected branches and a button to select/deselect all available branches or select only the ones that are selected on the table.
When you have made your choices press finish to start the process.
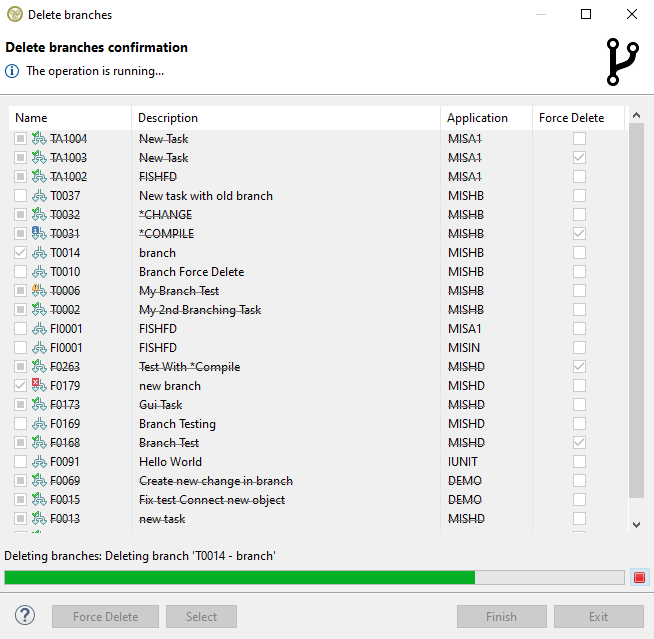
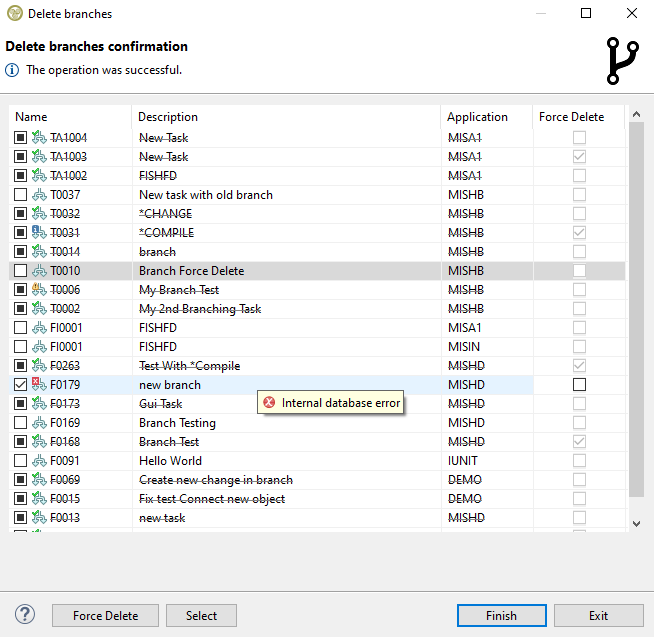
A progress bar will appear showing which branch is processed at the moment. As the progress continues the table will update the branches based on the returned status of each one: Deleted, Deleted with an informational or warning message, or Not Deleted with an error. If the branch is deleted it will have a strike-through line in the middle of its text and if there is no extra information to display then it will have a green check on the top left of its icon. If there is extra information to display it can be viewed when hovering over a branch row with an extra icon.
The operation can be cancelled by pressing the red box at the right of the progress bar and the table will show the status of the branches that have been processed already. Any deleted branches will be gray-checked and won't be available for selection anymore and they will be excluded from any actions in the wizard.
If all available branches on the table are deleted without any extra messages to show then the wizard will close automatically when the process is finished. Any affected objects that are visible in a tree in all open views will be refreshed and all affected open editors will be refreshed or closed accordingly.
</translate>
コンポーネントをタスクに接続
ソリューションはタスクに接続しているコンポーネント(オブジェクト、IFSファイル、4GLオブジェクト)、メッセージおよびソース・メンバーです。タスクを展開すると、既にそのタスクに接続しているソリューションを表示します。
この章は次の内容について説明します。
- オブジェクトをタスクに接続します
- メンバーをタスクに接続します
- メッセージをタスクに接続します
ソリューションの作成にはTD/OMS作業管理ビューおよびTD/OMSコンポーネント・ビューを使用する必要があります。選択した方法に応じ、TD/OMS接続リスト・ビューはプロセス中に使用できます。
以下の手順が行われること、または行われていることを確認します。
- TD/OMS作業管理ビューを開きます
- ソリューションを受け入れる必要があるタスクを選択します
- コンテキスト・メニューを表示するため、タスクを右クリックします
- Show in.. / TD/OMS Components を選択します
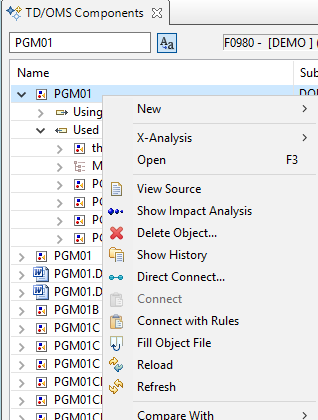
コンポーネント・ビューがいったん開くと、 クイック検索ボックスで必要なコンポーネントを検索するかまたはフィルタを適用することによって必要なコンポーネントを見つけることができます。接続オプションを表示するため、必要なコンポーネント、メンバーまたはメッセージを右クリックします。
メニューはソリューションを作成するための3つのオプションを含みます。
- 直接接続(Direct Connect)
- コンポーネントは直ちにTD/OMS作業管理ビューで選択したタスクに接続します。これは以下によって行います。
- このレジストリ設定で必要な場合、接続ルールを実行します
- 接続リストにオブジェクトを追加します
- 接続リストの処理を開始します
- 接続(Connect)
- 選択したコンポーネントは接続リスト・ビューで見えるようになります。接続リスト・ビュー内のコンポーネントは接続リストから削除するか、または他のグループ(タスク)に割り当てることができます。TD/OMSコンポーネント・ビューまたはTD/OMS接続リスト・ビューの
 Process Connection List ボタンを押すことによって、接続リストのコンポーネントはソリューションに変換できます。
接続オプションが無効になっている場合、ルールで接続のみが許可されています(直接接続またはルールで接続を使用します)。
- ルールで接続(Connect with Rules)
- TD/OMS内で定義した接続ルールは選択したコンポーネントに適用されます。選択したコンポーネントおよび選択基準を満たした(追加)コンポーネントは接続リスト・ビューで見えるようになります。接続リスト・ビュー内のコンポーネントは接続リストから削除するか、または他のグループに割り当てることができます。TD/OMSコンポーネント・ビューまたはTD/OMS接続リスト・ビューの
 Process Connection List ボタンを押すことによって、接続リストのコンポーネントはソリューションに変換できます。
タスクは作業管理ビューで選択されている場合のみ、接続オプションが期待通りに動作することに注意してください。タスクが選択されていない場合、コンポーネントは接続リストに追加されますが、期待したところではないかもしれません。選択したタスクはビューのヘッダーに表示されます。
さらに、この機能(リストまたはツリー項目のコンテキスト・メニューはアイテム自体および他のビューで選択した項目によって異なります)は可能な限り適用されます。特定の接続アクションの可用性はまた権限、 TD/OMSレジストリ設定およびタスク・ステータス(タスク・ステータスは*CMP(完成)のとき、接続は使用できません)に依存します。
ソース・メンバーまたはメッセージをタスクに接続
ソース・ファイル(まだコンポーネントのソースではない場合)からのメンバー、またはメッセージ・ファイルからのメッセージを添付する手順は上述したのと同じ方法で行います。必要なメンバーまたはメッセージをより良く検索するため、別の詳細ビューがあることに注意してください。通常通り、ツールバーのクイック・アクセス・フィールドを使用するか、またはメッセージ・ファイルやソース・ファイルを選択してコンテキスト・メニューのShow in ... / TD/OMS Details view を使用することによって、詳細ビューを開くことができます。

